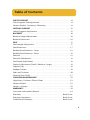
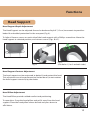
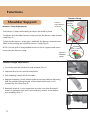
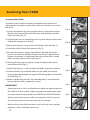
1
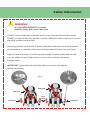
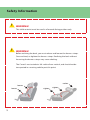
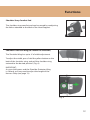
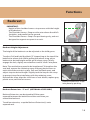
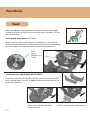
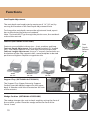
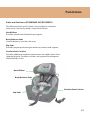
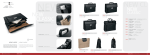
CARROT 3 - CHILD RESTRAINT SYSTEM
For Children with Special Needs
Instruction Manual
!
WARNING!
Read all instructions
before using this
restraint system.
CARROT 3 CHILD RESTRAINT SYSTEM
The Carrot 3 is designed to provide additional support for children who have
difficulty sitting correctly in conventional car seats. Always consult your doctor
to make sure that this restraint system is suitable for your child.
Your child’s safety is very important to us. To ensure that your restraint system
is installed correctly, please read all the instructions in this manual before use.
If you require additional assistance, please call Convaid at (888) 266-8243.
Table of Contents
WARNINGS. . . . . . . . . . . . . . . . . . . . . . . . . . . . . . . . . . . . . . . . . . . . . . . . . . . . . . . 1
SAFETY INFORMATION . . . . . . . . . . . . . . . . . . . . . . . . . . . . . . . . . . . . . . . . . . 3
Important Notes . . . . . . . . . . . . . . . . . . . . . . . . . . . . . . . . . . . . . . . . . . . . . . . . . . 3
Certification . . . . . . . . . . . . . . . . . . . . . . . . . . . . . . . . . . . . . . . . . . . . . . . . . . . . . . 4
FEATURES. . . . . . . . . . . . . . . . . . . . . . . . . . . . . . . . . . . . . . . . . . . . . . . . . . . . . . . . 6
INSTALLATION . . . . . . . . . . . . . . . . . . . . . . . . . . . . . . . . . . . . . . . . . . . . . . . . . . . 8
LATCH Installation . . . . . . . . . . . . . . . . . . . . . . . . . . . . . . . . . . . . . . . . . . . . . . . . 8
Using LATCH Top Tether Strap . . . . . . . . . . . . . . . . . . . . . . . . . . . . . . . . . . . . . 9
Aircraft Installation. . . . . . . . . . . . . . . . . . . . . . . . . . . . . . . . . . . . . . . . . . . . . . . . 9
HEAD SUPPORT . . . . . . . . . . . . . . . . . . . . . . . . . . . . . . . . . . . . . . . . . . . . . . . . . . 10
Head Support Depth Adjustment. . . . . . . . . . . . . . . . . . . . . . . . . . . . . . . . . . 10
Head Support Contour Adjustment. . . . . . . . . . . . . . . . . . . . . . . . . . . . . . . . 10
Head Pillow Adjustment. . . . . . . . . . . . . . . . . . . . . . . . . . . . . . . . . . . . . . . . . . . 10
SHOULDER SUPPORT . . . . . . . . . . . . . . . . . . . . . . . . . . . . . . . . . . . . . . . . . . . . 11
Harness Strap Adjustment. . . . . . . . . . . . . . . . . . . . . . . . . . . . . . . . . . . . . . . . . 11
Seatbelt Length Adjustment . . . . . . . . . . . . . . . . . . . . . . . . . . . . . . . . . . . . . . 11
Shoulder Strap Comfort Pad . . . . . . . . . . . . . . . . . . . . . . . . . . . . . . . . . . . . . . . 12
Shoulder Protector Wing . . . . . . . . . . . . . . . . . . . . . . . . . . . . . . . . . . . . . . . . . . 12
Shoulder Protector Wing Installation. . . . . . . . . . . . . . . . . . . . . . . . . . . . . . . 13 i
Table of Contents
CHEST SUPPORT . . . . . . . . . . . . . . . . . . . . . . . . . . . . . . . . . . . . . . . . . . . . . . . . 14
Chest Support Pad Adjustment . . . . . . . . . . . . . . . . . . . . . . . . . . . . . . . . . . . 14
Harness Buckle - Fastening / Releasing . . . . . . . . . . . . . . . . . . . . . . . . . . . . 14
LATERAL SUPPORT . . . . . . . . . . . . . . . . . . . . . . . . . . . . . . . . . . . . . . . . . . . . . . 15
Lateral Support Adjustment . . . . . . . . . . . . . . . . . . . . . . . . . . . . . . . . . . . . . . . 15
BACKREST . . . . . . . . . . . . . . . . . . . . . . . . . . . . . . . . . . . . . . . . . . . . . . . . . . . . . . . 16
Backrest Height Adjustment. . . . . . . . . . . . . . . . . . . . . . . . . . . . . . . . . . . . . . . 16
Backrest Extensions . . . . . . . . . . . . . . . . . . . . . . . . . . . . . . . . . . . . . . . . . . . . . . . 16
SEAT . . . . . . . . . . . . . . . . . . . . . . . . . . . . . . . . . . . . . . . . . . . . . . . . . . . . . . . . . . . . . 17
Seat Length Adjustment . . . . . . . . . . . . . . . . . . . . . . . . . . . . . . . . . . . . . . . . . . 17
Seat Extensions . . . . . . . . . . . . . . . . . . . . . . . . . . . . . . . . . . . . . . . . . . . . . . . . . . . 17
Rodded Seat Extension - Long . . . . . . . . . . . . . . . . . . . . . . . . . . . . . . . . . . . . . 18
Rodded Seat Extension - Short . . . . . . . . . . . . . . . . . . . . . . . . . . . . . . . . . . . . 18
Pommel . . . . . . . . . . . . . . . . . . . . . . . . . . . . . . . . . . . . . . . . . . . . . . . . . . . . . . . . . . 18
Pommel Attachment . . . . . . . . . . . . . . . . . . . . . . . . . . . . . . . . . . . . . . . . . . . . . . 18
Seat Depth Adjustment . . . . . . . . . . . . . . . . . . . . . . . . . . . . . . . . . . . . . . . . . . . 19
Footrest Adjustment (Small / Medium / Large) . . . . . . . . . . . . . . . . . . . . . 19
Support Tray . . . . . . . . . . . . . . . . . . . . . . . . . . . . . . . . . . . . . . . . . . . . . . . . . . . . . 19
Wedge Cushion . . . . . . . . . . . . . . . . . . . . . . . . . . . . . . . . . . . . . . . . . . . . . . . . . . . 19
Pads and Cushions . . . . . . . . . . . . . . . . . . . . . . . . . . . . . . . . . . . . . . . . . . . . . . . 20
Securing Your Child . . . . . . . . . . . . . . . . . . . . . . . . . . . . . . . . . . . . . . . . . . . . . . . 21
CARE AND MAINTENANCE . . . . . . . . . . . . . . . . . . . . . . . . . . . . . . . . . . . . . . 23
Upholstery, Cushions, Pillow & Pads . . . . . . . . . . . . . . . . . . . . . . . . . . . . . . . 23
Harness Buckle . . . . . . . . . . . . . . . . . . . . . . . . . . . . . . . . . . . . . . . . . . . . . . . . . . . 23
Harness & Straps . . . . . . . . . . . . . . . . . . . . . . . . . . . . . . . . . . . . . . . . . . . . . . . . . 23
WARRANTY . . . . . . . . . . . . . . . . . . . . . . . . . . . . . . . . . . . . . . . . . . . . . . . . . . . . . . 24
Consumer Information Record. . . . . . . . . . . . . . . . . . . . . . . . . . . . . . . . . . . . . 24
Warranty . . . . . . . . . . . . . . . . . . . . . . . . . . . . . . . . . . . . . . . . . . . . . . . . Back Cover
Warranty Limitations . . . . . . . . . . . . . . . . . . . . . . . . . . . . . . . . . . . . . Back Cover
Limitation of Damages . . . . . . . . . . . . . . . . . . . . . . . . . . . . . . . . . . . Back Cover
ii
!
WARNING !
DEATH or SERIOUS INJURY can occur
• Failure to follow all instructions and product labels can result in death or serious injury in a
crash. Carefully read and understand all instructions on this child restraint and in the written
instructions. If you have questions, contact Convaid at 1-888-CONVAID (266-8243).
• Use only with children who weigh between 30 and 108 pounds (mass between 13.6 and 49
kg) and whose height is between 37 and 60 inches (94 and 152 cm).
• Use only in a forward-facing position.
• Use restraint ONLY with forward-facing vehicle seats. Do not use restraint with side-facing,
rear-facing or flip-down vehicle seats.
• According to accident statistics, the National Highway Traffic Safety Administration
recommends the vehicle’s rear seat is the safest location for a properly installed child
restraint system.
• Do not use a child restraint in the front seat of the vehicle unless the passenger air bag is
turned off. Death or serious injury can occur. Refer to your vehicle owner’s manual for
instruction, warnings, and precautions.
• Adjust the harnesses and belts for a comfortable and snug fit around your child. There should
not be any slack or twist in the straps, and the straps should not press on the child’s skin or
push the child’s body into an unnatural position.
• Never leave a child unattended in the vehicle even if they are secured in the child restraint.
• Secure this restraint to the vehicle’s seat with the upper top tether strap and lower anchor
straps (LATCH).
• Use this child restraint only with vehicles with lap shoulder 3-point safety belts approved
by FMVSS 209.
• Rigid items & plastic parts of the restraint system must be located and installed so they do
not become trapped by a movable seat or in a door of the vehicle.
1
!
WARNING !
DEATH or SERIOUS INJURY can occur
• Discontinue use of your child restraint if it has been involved in ANY type of accident. It
may no longer be effective and should be replaced immediately.
• This child seat must not be used in the home, in boats, or other non-certified
applications.
• Always keep this child restraint secured in the vehicle, even when not in use. In an
accident, an unsecured child restraint system may injure other occupants.
• Do not use the child restraint in a vehicle with passenger air bags unless the air bags are
turned off. Death or serious injury can occur. Refer to your vehicle’s owner’s manual for
instructions, warnings and precautions.
• When using this child restraint in a vehicle with side air bags, refer to your vehicle’s
owner’s manual for instructions, warnings and precautions.
• This restraint must not be used without the upholstery cover.
• The child restraint upholstery cover should only be replaced with one recommended
by the manufacturer.
• Follow all instructions on this child restraint and in the written instruction manual
located in the pocket behind the unit.
• Never use the adjustment straps to lift or carry this restraint. This can damage the
mechanism and the webbing.
• Do not remove the harness and straps from the child seat. Never remove the buckles
and/or the buckle clasps from the harness or the straps.
• The primary protection for occupants of a vehicle in a collision is the body of the vehicle
itself; a child restraint will not protect a child when a vehicle is seriously impacted.
However, correctly installed, a child restraint will substantially improve chances for
survival in most crashes. Make sure all users fully understand the correct ways to use
this child restraint in a vehicle.
・ Register your child restraint with the manufacturer.
2
Safety Information
· This child restraint system conforms to U.S. Federal Motor Vehicle
Safety Standard FMVSS 213.
· This restraint is certified for use in motor vehicles and aircrafts.
· Register this restraint with the manufacturer.
Child restraints could be recalled for safety reasons. To be reached directly in the event of a recall,
you must register your restraint with the manufacturer. Send your name, address, email address
if available, child restraint’s serial number and manufacturing date to:
Convaid Product Registration
2830 California Street
Torrance, CA 90503
Or call Convaid at 1-888-CONVAID (266-8243).
For recall information, call the U.S. Government’s Vehicle Safety Hotline at 1-888-327-4236
(TTY: 1-800-424-9153) or go to http://www.NHTSA.gov.
Important Notes
Correctly set up and install the child restraint before using. Before each use, verify it is securely
installed to the vehicle seat and the harness is properly adjusted around child.
• Adjust harness to fit securely around the clothes the child is wearing. Remove bulky coats
and/or jackets before putting child in restraint system.
• Cover child restraint when vehicle is parked in direct sunlight. Parts of the restraint could
become hot and cause injury to a child.
• Store restraint in a safe place when not in use. Avoid placing heavy objects on top of it.
• Never leave children alone in a vehicle, even for a short time.
• Do not attempt to disassemble any part of the child restraint or change the way its harness
or vehicle’s seat belts are used, except as described in this manual.
• Do not leave loose objects, e.g. books, bags, etc., in the back of a vehicle. In the event of a
sudden stop, loose objects will keep moving, potentially causing serious injuries.
• Make sure vehicle seats that fold forward are securely locked in their open position.
An unsecured vehicle seat back could prevent the restraint from protecting the
child completely.
• Do not use anything to raise child seat off vehicle seat except as described in this manual.
In an accident, the child restraint may not adequately protect the child.
• Do not allow children to play with this or any child restraint system.
• This child seat is recommended to be used in the upright position.
Certification
This child restraint system conforms to U.S. Federal Motor Vehicle Safety Standard
FMVSS 213 and European Safety Standard ECE R44/04.
3
Safety Information
!
WARNING!
It is your RESPONSIBILITY to use the
Vehicle’s Safety Belts at the same time.
DO NOT secure a child only with the harness straps (5-point) of the child restraint;
ALWAYS use the vehicle’s lap shoulder (3-point) safety belt at the same time to secure
the child restraint and the child.
Not using vehicle’s lap shoulder (3-point) safety belt could cause your child restraint
to not perform as intended, and increase the potential of Serious Injury or Death.
Figure A. below illustrates a vehicle lap and shoulder (3-point safety) belt secured
over the child restraint. Child restraint is shown at its smallest and largest
configurations.
IMPORTANT: Upper belt path should be above occupant’s shoulder for
proper securement.
Fig. A
belt path
belt path
belt
path
belt path
belt path
4
Safety Information
!
WARNING!
This child restraint must be used in a forward-facing position only.
!
WARNING!
Before reclining the back, you must release and loosen the harness straps.
Once reclined, re-tighten the harness straps. Reclining the back without
loosening the harness straps may cause choking.
The Carrot 3 was tested at a 30º recline from vertical, and should not be
transported in a moving vehicle past this point.
recline
loosen
loosen
5
tighten
tighten
Features: Carrot 3 Standard Model
Top Tether Strap
(Optional Accessory)
Head Pillow
Head Support
Shoulder Strap
Comfort Pads
Vehicle’s Belt Path
Body Balance Pads
Seat
Backrest
Chest Pad
Support
Harness Adjuster
Chest Pad Support
Height Adjuster
Harness Yoke
Harness Buckle
LATCH Connector
with 4” extensions
with 2” extensions
Measurements
shown are with the
extensions added.
* Extensions not
included with
standard model.
Backrest Height
11.8”
12.8”
13.8”
14.8”
15.8”
16.8”
Seat Depth
9.8”
11.2”
11.8”
13.2”
13.8”
15.2”
6
Features: Carrot 3 Standard Model
Top Tether Strap
(Optional Accessory)
Shoulder Width
Adjustment Button
Shoulder Protector Wings
(Optional Accessory)
Sholuder
Harness
Backrest
Instruction
Guide (inside)
Hip Pads
Lap Belt Guide
Storage
Pocket
Comfort
Seat
Cushion
Seat Depth
Adjustment Knob
Measurements
shown are with the
extensions added.
* Extensions not
included with
standard model.
with 6” extensions
with 6” + 2“ extensions
with 2” extensions
with 6” + 4“ extensions
with 4” extensions
Backrest Height
17.7”
18.7”
19.7”
20.7”
21.7”
16.8”
Seat Depth
9.8”
10.8”
11.8”
12.8
13.8”
15.2”
7
Installation
Lower Anchor and Tethers for CHildren
LATCH Installation
This child restraint system is recommended for use in a vehicle
with LATCH anchors. Verify that your vehicle is equipped with
LATCH anchors.
Lower Anchor Straps Installation:
1. Press and hold the first LATCH adjuster release
button, then pull the LATCH strap to full length.
Repeat for the remaining LATCH connector (Fig. A).
2. Place the child restraint forward-facing on the
vehicle seat.
Fig. A
3. Attach one LATCH connector to its adjacent vehicle
LATCH anchor (Fig. B).
a. An audible click confirms attachment
b. Ensure that the LATCH strap is not twisted.
4. Attach the remaining LATCH connector to its
adjacent vehicle LATCH anchor.
a. An audible click confirms attachment
b. Ensure that the LATCH strap is not twisted.
Fig. B
5. Push the child restraint into the vehicle seat while
pulling each LATCH strap tight (Fig. C).
NOTE:
If an audible click is not heard when connecting either LATCH
connector, the LATCH strap may be twisted, or there may be
debris in the LATCH connector. Correct either situation before
continuing with the installation process.
Fig. C
IMPORTANT:
Ensure the LATCH strap does not fold into the LATCH adjuster
while tightening.
8
Installation
USING LATCH Top Tether Strap
If your vehicle is equipped with LATCH Top Tether Anchor points,
you can use the Top Tether Strap to attach the Head Support.
NOTE:
All vehicles manufactured since September 1, 2002 are
equipped with tether anchors located behind the rear seats.
1. Consult your vehicle owner’s manual to locate the
tether anchor points.
2. Pull and fully extend the top tether strap (Fig. A or B).
3. Locate the hook on the strap and loosely attach the
tether strap to the anchor point.
4. Pull the tether strap to remove ALL slack (Fig. B).
5. Make sure the tether strap is taut and that child seat
is properly secured.
NOTE:
The child restraint is secure when it cannot be moved
front-to-back or side-to-side more than 1 inch (2.5 cm) at
the belt path. If the child restraint is not secure, repeat the
installation process or use an alternate seating location.
Aircraft Installation
This restraint is certified for use in an aircraft. Most airlines allow
the use of a child restraint if it has been approved for airline use
and properly fits into the aircraft. Contact your airline about their
child restraint policy before traveling.
· The FAA recommends that a child weighing up to 40 lbs
(18.1 kg) use a certified harness child seat while traveling
on an aircraft.
· Install child restraint in a window seat.
· If the aircraft lap belt is too short, ask the flight attendant
for a belt extender.
9
Fig. A (Car)
Fig. B (Van)
Functions
Head Support
Head Support Depth Adjustment
The Head Support can be adjusted forward or backward by 0.6” (1.5 cm) increments to provide a
better fit and added protection for the occupant (Fig. A).
To Adjust: Remove screws on each side of the head support with a Phillips screwdriver. Move the
head support to selected position, and reinsert screws (Figs. B & C).
3
2
1
Fig. A
Fig. B
Fig. C
(Use holes 1,2 or 3 on both sides)
Head Support Contour Adjustment
The head support can be contoured to better fit and protect the head.
This adjustment must be performed on limited bases (to not weaken
the head support structure) by the dealer.
Head Pillow Adjustment
The Head Pillow provides added comfort and positioning.
To reposition: Grasp the head pillow and pull it away from the head
support. Place the head pillow where desired and press down to
affix Velcro.
10
Functions
Shoulder Support
Harness Strap Adjustment
Harness Strap
Harness
Adjustment
Strap (A)
Shoulder
Harness
Strap (B)
The Harness Strap comfortably positions the child in place.
To tighten the shoulder harness strap, pull on the harness adjustment
strap (Fig. A).
To loosen the harness strap, press and hold the harness release lever
(Red), while pulling the shoulder harness strap (Fig. B).
NOTE: Do not pull on the padded covers or chest support pad when
loosening the harness strap.
Harness
Release
Lever
Press & Hold
Red lever
Seatbelt Length Adjustment
1. Turn knob counter clockwise and remove (Fig. A).
2. Separate the Carrot seat from the back.
3. Pull webbing (strap) off of seat tube.
Fig. A
4. Replace webbing (strap) utilizing the lower loop. Before replacing,
fold the webbing loop inward so the attachment area is not
covered by the strap (Fig. B).
5. Reattach knob. It is very important to make sure that the back’s
tube is in between the seat’s tube and gray plastic cover before
reassembling (Fig. C).
11
Fig. B
Fig. C
Functions
Shoulder Strap Comfort Pad
The shoulder strap comfort pad can be moved by readjusting
the Velcro attached to the back of the Head Support.
Shoulder Protector Wing (OPTIONAL ACCESSORY)
The Shoulder Wing has up to 4” of width adjustment.
To adjust the width, press/ hold the yellow button on the
back of the shoulder wing, and pull the shoulder wing
outward to the desired position. (Fig. A).
IMPORTANT :
As your child grows and the Shoulder Protector Wing
is utilized, you may need to adjust the length of the
Harness Strap (see page 13).
Fig. A
12
Functions
Shoulder Protector Wing Installation
1. Detach straps from shoulder strap harness bracket. Remove
straps and padded covers from chair (Fig. A & B).
2. Press and hold height adjustment buttons, and remove head
support (Fig. C & D).
3. Remove 2 screws located on the rods (Fig. E)
4. Insert head support rods into the shoulder wing rods, and press
together (Fig. F).
5. Align the holes located on the rods, insert 2 screws and tighten.
(Fig. G).
7. Attach shoulder wings/head support to the base unit (Fig. H).
8. Re-thread shoulder straps and padded covers, and reconnect
to the shoulder strap harness bracket.
Fig. A
Fig. B
Fig. C
Fig. D
Fig. E
Fig. F
Fig. G
13
Fig. H
Functions
Chest Support
!
WARNING!
The top of the Chest Support Pad must be at armpit
level or lower. Positioning the support pad too high
may cause choking
Chest Support Pad Adjustment
To raise the height of the Chest Support Pad, press & hold the Height
Adjustment Lever (Yellow) on the front of the child seat, and pull on
the pad (Fig. A). To lower the chest support pad, pull the chest
support strap (Fig. B).
Press & Hold
Yellow lever
Fig. A
Fig. B
Harness
Release
Lever
Harness Buckle - Fasten / Release
1. Fasten: Hold the harness buckle with one hand. Use the other hand
to insert buckle clasps into the harness buckle (Fig. C). Proper
connection is confirmed when you hear a positive click after
inserting each buckle clasp.
Fig. C
2. Release: Hold the harness buckle with one hand. With the other
hand, press the release button and remove both clasps from the
buckle (Fig. D).
Fig. D
14
Functions
Lateral Support
Lateral Support Adjustment (OPTIONAL ACCESSORY)
Lateral supports are used to maintain midline positioning of the
trunk.
To adjust:
1. Unfasten the Velcro and the zipper on the back upholstery.
2. Pull back the upholstery. (Fig. A)
3. Loosen 2 screws with a 7/64” Allen Wrench. (Fig. B)
4. Slide lateral to desired height and width. (Fig. C)
5. Retighten the screws. (Fig. D)
6. Repeat steps 2 - 5 on opposite side.
7. Secure the upholstery.
15
Fig. A
Fig. B
(Fig. C)
Fig. D
Functions
Backrest
IMPORTANT:
· Height of the shoulder harness strap moves with the height
of the backrest.
· The Shoulder Harness Strap must be at or above the child’s
shoulders, and parallel to the ground.
· The Shoulder Harness Strap is for positioning only, and not
designed to support occupant in a crash.
Backrest Height Adjustment
The height of the backrest can be adjusted as the child grows.
To adjust: Pull and hold the black “D” shaped ring at the top of the
backrest to release lock. While pulling the release strap, move
backrest to desired height and let go of release strap. To fully
engage the lock, slightly move backrest until it “clicks” into place.
Note: The seat belt may need to be lengthened. To lengthen the
seat belt, remove the retaining screw and gray plastic cover on
each side of the restraint system. Pull seat and back apart, and
adjust strap to desired length. Slightly tuck the loop on the strap
to prevent strap from interfering with the retaining screw.
Reinstall the strap, align the silver bars of seat & back, replace gray
plastic cover, and reinsert screws.
Backrest Extensions snaps
into place by pushing.
Backrest Extensions - 2” or 4” (OPTIONAL ACCESSORY)
Backrest Extensions are designed to fill the space
exposed between the backrest and the seat when you
extend the backrest.
To add an extension, snap the Backrest Extension(s) onto
exposed rods.
16
Functions
Seat
When the child is sitting with knees bent, the total seat length
should be slightly shorter than the length from the pelvis, to the
rear of the knee.
Seat Length Adjustment – 2” or 4”
Release lock by pulling the black “D” shaped ring - Seat Depth
Release Strap on the front of the child restraint, and while pulling
the strap, adjust the position of the rodded seat extension.
Seat
Depth
Release
Strap
Seat Extensions (OPTIONAL ACCESSORY)
Seat Extensions are designed to fill the space around the metal
rods created when you use a rodded seat extension seat and/or
extend the footrest.
Seat Extension snaps into place
when used with the Rodded
Seat Extension
17
Seat Extension snaps into place
when used with the with Footrests
Functions
Rodded Seat Extensions (OPTIONAL ACCESSORY)
Rodded Seat Extension - Long
Allows the legs to be stretched out and comfortably supported.
Rodded Seat Extension - Short (OPTIONAL ACCESSORY)
Allows the knees to be bent, with the femurs comfortably
supported.
Pommel (OPTIONAL ACCESSORY)
The Pommel separates thighs to improve hip alignment and
stabilize sitting posture.
Pommel Attachment
To attach the pommel, insert the seat extension rods* through the
holes on the pommel’s attachment bracket, and into the holes on
the front of the Carrot’s seat.
* A rodded seat extension is required to attach the pommel
to the Carrot 3.
18
Functions
Seat Depth Adjustment
The seat depth can be adjusted a maximum of 1.4” (3.5 cm) by
moving the location of the Seat Depth Adjustment Knob.
To change the seat depth; remove the adjustment knob, reposition to the desired location and reattach.
Note: The knob MUST go through the plastic cover, the seat back
rod and the seat rod.
Footrest (OPTIONAL ACCESSORY)
Footrests are available in three sizes - short, medium and long.
Footrest Depth Adjustment: Pull and hold the black “D” shaped
ring - Seat Depth Release Lever and adjust to desired position.
Footrest Length Adjustment: Using a ½” wrench, loosen bolts on
the bottom of the side support tubes, move footplate to desired
position and tighten. Repeat on opposite side.
Small
10”-12”
Medium
12”-16”
Large
14”-18”
Support Tray (OPTIONAL ACCESSORY)
The Support Tray (Upper Extremity Support
Surface) provides added support for the upper
body. It attaches with Velcro located on the side
of the restraint.
Wedge Cushion (OPTIONAL ACCESSORY)
The wedge changes the seat-to-back angle by raising the front of
the restraint system. Place the wedge under the front of the
Carrot 3 seat.
19
Saet
Depth
Release
Lever
Functions
Pads and Cushions (STANDARD ACCESSORIES)
The following Pads and Cushions are provided as standard
accessories, and easily attach / adjust with Velcro.
Head Pillow
Provides comfort and lateral head support.
Body Balance Pads
Used to balance / position the user.
Hip Pads
Provides proper positioning for balance, comfort and support.
Comfort Seat Cushion
Provides additional comfort and prevents the child’s pelvis from
slipping forward. Comfort cushions are required for occupants
that are 40 lbs or less.
Head Pillow
Body Balance Pads
Comfort Seat Cushion
Hip Pads
20
Securing Your Child
Securing Your Child
Once the child restraint has been installed in the vehicle and
adjustments have been made, follow these instructions to secure
the child.
1. Loosen the harness by pressing the harness strap release lever
(Red) on the front of the child restraint, and pull the shoulder
straps forward (Fig. A).
2. Unfasten the harness buckle by pressing the release button and
sliding the tongues out (Fig. B).
Fig. A
Fig. B
3. Move each harness strap to the side of the child seat (Fig. C).
4. Place the child in the child restraint (Fig. D).
5. Position the harness straps around the child and fasten the
harness buckle (See Backrest Section for harness adjustment).
Proper connection is confirmed when a positive click is heard
after inserting each buckle clasp (Fig. E).
Fig. C
6. Slowly pull the harness adjuster strap to tighten the harness
around the child (Fig. F).
7. Verify that harness is not twisted and child is properly secured.
8. Fasten vehicle’s lap shoulder belt over the child restraint by
routing the belt through the upper RED belt guides on the child
restraint (Fig. G).
Fig. D
9. Make sure that the vehicle’s lap shoulder belt is not twisted or
loose, and the child is properly secured.
IMPORTANT:
Fig. E
・ Always park your car in a safe place to make any adjustments to
the child restraint system. Adjusting and/or handling the child
restraint when driving could cause DEATH or SERIOUS INJURY.
Fig. F
・ Always pull on the harness after securing the child, to ensure
the buckle clasps are secure in the harness buckle.
・ When driving, the child restraint must be in the most upright
position, unless medically necessary.
21
Fig. G
Securing Your Child
!
WARNING!
It is your RESPONSIBILITY to use the
Vehicle’s Safety Belts at the same time.
DO NOT secure a child only with the harness straps (5-point) of the child restraint;
ALWAYS use the vehicle’s lap shoulder (3-point) safety belt at the same time to secure
the child restraint and the child.
Not using vehicle’s lap shoulder (3-point) safety belt could cause your child restraint
to not perform as intended, and increase the potential of Serious Injury or Death.
Figure A. below illustrates a vehicle lap and shoulder (3-point safety) belt secured
over the child restraint. Child restraint is shown at its smallest and largest
configurations.
IMPORTANT: Upper belt path should be above occupant’s shoulder for
proper securement.
Fig. A
belt path
belt path
belt
path
belt path
belt path
22
Care and Maintenance
Upholstery Cover, Cushions, Pillows and Pads
Upholstery Cover: SPONGE CLEAN using cold water & mild soap, and TOWEL DRY. Do not
remove the upholstery cover. Contact the distributor for removal or replacement of the
upholstery.
Cushions, Pillow, and Pads: HAND WASH using cold water and mild soap. LINE DRY or LIE FLAT
to prevent shrinkage. Do not bleach, machine wash, machine dry or iron, as this may damage
fabrics. When damage to fabric occurs, it must be replaced. Periodical replacement is
recommended.
Harness Buckle
The child restraint, the harness buckle needs to be periodically checked for performance.
If a positive click is not heard when using the harness buckle, it must be replaced.
Harness and Straps
Do not take apart or attempt to take apart the harness and the straps from the child seat. If
reassembled incorrectly, the child restraint may not perform as intended. Never remove the
buckles and/or the buckle clasps from the harness or the straps. They cannot be reattached
after removal.
23
Warranty
For your convenience, record all the information about your child restraint below.
Refer to the Serial Number & Manufactured Date Label for all information:
LIMITED FIVE-YEAR WARRANTY
Product Model: CARROT 3 CHILD RESTRAINT SYSTEM
Name:
Street Address:
City:
State:
Zip Code:
Country:
Phone Number:
Email Address:
Lot Number:
Serial Number: CT3 Manufactured Date:
Date of Purchase:
Distributor:
24
Warranty
LIMITED FIVE-YEAR WARRANTY
This product is warranted against defective materials and workmanship for
five years from the date of original purchase. Proof of purchase is required.
To make a claim under this warranty, contact the authorized distributor or the
retailer from whom you purchased this product. Proof of purchase is required.
WARRANTY LIMITATIONS
This warranty does not include damages which arise from negligence, minor
use not in accordance with the product instruction.
The use of non-CARROT 3 covers, inserts, toys, accessories, or tightening
devices is not approved. Their use could cause this child seat to fail Safety
Standard FMVSS 213, or not to perform as intended in a crash. Their use
automatically voids this warranty.
LIMITATION OF DAMAGES
The warranty set forth above is exclusive and in lieu of all others, oral or
written, express or implied. In no event will the manufacturer, the distributors,
or the retailers selling this product, be liable for any damages, including
incidental or consequential damages, arising out of the use or inability to use
this product.
2830 California Street, Torrance, CA 90503
(888) 266-8243 · (310) 618-0111 · Fax: (310) 618-2166
Website: www.convaid.com · Email: [email protected]
UG0002-ENG-Rev_0-10172012