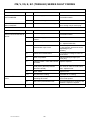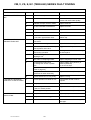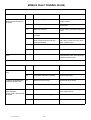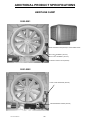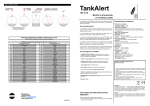
1
ABN 68 547 176 720 TECHNICAL MANUAL BOOK 2 2008 Edition AIR GROUP AUSTRALIA MANUFACTURED UNITS ONLY SERVICE GROUP AUSTRALIA 28/30 DIVISION STREET WELSHPOOL WA 6106 www.airgroup.com.au FM774/0708 BOOK 2 1 FM774/0708 BOOK 2 2 CONTENTS Page Introduction and Abbreviations 4 Safety and Installation Notes 5 CO Series Specifications 6 CZ Series Specifications 7 CO Roof Unit Board Diagram 8 Fused Roof Unit Board Diagram 9 CO/CZ Schematic Diagram 10 CO/CZ Fault Finding 11 CR Series Specifications 12 CRR Series Specifications 13 CY Series Specifications 16 CA Series Specifications 17 CA Series Dip Switch Diagram 18 Modular Roof Unit Board Diagram 19 CA/CR/CY Schematic Diagram - MS System 20 CA/CR/CY Schematic Diagram - MWL System 21 WW Series Specifications 22 WW Series Schematic Diagram 23 WW Series Remote Receiver 24 Fault Finding CO/CZ/CA/CR/CY/WW/EX/I 25 CM (TEKELEK) Series Specifications 28 V (Tekelek) Schematic Diagram 29 CM (Tekelek) Wiring Diagrams 30 Fault Finding V(MC or TEKELEK) 32 Fault Finding Mobile Unit M240 34 Additional Product Specifications 35 Heritage Sump Layout 35 Cascade Sump Layout 37 Illusion Sump Layout 39 EX Sump Layout 40 Water Inlet 41 Water Outlet 44 FM774/0708 BOOK 2 3 INTRODUCTION This document is designed as a guide only, and does not cover all possible faults that may occur. It is intended for use by technicians and trades people with fault finding skills and relevant qualifications. Its aim is to help identify failed components and assist in diagnosis of system faults. The guide has been set out in logical order, from the basic to the more complex faults. All faults should be approached in this order and all instructions followed to avoid incorrect fault identification and/ or part replacement. It should be noted that all information provided in this guide is based on current designs. Variations to these designs will be encountered on earlier models, since modifications have occurred to the product. ABREVIATIONS FM774/0708 BOOK 2 V Volt W Watt CZ Coolzone CO Comfort MX Formerly “Maxima” CZR Coolzone Rotary KDU Keypad Display Unit MCU Master Control Unit R/U Roof Unit cct Circuit DVT Drain Valve Timer PIR Passive Infra-Red (detector) LED Light Emitting Diode PIN Personal Identification Number MRU Modular Roof Unit MWL Magnetic Water Level System MS Magnetic Sensor Water Level System 4 SAFETY NOTES Electrical & Rotary Machinery • All electrical equipment should be isolated before work is performed. If ‘live testing’ is required all necessary safety precautions should be followed. Working at Heights • When work is to be performed at heights all necessary safety precautions should be followed. INSTALLATION NOTES Motor & Fan • A fan clipping two opposite points of the cowling indicates the dropper is ‘out of square’. Diagonal dimensions of dropper must be equal, +/-5mm. • Centralise the fan in the cowling by tightening the nearest 8mm motor mounting nut to the point of contact. This will only achieve several millimetres of movement due to fan and cowling tolerances. • When replacing a Roof Unit circuit board or fan motor a ‘minimum speed set-up’ should be preformed to avoid damaging motors by operating below specified minimum RPM values. • Fan blade pitch should not be altered from factory setting as significant changes in motor loading, airflow and noise characteristics will result. • The fan motor will not operate if the Motor Speed Key is not fitted to the keypad or MCU circuit board. Plumbing • Non-return type valves are not required as isolation valves in water supply. Back flow is not possible due to physical air gap created by water inlet design. Using a non-return type valve may result in a pressure lock between it and the solenoid valve due to water hammer or water expansion from heat. • As of September 2002. All units except the ‘E’ series will be supplied with an isolation valve which incorporates a filter/strainer. The filter can be cleaned during a routine maintenance. In installations where copper water supply piping is connected directly to water inlet solenoid elbow a slight ‘humming’ or ‘buzzing’ may be heard. This can be eliminated by connecting a length of flexible water pipe, immediately before the solenoid elbow. • Drainage pipe size, position and discharge location must all conform to local regulations. Electrical • All units should be powered from a dedicated circuit protected by a 10A or 15A re-wireable fuse or circuit breaker, (Ref: AS3000, 2.4.2). A GPO or socket outlet is not required and therefore RCD protection is not required. Flexible wiring can be joined to fixed wiring in a junction box, (Ref: AS3000, 3.7.2.7). Supply ing a unit from an existing RCD protected power circuit may result in nuisance tripping of that device due to the sum of leakage current from all appliances on that circuit. • Damage to equipment can occur if power is not isolated when connecting or disconnecting keypads, or appliances from Roof Units or MCU’s. FM774/0708 BOOK 2 5 CO (COMFORT) SERIES (1994 - 2000) Wall Control : CO Series 17vdc (SP3212) (Obsolete) replace with QA (SP3221) Compatible Roof Unit: CO R/U (SP3006) or MRU (SP3000) Control Cable: 7-pin 17 vdc pre-terminated (SP5200) Fan Motor: 370 W, 600 W, 750 W Drainage: 240v Electric Drain Valve (SP2062), Hydraulic Drain Valve (SP2064) or Bleed Off Pump: 240v pump Solenoid: 24v or Retro-Fit kit (on CO Roof Unit SP3006 only) Display Reading Modes of Operation: F E C AC FAN EXHAUST COOL AUTO - ventilation with fresh air - to extract air - for cooling - fan speed and water regulated automatically according to ’set’ temperature. AUTO FAN - auto operation without cooling TIMER - countdown timer to switch unit on and off after timed interval AF 00-00-30 Fan Speed: 100 speed in all modes Other Features: • • • • • Automatic wash and flush functions in Cool mode. Temperature sensor in keypad. Variable drain cycle - 0.5 to 99.5 hours. Keypad reset button - current version. Display illumination adjustable by pressing the arrow keys when in the off position. CO 94/95 RED DISPLAY COMFORT COOL CO 97/00 CO 95/97 GREEN DISPLAY COMFORT OFF COOL RUBBER BUTTON FAN TIMER EXH << GREEN DISPLAY RESET CO Series OFF WHITE/GREY PLASTIC BUTTONS COOL OFF FAN TIME FAN TIMER AUTO EXH AUTO EXH AUTO >> << >> << >> FM774/0708 BOOK 2 (TRASPARENT) 6 OVERLAY (NO BUTTONS) CZ (COOLZONE) SERIES (1995 - 2000) Wall Control : CZ Series 17vdc (SP3211)(Obsolete) replace with CY (SP3214) Compatible Roof Unit: Fused R/U (SP3003) (Obsolete) replace with MRU (SP3000) Control Cable: 7-pin 17vdc pre-terminated (SP5200) Fan Motor: 370 W, 600 W, 750 W Drainage: 240v Electric Drain Valve (SP2062) or Bleed Off Pump: 240v pump Solenoid: 24v solenoid Modes of Operation: FAN - ventilation with fresh air EXHAUST - to extract air COOL - for cooling Fan Speeds: 10 speeds in all modes Other Features: • • • • 2.5 or 5 hour drain cycles (long jumper). Automatic wash and flush functions in Cool mode (drain jumper). Option of retaining or draining wash water (wash jumper). Display illumination adjustable by pressing the arrow keys when in the off position. • Keypad reset button - current version. • Power on LED indicator. CZ 95/97 CZ 97/00 RESET BUTTON BLUE Cool 1 2 Zone 3 4 5 GREEN RESET Air Conditioning 6 7 8 CZ Series 9 10 1 << FAN SPEED ADJUSTMENT >> COOL FAN EXH OFF FM774/0708 BOOK 2 2 3 4 5 6 7 8 POWER ON LED 9 10 << FAN SPEED ADJUSTMENT >> WHITE / GREY BUTTONS HARD PLASTIC 7 COOL FAN EXH OFF OVERLAY (NO BUTTONS) FM774/0708 BOOK 2 8 MOTOR EARTH MAINS EARTH NEUTRAL VALVE MAINS ACTIVE BLUE PUMP BROWN BLUE INLET BROWN 15A FUSE DRAIN FUSE 5A SLOW BLOW PUMP FUSE 5A SLOW BLOW BLUE DUMP VALVE BROWN MOTOR FUSE 15A SLOW BLOW ORANGE CAP CAP MOTOR WHITE AGA COMFORT Ver 98/2 RELAY BLACK BLUE ROOF J2 PUMP EARTH MAINS POWER LED BROWN PUMP UNIT DRAIN EXHAUST SPEED TRIACS 7 PIN HEADER CONTROL CABLE INDICATOR LED’S MINIMUM SPEED ADJUSTMENT JUMPERS (EARLIER VERSIONS FITTED WITH ADJUSTABLE POTENTIOMETER) CO ROOF UNIT BOARD (SP3006) ONLY INSTALLED IN UNITS UP TO 1996 J3 J4 9 MAINS SUPPLY CONNECTION 240 VOLTS AC SUPLEMENTRY MAINS FILTER CABLE ISOLATOR A N E A N E ISOLATION SWITCH CABLE INCOMING MAINS SUPPLY CONNECTION 240 Volts AC AGA ROOF UNIT 99/3 AGA ROOF UNIT VER 96/7 MAINS POWER AVAILABLE LED PUMP/INLET RELAY 15.0 SLOW BLOW MOTOR FUSE MOTOR 15A SLOWFUSE BLOW 5.0 SLOW BLOW DRAIN FUSE 5A DRAIN SLOW FUSE BLOW 5.0 SLOW BLOW PUMP FUSE 5A PUMP SLOWFUSE BLOW DRAIN PUMP EXHAUST SPEED DRAIN EXHAUST SPEED 1 2 3 4 5 6 7 (see page 12 for details) BROWN BROWN DRAIN PUMP BLUE WHITE CAP CAP BLUE BLUE FAN MOTOR TERMINALS FAN MOTOR TERMINALS VARIABLE VOLTAGE VARIABLE VOLTAGE PUMP TERMINALS 240 V PUMP TERMINALS 240 VAC DRAIN VALVE TERMINAL 240VALVE V DRAIN TERMINAL 240 VAC - 1 MIN DELAY BEFORE PUMP ACTIVATION - NO DELAY BETWEEN SOLENOID & PUMP ACTIVATION JP3 PUMP DELAY JUMPER NOTE: IF JUMPER NOT FITTED - PUMP WILL NOT OPERATE MOTOR EARTH PUMP EARTH BROWN BLACK ORANGE MINIMUM SPEED ADJUSTMENT JUMPERS (EARLIER MODEL MINIMUM SPEED ADJUSTMENT FITTED WITH ADJUSTABLE POTENTIOMETER) PUMP LED JP3 TRIACS INDICATOR LED’S INDICATOR LED'S J4 WATER INLET SOLENOID TERMINALS. POLARITY IS WATER INLET SOLENOID POLARITY NOTTERMINALS. IMPORTANT 24V IS NOT IMPORTANT 24 VAC J4 J3J3 J2 J2 FM774/0708 BOOK 2 MOTOR 7 - PIN CONTROL CABLE HEADER 17VDC 7-PIN CONTROL CABLE HEADER 17 VDC FUSED ROOF UNIT BOARD (SP3003) (No longer available) 10 *NOTE: Only fused roof unit ver. 99/3 boards & onwards require this filter as they no longer have C1 & C2 filter capacitors ELECTRO MAGNETIC COMPLIANCE A N E A N E FUSED ROOF UNIT 240 Volts AC PUMP DRAIN ORANGE BLACK DRAIN FUSE 5.0 SLOW BLOW MOTOR FUSE 15.0 SLOW BLOW BLUE DRAIN MOTOR EARTH BLUE WHITE CAP CAP BLUE PUMP PUMP EARTH BROWN BROWN BROWN PUMP FUSE 5.0 SLOW BLOW 1 2 3 4 5 6 7 MINIMUM SPEED ADJUSTMENT PUMP LED JP3 SPEED EXHAUST 7 PIN 17V CO OR CZ KEYPAD 7-PIN CONTROL CABLE HEADER 17 VDC INDICATOR LED'S 240V INCOMING MAINS SUPPLY CONNECTION MAINS SUPPLY AGA 99/3 96/7 AGAROOF ROOF UNIT UNIT VER WATER INLET SOLENOID TERMINALS. POLARITY IS NOT IMPORTANT 24 VAC 24V J4 J3 J2 FM774/0708 BOOK 2 MOTOR SOLENOID 6 PIN 240V FAN MOTOR TERMINALS VARIABLE VOLTAGE DRAIN VALVE TERMINAL 240 VAC 240V PUMP TERMINALS 240 VAC 240V MOTOR ELECTRIC DRAIN VALVE PUMP CO/CZ SCHEMATIC DIAGRAM CO & CZ FAULT FINDING NOTES • R/U Indicator LED’s display incoming control signals only. Outputs must be verified with a multimeter at appliance terminals. • Resetting a CO KDU will reset to factory default any preset valves e.g. drain cycle interval, auto mode temp. • Damage to equipment can occur if power is not isolated when connecting or disconnecting keypads, or appliances from Roof Units. • All version keypads with serial numbers larger than 30516 have internal timers fitted. Some of these will be identified by a fluorescent orange sticker stating ’FITTED WITH INTERNAL DRAIN VALVE TIMER’. All version keypads prior to the above serial number need to have an External Drain Valve Timer fitted. EXTERNAL DRAIN VALVE TIMERS • The External Drain Valve Timer is to be fitted to the Roof unit (Always remove existing External Drain Valve timers fitted to roof unit before fitting new one). It is not necessary to remove any existing External Drain Valve Timer fitted to the keypad. • The timers generate a 5 second ON and 15 second OFF duty cycle to increase durability of the drain valve. They do not affect the drain cycle times. ROOF UNIT MOUNTED STYLE (SP3009) IMPORTANT ALWAYS REPLACE DRAIN VALVE TIMER WHEN REPLACING ELECTRIC DRAIN VALVE. MINIMUM SPEED ADJUSTMENT The minimum fan speed is adjusted by changing the configuration of the three jumpers on the Roof Unit circuit board, indicated on the drawing on page 10. It is important when setting speeds on 1000W, 750W and 600W motors that the minimum speed does not fall below 750 RPM. MINIMUM SPEED ADJUSTMENT • MINIMUM SPEED HAS BEEN FACTORY SET • IF NECESSARY ADJUST MINIMUM SPEED. • RUN FAN AT LEAST 10 MINUTES BEFORE SETTING MIN. SPEED. • ADJUST WITH KEYPAD SET AT SPEED 1. • DO NOT SET BELOW 700 RPM. FASTEST JUMPER FITTED SLOWEST JUMPER REMOVED FM774/0708 BOOK 2 11 CR SERIES 2000 - 2005 (Replaces CO Series) Wall Control : CR Series 17vdc (SP3215) Compatible Roof Unit: Modular R/U (SP3000) Control Cable: 7-pin 17vdc pre-terminated (SP5200) Fan Motor: 600W, 750W, 1000W Drainage: 240v Electric Drain Valve (SP2062) or Counterweight Drain Valve (SP2040) Pump: 240v pump Solenoid: 24v solenoid Display Reading: Modes of Operation F E C AC FAN EXHAUST COOL AUTO - ventilation with fresh air. - to extract air. - operates pump & fan for cooling. - fan speed and water regulated automatically according the ‘set’ temperature. AUTO FAN - auto operation without cooling. TIMER - countdown timer to switch unit on or off after timed interval. AF 00-00-30 Fan Speeds: 100 speeds in all modes Selected fan speed displayed when in manual mode Other Features: • • • • • Automatic wash and flush functions in Cool mode. Temperature sensor in keypad - Current room temp displayed when in standby/off mode. Variable drain cycle – 0.5 to 99.5 hours. Keypad reset button - current version. Display illumination adjustable by pressing the arrow keys when in the off position. CR 00/04 BACK OF KEYPAD CIRCUIT BOARD GREEN DISPLAY RESET FM774/0708 BOOK 2 COOL OFF FAN TIMER EXH AUTO << >> PALE GREEN OVERLAY WHITE PLASTIC HOUSING 12 CRR SERIES (SP3216) 2002 - 2003 Wall Control : All functions same as CR CR KEYPAD 2002 - 2003 BACK OF KEYPAD CIRCUIT BOARD 2002 - 2003 GREEN DISPLAY J1 = FIT FOR ROOF UNIT CIRCUIT BOARD J2 = FIT JUMPER WHEN DRAIN VALVE FITTED J3 = MOTOR SPEED KEY SOCKET RESET COOL OFF FAN TIMER EXH AUTO JP1 PALE GREEN OVERLAY JP2 JP3 << WHITE PLASTIC HOUSING >> TEMP REMOTE RECEIVER ROOF UNIT CABLE CABLE CALIB. Fitted with Remote Receiver Header Multifunction Receiver (SP3217) • • External receiver only used in 2002/2003 session. Internal receiver fitted to keypad 2003/2004 session. YELLOW WHITE RED GREEN BLACK GREEN RED BROWN BLUE PURPLE Multifunction Receiver PCB CRR/DRR REMOTE CONTROL RECEIVER WIRING DIAGRAM Multifunction Receiver Wiring Diagram 8 core 3m Cable to Keypad REMOTE TRANSMITTER (SP3218) DECREASE FAN SPEED FAN FM774/0708 BOOK 2 INCREASE FAN SPEED COOL ON / OFF 13 ADD/CLR Pins & Jumper CRR SERIES (SP3219) 2003 - 2005 (Replaces CRR SP3216) Wall Control • • All functions same as CR Receiver built into CRR Wall Controller CR KEYPAD 2004 - 2005 BACK OF KEYPAD CIRCUIT BOARD GREEN DISPLAY J1 = FIT FOR ROOF UNIT CIRCUIT BOARD J2 = FIT JUMPER WHEN DRAIN VALVE FITTED J3 = MOTOR SPEED KEY SOCKET RESET JP2 COOL FAN OFF JP1 JP1 PALE GREEN OVERLAY TIMER JP2 ADD EXH << RECEIVER LED CLRJP3 AUTO WHITE PLASTIC HOUSING >> TEMP REMOTE RECEIVER ROOF UNIT CABLE CABLE COR 03/ 3 7 PIN HEADER FOR ROOF UNIT CABLE CALIB. TEMPERATURE CALIBRATION AERIAL CABLE Multifunction Receiver • CRR Series keypad part number SP3219 has receiver fitted to keypad. REMOTE TRANSMITTER (SP3218) DECREASE FAN SPEED FAN FM774/0708 BOOK 2 INCREASE FAN SPEED COOL ON / OFF 14 CRR SERIES 2002 - 2005 Fault Finding for SP3216 and SP3219 • • Remove 8 pin remote control receiver cable from rear of keypad and fault find as per CO/CZ/CA/CR/CY. If fault is attributed to remote control then replace the transmitter and re-programme the receiver Programming additional transmitters The receiver and transmitter supplied in the remote pack are pre-programmed. To attach additional transmitters, program as follows:1. 2. 3. Power to remain connected. Remove the cover from the receiver box and locate the ‘ADD’ pins and jumper. Remove the jumper from the top pin and bridge the ‘ADD’ pins with the jumper. The Red LED will illuminate. ADD CLR 4. 5. ADD Remove Jumper Bridge ADD Pins CLR Press each button on the transmitter once. The LED will flash once, indicating that the button press has been accepted Remove the jumper from the ‘ADD’ pins and replace it on the top pin. ADD ADD Remove Jumper CLR CLR Replace Jumper Resolving a conflict situation If the transmitter is operating other devices in the home (even a neighbour’s home), or another remote transmitter operates the air conditioning , the transmitter will need to be replaced with a new one, and the receiver re-programmed. 1. With the power connected, bridge the ‘CLR’ pins with the jumper. ADD Bridge CLR pins with jumper CLR 2. The LED will flash slowly 12 times, then stay on. 3. Remove the jumper. The LED will flash rapidly as the memory is erased. ADD CLR 4. Remove Jumper Select a new transmitter and repeat ‘PROGRAMMING EXTRA TRANSMITTERS’ steps 3 to 5. FM774/0708 BOOK 2 15 CY SERIES 2000 - 2005 (Replaces CZ Series) Wall Control : CY Series 17vdc (SP3214) Compatible Roof Unit: Modular R/U (SP3000) Control Cable: 7-pin 17vdc pre-terminated (SP5200) Fan Motor: 600W, 750W, 1000W Drainage: Drain 240v Electric Drain Valve (SP2062), or Counterweight Valve (SP2040) Pump: 240v pump Solenoid: 24v solenoid Modes of Operation: FAN - ventilation with fresh air EXHAUST - to extract air COOL - operates pump and fan for cooling Fan Speeds: 10 speeds indicated by fan speed LED Other Features: • 2.5 or 5 hour drain cycles (long jumper). • Automatic wash and flush functions in Cool mode (drain jumper). • Option of retaining or draining wash water (wash jumper). • Display illumination is adjustable by arrow keys when in the off position. • Keypad reset button. • Power on LED indicator . CY 00/05 BACK OF KEYPAD CIRCUIT BOARD RESET CY Series 1 3 2 4 5 6 7 8 9 10 << FAN SPEED ADJUSTMENT >> COOL FAN EXH OFF GREEN FM774/0708 BOOK 2 WHITE PLASTIC HOUSING SPEED KEY SOCKET PALE GREEN OVERLAY 16 CA SERIES 2000 - 2005 Wall Control : CA Series 17vdc (SP3213) Compatible Roof Unit: Modular R/U (SP3000) Control Cable: 7-pin 17vdc pre-terminated (SP5200) Fan Motor: 600W, 750W, 1000W Drainage: Drain 240v Electric Drain Valve (SP2062) or Counterweight Valve (SP2040) Pump: 240v Pump Solenoid: 24v solenoid Modes of Operation: FAN - fan only for ventilation with fresh air EXHAUST - reverse fan direction to extract air COOL - fan and pump both operate for cooling Fan Speeds: Variable speed by illuminated columns Other Features: • • • • Automatic wash & flush functions in cool mode. Variable drain cycle 2-8 hours. Keypad reset button. Display illumination is adjusted by rotation of the on/off knob when in the off mode. CA 00/05 FRONT OF KEYPAD CIRCUIT BOARD RESET 1 ON DIP RESET 2 3 PRESS ON / OFF 4 FAN COOL 5 EXHAUST 6 7 8 CA Series WHITE HOUSING FM774/0708 BOOK 2 PALE GREEN OVERLAY 17 ROTARY SWITCH CA SERIES 2000 - 2005 STANDARD SETTING OF DIP SWITCHES FM774/0708 BOOK 2 18 Red Yellow Brown Blue Pin No. & Colour 1. 3. 5. 7. SPEED DRAIN 17 Volts Reverse (EXH) Pump Ground Function 2. Green 4. Black 6. White Pin No. & Colour 7-Pin Controller Cable Functions EXH 1 2 3 4 5 6 7 INDICATOR LED’S 7-PIN CONNECTOR KEYPAD CABLE 17 VDC OPTO 4 Fan Speed Drain 50 Hz Square Wave Function PUMP MAX CAP BLUE MOTOR WHITE ORANGE DRAIN AGA/MRU/2000 Teco Teco Teco Teco Fasco motor 1000W 750W 600W 600W 315W size Black Grey Grey / Green hub Grey / Red hub Grey / Green hub fan colour 850 600 - 750 600 - 750 600 - 750 600 RPM (Min) MAX POT REMOVED ON VER 2001/4 SPEED POT SETTINGS 15A FUSE TO ISOLATION SWITCH BLACK 3 2 1 E N A MIN NO ADJUSTMENT REQUIRED. NOT INCLUDED 02/03 DRAIN A DRAIN N LAY REPLACED WITH JUMPER 02/03 BROWN REFER SPEED POT SETTING TABLE FOR MINIMUM SPEEDS CAP PUMP A PUMP N MOTOR E 19 PUMP E 3 PIN CONNECTOR CABLE (MS BOARD ONLY) PUMP FM774/0708 BOOK 2 RELAY DIP SWITCH (00/02) DIP SWITCH NUMBER 1: • • SWITCH ON = NO DELAY • SWITCH OFF = 1 MIN DE- indicative minimum speed pot setting 7.5 - 8 3-5 3-5 7 4 WATER INLET SOLENOID TERMINALS. POLARITY IS NOT IMPORTANT 24 V. MODULAR ROOF UNIT BOARD (MRU) (SP3000) 2000 - 2008 > < EXH TO ISOLATOR SWITCH INDICATOR LEDS SPEED DRAIN 1 2 3 4 5 6 7 PUMP 17 PIN 17 vdc AUT0O 4 MAX POT REMOVED FROM VER 2001/4 240V OR 15A FUSE MOTOR MRU BOARD MAX MIN 3 PIN CABLE BROWN 3 1 2 E N A MWL BLUE EXH BLACK MS CAP TIMER 240V 240V AGA/MRU/2000 WATER INLET ELECTRIC DRAIN 6 PIN 240V MOTOR LEAD WHITE FAN ORANGE OFF DRAIN COOLLL CAP DRAIN A DRAIN N MOTOR E PUMP A PUMP N 20 PUMP E FM774/0708 BOOK 2 PUMP MS BOARD RELAY CA/CR/CY/CRR/QA/QM KEYPAD 24V 240V SOLENOID 6 PIN MOTOR PLUG OR MOTOR PUMP COUNTERWEIGHT DRAIN CA/CR/CY/QA/QM SCHEMATIC DIAGRAM - MS SYSTEM 2000 - 2008 DRAIN TO ISOLATOR SWITCH INDICATOR LEDS SPEED EXH 1 2 3 4 5 6 7 PUMP 1 2 3 4 E N A MOTOR MRU BOARD 15A FUSE MAX MIN MAX POT REMOVED FROM VER 2001/4 17 PIN 17 V > < BROWN AUT0O BLACK EXH BLUE TIMER CAP FAN WHITE OFF CAP OR 240V 240V DRAIN A DRAIN N MOTOR E PUMP A 21 PUMP N COOLLL 6 PIN MOTOR LEAD AGA/MRU/2000 PUMP FM774/0708 BOOK 2 2PUMP E WATER INLET 240V ELECTRIC DRAIN RELAY CA/CR/CY KEYPAD COUNTERWEIGHT DRAIN 6 PIN MOTOR PLUG 24V 240V MWL MWL MWL BOARD BOARD MWL MS PUMP MOTOR 24V SOLENOID CA/CR/CY SCHEMATIC DIAGRAM - MWL SYSTEM 2000 - 2005 DRAIN ORANGE WW SERIES 2000 - 2005 Wall Control : WW Controller (SP3225) Communication Board : WW BMCU (SP3227) Compatible Roof Unit: Modular R/U (SP3000) Control Cable: 7-pin 17vdc pre-terminated (SP5200) connection between R/U and BMCU board. 7-pin 14vdc pre-terminated (SP5200) connection between BMCU and keypad. 4-pin 14vdc pre-terminated (SP5202) connection between BMCU and keypad for temperature sensing. 8-pin pre-terminated (SP3229) connection to remote receiver board. a) b) c) d) Fan Motor: 600W, 750W, 1000W Drainage: Counterweight Drain Valve (SP2040) Pump: 240V pump Solenoid: 24V solenoid Modes of Operation FAN EXHAUST COOL AUTO TIMER - ventilation with fresh air. - to extract air. - operates pump & fan for cooling. - control unit to maintain constant pre-set temperature - WAKE/SLEEP countdown timer to switch unit on or off after timed interval. DAILY ON / DAILY OFF TIMERS Fan Speeds: 100 speeds in all modes Other Features: • • • • • • Automatic wash and flush functions in Cool mode. Temperature sensor in keypad - Current room temp displayed when in standby mode. Variable drain cycle – 1 to 24 hours. Keypad reset button. Digital display. Time display. WW Keypad Back of WW Keypad WW BMCU Board 5A Fuse 9V Battery 9V Battery Snap Temp. Sensor Roof Unit FM774/0708 BOOK 2 22 KDU Remote KDU WW SERIES SCHEMATIC DIAGRAM 2000 - 2005 Back of WW Keypad (SP3225) WW BMCU (SP3227) c) 4– PIN PRE-TERMINATED CABLE (SP5202) b) 7– PIN PRE-TERMINATED CABLE (SP5200) Roof Unit KDU Remote KDU MRU BOARD (SP3000) AGA/MRU/2000 a) 7– PIN PRE-TERMINATED CABLE (SP5200) MOTOR E WHITE CAP MOTOR 15A FUSE DRAIN ORANGE CAP BLUE d) 8– PIN PRE-TERMINATED CABLE (SP3229) RELAY WW Multifunction Receiver (SP3229) MIN BROWN E N A PUMP DRAIN EXH 3 4 23 SPEED 2 1 2 3 4 5 6 7 1 FM774/0708 BOOK 2 WW SERIES 2003 - 2005 WW Multifunction Receiver Wiring Diagram YELLOW WHITE RED GREEN BLACK GREEN BLACK BROWN BLUE PURPLE FM1953/1203 WW Multifunction Transmitter (SP3223) DECREASE FAN SPEED FAN INCREASE FAN SPEED COOL ON / OFF Note: Conflict situations refer to CRR series page 15 FM774/0708 BOOK 2 24 WIRI NG DI AGRAM FOR WW REMO TE RECEIVE R WW Multifunction Receiver (SP3229) CO/CZ/CA/CR/CY/WW/EX/I/QA/QM FAULT FINDING ELECTRICAL FAULTS FAULT Ref 1. NO DISPLAY AT KEYPAD 1.1 Display illumination level set too low. (Excludes WW) Whilst in ‘OFF’ mode adjust illumination with speed > (increase) button, or the dial on the CA keypad. 1.2 240v mains supply isolated. Check mains fuse, circuit breaker, unit isolation switch or MRU. 1.3 Keypad not connected. Check 7-pin cable connection and continuity. 1.4 Keypad locked up. Push ‘RESET’ button on keypad. 1.5 MRU failure. If 17 vdc not present between pins 1 and 7 replace MRU. Refer to pg. 19-20. 1.6 Keypad failure. Verify control signal from keypad with indicator LED’s on MRU and /or BMCU. Check using substitute keypad. 1.6a BMCU failure. Verify control signal from BMCU with indicator LEDS on MRU. 2.1 Keypad failure. Check appropriate LED on MRU and / or BMCU with function selected. 2.2 MS board failure (If MS float is fitted). Remove 3 pin MS cable from MRU & check unit operation. 2.3 MRU failure. No output to selected components. Replace MRU. 2. NO RESPONSE FROM WALL CONTROL CAUSE ACTION FAN FAULTS FAULT 3. FAN NOT OPERATING Select ‘FAN’ at keypad and fault find as follows 4. FAN WILL NOT OPERATE IN EXHAUST Select ‘EXHAUST’ at keypad and fault find as follows 5. FAN CONSTANTLY RUNNING FM774/0708 BOOK 2 Ref CAUSE ACTION 3.1 Speed key not fitted - JP3. Check keypad to see if speed key is required. If so, fit. Refer to pg 15 3.2 Keypad failure keypad or BMCU failure no signal to MRU. If Speed LED not lit on MRU suspect keypad, cable or BMCU fault. 3.3 MS board failure (if MS float is fitted). Remove 3-pin MS cable and confirm motor operation. 3.4 Capacitor failure (motor will buzz but not rotate). Replace capacitor. 3.5 Motor not powered. Check 6-pin plug to motor. Refer to pg 19-20. 3.6 Motor seized. Replace motor. 3.7 Fan jammed in cowling. Centralise fan in cowling. 3.8 MRU failure. Verify output with voltmeter between blue & black motor spade terminals. 3.9 Motor failure or shutdown due to internal (motor) thermal protection (thermal overload). Check run current, if running at more than 120% of value on motor name plate - replace motor. 4.1 Any of the above FAN faults. Check to 3.1 to 3.8 above. 4.2 Keypad or BMCU failure no signal to roof unit. If Exhaust LED is not lit on MRU suspect keypad, cable or BMCU fault. 4.3 MRU failed or locked up. If Exhaust LED is lit yet motor direction has not reversed replace MRU 5.1 MRU triac shorted. If fan runs with keypad ‘OFF’ or unplugged replace MRU. 25 CO/CZ/CA/CR/CY/QA/QM/WW/EX/I FAULT FINDING FAN FAULTS FAULT Ref CAUSE ACTION 6. FAN COMES ON BY ITSELF (AND CAN BE TURNED OFF AT KEYPAD) 6.1 7. FAN CUTS OFF 7.1 Unit has sustained an electrical spike on supply cable. Unit has sustained an electrical spike on the low voltage keypad cable. Loss of power to air-conditioner. Confirm unit is wired on its own dedicated supply. Fit a spike filter on both end of the low voltage keypad cable. Check display on keypad if keypad illuminated suspect thermal overload. Confirm keypad is in ‘ON’ position. Check run current, if running at more than 120% of value on motor name plate—replace motor 6.2 7.2 7.3 Loss of power to motor. Motor failure or shutdown due to internal (motor) thermal protection (thermal overload). 8.1 8.2 Isolation tap closed or filter blocked. Solenoid time delay active. 8.3 8.4 Keypad not signalling roof unitDrain LED not lit. BMCU board not signalling roof unit. Replace BMCU Drain LED not lit. No 24vac output Water Inlet on MRU. Replace MRU. Refer pg 19-20. 8.5 No 24vac output at MWL board. 8.6 MS board failure (If MS float is fitted). Solenoid mesh strainer blocked. WATER FAULTS 8. WATER NOT ENTERING UNIT Select “COOL” and fault find as follows: 8.3a 8.7 8.8 8.9 9. WATER CONTINUALLY RUNNING FROM UNIT Select “COOL” and fault find as follows 9.1 9.2 9.3 9.4 9.5 9.6 9.7 FM774/0708 BOOK 2 Open tap and clean filter. Wait 1 min for drain valve to close & delay to end. Replace keypad. Replace MWL board. Remove 3-pin MS cable if no voltage to solenoid replace MRU. Remove solenoid & clean mesh strainer & check water quality. Recommend replace solenoid. Solenoid coil open circuit or failed. Replace solenoid. Pressure lock between solenoid & Relieve pressure & fit standard non-return type isolation valve. isolation tap. Keypad or BMCU failure. If Drain LED not lit suspect 7-pin cable and/or keypad and/or BMCU. Electric drain valve failure. (If MWL If 240v at drain terminals replace float fitted.) drain valve or if no voltage at drain terminals replace MRU. MS board failure. (If MS float is Remove 3-pin MS cable from MRU. If fitted.) 240v at drain terminals replace drain valve. If no voltage at drain terminals replace MRU. Solenoid passing water/continuously. Strip & clean solenoid diaphragm & seating. Recommend replace solenoid. Water level set too high. Adjust either Fluidmaster Float valve, MS or MWL float level. Check for water in float. Counterweight Drain Valve Replace plastic clips (SP2041) or a) Leaking from hoses or plastic clips hoses kit (SP2042). Do not re-use clips. b) Hoses Incorrectly connected Replace hoses kit (SP2042). (Refer to pg 39) c) Physical or Mechanical Replace drain valve (SP2040). impairment of counterweight drain valve body Square section blue ‘O’ ring faulty Replace ‘O’ ring (SP2043). 26 CO/CZ/CA/CR/CY/QA/QM/WW/EX/I FAULT FINDING WATER FAULTS FAULT 10. WATER NOT DRAINING FROM UNIT 11. WATER DRAINING OUT OF CYCLE 12. WATER NOT CIRCULATING Select “COOL” and fault find as follows FM774/0708 BOOK 2 Ref CAUSE ACTION 10.1 Unit may be in AUTO mode (CR or WW only). 10.2 Electric drain valve failed and/or roof If 240v present at drain terminals unit triac shorted as a result. when OFF selected - replace roof unit. Recommend replace Electric Drain Valve. 10.3 DRAIN jumper not fitted to Check position of jumper is correct keypad - JP2. (Excludes WW & CA) for system set-up. Refer pg. 12. 10.4 Drain Interval set too long (CR only). Remove 7-pin cable from rear of keypad, defaulting drain interval to 5 hours. 10.4a Drain internal set too long (WW only). Set drain interval on keypad. Press SET and COOL) 10.5 Counterweight drain valve a) Stuck in closed position Replace drain valve (SP2040). b) Blockage in components Replace drain valve (SP2040). 11.1 Drain jumper not fitted to keypad - JP2. (Excludes WW & CA) Check position of jumper is correct for system set-up. 11.2 Wash jumper not fitted to keypad (CY only). Refer pg. 15. Check position of jumper is correct for system set-up. 11.3 Long jumper in incorrect position (CY only). Refer pg. 15. Check position of jumper is correct for system set-up. 11.4 Dip switches in incorrect position (CA only). Refer to setting of dip switches on pg. 17. 12.1 Keypad failure - Display reading “C” refer pg. 12. If pump LED on MRU not lit suspect keypad, cable or BMCU fault. 12.2 Pump time delay is active, normal operation. Wait 1 min after solenoid operation for pump to start. 12.3 Roof unit failure - no 240v supply to pump. If Pump LED on MRU lit and 240v not present at terminals - replace roof unit. 12.4 MS failure (if MS float fitted). If pump LED on MRU lit remove 3pin MS cable from MRU. If 240v at pump replace MS. 12.5 Pump seized, impellor stripped or base cracked. Replace pump. 12.6 Pump strainer basket clogged. Remove & clean strainer basket. 12.7 Water distribution manifold blocked. Remove and flush manifold of any blockages. 27 Check system mode at keypad. Refer pg 12. CM, V, VS, E, EC (TEKELEK) SERIES (Heritage only) Wall Control : TEKELEK 285 or 240v Controller (SP 3016) Compatible Roof Unit: TEKELEK 210 Speed Control Circuit board (SP 3014) Control Cable: 4 conductors, insulated wire rated at 240v 5 amp Fan Motor: 370W, 600W, 750W, 1000W Drainage: Hydraulic Drain Valve (SP2064) and/or Bleed Off and/or Counterweight Drain Valve (SP2040) Pump: 240v pump Solenoid: If fitted 24v with retro-fit kit Modes of Operation: FAN - ventilation with fresh air COOL - pad wash FAN & COOL - operates pump and fan for cooling Fan Speeds: Variable potentiometer Other Features: Replaceable ‘fusible link’ in wall control for circuit protection. Spares mounted on back of wall control. V 00/04 Cooler Control Fan Cool  Fan Speed FM774/0708 BOOK 2 28 FM774/0708 BOOK 2 TRANSFORMER TO WALL SWITCH 29 MAINS IN EARTH EARTH STUD ACTIVE/ BROWN NEUTRAL/ BLUE YELLOW/GREEN SOLENOID POWER IN CONTROL WHITE BLACK MAX SPEED MIN SPEED POWER OUT BROWN BLUE BLACK CONNECTOR TEK210 CIRCUIT BOARD MOTOR YELLOW/GREEN BROWN TEKELEK 285 KEYPAD MOTOR CAPACITOR MOTOR CAPACITOR MOTOR CAPACITOR ACTIVE FAN PUMP CONTROL SOLENOID BROWN SOLENOID BLUE ISOLATOR SWITCH WATER SOLENOID COUNTERWEIGHT 240V MWL MWL MS MWL BOARD MWL BOARD V, VS, E, EC (TEKELEK) SCHEMATIC DIAGRAM - MWL SYSTEM 2000 - 2004 BLUE CM (TEKELEK) SERIES WIRING DIAGRAM PRE 2000 WATER PUMP FAN MOTOR BROWN ORANGE BROWN WHITE WHITE GREEN / YELLOW GREEN/YELLOW ORNAGE BLUE BLUE BLACK BLACK GREEN / YELLOW BLUE BROWN ISOLATOR SWITCH CONNECTOR WATER SOLENOID SOLENOID BLUE POWER OUT TO WALL SWITCH SOLENOID BROWN POWER IN CONTROL CONTROL TEK 210 CIRCUIT BOARD MIN FAN MINIMUM SPEED ADJUSTMENT MAX PUMP MAXIMUM SPEED ADJUSTMENT ACTIVE MAINS IN NEUTRAL / BLUE ACTIVE / BROWN EARTH CAPACITOR INSIDE ELECTRICAL BOX V, VS (TEKELEK) SERIES WIRING DIAGRAM 2000 - 2001 ISOLATOR SWITCH WATER SOLENOID SOLENOID BLUE BROWN SOLENOID BROWN CAPACITOR TO WALL SWITCH CONTROL PUMP POWER OUT WHITE POWER IN BLACK CONTROL FAN MIN SPEED ACTIVE MAX SPEED CAPACITOR TEK210 CIRCUIT BOARD CAPACITOR MAINS IN NEUTRAL/ BLUE ACTIVE/ BROWN BLUE BROWN BLACK EARTH BLUE CONNECTOR YELLOW/GREEN BROWN WATER PUMP MINIMUM RPM MOTOR SETTING WHITE YELLOW/GREEN ORANGE EARTH STUD _________________________________________________________________________________________________________________________________________________________________________________________________________________________________________ MOTOR TECO TECO/FASCO FASCO FM774/0708 BOOK 2 SIZE 1000w 750w 600w FAN COLOUR BLACK GREY GREY/GREEN HUB RPM(MIN) 800 750 750 FAN MOTOR 30 V, VS, E, EC (TEKELEK) SERIES WIRING DIAGRAM 2000 - 2004 MWL ISOLATOR SWITCH WATER SOLENOID TRANSFORMER SOLENOID BLUE BROWN SOLENOID BROWN MOTOR CAPACITOR TO WALL SWITCH CONTROL PUMP POWER OUT WHITE POWER IN BLACK CONTROL FAN MIN SPEED ACTIVE MAX SPEED MOTOR CAPACITOR TEK210 CIRCUIT BOARD MOTOR CAPACITOR MAINS IN NEUTRAL/ BLUE ACTIVE/ BROWN BLACK BLUE CONNECTOR YELLOW/GREEN WHITE WATER PUMP MINIMUM RPM MOTOR SETTING ORANGE YELLOW/GREEN BROWN BLUE EARTH STUD BROWN EARTH _________________________________________________________________________________________________________________________________________________________________________________________________________________________________________ MOTOR TECO TECO/FASCO FASCO FM774/0708 BOOK 2 SIZE 1000w 750w 600w FAN COLOUR BLACK GREY GREY/GREEN HUB RPM(MIN) 800 750 750 FAN MOTOR 31 CM, V, VS, E, EC (TEKELEK) SERIES FAULT FINDING ELECTRICAL FAULTS FAULT Ref CAUSE ACTION 1. WALL CONTROL NOT POWERED 1.1 No mains supply to roof unit. Check mains fuse, circuit breaker & unit isolation switch. 1.2 Wall control wiring fault. Check all electrical connections. 2.1 Fuse blown or circuit breaker tripped. Check for short or earth fault in system or arcing in 6-pin motor plug. Ref CAUSE ACTION No mains supply to roof unit. Check mains fuse, circuit breaker or unit isolation switch. No 240vac supply to wall Control. Check all electrical connections. 3.3 Fusible link open circuit or failed. If fan starts but will not continue to run - replace fusible link. 3.4 Wall control failure potentiometer open circuit. Check for a potential difference of 0v to 100v between active and control (depending on pot position). 3.5 Speed control board failure. If no power out voltage to motor replace board. 3.6 Motor not powered. Check continuity through 6-pin motor plug. 3.7 Capacitor failure - motor will buzz but Replace capacitor. not rotate. 3.8 Motor failure or shutdown due to internal (motor) thermal protection (thermal overload). Check run current, if running at more than 120% of value on motor name plate - replace motor 3.9 Motor seized. Replace motor. 3.10 Fan jammed in cowling. Centralise fan in cowling. 4.1 Min & max speed adjust pots cancelling each other. Adjust potentiometers to allow variation in motor speed. 4.2 Wall control potentiometer fault. Test potentiometer for continuity and variation & replace if required. 2. NO RESPONSE FROM WALL CONTROL FAN FAULTS FAULT 3. FAN NOT OPERATING 3.1 Select ‘FAN’ and fault find as follows 3.2 4. FAN SPEED WILL NOT VARY FM774/0708 BOOK 2 32 CM, V, VS, E, EC (TEKELEK) SERIES FAULT FINDING WATER FAULTS FAULT Ref CAUSE ACTION 5. WATER NOT ENTERING UNIT 5.1 Mains isolation tap closed. Open tap. 5.2 Solenoid mesh strainer blocked. Remove solenoid, clean mesh strainer and check water quality. 5.3 Solenoid coil open circuit or failed. Replace solenoid. 5.4 No 240v off board to transformer. Replace roof unit. 5.5 No 24v to MWL. Replace transformer. 5.6 No 24v to solenoid. Replace MWL. 5.7 Pressure lock between solenoid & non-return type isolator valve. Relieve pressure and fit standard isolation tap. 6.1 Correct operation for bleed-off is a slow trickle. Ensure bleed-off rate set as required. 6.2 Water level set too high. Adjust float valve setting. 6.3 Mains water pressure too low to operate hydraulic drain valve. Suggest bleed-off system be used. 6.4 Hydraulic Drain Valve seeps some water during operation. If leaking is excessive or valve body cracked replace. 6.5 Solenoid leaking due to failed diaphragm coil. Replace solenoid. 6.6 Float Valve or diaphragm failed. Replace diaphragm or float valve. 6.7 Counterweight Drain Valve a) Leaking from hoses or plastic clips Replace plastic clips (SP2041) or hoses kit (SP2042). Do not re-use clips. b) Hoses incorrectly connected (Refer to page 39) Replace hoses kit (SP2042). c) Physical or mechanical impairment of drain valve body Replace drain valve (SP2040). 6.8 Square section blue ‘O’ ring faulty. Replace ‘O’ ring. 7.1 Correct operation for bleed-off unit. Ensure bleed-off rate is set as required. 7.2 Faulty Hydraulic Drain Valve. Replace Drain Valve. 7.3 Counterweight Drain Valve a) Stuck in closed position Replace drain valve (SP2040). b) Blockage in components Replace drain valve (SP2040). 8.1 Pump failure. Replace pump. 8.2 Pump strainer basket clogged. Remove & clean strainer basket. 8.3 Water distribution manifold blocked. Remove & flush manifold of any blockages. 6. WATER CONTINUALLY RUNNING FROM UNIT 7. WATER NOT DRAINING FROM UNIT AT SHUT DOWN 8. WATER NOT CIRCULATING FM774/0708 BOOK 2 33 MOBILE FAULT FINDING (M 240) FAN FAULTS FAULT Ref CAUSE ACTION 1. FAN NOT OPERATING Select ‘FAN’ and fault find as follows 1.1 No mains supply to control board. Check mains fuse, circuit breaker or isolation switch. 1.2 Control board failure. If no power out voltage to motor replace board. 1.3 Motor not powered. Check continuity through 6-pin plug motor. 1.4 Capacitor failure - motor will buzz but Replace capacitor. not rotate. 1.5 Motor failure or shutdown due to internal (motor) thermal protection (thermal overload). Check run current, if running at more than 120% of value on motor name plate - replace motor 1.6 Motor seized. Replace motor. 1.7 Fan jammed in cowling. Centralise fan in cowling. 2.1 Control board failure. Confirm voltage between supply neutral and brown motor wire 130-240V if present replace motor. Ref CAUSE ACTION Mains isolator tap closed. Open tap. 3.2 Fluidmaster diaphragm jammed. Replace diaphragm. 4.1 Water level set too high. Adjust float valve setting. 4.2 Float Valve or diaphragm failed. Replace float valve or diaphragm. 5.1 Pump failure. Confirm 240v present at pump terminals - replace pump. 5.2 Pump strainer basket clogged. Remove and clean strainer basket. 5.3 Water distribution manifold blocked. Remove and clean manifold. 2. FAN SPEED WILL NOT VARY WATER FAULTS FAULT 3. WATER NOT ENTERING 3.1 UNIT 4. WATER CONTINUALLY RUNNING FROM UNIT 5. WATER NOT CIRCULATING Select ‘COOL’ and fault find as follows FM774/0708 BOOK 2 34 ADDITIONAL PRODUCT SPECIFICATIONS HERITAGE SUMP 2000-2001 WMS FLEXIBLE HOSE (SP2202) FITTED UNDER SUMP MS FLOAT ASSEMBLY (SP2212) or MWL FLOAT ASSEMBLY (SP2210) ELECTRIC DRAIN VALVE (SP2062) 2001-2002 SLOW CLOSE SOLENOID (SP2045) COUNTERWEIGHT DRAIN (SP2040) FM774/0708 BOOK 2 35 HERITAGE SUMP 2002-2008 SHROUDED MOTOR RING (SP6025) 530mm FAN BLADE ASSEMBLY 10 BLADE (SP6054) 9 BLADE (SP6056) RPE SOLENOID (SP2075) ELECTRICAL BOX SHAPE REDESIGNED MRU NOW LOCATED IN LID. (BOX TOP (SP3046) BOX BASE (SP3045) FM774/0708 BOOK 2 36 CASCADE SUMP 2000-2001 WATER INLET FLEXIBLE HOSE (SP2202) FITTED UNDER SUMP. MS FLOAT ASSEMBLY (SP2212) OR MWL FLOAT ASSEMBLY (SP2210) ELECTRIC DRAIN VALVE (SP2062) 2001-2002 SLOW CLOSE SOLENOID ASSEMBLY (SP2045) COUNTERWEIGHT DRAIN (SP2040) FM774/0708 BOOK 2 37 CASCADE SUMP 2002 - 2005 MS FLOAT ASSEMBLY FITTED BEHIND PUMP RPE SOLENOID (SP2075) ELECTRICAL BOX SHAPE REDESIGNED MRU NOW LOCATED IN LID. (BOX TOP SP3046, BOX BASE SP3045) FM774/0708 BOOK 2 38 ILLUSION SUMP 2004 - 2005 FEEDER PIPES ELECTRICAL BOX FM774/0708 BOOK 2 MS FLOAT ASSY RPE SOLENOID FITTED TO THROUGH SUMP EBOW AND FLEXIBLE HOSE. 39 EX SERIES SUMP 2002 - 2005 EX Series Sump FM774/0708 BOOK 2 40 WATER INLET TAP AND FILTER (SP2076) Introduced 2002 Purpose: To filter and isolate water supply to unit. Description: ½” brass ball valve with integral filter. Filter Notes:- When 1/4 turn valve is in line with pipe supply on. WMS FLEXIBLE HOSE (SP2202) Introduced 2000 - 2001 (Discontinued 2001/2002) Purpose: To assist the plumber in connecting to water supply pipe. Description: 1.2m, reinforced hose and water inlet assembly. Notes: This WS Hose System is suited to Electric Drain only. Version Three WS Hose to replace all previous versions. 24v SOLENOID ASSEMBLY (SP2057) Introduced 2001 Purpose: To replace Water Inlet Flexible Hose. Description: Introduced in conjunction with the Counterweight Drain, this water inlet has a Slow Close Solenoid designed to reduce water rush, hence replacing the hose. Notes: This WS system suits units installed with a Counterweight Drain Valve and 24V Solenoid. Product run 01/02 - Slow Close Solenoid. Product run 02/05 - RPE Solenoid. FM774/0708 BOOK 2 41 REPLACEMENT SOLENOID KIT 2002 - 2004 CONTENTS OF KIT: A B E D C Rubber Washer Directional Arrow for Water Flow 24V 45° Nozzle Plastic Clip Inline Filter Water Restrictor Care must be exercised to ensure the solenoid is fitted to follow the directional arrow for water flow on the solenoid body. Kit parts required when replacing solenoid. PRE 2001 Solenoid Assembly A ½” to ¾” Adaptor Fluidmaster Model 703 Solenoid D Brass Fitting for Hydraulic Drain Valve Solenoid POST 2000 Kit parts required when replacing solenoid. Solenoid Assembly c/w 45° Nozzle A C 45° Nozzle Barbed Solenoid (SP2031) D E Solenoid Kit parts required when replacing solenoid. A C B Solenoid FM774/0708 BOOK 2 E 42 D WATER INLET MAGNETIC WATER LEVEL SYSTEM (MWL) Introduced 2000 MWL CONTROL UNIT (SP2210) Purpose: Determine water level. Adjustable by holding float shaft and rotating ball float. Description: The float assembly is wired in series with the solenoid on the 24v circuit. A schematic wiring diagram of MWL sys tem can be found on page 20. FLOAT ASSEMBLY (SP2200) MAGNETIC SENSOR WATER LEVEL SYSTEM (MS) Introduced 2000-2002 MS CONTROL UNIT (SP2212) Purpose: Determine water level. Adjustable by holding float shaft and rotating ball float. Description: This float assembly is connected by a pre-assembled 3 pin cable directly onto the roof unit. For testing purposes it is easier to remove this cable from MRU, so testing each compo nent. It must be remembered when doing this there is no control over the water level. A schematic wiring diagram of MS system can be found on page 19. Notes: A faulty MS board can cause several faults which point to MRU failure. It is important to be aware of these to avoid unnecessary MRU replacement. MS FLOAT ASSEMBLY (SP2200) FM774/0708 BOOK 2 43 WATER OUTLET COUNTERWEIGHT DRAIN VALVE (SP2040) Introduced 2001 Counterweight drain valve shown in the normally open position (dry sump) FLOAT ASSEMBLY REAR BARB 3 mm & 5 mm STAINLESS STEEL SUPPORT FRONT BARB ADJUSTING SCREW Pre 03/04 Water level to be set 10mm below overflow SUPPORT ARM With no adjusting screw Blue 40mm Square Section ‘O’ ring Black 40mm Round Section ‘O’ ring Purpose: To allow the unit to hold water whilst in operation and to drain water when turned off or during a house keeping cycle. Description: Counterweight Drain Valve can be recognized by the large float assembly (box), which is positioned on top of the Drain Valve. This component is operated by the volume of water (weight), hence enabling it to be used in high and low water pressure areas. It does not re quire any electrical connections, therefore the active and neutral pins on the MRU are not used. Notes: Valve operates by spring return open In operation water should be 10mm below overflow point. IMPORTANT: The Counterweight Drain Valve is not interchangeable with an Electric Drain Valve FM774/0708 BOOK 2 44 IMPORTANT When reconnecting hoses on counterweight drain valve, ensure original hose configuration is used. Refer to pictures below for configuration options. CASCADE WATER INLET MS - BEHIND PUMP PUMP FEEDER PIPE HERITAGE WATER INLET MS ASSEMBLY FEEDER PIPE PUMP IMPORTANT: Do not re-use clips FM774/0708 BOOK 2 45 NOTES FM774/0708 BOOK 2 46