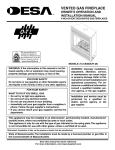
1
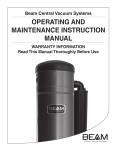
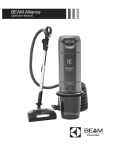
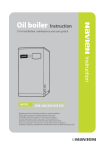
Mundo Series
Owner’s Manual
CONTENTS
Introduction
2
Maintenance
6
Safeguards
3
Trouble-shooting
7
Power Unit installation
4
Service warranty
8
Operation & cleaning
5
INTRODUCTION
Congratulations on your purchase of a new Beam®
Central Vacuum System. It is the built-in cleaning
appliance designed to help you clean your home
e ciently and e ectively. Unlike conventional
vacuums that can recirculate dust, a Beam®
system lifts dirt, dust mites, pollen, dander and
other allergens from oors, curtains, furniture
Components of Beam®
Central Vacuum System
Power Unit/Dust Collection Receptacle:
Mounted in the utility room, basement or garage, it
removes dust, dirt and allergens from living areas.
Tubing: Dust and dirt are carried through tubing
from “inlet valves” to the power unit/receptacle.
and other surfaces, and carries them away from
living areas to help improve indoor air quality.
It has been clinically proven to relieve allergy
Inlet valves: Installed in the wall, each inlet valve
connects the power brush and exible cleaning
symptoms.
hose to the tubing in your home.
To obtain the maximum bene t from your Beam®
System, please read this manual carefully prior
to use. Then enjoy cleaner, healthier living and
Cleaning tools:
Flexible hose and tools make
whole-house cleaning easy.
years of trouble-free performance.
For more information on Beam®
Central Vacuum Systems and
other innovative
Beam® products, visit
www.beamvac.com.
1. Central Vacuum
Pipe Installation
2. Wall Inlet
3. Power Unit Utility Valve
4. VacPan
5. Filtered Separator
6. External Exhaust
2
GENERAL INFORMATION
The built-in vacuum system is designed for dry pick up of household dirt and dust. Avoid vacuuming up
hard or sharp objects to prevent hose and plastic pipe clogs or damage.
IMPORTANT SAFEGUARDS
When using an electric appliance, basic precautions should always be followed, including the following:
WARNING: Read All Instructions Before Using This Vacuum Cleaner.
.
To reduce the risk of re, electric
shock or injury:
t Do not use outdoors or on wet surfaces.
t Do not block the motor hood ventilation openings
and duct on the top of the power unit. Lack of
ventilation air ow will cause the motor to overheat.
t Do not locate the power unit in a high temperature
area or where it is inaccessible, for example, an attic
or crawl space.
t Mount the built-in vacuum system power unit no less
than 30cm from the ceiling or any adjacent wall and
at least 70cm from the oor. If the unit is not
exhausted outside, make sure the adjacent wall is at
least 30cm from the exhaust port. DO NOT exhaust
into a concealed area.
t Do not leave vacuum cleaner when plugged in.
Remove hose from inlet valve and unplug from outlet
when not in use and before servicing.
t This appliance is not intended for
use by persons
(including children) with reduced physical, sensory, or
mental capabilities, or lack of experience and
knowledge, unless they have been given supervision
or instruction concerning use of the appliance by a
person responsible for their safety.
t Do not allow to be used as a toy. Close attention is
necessary when used by or near children.
t Use extra care when cleaning on stairs.
t Use only as described in this manual. Use only
manufacturer’s recommended attachments.
t Some hoses contain electrical wires. Do not use if
t
damaged, cut or punctured. Avoid picking up sharp
objects.
Do not use with damaged cord or plug. If vacuum
cleaner is not working as it should, has been
dropped, damaged, left outdoors or dropped into
water, return it to a service center.
t Connect to a properly grounded (earthed) outlet only
(see grounding/earthing instructions).
t Do not use extension cords or outlets with
inadequate current carrying capacity.
t Turn o all controls before unplugging.
t Do not unplug by pulling on cord. To unplug, grasp
the plug, not the cord.
t Do not handle plug or vacuum cleaner with wet hands.
t Do not put any object into openings. Do not use with
any opening blocked; keep free of dust, lint, hair and
anything that may reduce air ow.
t Keep hair, loose clothing,
ngers and all parts of
body away from openings and moving parts.
t Do not pick up anything that is burning or smoking,
such as cigarettes, matches, or hot ashes.
t Do not operate vacuum without dust bag or
lter in
place.
t Do not pick up
ammable or combustible liquids such
as gasoline, or use in areas where they may be
present.
SAVE THESE INSTRUCTIONS
Waste of Electrical and Electronic Equipment (WEEE) The symbol on the product or on its packaging indicates that
this product may not be treated as household waste. Instead it shall be handed over to the applicable collection point for the
recycling of electrical and electronic equipment. By ensuring this product is disposed of correctly, you will help prevent potential
negative consequences for the environment and human health, which could otherwise be caused by inappropriate waste
handling of this product. For more detailed information about recycling of this product, please contact your local waste disposal
service or the shop where you purchased the product.
3
GROUNDING (EARTHING)
INSTRUCTIONS
This appliance must be grounded (earthed) and
is equipped with a cord having an equipmentgrounding (earthing) conductor and grounding
(earthing) plug. The plug must be plugged into an
appropriate outlet that is properly installed and
grounded (earthed) in accordance with all local
codes and ordinances.
DANGER
Improper connection of an equipment-grounding
(earthing) conductor can result in risk of electricshock. Do not modify the plug provided with the
the outlet, have proper
appliance. If it will no
outlet installed by a quali ed technician. This
appliance is for use in a regular electrical circuit,
corresponding to the electrical standard in your
country.
PLANNING
If your home already has a system of plastic
tubing and inlet valves, you are ready to install
the power unit (refer to Power Unit Installation
section). If not, you may have the system installed
by a professional or you may choose to do it
yourself. If you install the system yourself, it is
important to carefully plan the location of each
inlet valve, the power unit, and the network of
plastic tubing. This booklet deals only with the
installation of the power unit; “How-To” booklets
generally are included with installation kits.
Power Unit Location
The power unit is connected to inlet valves via a
system of lightweight plastic tubing installed in the
walls of your home.
4
The power unit should be located as far from the
general living area as possible, yet accessible
so you can remove the dirt receptacle, reach
the lter, and inspect the unit. Typical locations
are utility room, basement or garage. It is
recommended that the exhaust be vented outside;
never into a wall, a ceiling, or a concealed space
in the house.
Power Unit Wiring
The power unit must be mounted within 1.8m of a
grounded (earthed) electrical outlet. Be sure your
house agrees with the voltage on the Rating Plate
and do not overload the circuit.
Power Unit Installation
The power unit hangs on a mounting bracket
which is screwed to the wall. The bottom screws
of the mounting bracket should be about 1.2m up
from the oor for convenient removal of the dust
receptacle (or at least 70cm from the oor). For
proper motor cooling, mount the power unit at
least 30cm from the ceiling and any adjacent wall.
motor be overloaded causing the circuit to open. If this
occurs and the power unit fails to operate, depress the
reset button which is located on the side of the power unit.
If the protector continues to trip; contact the authorized
service center nearest you.
Electrical Fault Protection for BM262,
BM265, and BM285
The central vacuum system employs features that monitor
the following operation levels: AC voltage, currenty draw
voltage, current draw and board temperature. If the
voltage is below or above standard operating voltage,
high current or locked rotar, the power unit will not
Mounting the Power Unit
When you have chosen a mounting location, you can
install the mounting bracket using the enclosed screws.
Drill the holes and tighten the screws to hang the power
unit. Please make sure to consider the wall type when
attaching the mounting bracket. Align the power unit
wall. Securely tape each joint using duct or electrical tape.
DO NOT USE GLUE. Attach the exhaust pipe to the motor
exhaust if exhausting outdoors. Connect the two low
voltage wires located on the backside of the power unit to
the wires installed with the main trunk line. It is recommended you secure the connection with wire nuts. Be
certain to comply with local electrical codes and regulations. Plug the unit into a regular electrical outlet. You are
now ready to check the installation of the unit:
t Be sure the lter is properly installed in the
power unit.
t Be sure the dirt receptacle is properly secured to the
power unit
t Plug the hose into each inlet valve to be sure
the electrical contacts operate properly.
t Check each inlet valve for air leaks.
t Check each pipe connection for air leaks.
OPERATION
Your central vacuum system starts and stops
automatically. To turn the system on, plug the
remove the hose from the valve.
blink or go out until the problem ceases. If the circuit
board reaches an elevated temperature, the power unit
will not operate
any one of these problems happening, make sure all lowvolt switches are in the off position, then press the on/off
button, unplug hose, or wait for temperature to lower. If
problem persists, contact your authorized dealer or
distirbutor.
BM265, and BM285
In the unlikely event that something causes the power
unit to turn on, or if the power unit is unintentionally left
on, your central vacuum has been developed with a motor
damage to the motor.
To restart, remove the hose from the wall inlet and
reinsert - the power unit should come back on.
Inlet valves
Plugging the hose into an inlet valve completes a
low-voltage (24-volt) electrical circuit which activates a
unit, unplug the hose from the inlet. When unplugging the
hose, hold the inlet cover open for a few seconds to allow
suction to decrease and protect the inner seal.
An obstruction in the inlet valve may cause the power
unit to continue to run after the hose has been removed
from the inlet. To shut down the power unit, check all the
inlet valves and remove obstructions.
The hose handle may be equipped with an
start and stop of the power unit while the
hose is plugged into an inlet valve. This allows
you to control the system without unplugging
the hose.
Overload-protection reset button for
BM165 and BM185
Certain central vacuum system models feature an overload
protection (circuit breaker) which can be reset should the
Hose use and care
The hose should be used and stored at temperatures
above 5°C. When not in use, hang the hose on the hanger
supplied. If the hose becomes clogged, turn on the power
unit using the manual switch and seal the extra air-space
by holding the hose firmly and blocking the end. This
the obstruction. If the hose remains
clogged, insert an electrician’s fish tape (wire) or dry
hose to remove the obstruction,
being careful not to puncture the hose. Disconnect hose
handle from wands before storing.
5
Cleaning Tools
The Beam® hose and attachment set comes with
a telescopic wand and a variety of cleaning tools
allowing you to clean virtually any surface from
wand or directly on the hose handle.
The combo tool is used for
cleaning and is used about
80% of the time. It allows
you to move from carpets to
stopping by switching the convenient toe switch
on top of the tool.
The round dusting brush
makes dusting quick and
easy. It can be used for
furniture, counters, wall
decorations, window areas, lamp shades or
wherever dusting is needed.
The upholstery nozzle
with slip-on brush is
convenient when cleaning
walls, furniture, curtains
or mattresses. It can be used with or without
the slip-on brush.
The crevice tool is ideal for
tight spaces and corners,
such as in the kitchen and
beneath/around cabinets. It is designed for narrow
spaces, crevices, along edges or other hard-toclean areas.
The snap-on, three-tool caddy
allows you to carry your mostused tools directly on the
wand.
The hose hanger is used to
easily coil and store the hose
in a closet.
Dirt Receptacle and Filter
the dirt
pass
through the unit and no cleaning can take place.
Emptying the Dirt Receptacle
BM185 and BM285
To empty the dirt receptacle grasp the latches on the side
of
releasing the receptacle. Remove and empty the contents.
upward. To avoid suction leakage make sure the receptacle is securely attached.
Filter maintenance
BM165, BM262 and BM265
-cleaning.
However, if cleaning is desired, just follow these steps:
NOTE: Disconnect power .cord from electrical outlet
1. Remove the dirt receptacle.
2. Wrap a large plastic bag around the lower portion
place.
through the plastic bag. Shake vigorously. Dirt will
fall into the bag.
4. Carefully remove the bag from the unit. Then empty
the dirt receptacle into the bag.
5. Replace the dirt receptacle on the power unit.
Cleaning Instruction Caution:
Dust Collection:
BM165, BM262, and BM265
Your Mundo Power Unit comes equipped with a convenient
paper bag, which can be simply discarded when full. A full
paper bag will deprive the power unit of proper suction and
minimizes the performance of the machine. Depending on
how much you use your central vacuum system it is recommended that you empty the paper bag 2-3 times per year.
Replacement bags can be purchased through your authorized central vacuum distributor/dealer.
NOTE: Never use the BM165 or BM265 without a paper bag
in place.
MAINTENANCE
Instructions provided in the booklet serve as a
suction can be maintained by keeping the dirt
hose free from clogs.
6
How to Change the Paper Bag
1. Unplug the power unit from all electrical sources.
2. Remove the canopy.
3. Remove the paper bag from the intake valve.
4. Place and press the new bag into place. Turn the bag’s
opening to lock it into place.
5. Place the canopy back on the power unit.
TROUBLE-SHOOTING
Power unit will not start
If you experience trouble with your central
vacuum system, follow the suggestions below
before calling for service.
t Check for blown fuse in main house electric supply box.
t If your power unit has a control light, the solid green light
will indicate when when the unit has proper voltage and
the low-voltage circuit is supplying power to the inlets.
Partial/total loss of suction power
t Be sure lid is on properly.
t Empty dirt receptacle.
t Clean cartridge lter.
t Be sure each inlet valve is properly closed.
t Check for hose obstruction.
t If the green light is flashing, or does not light up, and the
motor does not start, the power unit could have
experienced a fault due to excessively high or low
standard operating voltage, high current draw, or a
locked rotor. It is also possible that the unit was powered
on with a low-volt connection (ie. handle, vac pan, etc.)
in the ON position. To resolve this issue:
a. Ensure all handles and vac pans are in the OFF
position
b. Unplug the power unit cord from the wall outlet,
and then plug in again.
c. Press the on/off button on the power unit.
t Should the light be on, but the motor starts only with the
on/off button and not at the inlets, the problem is
broken low-voltage wiring to the wall inlets. Call your
authorized BEAM dealer/distributor.
Plug hose into any inlet valve. Then, as you check
each of the other inlet valves, raise the inlet cover
and hold your hand over the opening to check for
suction. If there is normal suction at each inlet,
then insert the hose into one of the other inlets. If
there is no suction through the hose at the second
inlet, the blockage is in the hose. To clear the
hose obstruction, insert a blunt instrument into the
hose (garden hose, wood dowel). If there is one
inlet valve without normal suction and you have
checked for hose blockage, then the blockage is
in the pipe system between the blocked inlet valve
and the power unit (see instructions below).
Power unit will not stop
t Check inside each inlet valve for obstruction of lowvoltage contacts. If no visual obstruction can be detected,
disconnect the cleaner from the power receptacle and
contact your nearest service station/dealer.
DO NOT OIL THE MOTOR AT ANY TIME. IT IS
PERMANENTLY LUBRICATED AND SEALED.
Clear blockage in pipes
Insert the hose into the inlet valve where there is no
suction; hold your hand over the hos end. Release hand
quickly. Repeat several times. If blackage does not clear,
contact your nearest dealer/distributor.
BM 165
BM 185
Power Unit Shuts Off by Itself
Remove and then re-insert the hose into inlet or toggle switch
off/on. See “Motor Protection Shutoff” portion of the user
manual.
BM 262
BM 265
BM 285
7
SERVICE INFORMATION
The instructions in this booklet serve as a guide to
routine maintenance. For additional information,
contact your nearest Authorized Beam dealer or
distributor.
Service warranty
Warranty is managed by your local
dealer/distributor.
1 07 52 3 2 000001
Rating plate
Weeks sequential
10,000 units max
Module Number
Assembly Line
Week
Year
Place holder
XXXXXXXXX
MODEL
XXX VOLTS
XXXXXXXXXXX
SERIAL NUMBER
XX Hz
XXXX WATTS
The model, type and serial numbers are indicated on
the rating plate located on the control panel or motor
hood. For prompt and complete service information,
always refer to these numbers when inquiring
about service.
Sold and serviced by:
www.beam.com
©2007 Electrolux Home Care Products Ltd.
# 460511
8