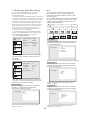
1
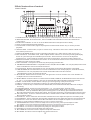
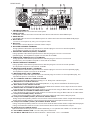
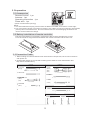
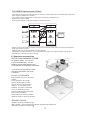
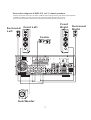
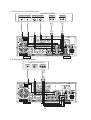
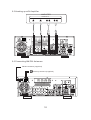
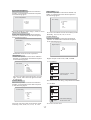
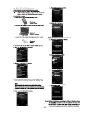
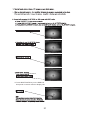
The Lead in Sing-Along Entertainment
DKR-510 640 WATTS 5.1 SURROUND-SOUND
UPCONVERSION DVD KARAOKE RECEIVER
WITH HDMI SWITCHING,BLUETOOTH
USER’S MANUAL
DKR-510
BLUETOOTH
INPUT
STOP
5.1 SURROUND-SOUND UPCONVERSION
DVD KARAOKE RECEIVER
-
MASTER VOLUME
with HDMI switching, Bluetooth, IPod Dock
PLAY/PAUSE
OPEN/CLOSE
MIC VOL / ADJUST
5.1CH
b
#
MULTIPLEX
MUSIC.MENU
CH-/PREV. CH+/NEXT
KEY CONTROL
TUN.-/REW TUN.+/F.F
PHONE
SD/MMC/MS
USB
0
1
2
3
4
5
6
7
8
MIC1
MIC2
MIC BASS
MIC TREBLE
9
FRONT AUX
L AUDIO R
VIDEO
IPod Dock
10+
PREV
NEXT
AM/FM
CH MODE
MIC MENU
MIC1 / MIC2 VOL
MIC
DELAY
MIC
REPEAT
MIC
ECHO
CD+G
CD+G
CAUTION:
To assurethisplayerwillworkat itsbest , please
and keepforfuture reference.
BLUETOOTH
BLUETOOTH
www . acesonic . com
CONTENT
1. Safety Cations
2. Brief Instruction of Controls
1
3. Preparations
5
5
5
5
6
3.1 Accessories
3.2 Battery installation of remote controller
3.3 Connection cable
3.4 Video conversion
2
4. Speaker connection
6
5. Connection
8
8
8
5.1
5.2
5.3
5.4
5.5
5.6
HDMI connection
External DVD/VCR/HDP/AUX connection
Hooking up a DVD recorder
Hooking up a TV monitor
Hooking up a AV amplifier
Connecting AM/FM antennas
9
9
10
10
6. Amplifier-function
11
7. Disc player function
12
7.1 Disc player basic operation
12
7.2 DVD Functions
7.3 Setting of the disc player
7.3.1 Language setting
7.3.2 Video
7.3.3 Audio
7.3.4 Rating
7.3.5. Misc
13
8. Operation of Mp3 function
18
9. JPEG
18
10. Function of USB and card reader
18
11. Function of iPOD docking
18
12. Radio application
19
13. KARAOKE function
19
14. BLUETOOTH function
20
15. Trouble shooting guide
23
16.Technial specification
24
15
15
15
16
17
17
1. Safety Cautions
CAUTION
RISK OF ELECTRIC SHOCK
DO NOT OPEN
CAUTIONㄩTO REDUCE THE RISK OF ELECTRIC SHOCK,
DO NOT REMOVE COVER (OR BACK). NO USER SERVICEABLE PARTS INSIDE .REFER SERVICING TO QUALIFIED
SERVICE PERSONNEL.
The lightning flash with arrowhead symbol,within an equilateral triangle,
is intended to alert the user to the presence of uninsulated "dangerous
voltage" within the product's enclosure that may be of sufficient
magnitude to constitute a risk of electric shock to persons.
The exclamation point within an equilateral triangle is intended to alert the
user to the presence of important operating and maintenance(servicing)
instructions in the literature accompanying the appliance.
WARNING: TO REDUCE THE RISK OF FIRE OR ELECTRIC SHOCK, DO NOT EXPOSE THIS
APPLIANCE TO RAIN OR MOISTURE.
CAUTION:
TO reduce the risk of electric shock , do not remove cover. Refer servicing to qualified service personnel.
Please read the manual carefully before operation. Keep it in a safe place for future reference.
USAGE NOTES OF DVD PLAYER
Please dont put the player at following position.
Sun shining or heat. radiation place, such as heater, stoves or other appliances that produce heat.
Top of other heat radiation device.
Bad ventilation or dusty, high moisture, unsteady or vibration place or expose the unit to rain or water.
Nearby the high power speaker or on the same stand with speaker, keep it away from shocking to protect
its normal work.
Don*t play discs that are scratched, cracked or warped to prevent the unit from damage.
USAGE NOTES OF POWER SUPPLY
The power supply required is AC 110V 60Hz and 220V 50Hz manul switch.
When not planning to use this unit for long periods of time, disconnect the AC power plug from the outlet.
To prolong its serve, the changeover period between switch-on and switch-off, should not be less than ten seconds.
DVD PLAYER
1. Compatible with DVD, SVCD, VCD, CD+G, Mp3 CD-R and CD-RW with high error correction ability.
2. Read Picture CD to realize digital Picture displaying.
3. 10 bit digital video converter, the resolutions is more than 500 lines.
4. 24bit/96KHz digital audio converter, high quality of sound effect, professional Hi-Fi level.
5. C omponent v ideo signal output, S-video output. Composite video output, optical and coaxial output for
audio/video selections.
6. Eight languages and 32 caption modes can be selected.
7. Various of screen selection of TV display and you may select preferred story section to view.
8. Professional digital karaoke effect.
9. Full function intelligent upgrade.
COMPONENT VIDEO OUTPUT
Component video output (Y, Pb/Cb, Pr/Cr) enables you to enjoy real DVD effect. It renders pure color
signals as they are, and without any video noise.
AC-3/DTS DECODING
This appliance decodes Dolby Digital/AC-3 signal source, and outputs the signal through analog 6 channels.
1
2.Bri e f instruction of control
FRONT PANEL
DKR-510
INPUT
BLUETOOTH
STOP
5.1 SURROUND-SOUND UPCONVERSION
DVD KARAOKE RECEIVER
-
MASTER VOLUME
with HDMI switching, Bluetooth, IPod Dock
PLAY/PAUSE
OPEN/CLOSE
MIC VOL / ADJUST
5.1CH
b
#
MULTIPLEX
MUSIC.MENU
KEY CONTROL
PHONE
SD/MMC/MS
USB
0
1
2
3
4
5
6
7
8
9
10+
PREV
NEXT
AM/FM
CH MODE
MIC MENU
MIC1 / MIC2 VOL
MIC
DELAY
MIC
REPEAT
MIC
ECHO
MIC1
MIC2
MIC BASS
VIDEO
IPod Dock
MIC TREBLE
FRONT AUX
L AUDIO R
CD+G
14 15
16
17 18 19 20 21 22 23 24 25 26 27 28
BLUETOOTH
29
30
31 32
1. POWER SWITCH: Turns the power on and off(Have to manually switch between AC110V and 220V).
2. INPUT SELECTOR: Press this button , then use #8 MIC VOL/ADJUST knob to select the desired
input source.
3. BLUETOOTH ON/OFF: To turn on or off the BLUETOOTH function(See P.20 for detail).
4. STOP: In DVD mode,Stop/ends playback.
5. PLAY/PAUSE: In DVD mode, begins the playback of media inside the disc tray or resume paused
playback.
6. OPEN/CLOSE: In DVD mode, to open or close the tray. This button also uses to switch to DVD mode
from other input sources.
7. DISPLAY SCREEN: Displays various operating information.(e.g. Main Volume, DSP, source, etc.)
8. MIC VOL/MULTI: In Karaoke mode, used to adjust the MIC volume. Or use it after pressing INPUT(#2)
button to cycles through the available input channels. This button also can be use to adjust the
parameters for various settings including surround-sound settings, microphone effect settings etc.
9. MASTER VOLUME: Controls the music volume. Trun clockwise to raise the music volume and counterclockwise to lower the music volume.
10. KEY CONTROL: Transposes the music key while playing Karaoke disc.
11. SD/MMC/MS CARD READER: Compatible formats: SD,Mini SD and MMC. You can play MP3,VCD format.
*All the CARD device need to be FAT32 file format.
12. IPod Docking: Support Ipod playback, stop, fast forward, back forward. Not IPhone compatible.
13. USB INTERFACE: Use this interface to connect USB devices such as Mp3 players, external hard drive,
or flash drives. You can play MP3,VCD or DVD Audio/Video files form this interface.
*All USB device need to be FAT32 file format.
14. MULTIPLEX: Switch between the left mono, the right mono or stereo sounds. Use to turn ON/OFF on
multiplex CD+G or VCD karaoke discs.
15. MUSIC MENU: Press this button to switch between BASS, TREBLE, SUB WOOFER and sound channel
(2.1 Ch, 5.1 Ch or Bypass)setting, then use the MICVOL/ADJUST knob(#8) to adjust the volume.
16. PREV: In DVD mode, use this button to skip to go to the beginning of the previous track.
17. NEXT: In DVD mode, use this button to skip to go to the beginning of the next track.
18. AM/FM : Press the key to switch between AM and FM, then use the MICVOL/ADJUST knob to adjust
the tuning.
19. CHANNEL MODE: To switch cycles through the 2.1, 5.1 or bypass audio channel mode.
20. NUMBER BUTTON: Use to input selections for track selection in DVD mode,or programing purpose.
21. MIC MENU: To set up 8 different Microphone settings(see P.19 for detail), press this button and use
MIC VOL/ADJUST knob to change the volume. This function works only when Microphone input is found .
22. MIC1/MIC2 VOL: Press it to switch between MIC1 and MIC2 then use MIC VOL/ADJUST knob to adjust
MIC1 or MIC2 volume.
23. MIC DELAY: Press this button and use MIC VOL/MULTI knob to adjust microphone vocal delay level.
24. MIC REPEAT: Press this button and use MIC VOL/MULTI knob to adjust microphone vocal repeat level.
25. MIC ECHO: Press this button and use MIC VOL/MULTI knob to adjust microphone vocal echo level.
26. DVD tray: Press OPEN/CLOSE(#6) button to open or close the DVD Tray.
27. HEADPHONE INPUT JACK: Connect headphones to this jack using a mini-jack headphone cable.
The speakers are turned off while the headphones plug is connected to the headphone jack.
28. MIC INPUT 1: Connect to a microphone by using 1/4" microphone cable .
29. MIC INPUT 2: Connect to a microphone by using 1/4" microphone cable .
30. AUX INPUT: Connect to the AUX audio and video inputs.
31. MIC TREBLE: This knob is used to adjust microphone treble level.
32. MIC BASS: This knob is used to adjust microphone bass level.
2
REAR PANEL
1
2
SUB WOOFER
6
3
4
5
SURROUND SOUND SPEAKERS
7
8
9
10
11
12
13 14 15 16
17 18 19 20
21
22
1. FM/AM ANTENNA IN
Use FM/AM antenna to connect to these jacks.
2. HDMI OUTPUT
Use HDMI cable to Connect to external video device like monitor with HDMI input.
3. HDMI INPUTS
Use HDMI cable to Connect to HDMI output from external A/V devices like HDMI DVD player.
4. MIC3 INPUT
Connect to a microphone by using 1/4" microphone cable .
5. MIC3 VOL
This knob is used to adjust the volume of MIC 3 input.
6. WOOFER SPEAKER TERMINAL
Using speaker cable with exposed wires or banana plugs to connect to woofer speaker,
the impedance equal or more than 6-16 OHM.
7. SURROUND SPEAKER (RIGHT) TERMINAL
Using speaker cable with exposed wires or banana plugs to connect to surround
speaker(right), the impedance equal or more than 8-16 OHM.
8. SURROUND SPEAKER (LEFT) TERMINAL
Using speaker cable with exposed wires or banana plugs to connect to surround
speaker(left), the impedance equal or more than 8-16 OHM.
9. CENTER SPEAKER TERMINAL
Using speaker cable with exposed wires or banana plugs to connect to center speaker.
The impedance equal or more than 8-16 OHM.
10. MAIN SPEAKER (RIGHT) TERMINAL
Using speaker cable with exposed wires or banana plugs to connect t to front speaker(right),
the impedance equal or more than 8-16 OHM.
11. MAIN SPEAKER (LEFT) TERMINAL
Using speaker cable with exposed wires or banana plugs to connect to front speaker(left), the
impedance equal or more than 8-16 OHM.
12. 5.1 CHANNEL DVD/AC-3 AUDIO OUTPUTS
Using composite audio cables for analog 5.1 ch. Dolby/AC-3 audio output.
13. RECORD OUT L/R RCA OUTPUT
Connect to a recording device, powered speakers, or any device with RCA L/R audio inputs.
14. RCA VIDEO and S-VIDEO OUTPUT
Connect to a TV with an RCA or S-Video input. Make sure that the correct input channel is select.
15. AUX2 AUDIO and VIDEO/S-VIDEO INPUT
AUX2 audio and video/s-video input channel. Connect here using an RCA cable or S-Video cable.
16. AUX1 AUDIO and VIDEO/S-VIDEO INPUT JACK
AUX1 audio and video/s-video input channel. Connect here using an RCA cable or S-Video cable.
17. Component VIDEO(YPbPr) OUTPUT
Using component(YPbPr) video cable to connect to external video device like projector.
18. Component VIDEO 2(YPbPr) & OPTICAL AUDIO INPUT
Using component(YPbPr) cable to connect from external device with YPbPr output like DVD player.
Using Optical audio cable to connect from external device with Optical audio output.
19. Component VIDEO 1(YPbPr) & COAXIAL AUDIO INPUT
Using component(YPbPr) cable to connect from external device with YPbPr output like DVD player.
Using Coaxial audio cable to connect from external device with Coaxial audio output.
20. OPTICAL and COAXIAL INPUT
Optical/Coaxial audio input can be used individually, or co-operate with YPbPr 1 or 2 video input.
21. AC POWER CONNECTOR - Connect the power cable here
22. AC INPUT SWITCH-M anual switch between ~ 220V/ 50Hz and ~110V/60Hz
3
Remote Control Function
1.OPEN/CLOSE TRAY - To switch to DVD mode, or open/close tray.
1
2.YPbPr/DIGITAL INPUT- Cycles though YPbPr 1(w/coaxal audio),
33
2
3
4
5
32
31
YPbPr 2(w/ optical audio), Coaxal audio only, and Optical audio only.
3.OTHER INPUTS - Cycles though 5 different inputs: DVD/USB/CARD,
iPod, AM/FM, Front AUX, AUX 1, and AUX 2.
4.MUSIC MENU- Press this button to switch between BASS volume, TREBLE
volume, SUB WOOFER and Sound Channel selection amount 2.1 Ch, 5.1 Ch and
6
30
7
Bypass setting, Press this button and use + & - buttons to adjust value.
29 5.MIC MENU- To set up 8 different Microphone dffects(see P.19 for detail),
press this button and use + & - buttons to adjust the volume. This function only
8
work when Microphone input is found.
9
6.KEY CONTROL- To t ransposes the music key while playing Karaoke disc.
7.MENU/PBC- In DVD mode, use this button to return main menu.
While playing music or CDG disc, this button will show the list of the
10
28
11
12
CH-/PRV. CH+/NEXT
songs and also shows the song playback setup.
27 8.ENTER- To confirm the commend.
9.DIRECTION KEY- Use this key for navigation function.
26
10.RETURN- Return to previous step.
TUN-/REW. TUN+/F.F.
13
14
11.NEXT/CHANNEL+(RADIO)- To go to the beginning of th next track
25
15
in DVD mode. or tunning up the radio frequence in Radio mode.
12.PREVIOUS/CHANNEL-(RADIO)- To go to the beginning of th previous
track in DVD mode. or tunning down the radio frequence in Radio mode.
16
13.FAST BACKWARD /TUNING-(RADIO)- To shift the playing location
backwards quickly.
14.FAST FORWARD/TUNING+(RADIO) - To shift the playing location
17
forwards quickly.
24 15.MAIN VOLUME ADJUST- To turn up or down the music volume
23 16.MUTE- To turn the sound ON or OFF.
18
22 17.NUMBER BUTTON- Used to input selections for track selection or
21 programming purpose.
19
20 18.ANGLE(DVD)/AUTO(RADIO)- To Select view for multi-angle in DVD
mode, or auto scan channels in Radio mode.
19.REPEAT(DVD)/AM/FM(RADIO)- To enable or disable the repeat function
INFRARED REMOTE
CONTROL RECEIVER
in DVD mode, or switch between AM and FM in Radio mode.
20.AUDIO(DVD)/ MEMORY (AUDIO)- To switch languages in DVD mode,
or Memorize the channel in Radio mode.
21.USB/CARD(DVD)- To switch amount Disc, Card, and USB port.
30
O
30
O
22.ZOOM(DVD)/STEREO/MONO(TUNER)- Zoom in/out function in DVD mode.
5m
23.SUBTITLE(DVD)- To switch subtitle in DVD mode (See also P.13)
INFRARED REMOTE
CONTROL UNIT
24.DIR/TIME(DVD)-To show DIR/TIME information in DVD mode.
25.MIC VOLUME ADJUST- To adjust microphone volume
26.STOP- To stop a playback
27.PLAY/PAUSE- To begin disc playback or pause.
29.SETUP- To enter/exit machine set up mode.
30.MULTIPLEX- To switch between Left mono, the right mono, or stereo sounds.
Used to turn vocal on./off on multiplied CD+G or VCD disc.
31.MULTI ADJUST -Use to change the settings in MIC MENU and MUSIC MENU.
32.BLUETOOTH- To enable/disable bluetooth function (See also P.20) .
33.HDMI INPUT- Cycles amount different HDMI inputs.
4
3. Preparation
3.1 Accessories
Remote Control 1 pc
Antenna 1 pc
Operating Instruction 1 pc
Power wire 1 pc
(Check contents after opening)
NOTE:
1. Put the lead attachment plug into the socket of INPUT VOLTAGE, and ensure it is insert tight.
2.The consumption voltage of local factory setting is 110 V/60Hz. If need to exchange to 220 V/50Hz,
please pull out a switch till 220 V. Don*t touch this switch to avoid damaging the machine if it
doesn’t need to switch the voltage.
3.2 Battery installation of remote controller
Place two AA batteries in the battery compartment. Be sure the polarities are correct.
There should be no large obstacles between the remote controller and the main unit.
AA
3.3 Connection Cable
1. When making connection between this unit and other components, be sure all connection
with power-off.
2. Audio/Video cables are connected according to the different color identification and
they should be fitted firmly.
AUDIO
VIDEO
YPbPr
COAXIAL
(Green)
(Blue)
(Red)
(Orange)
OPTICAL
(Y)
(P b /C b )
(Pr/Cr)
S-VIDEO
STEREO L/R
(White)
(Red)
VIDEO
(Yellow)
SW/CEN
(Black)
HDMI
HDMI AUDIO+VIDEO
SIGN
AUDIO
5
VIDEO
3.4 VIDEO Upconversion Chart
This feature will automatically transfer all formats of video signal into the formats that output the
video signal of DKR-510 to monitor.
Four types of video signal for the video input / output circuit of DKR-510
Digital video signal: HDMI
Analog video signal: Component video, S-video and video
HDMI
HDMI
YPbPr
YPbPr
S-VIDEO
S-VIDEO
VIDEO
MONITOR
VIDEO
VIDEO INPUT
VIDEO OUTPUT
Please connect the monitor output by the types of terminal as the same as video input terminal
when disuse this function.
HDMI signals can not be switched to analog signals.
The function of video switch may out of operate when input non-standard video signals from
game player or the other audio sourcing.
4. Speakers connection
Centre speaker
SET UP YOUR SPEAKER SYSTEM
Front speaker
Delay
six speakers system, you can have
a good sound field effect, the rear
speakers provide widely diffused sound,
Center speaker use for dialogue environment.
Subwoofer
Front speaker
Surround
speaker
If you want to feel low frequency effect
and vibrant atmosphere, sub woofer
is essential.
Surround
speaker
PLACE OF SPEAKERS
Main speakers can put on the usual
position.
Centre speaker in the central
position should upper or lower
than TV screen to avoid magnet
influence, or use magnet proof
speakers. The place of subwoofer
is not so critical because low
frequency without highly directional.
Rear surround speakers,
which behind your listening position,
should be nearly 2 meters up the floor.
Front speaker
Subwoofer
Centre speaker
Front speaker
surround speaker
Surround speaker
SPEAKER CHOICE
Speaker should be powerful enough.
Main speaker , Centre and surround speaker impedance all should be 8.
Subwoofer impedance should be 6 .
6
Connection diagram of DKR-510 to 5.1 chanal speakers
Please check and connect to the LEFT / RIGHT channel and positive (red) and negative (black)
of DKR-510. Make sure the connection of channel and the two poles are correct.
Don’t touch the speaker terminals to avoid electric shocks when the power is on.
Surround
Left
Front
Right
Front Left
Center
SUB WOOFER
SURROUND SOUND SPEAKERS
Sub Woofer
7
Surround
Right
5.Audio & Video Connection
5.1 HDMI connection
TV,MONITOR
INPUT
HDMI
SUB WOOFER
HD DVD
OUTPUT
HDMI
Satellite Tuner
PS3
OUTPUT
HDMI
OUTPUT
HDMI
SURROUND SOUND SPEAKERS
5.2 External DVD/VCR/HDP/AUX connection
TV,MONITOR
INPUT
HDMI
DVD/VCR/HDP/AUX OUTPUT
VIDEO
S-VIDEO
YPbPr
AUDIO
L
SUB WOOFER
SURROUND SOUND SPEAKERS
8
R
OPTICAL
COAXIAL
5.3 Connect to a DVD Recorder
DVD RECORDER
INPUT
OUTPUT
VIDEO
VIDEO
INPUT
OUTPUT
S-VIDEO S-VIDEO
INPUT
OUTPUT
AUDIO
AUDIO
L
SUB WOOFER
SURROUND SOUND SPEAKERS
5.4 Connect to a TV monitor
TV MONITOR INPUT
VIDEO
SUB WOOFER
S-VIDEO
YPbPr
SURROUND SOUND SPEAKERS
9
R
L
R
5.5 Hooking up a AV Amplifier
AMPLIFIER
AUDIO INPUT
SUBWOOFER
CENTRE
SW
CEN
SUB WOOFER
SURROUND
SL
SR
SURROUND SOUND SPEAKERS
5.6 Connecting AM/FM Antennas
FM wire antenna (supplied)
AM loop antenna (supplied)
SUB WOOFER
SURROUND SOUND SPEAKERS
10
FRONT
FL
FR
6. Amplifier Function
1.Be sure cut off power, connecting source outputs with corresponded input jacks.
2.Turn on the power, waiting 3-4 seconds till the speakers function connected.
3.Input select
Select audio source by press the key INPUT on the front panel, then adjust the
knob MIC VOL/ADJUST.
Total 14 Inputs:
HDMI1, HDMI2, HDMI3, COAXIAL, OPTICAL, Ipod, BLUETOOTH, RADIO,
YPBPR1, YPBPR2, FRONT AUX, AUX1, AUX2, DVD
INPUT
MIC VOL / ADJUST
MASTER VOLUME
INPUT
BLUETOOTH
CH.MODE
PLAY/PAUSE
OPEN/CLOSE
MIC VOL / ADJUST
b
#
MULTIPLEX
MUSIC.MENU
KEY CONTROL
You can also use the source buttons on the remote control.
HDMI: HDMI1, HDMI2, HDMI3
INPUT: Ipod, RADIO, FRONT AUX, AUX1, AUX2, DVD
YPbPr/DIGITAL: YPBPR1, YPBPR2, COAXIAL, OPTICAL
BLUETOOTH
-
#
+
MULTIPLEX
4.Adjust the knob MASTER VOLUME on the front panel or the key VOL+/VOL- on the remote
control to adjust the setting of main volume control to your listening level.
5.Press the key CH.MODE on the front panel or MUSIC MENU on the remote control to display
CH MODE then press -/+ to select channel mode.
Three channel mode: Bypass, 2.1 CH, 5.1 CH.
When you set on Bypass, only the volume can be adjusted.
When you set on 5.1 Channel, the light 5.1CH on.
6.Press the key MUSIC MENU on the front panel to display SL VOL, SR VOL, CTR VOL, SUB VOL,
then adjust the knob MIC VOL/ADJUST, to change surround speakers, centre speaker and subwoofer
volume.
Press the key MUSIC MENU on the remote control to display SL VOL, SR VOL, CTR VOL, SUB VOL,
then press the keys -/+ to change surround speakers, centre speaker and subwoofer volume.
7.Press the key MUSIC MENU on the front panel to display TREBLE, then adjust the knob
MIC VOL/ADJUST, to increase or decrease music treble effect.
Press the key MUSIC .MENU on the remote control to to display TREBLE, then press the
keys -/+ to increase or decrease music treble effect.
8.Press the key MUSIC MENU on the front panel to display BASS, then adjust the knob
MIC VOL/ADJUST, to increase or decrease music bass effect.
Press the key MUSIC MENU on the remote control to to display BASS, then press the
keys -/+ to increase or decrease music bass effect.
9.DSP MODE
Swith channel to 5.1 Channel.
Press the key MUSIC MENU on the front panel to display DSP, then adjust the knob
MIC VOL/ADJUST, to select the DSP mode.
Press the key MUSIC MENU on the remote control to to display DSP, then press the
keys -/+ to select the DSP mode.
DSP Mode: HOUSE, ROCK, CLASSIC, SIMULATE, DISCO, HALL, DSP OFF.
10.Press the MUTE key on the remote control to mute, press it again to reset, or adjust
the knob MASTER VOLUME to reset.
11.Press the three keys PLAY/PAUSE , 0 , 10+ one by one, to reset the system.
11
7. Disc Player Function
7.1 Disc Player Basic operation
Press PREV key:
Once all the connections and settings have been
done, the unit is ready for normal use. Prior to
playback, make sure the following operations
have been carried out.
,
1. Switch on TV and select AV mode. lf it s
S-Video connect select S-Video mode.
2. Select DVD input,
Step 1: DISC LOADING
shown on screen:
POWER
Prev
PREV
Press NEXT key:
Next
NEXT
Loading...
Press FORWARD key to get 2X, 4X ,8X, 16X,
normal play circular fast forward function of DVD
disc playing.
Press FORWARD key to get 2X, 4X, 8X, 16X,
normal play circular fast forward function of
other type of disc playing.
lf there is no disc, NO DISC shown on screen:
No disc
FORWARD
X2
Step 2: Press OPEN/CLOSE key, the tray
comes out automatically.
Press BACKWARD key to get 2X,4X, 8X, 16X,
normal play circular fast reverse function of DVD
disc playing.
Press BACKWARD key to get 2X, 4X, 8X, 16X,
normal play circular fast reverse function of other
disc playing.
Open
Step 3: Place disc on the tray, press OPEN/CLOSE
key to close the tray, the disc type will be shown on
the up-left corner of the screen as well as shown on
VFD screen.
X2
BACKWARD
Once it ,s read the disc, this machine will start
playing automatically.
lf it is a DVD, the machine will show the DVD
menu or title menu.
lf it is a CD ,this machine will start playing in the
sequence.
Press STOP key to enable Memory stop.
Press play to execute Memory stop.
Press STOP key twice to stop playback.
STOP
Play
STOP
PLAY
Press PAUSE key:
Pause
PAUSE
12
7.2. DVD Function
7.2.6 Time
7.2.1 Title
When playing a DVD, press TIME key.
The following will be displayed:
Press TITLE key to get title menu.
(This operation works only for the disc with
multi title encoded).
TITLE
TIME
7.2.2 Menu
Press MENU key to return to main menu for
DVD disc playing.
Press UP or DOWN key to select title
and chapter. Select direct time by
pressing number in subtitle chapter,
then press play key.
7.2.3 Direction key
During playing discs, the four direction keys
enable you to select at your option in title,
menu or setup.
ln the condition of SVCD, VCD disc in
PBC OFF:
Track
TIME
7.2.4 Number key
Press relevant number key for direct access
according to picture titles.
Time
7.2.5 Subtitle
This function may enable you to select multi
subtitle languages (as many as 32 kinds and
only for the disc with multi subtitle encoded).
Press SUBTITLE key to get desired display.
Disc Time
For example, to select language 2 English
from 8 options.
SUBTITLE
You may press the numbered buttons to enter
the desired playing time.
For example 55:50,stands for 55 minutes and
50 seconds.
02/08 English
Off
7.2.7 PBC play
In the PBC ON mode, song selection can only
be done from the main menu.
13
7.2.9 Angle
7.2..8 Repeat
In DVD mode, press REPEAT key. The following
will be displayed:
REPEAT
Repeat Chapter
During a sport match, concert or theatrical
program, press ANGLE key continually on
remote controller to select various angles
to view the same image
(This operation works only for the disc with
multi angle encoded).
Angle
2
2/2
Chapter repeat on
REPEAT
Repeat Title
7.2.10ZOOM
Title repeat on
REPEAT
The picture may be enlarged by up to 4 times
to facilitate you to enjoy a particular action
or still picture. Press this button 4 times,
the zoom scales will be Q1, Q2, Q3, Q Off
respectively.
Repeat Off
Repeat off
ln SVCD/VCD mode, press PBC key to
get PBC off, then press REPEAT key.
The following will be displayed:
REPEAT
7.2.11 AUDIO
When play VCD,SVCD disc, and SL speaker,
SR speaker, centre speaker be set NONE,
press AUDIO to select left vocal , right vocal,
mix vocal or stereo vocal.
Repeat Single
Repeat single
REPEAT
Repeat All
Repeat all
REPEAT
Repeat Off
Repeat off
14
7.3 Setting of the Disc Play
Note:
1).lrrespective of what screen format you
have selected, if your screen displays in
4:3 format, the picture will be shown in that
format anyway.
2).For DVDs, the screen format is convertible.
3).lf your screen displays in 4:3 format, when
a DVD with 16:9 display format is used, the
picture will be flattened.
Press the SETUP button on the remote
c o n t r o l l e r, t h e S E T U P M E N U ( m a i n )
will be displayed.
1. After accessing the SETUP Menu, press the
direction buttons for up and down movement
t o s e l e c t a n i t e m d e s i r e d , t h e n p r e s s t h e P L AY
button to confirm your entry and move to the
sub-menu. Use the left and right direction
b u t t o n s t o m o v e t h e p o i n t e r, a n d t h e u p a n d
down direction buttons to select the option
d e s i r e d . A l s o , p r e s s t h e P L AY b u t t o n t o
c o n f i r m y o u r s e l e c t i o n . N o w, s e t u p o f t h i s
current function is completed.
2. To end the setup, press the SETUP button
again. ln the SETUP MENU, you may choose
any of the following options as you like.
TV
screen
Film
format
16:9
4:3
Normal
Full view
Mailbox
Wide screen
4:3
16:9
7.3.1.Language setting
Language
OSD Language : English
Subtitle
Video
Audio
View Mode
: English
Follow the operation instructions stated in
※Video in combination with desired option
in the following figure.
Divx subtitle: western European
Audio
: English
DVD menu
: English
View Mode:
Rating
Misc
Fill
Original
Auto Fit
Pan Scan
The user may use this item to set the language
of screen display, subtitle, audio, DVD menu
to English.
7.3.2.Video
Language
Video
Audio
Select view mode : Fill, Original, Auto Fit, Pan Scan.
TV System
Aspect Ratio
: 4:3
View Mode
: Auto Fit
TV System
: PAL
Video out
: HD
Follow the operation instructions stated in
※Video in combination with desired option
in the following figure.
HD Jpeg Mode :On
TV System:
Rating
NTSC
PAL
Auto
Misc
Video setup includes: aspect ratio, view mode,
TV system, video out, Brightness, Sharpness,
HD Resolution and HD Jpeg Mode.
The user may select the TV system : PAL,
NTSC, or Auto.
Aspect Ratio
Video Out
Follow the operation instructions stated in
※Video in combination with desired
option in the following figure.
Aspect Ratio :
Follow the operation instructions stated in
※Video in combination with desired option
in the following figure.
4:3
16:9
Video out:
The user may use this item to select aspect
ratio 4:3 or 16:9.
15
S-Video
Component
P-Scan
HD
The user may select the Video out : S-Video,
Component, P-Scan, HD..
HD Resolution
Bass Management
Follow the operation instructions stated in
※Video in combination with desired option
in the following figure.
Follow the operation instructions stated in
※Audio in combination with desired option
in the following figure.
Language
Video
Audio
Rating
Misc
Aspect Ratio
: 4:3
View Mode
: Auto Fit
Bass Management
off
on
TV System
: PAL
Auto
Video out
: HD
480p/576p
720p
Brightness
8
1080i
Sharpness
1080p 8
1024x768
HD Resolution :Auto
1360x768
HD Jpeg Mode :On
Bass management is set OFF or ON.
The user may select the HD Rsolution: Auto ,
480p/576p, 720p, 1080i, 1080p, 1024x768, 1360x768.
Relevant information :what is HDMI
The High-Definition Multimedia Interface (HDMI)
is a compact audio/video connector interface for
transmitting uncompressed digital streams. It
represents a digital alternative to consumer
analog standards such as Radio Frequency (RF)
coaxial cable, composite video, S-Video, SCART,
component video, D-Terminal, and VGA.
HDMI connects digital audio/video sources such
as set-top boxes, Blu-ray Disc players, personal
computers, video game consoles, and AV
receivers to compatible digital audio devices,
video monitors, and digital televisions (DTV).
The world's first HDMI products started shipping
in the fall of 2003 and currently over 800 CE and
PC companies have adopted the HDMI
specification (HDMI Adopters). HDMI began to
appear on consumer HDTV camcorders and
expensive digital still cameras in 2006.
Shipments of HDMI are expected to exceed that
of Digital Visual Interface (DVI) in 2008, driven
primarily by the Consumer Electronics (CE)
Market.
Front Speakers
Follow the operation instructions stated in
※Audio in combination with desired option
in the following figure.
Front Speakers
Large
Small
Front speaker is set to large or small.
When set centre, rear and subwoofer to※off
and front to※Large ㄛthen front audio signal
can be mixed from centre, rear and sub woofer
speakers. Usually it is set to※Large.
Centre Speakers
Follow the operation instructions stated in
※Audio in combination with desired option
in the following figure.
7.3.3. Audio
Language
Video
Audio
Rating
Centre Speakers
Bass management: on
Front Speakers
: Large
Center Speaker : Large
Surround Speaker: Large
Subwoofer
: Present
Test tones
: off
Center Delay
: No Delay
Surr. Delay
: No Delay
Digital Output
: RAW
Large
Small
None
Misc
This submenu options include Bass management,
Front, Center, Surround, Subwoofer, Test tones,
Delay, or Digital output.
This setting is suitable for films. lf you only need
two channels to enjoy music, it*s recommended
to select the 2 nd option. Where 5.1 theatre sound
is available, the 4 rd option is recommended.
16
Centrespeaker is set to large , small, or none.
Surround Speakers
Surr. Delay
Follow the operation instructions stated in
※Audio in combination with desired option
in the following figure.
Follow the operation instructions stated in※
Audio in combination with desired option in
the following figure.
Surround Speakers
Surr. Delay
Large
Small
None
No Delay
1m,
2m
3m
4m
5.1m
Surround speaker is set to large , small, or none.
Subwoofer Speakers
The user can select the surround delay mode:
No delay, 1m, 2m, 3m, 4m, or 5.1m.
Follow the operation instructions stated in
※Audio in combination with desired option
in the following figure.
Digital Output
Follow the operation instructions stated in
※Audio in combination with desired option
in the following figure.
Subwoofer
None
Present
Digital Output
Off
PCM
RAW
Subwoofer is set to none or present.
Test Tones
Follow the operation instructions stated in
※Audio in combination with desired option
in the following figure.
Digital output is set to off, PCM, or RAW.
7.3.4. Rating
Test Tones
Language
Off
Left
Right
Center
Left.Surr
Right.Surr
Subwoofer
Video
Audio
Rating
The user can select the test tones: off, left,
right, center, left surround,right surround,
or subwoofer.
Parental Control : 8 Adult
Set Password
Misc
The user can set the rating. The password is 0000.
Center Delay
Follow the operation instructions stated in
※Audio in combination with desired option
in the following figure.
7.3.5. Misc
Language
Center Delay
Video
No Delay
0.3m
0.6m
1m
1.4m
1.7m
Audio
Rating
Use Default Settings
Misc
The user can select the center delay mode:
no delay, 0.3m, 0.6m, 1m, 1.4m, or 1.7m.
Screen Saver: ON
The user can set misc.
17
8.Operation of Mp3 function
Mp3 is an audio compression mode using Level 3 of the international standard MPEG, whereby
sound signal is compressed in a rate of 12:1 A Mp3 disc can record music for play of over 600
minutes or record over 170 songs, rivalrous CDs in sound quality.
To play a Mp3 disc
Select the track using numbered buttons
1.Follow the basic operating instructions to insert a Mp3 disc, this machine will start to search the
information on the disc and show it in the display.
2.Press the number buttons to select the track number desired.
3.Press stop key then direction key to select other menu.
Repeat play
Using this function, the user will be able to enjoy a particular song or all the songs on the disc over
and over again.
1.Choose a particular song to be repeated.
2.Press the REPEAT button to show※repeat one on the TV screen. The Screen will display as illustrated
3.Exit repeat play, the screen will display as illustrated.
4.Cancel the repeat function, folder will be on screen.
Others functions:
when a Mp3 disc is played, the features of mute, volume control, pause and forwards and backward
search will also be available. The operations are the same with those of CDs.
9.JPEG
JPEG adopting the most efficient compression is widely used as picture storage type flattened
and stored format.
Even if pictures are compressed 15-20 times. They still have good effect. Supported by most
picture precessing software, fit for picture storage, it has small data and easy use. This machine
can read JPEG format picture CD discs .
Press direct number key to select picture display.
1.Put in disc correctly ,the machine begins to search disc information.
2.Press number key to select picture.
3.lt s efficient only in present picture when number key pressed .
Select to play by menu
1. Insert disc, machine searches disc information and main menu displays on screen. Press
number key to select picture. Press play key to enter play mode
2.Press direction key to select picture then press. Play key.
3.ln condition of stop. press direction key to select other pictures.
, condition of stop. Select the first line file item on the right. Then press play key, to return to
4.ln
upper menu.
10. Function of USB and card reader
3 In 1 Card Reader Function
This unit has a 3 in1 card jack, when select DVD input and stop disc play.Press the key CARD/USB
to select CARD.You can insert (MMC,SD ,MS) three kinds of card with card port interface to play the
mp3 music or MPEG4 movie and J-PEG files.All the functions are the same as when playing a disc.
USB interface
This unit has a USB jack, when select DVD input and stop disc play.Press the key CARD/USB to
select USB. You can insert a USB DISC or a Mp3 Player with USB Interface to play the Mp3
music or and JPEG files. All the function is the same to play a disc.
NOTE:
When using USB function. Please do not insert in the wrong direction, or it will be corrupted.
When using CARD/USB function. It is preferable if it is on 5.1Channel MODE.
11. Function of iPOD docking
This unit has an iPOD docking station,You can insert iPOD to play the music or movie and other files.
Select iPOD input function.
Press the key PLAY/PAUSE on the front panel or on the remote controller, to play and pause.
Press the key PREV on the front panel or on the remote controller, to play form previous music.
Press the key NEXT on the front panel or on the remote controller, to play form next music.
18
12.RADIO application
1. Before using radio function, you must attach the supplied antenna. Adjust the antenna to obtain
optimum reception.
Select "RADIO i np ut f un ct io n.
2. Press AM/FM button on the front panel or on the remote control, to select AM band or FM band.
3. Press the keys CH+/CH- on the remote control, you can find out the radio bands you've
memorized before.
4. Press the keys TUNING+/TUING- on the remote control, you can adjust the radio frequency
by hand.
5. Press the key AUTO on the remote control, the machine can scan radio channel from
low-frequency to high-frequency by itself, and memorize the channels one by one.
6. Press the key MEMORY on the remote control, it can memorize the current radio frequency
in the band, the machine can memorize at most 40 FM radio bands and 20 AM radio bands.
7. Choice FM band.
Press the key STEREO/MONO on the remote control, to select stereo or mono.
13. KARAOKE function
1. The machine can auto detect whether MIC1 or MIC2 being inserted. Please turn off microphone
volume and adjust the volume gradually after inserting microphone.
There is MIC3 jack on the rear panel. You can adjust the knob MIC3 VOL on the rear panel to
change the MIC3 volume.
2. Adjust the knob MIC VOL/ADJUST on the front panel, or press the keys MIC VOL+/MIC VOLon the remote control to change microphone 1&2 volume.
Press the key MIC1/MIC2 VOL on the front panel, then adjust the knob MIC VOL/ADJUST
to change microphone 1 or microphone 2 volume dividually.
Press the key MIC MENU on the remote control to display MIC1 VOL or MIC2 VOL, then
press the keys -/+, to change microphone 1 or microphone 2 volume dividually.
3. Press the key MIC DELAY/REPEAT/ECHO on the front panel to display ECHO DELAY
/ECHO REPEAT/ECHO VOLUME, then adjust the knob MIC VOL/ADJUST, to change
microphone ECHO DELAY/ECHO REPEAT/ECHO VOLUME effect.
Or press the key MIC MENU on the remote control, to select ECHO DELAY
/ECHO REPEAT/ECHO VOLUME, then press the keys -/+,to change microphone
ECHO DELAY/ECHO REPEAT/ECHO VOLUME effect.
4. Adjust the knobs MIC TREBLE or MIC BASS on the front panel, to change microphone tone.
5. KEY Control BUTTON
. Upward key transpose # (display +1 to +6)
By pressing the button # , a higher key than the standard key can be set in tone steps.
. Downward key transpose b (-1 to -6)
By pressing the button b , a lower key than the standard key can be set in tone steps.
. The key
is reset automatically to the standard key every time that a music has been played.
6. Multiplex function
When this button is pressed during playing a digital Multiplex audio disc, the Left channel
audio is muted, display MONO R.
Second press the Right channel audio is muted, display MONO L.
Third press reset to the stereo state, display STEREO.
7. MIC MENU
Press the key MIC MENU on the front panel the adjust the knob MIC VOL/ADJUST, or press
the key MIC MENU on the remote control, you can select microphone menu to adjust
DIR VOL: DIRECT SOUND(ECHO OFF) VOLUME
REV TIME: REVERB TIMING
REV LPF: REVERB LOW FREQUENCY FILTER
REV VOL: REVERB VOLUME
MIX DLY: ECHO DELAY
MIX RPT: ECHO REPEAT
MIX LPF: ECHO LOW FREQUENCY FILTER
MIX VOL: ECHO VOLUME
Note:
,
Please don t touch the top of microphone when singing to avoid howling effect.
Please adjust the microphone volume gradually to avoid howling effect.
19
14. BLUETOOTH function
ACE DKR-510
ACE DKR-510.
ACE DKR-510
Amplifier
ACE DKR-510
c. Press BLUETOOTH key on the DKR-510
front panel or remote control to display ON.
Amplifier.
20
ACE DKR-510
H. Press BLUETOOTH key on the DKR-510
front panel or remote control to display ON.
21
Note: A system can be connected with only one BLUETOOTH device each time.
Before searching for a new device, please cancel the existing connection.
23
15. Trouble shooting guide
Incorrect operations are often mistaken for trouble and malfunction. If you suspect that
something is wrong with the unit, check the list below. Sometimes, the troubles lie within
another component. Remember to try inspecting other component and electrical appliances
in use. If the trouble can not be rectified even after exercising the steps list below, call
Acesonic servic center +1(626)820-0670 to inquire about repairs.
Problem
Possible Cause
Suggested Solution
The display dose not
light and no sound output
Power cord not plugged
in securely
Check power cord &
plug connection
Display lights but sound
is not produced
Speaker connections not secure
Volume control at minimum level
Input incorrect
Connect securely
Turn volume up
Select the input to played mode
No sound from Center channel
Speaker connections not secure
Center channel volume set
to minimum
Connect securely
Adjust Center channel
volume control
Sound from one channel only
Speaker connections not secure
Input/Output connections
Left/Right balance off
Connect securely
Connect securely
Adjust balance control
Sound channel no sound
Speaker connections not secure
Surround channel volume set
to minimum
Connect securely
Adjust Surround channel
volume control
Instrument sound reversed
in stereo playback
Incorrect speaker polarity
Ensure+ and - connections
are connections
Ensure+ and - connections
are connections
Card does not play
Loaded incorrect
Make the card is loaded
correctly
Disc does not play
Loaded incorrect
Disc is not clean
Make the card is loaded correctly
Change the disc
No picture
TV/Monitor connections not secure
Connect securely
Bluetooth un-connect
Bluetooth device is too far
from the system
Distance up to 10m
Bluetooth function is turn off
Press the key BLUETOOTH
No A2DP profile is built in the device
with A2DP Profile
Other Bluetooth device is connected
Connect the playing device
Pairing the incorrect password
Pairing the correct password
Media player is off
Media player is on
Media player playing without
sound card
Media player playing with
sound card
Batteries dead
Batteries inserted incorrectly
Remote too far from receiver
Obstacle between remote and receiver
Incorrect button being used
Replace batteries
Check are correct
Use closer
Remove obstacle
Use correct button
Bluetooth connect
but silent
Receiver dose not operate
correctly with Remote
Incorrect input polarity
Caution:
Abnormal activity of this unit can be caused by static electricity, or other external interference.
To restore normal operation, unplug the AC power cord and plug it in again.
24
16.Technical Specification
Model
DKR-510
Play mode
NTSC/PAL/AUTO
Disc mode
DVD ` VCD ` CD ` SVCD `Mp3 ` DVD-R ` CD-R ` CD-RW ` MP4
Sub woofer output power -150W
Power
Front speakers output power -150WX2
Centre speaker output power -70W
Surround speakers output power -60WX2
Frequency response
CD: 4Hz-20KHz(EIAT)
DVD: 4Hz-22KHz(48K)
4Hz-44KHz(96K)
Audio S/N ratio
≡80dB
Dynamic range
≡90dB
Distortion
<0.1% (Max)
D/A converter
192KHz/24bit
Video input
Video(Composite) input X2
YPbPr input X2
HDMI input X3
Output characteristic
Video output
Video(Composite) output X1
YPbPr output X1
HDMI output X1
Audio output
2CH output X2
AC-3 output
5.1 channel output X1
Power Voltage
AC 110V / 60Hz / AC 220V/50Hz
Power consumption
≒345W
Amplifier/DVD Size
435x165x420mm
Amplifier/DVD Weight
12kg
Specifications are subject to change without notice.
Acesonic Corp. City of Industry CA, U.S.A.
Sale:+1-626-820-0608
Technicians: +1-626-820-0605
www.acesonic.com
25