1
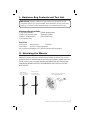
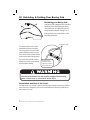
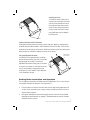
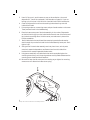
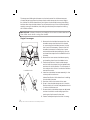
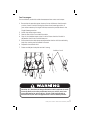
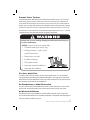
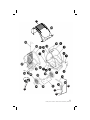
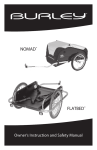
Cub
Owner’s Instruction & Safety Manual
Contents
Section
Introduction
I.
Hardware Bag Contents & Tool List
II.
Attaching the Wheels
III.
Installing the Tongue & Safety Flag
IV. Unfolding & Folding your Burley Cub
V.
Using the Seat Harness
VI. Padded Seat & Shoulder Harness
VII. Hitching the Burley Cub to Your Bicycle
VIII. Trailer Maintenance and Care
IX. Safety Guidelines
X.
Safety Checklists
XI. Parts List & Drawing
Warranty
Page
2
3
3
4
6
9
12
13
14
16
21
22
24
Congratulations!
You’ve just purchased a Burley® trailer, the leading choice of discriminating bicycle
trailer owners worldwide. Every effort has been made to ensure your purchase is of
top quality and proven design, ready to provide you with many years and thousands
of miles of happy, safe trailering.
IMPORTANT: Because some of the features and guidelines for
using the Burley Cub merit close attention, it is very important
that you familiarize yourself with the trailer by reading this
manual all the way through before use. If you have any questions, we encourage you to contact your Burley dealer.
Introduction
This manual is written sequentially to assist initial assembly. Your Burley Cub is
shipped 95% factory-assembled. You will need to mount the reflectors, install the
tongue and brake, attach the wheels, side panels, roll bar and safety flag, and snap
the cover into place. Once you’ve read the safety guidelines, you’re ready to go. Initial
assembly should take 10-15 minutes. Subsequent setting up and folding can easily
be done in a couple of minutes, no tools required.
Before trailering, be sure you have a thorough understanding of the safety harness
and of trailer hitch operation. Practice folding and unfolding your trailer; it can easily
be done in less than a minute, no tools required. Check to see that the trailer wheels
and hitch are securely attached. We again request that you read this manual from
start to finish before use, referring to it as necessary in the future.
NOTE: Any reference to left or right is made in the direction of
travel, as if you were sitting in the child seat looking forward.
When Loaning or Selling Your Trailer
If you loan or sell your Burley Cub, supply the new user with this manual. They must
familiarize themselves with all sections—especially sections “IX. Safety Guidelines”
and “X. Safety Checklists” prior to use. It is essential that they understand the differences between riding a bicycle with a trailer and without one. It is also essential that
they understand correct wheel attachment, setup, folding, and use of the harness,
safety flag, cover, and hitch. Always ensure that both adult and child are wearing
helmets. Never loan your trailer if it is in need of maintenance or repair.
2
Burley Cub Owner’s Instruction and Safety Manual
I. Hardware Bag Contents and Tool List
IMPORTANT: Please verify that you have received all of the
contents listed. Do not proceed with assembly if any parts are
missing; contact Burley immediately for replacement parts.
Hardware Bag Contents
(1) Cub Brake Assembly
(3) #10 x 5/8 Philips pan bolts
(3) #10 x 1” fender washers
(1) 6 x 18 plastic bag
(1) Brake Hardware Bag
(3) #10 split washers
(1) 4 x 6 plastic bag
Tool List
7/16” wrench
Torque wrench
Extension
7/16” socket
Two no. 2 Phillips screwdrivers
1/4” pin punch and hammer, or 1/4” drill bit and hand drill (see page 8)
II. Attaching the Wheels
First, verify that the tires are inflated to 30-35 P.S.I. Next, tip the trailer frame on its
back end. If you are working on a rough or dirty surface, lay down a cloth or other
protective barrier to avoid damage to your trailer. With the quick-release lever in the
“OPEN” position, insert the wheel axle assembly COMPLETELY INTO THE HOLLOW
TRAILER AXLE, MAKING SURE THAT THE HORIZONTAL SHAFT GOES ALL THE WAY
INTO THE AXLE.
Quick-release
lever in unlocked
“open” position
Quick-release
lever in locked
“closed” position
Wheel axle assembly inserts
into hollow trailer axle
3
Burley Cub Owner’s Instruction and Safety Manual
Once the wheels are fully seated in the hollow axle,
the quick-relase lever should be positioned so that it is
aimed to the rear of the trailer in the “CLOSED” position
(the lever is marked for OPEN or CLOSED positions).
The wheel quick-release/axle assembly comes preadjusted from Burley.
NOTE: All wheels, including optional spoked alloy wheels, must
be mounted with the recessed side of the hub facing outward.
Make sure wheels are held securely, with wheel shaft fully
inserted into the hollow axle. You should not be able to rock or
shift wheels. Improperly installed wheels can fall off, causing an
accident or serious injury.
With wheels mounted, both reflectors must face outward.
Check to see that both reflectors have been installed correctly.
Incorrectly installed reflectors can reduce visibility at night and
cause an accident or serious injury.
III. Installing the Tongue & Safety Flag
Installing the Tongue
The tongue attaches to the left side of the trailer. When installed, the tongue bends
to the right, which places the hitch near the center line of the trailer. Slide the
tongue through the two plastic tongue receptacles until the end of the
tongue is flush with the back edge of the rear tongue receptacle.
Secure the tongue as follows:
1. Slide the retaining pin
in the rearward receptacle through
the hole provided in the tongue.
4
Burley Cub Owner’s Instruction and Safety Manual
2. Secure it and lock the pin by
rotating it toward the rear of the
trailer as shown in the drawing on
the right.
3. Slip the safety pin though the
forward hole in the tongue and
lock in place. Refer to the illustra
tion showing the locked position
of the safety pin. Firmly pull on the
tongue to ensure that it is secure.
Retaining Pin
Safety Pin
Forward hole in tongue
2
3
1
OPEN
LOCKED
Important: The tongue retaining pin is captured between
the tongue receptacle and the lip of the poly shell. It should
never be completely removed from the tongue receptacle.
Tongue retaining pin must be locked into place before using
trailer. If pin is not properly locked, trailer could separate from
bicycle, resulting in an accident or serious injury. Safety pin is a
backup for the retaining pin. Under no circumstances should the
trailer be towed with only the safety pin engaged.
Installing the Safety Flag
Insert the safety flag pole through the loop of ½” webbing on the outside of the
trailer and into the flag pocket at the bottom left hand corner of the trailer as shown
below. DO NOT USE YOUR TRAILER WITHOUT THE SAFETY FLAG IN PLACE.
5
Burley Cub Owner’s Instruction and Safety Manual
IV. Unfolding & Folding Your Burley Cub
Unfolding your Burley Cub
Your Burley Cub is designed with a durable
polyethelyne bucket, lightweight aluminum frame with roll cage, and bright-colored polyester software. Setting it up or
folding it down is accomplished in a few
easy steps as follows:
Frame Lock
To unfold, rotate the front tube
upward and the rear tube back
until they meet on the two black
plastic saddles as shown at right.
Then rotate the two frame locks to
snap onto the rear tube as shown.
The frame locks should connect
adjacent to, and to the outside of
the two plastic saddles.
Frame locks
snapped into
closed position
onto rear tube.
Check that the frame locks are properly engaged before using
trailer. Failure to do so can result in serious injury.
Installation and Use of the Cover
Your Big Screen 2-in-1 Cover is held in place by eight snaps at the rear, top, and two
sets in the front. Always use your cover to keep debris out (and toys inside) of the
trailer when it’s in use.
6
Burley Cub Owner’s Instruction and Safety Manual
Installing the Cover
To install the cover, unfold it and
snap the top two snaps first. Next,
pull the cover toward the back of
the trailer and snap the two rear
snaps. Finally, using the B-tabs in
front, pull the cover taut by snapping the B-tabs over the edge of
the frame rails.
B-tabs
Folding and Stowing the Front Window
Folding and stowing the front window is quick and easy. Begin by unzipping the
window. Next, fold the window in half toward the back of the trailer. Then roll the
window up toward the top of the trailer. Hold the window in place by inserting the
elastic straps into the Velcro holders on the top of the trailer.
Using the Adjustable Sunscreen
Your Burley Cub is equipped with an adjustable sunscreen to keep your kids in the shade
during bright, sunny days. To move the
Adjustable Sunscreen, simply pull on the tabs
to move it up or down on the trailer as necessary. If more visibility is required, pull the
sunscreen up in the middle. This is depicted
in the illustration at right.
Adjustable
Sunscreen
Parking Brake Installation and Operation
The roll cage should be fully unfolded; remove the Big Screen 2-in-1 Cover; remove
the tongue, and leave the wheels in running position.
1.
2.
Put the trailer on its nose on the floor with the roll cage leaning against a wall
or table. If you are working on a rough or dirty surface, lay trailer on a cloth or
other protective barrier.
Facing the underside of the bucket, identify the rear-most row of six molded
depressions (see illustration on page 8). These depressions have 1/4” dimples
molded into their centers.
7
Burley Cub Owner’s Instruction and Safety Manual
3.
Use a 1/4” pin punch and a hammer to pop out three dimples - the ones in
depressions 1, 3, and 6 (as numbered in the illustration on page 9). If you are
lacking a pin punch, use a 1/4” drill bit in a hand drill to drill out those dimples.
4. Clean the slugs and/or burrs from the resulting holes where they enter the
inside of the bucket.
5. Put a spring washer on a mounting screw, and put a fender washer on the screw.
These parts are found in the hardware bag.
6. Place the brass center post of the brake assembly in the number 3 depression
so that the black vinyl grip on the brake handle clears the rear of the bucket and
let the brake arms hang down. Hold the center post and screw in place with a
Phillips screwdriver.
7. Reach inside the bucket and thread the screw/spring washer/fender washer
stack through the punched hole and into the brake assembly center post. Don’t
tighten it yet.
8. Swing each of the two brake assembly arms into place in turn, so their posts
enter their respective depressions, and fasten them from the inside of the
bucket with the scew/springwasher/fender stacks.
9. Using two screwdrivers, one inside the bucket and one outside, tighten the
mounting screws firmly, until the spring washers are fully flattened between the
mounting screw heads and fender washers.
10. Be careful to keep the left-most post from rotating as you tighten its mounting
screw so as not to distort the brake return spring.
Brake
Released
1
2
Brake
Engaged
3
4
8
Burley Cub Owner’s Instruction and Safety Manual
5
6
Your assembly of the Cub parking brake is complete. Now reattach the tongue and
you are ready to go!
Using the Parking Brake
Once installed, the parking brake is engaged by pushing the handle to the right,
which pushes the brake arms outward so that the tip of each brake engages the
inside of each tire. This can be done with your hand or foot. When disengaging the
brake, it may spring to the left, so exercise caution.
Folding Your Burley Cub
Folding your Burley Cub is basically the reverse of unfolding it. Familiarize yourself
with unfolding the trailer as outlined in section IV, on page 6. To fold your trailer:
1. Remove the safety flag.
2. Remove the tongue by pulling out the safety pin and lock pin and reversing
the process described previously.
3. Remove the wheels and store them in a safe place with the handle.
4. Remove the cover and store in a safe place.
5. Unclip the safety clips at the top rear of the frame.
6. Push the rear part of the trailer forward and down while simultaneously
pushing the top of the trailer down.
We recommend reinserting the safety pins in their receptacles
for storage or transport to avoid snagging.
You can partially fold your Burley Cub as needed. Your options are to fold only the
top, remove only the tongue and hitch, remove the quick release wheels, or any
combination of the above. Do not operate your trailer in a partially folded condition.
V.
Using the Seat Harness
Only passengers who are able to wear a helmet and sit
upright, unassisted should ride in a trailer. Adequate neck
strength is required to hold head upright while trailering. A
physician should evaluate anyone who is of questionable
developmental age for trailering.
9
Burley Cub Owner’s Instruction and Safety Manual
The straps and sliding buckles sewn to the backrest of the child seat are part
of a self-adjusting system that keeps the shoulder straps at the correct height
for children of various sizes. When you tighten the shoulder harness, the sliding
buckles allow the shoulder belts to come across the top of the child’s shoulders,
creating a snug fit. In addition, the sliding buckles keep the straps from falling
off of the shoulders.
IMPORTANT: Always fasten and adjust the two buckles behind
the child seat when using the trailer.
Single Passenger:
Ladder Lock
10
1. Remove both shoulder harnesses from the
shoulder straps (see Section VI for details
on removing the shoulder harness). Unclip
the Y-buckle if necessary. Store one of the
shoulder harnesses in a safe place. Leave
outboard shoulder straps dangling. Do not
unthread the straps from the ladder locks in
this step.
2. Remove the two center shoulder straps by
unthreading them from the ladder locks.
3. Trade the position of the shoulder straps
and re-insert the straps into the ladder locks
as shown in the illustration. The flat parts of
the male portion of the Y-buckle should face
toward the center.
4. Install one shoulder harness assembly in the
center position as shown
below. See Section VI for details on installing
the shoulder harness.
5. Seat the child in the center of the seat.
6. Snap in the shoulder straps at the Y-buckle.
Ensure that the Y-buckle is adjusted so that it
is at the child’s sternum.
7. Ensure that the shoulder straps are adjusted
so that the child is comfortably kept from
moving too far forward in the seat.
8. Fasten and adjust lap belt so that it is snug.
Burley Cub Owner’s Instruction and Safety Manual
Two Passengers
For two children, use both shoulder harnesses and two outer crotch straps.
1. Ensure that the restraint system is set up for two children so that the male
portion of each Y-buckle is facing the center of each seating position. If
your trailer was set up for single-child use, reverse the process above in the
Single Passenger section.
2. Attach the center support strap.
3. Seat the first child on one side of the trailer.
4. Snap in the shoulder straps at the Y-buckle. Ensure that the Y-buckle is
adjusted so that it is at the child’s sternum.
5. Ensure that the shoulder straps are adjusted so that the child is comfortably
kept from moving too far forward in the seat.
6. Repeat for the second child.
7. Fasten and adjust the lap belt so that it is snug.
Ladder Lock
Junction of Y-buckle must be positioned at child’s sternum to work
correctly. Belts or buckles positioned near your child’s neck can
cause discomfort or serious injury. Check child periodically to
ensure that he/she has not slipped from correct seated position.
11
Burley Cub Owner’s Instruction and Safety Manual
Child and cyclist must wear helmets when trailering. Helmets can
prevent or significantly reduce head injury in event of accident.
VI.
Padded Seat & Shoulder Harness
The seat in your Burley Cub is designed to provide the utmost comfort for your
children. From a padded seat and shoulder harnesses to room for your children’s
helmets to flow-thru mesh to keep your children cool, the Burley Cub is the most
comfortable trailer on the market.
Seat Pad and Shoulder Harnesses
The seat pads and shoulder harnesses in your Burley Cub are made of a durable
spacer weave fabric for ventilation to keep your children cool, and a high tech foam
material to provide the padding necessary for a comfortable ride. If the seat pad
and/or shoulder harnesses become dirty, they can be easily removed and handwashed with mild soap and water. If it is extremely hot, the shoulder harnesses can
be removed to provide maximum flow-thru ventilation. Installing the seat pad and
shoulder harnesses is quick and easy. Simply follow the steps below.
Seat Pad
1. Ensure that shoulder straps and lap
belt are not in the way of the seat
pad during installation.
2. The seat platform and seat pad each
have two strips of Velcro material as
shown at right. Install the front part of
the seat pad so that the square edges
of the pad face match up with the front
of the seat.
3. Attach the top part of the seat pad to
the seat to complete the process.
12
Burley Cub Owner’s Instruction and Safety Manual
Shoulder Harness Pad
Insert the shoulder straps into the
shoulder harness pad as shown in the
drawing at right. The shoulder straps
should be oriented so that the FLAT
parts of the male buckles are facing
toward each other.
VII. Hitching the Burley Cub to Your Bicycle
The trailer hitch was designed to quickly and safely attach to virtually all types of
bicycles. It is inserted in front of the left rear dropout of your bicycle.
Hitching the Trailer to Your Bicycle
1.
2.
3.
4.
Loosen the knob on the eyebolt until the two arms are spread fully apart.
Slip the lower hitch arm under the chain stay (A) and the upper arm above the
seat stay (B).
Wedge the hitch cone all the way back into the angle formed by the stays at the
wheel.
Tighten the knob until the arms are firmly clamped against the stays. Wrap the
safety strap around the inside of the chain stay, over the hitch body, and back to
the D-ring at the end of the tongue.
B
A
Make sure that the cone is wedged securely into the stays. The knob should be
finger-tight; do not overtighten. The hitch should not move, but should allow the
bicycle complete movement, including lying it down on the ground. It should clear
13
Burley Cub Owner’s Instruction and Safety Manual
any racks, bags, or fittings you have on your bicycle. If there is any interference,
contact your Burley dealer.
IMPORTANT: Remove trailer from your bicycle when it’s not in
use to prevent deforming the plastic hitch.
Do not operate trailer without hitch safety strap properly installed.
A dangling safety strap can contact spokes and damage rear
wheel or cause an accident resulting in serious injury.
Hitch must seat properly into stays and not interfere with racks,
bags, or fittings. Inspect hitch and tongue frequently for damage or
loose fasteners. Interfering parts or damaged hitch can cause an
accident resulting in serious injury.
Do not use or store trailer at temperatures below 32˚ Fahrenheit
as hitch rubber flex connector can become brittle and possibly
break, causing an accident resulting in serious injury.
VIII. Trailer Maintenance and Care
Storing Your Burley Cub
We build trailers to last, and often see fifteen-year-old trailers in use, but even a
Burley trailer will not last forever. When not in use, the trailer shold be stored out of
the sunlight, as extended exposure will cause deterioration of the polyethylene shell,
hitch and fabric.
Your polyethylene shell will need to be replaced if it becomes damaged or cracked.
Periodically inspect all parts of your Burley Cub using section “X. Safety Checklists.”
Hitch and Tongue Maintenance
Your trailer is designed for low maintenance and easy care. Clean and grease the
eyebolt threads on the hitch periodically to ensure that the eyebolt knob can be
properly tightened.
14
Burley Cub Owner’s Instruction and Safety Manual
Because of ultraviolet degradation, we recommend that the hitch be replaced every
five years under normal use. In sunny or smoggy locations or for trailers that are
stored outdoors, the hitch should be replaced every two to three years for safety.
Replace your hitch or tongue if there are any signs of damage—i.e., cracks, dents,
scratches.
When ordering a replacement hitch, you must specify that your Burley trailer is
equipped with a square tongue. Trailers with round tongues require a different
hitch.
Fabric Care
Your Burley Cub is manufactured from a tough, durable polyester. The fabric is
coated for waterproofness and is highly resistant to fading. It can be easily cleaned
with any mild soap or detergent and warm water. For more persistent soil, use a
nylon bristle brush. When not in use, store your trailer in a dry, well-ventilated area;
wipe it dry before storing to help avoid mildew.
Polyester fabric will eventually fade, especially when exposed to direct sunlight. To
extend the life of your fabric, as well as the hitch and other components, do not
store your trailer in direct sunlight. Do not use bleach for cleaning, as it will damage
the fabric. The fabric is an important part of your trailer’s structure, and provides a
safety envelope for child passengers. Replace any fabric that is ripped, scuffed, or
otherwise damaged.
Burley offers a durable polyester storage cover to protect your Cub from the elements when it is not in use. Contact your Burley dealer for details.
Trailer with damaged or ripped fabric components can permit
harmful contact between child and spinning spokes or moving
pavement, and cause serious injury. Replace damaged
components.
Suspension Elastomer Maintenance
Periodically inspect suspension elastomers for wear, cuts, or damage. Should you
need them, replacements are available from your authorized Burley dealer and are
easily installed.
15
Burley Cub Owner’s Instruction and Safety Manual
IX. Safety Guidelines
Bicycling with a trailer is different from bicycling without one, in ways which aren’t
always obvious. It is therefore essential that you read and understand all of the
following safety guidelines—in addition to the warnings and instructions in the
previous sections—prior to using your trailer. Before loaning your trailer to others,
make sure they too understand its proper, safe use. Contact your dealer or Burley if
any of these instructions are unclear.
Bicycling with a trailer, and bicycling in general, can be
hazardous. Failure to observe any of section “IX. Safety
Guidelines” could result in an accident and serious injury or death.
Use Well-Maintained Bicycle and Trailer
Use a bicycle which is in good working condition, with good brakes. A frequent
safety check of your bicycle is essential. Inspect and maintain your trailer as outlined
in section “X. Safety Checklists” of this manual. Have your Burley dealer maintain and
inspect your bicycle and trailer if you are not qualified to do so.
Loading Your Trailer
Do not overload the trailer. Maximum trailer load limit for children and/or cargo is
100 lbs. When placing children or cargo into the trailer, keep the load centered or
forward of the axle. Pack the load as low as possible and make sure items cannot
shift around. Loose, heavy objects can injure passengers in event of a sudden stop or
tip over.
Starting and Stopping
Because of the trailer’s additional weight, a bicycle pulling a trailer will be slower to
start up and stop, and because of its length it requires more time to cross streets or
paths. Your entire vehicle is heavier and less responsive. This means you should think
further ahead in anticipating stops, turns, and starts. Note that your trailer extends
out further on the left; allow for this difference when turning, passing pedestrians, or
approaching obstacles (like posts on bike paths). We recommend you spend some
time experimenting with a loaded trailer in an uncongested area to become familiar
with how your heavier, longer vehicle responds.
16
Burley Cub Owner’s Instruction and Safety Manual
Prevent Trailer Tip Over
Just like automobile and motorcycle trailers, bicycle trailers can tip over. To avoid
overturning: Do not pull your trailer over curbs or hit holes or other obstructions
in the road. Instruct children not to bounce, rock, or lean, which can cause a shift of
weight. Do not make high-speed turns or descents when pulling the trailer. Always
corner with caution at 5 m.p.h. or less, as the trailer cannot lean into a turn the way
a bicycle can. Do not under any circumstances travel faster than 15 m.p.h.—all road
irregularities and your slowness to react are greatly magnified.
Trailers can tip over causing damage to trailer and serious injury to
cyclist or passengers.
AVOID causes of tip over, especially
•
Children leaning or bouncing
•
Hitting potholes, curbs, other
road obstructions
•
Taking turns too fast
•
Sudden swerving
•
Off-banked turns
•
Improper wheel installation
•
Improper tire inflation
Fit, Alert, Adult Pilot
To safely pull a trailer, you need to be a fit, experienced cyclist. You must be alert,
have good sight and hearing, and adequate strength in your legs, arms, and hands.
Never allow a child or adolescent to pull your trailer because it is likely that they lack
the necessary physical ability and judgement.
No Headphones or Other Distraction
Do not bicycle or stroll with headphones, radios, or other distractions. You must be
able to hear surrounding traffic, and concentrate on safe bicycling at all times.
No Motorized Vehicles
Your Burley Cub is only intended for use with pedal-powered cycles; never pull it
with a motorized vehicle, as the increased acceleration and speed could damage the
trailer or cause the trailer to tip over.
17
Burley Cub Owner’s Instruction and Safety Manual
Avoid Riding in Traffic
We recommend against riding in traffic. If you must ride in traffic, do not pull your
trailer on highways, busy streets, or on streets unsafe for bicycling with children.
Never assume that you will be given the right-of-way, even if it is legally yours. Your
child is a precious load; his or her safety should not be entrusted to a car driver
whose attention or regard for bike riders is unknown. Use care when pulling your
trailer on bike routes or along bike lanes, especially at intersections.
Ride on Clean, Paved Surfaces
Your Burley Cub is not intended for off-road use. Towing a child off road can be
especially dangerous. Any bumps or irregularities could cause tip over and serious
injury to the bicyclist or passenger, or damage to the trailer. Cross over railroad
tracks, curb cutouts, and road grooves at 90˚. Riding parallel or at acute angles to
such obstacles can cause a crash.
Riding When It’s Slippery
Be especially careful in wet, rainy, or freezing conditions. Your ability to control and
stop your bicycle when towing a trailer is greatly impaired. In wet conditions apply
your brakes periodically to be sure the rims and brake pads are clear of water. Avoid
forceful braking which can cause dangerous skidding. Ride slowly and allow a
greater margin of safety when starting, stopping, and turning. Do not ride on surfaces where sand, gravel, ice, oil, or other slippery substances are present; if you must
pass over slippery surfaces, walk your bike and trailer.
Navigating Curbs, Stairs, and Escalators
Never tow your trailer over curbs; rider must dismount and walk over any curbs. If
you must traverse stairs, prevent a hazardous loss of control: have the children get
out of the trailer and disconnect it from the bike; carefully roll your trailer and bike,
independently, up or down the stairs. Never take your bike or trailer on escalators.
Use Cautiously with Pets
Your trailer is not designed to secure pets. A cat or other small pet can be towed
if they are in a pet carrier secured to the trailer frame. A sedate dog can be towed
seated on the trailer floor: add carpet for comfort, always use a cover, and do not
exceed 100 lbs. Never tow an excitable dog in your trailer, as it may lunge or try to
jump out causing tip over or other accident.
Avoid Riding at Night
Make every effort to schedule your rides so you are not pulling a trailer at night.
Because your vehicle is longer and heavier you will be less able to react to unseen
hazards. Automobile drivers may not be accustomed to your longer vehicle and may
18
Burley Cub Owner’s Instruction and Safety Manual
not react to it appropriately. If you must ride at night, wear bright, reflective clothing,
use a bright headlight and a red blinking taillight on your bike. Similarly, put a red
blinking light in the light-holder tab sewn onto the back of your cover so you can
be more easily seen. Do not operate without properly attached reflectors; replace
cracked or missing reflectors.
Always Use Your Cover
Affix your Big Screen 2-in-1 Cover to protect your child from flying debris when
pulling your trailer. Never leave a child unattended in direct sunlight because heat
buildup in the trailer can cause serious harm. Open or close the vinyl cover depending on the weather, to help keep your child cooler or warmer. Check periodically to
ensure that they are comfortable.
Cool Weather Use
When the temperature is 60-70˚ or colder you may be comfortable without heavy
clothing because your pedaling effort helps keep you warm. However, when you
consider the child’s inactivity sitting in the trailer—coupled with a potential windchill factor—an extra sweater or jacket may be needed for them to keep from
getting too cold.
Wear Helmets
Numerous studies have shown that:
•
Head injury is the leading cause of bicycling fatalities; and,
•
Helmets prevent or reduce bicyclists’ head injuries.
For safety, it is essential that both cyclist and passengers use approved bicycling
helmets at all times. Don’t take chances.
Proper Wheels and Tires are Essential
Use only the factory-supplied wheels, and keep them properly maintained. Inflate
tires to 30–35 P.S.I. and check pressure before each use. Do not use higher-pressure
tires, as the trailer will be bouncy and prone to tip over with light loads. We only
recommend tires with street tread. Do not use knobbies. For stability, dished wheels
must be offset to the outside of the trailer (with tires close to the outer frame, providing a wider track).
Know Your Trailer Hitch
Clamp the hitch securely to the bicycle frame, and check for a tight attachment each
time you use the trailer. Refer to sections “VII. Hitching the Burley Cub to Your Bicycle”
and “VIII. Trailer Maintenance and Care” of this manual for proper installation, use and
maintenance of your hitch.
19
Burley Cub Owner’s Instruction and Safety Manual
Use Your Flag
Always use the safety flag—it’s an essential safety device. The moving flag will help
make you more visible to motorists and other cyclists.
Protect Your Child
When pulling a child, use the shoulder harness, lap belt, and a child helmet at all
times. Always fasten the seat belt so that each child is held securely. For maximum
stability and safety, seat a single child in the center of the trailer. Periodically check
placement of shoulder straps, especially for a sleeping child. Check that a child cannot put a finger into the wheel spokes. Also, be aware that children get thirsty when
riding in the trailer. Bring plenty of water, especially on longer rides; keep a full water
bottle in the trailer where your children can easily quench their thirst when they
desire.
Observe Age and Height Restrictions
The trailer seat is intended only for children old enough to wear a helmet and sit
upright alone. Your child must have adequate neck strength to hold his or her head
up while trailering. Check with your pediatrician if you are unsure about your child’s
ability to sit upright and hold his or her head up. Never carry a child whose sitting
height (with helmet) is above the roll bar, because their chance of injury is significantly higher in the event of tip over.
Follow the Rules of the Road
Bicycles are vehicles, and are required to observe all rules of the road. Always signal
turns and stops; ride with both hands on the handlebars except when signalling.
Scan ahead for dangerous situations, and anticipate turning traffic. Watch out for
parked cars and opening doors. Never run stop signals, and never ride against
oncoming traffic. On bike paths, give audible warning when passing pedestrians
from behind. If you are not aware of your local and state bicycle regulations, contact your nearby police or motor-vehicles office for more information. Refer to the
owner’s manual of your lead bicycle for safe cycling information.
Have Fun Defensively
Besides being practical and easy-to-use, the Burley Cub allows adults and children
to get outdoors for some fun together, rain or shine. The fact that you’re getting
exercise and fresh air at the same time is an added benefit! So, whether you’re going
down to the corner store, across town on a picnic, or off for an extended vacation,
enjoy your Burley Cub and remember . . . ALWAYS RIDE DEFENSIVELY!
20
Burley Cub Owner’s Instruction and Safety Manual
X.
Safety Checklists
Before Each Ride, Ensure the Following:
√
√
√
√
√
√
√
√
√
Wheels tightly attached
Tire pressure 30–35 P.S.I.
Hitch properly secured with safety strap in place
Locked safety pins for tongue and roll bar
Maximum load 100 lbs.
Bicycle safety check, especially brakes and tires
Helmets for children & rider
Safety flag in place
Both seat buckles in rear of seat are securely fastened
Monthly Checklist
√
√
√
√
√
√
√
√
Inspect tongue and hitch for damage, scratches, or loose fasteners
Inspect tongue pivot for smooth operation: tongue should fold and unfold
freely; lubricate brass bushing if necessary
Inspect frame tubing and hardware for cracks, damage, or loose parts
Inspect tires; worn out or cracked tires can lead to blowout
Inspect wheels for trueness and cracks
Inspect wheel bearings for wear
Inspect fabric canopy, child seat, and harness for rips, abrasion, or missing or
damaged hardware
Contact authorized Burley dealer for repairs/replacement of any damaged or
worn out parts
IMPORTANT: Refer to section “VIII. Trailer Maintenance and
Care” of this manual for additional periodic maintenance.
Unless you are a qualified bicycle mechanic, contact your
Burley dealer for repairs and maintenance.
21
Burley Cub Owner’s Instruction and Safety Manual
XI. Parts List and Drawing
Note: Subassemblies are indented; inquire for additional parts
1. (1) Polyurethane Shell
2.
(2) Front Reflector (clear)
3.
(2) Rear Reflector (red)
4.
(2) Suspension Elastomer
5.
(1) Pair Side Panel Hold Down (left and right)
6.
(1) Tongue Retaining Pin
7.
(1) Pair Tongue Receptacle (front and rear)
8.
(1) Safety Pin & Tether
9. (1) Front Roll Bar, 7/8” Aluminum Tube
10.
(2) Frame Locks
11.
(2) Front Roll-Bar Hinge (plastic)
12. (1) Rear Roll bar, 7/8” Aluminum Tube
13.
(2) Rear Roll Bar Hinge (plastic)
14.
(2) Roll Bar Saddle (plastic)
15. (1) Tongue and Hitch Assembly
16.
(1) Tongue, 1 1/8” Square Aluminum
17.
(1) Hitch with Hitch Knob & Ball
18.
(1) Hitch Safety Strap
19.
(1) Clip & D-Ring
20.
(1) Rubber Flex Connector (not available without hitch)
21. (1) Pair Fabric Side-panel Assembly, with Vinyl Windows
22. (1) Seat pad
23. (2) Shoulder Pads
24. (1) Flow-Thru Seat Back with Harness
25.
(4) Shoulder Strap
26.
(3) Crotch Strap
27.
(1) Lap Belt
28.
(1) Buckle for Lap Belt
29. (2) Plastic Wheel, Each with (2) Wheel Bearing
30.
(2) Wheel Reflector (clear) with Self-Tapping Screw
31. (1) Swing Arm Assembly
32.
(2) Hollow Axle
33. (2) Wheel Axle Assembly
34.
(2) Quick-Release Lever
35. (1) Two-Piece Safety Flag
36. (1) Big Screen 2-in-1 Cover
37. (1) Adjustable Sunscreen
Options (at addditional cost):
Walk ’n Roller Stroller Kit (not shown)
Alloy-Wheel Option
Trailer Storage Cover
22
Burley Cub Owner’s Instruction and Safety Manual
37
15
23
17
18
23
Burley Cub Owner’s Instruction and Safety Manual
About Burley Design Cooperative
Burley has been supplying products to the bicycle industry since 1975. Burley products are designed and manufactured at our Eugene, Oregon shop. As worker-owners
of our cooperatively owned business, we bring an uncommon degree of personal
pride and attention to our work. Use our products with confidence and satisfaction!
Burley Trailer Limited Warranty
Burley will repair or replace any original equipment parts
it determines to be defective for the life of the trailer. The
owner of a Burley trailer must present the trailer for repair at
an authorized Burley dealer, together with an original sales
receipt or similar proof of purchase. This warranty applies only
to the original owner and is nontransferable. Burley cannot be
responsible for failure due to improper assembly, modification
of parts or instructions, neglect, abuse, accident, and/or
normal wear. The warranty does not cover any trailers used for
rental, competition, or commercial use.
Burley neither assumes nor authorizes any person to assume any other
liability in connection with Burley trailers, and there are no oral agreements or warranties collateral to or affecting this agreement.
This warranty gives you specific legal rights and you may also
have other rights which vary from state to state.
Burley Design Cooperative • 4020 Stewart Rd • Eugene, OR 97402
(541) 687-1644 • Fax (541) 687-0436 • www.burley.com
Copyright © 2004 by Burley Design Cooperative
“Burley” is a registered trademark of Burley Design Cooperative.
rev3: 02/04