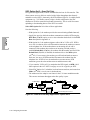
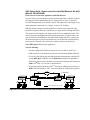
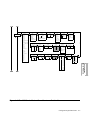
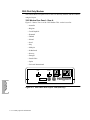
1
Motorola
12
34
RD
TR
RI/OH
TD
CD
RC/NC
3260
326X V.34, V.34-SDC, and V.32bis
Series Modem User’s Guide
Notice
©1998 Motorola, Inc.
20 Cabot Boulevard
Mansfield, Massachusetts 02048
(508) 261-4000
All rights reserved
Printed in U.S.A.
34
Restricted Rights Notification for U.S. Government Users
The software (including firmware) addressed in this manual is provided to the U.S.
Government under agreement which grants the government the minimum “restricted rights”
in the software, as defined in the Federal Acquisition Regulation (FAR) or the Defense
Federal Acquisition Regulation Supplement (DFARS), whichever is applicable.
If the software is procured for use by the Department of Defense, the following legend
applies:
Restricted Rights Legend
Use, duplication, or disclosure by the Government
is subject to restrictions as set forth in
subparagraph (c)(1)(ii) of the
Rights in Technical Data and Computer Software
clause at DFARS 252.227-7013.
If the software is procured for use by any U.S. Government entity other than the Department
of Defense, the following notice applies:
Notice
Notwithstanding any other lease or license agreement that may pertain to,
or accompany the delivery of, this computer software, the rights of the
Government regarding its use, reproduction, and disclosure are as set forth
in FAR 52.227-19(C).
Unpublished - rights reserved under the copyright laws of the United States.
Notice (continued)
Proprietary Material
Information and software in this document are proprietary to Motorola, Inc. (or its Suppliers)
and without the express prior permission of an officer of Motorola, Inc., may not be copied,
reproduced, disclosed to others, published, or used, in whole or in part, for any purpose other
than that for which it is being made available. Use of software described in this document is
subject to the terms and conditions of the Motorola Software License Agreement.
This document is for information purposes only and is subject to change without notice.
Radio Frequency Interference Regulations
This equipment has been tested and found to comply with the limits for a Class A digital
device, pursuant to Part 15 of the FCC Rules. These limits are designed to provide reasonable
protection against interference when the equipment is operated in a commercial environment.
This equipment generates, uses, and can radiate radio frequency energy and, if not installed
and used in accordance with the instruction manual, may cause harmful interference to radio
communications.
Note: the 3262/63/67/68 Modem is a Class A product. In a domestic environment, this product may cause radio interference, in which case the user may be required to take adequate
measures.
Changes or modifications not expressly approved by Motorola could void the user’s authority
to operate the equipment.
This Class A digital apparatus meets all requirements of the Canadian Interference-Causing
Equipment Regulations.
This is a Class A product. Operation of this equipment in a residential environment may
cause radio interference, in which case the user may be required to take adequate measures to
correct the interference at his/her own expense.
This product is CISPR 22 Class B verified under test conditions that included use of shielded
DTE cables. Ferrite cylinders attached to the dial line are required for Modem 3266 (Canada). Leased line cables with 1.5 turns through a ferrite cylinder were also used. Use of different cables will invalidate verification and increase the risk of causing interference to radio
and TV reception.
You can obtain the proper cables from Motorola.
This product is CE marked to indicate compliance with the following European directives.
• 73/23/EEC Low Voltage Directive (Safety)
• 89/336/EEC EEC Directive
Compliance with the above directives may only be assured when the equipment is installed
and operated in accordance with the instructions for its use and the purpose for which it is
intended.
Products that do not bear the CE mark are not intended for supply or use in the European
Union.
Writer: Christina Lamkin
Project Editor: Susan L. Roswit
Publications Specialist: Denise Skinner
Illustrators: Dennis Alves, Tim Kinch
Part No. T0009, Rev B
Publication Code: KP
First Printing: April 1996
Manual is current for Release 8.0 of the 326X Series Modem.
To comment on this manual, please send e-mail to [email protected].
Contents
Restricted Rights Notification for U.S. Government Users .....................
Proprietary Material .................................................................................
Radio Frequency Interference Regulations ..............................................
Overview ......................................................................................................
326X Series Modem Family .........................................................................
Product Family Model Numbers ..............................................................
Documentation Target Audience ..................................................................
Note to Programmers and System Developers .............................................
How to Use the Documentation Set .............................................................
326X V.34 Series Modem User’s Guide (T0009) ....................................
326X Series Modem Reference Guide (09925) .......................................
References ....................................................................................................
Trademarks ...................................................................................................
Conventions ..................................................................................................
Special Notices .............................................................................................
Messages spéciaux ........................................................................................
Besondere Hinweise .....................................................................................
Avisos Especiales .........................................................................................
Introduction ..............................................................................................
Questions about Your Product Shipment .................................................
Technical Assistance or Scheduling Service ............................................
Sales-Related Issues .................................................................................
Information on Product Training ..............................................................
Questions about Billing ............................................................................
Comments about the Manual ...................................................................
User Documentation .................................................................................
Customer Response Card .........................................................................
ii
iii
iii
xi
xi
xi
xii
xii
xii
xiii
xiv
xiv
xiv
xv
xv
xvi
xvi
xvii
xix
xix
xix
xx
xx
xx
xxi
xxi
xxiii
Chapter 1. About the Modem
Introduction ..................................................................................................
Safety and Operational Notices ................................................................
Operating the Modem from the Front Panel .................................................
Selecting Programmed Option Sets ..............................................................
Automatic Calling Interfaces (ACUs) ..........................................................
AT ACU ...................................................................................................
V.25bis ACU ............................................................................................
LPDA2 ACU ............................................................................................
Managing a Modem ......................................................................................
Restoring Data Transmission ........................................................................
ITU-T V.34 Compliant Modulation Mode ...................................................
Synchronous Data Compression (SDC) Feature ..........................................
Automode/Multimode Feature .....................................................................
Remote Configuration ..................................................................................
Error Correction and Data Compression ......................................................
Security .........................................................................................................
Status Snapshots ...........................................................................................
Adaptive Rate System ..................................................................................
1-2
1-3
1-4
1-5
1-5
1-5
1-5
1-5
1-6
1-6
1-6
1-7
1-7
1-8
1-8
1-8
1-8
1-9
v
Contents (continued)
Troubleshooting (V.54 and V.22bis Tests) ....................................................
Country-Specific Information ......................................................................
NET Compliance ..........................................................................................
CE Regulatory Marking Directive (93/68/EEC) ..........................................
1-9
1-9
1-9
1-9
Chapter 2. Installing the Modem
Introduction ..................................................................................................
Unpacking the Modem .................................................................................
Additional Equipment Required ...................................................................
Choosing a Site .............................................................................................
Connecting the Modem ................................................................................
Rear Panel Connectors .............................................................................
Ferrite Cylinders .......................................................................................
Cabling the Modem ..................................................................................
Connecting the Modem to a Network Management System ...................
Turning on the Modem .............................................................................
Automatic Self-Test ......................................................................................
After Installing the Modem... .......................................................................
2-2
2-3
2-4
2-4
2-5
2-5
2-7
2-11
2-13
2-14
2-15
2-15
Chapter 3. Getting Started
Introduction ..................................................................................................
System Requirements for Software Upgrades ..............................................
Configuring and Operating the Modem .......................................................
Using the Front Panel ...............................................................................
Navigating the Configuration Menu Tree ................................................
Setting Configuration Options from the Front Panel ...............................
Using the Modem with a Network Management System (NMS) ............
Using the AT Automatic Calling Unit (ACU) ..........................................
Other Call Establishment Methods ...............................................................
V.25bis ACU for Sync or Async Applications .........................................
NetView LPDA-2 ACU for Sync Applications .......................................
Sync Dialing from an IBM AS 400 ..........................................................
External Auto-Call Units ..........................................................................
3-2
3-2
3-2
3-2
3-5
3-5
3-7
3-8
3-10
3-10
3-10
3-11
3-11
Chapter 4. Configuring the Modem
Overview ......................................................................................................
Communications Software Package Operating Notes ..................................
Configuring the Modem for Use with Communications
Software ...............................................................................................
Operating Notes .......................................................................................
If the Communications Software and Modem Do Not Operate... ............
Preparing for Operation ................................................................................
Reinitializing Memory from the Front Panel ...........................................
vi
4-2
4-2
4-2
4-3
4-5
4-5
4-5
Contents (continued)
Reinitializing Memory Using the AT&F Command ................................
4-5
Configuration Option Sets ............................................................................
4-6
What is an Option Set? .............................................................................
4-6
Configuring an Option Set .......................................................................
4-10
Option Set Defaults ..................................................................................
4-12
326X V.32bis and 326XFAST Modem Application Examples ....................
4-18
Option Set 1—Async Calls to Central Site Using AT ACU ....................
4-19
Option Set 2—Sync Answering Central Site Without ACU ....................
4-20
Option Set 3—Sync Calls to Central Site, V.25bis ACU .........................
4-20
Option Set 4—Async Answering Central Site without ACU (Models 3260/62/65/67)
4-21
Option Set 4—Synchronous Leased Line Applications with Dial Restoral (Models
3261/63/66/68) .....................................................................................
4-22
326XFAST-SDC Modem Application Examples .........................................
4-22
SDC Pre-Operation Notes ........................................................................
4-23
Configuring the Modem for SDC Operation ...........................................
4-23
SDC Sample Applications ........................................................................
4-24
Remote Access Reset ...................................................................................
4-29
Operation ..................................................................................................
4-29
When Remote Access Reset Is Disabled .................................................
4-29
Chapter 5. Using the AT Automatic Calling Interface
Introduction ..................................................................................................
What is the Attention (AT) Command Set? ..................................................
What Role Does Communications Software Play? ..................................
Using AT Commands ...................................................................................
Entering AT Command Lines ...................................................................
Autobaud Feature .....................................................................................
The Escape Sequence—(+++) .................................................................
Non-Configuration AT Commands ..........................................................
S-Registers ...............................................................................................
5-2
5-3
5-3
5-3
5-3
5-5
5-5
5-6
5-9
Chapter 6. Troubleshooting Guide
Introduction ..................................................................................................
Troubleshooting ............................................................................................
326X Series Modem Diagnostic Tests ..........................................................
Synchronous Data Compression (SDC) Testing ......................................
6-2
6-2
6-10
6-11
Appendix A. Configuration Quick Reference
Configuration Quick-Reference—Menu Trees ............................................
For More Detail ........................................................................................
Audience and Assumptions ......................................................................
Performing Numeric Entry ...........................................................................
A-2
A-2
A-2
A-37
vii
Contents (continued)
S-Register/AT Command Cross-Reference ..................................................
Dial Modifiers for Special Dialing Requirements ........................................
Result Codes .................................................................................................
Configuring the Modem’s Dual In-line Package (DIP) Switches ................
A-38
A-39
A-41
A-44
Appendix B. Cabling and Interface Pinouts
Introduction ..................................................................................................
EIA/TIA 232-D (Modem to Computer) Interface ........................................
ITU Recommendation V.35 Modem-to-Computer Interface .......................
ITU Rate V.35 Modem-to-Computer Interface Pinouts ...........................
Differences, EIA/TIA 232-D and ITU Rate V.35 Interfaces ....................
DIAL LINE, LEASE (PRIVATE) LINE, PHONE Connector Pinouts ........
NC (Network Control) Port Pinouts .............................................................
Cabling .........................................................................................................
Cable Considerations ...............................................................................
DTE Cable Diagnostics ............................................................................
B-2
B-2
B-4
B-5
B-6
B-6
B-7
B-7
B-7
B-10
Appendix C. Country-Specific Information
Introduction ..................................................................................................
Country Support .......................................................................................
Installation Notes ..........................................................................................
Restricted Features Summary .......................................................................
Operating Notes ............................................................................................
Standalone Modem Rear Panel Views ..........................................................
3260 Dial Only Modem ...........................................................................
3261 Modem Rear View (Leased Line, Dial Restoral) ............................
3265 Dial Only Modem ...........................................................................
3266 Modem (Leased Line with Dial Restoral) .......................................
Rear Panel Interface Pinouts ........................................................................
Standalone Models 3260/65 and 3261/66 Interface Pinouts ....................
Card Models 3262/67, 3263/68 Backplane Interface Pinouts ..................
Delayed and Forbidden Lists ........................................................................
Australia—Delayed Call Lists .................................................................
Austria—Forbidden Call Lists .................................................................
Belgium—Delayed Call Lists ..................................................................
Finland—Delayed Call Lists ....................................................................
France—Delayed and Forbidden Call Lists .............................................
Hong Kong—Delayed Call Lists .............................................................
Ireland—Delayed Call Lists .....................................................................
Netherlands—Delayed Call Lists .............................................................
Norway—Delayed Call Lists ...................................................................
Spain—Delayed Call Lists .......................................................................
Other Country-Specific Information ............................................................
Canada ..........................................................................................................
DOC Registration and Requirements .......................................................
viii
C-3
C-3
C-4
C-4
C-12
C-12
C-13
C-13
C-14
C-16
C-18
C-18
C-21
C-23
C-23
C-23
C-24
C-25
C-25
C-26
C-26
C-27
C-27
C-28
C-28
C-28
C-28
Contents (continued)
Industry Canada Equipment Attachment Limitations ..............................
Canadian Emissions Statement ................................................................
Rear Panel Pinouts ...................................................................................
Telco Option (AT&J) ................................................................................
Denmark—Blind Dialing .............................................................................
Hong Kong and United Kingdom—BABT Regulations ..............................
Compliance with BS6328: Part 1: 1982 Section 8.3 ................................
Compliance with BS6328: Part 1: 1982 Section 8.7 ................................
Compliance with BABTSITS/82/01/C and BABT/SITS/82005S/D .......
Compliance with BS6305 Clause 6.2, BS6320 Clause 7.2 ......................
Ringer Equivalence Number (REN) ........................................................
Compliance with BABT/SITS/83/08/A Clause 1.2 .................................
Compliance with BS6789: Section 6.1:1986 Clause 5.2 .........................
Compliance with BS6789: Section 6.1:1986 Clause 7.3.1.3 ...................
Compliance with BS6789: Section 6.1:1986 Clause 7.3.1.4 ...................
Compliance with DTI 83/009I .................................................................
Compliance with BS6301 ........................................................................
Compliance with BABT SITS 83/009 Section D ....................................
Installation of Telephone Socket ..................................................................
Application for Installation of Telephone Socket .........................................
U. S. A. .........................................................................................................
FCC Registration ......................................................................................
FCC Regulations ......................................................................................
Dial Line Jack Types ................................................................................
Rear Panel Pinouts ...................................................................................
Dial and Leased Line Transmit Levels ....................................................
Making Telephone-to-Modem Connections .............................................
Telco Option (AT&J) ................................................................................
Declaring The Jack Type ..............................................................................
Using the Modulus Backplane’s Busy Out Feature ......................................
C-29
C-29
C-30
C-31
C-32
C-32
C-32
C-32
C-33
C-33
C-33
C-34
C-34
C-34
C-34
C-35
C-35
C-35
C-36
C-36
C-36
C-36
C-37
C-38
C-39
C-41
C-41
C-41
C-42
C-43
Equipment Return Procedures ......................................................................
Expiration of Lease ..................................................................................
Factory Repair ..........................................................................................
Packaging Guidelines for Equipment Return ...........................................
ret-2
ret-2
ret-2
ret-2
Glossary
Return Procedures
ix
Contents (continued)
x
Using the Documentation Set
Overview
The 326X product documentation set includes the 326X V.34 Series Modem Reference Card (T0009-01).
Optionally, with a 326X Series Modem card backplane (to install a 326X card into a
Modulus 9 or 21 enclosure), you receive the following:
• 326X Series Modem Cards (Part No. 09949)
Throughout this guide, references to the 326X Series Modem apply to 326X V.32bis,
326X V.34, and 326X-SDC Series Modems, unless stated otherwise.
326X Series Modem Family
The 326X product family consists of three series: V.34, V.34 SDC, and V.32bis.
This Series...
326XFAST V.34
326XFAST-SDC
Supports This
Modulation...
ITU V.34
ITU V.34
This Maximum
DCE Rate...
33.6 kbps
33.6 kbps
326X
ITU V.32bis
14.4 kbps
And This Maximum
DTE Rate:
128 kbps, asynchronous
128 kbps, asynchronous, and,
with proprietary compression,
128 kbps synchronous
57.6 kbps, asynchronous
IMPORTANT: When you select a modulation mode, you must ensure that the Max
Rate (AT*MX) and Min Rate (AT*MN) parameter options are within the valid range
for the mode.
Some 326XFAST-SDC models are available with a V.35-compatible interface. This
unit has a DB25 connector, so a converter is required.
Product Family Model Numbers
Motorola refers to the product family as 326X because the last digit denotes the
modem model. Model numbers (“X”) are as follows.
This Model Number...
3260, 3261, 3262, 3263
3265, 3266, 3267, 3268
3260, 3265
Denotes:
Models for use in the U.S.A.
Equivalent models, respectively, for international use;
provided in country-specific setups
Standalone models for:
• Two-wire dial operation
• Two-wire leased-line operation
xi
Using the Documentation Set (continued)
This Model Number...
3261, 3266
Denotes:
Standalone models for:
• Two-wire dial operation
• Two- or four-wire leased-line operation
3262, 3267
Rack-mount dual-modem card models, equivalent to 3260
and 3265, respectively, for Modulus enclosure installation
3263, 3268
Rack-mount single-modem card models, equivalent to 3260
and 3265, respectively, for Modulus enclosure installation
Documentation Target Audience
The documentation set assumes that you are familiar with the basic concepts of data
communications, that you are an operator only, and that you will not be servicing the
modem hardware (other than making initial cabling connections).
Note to Programmers and System Developers
For detailed information on configuration options, equivalent AT Commands, V.25
bis Automatic-Calling Unit, NetView’s LPDA-2 dialing commands, or diagnostic
tests, order the 326X Series Modem Reference Guide (Part No. 09925) by contacting
your Motorola sales representative or local distributor.
How to Use the Documentation Set
Following is a description of the 326X Series Modem documentation set.
326X V.34 Series Modem Reference Card (T0009-01)
*
For a quick reference to AT, AT&, and AT commands, dial modifiers, and
disconnect codes, see the 326X V.34 Series Modem Reference Card. The card also
includes a menu tree of front panel options and AT command settings.
xii
Using the Documentation Set (continued)
326X V.34 Series Modem User’s Guide (T0009)
This User’s Guide provides the information needed to install, configure, and operate
the modem. Chapter outlines are as follows:
Chapter 1, About the Modem, introduces the modem’s features.
Chapter 2, Installing the Modem, explains how to install and cable a modem.
Quick-reference figures showing the connections to make are included.
Chapter 3, Getting Started, discusses how the modem can be used, and
recommends how to configure and operate it. The chapter includes a reference
guide to the rest of the documentation set for further information.
Chapter 4, Configuring the Modem, explains how to effectively configure the
modem. The four preconfigured option sets are described, along with sample
applications that help you choose an option set.
Chapter 5, Using the AT Automatic Calling Interface, discusses the 326X Series
Modem’s AT ACU. This chapter introduces:
• The ACU industry-standard (AT and AT&) commands
• The Motorola enhanced AT command syntax (AT*).
• The AT commands that are referred to as “action” AT commands (rather than
“configuration” AT commands), and S-Register functions and settings
Chapter 6, Troubleshooting Guide, is a quick reference to problems and
suggestions for correcting them. This chapter assists you in isolating and
correcting a problem before calling Motorola’s Customer Support Center.
Appendix A, Configuration Quick Reference, provides reference material you
need to change a modem’s default settings. It describes:
— Configuration options with and without AT equivalents
— Result codes (long and short forms)
— S-Registers
— Dial modifiers
— Numeric entry procedure
— The configuration menu structure
Appendix B, Cabling and Interface Pinouts, contains the pinouts for the
modem’s rear panel connectors and associated cables.
Appendix C, Country-Specific Information, discusses the cabling, rear panel
layouts, pinouts and other modem features that are required or restricted by
regulatory agencies for each country.
xiii
Using the Documentation Set (continued)
326X Series Modem Reference Guide (09925)
Available as an optional order item, the 326X Series Modem Reference Guide is
designed for users who require more detail on operating the modem’s configuration
options and diagnostic self-tests. Contact your Motorola sales representative or local
distributor for ordering information.
References
Refer to the following documents for more information:
• 326X, 326XFAST, and 326XFAST-SDC Series Modem Product Specification
Sheets
• EIA Application Note #562, Appendix A (defines cable lengths in terms of
DTE rates)
NetView operators should be familiar with:
• NetView Operations Primer (IBM Part No. SC30-3363)
• NetView Operation Scenarios (IBM Part No. SC30-3376)
Trademarks
The following are trademarks or registered trademarks of their respective companies
or organizations:
AT is a command language used with the Smartmodem 1200 and the
Smartmodem 2400/Hayes Microcomputer Products, Inc.
CompuServ / CompuServ Inc.
MNP (Microcom Networking Protocol) and Relay Gold / Microcom, Inc.
NetView and IBM / International Business Machines Corporation
Novell and NetWare / Novell, Inc
Telenet / Sprint International Communications Corporation
Tymnet / British Telecommunications
UNIX / Unix System Laboratories
xiv
Using the Documentation Set (continued)
Conventions
The following conventions are used in this manual:
• User entries appear as follows: AT T<CR>
*
• System messages appear as follows: NO CARRIER
• A carriage return appears as follows: <CR>. It designates the Return or Enter
key. It is used to complete a text entry or initiate an action from the keyboard.
Special Notices
These notices emphasize certain information in the manual. Each serves a special
purpose and is displayed in the format shown.
IMPORTANT: Important is used to emphasize any significant procedural
information.
Caution
Caution provides information that, if not followed, can result
in damage to software, hardware, or data.
Warning
Warning is the most serious notice, indicating that you can be
physically hurt.
xv
Messages spéciaux
Les messages suivants mettent en valeur certaines informations dans le guide. Chacun d’eux remplit une fonction spéciale et est affiché dans le format indiqué.
IMPORTANT: Important est utilisé pour souligner des informations critiques au
sujet d’une procédure.
Mise en Garde
Une mise en garde vous fournit des informations qui, si elles
ne sont pas observées, peuvent se traduire par des dommages
pour le logiciel, le matériel ou les données.
Avertissement
Un avertissement constitue le message le plus sérieux, indiquant que vous pouvez subir des blessures corporelles.
Besondere Hinweise
Durch die folgenden Hinweise werden bestimmte Informationen in diesem Handbuch hervorgehoben. Jeder
Hinweis dient einem bestimmten Zweck und wird im dargestellten Format angezeigt.
WICHTIG: Wichtig wird zur Betonung signifikanter Angaben zu Vorgehensweisen
verwendet.
Vorsicht
Ein Vorsichtshinweis macht Sie darauf aufmerksam, daß Nichtbefolgung zu Software-, Hardware- oder Datenschäden führen
kann.
Warnung
Eine Warnung weist Sie darauf hin, daß ernsthafte Körperverletzungsgefahr besteht.
Using the Documentation Set (continued)
Avisos Especiales
Los siguientes avisos hacen hincapié en determinada información de la guía.
Cada uno de ellos tiene un propósito especial y aparecen con el formato siguiente:
IMPORTANTE: Importante se utiliza para enfatizar cualquier información de pro-
cedimiento importante.
Precaucion
La precaución le ofrece información, que de no cumplirse,
puede derivar en posibles daños tanto para el software y el
hardware, como para ambos.
Advertencia!
Una advertencia es un aviso importante, que le advierte sobre
la presencia de un inminente peligro.
xvii
!
Using the Documentation Set (continued)
xviii
Motorola Information System Group (ISG)
Customer Information
Introduction
U.S.A. customers who have questions about Motorola ISG products or services
should refer to the following sections. Non-U.S.A. customers should contact their
local Motorola ISG subsidiary office or distributor.
Questions about Your Product Shipment
If you have questions about whether your shipment is complete or about its condition
upon receipt, please call your nearest Motorola ISG representative or Customer
Administration at (508) 261-4000, Extension 4745.
Technical Assistance or Scheduling Service
To have Motorola ISG implement your equipment:
You can purchase and schedule Implementation Services by calling (800) 544-0062
(from within the U.S.). The average lead time for implementation services is 5
business days from the time of the call. Implementation services include running
power-up diagnostics, configuring the equipment, and connecting the equipment into
existing networks. A service engineer will be dispatched to your site to perform these
services.
If you implement your equipment yourself:
Carefully follow the instructions in the following sections of this documentation set:
To install and power up - Chapter 2.
To configure and operate - Chapter 3.
If you have difficulty - Chapter 6 provides a quick reference to problems you
may encounter, and suggestions for correcting them.
xix
Motorola ISG Customer Information (continued)
For service, if your unit is under warranty and/or you have a service contract:
Call (800) 544-0062 for assistance. When you call, please have the following information ready :
Item
Location or Description
Model number
Front of unit. 3260, 3261, 3262, 3263, 3265, 3266, 3267, 3268.
(For synchronous data compression models, specify SDC.)
Serial number
Bottom of standalone unit; edge of card unit.
Error message/
Problem Description
LCD Display.
Software revision
LCD Display: from [Modulation Mode] 9600 T/D? press
to
display the operating status. (Example: DTE 19.2 RELIABL.)
Press
Press
until Display Modem ID displays.
. SWPart=x displays.
The rightmost two digits show the revision level.
Option Settings
Up-to-date configuration worksheet (see the 326X Series Modem
Reference Guide).
Site ID
Assigned to the customer site by Motorola at first service call.
Customer should store the ID, once assigned.
Application type
Leased line with or without dial restoral or dial. Also specify the
data transfer protocol: asynchronous, direct-synchronous, or
synchronous data compression (SDC) mode.
Connected hardware
DTE type(s): asynchronous or synchronous terminal or PC.
If you do not have a service contract, and your unit is no longer under warranty:
You can purchase a service contract or arrange for Time and Material services by
calling (800) 544-0062 for assistance.
Sales-Related Issues
Please call your local Motorola ISG sales office, authorized distributor, or the Sales
Assistance Center at (800) 487-1456. For a listing of our Sales Offices, visit our Web
site at: http://www.mot.com/MIMS/ISG/.
Information on Product Training
For information on classroom training, customized on-site training, or to order
self-study training materials, call the Sales Assistance Center at (800) 487-1456.
Questions about Billing
If you have a question regarding billing, call (800) 446-0144 and select option 2.
xx
Motorola ISG Customer Information (continued)
Comments about the Manual
To help us improve our product documentation, please complete and return by mail,
or fax to (508) 339-6814, the prepaid comment card on the next page. If you prefer,
simply include your name, company, and telephone number and a member of the
documentation group will contact you to discuss any comments you might have.
User Documentation
To order Motorola ISG user documentation, call (508) 261-7056.
xxi
Motorola ISG Customer Information (continued)
xxii
Customer Response Card
Motorola would like your help in improving its product documentation. Please complete and return this
card (by mail or fax to (508) 339-9592; Attention: Product Documentaton), to provide your feedback.
To discuss comments with a member of the Motorola documentation group, provide telephone
information at the bottom of this page. Thank you for your help.
Name _________________________________________________________________________
Company Name _________________________________________________________________
Address _______________________________________________________________________
_______________________________________________________________________
_______________________________________________________________________
Document Title: 326x v.34, V.34-SDC, and V.32bis Series Modem User’s Guide
Part Number: T0009, Rev B
Please rate this document for usability:
Excellent
Good
Average
Below Average
Poor
What did you like about the document? ______________________________________________
______________________________________________________________________________
______________________________________________________________________________
______________________________________________________________________________
______________________________________________________________________________
What information, if any, is missing from the document? _________________________________
______________________________________________________________________________
______________________________________________________________________________
______________________________________________________________________________
______________________________________________________________________________
Please identify any sections/concepts that are unclear or explained inadequately.
______________________________________________________________________________
Cut Here
______________________________________________________________________________
______________________________________________________________________________
______________________________________________________________________________
Additional comments/suggestions. __________________________________________________
______________________________________________________________________________
______________________________________________________________________________
______________________________________________________________________________
______________________________________________________________________________
Telephone ________________________ Ext. _________________ Best time to call __________
FOLD HERE
DO NOT TEAR – FOLD HERE AND STAPLE
NO POSTAGE
NECESSARY
IF MAILED
IN THE
UNITED STATES
BUSINESS REPLY MAIL
FIRST CLASS
PERMIT NO. 39783
MANSFIELD, MA
POSTAGE WILL BE PAID BY ADDRESSEE
34
Motorola University East M3-30
20 Cabot Boulevard
Mansfield, Massachusetts 02048-1193
USA
About the Modem
Contents
Introduction ..................................................................................................
Operating the Modem from the Front Panel .................................................
Selecting Programmed Option Sets ..............................................................
Automatic Calling Interfaces (ACUs) ..........................................................
AT ACU ...................................................................................................
V.25bis ACU ............................................................................................
LPDA2 ACU ............................................................................................
Managing a Modem ......................................................................................
Restoring Data Transmission ........................................................................
ITU-T V.34 Compliant Modulation Mode ...................................................
V.34 Modulation Mode Characteristics ...............................................
Compatibility in V.34 Modulation Mode .............................................
Synchronous Data Compression (SDC) Feature ..........................................
Automode/Multimode Feature ......................................................................
Remote Configuration ..................................................................................
Error Correction and Data Compression ......................................................
Security .........................................................................................................
Status Snapshots ...........................................................................................
Adaptive Rate System ...................................................................................
Troubleshooting (V.54 and V.22bis Tests) ....................................................
Country-Specific Information ......................................................................
NET Compliance ...........................................................................................
CE Regulatory Marking Directive (93/68/EEC) ...........................................
1-2
1-3
1-4
1-4
1-4
1-4
1-5
1-5
1-5
1-6
1-6
1-6
1-6
1-7
1-7
1-7
1-7
1-7
1-8
1-8
1-8
1-8
1-8
About the Modem 1-1
About the
Modem
Chapter 1
About the
Modem
Introduction
This chapter summarizes the features and options of the 326X Series Modem. The
series includes:
• The 326X V.32bis Series Modem, which operates in V.32bis modulation mode
• The 326XFAST Series Modem, which can operate in V.34 modulation mode
• The 326XFAST-SDC Series Modem, which can operate in V.34 modulation
mode and the Synchronous Data Compression mode
In this guide, references to the modem apply to all of the above, unless stated
otherwise.
IMPORTANT: When you select a modulation mode, you must ensure that the Max
Rate (AT*MX) and Min Rate (AT*MN) parameter options are within the valid range
for the mode.
The modem provides reliable data communication over 2-wire dial lines and 2-wire
or 4-wire leased lines, depending on the model. Dial lines are public lines to which
all telephone users have access; leased lines, also called private lines, provide a
dedicated connection, over lines provided by the telephone company.
Whether you use dial or leased lines, you can operate the modem as follows:
• Using the front panel: control keys and liquid-crystal display (LCD)
• Using industry-standard (AT and AT&), and Motorola-enhanced (AT ) AT
commands from an attached terminal, or commands from an asynchronous
communications software package running on an attached PC
*
• From a network management system (NMS)
• Using call establishment methods, such as V.25bis or LPDA2 automatic call
units (ACUs)
Figure 1-1 shows desktop, or standalone, modems. The device is also available in
high-density nest cards, which offer the same features, and can be installed in
Motorola’s Modulus 9-slot and Modulus 21-slot rack-mounted enclosures.
1-2 About the Modem
About the
Modem
34
RD
TR RI/OH
TD
CD RC/NC
3260
Figure 1-1. 326X Series Modem, Standalone Desktop Model
Safety and Operational Notices
Repair
Warning
Do not attempt to repair the modem or enclosure. They contain no
electronic components that can be serviced or replaced by a user.
Any attempt at user service of the 3460 Fast’R or AccessWay
enclosure, or opening of the 3460 Fast'R unit, voids the product
warranty.
Avertissement
N’essayez pas de réparer le modem ou le boîtier. Ils ne contiennent
aucun composant électronique pouvant êtreréparé ou remplacé par
un usager. Toute tentative de réparation du boîtier du 3460 Fast’R
ou de l’AccessWay 16par un usager, ou toute intervention à
l’intérieur du 3460 Fast’R, annule la garantie du produit.
Warnung
Versuchen Sie nicht, das Modem oder sein Gehäuse zu reparieren.
Es sind keine durch den Benutzer wartungs- oder austauschfähige
Teile darin enthalten. Bei jeglichem Öffnen oder Wartungsversuch
am 3460 Fast'R bzw. AccessWay 16-Schaltkasten durch den
Benutzer verfällt die Gerätegarantie.
About the Modem 1-3
About the
Modem
Lightning
Warning
All Motorola devices should be used in environments designed for
computers and electronic equipment. In areas susceptible to lightning, take precautions to prevent damage to electronic equipment.
Contact your telephone company, or an electronic accessories vendor, for information on lightning protection equipment. Customers
experiencing problems caused by surges from lightning have eliminated such problems by installing appropriate surge suppressors
on power and data lines connected to Motorola devices.
Avertissement
Tous les dispositifs Motorola doivent être utilisés dans des environnements conçus pour des ordinateurs et du matériel électronique. Dans les zones susceptibles d’être frappées par la foudre,
prenez des précautions pour éviter que le matériel électronique soit
endommagé. Contactez votre compagnie téléphonique, ou un vendeur d’accessoires électroniques, pour obtenir des renseignements
concernant les systèmes de protection contre la foudre. Certains
usagers confrontés à des problèmes causés par des sautes de tension dues à la foudre ont éliminé ces problèmes en installant des
régulateurs de tension appropriés sur les câbles électriques et les
câbles de données reliés aux dispositifs Motorola.
Warnung
Motorola-Geräte sind grundsätzlich in für Rechner und elektronische Anlagen vorgesehenen Umgebungen zu verwenden. In
unwettergefährdeten Bereichen ist jegliche Elektronik gegen
Blitzeinwirkung zu schützen. Näheres über entsprechende
Schutzeinrichtungen erfahren Sie von Ihrer Telefongesellschaft
oder einem Elektrohändler. Probleme mit Spannungsstößen durch
Blitzeinwirkung lassen sich durch Einbau von Überspannungsableitern in die zu Motorola-Geräten führenden Netz- und Datenleitungen beheben.
Operating the Modem from the Front Panel
The front panel menus are organized functionally so that operation is easy for novice
and advanced users.
Refer to Chapter 3, Getting Started, to learn about front panel operation.
1-4 About the Modem
Selecting Programmed Option Sets
• Asynchronous and synchronous answering
• Asynchronous and synchronous dialing
• Leased line with dial restoral operation
Four sets of options are stored in nonvolatile memory. If none is appropriate to an
application, you can customize an option set, and save it in nonvolatile memory.
Refer to Chapter 4, Configuring the Modem, for more information on option sets.
Automatic Calling Interfaces (ACUs)
The modem supports three automatic calling interfaces (also known as Auto-Call
Units). ACUs let you execute functions directly from a keyboard.
AT ACU
The asynchronous AT ACU is compatible with the industry-standard AT command
set. AT Commands provide a standard modem communications interface, allowing
you to configure and operate your modem from a terminal or PC keyboard.
Using the AT-compatible command set (AT and AT&), you can, for example, dial
and receive phone calls. Motorola’s extended AT command set (AT ) includes other
important parameters used in configuring advanced modem features.
*
Refer to Chapter 3, Getting Started, and Chapter 5, Using the AT Automatic Calling
Interface, to learn more about the AT ACU and AT command syntax.
V.25bis ACU
For sync or async auto-calling, use the ITU-T V.25bis compliant ACU.
With either the AT or V.25bis ACU, you can store, dial, or change up to nine phone
numbers in the modem's electronic telephone book, directly from your terminal.
Refer to Chapter 3, Automatic Calling Interfaces, in the 326X Series Modem
Reference Guide, for details.
LPDA2 ACU
The LPDA2 feature lets you use IBM dial and leased line restoral applications with
LPDA2 Dial and Disconnect commands. LPDA2 allows Netview and other IBM
applications, like POS outbound dialing applications, to control dialing.
In dial applications, LPDA2 eliminates the need for additional ports and equipment
that had been required to support external 801 auto-dialing equipment in IBM
environments.
About the Modem 1-5
About the
Modem
Option sets make it easy to use a modem with common applications, including:
About the
Modem
In leased line operation, while connected on the dial line, the modem can monitor for
LPDA2 commands in the data stream. If the local modem detects an LPDA2
command, the frame that is being processed is aborted. This prevents the remote
DTE from processing the command frame as valid data.
Refer to Chapter 3, Automatic Calling Interfaces, in the 326X Series Modem
Reference Guide, for details.
Managing a Modem
Integral Network Management by Motorola’s 9110, 9000-UX, and 9000-PC
Network Management Systems (NMS) is standard. The NMS can configure, monitor, and control local and remote modem operation.
An NMS continuously polls modems to collect management information and check
status. Network management traffic, including alarms, commands, events, and
polling, is transported to remote modems on an in-band channel that does not disrupt
user data traffic nor consume user bandwidth. The modem supports a daisy-chain
network management interface, reducing the hardware required for connections.
Refer to Chapter 2, Installing the Modem, for instructions on installing and cabling a
modem for use with Motorola’s Network Management Systems.
Restoring Data Transmission
For critical leased line applications that require backup, you can use Models 3261,
3263, 3266, or 3268 in a point-to-point configuration. If the leased line fails, these
modems can automatically reroute data traffic through the public switched telephone
network (PSTN) over a 2-wire dial line. This integral dial line restoral feature
guarantees that data will keep flowing, minimizing network downtime.
ITU-T V.34 Compliant Modulation Mode
326XFAST and 326XFAST-SDC modems support the ITU-T V.34 compliant
modulation mode. 326XFAST- SDC modems offer the same broad set of features
available in the 326XFAST modems, and let you take advantage of faster
transmission speeds while providing highly reliable data transmission in full-duplex
synchronous environments.
326XFAST modems have a line probing feature that optimizes performance on every
connection by automatically choosing the optimum bandwidth, carrier frequency,
and data rate.
V.34 Modulation Mode Characteristics
V.34 modulation mode characteristics are as follows.
1-6 About the Modem
Baud Rate: 2400, 2743, 3000, 3200, and 3429. Some baud rates do not support all
data rates.
Carrier Frequency: 1600, 1646, 1800, 1829, 1920, 1959, and 2000 Hz. Some baud
rates do not support all carrier frequencies.
Modulation: V.34 is a four-dimensional trellis-coded modulation standard that uses
precoding and pre-emphasis equalization schemes.
Compatibility in V.34 Modulation Mode
326XFAST Series Modems (operating in V.34 Auto modulation mode), are
compatible with modems that do not support the V.34 modulation mode, by
automatically negotiating the highest common modulation mode (e.g., V.32bis).
V.90 Compatibility: Release 8.1 software enables 326X modems to operate with
V.90 modems in dial-up connections. With this software, 326X modems can communicate with V.90 modems and negotiate V.34 rates. The release does not provide
56kbps rates for 326X modems, nor 326X rates higher than the V.34 33.6 kbps standard. An upgrade to 8.1 is not required for modems used only in leased-line applications.
Synchronous Data Compression (SDC) Feature
The 326XFAST Series Modem is available in a synchronous data compression
(SDC) model. 326XFAST products offer all the features of the 326XFAST family,
plus synchronous DTE rates at 72.0 kbps or higher.
The 326XFAST-SDC Modem is an ideal alternative to costly digital services.
Whether your application requires dedicated bandwidth, bandwidth on demand,
synchronous dial-up, or dial backup, the 326X-SDC provides optimum throughput
for all HDLC/SDLC-like environments, such as X.25, Systems Networking
Architecture (SNA), Statistical Multiplexer, and Router networks.
Refer to Chapter 4, Configuring the Modem, for details.
The synchronous data compression feature in the 326XFAST-SDC Modem is
Motorola proprietary technology.
Automode/Multimode Feature
Using Automode/Multimode, the modem can automatically negotiate the highest
common modulation speed (within a modulation mode) with another modem.
About the Modem 1-7
About the
Modem
Data Rate: 2.4, 4.8, 7.2, 9.6, 12.0, 14.4, 16.8, 19.2, 21.6, 24.0, 26.4, 28.8, 31.2, and
33.6 kbps
About the
Modem
Remote Configuration
Using the local front panel, an NMS, or local-modem AT ACU, you can configure a
remote modem. You can also read the remote modem’s status snapshots and receive
its configuration summary on a front panel or async terminal.
Error Correction and Data Compression
The modem provides error correction and data compression in accordance with
the V.42 and V.42bis ITU-TS recommendation. With V.42, modems automatically
determine whether to use Microcom Networking Protocol (MNP) Level 4 or Link
Access Procedure for Modems (LAPM) for error correction. Depending on the
scheme negotiated, the modem uses MNP Level 5 or V.42bis data compression. The
SDC modem uses LAPM with a Motorola proprietary data compression technology.
Security
The modem provides access security at two levels:
• Front panel
• Modem access
Front panel security lets you password-protect a modem from access by other users.
This prevents unauthorized changes from being made to a configuration. Front panel
security does not prevent you from using the modem.
You can also screen incoming calls so that unauthorized users cannot access a
modem. This is accomplished with password and callback functions.
Appendix A explains how to configure security features.
Status Snapshots
The modem’s status snapshot feature lets you view a local or remotely controlled
modem's EIA signals and Motorola circuit quality monitoring system (CQMS)
parameters, and view a configuration summary.
CQMS parameters continuously estimate major line parameters without disrupting
data traffic. Measurement of such selections as signal-to-noise ratio and receive level
helps you to isolate causes of degraded network performance.
1-8 About the Modem
Adaptive Rate System
Troubleshooting (V.54 and V.22bis Tests)
The modem supports a full range of ITU-TS V.54 and V.22bis compatible tests to
help isolate and correct problems.
Refer to Chapter 6 for typical problems and ways to correct them. Chapter 6 also
lists the supported diagnostic tests, and instructions for initiating and terminating
tests using either the front panel control keys or AT commands.
For details on tests, refer to Chapter 4 of the 326X Series Modem Reference Guide.
Country-Specific Information
Telephone company regulations vary by country. Because of this, there are minor
physical or operational differences among 326X Series Modem models.
Appendix C, Country-Specific Information, provides cabling, rear panel layouts,
interface pinouts, and other modem features that are required or restricted by country
regulatory agencies.
NET Compliance
This release of the 326X Series Modem complies with the European
Telecommunication Standards Institute’s (ETSI) Net 20, 21, 22, 23, and 25.
CE Regulatory Marking Directive (93/68/EEC)
This product is CE marked to indicate compliance with the following European
directives:
• 73/23/EEC Low Voltage Directive (Safety)
• 89/336/EEX EMC Directive
Compliance with the above directives may only be assured when the equipment is
installed and operated in accordance with the instructions for its use and the purpose
for which it is intended.
Products that do not bear the CE mark are not intended for supply or use in the
European Union.
About the Modem 1-9
About the
Modem
With the Adaptive Rate System enabled, the 326X Series Modem continuously
optimizes its transmit speed within the V.34, V.32bis, V.32 (coded and uncoded),
and V.22bis modulation modes. By constantly monitoring signal quality, the modem
adapts to the optimum transmission rate allowed by line conditions, ensuring
maximum throughput and efficiency.
About the
Modem
1-10 About the Modem
Chapter 2
Installing the Modem
Introduction ..................................................................................................
Unpacking the Modem .................................................................................
Additional Equipment Required ...................................................................
Choosing a Site .............................................................................................
Connecting the Modem ................................................................................
Rear Panel Connectors .............................................................................
Electrical Interfaces—EIA/TIA-232 and ITU-TS V.35 .......................
Operating at V.34 DTE Rates ..............................................................
Attaching a Ferrite Cable for Dial Line Connection
(U.S.A., Canada, Germany, U.K., and Japan) .................................
Cabling the Modem ..................................................................................
Connecting the Modem to a Network Management System ...................
Turning on the Modem .............................................................................
Automatic Self-Test ......................................................................................
Handling Error Messages .....................................................................
After Installing the Modem... .......................................................................
2-2
2-3
2-4
2-4
2-5
2-5
2-6
2-6
2-6
2-7
2-9
2-10
2-11
2-11
2-11
Installing the Modem 2-1
Installing
the Modem
Contents
Introduction
This chapter describes how to install and connect a 326X Series Modem. In this
chapter, you:
Installing
the Modem
• Unpack the modem
• Choose an appropriate site to install the modem
• Familiarize yourself with the modem’s rear panel and connectors
• Connect the modem to a PC or other data terminal equipment (DTE)
• Connect the modem to a telephone handset (if appropriate) and to the
dial/leased telephone line jacks
• Attach ferrite cylinders, if necessary
• Connect the modem to a Network Management System (NMS), if appropriate
• Turn on the modem and run the unit’s automatic self-test
IMPORTANT: Telephone company and governmental regulations vary by country.
Your modem’s rear panel layout and cabling may vary from that shown in this guide.
Appendix C
Refer to Appendix C for a description of the modem rear panel and cabling;
important safety guidelines for connecting the modem in your country; and
regulatory restrictions and requirements.
To order cables, refer to Appendix B; then contact your Motorola sales representative or local distributor for ordering information.
Appendix B
2-2 Installing the Modem
NOTE: If you are installing a 326X Series Modem card, refer to the addendum,
326X Series Modem Cards, shipped with your modem’s backplane.
Unpacking the Modem
The modem is wrapped in reusable shock-absorbent packing material. Save the
carton and packing material for later reuse. Motorola supplies the items shown in
Figure 2-1 with the modem.
Installing
the Modem
One or Two Modular Audio Cables
(3260, 3265: One; Others, Two)
One Power Cord
One 326X Series Modem
(Standalone Unit Shown)
One User’s Guide
One Reference Card
Figure 2-1. Unpacking the Modem
If the equipment is damaged, contact the shipper. If you have further concerns about
damage or missing parts, contact your nearest Motorola representative, or:
In the U.S.A.:
Motorola Customer Administration
20 Cabot Boulevard
Mansfield, MA 02048-1193
(508) 261-4000, Extension 4745
Outside the U.S.A.:
The nearest Motorola distributor can be found
by accessing our Web site at:
http://www.mot.com/MIMS/ISG/.
Installing the Modem 2-3
Additional Equipment Required
Installing
the Modem
Modem-to-Terminal Cable
Personal Computer with Communications
Software Package
Asynchronous or Synchronous
Terminal (DTE)
In addition to the items supplied with the modem, you may need the following:
• Communications Software Package
Many modem applications are controlled by communications software that
supports serial communications. When connecting a modem to a terminal,
communications software is unnecessary. (Refer to Chapter 3 and Chapter 4 for
more information.)
• Serial Cable
A shielded, straight-through modem-to-terminal cable, data communications
equipment (DCE) to data terminal equipment (DTE) cable, is required.
The cable must have a 25-pin D male connector and a DTE connector.
For modem-to-modem (or other DCE-DCE connection), use a crossover cable.
The cable must support the modem signaling your application requires. Select a
cable based on your computer and the DTE pin assignments in Appendix B.
Appendix B
Choosing a Site
Where you place the modem can affect its operation. To enhance performance:
• Install the modem in a clean, well-lighted area that is free from temperature
extremes and dust.
• Do not place anything on top of a modem.
• Locate the modem no more than the EIA-recommended distance from a DTE
and within 6 feet (1.83m) of a grounded AC power outlet.
• Do not place anything within 1 inch (2.54 cm) of either side of a modem. Also,
to prevent overheating, do not place a modem on its side.
Refer to Appendix C for site requirements for operating the modem in your country.
Appendix C
2-4 Installing the Modem
Connecting the Modem
Rear Panel Connectors
• Modular jacks for making:
— DIAL LINE and PHONE connections (3260/3265 Modems) or
— DIAL LINE, PHONE, and LEASE LINE connections (3261/3266
Modems)
• One 6-position Dual Inline Package (DIP) switch. This switch “hardconfigures” some operating functions. When the modem is shipped from the
factory, all switches are in the Off (up) position. DIP switch selections cannot
be overridden by remote front panel configuration. Refer to Appendix C for
DIP switch function details.
Appendix C
• Network Control (NC) IN and OUT ports for connecting to Motorola
Network Management Systems (NMS)
• A DTE port for connecting to a PC or DTE
• An AC power receptacle to accept an AC line cord
• An AC power switch
Refer to Appendix C for a description of the modem’s rear panel. For information on
326X Series Modem Card backplanes (models 3262, 3263, 3267, and 3268), refer to
the addendum, 326X Series Modem Cards, shipped with your backplane.
DIAL
LINE
PHONE
NC
123456
1 ON 6
1
2 3
4 5 6
OUT
IN
DTE
Factory Preset 6-Position
DIPs are Off (Up)
Figure 2-2. 3260/3265 Modem Rear Panel Layout
Installing the Modem 2-5
Installing
the Modem
Figures 2-2 and 2-3 show 3260/3265 and 3261/3266 standalone modem rear panels.
The rear of the modem has the following connectors:
PHONE
DIAL
LINE
LEASE
LINE
Installing
the Modem
NC
123456
1 ON 6
1
2 3
4 5 6
OUT
IN
DTE
Factory Preset 6-Position
DIPs are Off (Up)
Figure 2-3. 3261/3266 Modem Rear Panel Layout
Electrical Interfaces—EIA/TIA-232 and ITU-TS V.35
Caution
Ensure that the electrical interfaces of the equipment you connect
to the modem are compatible. Incompatible interfaces may
seriously damage the modem. Motorola makes no guarantee of the
equipment’s integrity if you do not ensure that compatible interfaces are used. If your DTE has a different interface, you will need
an external converter cable.
326X Series Modems have an EIA/TIA-232/EIA/TIA-562 electrical interface for
connection to external equipment. For compatibility with DTEs that have a V.35
interface, the V.34-SDC Modem is also available with the optional ITU-TS V.35
Recommendation electrical interface.
The rear-panel DTE port is configured at the factory for either interface. Both
interfaces are not available in a unit. Regardless of the interface, external DTEs are
connected through the modem’s rear-panel DTE port.
NOTE: When operating with the V.35 interface, DIP switch S1 must be set to the off
(up) position (see Figure 2-2 or 2-3).
To purchase a compatible cable, consult Appendix B.
Appendix B
2-6 Installing the Modem
Operating at V.34 DTE Rates
To operate V.34 or V.34-SDC modems at DTE rates greater than 19.2 kbps, you must
use cables that can handle the higher data rates. Refer to Appendix B for instructions
on determining the correct cables to use.
Ferrite Cylinders
Ferrite cylinders or beads installed on cables filter out line disturbances. They are
required on some 326X models in some countries, as described in this section.
Install cables with the ferrite end adjacent to the modem.
The ferrite cylinder ensures that the unit operates in compliance
with FCC RFI requirements.
Models 3261 and 3266 – Dial Line Connections
Two telephone cables with ferrite cylinders are included in the Model 3261
(U.S.A.) and the 3266 (Canada, Germany, U.K., and Japan) accessory kit. Connect the cables from the modem to 6- or 8-conductor dial-line connections.
Install the telephone cable. Figure 2-4 shows the proper orientation. Figure 2-8, in
the next section, shows how to connect the 3261/3266 modem.
Dial Line Cable
To Wall Jack
Ferrite
Figure 2-4. Attaching Ferrite Cable to the Modem
Models 3267 and 3268
Ferrite cylinders are required on:
• Both dial line cables and on DTE cables on the 3267 V.34 Modem
• Both audio (leased or dial) cables and on DTE cables on the 3268 V.34
Modem
• Power cables on Modulus enclosures populated with 3267 and 3268 V.34
Modems
• Network management cables on Modulus enclosures populated with 3267
and 3268 V.34 Modems
A cylinder is included with each cable that requires one. Follow the instructions
below to ensure correct cylinder installation.
Installing the Modem 2-7
Installing
the Modem
Caution
Installing a Ferrite Cylinder on an Audio or Network Management Cable
Do the following for each cable:
1) Snugly wrap the cable twice completely around the cylinder (Figure 2-5).
Installing
the Modem
2) Set the cable into the cylinder cutouts.
3) Ensure that 1 to 1-1⁄2 inches of the cable protrude from the cylinder (on the
end you insert into the backplane connector).
4) Snap the cylinder closed. You can reopen and close it to reset the cable.
5) Insert the cable into the modem backplane connector (with the ferrite cylinder
close to the backplane connector).
To Line Jack
Audio Cable
Cutout
To Connector On
Modem Rear Panel
Ferrite Cylinder
1"- 1 1/2 "
Cable Looped Twice
Around Cylinder
Figure 2-5. Installing a Ferrite Cylinder on an Audio Cable
Installing a Ferrite Cylinder on a DTE Cable
Do the following for each DTE cable:
1) Pass the DTE cable through the cylinder.
2) Set the cable into the cylinder cutouts.
3) Position the cylinder as close as possible to the plug you install on the backplane connector.
4) Snap the cylinder closed. You can reopen and close it to reset the cable.
5) Insert the cable into the DTE connector on the modem backplane connector,
with the ferrite cylinder close to the backplane connector.
2-8 Installing the Modem
Installing a Ferrite Cylinder on a Power Cable
Do the following for each power cable of a Modulus enclosure populated with 3267
and 3268 V.34 Modems.
1) Snugly wrap the cable once completely around the cylinder (Figure 2-6).
3) Ensure that 1 to 1-1/2 inches of the cable protrude from the cylinder (on the
end you insert into the backplane connector).
4) Snap the cylinder closed. You can reopen and close it to reset the cable.
5) Insert the cable into the Modulus enclosure connector (with the ferrite cylinder
close to the connector).
To Power Jack
Power Cable
Cutout
Ferrite Cylinder
1"- 11/2 "
Cable Looped Once
Around Cylinder
To Modulus Enclosure Connector
Figure 2-6. Installing a Ferrite Cylinder on a Power Cable
Installing the Modem 2-9
Installing
the Modem
2) Set the cable into the cylinder cutouts.
Important Information About the Modulus Enclosure Front Door
Warning
Installing
the Modem
For safety, the enclosure front door should remain closed and locked
at all times unless you are installing, removing, or configuring product cards.
Avertissement
Pour des raisons de sécurité, la porte d’entrée doit être toujours fermée et verrouillée, sauf lorsque vous installez, retirez ou configurez
des cartes.
Warnung
Aus Sicherheitsgründen darf die Klappe auf der Vorderseite nur zum
Installieren, Entfernen oder Konfigurieren von Produktkarten entriegelt und geöffnet werden.
Por razones de seguridad, la puerta frontal deberá permanecer cerrada en todo momento, a menos que se proceda a la instalación,
extracción o configuración de las tarjetas del producto.
Important Information About the Modulus Enclosure
This notice applies to cooling airflow around the Modulus unit.
Caution
Failure to properly arrange cables could impede cooling airflow,
possibly resulting in damage to the equipment
Mise en Garde
Un mauvais agencement des câbles risque d’empêcher une bonne
ventilation et par conséquent de causer des dommages matériels.
Vorsicht
Die inkorrekte Anordnung von Kabeln kann den Kühlluftstrom
behindern und zu Geräteschäden führen.
Precaucion!
!
La disposición defectuosa de los cables puede impedir el flujo de
aire frío, resultando en posibles daños para el equipo.
2-10 Installing the Modem
Cabling the Modem
This section explains how to connect the modem to:
1) A PC or DTE (asynchronous or synchronous terminal)
2) A dial telephone line
Installing
the Modem
3) A telephone cable (between handset and modem)
4) A leased telephone line (if appropriate)
5) The power cord
6) Network management system cables (if appropriate)
For models 3260/3265, connect modem cables in the order shown in Figure 2-7.
For models 3261/3266, connect modem cables in the order shown in Figure 2-8.
Warning
The modem must be grounded through its electrical plug. If you
cannot use the safety plug with your electrical outlet, consult a
licensed electrician to ensure that the modem is properly grounded.
Unplug the modem from the power outlet before having it serviced.
Avertissement
Le modem doit être mis à la terre lors de son branchement. Si vous
n'avez pas de cartouche fusible, consultez un électricien pour assurer
la mise à terre adéquate de votre appareil. Mettez-le hors tension
avant de commencer toute réparation.
Warnung
Das Modem wird normalerweise über den Stecker geerdet. Wenn
Sie den Schuko-Stecker nicht an die Steckdose anschließen können,
wenden Sie sich an einen zugelassenen Elektriker, um sicherzustellen, daß das Gerät korrekt geerdet ist. Trennen Sie das Gerät vor
dem Öffnen des Gehäuses vom Netz.
Installing the Modem 2-11
1
EIA/TIA 232-D
Interface Cable
2
Dial/
Leased
Line
Jack
Telephone
Cable
Dial/
Leased
Telephone
Line
3
4
AC
Outlet
Power
Cord
Step 1: Install ferrite cylinders as explained in this chapter.
Step 2: Install an EIA/TIA 232-D cable between the modem’s DTE connector and the
DTE or PC serial port. Tighten the cable-connector retaining screws.
Step 3: Unplug the telephone cord from the wall jack and plug it into the modem’s
PHONE LINE connector
Step 4: Attach the modular audio cable (provided with the modem) to the modem’s DIAL
LINE connector. Connect the cable to the RJ-11 dial line wall jack.
Step 5: Plug the power cable into the modem, and then plug into an outlet.
IMPORTANT: Transmit levels on a leased line are typically much greater than those on
a dial line. Do not connect a modem to the dial network when the modem is
configured for leased line operation; the telephone company may detect a fault
condition and initiate an incorrect service call.
Figure 2-7. 3260/3265 Modem Cabling
1
EIA/TIA 232-D
Interface Cable
2
Telephone
Cable
Leased
Line
Jack
4
Dial
Line
Jack
Dial
Telephone
Line
3
Leased
Telephone
Line
5
AC
Outlet
Power
Cord
Step 1: Install ferrite cylinders as explained in this chapter.
Step 2: Install an EIA/TIA 232-D cable between the modem’s DTE connector and the DTE
or PC’s serial port. Tighten the cable-connector retaining screws.
Step 3: Unplug the telephone cord from the wall jack and plug it into the modem’s PHONE
LINE connector.
Step 4: Attach the modular audio cable (provided with the modem) to the modem’s DIAL
LINE connector. Connect the cable to the RJ-11 dial line wall jack.
Step 5: Attach another modular audio cable (provided with the modem) to the modem’s
LEASE LINE connector. Connect the cable to the leased line wall jack.
IMPORTANT: Transmit levels on a leased line are typically much greater than those on a
dial line. Do not connect a modem to the dial network when the modem is configured for leased line operation; the telephone company may detect a fault condition
and initiate an incorrect service call.
Step 6: Plug the power cable into the modem, and then into an outlet.
Figure 2-8. 3261/3266 Modem Cabling
Connecting the Modem to a Network Management System
326X Series Modems can be connected to the following Motorola systems:
Use the modem’s NC IN and NC OUT 8-pin DIN connectors for NMS connections.
1
326X Series Modem
3
9110 Terminal
2
Step 1: Install ferrite cylinders as explained in this chapter.
Step 2: Attach an 8-pin DIN adapter cable connector to the modem’s NC IN connector.
NOTE: The modem can be connected to either a 9- or 25-pin serial communication port on the rear of
the 9110 DMS. Figure 2-7 shows a 25-pin port connection.
Step 3: Attach the other end of the 8-pin DIN adapter cable to the DB 25-pin connector on the 9110’s
network control 9- or 25-pin adapter cable.
Step 4: Attach the 25- or 9-pin connector to the appropriate port on the rear of the 9110 DMS.
Figure 2-9. Connecting to a 9110 NMS
1
326X Series Modem
2
Junction Box
3
To Proxy Agent (PC), and then
to 9000-PC or 9000-UX
Step 1: Install ferrite cylinders as explained in this chapter.
Step 2: Attach an 8-pin DIN adapter cable connector to the modem’s NC IN connector.
Step 3: Connect the 8-pin control-channel connector on the other end of the 8-pin DIN adapter cable
into its receptacle on a junction box.
Step 4: Attach the 50-pin connector on the network control cable to the junction box. Connect the
other end to the appropriate Digi-Board on the rear of the NMS Proxy Agent PC.
Figure 2-10. Connecting to a 9000-PC or 9000-UX NMS
Installing the Modem 2-13
Installing
the Modem
• 9110 NMS (Figure 2-9)
• 9000-PC (Figure 2-10)
• 9000-UX(Figure 2-10)
Installing
the Modem
To connect multiple modems in a daisy chain configuration, refer to Figure 2-11.
326X Series Modem
Step 1: Install ferrite cylinders as explained in this chapter.
Step 2: Attach an 8-pin DIN adapter cable connector to the
modem’s NC IN connector.
(The 8-pin control channel connector at the other end of
this cable is connected to a junction box, as shown in
Figure 2-8.)
Step 3: Connect an 8-pin DIN cable from the first NC OUT
connector to the next NC IN connector, and so on.
To Junction Box
and NMS
326X Series Modem
326X Series Modem
Figure 2-11. Connecting Modems in a Daisy Chain Configuration
To attach modem enclosure cards to an NMS, refer to the addendum, 326X Series
Modem Cards, shipped with the modem backplane.
Turning on the Modem
The power cable connects the rear of the modem to a standard 115V outlet. After
making other connections, plug the power cable into the modem, and then plug it
into an outlet. Turn the rear panel power switch to the On (up) position.
When powered on, the modem automatically performs a self-test of internal circuits.
The "Automatic Self-Test" section, next, describes this test and the front panel
displays that can follow it.
2-14 Installing the Modem
Automatic Self-Test
When you apply power to the modem, it automatically runs a self-test that checks for
and identifies faults in the modem’s circuits. After displaying the message SELFTEST, the front modem displays one of the messages shown in Table 2-1.
Installing
the Modem
Table 2-1.
Self-Test Messages
This Message...
Indicates:
326X Initial
The modem is set to operate using factory default values.
326X Ready
No faults were encountered during the self-test. The modem is ready
for operation.
[Error message]
A system fault was detected during the self-test.
Handling Error Messages
If the modem fails the self-test and displays an error message, do the following:
1) Record the message to assist in troubleshooting the modem.
2) Turn the modem off and then on again, and observe the front panel display.
If the modem displays 326X READY, the earlier error message was probably
caused by a temporary power line problem. Some line problems do not affect
modem operation. If the modem continues to display an error message, contact
Motorola Customer Support or an authorized Motorola distributor.
After Installing the Modem...
Go on to Chapter 3, Getting Started, for information on how to configure and operate
the modem.
Installing the Modem 2-15
Installing
the Modem
2-16 Installing the Modem
Chapter 3
Getting Started
Contents
3-2
3-2
3-2
3-2
3-4
3-5
3-5
3-5
3-6
3-7
3-8
3-8
3-9
3-10
3-10
3-10
3-11
3-11
Getting Started 3-1
Getting Started
Introduction ..................................................................................................
Configuring and Operating the Modem .......................................................
If You Are Unsure of Your DTE’s Data Format... ...............................
Using the Front Panel ...............................................................................
Front Panel Display .............................................................................
Navigating the Configuration Menu Tree ................................................
Menu Structure ....................................................................................
Setting Configuration Options from the Front Panel ...............................
Status Displays .....................................................................................
Using the Modem with a Network Management System (NMS) ............
Using the AT Automatic Calling Unit (ACU) ..........................................
Using the Modem with an Async Terminal .........................................
Using the Modem with a PC and Async Communications
Software ...........................................................................................
Other Call Establishment Methods ...............................................................
V.25bis ACU for Sync or Async Applications .........................................
NetView LPDA-2 ACU for Sync Applications .......................................
Sync Dialing from an IBM AS 400 ..........................................................
External Auto-Call Units ..........................................................................
Introduction
This chapter has three parts:
• System Requirements for Software Upgrades
• Configuring and Operating the Modem
Getting Started
• Other Call Establishment Methods
System Requirements for Software Upgrades
This section explains the prerequisites for an upgrade to 7.9 software. This section
does not apply to new units with 7.8 or higher software installed.
A modem can be upgraded to Release 7.9 software only if it has Release 7.0, 7.5, 7.6,
or 7.7 software.
Configuring and Operating the Modem
You can configure and operate the modem in several ways:
• From the modem front panel
• From a Network Management System (NMS)
• From the modem AT Automatic Calling Unit (ACU), if it is attached to an
asynchronous “dumb” terminal—a terminal without software—or to a PC
running an asynchronous communications software package
Each of these is described in the sections that follow.
If You Are Unsure of Your DTE’s Data Format...
The DTE manual should tell you what data format—asynchronous or synchronous—
it uses. Most PC applications use an asynchronous data format.
Using the Front Panel
You can configure and operate all modem functions using the front panel’s:
• Light-emitting diodes (LEDs)
• Liquid crystal display (LCD)
• Configuration menus
• Control keys
Figures 3-1 and 3-2 show the stand-alone modem front panel. Figure 3-3 shows the
enclosure card front panel. Note the LCD, LEDs, and control keys.
NOTE: Information specific to enclosure card modems is covered in the addendum,
326X Series Modem Cards, shipped with the modem backplane.
3-2 Getting Started
IMPORTANT: To use the front panel keys, the modem must be connected to an AC
power source, the rear panel power switch must be turned on, and rear panel DIP
Switches #3 and #6 must be set to the Off (up) position. See Chapter 2 for details.
34
108
TR
125
RI/OH
TD
103
CD
109
RC/NC
Getting Started
Six front-panel LEDs
indicate status
104
RD
3260
Figure 3-1. Standalone 3260 Modem with Front Cover Closed
LCD Display
326x Ready
Control Keys
RD
TR
RI/OH
104
108
125
103
109
TD
CD
RETURN
ENTER
RC/NC
Figure 3-2. Standalone 3260 Modem with Front Cover Open
125
A/B ALM
108
109
RC/NC RI/OH
104
CD TR
103
TD RD
Enclosure Card has eight LEDs
326x Ready
RETURN
DOWN
ACROSS
ENTER
Figure 3-3. 3260 Modem Enclosure Card Front Panel
LEDs show the status of key DTE interface signals. If a communication problem
occurs, LEDs can help you determine the cause. (Refer to Chapter 6 for a quick
reference to problems and how to correct them.) Table 3-1 describes LED functions.
Table 3-1.
326X LEDs
LED
TD
Name
Transmit Data
RD
Receive Data
RI/OH
Ring Indicator/
Off-Hook
Description
Flashes when the modem accepts data from the local DTE, to
transmit.
Flashes when the modem passes received data to the local
DTE.
On when an incoming call is ringing, and when the modem is
off-hook and connected to the dial line.
Getting Started 3-3
Getting Started
Table 3-1.
326X LEDs
LED
CD
Name
Data Carrier
Detect
Description
On when the local modem receives a carrier signal (as
defined by the current modulation mode) from the remote
modem or when the DCD parameter=High.
On when a DTR signal from a terminal is detected.
TR
Data Terminal
Ready
RC/NC
Remote Control/ Flashes to indicate that the modem is under remote
Network Control configuration (via front panel or AT ACU).
A/B
A or B
On when the modem is under NMS control.
Enclosure cards only.
On when modem A front panel information is displayed.
Off when modem B front panel information is displayed.
To toggle between modem A and modem B front panels, hold
and then press .
ALM
Alarm
Enclosure cards only.
On when a test is in progress or a modem failure occurs. With
the 3262/3267 Modem card, if one modem fails, the ALM
LED lights and remains lit regardless of which modem front
panel is being viewed.
Front Panel Display
The front panel has a 16-character alphanumeric LCD display (see Figure 3-2 or
3-3). You access the configuration menu tree through this display, to:
•
•
•
•
•
•
3-4 Getting Started
Configure the modem
Store and view telephone numbers
Initiate and answer calls
View status information
Run online tests
Enter passwords and network addresses
Navigating the Configuration Menu Tree
This section describes the modem menu tree structure. It explains how to access
parameters using the front panel control keys.
Menu Structure
The menu structure consists of fifteen categories, which appear in capital letters.
Example: CONFIGURATION OPT’S.
You can view parameters and options in the front panel LCD display. If options can
be set, the following indicators display:
• An equals sign (=) indicates the currently selected option of the parameter
• A colon (:) indicates that the displayed option is available but is not selected
Each parameter has a default option:
• Some defaults are determined by the assigned factory-preset option sets
(preconfigured option sets). These defaults are exclusive to an option set.
• Other factory options are not exclusive to an option set and they always have
the same default setting, regardless of which factory-preset option set you use.
Refer to Appendix A, Figure A-1, or to the Reference Card to see the complete menu
tree structure, including the available and default options.
Setting Configuration Options from the Front Panel
The four control keys (Figures 3-2 and 3-3) let you access parameters and options.
Table 3-2 describes control key functions.
Table 3-2.
Front Panel Keys
Keys
Return
Function
Steps up through the menu tree from a parameter to a category, or from a
category to the default display. Example: from Test=, pressing
displays the
TEST OPTS category. Pressing
again displays the default display, such as,
DATA 9600 T/D?
Steps through the parameters in a menu category.
Across
NOTES:
1) If you hold the
or
key down, it repeats until you stop pressing.
2) With the 3262/3267 Modems, to toggle between modem A and modem B front
panels, hold
while pressing .
Getting Started 3-5
Getting Started
Each category has parameters (example: Mode). Some parameters are
configurable; others indicate modem and call status. Most parameters have
selectable options. Options affect the modem’s operating characteristics.
Table 3-2.
Front Panel Keys
Keys
Down
Getting Started
Enter
Function
Steps through categories (example: Data 9600 T/D?, TEST OPTS,
MODULATION OPT’S), or, at a parameter within a category, scrolls through
the options.
Selects an option and/or initiates an action. This key also serves as a Talk/Data
“softkey,” allowing you to toggle between using a telephone and the modem to
establish a telephone connection.
NOTES:
1) If you hold the
or
key down, it repeats until you stop pressing.
2) With the 3262/3267 Modems, to toggle between modem A and modem B front
panels, hold
while pressing .
Example: Accessing a Configuration Option
DATA 9600 T/D?
To select a predefined configuration option set:
Select Options
1) From the Data 9600 T/D? display, press
until Select Options=1 displays.
2) Press
to display Select Options:2, Select Options:3, or Select Options:4.
3) Press
to select an option. The modem is now configured for the option.
Status Displays
The Data 9600 T/D? category is the default display when the modem is powered-up
or after the modem has “timed-out” (i.e., the front panel control keys have not been
used for at least five minutes). The data rate (9600, in the display Data 9600 T/D?)
is the current DCE (modem-to-modem) data rate. It varies with the speed at which
the modems connect. The Data 9600 T/D? category serves three primary functions:
• Talk/Data” Switch
• Operating Status Displays
• Option Sets/Dialing Options
Talk/Data Switch
Pressing
when Data 9600 T/D? is displayed toggles the modem between using:
• An external telephone to manually dial a telephone call
• The modem to dial a stored or unstored telephone number
3-6 Getting Started
Operating Status Displays
The DTE19.2 RELIABL and Phase Jitter subcategories let you view modem
operating status. Example: in the DTE 19.2 RELIABL subcategory, pressing
displays:
• Operating status messages
• DTE/DCE rate/status
• Error correction/data compression status
Getting Started
• EIA/TIA signal status
• Disconnect reasons
• The modem’s software revision level
• Circuit Quality Monitoring System (CQMS) parameter status
For details, refer to Appendix A. For details on status displays, refer to Chapter 1, AT
Commands, of the 326X Series Modem Reference Guide.
Option Sets/Dialing Options
These status subcategories let you choose a preconfigured option set, and make other
selections to determine how the modem will establish telephone connections.
For details on configuring option sets and other call establishment options in this
category, refer to Appendix A.
Where Do I Go from Here?
?
When you are familiar with the front panel, configuration menu system, and control
keys, refer to the following:
• Chapter 4 for specific configuration instructions.
• Appendix A to change parameter options, and to enter and dial a telephone
number. The Reference Card shows the complete menu structure.
• Chapter 6 for a discussion of typical problems and ways to correct them.
Using the Modem with a Network Management System
(NMS)
Modem functions can be configured and controlled from an NMS. Refer to:
• The network management system documentation
• Appendix A for brief descriptions of parameter options and features
• The 326X Series Modem Reference Guide for detailed descriptions of
parameter options and features
Getting Started 3-7
Using the AT Automatic Calling Unit (ACU)
ATZ4
To connect the modem to an asynchronous terminal—a terminal without
software—or a PC running an asynchronous communications software package,
you use the modem’s AT Automatic Calling Unit (ACU) interface.
The AT ACU is compatible with:
• The industry-standard AT command set (AT and AT& commands)
* commands)
Getting Started
• The Motorola enhanced AT command set (AT
AT commands define how the modem is configured, how it makes calls, and what
test operations it performs. The AT command set lets you configure and operate
modem options and features from the PC or asynchronous terminal keyboard.
Using the Modem with an Async Terminal
If you are connecting the modem to an asynchronous terminal, you can use the AT
ACU to configure parameter options from the keyboard. Learn the AT command
syntax in order to generate the appropriate AT commands.
Where Do I Go from Here?
?
To continue configuring the modem from an asynchronous terminal, refer to:
• Chapter 4 for configuration instructions.
• Chapter 5 to learn AT command syntax.
• Chapter 6 for a discussion of common problems and how to correct them.
• Appendix A to change configuration options. The Reference Card shows the
complete menu structure.
(The modem also supports an ITU-TS V.25bis ACU for initiating calls from an
asynchronous or synchronous DTE, described later in this chapter.)
3-8 Getting Started
Using the Modem with a PC and Async Communications
Software
When using the modem with a PC, you need communications or terminal emulation
software. Communications software acts as an interface—with pull-down menus or
graphics—between your PC and modem, allowing you to perform modem operations from your PC.
Communications software packages that directly support the modem (where Codex
3260 Modem or Motorola 3260 Modem is a selection within the package) support
the industry standard commands (AT, AT&) and the Motorola-enhanced commands
(AT ), making more knowledge of AT command syntax unnecessary.
*
Communications software packages that offer a Hayes-Compatible selection do not
support Motorola-enhanced commands: (AT ). In this case, you may enter AT
commands yourself, if required by your application.
*
*
Where Do I Go from Here?
?
If your communications software package supports a 3260 Modem (or a comparable
3260 selection), refer to:
• Chapter 4, the “Communications Software Package Operating Notes” section.
• Chapter 4, the “Configuration Option Sets” section.
• Appendix A to change configuration options. The Reference Card shows the
complete menu structure.
If your package does not support all of the modem’s configuration options, or
requires you to issue AT commands to the modem directly, refer to:
• Chapter 5 to learn AT command syntax.
• Chapter 6 to resolve problems that you have isolated to the modem.
• Communications software documentation.
If your package supports a Hayes-Compatible selection, refer to:
• Chapter 4, the “Communications Software Package Operating Notes” section.
• Chapter 5 to learn AT command syntax.
• For AT
* configuration settings, refer to:
— Chapter 4, the “Configuration Option Sets” section.
— Appendix A to change configuration options. The Reference Card shows
the complete menu structure.
• Chapter 6 to resolve problems that you have isolated to the modem.
Getting Started 3-9
Getting Started
It is unlikely that you will use AT commands directly to configure and test the
modem. Some communications software, however, may not support all of the
modem’s configuration options or may require you to issue commands to the modem
directly.
Other Call Establishment Methods
1
2
3
4
5
6
7
8
9
0
#
In addition to the configuration and operation methods in this chapter, the modem
supports other methods to establish and manage telephone connections:
• V.25bis ACU (for synchronous or asynchronous applications)
• NetView LPDA-2 ACU (for synchronous applications)
• IBM AS 400 (for synchronous dialing)
Getting Started
• External Auto-Call Units such as the Bell 801C
These methods are described in the sections that follow.
V.25bis ACU for Sync or Async Applications
The modem supports an ITU-TS V.25bis ACU for initiating calls from an intelligent
terminal, in synchronous or asynchronous formats, which supports:
• Addressed mode, to perform call-related tasks, such as storing phone numbers
in memory, dialing calls from memory, connecting/disregarding incoming calls
• Manual and direct call establishment methods. Direct mode lets you use DTR
transitions from the DTE to establish calls. Manual mode lets you manually
initiate and answer calls with a telephone and then transfer the call to the
modem.
Where Do I Go from Here?
?
For more information on the V.25bis ACU, refer to Chapter 3, Automatic Calling
Interfaces, in the 326X Series Modem Reference Guide. Programmers and System
Developers should also refer to Chapter 3 for a programming guide describing
asynchronous and synchronous data formats using the ASCII/EBCDIC character
sets.
NetView LPDA-2 ACU for Sync Applications
The modem supports Link Problem Determination Aid (LPDA-2). LPDA-2 is the
communications protocol between IBM host software and transmission devices for
exchanging diagnostic and control information. LPDA-2 commands provide a means
for an attached terminal to command the modem to dial a telephone number and
report back if the call is successful or not successful.
Where Do I Go from Here?
?
3-10 Getting Started
For more information on using the LPDA-2 ACU, refer to Chapter 3, Automatic
Calling Interfaces, in the 326X Series Modem Reference Guide for configuration
information and for information on NetView’s LPDA-2 dialing commands.
Sync Dialing from an IBM AS 400
The modem can be configured to operate as a synchronous originate modem
with the IBM AS 400. The AS 400 supports switched operation with call
origination via a V.25bis-compliant call establishment driver. In this type of
application, the modem is driven by the APPC/APPN bit-synchronous protocol.
Where Do I Go from Here?
• Chapter 4 for configuration instructions.
• Chapter 3, Automatic Calling Interfaces, in the 326X Series Modem
Reference Guide for details on bit-synchronous protocol frame formats and the
V.25bis protocol.
External Auto-Call Units
The modem can be used with applications that support external dialers, such as
the Bell 801C. Once an external dialer establishes a call, it passes control of the
dial line to the modem by the MI/MIC control leads on the DIAL LINE
connector. NOTE: This type of application is supported in Canada and the
U.S.A. only.
Where Do I Go from Here?
?
For more information on external call units, refer to Chapter 3, Automatic
Calling Interfaces, in the 326X Series Modem Reference Guide.
Getting Started 3-11
Getting Started
?
For more information on using the modem with an IBM AS 400, refer to:
Chapter 4
Configuring the Modem
Contents
4-2
4-2
4-2
4-3
4-5
4-5
4-5
4-5
4-6
4-6
4-10
4-11
4-16
4-17
4-18
4-18
4-19
4-20
4-21
4-21
4-22
4-22
4-27
4-27
4-27
Configuring the Modem 4-1
Configuring
the Modem
Overview ......................................................................................................
Communications Software Package Operating Notes ..................................
Configuring the Modem for Use with Communications Software ..........
Operating Notes .......................................................................................
If the Communications Software and Modem Do Not Operate... ............
Preparing for Operation ................................................................................
Reinitializing Memory from the Front Panel ...........................................
Reinitializing Memory Using the AT&F Command ................................
Configuration Option Sets ............................................................................
What is an Option Set? .............................................................................
Configuring an Option Set .......................................................................
Option Set Defaults ..................................................................................
326X V.32bis and 326XFAST Modem Application Examples ......................
Option Set 1—Async Calls to Central Site Using AT ACU ....................
Option Set 2—Sync Answering Central Site Without ACU ....................
Option Set 3—Sync Calls to Central Site, V.25bis ACU .........................
Option Set 4—Async Answering Central Site without
ACU (Models 3260/62/65/67) .................................................................
Option Set 4—Synchronous Leased Line Applications with
Dial Restoral (Models 3261/63/66/68) .....................................................
326XFAST-SDC Modem Application Examples ...........................................
SDC Pre-Operation Notes ........................................................................
Configuring the Modem for SDC Operation ...........................................
SDC Sample Applications ........................................................................
Remote Access Reset ...................................................................................
Operation ..................................................................................................
When Remote Access Reset Is Disabled .................................................
Overview
This chapter explains how to configure the modem, in conjunction with Chapter 3,
Getting Started. Read Chapter 3 before continuing. Then select an option:
• If the application requires a communications software package, read the
section, “Communications Software Package Operating Notes”.
• If you have previously installed the 326X in another application, the section
“Preparing for Operation” explains how to reinitialize the modem memory so it
can be installed in a new application.
Configuring
the Modem
• To configure quickly, the 326X Series Modem offers four preconfigured
option sets. Each option set is tailored for an application and stored in the
modem’s nonvolatile memory. Refer to the section “Configuration Option
Sets” to determine if an option set is appropriate for your application.
• The following two sections provide examples of common 326X applications
and tell you how to configure the modem for each application. These
sections will help you to configure the modem quickly.
• If you are unfamiliar with the AT command set or the modem front panel,
refer to the section “Remote Access Reset”, later in this chapter. Once this is
done, you can use a remote modem to configure the local modem.
If the modem is part of a network and you have a Network Management System
(NMS) installed, consult your network manager for configuration information.
Communications Software Package Operating Notes
This section provides information for configuring the 326X Series Modem to work
with communications software packages.
Configuring the Modem for Use with Communications
Software
Select the Modem’s Preconfigured Option Set 1
Option Set 1 (the modem’s factory default setting) is for use with communications
software in asynchronous dial applications, where the AT ACU originates calls.
Refer also to:
• “Operating Notes” at the end of this section
• “Configuration Option Sets”
4-2 Configuring the Modem
What to Select in the Communications Software Package’s Modem Menu List
1) Select Codex 3260 Modem, Motorola 3260 Modem, or another 3260 option
from the package’s modem list. Packages that directly support the 326X Series
Modem support industry-standard commands and Motorola-enhanced
commands, making further configuration unnecessary.
2) If a 3260 option does not appear in the list, contact the software manufacturer
for the latest version of the package (which should have such an option).
3) Select a Hayes-Compatible entry. With this option, Motorola-enhanced
commands (AT ) are not supported.
*
4) Try operating the communications software. If you have problems, refer to the
“Operating Notes” section, next, and to Chapter 6, Troubleshooting Guide.
Keep the following in mind when using the modem with communications software.
General Notes
The information in this section applies to all 326X Series Modem platforms.
Selecting an Option Set
Option Set 1 was designed for use with asynchronous communications software
packages. It is compatible with most communications software. Option Sets 2, 3, and
4 are intended for different applications and have different default settings. Select
Option Set 1 when using a communications software package.
Establishing a Connection with Option Set 1
With Option Set 1, the modem operates as follows:
1) The modem attempts to establish a LAPM connection.
2) If the connection is unsuccessful, the modem attempts to establish an MNP
connection.
3) If the previous connections are unsuccessful, the modem attempts a Normal
mode connection to the remote modem. All data that is sent to the modem’s
attached computer terminal before the modem establishes a connection is lost.
Auto Dialing and Answering in Option Set 1
When the modem is configured for Option Set 1, and the communications software
package executes an auto dialing and answering operation, the modem automatically
adjusts its baud rate to the communications software baud rate and parity. This rate
remains constant during the established connection.
Configuring the Modem 4-3
Configuring
the Modem
Operating Notes
Direct Operating Mode
If you select Mode=Direct (EC/DC OPT’S category):
• Speed conversion and flow control are not supported. If the communications
package does not support speed detect, change the 326X’s modulation mode to
Auto V.32, and after a connection is established, change the communications
software rate to match the modem’s connection rate.
• If the communications package supports data rates higher than 9.6 kbps, set the
modem’s maximum rate (Max Rate, AT MX) to the higher rate and disable
the adaptive rate feature before placing or answering calls. Ensure that the
package’s speed and the modem’s connection rate match when the connection
is established. NOTE: Some communications software packages support the
automatic speed detect feature, which automatically matches the modem’s baud
rate with the software package’s baud rate.
Configuring
the Modem
*
Transferring a File
Refer to the communications package instructions for the procedure for transferring
files using the communications software package’s supported protocols.
Ring Messages
Some communications packages wait for ring messages to be received before the
modem answers incoming calls. The 326X Series Modem must be set to the
communications software package’s baud rate before the package recognizes the ring
message. Set DTE Rate, by the front panel or by issuing an AT command, when the
modem is configured for autobaud operations.
Flow Control Requirements
• Flow control prevents buffer overflow when line disturbances cause frequent
retransmissions. See “AT FL” (for the DTE) and “AT MF” (for the modem)
in Appendix A.
*
*
If the communications package does not directly support the 326X Series
Modem and you want to use the package’s file transfer method:
• If the communications package supports RTS/CTS flow control, enable it:
a) Set the modem to Flow=RTS/CTS
b) Set Modem Flow=Off
c) Transfer data, using the instructions in the communications package.
• If the communications package does not support RTS/CTS flow control:
a) Set the modem to Flow=Off
b) Set Modem Flow=Off
c) Transfer data, using the instructions in the communications package.
• If the communications package supports the automatic speed detect
feature, set Max Rate to a value also supported by the software package.
Set Speed Conver=Off. Set the modem’s adaptive rate parameter to Off.
4-4 Configuring the Modem
326XFAST V.34 and 326XFAST-SDC Notes
The information in this section applies when operating at the higher DTE rates
available with the 326XFAST V.34 and 326XFAST-SDC Series Modems.
• If the communications software package supports the higher terminal rates
available with these modems, and you want to use the package’s auto dial or
auto answer features, set the modem’s DTE Rate (TERMINAL OPT’S
category) to that of the package.
• Some communications packages do not let you select the higher rates available
with the 326XFAST V.34 modem while using the package’s auto dial or auto
answer functions. To take advantage of the higher DTE rates, do the following:
a) Set the package for Direct or Terminal mode.
b) Select the higher speed of the package.
d) Use the AT command set to establish the connection.
• Some file transfer protocols offered by a communications package may not
operate properly when DTE Rate is greater than 38.4 kbps, because some
serial ports cannot sustain data transmission at these rates.
If the Communications Software and Modem Do Not
Operate...
If, after following the suggestions in this section, you cannot get the communications
software package and modem to operate, refer to Chapter 6, Troubleshooting Guide.
If you still cannot get the communications software package and modem to operate,
contact your software vendor for assistance.
Preparing for Operation
The procedures in this chapter assume that you are installing the modem for the first
time. If you want to reinstall the modem, perform the procedure(s) below to
reinitialize the modem’s memory. NOTE: Reinitializing modem memory sets
modem parameter options back to factory defaults (Option Set 1) and deletes stored
telephone numbers from memory.
Reinitializing Memory from the Front Panel
1) Press
twice. Press
until the modem displays Reinit Memory.
2) Press
. The modem displays Reinit Mem?
3) Press
to reinitialize modem memory.
Reinitializing Memory Using the AT&F Command
You can also reinitialize memory by entering AT&F<CR> from the terminal.
Configuring the Modem 4-5
Configuring
the Modem
c) Set the modem’s DTE Rate to match the package’s set speed.
Configuration Option Sets
This section discusses the modem’s preconfigured option sets, in three parts:
• What is an Option Set?
• How to Configure an Option Set
• Option Set Defaults—326X V.32bis, 326XFAST V.34, and 326XFAST-SDC
What is an Option Set?
Configuring
the Modem
Option sets are complete configurations, each tailored for an application and stored
in memory. Option sets get the modem working quickly.
If an option set does not exactly suit your needs, pick the one that most closely
matches your application, modify its settings, and save the changes in the modem’s
nonvolatile memory (refer to Appendix A).
Table 4-1 shows V.3bis and V.34 option sets. Table 4-2 shows SDC option sets.
Table 4-1.
Option Set Summary—326X V.32bis and V.34 Modems
Application
Async dial applications in which you are using the AT ACU to originate calls to
a central site (default option set)
Sync central site auto-answer applications; no ACU
Sync calls to a central site
Async central site auto-answer applications; no ACU (Models 3260/62/65/67)
Leased line application with dial restoral; no ACU (Models 3261/63/66/68)
Option
Set
1
2
3
4
4
Table 4-2.
Option Set Summary—326XFAST-SDC Modem
Application
Async dial applications in which you are using the AT ACU to originate calls to
a central site (default option set)
Sync dial A/B restoral application
Sync dial only application
Sync leased line application with dial restoral; no ACU (Models 3261/63/66/68)
4-6 Configuring the Modem
Option
Set
1
2
3
4
Option Set Descriptions—326X V.32bis and V.34 Modems
Option Set 1—Async Calls to Central Site Using the AT ACU
With Option Set 1, the modem communicates over dial lines using an asynchronous
data format. This option set is appropriate for home or office use where you plan to
dial, for example, into a central-site computer, minicomputer, an electronic bulletin
board, or a personal computer. When you first install the modem, it is set to power up
with Option Set 1 as the factory default. The modem recognizes the standard AT
Command Set and the Motorola-enhanced AT Command set.
To satisfy common asynchronous communications software packages, Option Set 1
holds several EIA 232-D (ITU V.24) control signals asserted (see Tables 4-1 and
4-2). The modem originates calls and answers incoming calls according to the setting
of S-Register 0 (see the “S-Registers” section in Chapter 5 for more information).
Option Set 2—Sync Answering Central Site Without an ACU
Option Set 2 satisfies the needs of a synchronous application where most calls are to
a central site (see Table 4-1).
Because calls are received primarily at the central site, the modem is set to answer
calls automatically. With DTR=108.2, the local DTE can control the DTR signal.
This allows the local DTE to use DTR transitions to connect the modem to the
central site at the beginning of transmission and disconnect it when transmission
ends.
At the beginning of each connection, the modem negotiates the highest common data
rate with the remote modem. The modem uses the adaptive rate feature in the V.34,
V.32bis, or V.32 modulation modes. This ensures maximum throughput when line
quality is poor.
Option Set 3—Sync Calls to Central Site Using the V.25bis ACU
Option Set 3 satisfies the needs of a synchronous application, where the remote
modems originate calls to a central site (see Table 4-1).
With Option Set 3, the modem originates calls with its V.25bis ACU. The DTR
option is set to 108.2 so that the V.25bis ACU can manipulate the DTR signal. All
other options in the ACU OPT’S category are set for a typical synchronous DTE.
At the beginning of each connection, the modem negotiates the highest common data
rate with the remote modem. The modem uses the adaptive rate feature in the V.34,
V.32bis, or V.32 modulation modes. This ensures maximum throughput when line
quality is poor.
Configuring the Modem 4-7
Configuring
the Modem
At the beginning of each connection, the modem negotiates the highest common data
rate with the remote modem set to its factory default setting or automode. The
modem also uses the adaptive rate feature in the V.34, V.32bis, or V.32 modulation
modes. This ensures maximum throughput when line quality is poor.
Option Set 4—Async Answering Central Site Without an ACU (Models 3260/
62/65/67)
Option Set 4 satisfies the needs of an asynchronous application where most calls are
inbound (see Table 4-1).
Configuring
the Modem
Because calls are received primarily at the central site, the modem is set to answer
calls automatically. With DTR=Discon, the local DTE can control the DTR signal.
This allows the local DTE to use DTR transitions to connect the modem to the
central site at the beginning of transmission and disconnect it when transmission
ends. The DTR signal from the DTE must be high for the modem to auto-answer. If
the DTR signal is low, it does not answer incoming calls.
At the beginning of each connection, the modem negotiates the highest common data
rate with the remote modem. The modem uses the adaptive rate feature in the V.34,
V.32bis, or V.32 modulation modes. This ensures maximum throughput when line
quality is poor.
Option Set 4—Sync Leased Line Applications With Dial Restoral (Models
3261/63/66/68)
Option Set 4 uses the modem’s leased line restoral feature. With this option set, the
modem operates primarily on a leased line unless that line fails. If so, the modem
automatically restores the connection over a single dial line. You must install a 326X
Series Modem at both ends of the leased line to implement restoral operation.
Option Set 4 configures the modem for a general restoral application (see Table 4-1).
The modem uses the adaptive rate feature in the V.34 or V.32bis Auto modes. This
ensures maximum throughput when line quality deteriorates. If restoral criteria are
met, the modem automatically reroutes data traffic through the public switched
telephone network (PSTN) over a single dial line. At that time, the modem attempts
to run at its maximum rate over the dial line, and falls back to lower speeds if
required. After an hour, the modem returns to the leased line.
If you operate your modems in leased-line mode with Option Set 4, and one modem
has software Revision 7.8 or 7.9, set the Fast Call parameter (AT FC, Modulation
Opts Menu) to Off in both modems.
*
Option Set Descriptions—326XFAST-SDC Modems
Option Set 1—Async Calls to Central Site
Option Set 1 in the 326X-SDC product functions the same as Option Set 1 above.
Option Set 2—Sync Dial A/B Restoral
Option Set 2 satisfies the needs of a synchronous point-to-point digital link restoral
application (see Table 4-2).
With this option set, the Clock is set to External as network timing is provided by the
DSU/CSU. NOTE: With this option set, (for Motorola and non-Motorola DSU/
CSUs), the DSU’s restoral configuration should be set to Timing=Internal.
4-8 Configuring the Modem
With this option set, the local and remote modems are configured for SDC operation.
The modems default to Fast Call=Lvl3, and use LAPM error correction with
modified V.42bis data compression. Enable Option Set 2 in both the local and remote
modems, and ensure that Mode (AT SM) is set the same in both modems.
*
The modem uses the adaptive rate feature in the V.34 Auto modulation mode. This
ensures maximum throughput when line quality is poor.
Option Set 3—Sync Dial Only
Option Set 3 satisfies the needs of a synchronous dial application (see Table 4-2).
With Option Set 3, the modem provides the network timing (Clock=Internal).
Select a data rate at which the modem communicates with the DTE, using DTE Rate
(AT DE). Consult the description in Appendix A.
*
*
With Option Set 3, DTR=108.1 so that an off-to-on DTR transition instructs the
modem to connect to the telephone line. If the modem detects an incoming call, the
call is connected. If the modem does not detect an incoming call and Default Dial
(AT DA) is enabled, the modem dials the number specified. If Default Dial is
disabled, the modem refers to the Modulation Mode option (AT MM). If set to
Answer, the modem goes off-hook and sends an answer-back tone. An on-to-off
DTR transition disconnects the modem from the telephone line. If DTR is low, the
modem does not auto-answer. DTR transitions govern how the modem answers and
disconnects calls. All options in the ACU OPT’S category are set for a typical
synchronous DTE.
*
*
The modem uses the adaptive rate feature in the V.34 Auto modulation mode. This
ensures maximum throughput when line quality is poor.
Option Set 4—Sync Leased Line with Dial Restoral; No ACU (Models 3261/
63/66/68)
Option Set 4 uses the modem’s leased line restoral feature. With this option set, the
modem operates primarily on a leased line unless that line fails. If so, the modem
automatically restores the connection over a single dial line. You must install a
326XFAST-SDC Modem at both ends of the leased line to implement restoral.
Option Set 4 configures the modem for a general restoral application (see Table 4-2).
The modem uses the adaptive rate feature in the V.34 Auto modulation mode. This
setting ensures maximum throughput when line quality deteriorates. If restoral
criteria are met, the modem automatically reroutes data traffic through the public
switched telephone network (PSTN) over a single dial line. At that time, the modem
attempts to run at 28.8 kbps over the dial line, and falls back to lower speeds if
required. After an hour, the modem returns to the leased line.
With Option Set 4, the modem provides the network timing (Clock=Internal).
Select a data rate at which the modem communicates with the DTE, using DTE Rate
(AT DE). Refer to the description in Appendix A.
*
Configuring the Modem 4-9
Configuring
the Modem
With this option set, the local and remote modems are configured for SDC operation.
The modems default to Fast Call=Lvl3, and use LAPM error correction with a
modified V.42bis data compression. Enable Option Set 3 in both the local and remote
modems, and ensure that Mode (AT SM) is set the same in both modems.
In this option set, the local and remote modems are configured for SDC operation.
The modems default to Fast Call=Lvl3, and use LAPM error correction with
modified V.42bis data compression. Enable Option Set 4 in both the local and remote
modems, and ensure that Mode (AT SM) is set the same in both modems.
*
Refer to “326X V.32bis and 326XFAST Modem Application Examples” below.
If you operate your modems in leased-line mode with Option Set 4, and one modem
has software Revision 7.8 or 7.9, set the Fast Call parameter (AT FC, Modulation
Opts Menu) to Off in both modems.
*
Configuring an Option Set
Configuring
the Modem
This section describes how to configure and save an option set.
From the Modem Front Panel:
1) Read “Preparing for Operation,” earlier in this chapter.
2) Identify the option set for your application. The default is Option Set 1.
3) Display SELECT OPTIONS on the front panel (refer to Chapter 2 to review
the function of front panel control keys).
4) Press
until the modem displays SELECT OPTIONS:n, where n=1-4.
5) Press
to select an option set. The modem displays SELECT OPTIONS=n.
Using the ATZ Command:
1) Read “Preparing for Operation,” earlier in this chapter.
2) Identify the option set for your application. The default is Option Set 1.
3) Type ATZn<CR>, where n=1-4.
NOTE: The modem disconnects from the line when the ATZ command is
entered, and any test in progress is immediately terminated. Since any AT
command following the ATZ command is ignored by the modem, make sure
ATZ is the last command entered in the command string.
To create a customized option set:
Using the AT&W Command:
1) Using the ATZn command, select an option set n that most closely suits the
application.
2) Use AT commands (see Appendix A) to change parameter options. For
example, to change RTS/CTS delay from its time in S-Register 26, to 15 ms,
enter AT DL1<CR>. The front panel displays OK.
*
3) Enter AT&Wn, where n specifies the address (option set) where the new
customized option set is stored.
The front panel displays SAVING OPTIONS.
4) After a few seconds, your modifications are stored in the modem’s nonvolatile
memory, and the modem front panel displays SAVE COMPLETED!
4-10 Configuring the Modem
5) Do not turn off modem power until SAVE COMPLETED! appears.
Configuring
the Modem
Configuring the Modem 4-11
From the Modem’s Front Panel:
1) Identify the option set that most closely suits the application. The default is 1.
2) Display the option(s) you want to modify using
and . For example, to
change Max Rate from 2400 to 7200, display Max Rate: 7200.
Press . The display flashes three times and the colon changes to an equals
sign. The new option is temporarily saved and Max Rate=7200 displays.
3) Step across the Status/Option Sets/Dialing menu by pressing
Save Changes=n.
until you see:
4) Use the
key to display the option set number where you want the changes
saved, and then press . The modem displays Saving Options.
Configuring
the Modem
5) After a few seconds, the modifications are stored in the modem’s nonvolatile
memory, and the modem displays SAVE COMPLETED!
6) Do not turn off modem power until SAVE COMPLETED! appears.
Option Set Defaults
Table 4-3 summarizes option set defaults for 326X V.32bis and 326X V.34 modems.
Table 4-4 summarizes option set parameter defaults for 326X V.34-SDC modems.
Table 4-3.
Option Set Defaults—326X V.32bis and 326X V.34 Modems
Parameter
MOD OPT’S
Line
Mod*
Option Set 1
Option Set 2
Option Set 3
Option Set 4
Option Set 4
(3260/62/65/67) (3261/63/66/68)
Dial
Dial
Dial
Dial
2W Lease
V.32bis Auto/
V.34 Auto
V.32bis Auto/
V.34 Auto
V.32bis Auto/
V.34 Auto
V.32bis Auto/
V.34 Auto
V.32bis Auto/
V.34 Auto
Auto Type
CCITT
CCITT
CCITT
CCITT
CCITT
Low Speed
Country-specific
Country-specific
Country-specific
Country-specific
Country-specific
Max Rate*
14.4/ 33.6
14.4/ 33.6
14.4/ 33.6
14.4/ 33.6
14.4/ 33.6
Min Rate
300
300
300
300
300
V.34 Asym
[none]/On*
[none]/On*
[none]/On*
[none]/On*
[none]/On*
Fast Call
Off
Off
Off
Off
Off
Adaptive Rate
On
On
On
On
On
Mode
Originate
Answer
Originate
Answer
Answer
Clock
Internal
Internal
Internal
Internal
Internal
Retrain
High BER
High BER
High BER
High BER
High BER
Longspace
Off
Off
Off
Off
Off
PSTN
On
On
On
On
On
Guard Tone
Country-specific
Country-specific
Country-specific
Country-specific
Country-specific
*V.32bis Series default shown first/V.34 Series default shown second
4-12 Configuring the Modem
Table 4-3.
Option Set Defaults—326X V.32bis and 326X V.34 Modems (Continued)
*V.32bis Series default shown first/V.34 Series default shown second
Configuring the Modem 4-13
Configuring
the Modem
Option Set 4
Option Set 4
Parameter
Option Set 1
Option Set 2
Option Set 3
(3260/62/65/67) (3261/63/66/68)
RESTORAL OPT’S (modems without the restoral function display only the HOLD DIALINE option)
Restore
Off
Off
Off
Off
FP/Auto
L to D
Low/Fast
Low/Fast
Low/Fast
Low/Fast
Low/Fast
D to L
Manual
Manual
Manual
Manual
1 Hr
Hold Dialine
Off
Off
Off
Off
Off
Ans Rest
LL Fail
LL Fail
LL Fail
LL Fail
LL Fail
EC/DC OPT’S
Mode
Auto Rel
Direct
Direct
Auto Rel
Direct
Buffers
Regular
Regular
Regular
Regular
Regular
EC
V.42
V.42
V.42
V.42
V.42
DC
Enabled
Enabled
Enabled
Enabled
Enabled
Break
Destruct
Destruct
Destruct
Destruct
Destruct
Modem Flow
On
On
On
On
On
Delay
Off
Off
Off
Off
Off
EC ID
Default
Default
Default
Default
Default
ACU OPT’S
ACU Select
AT
None
V.25b
None
None
AT Form
Async
Async
Async
Async
Async
V25 Form
Bitsync
Bitsync
Bitsync
Bitsync
Bitsync
NoACU Form
Async
Sync
Sync
Async
Sync
Default Dial
Off
Off
Off
Off
1
Answer
Country-specific Country-specific Country-specific Country-specific Country-specific
Async Echo
On
On
On
On
On
Char Length
10
10
10
10
10
V25 Char
ASCII
ASCII
ASCII
ASCII
ASCII
Sync Idle
Char
Char
Char
Char
Char
V25 Resp
V25bis
V25bis
V25bis
V25bis
V25bis
Parity
V.25bis
V.25bis
V.25bis
V.25bis
V.25bis
AT Msg
Before CD
Before CD
Before CD
Before CD
Before CD
Rslt Code
Enable
Enable
Enable
Enable
Enable
ResltForm
Verbose
Verbose
Verbose
Verbose
Verbose
Con Msg
DTE Rate
DTE Rate
DTE Rate
DTE Rate
DTE Rate
Rel Msg
Off
Off
Off
Off
Off
LPDA2 Addr
FF
FF
FF
FF
FF
LPDA2 ID
326X
326X
326X
326X
326X
LPDA2 Det
Enable
Enable
Enable
Enable
Enable
Call Progress
4
4
4
4
4
TERMINAL OPT’S
Configuring
the Modem
Table 4-3.
Option Set Defaults—326X V.32bis and 326X V.34 Modems (Continued)
Parameter
DTE Rate*
Flow
Speed Conver
DTR
RTS
CTS
RTS/CTS Delay
DCD
RemRST/DCD
DCD Loss Dis
DSR
Overspeed
DTR Delay
DTE Ct 140
DTE Ct 141
DTE Pin 25
Ext Select
Ext Cntrl
Inactivity
Option Set 1
Auto
XON/XOFF
On
High
High
AsynSync
0
High
Codex
S10
High
1%
S25
Off
Off
Test
Off
Pin 14
S30
Option Set 2
14.4/28.8
XON/XOFF
On
108.2
Normal
Normal
0
Normal
Codex
S10
Drop on Disc
1%
S25
Off
Off
Test
Off
Pin 14
S30
Option Set 3
14.4/28.8
XON/XOFF
On
108.2
Normal
Normal
0
Normal
Codex
S10
Normal
1%
S25
Off
Off
Test
Off
Pin 14
S30
*V.32bis Series default shown first/V.34 Series default shown second
4-14 Configuring the Modem
Option Set 4
(3260/62/65/67)
19.2
XON/XOFF
On
Discon
Normal
Normal
0
Normal
Codex
S10
Normal
1%
S25
Off
Off
Test
Off
Pin 14
S30
Option Set 4
(3261/63/66/68)
14.4/28.8
XON/XOFF
On
High
Normal
Normal
0
Normal
Codex
S10
Normal
1%
S25
Off
Off
Test
Off
Pin 14
S30
Table 4-4.
Option Set Defaults—326X-SDC V.34 Modem
Option Set 1
Option Set 2
Option Set 3
Option Set 4
(3261/63/66/68)
Dial
Dial
Dial
2W Lease
V.34 Auto
V.34 Auto
V.34 Auto
V.34 Auto
CCITT
CCITT
CCITT
CCITT
Country-specific
Country-specific
Country-specific
Country-specific
33.6
33.6
33.6
33.6
300
9600
9600
9600
On
On
On
On
Off
Lvl3
Lvl3
Lvl3
On
On
On
On
Originate
Answer
Originate
Answer
Internal
External
Internal
Internal
High BER
High BER
High BER
High BER
Off
Off
Off
Off
On
On
On
On
Country-specific
Country-specific
Country-specific
Country-specific
Off
Off
Off
FP/Auto
Low/Fast
Low/Fast
Low/Fast
Low/Fast
Manual
Manual
Manual
1 Hr
Off
Off
Off
5min
LL Fail
LL Fail
LL Fail
LL Fail
Auto Rel
Auto Rel
Auto Rel
Auto Rel
Regular
Regular
Regular
Regular
V.42
V.42
V.42
V.42
Enabled
Enabled
Enabled
Enabled
NRZ
NRZ
NRZ
NRZ
Destruct
Destruct
Destruct
Destruct
On
On
On
On
Off
Off
Buff or S38
Off
Default
Default
Default
Default
AT
None
None
None
Async
Async
Async
Async
Bitsync
Bitsync
Bitsync
Bitsync
Async
Sync
Sync
Sync
Configuring the Modem 4-15
Configuring
the Modem
Option
MOD OPT’S
Line
Mod
Auto Type
Low Speed
Max Rate
Min Rate
V.34 Asym
Fast Call
Adaptive Rate
Mode
Clock
Retrain
Longspace
PSTN
Guard Tone
RESTORAL OPT’S
Restore
L to D
D to L
Hold Dialine
Ans Rest
EC/DC OPT’S
Mode
Buffers
EC
DC
Data Form
Break
Modem Flow
Delay
EC ID
ACU OPT’S
ACU Select
AT Form
V25 Form
NoACU Form
Configuring
the Modem
Table 4-4.
Option Set Defaults—326X-SDC V.34 Modem (Continued)
Option
Default Dial
Answer
Async Echo
Char Length
V25 Char
Sync Idle
V25 Resp
Parity
AT Msg
Rslt Code
ResltForm
Con Msg
Rel Msg
LPDA2 Addr
LPDA2 ID
LPDA2 Det
Call Progress
TERMINAL OPT’S
DTE Rate
Option Set 3
1
Country-specific
On
10
ASCII
Char
V25bis
V.25bis
Before CD
Enable
Verbose
DTE Rate
Off
FF
326X
Enable
4
Option Set 4
(3261/63/66/68)
1
Country-specific
On
10
ASCII
Char
V25bis
V.25bis
Before CD
Enable
Verbose
DTE Rate
Off
FF
326X
Enable
4
Option Set 1
Off
Country-specific
On
10
ASCII
Char
V25bis
V.25bis
Before CD
Enable
Verbose
DTE Rate
Off
FF
326X
Enable
4
Option Set 2
1
Country-specific
On
10
ASCII
Char
V25bis
V.25bis
Before CD
Enable
Verbose
DTE Rate
Off
FF
326X
Enable
4
Auto
56.0 U.S. A., Canada 56.0 U.S. A., Canada 56.0 U.S. A., Canada
64.0 other countries
64.0 other countries
64.0 other countries
Flow
XON/XOFF
Tx Clk
Tx Clk
Tx Clk
TpDlyMin
—NA—
Rx Clk
Rx Clk
Rx Clk
Speed Conver
On
On
On
On
DTR
High
Tail
108.1
High
RTS
High
Normal
Normal
Normal
CTS
AsynSync
Normal
Normal
Normal
RTS/CTS Delay
0
0
0
0
DCD
High
Normal
Normal
Normal
RemRST/DCD
Codex
Codex
Codex
Codex
DCD Loss Dis
S10
S10
S10
S10
DSR
High
Normal
Normal
Normal
Overspeed
1%
1%
1%
1%
DTR Delay
S25
S25
S25
S25
DTE Ct 140
Off
Off
Off
Off
DTE Ct 141
Off
Off
Off
Off
DTE Pin 25
Test
Test
Test
Test
Ext Select
Off
Off
Off
Off
4-16 Configuring the Modem
Table 4-4.
Option Set Defaults—326X-SDC V.34 Modem (Continued)
Option
Ext Cntrl
Inactivity
Option Set 1
Pin 14
S30
Option Set 2
Pin 14
S30
Option Set 3
Pin 14
S30
Option Set 4
(3261/63/66/68)
Pin 14
S30
Configuring
the Modem
Configuring the Modem 4-17
326X V.32bis and 326XFAST Modem Application Examples
Configuring
the Modem
This section provides application examples for each option set, and notes options
you may need to change from factory default settings for each option set.
For This Type of Application...
The modem connected to a remote terminal dialing into an asynchronous
host computer (VAX, for example)
The modem connected to a remote PC dialing into a LAN (remote node
and remote control application)
Remote X-Terminal dialing to a UNIX workstation or PC into a central site
(for example, a UNIX-based terminal server or mini-computer)
The modem connecting LANs via dial-up router/bridge
The modem connected to a terminal calling an X.25 network or an electronic bulletin board
The modem as an answer modem connected to one of the following:
Select...
Option Set 1
Option Set 1
Option Set 1
Option Set 1
Option Set 1
Option Set 2
• A Front End Processor (FEP) or host computer
• An X.25 host/node
• Asynchronous router/bridge
Cluster controller calling a host computer
Option Set 3
Synchronous terminal calling a host computer
Option Set 3
Router/bridge calling another router/bridge
Option Set 3
X.25 node/host computer calling another X.25 node/host computer
Option Set 3
The modem as an external restoral device for leased line failure
Option Set 3
Bandwidth on demand for leased line applications
Option Set 3
Synchronous Dialing from an IBM AS 400
Option Set 3
The modem as an answer modem connected to one of the following:
Option Set 4
• An electronic bulletin board
• An asynchronous host computer
(Models 3260/
62/65/67)
• A terminal server
• An asynchronous dial-up router/bridge
The modem connecting routers/bridges on a leased line
Option Set 4
(Models 3261/
63/66/68)
The modem connecting an FEP to a cluster controller
Option Set 4
(Models 3261/
63/66/68)
The modem connecting two FEPs
Option Set 4
(Models 3261/
63/66/68)
X.25/statistical multiplexer internodal with dial restoral
Option Set 4
(Models 3261/
63/66/68)
4-18 Configuring the Modem
Option Set 1—Async Calls to Central Site Using AT ACU
Changing Default Configuration Settings
Depending on application requirements, you may need to change the following:
• Buffer Delay (AT DB, EC/DC OPTS category), when enabled, allows
buffered data in the communications link to be effectively transmitted to the
other modem before the modems disconnect. Enable this feature if your
application does not ensure a complete transfer of data before the modems
disconnect.
*
• When the 326X is configured for Option Set 1: if you do not use the AT ACU
to send commands to operate the modem, you must customize the DTE port by
selecting these options:
*
— Parity. Set the modem’s parity to match the parity set in the asynchronous DTE using the Parity option (AT RP, ACU OPTS category).
*
— Character Length. Set the modem’s character length (Char Length,
ACU OPTS category) to match the length set in the asynchronous DTE.
(Refer to Appendix A for parameter and setting descriptions.)
• In Option Set 1, the default settings assume you will use the AT ACU to operate the modem (for example, the default for ACU Select=AT; EIA signals are
set high). If you plan on using DTR transitions (“DTR Dialing”) to signal the
modem to make a call (rather than AT Commands), do the following:
1) Set Default Dial=1 (AT DA, ACU OPTS category).
*
2) Store a number in memory location 1 (using Enter Phone #, AT&Z,
9600 T/D? category).
3) Set DTR=108.1 (AT&D, TERMINAL OPTS category). When DTR is
raised, the modem will dial the specified call.
• If the DTE does not require EIA signal pins to be held high, adjust the EIA
settings (TERMINAL OPTS category) to match your application requirements.
• In Option Set 1, the modem is set for XON/XOFF (software) flow control. If
your application requires hardware flow control, change the Flow setting
(AT FL, TERMINAL OPTS category).
*
Configuring the Modem 4-19
Configuring
the Modem
— DTE Rate. Set the modem’s DTE rate to match the asynchronous DTE’s
rate using the DTE Rate option (AT DE, TERMINAL OPTS category).
Option Set 2—Sync Answering Central Site Without ACU
Changing Default Configuration Settings
Depending on application requirements, you may need to change the following:
• In Option Set 2, the default for network timing is Clock=Internal (AT&X,
MODULATION OPTS category). It may be necessary to change the timing to
external or loopback, depending on the network clocking source.
• In Option Set 2, the default for ACU Select=None. If you want an ACU to
operate the modem, select an ACU and a data format.
• Customize the DTE port as follows:
Set the modem’s DTE rate to match the synchronous DTE’s rate using DTE
Rate (AT DE, TERMINAL OPTS category) (refer to Appendix A for
parameter and setting descriptions.)
Configuring
the Modem
*
• The default Answer option is country-specific. Refer to Appendix C to verify
that this option is appropriate for your application.
• If the DTE does not provide DTR, the modem will not automatically answer an
incoming call. Set DTR=High (AT&D, TERMINAL OPTS category).
Option Set 3—Sync Calls to Central Site, V.25bis ACU
Changing Default Configuration Settings
Depending on application requirements, you may need to change the following:
• In Option Set 3, the default setting for network timing is Clock=Internal
(AT&X, MODULATION OPTS). It may be necessary to change the timing to
external or loopback, depending on the network clocking source.
• In Option Set 3, the default setting for ACU Select=None. If you want an ACU
to operate the modem, select an ACU and a data format.
• Customize the DTE port by selecting this option:
Set the modem’s DTE rate to match the synchronous DTE’s rate using the
DTE Rate option (AT DE, TERMINAL OPTS).
*
(Refer to Appendix A for parameter and option descriptions.)
• If you plan on using DTR transitions (“DTR Dialing”) to signal the modem to
make a call (rather than issuing commands from an ACU), do the following:
1) Set Default Dial=1 (AT DA, ACU OPTS category).
*
2) Store a number in memory location 1 (using Enter Phone #, AT&Z,
ATAT 9600 T/D? category).
3) Set DTR=108.1 (AT&D, TERMINAL OPTS category). When DTR is
raised, the modem will dial the specified call.
4-20 Configuring the Modem
Synchronous Dialing from an IBM AS 400
The modem operates as a synchronous originate modem with the IBM AS 400. Set
the modem to Option Set 3—no reconfiguration from this Option Set is
necessary. The AS 400 supports switched operation with call origination via a
V.25bis compliant call establishment driver.Using Option Set 3 allows it to be driven
by APPC/APPN, the bit-synchronous protocol supported by the IBM AS 400.
In an AS 400-to-AS 400 (mainframe-to-mainframe) environment, the setting of the
Calling Number parameter is critical to ensure the AS 400 operates properly with the
modem. Rather than entering the phone numbers you will be calling, set CALLNBR
to *NONE. This setting allows you to properly utilize V.25bis commands.
Chapter 3, Automatic Calling Interfaces, in the 326X Series Modem Reference
Guide, describes bit-synchronous protocol frame formats.
Changing Default Configuration Settings
Depending on application requirements, you may need to change the following:
• The Buffer Delay feature (AT DB, EC/DC OPTS category), when enabled,
allows buffered data in the communications link to be effectively transmitted to
the other modem before the modems disconnect. Enable this feature if your
application does not ensure a complete transfer of data before the modems
disconnect.
*
• The default Answer option is country-specific. Refer to Appendix C to verify
that this option is appropriate for your application.
• In Option Set 4, the default option for ACU Select=None. If you want an ACU
to operate the modem, select an ACU and a data format.
• If you do not use the AT ACU to send commands to operate the modem,
customize the DTE port as follows:
— Set the modem’s DTE rate to match the asynchronous DTE’s rate using
DTE Rate (AT DE, TERMINAL OPTS category).
*
— Set the modem’s parity to match the parity set in the asynchronous DTE
using Parity (AT RP, ACU OPTS category).
*
— Set the modem’s character length, using Char Length (ACU OPTS
category) to match the character length in the asynchronous DTE.
(Refer to Appendix A for parameter and setting descriptions.)
• In Option Set 4, the modem is set for XON/XOFF (software) flow control. If
your application requires hardware flow control, change the Flow option
(AT FL, TERMINAL OPTS category).
*
• If the DTE does not provide DTR, the modem will not automatically answer an
incoming call. Set DTR=High (AT&D, TERMINAL OPTS category).
Configuring the Modem 4-21
Configuring
the Modem
Option Set 4—Async Answering Central Site without ACU
(Models 3260/62/65/67)
Option Set 4—Synchronous Leased Line Applications with
Dial Restoral (Models 3261/63/66/68)
Changing Default Configuration Settings
Depending on application requirements, you may change the following options:
• The default Restoral setting in Option Set 4 (leased line models) is Auto/FP.
When first configuring the modem, set Restoral=Off. This prevents erroneous
status errors from displaying while you configure leased line options. After
configuration, if your application requires automatic initiation of dial restoral,
set Restoral=Auto/FP.
• When installing the modem in a leased line application, the default Mode
setting (AT CA, MODULATION OPTS category) is Answer. For proper
operation, you must set Mode=Answer in one modem, and
Mode=Originate in the other modem.
Configuring
the Modem
*
• Depending on application requirements, you may change the following:
— Line (MODULATION OPTS). Default option is 2W Lease. Can also be
set for 4W Lease application.
— No ACU Form (ACU OPTS). Default option is Sync. Can be set to
Async.
— Answer (ACU OPTS). Default option is country-specific. Refer to
Appendix C to verify that this option is appropriate for your application.
— Restoral (RESTORAL OPTS). Default option is Auto/FP (as described
above). Can be set to Off to disable restoral.
— Clock (MODULATION OPTS). Default option is Internal. Can be set
to external or loopback, depending on the network clocking source.
— DTE (TERMINAL OPTS). If No ACU Form=Async, customize your
DTE port by selecting these options:
Set the modem’s DTE rate to match the asynchronous DTE’s rate using
DTE Rate (AT DE, TERMINAL OPTS category).
*
Set the modem’s parity to match the parity set in the asynchronous DTE
using Parity (AT RP, ACU OPTS category).
*
Set the modem’s character length to match the character length set in the
asynchronous DTE, using Char Length ACU OPTS category)
(Refer to Appendix A for parameter and setting descriptions.)
326XFAST-SDC Modem Application Examples
This section provides application examples for each SDC option set, and notes
options you may need to change from factory default settings for each option set.
This section includes the following:
• SDC Pre-Operation Notes—read this before configuring the modem
4-22 Configuring the Modem
• Configuring The Modem for SDC Operation—configuration options that are
critical to ensure optimum network performance on an SDC connection
• SDC Sample Applications—examples of common SDC applications
SDC Pre-Operation Notes
This section contains important information for using the 326XFAST-SDC Modem in
SDC operating mode. Read this section before configuring the unit.
Operational Requirements
• 326XFAST-SDC modems require framed HDLC/SDLC-like data. NOTE: BER
tests do not operate in an SDC environment because the data is not framed.
*
Optimizing Network Performance
The 326XFAST-SDC modem provides front panel displays of RX/TX Throughput and
Link Utilization. Higher values indicate more efficient utilization; lower values indicate less efficient usage. These values are affected by the attached DTE and protocol
characteristics—frame size, window size, and DTE rate selected.
(Refer to Chapter 1 of the326X Series Modem Reference Guide for a description of
how to use the RX/TX Throughput and Link Utilization displays.)
Motorola recommends the following to maximize efficiency:
• If your application is operating in a windowed protocol environment, set the window sizes to greater than 1 to improve performance. Recall that windowing
refers to the number of packets sent before an acknowledgment is required.
• To improve network performance, adjust frame sizes. The optimum frame size
for most applications is between 128 and 1024 bytes. Experiment with window
and frame sizes for maximum performance.
• If link utilization is low, raise the DTE rate. Low link utilization typically implies
that the DTE equipment is the bottleneck in data transmission.
Configuring the Modem for SDC Operation
You can configure the 326XFAST-SDC Modem for SDC in one of these ways:
• Select Option Set 2, 3, or 4Leased, discussed below
• Configure the modem as follows:
— Select one of the reliable data transfer modes (Reliable, Auto Reliable, or
Speed Auto Reliable).
— Choose an Auto-Call Unit (ACU)—AT, V.25bis, LPDA, or None—using
the ACU Select option, ACU OPT’S category.
— Select a bit-synchronous data format (depending on the ACU type).
Configuring the Modem 4-23
Configuring
the Modem
• 326XFAST-SDC modems support an NRZ or NRZI data encoding method. Refer
to the DTE documentation for information on the data encoding method the DTE
supports. (Refer to Appendix A, Data Form [AT DF] option, for details on
NRZ/NRZI data encoding methods.)
Refer to Appendix A for additional information on each of these methods.
Ensuring Optimum Network Performance in SDC Mode
The following parameters are critical for ensuring optimum network performance:
*
*
• Fast Call (AT FC)
• DTE Rate (AT DE)
*
• Flow (AT FL)
*
• TpDlyMin (AT TD)
Table 4-4 shows 326X-SDC option set default settings.
Carefully note the following when configuring the modem for SDC operation:
Configuring
the Modem
• Fast Call. Both modems must be configured the same in order to connect. If
one of the modems does not support Fast Call, change the default setting to Off.
• DTE Rate. For better link utilization and throughput, higher values than the
default may be appropriate. (Refer to the DTE Rate description in
Appendix A.) Refer to “Optimizing Network Performance” in the preceding
section for more information.
• Flow/TpDlyMin. The default options assume the DTE can accept nondisruptive clock stoppage. For DTEs that cannot handle Rx/Tx clock stoppage
without disrupting data, select a different option. In this situation, Motorola
recommends that the default values not be used.
SDC Sample Applications
SDC Option Set 1—Async Calls to Central Site Using AT ACU
SDC Option Set 1 functions the same as described above for non-SDC modems.
Refer to that section for application examples.
SDC Option Set 2—Sync Dial A/B Restoral
Single Channel Point-to-Point Digital Link Restoral (via A/B Switch)
When used as a dial backup device for a digital network, the SDC modem provides
economical dial backup and/or disaster recovery, at synchronous speeds matching
speeds available on the DDS circuit.
When used as a restoral device for Motorola 35XX DSU/CSUs (Figure 4-1), select
SDC Option Set 2 in the local and remote SDC Modems. This places the modems in
external timing, as digital services typically provide the network timing.
4-24 Configuring the Modem
To 33.6 kbps
PSTN
326XFAST
SDC
326XFAST
SDC
To
56 kbps
Router
56/64 kbps
35XX
Router
35XX
NMS
Network Management Channel
Figure 4-1. Single Channel Point-to-Point Digital Link Restoral (A/B Switch)—Option Set 2
• With SDC Option Set 2 selected (for Motorola and non-Motorola DSU/CSUs),
the DSUs’ restoral configuration should be set to Timing=Internal.
• In this case, the 326XFAST-SDC DTE Rate must be set to a constant rate as
provided by the network (defaults of 56/64 kbps).
• Enable Option Set 2 in both the local and remote modems, and ensure that
Mode (AT SM) is set the same in both modems.
• The SDC modem supports single channel environments only. For example, the
SDC modem can restore Port 1 only of the 35XX device.
• The 35XX device, when initiating restoral, must be set to Normal mode (as the
35XX network management channel is virtually a time division multiplexed
data stream which cannot be compressed with the SDC product).
• The SDC modem may have the ARS feature enabled. In this case, ARS
determines the link rate.
*
Figure 4-2 shows a configuration using an external A/B switch. Network
configuration (SDC Option Set 2) and operation is the same as with an internal
switch.
To 33.6 kbps
To 56 kbps
A/B
PSTN
326XFAST
SDC
326XFAST
SDC
A/B
56/64 kbps
Router
DSU/CSU
NMS
DSU/CSU
Router
Network Management Channel
Figure 4-2. Single Channel Point-to-Point Digital Link Restoral (A/B Switch)—Option Set 2
Configuring the Modem 4-25
Configuring
the Modem
Note the following:
SDC Option Set 3—Sync Dial Only
In a typical dial application, a remote terminal dials the host for file transfers. This
allows remote users to dial in as needed, with a higher throughput than formerly
attainable over the PSTN. Alternately, the DTE and host (Figure 4-3) could be nodal
equipment (e.g., X.25 PADs, routers, bridges). In this configuration, the SDC
modems are used for remote dial-up branch connectivity. This is useful for remote
uploading or downloading data over the PSTN as needed.
Select SDC Option Set 3 for either of these applications.
Note the following:
• With Option Set 3, the modem provides the network timing (Clock=Internal).
• Specify the speed at which the modem communicates with the DTE using the
DTE Rate (AT DE) option, to use a value other than the default. See the DTE
Rate description in Appendix A.
Configuring
the Modem
*
• With Option Set 3, the modem originates calls with its V.25bis ACU. DTR is
set to 108.1 so that an off-to-on DTR transition instructs the modem to connect
to the telephone line. If the modem detects an incoming call, the call is
connected. If the modem does not detect an incoming call and you have
enabled Default Dial (AT DA), the modem dials the number specified. If the
Default Dial (AT DA) is disabled, the modem refers to the Mode option
(AT AC). If set to answer, the modem goes off-hook and sends an answerback tone. An on-to-off DTR transition disconnects the modem from the
telephone line. If DTR is low, the modem does not auto-answer. DTR
transitions govern how the modem answers and disconnects calls.
*
*
*
• If you want the V.25bis ACU to manipulate the DTR signal, set DTR=108.2.
Other options in the ACU OPT’S category are set for a typical sync DTE.
• Select SDC Option Set 3 in both the local and remote modems, and ensure that
Mode (AT SM) is set the same in both modems.
*
• The modem uses the adaptive rate feature in the V.34 Auto modulation mode.
This ensures maximum throughput when line quality is poor.
PSTN
To 56/64 kbps
326XFAST
SDC
326XFAST
SDC
NMS
DTE
Host
Network Management Channel
Figure 4-3. 326X-SDC Dial-Only Application—Option Set 3
4-26 Configuring the Modem
Bandwidth On Demand
Bandwidth on demand is often required to support sporadic peak loads. With the
SDC modem, you can ensure full network availability and performance at low dialup line costs, without having to prioritize users or applications.
Figure 4-4 shows a point-to-point digital link with Motorola 35XX DSU/CSUs
connecting two routers over a DDS circuit. The SDC modems are also connected
directly to the routers. During peak network access periods, the router is configured
to signal the SDC modem to establish a dial connection through the PSTN. Users
transparently bypass the digital link, using the 326XFAST-SDC PSTN link to
continue data transmission. As bandwidth demands subside, the dial call is dropped,
and transmission resumes over the DDS link.
Select SDC Option Set 3 for a bandwidth on demand application. All operational
information described in the preceding section, “SDC Option Set 3—Sync Dial
Only”, applies to this application.
To 33.6 kbps
PSTN
To
56 kbps
Router
326XFAST
SDC
326XFAST
SDC
56 kbps
35XX
35XX
NMS
Router
Network Management Channel
Figure 4-4. Bandwidth On Demand—Option Set 3
Configuring the Modem 4-27
Configuring
the Modem
The SDC modem supports all industry-standard ACUs (AT, V.25bis, DTR dialing,
and LPDA-2). Bandwidth on demand can be initiated/terminated under the control of
the nodal equipment by a secondary port. NOTE: Nodal equipment must be
configured for secondary port restoral/bandwidth on demand operation. Refer to the
nodal equipment documentation for instructions on configuring for this application.
SDC Option Set 4—Sync Leased Line with Dial Restoral; No ACU
(Models 3261/63/66/68)
Point-to-Point Leased Line Application with Dial Restoral
Figure 4-5 shows a typical point-to-point leased line application, with SDC modems
providing leased line and dial back-up for a bridge/router network. A Motorola
Network Management System (NMS) is shown. This application could apply to any
nodal equipment connections (e.g., bridges, routers, or X.25 PADs).
With the modem’s integral restoral capabilities, if leased circuit operation is disrupted, the modems restore the connection over a single dial line through the PSTN.
The modem uses the adaptive rate feature in the V.34 Auto modulation mode. This
ensures maximum throughput when line quality deteriorates. If restoral criteria are
met, the modem automatically reroutes data traffic through the PSTN. At that time,
the modem attempts to run at its maximum rate over the dial line, and falls back to
lower speeds if required. After an hour, the modem returns to the leased line.
Select SDC Option Set 4 for this application.
Note the following:
• The line configuration default of Option Set 4 is Two-Wire Leased Line.
• With Option Set 4, the modem provides the network timing (Clock=Internal).
• To specify a non-default rate at which the modem communicates with the DTE,
use the DTE Rate (AT DE). See the DTE Rate description in Appendix A.
*
• Select SDC Option Set 4 in both the local and remote modems, and ensure that
Mode (AT SM) is set the same in both modems.
*
• If operating with the Motorola 6500PLUS that has the Link Back-Up option, set
DTR=108.2 (the default is 108.1 for 6500s without the Link Back-Up option).
PSTN
Bridge/
Router
326XFAST
SDC
33.6 kbps
NMS
To 56/64 kbps
326XFAST
SDC
Bridge/
Router
Network Management Channel
Figure 4-5. Point-to-Point Leased Line Application with Dial Restoral—Option Set 4
Remote Access Reset
Remote access reset enables someone unfamiliar with the AT command set to
quickly configure a local modem so that another modem can dial into it. Then you
can use the remote modem to configure local modem options. Remote access reset
configures the modem to:
• Answer an incoming call
• Accept a network management session
• Accept a remote configuration session initiated by the calling modem
• Disconnect a call if one is in progress
• End any test in progress
To select remote access reset, press
and simultaneously for three seconds. Rmt
Access Reset displays. The modem resets itself to settings that let it answer a call
and be accessed by an NMS or remote modem. The modem may be dialed into and
reconfigured. Stored phone numbers and saved option sets remain unchanged.
When Remote Access Reset Is Disabled
Remote access reset is not supported when the modem is attached to a network
management system. If you select it in this situation, NETMAN ATTACHED!
displays. To invoke remote access reset, set OverrideMode=On (NETWK CRTL
OPT’S).
Remote access reset is not supported when the modem is password protected
(i.e., when pressing
and for three seconds displays PASSWD
PROTECTED). To choose the remote access feature, you must first unlock the
modem, either from the front panel, or with the AT PN (enter password)
command.
*
Configuring the Modem 4-29
Configuring
the Modem
Operation
Configuring
the Modem
4-30 Configuring the Modem
Chapter 5
Using the AT Automatic Calling Interface
Contents
*
5-2
5-3
5-3
5-3
5-3
5-3
5-4
5-4
5-4
5-5
5-5
5-6
5-6
5-7
5-7
5-7
5-8
5-8
5-8
5-9
5-9
5-9
5-10
Using the AT Automatic Calling Interface 5-1
Using the
AT ACU
Introduction ..................................................................................................
What is the Attention (AT) Command Set? ..................................................
What Role Does Communications Software Play? ..................................
Using AT Commands ...................................................................................
Entering AT Command Lines ...................................................................
To enter a single AT command line: ....................................................
To enter multiple AT commands on a single command line: ..............
AT Command String Examples ...........................................................
For Further Detail on AT Commands ..................................................
Autobaud Feature .....................................................................................
The Escape Sequence—(+++) .................................................................
To use the escape sequence with guard time: ......................................
Non-Configuration AT Commands ..........................................................
A/, Re-Execute Last Command ...........................................................
ATA, Manual Answer ..........................................................................
ATD, Dial .............................................................................................
ATH, Hang Up .....................................................................................
ATI, Display Software Information .....................................................
ATO, Leave Command Mode ..............................................................
AT RD, Redial Last Number .............................................................
S-Registers ...............................................................................................
Displaying and Changing S-Register Values .......................................
S-Register Descriptions .......................................................................
Introduction
The 326X Series Modem supports an asynchronous AT Automatic Calling Interface
(Auto-Call Unit or ACU), that is compatible with the industry-standard AT
command set.
AT commands provide a standard modem communications interface, allowing you to
configure and operate a modem from an asynchronous terminal or PC keyboard. AT
commands define how the modem is configured, how it makes calls, and the test
operations the modem performs. In addition to supporting industry standard AT
commands, Motorola has developed an enhanced AT command set for the modem.
• Industry-Standard AT Command Set—AT and AT&
These commands, called action AT commands, are intended for immediate
modem action and let you perform day-to-day operations, such as dialing and
storing numbers from your asynchronous DTE. These AT commands do not
cross-reference to the modem front panel.
*
Using the
AT ACU
• Motorola Enhanced AT Command Set—AT
Using these Motorola AT extensions, you can also configure most modem
options. These AT commands, called configuration AT commands, control the
same options as in your modem’s front panel menu tree.
This chapter discusses:
• The AT Command Set
• Using AT commands
• Action AT commands
• S-Registers
For an alphabetized quick-reference list of AT commands, corresponding front panel
options, and command functions, see Appendix A.
The 326X Series Modem supports two additional ACUs:
• V.25bis ACU, for asynchronous and synchronous applications
• LPDA2 ACU, for synchronous applications
For details, refer to Chapter 3 in the 326X Series Modem Reference Guide.
If you are using communications software, you normally do not use the AT
command set directly. Your communications software will do this for you.
5-2 Using the AT Automatic Calling Interface
What is the Attention (AT) Command Set?
The AT command set is a collection of commands that let you configure a modem
directly from an asynchronous terminal or PC keyboard. The characters AT are a
prefix to the commands you issue to your modem. When you type AT, you are asking
for the modem’s attention. For instance, to disconnect a telephone call, you type AT
for attention and H0 for on-hook (hang up).
You can also use AT commands to configure a remote modem (refer to Chapter 2,
Front Panel Operation, of the 326X Series Modem Reference Guide for details).
What Role Does Communications Software Play?
Some communications software packages “interpret” AT commands with pull-down
menus or graphics, making familiarity with the AT command syntax unnecessary.
Communications software packages that directly support the 326X Series Modem
usually support all of the modem’s AT commands (the industry standard commands
AT, AT&, and the Motorola-enhanced commands AT ).
*
*
Check the documentation included with your communications software package to
determine whether you need to use AT commands directly.
Using AT Commands
AT commands are accepted by the modem in command mode or escape mode.
• The modem is in command mode when it is disconnected from the
telephone line.
• You can enter escape mode and issue AT commands during a connection
(the escape sequence +++ is described later in this chapter).
Entering AT Command Lines
To enter a single AT command line:
1) Enter the prefix AT: The characters AT (upper-case or lower-case, but not
mixed) must begin the command line.
2) Enter an AT command. For example:
— D instructs the modem to dial a call. H instructs the modem to hang up. A
numeric character (for example, 2) following an AT command instructs
the modem to use a specific command option. If a numeric character is
not indicated, the modem assumes the 0 (zero) option.
3) End with a carriage return <CR>.
The exceptions to the above AT command line conventions are “A/” (repeat last
command) and “+++” (the escape sequence). Responses (result codes) to AT
commands always appear in upper-case.
Using the AT Automatic Calling Interface 5-3
Using the
AT ACU
Communications software packages that support a Hayes-compatible selection do
not support the Motorola-enhanced commands (AT ). You can enter these
commands yourself to modify option settings if required by your application.
To enter multiple AT commands on a single command line:
Multiple AT commands can be entered on a command line using a single AT prefix.
The modem accepts up to 60 characters after the prefix. Spaces are not counted in the
length. AT commands are interpreted in sequence in the command line until one of
the following occurs:
• A <CR> is encountered
• An invalid command is encountered
• A command is encountered which causes the modem to reset, go off-hook, or
enter a test state
For example, you might enter:
ATE0V1&W<CR>
Using the
AT ACU
on a single command line. This command disables Asynchronous Echo. It configures
the Result Code Format to Verbose, and the Save Changes feature to Option Set 1.
(These options and settings are described fully in Appendix A.)
Commands that are followed by a telephone number must be at the end of the line.
However, if the semicolon dial modifier (;) follows a telephone number, the modem
returns to command mode after dialing. Therefore, AT commands can be entered
after a semicolon in a command string. NOTE: If an error occurs, AT commands
prior to the error are executed; commands following the error are ignored.
If you enter an AT command that requires a postscript number and no number is
entered, the modem defaults to a 0 setting.
AT Command String Examples
Table 5-1 provides AT command string examples and their ACU results.
Table 5-1.
Interpreting AT Command Strings
Command
AT&X<CR>
Interpretation
Postscript number needed and none is provided. 0 is assumed.
Transmitter timing is set for internal.
ATS2
No response. Needs a carriage return after the command.
GATE0<CR>
Ignores everything before the AT prefix. The G is ignored. This
command disables the asynchronous echo feature.
ATS2?Q=1<CR>
Multiple command line. Selects S-Register 2 as the current S-Register,
displays contents of S-Register 2, turns on result code displays, and
sets S-Register 2 to 1.
For Further Detail on AT Commands
For a description of AT commands, and dial modifiers, refer to Appendix A.
5-4 Using the AT Automatic Calling Interface
Autobaud Feature
The modem automatically detects the speed and character format of the following
AT commands issued from your DTE:
• AT
• at
• A/
• a/
This means that any AT command you issue to the modem will cause the modem to
“Autobaud.” The exception is the lower-case “a/” and upper-case “A/”, from which
only speed can be detected. When the a/ or A/ commands are issued, the modem
assumes parity to be the same as that of the previous command.
NOTE: Autobaud does not operate when the modem is online in escape mode.
Autobauding works at the following DTE rates (bps):
300
1200
2400
4800
7200
9600
24,000
12,000
14,400
16,800
19,200
21,600
26,400
28,800
38,400
57,600
115,200
Table 5-2.
Valid Autobauding Character Formats
Start Bit
1
1
1
1
Data Bits
7
7
7
8
Parity
Even or Odd
None
Mark or Space
None
Stop Bits
1
2
1
1
Result codes, such as RING, are sent at the last autobauded DTE speed and parity.
CONNECT result codes are also sent at the last autobauded DTE speed, even if the
call is established at a different speed. When the modem is turned on, the last
autobauded speed is saved. Because parity is saved within option sets, the parity
value that is saved in the power-up option set is the one that is active.
The Escape Sequence—(+++)
The escape sequence is used when the modem is online and you need to enter
commands to the modem without disconnecting. The escape sequence with guard
time protects against losing the connection while you send commands.
NOTE: Autobaud does not operate when the modem is in escape mode.
Once in command state, you can:
•
•
•
•
•
•
Terminate a call
Initiate and terminate a test
Issue AT action commands
Change your modem’s configuration
Initiate a remote configuration session
Read modem status using the AT ST command
*
Using the AT Automatic Calling Interface 5-5
Using the
AT ACU
Table 5-2 summarizes the 10-bit-total character formats for autobauding.
(Autobauding is valid only with 10-bit character formats.)
The escape state is entered by sending the escape character three consecutive times.
The escape character is selectable as any ASCII character. Its value is stored in
S-Register 2, and the default is “+” (decimal 43). To disable escape command
detection, set S-Register 2 to a value greater than 127.
A guard time is used with the escape sequence. A guard time must precede and
follow the sequence of escape characters to prevent the +++ characters from
inadvertently placing the modem into command mode if they are transmitted in a
message. If data is sent within the guard time, the escape sequence is not detected.
The default guard time is one second.
The guard time specified by S-Register 12 also specifies the maximum time between
the three consecutive escape characters. If more than the allowable time elapses
between escape characters, the escape sequence is ignored. Setting S-Register 12 to
zero disables the guard time, so that the rate at which you enter the escape sequence
is not a factor.
Using the
AT ACU
To use the escape sequence with guard time:
1) Pause a bit longer than the guard time.
2) Send +++, ensuring the delay between +’s is less than the specified guard
time.
When a valid escape sequence is detected, the modem responds with
OK
Do not send commands until the OK response has been received. A command
that is sent too soon may not be interpreted correctly.
3) Pause again, a bit longer than the guard time.
4) Enter commands to the modem.
5) When you are ready to resume the call to the remote system, type ATO<CR>.
The modem returns to the online state.
When using error correction, if you “escape” from the data state to the command
state, the modem buffers any data received from the remote site. When you return
online (to data state), the buffered data is sent to the DTE.
Non-Configuration AT Commands
Most AT commands cross-reference to a front panel option. Some AT commands are
intended only for immediate modem action. These commands allow you to perform
a number of the important day-to-day modem functions, such as:
• Re-execute your last command
• Answer an incoming call
• Dial a telephone number
• Hang up
• Exit command mode, return to data mode
• Redial the last telephone number
5-6 Using the AT Automatic Calling Interface
This section addresses AT commands that do not cross-reference to a front panel
option.
A/, Re-Execute Last Command
Settings:
Not applicable
Format:
A/
This command re-executes the last AT command string issued to the modem,
including redialing a telephone number. To re-execute the last command, enter A/
but do not follow this command with <CR>.
The A/ command may be entered in either uppercase or lowercase characters.
However, when entered in lowercase characters, the modem cannot use the autobaud
feature to determine parity. The modem continues to use the parity determined by the
previous command. The AT ZD (Dial Rstrct) AT command limits the A/ command.
*
The modem does not support auto-parity for this command.
ATA, Manual Answer
Not applicable
Format:
ATA<CR>
This command instructs the modem to go off-hook and send answer-back tone over
the line. When the ATA command is used during an incoming call, the modem
initiates the “answer” end of the modulation mode handshake sequence. DSR
transitions from off to on when the answer-back tone is sent if DSR is not configured
for the High setting. If the modem is using error correction, the error-correction link
handshake takes place after the modulation mode handshake, and before DCD
(if DCD is not configured for the High setting) transitions from off to on.
This command causes the modem to answer a call regardless of the contents of
S-Register 0 (Ring Count to Answer On).
If the ATA command is issued while the modem is in escape mode or in remote
configuration, the modem responds with:
ERROR
ATD, Dial
To dial directly from the keyboard, enter ATD followed by the number you want to
dial. For example:
ATD1-617-555-1212<CR>
The ATD command causes the modem to go off-hook, dial the number, and execute
all dial modifiers in the dial string. The type of call progress message you see is
controlled by the Call Progress (ATX) setting. The modem can dial up to 50
characters, including spaces.
In originate mode, if the ATD command is issued without a phone number, the
modem goes off-hook.
Using the AT Automatic Calling Interface 5-7
Using the
AT ACU
Settings:
If ATD is issued while the modem is in escape mode or remote configuration, the
modem responds with:
ERROR
NOTE: Any invalid characters inserted into the dial string will be ignored.
ATH, Hang Up
Settings:
0, Modem hangs up
1, Busy Out the modem
Format:
ATHn<CR>
You may hang up the modem after entering the online escape mode by typing ATH
or ATH0. Typing ATH1 while in command mode causes the modem to Busy Out
until either the ATH command is entered or the
key is pressed. NOTE: For busy
out, make certain that the TELCO OPT’S Telco option is set for RJ4MB.
ATI, Display Software Information
Settings:
0, Displays 960
Using the
AT ACU
1, Displays 000
2, Displays OK
9, Displays reason for last disconnect
Format:
ATIn<CR>
The messages described above are displayed in addition to the “OK” sent when AT
command processing is complete. NOTE: If this command is the last or only
command in a command line, an additional “OK” message follows the above
responses.
ATO, Leave Command Mode
Settings:
0, Leave command mode and return online
1, Leave command mode, return online, and initiate a retrain
Format:
AT0n<CR>
This command can be used only when the modem is in the online escape mode, or
after a “;” (semicolon) dial modifier in a dial string.
The user may leave escape mode and return to data mode by typing ATO or ATO0.
If a retrain is desired while returning to data mode, ATO1 must be used.
If this command is issued while the modem is disconnected from the phone line, the
modem responds with:
NO CARRIER
If this command is issued while the modem is in a remote configuration session, the
modem responds with:
ERROR
NOTE: If the ATO command is issued after a “;” (semicolon) dial modifier (return
to command state after dialing), the modem trains as an originate modem.
5-8 Using the AT Automatic Calling Interface
*
AT RD, Redial Last Number
Settings:
0, 1 Redial last number one time.
n (The maximum number of redials allowed is country-specific. See the
326X Series Modem Country-Specific Guide for more details).
Format:
*
AT RDn<CR>
*
You may redial a failed call n times using the AT RD command. The modem
redials a call until a successful connection is made, or until the call has been
attempted n times. The AT RD command causes the modem to redial the last number dialed. So if an initial call fails, and the telephone number is linked to another
number, the modem redials the linked telephone number.
*
S-Registers
This section is in two parts:
• The first part describes the AT commands used to display and change
S-Register values.
• The second part describes S-Registers used by the modem.
Any S-Register that is not stored in memory is reset to its default value when you:
• Power up the modem
• Load a new Option Set
• Reinitialize memory
Displaying and Changing S-Register Values
Display S-Register Value (ATSn?)
Settings:
n, Specifies S-Register
Format:
ATSn?<CR>
This command displays the value of S-Register n, as stored in volatile memory.
If a “?” appears in the command string anywhere other than immediately following
the S-Register number, the command displays the value of the last S-Register
selected.
If you try to read the value of an unused S-Register, the modem displays OK.
Using the AT Automatic Calling Interface 5-9
Using the
AT ACU
S-registers are memory locations for storing specific configuration and operating
parameters. S-registers typically contain timing, counting, ASCII characters, or command option values. While communications software generally insulates you from
the need to alter S-register settings, you may want to reconfigure or read the contents
of an S-register. This section describes how to read and change S-Register values.
Display S-Register Value (AT?)
Settings:
Selected S-Register
Format:
AT?<CR>
This command displays the contents of the “selected” S-Register, as stored in volatile
memory. The “selected” S-Register is the last S-Register that was accessed using an
S-Register command or the ATSn command. The number must be within the S-Register’s specified range. On power-up, S-Register 0 is “selected.”
If you try to read the contents of an unused S-Register, the modem displays OK.
Change S-Register Value (ATSx=n)
Settings:
n, Specifies S-Register
x, Specifies value of S-Register
Using the
AT ACU
Format:
ATSn=x<CR>
This command lets you change the value of an S-Register stored in volatile
memory. n is the S-Register to change, and x is the value. x must be a number
within the S-Register’s range.
If you try to change the value of an unused S-Register, the modem displays OK.
Change S-Register Value (AT=x)
Settings:
x, Specifies value of selected S-Register
Format:
AT=x<CR>
This command lets you change the value of an S-Register stored in volatile memory.
The “selected” S-Register is the last S-Register that was accessed using an
S-Register command or the ATSn command. x must be a number within the specified
range for the S-Register. On power-up, S-Register 0 is “selected.”
If you try to change the value of an unused S-Register, the modem displays OK.
S-Register Descriptions
S-Register 0—Ring Count to Answer On
Stored in Nonvolatile Memory?:
Yes
Status-Only?:
No
Default Setting:
0
Range:
0 to 255
This S-Register specifies the ring on which the modem automatically answers a call.
When set to 0, automatic answering is disabled, and calls must be answered manually.
This register has no meaning unless Answer=Using S0 (ACU OPT’S).
5-10 Using the AT Automatic Calling Interface
S-Register 1—Ring Count
Stored in Nonvolatile Memory?:
No
Status-Only?:
Yes
Default Setting:
0
Range:
0 to 255
This S-Register counts the number of rings in an incoming telephone call. If the
modem is configured to answer (AT AA, or Answer=S0), when S-Register 1’s
value equals S-Register 0’s value, the modem answers the call. If no ring is received
after a country-specific time (eight to 10 seconds), the counter is reset to 0.
*
S-Register 2—Escape Code Character
Yes
Status-Only?:
No
Default Setting:
43
Range:
0 to 255
This S-Register determines the decimal value of the escape code character.
The default setting, 43, translates to the ASCII “+” character. Values greater than 127
disable the escape function.
S-Register 3—Carriage Return Character
Stored in Nonvolatile Memory?:
No
Status-Only?:
No
Default Setting:
13
Range:
0 to 127
This S-Register determines the decimal value of the carriage return character.
The default setting, 13, translates to the ASCII <CR> (carriage return) character.
S-Register 4—Line Feed Character
Stored in Nonvolatile Memory?:
No
Status-Only?:
No
Default Setting:
10
Range:
0 to 127
This S-Register determines the decimal value of the line feed character. The default
setting, 10, translates to the ASCII <LF> (line feed) character.
Using the AT Automatic Calling Interface 5-11
Using the
AT ACU
Stored in Nonvolatile Memory?:
S-Register 5—Backspace Character
Stored in Nonvolatile Memory?:
No
Status-Only?:
No
Default Setting:
8
Range:
0 to 127
This S-Register determines the decimal value of the backspace character. The default
setting, 08, translates to the ASCII <BS> (backspace) character. Values greater than
32 (except 127) disable the backspace function.
Using the
AT ACU
S-Register 6—Wait for Dial Tone
Stored in Nonvolatile Memory?:
Yes
Status-Only?:
No
Default Setting:
2
Range:
1 to 255 (seconds)
If Call Progress is set to 0, 1, or 3 (ATX0, ATX1, ATX3), and blind dial is selected,
the modem does not look for a dial tone. Instead, the modem goes off-hook and waits
for the number of seconds specified by S-Register 6 before blind dialing a telephone
number (if Blind Dial is set to S6, AT BD2). This S-Register does not affect the
wait dial modifiers W, w, or :.
*
S-Register 7—Wait for Data Carrier
Stored in Nonvolatile Memory?:
Yes
Status-Only?:
No
Default Setting:
30
Range:
1 to 255 (seconds)
*
If Call Timeout (AT TT) is set to S7, the value of S-Register 7 determines the
number of seconds that the modem waits for a carrier signal from the remote modem
after dialing or answering a call.
S-Register 7 also affects the dial modifiers @, W, w, and :.
Dial Modifier “@”
If Call Timeout (AT TT) is set to S7, the value of S-Register 7 determines the
length of time for which the @ dial modifier instructs the modem to detect five
seconds of silence.
*
Dial Modifier “W”, “w”, and “:”
If the Dial Wait option (AT DD) is set to S7, the value of S-Register 7 determines
the value of the dial wait modifier. The dial wait modifier determines how long the
modem waits for a second dial tone after the modem has dialed a number.
*
5-12 Using the AT Automatic Calling Interface
S-Register 8—Pause Time for Pause Delay Dial Modifiers
Stored in Nonvolatile Memory?:
Yes
Status-Only?:
No
Default Setting:
2
Range:
0 to 255 (seconds)
This S-Register determines how many seconds the modem pauses while dialing
when it encounters a K, k, “,”, or < dial modifier. Pause Delay (AT DP) must be set
to S8 (AT DP4) to use S-Register 8’s setting.
*
*
This S-Register also determines the time duration of the pause delay for the “,”
character when used in an AT command string. The modem pauses for the specified
time before continuing to process the command string.
With the “,” k, K, or < dial modifier, if S-Register 8 is set to 0 or 1, the pause delay
defaults to two seconds.
S-Register 10—Carrier Loss Hang Up Delay
Yes
Status-Only?:
No
Default Setting:
15
Range:
1 to 255
Using the
AT ACU
Stored in Nonvolatile Memory?:
S-Register 10 determines how long, in 100 millisecond increments, data carrier must
be lost before the modem hangs up. NOTE: This applies to V.22bis, B212, V.21, and
B103 operation only. To use S-Register 10’s setting, the front panel DCD Loss Dis
option (AT CD) must be set to S10. Also, if S-Register 10 is set to 255, the modem
will not hang up because of a carrier loss.
*
*
Setting the AT CD (DCD Loss Disconnect option under the TERMINAL OPT’S
menu) to S10 enables the DCE disconnect feature, for V.32, V.32bis, and V.34
modulation modes. For these modes, the S-Register 10 determines the length of time,
in seconds, for the modem to disconnect when the remote modem goes on hook
without sending a longspace or PSTN cleardown.
In Normal or Direct modes, S10 must be set between 1–9 seconds. For Reliable
mode, S10 must be set between 1–8 seconds. These selections result in Disconnect in
the specified time after the modem leaves data mode and starts to retrain. Values of
S10 other than the ones specified above disable the DCE Disconnect feature.
Using the AT Automatic Calling Interface 5-13
S-Register 11—DTMF Tone Duration
Stored in Nonvolatile Memory?:
Yes
Status-Only?:
No
Default Setting:
72
Range:
50 to 255 (country-specific)
S-Register 11 defines the duration/spacing of tones (in milliseconds) in Dual Tone
Multifrequency (DTMF) dialing. This register has no meaning unless the Tone
Length option under the DIALING OPT’S is set to S11. Refer to Appendix C,
Country-Specific Information, for the ranges supported by each country.
Using the
AT ACU
S-Register 12—Escape Code Guard Time
Stored in Nonvolatile Memory?:
No
Status-Only?:
No
Default Setting:
50 (1 second)
Range:
0 to 255
This S-Register sets the interval that must be present on either side of the escape
code (+++) in order for the modem to recognize the escape command and enter
command mode. This prevents the +++ characters from putting the modem in
command mode if they are contained in data. The value of S-Register 12 is
multiplied by 0.02 to determine the number of seconds. For example, the value of the
factory default 50 is one second.
If S-Register 12 is set to 0, the speed at which you enter the escape sequence is not a
factor.
S-Register 18—Test Timer
Stored in Nonvolatile Memory?:
Yes
Status-Only?:
No
Default Setting:
0
Range:
0 to 255 (seconds)
This S-Register determines the duration, in seconds, of loopback tests.
With S-Register 18 set to 0, the timer is not operational and tests must be terminated
manually. NOTE: S-Register 18’s function is valid only when loopback tests are
issued using the AT&T command. S-Register 18 cannot be used to automatically
terminate loopback tests if the test is initiated from the front panel.
5-14 Using the AT Automatic Calling Interface
S-Register 25—Delay Before Looking for DTR
Stored in Nonvolatile Memory?:
Yes
Status-Only?:
No
Default:
5
Range:
0 to 255 (seconds)
*
When DTR Delay=S25 (AT DT), and AT Form=Sync Data (AT&M) or V25
Form=AsynSync, the modem goes into synchronous data mode after the modem
dials asynchronously. S-Register 25 lets you switch from an asynchronous DTE to a
synchronous DTE without hanging up. S-Register 25 allows this switch by
specifying how many seconds the modem waits after connecting before looking for
DTR.
S-Register 26—RTS/CTS Delay
Yes
Status-Only?:
No
Default:
1
Range:
0 to 255
Using the
AT ACU
Stored in Nonvolatile Memory?:
This S-Register selects the delay between CTS and RTS while the modem is online.
It operates in modes specified by the RTS (AT RS) and CTS (AT CT) commands.
*
*
The time is selectable in 1/100 second intervals, from 0 to 2.55 seconds.
S-Register 30—DTE Inactivity Disconnect
Stored in Nonvolatile Memory?:
Yes
Status-Only?:
No
Default:
0
Range:
0 to 255 (x 10 seconds)
*
If DTE Inactivity=S30 (AT SI), the modem disconnects when data is not sent or
received for an amount of time greater than the value stored in S-Register 30,
multiplied by 10 seconds. Time-outs range from 10 to 2550 seconds (42.5 minutes).
A value of 0 stored in S-Register 30 disables the DTE inactivity option.
Using the AT Automatic Calling Interface 5-15
S-Register 38—Disconnect Buffer Delay
Stored in Nonvolatile Memory?:
Yes
Status-Only?:
No
Default:
5
Range:
0 to 255 (seconds)
S-Register 38 determines how long the modem processes buffered data when a
disconnect is initiated. For S-Register 38 to affect the Delay option (AT DB),
Delay (EC OPT’S menu) must be set to “Buf or S38” or “Buf & S38.”
*
Using the
AT ACU
S-Register 45—Access Security Tone Duration
Stored in Nonvolatile Memory?:
Yes
Status-Only?:
No
Default:
5
Range:
0 to 10 (seconds)
This S-Register specifies the prompt tone duration when the ACCESS SECURITY
option Tone=Prompt Only or Prompt/Ack (AT ZP). This delay is measured from
the time that the prompt tone is generated by the answer modem, to the time that the
answer modem detects the first digit of the calling modem’s password.
*
S-Register 46—Access Security Lead Digit Delay Timeout
Stored in Nonvolatile Memory?:
Yes
Status-Only?:
No
Default:
12
Range:
0 to 255 (seconds)
This S-Register specifies the lead digit delay timeout when ACCESS SECURITY
Tone (AT ZP) is enabled.
*
S-Register 96—Signalling System #5
Stored in Nonvolatile Memory?:
Yes
Status-Only?:
No
Default:
0
Range:
0-1
This S-Register specifies whether Signalling System #5 is enabled.
5-16 Using the AT Automatic Calling Interface
S-Register 97—Break Signal Duration
Stored in Nonvolatile Memory?:
Yes
Status-Only?:
No
Default:
0 (represents 1 second)
Range:
0 - 39
Break Signal Duration (ms.)
1000 (1 second)
26
52
78
104
130
156
182
208
234
260
286
312
338
364
390
416
442
468
494
520
546
572
598
624
650
676
702
728
754
780
806
832
858
884
910
936
962
988
1000
Using the AT Automatic Calling Interface 5-17
Using the
AT ACU
S-Register 97 Value
0
1
2
3
4
5
6
7
8
9
10
11
12
13
14
15
16
17
18
19
20
21
22
23
24
25
26
27
28
29
30
31
32
33
34
35
36
37
38
39
S-Register 98—AC Detect
Stored in Nonvolatile Memory?:
Yes
Status-Only?:
No
Default:
0
Range:
0-1
This S-Register applies to V.32bis and V.34 operating modes. It enables and disables
AC Tone Protect, which is part of the modem’s training sequence.
S-Register 99—V.32 Training Time
Stored in Nonvolatile Memory?:
Yes
Status-Only?:
No
Default:
0
Range:
0 to 216*
*One unit = 32 baud = 13.5 milliseconds.
This S-Register extends part of the V.32 modulation mode training time. It provides a
workaround to an inability of Rockwell-based modems to establish a connection.
Motorola recommends that with Rockwell-based modems, you set S-99 to 120.
Chapter 6
Troubleshooting Guide
Contents
Introduction ..................................................................................................
Assumptions..........................................................................................
Troubleshooting.............................................................................................
The First Step........................................................................................
Troubleshooting Steps .........................................................................
326X Series Modem Diagnostic Tests...........................................................
Initiating and Terminating Tests from the Modem’s Front Panel .........
Synchronous Data Compression (SDC) Testing ......................................
6-2
6-2
6-2
6-2
6-2
6-10
6-11
6-11
Troubleshooting
Troubleshooting Guide 6-1
Introduction
Most problems encountered when installing and using the modem can be corrected if
you carefully read and follow the instructions in the documentation. Use the
Troubleshooting section of this chapter to analyze and correct problems before
calling Motorola’s Customer Support Center.
The section after the troubleshooting guide tells you how to initiate and terminate
tests. Chapter 4 of the326X Series Modem Reference Guide contains detailed
information on these tests.
Assumptions
• The modem is set to factory default configurations.
• The modem has been installed with all initial cabling complete.
Troubleshooting
This section discusses:
• Dial operation problems
Troubleshooting
• Synchronous data compression (SDC) mode problems
• Leased line operation problems
The First Step
First, confirm that your data communications application is set up correctly:
• Confirm that your communications software is configured for the correct serial
port to which your modem is connected (i.e., COMM1, COMM2, etc.)
• Confirm the COM port is configured for the data rate, word length, and parity
your configuration requires
• Confirm that the cable connecting the modem to the host equipment is a
DCE-to-DTE straight-through cable
• Confirm the electrical interface of your modem (V.35 or RS-232) and ensure
that you have the correct cable installed
Troubleshooting Steps
Use the table that follows to match your problem with a diagnosis and solution.
6-2 Troubleshooting Guide
326X Series Modem Troubleshooting Guide
Problem
Diagnosis/Test
Possible Solution
During installation:
Modem won’t power up
Check AC power.
Check modem’s power switch.
Ensure AC outlet is active.
Turn on power switch.
Modem fails self test
(front panel displays
error code)
Repeat power-up sequence.
If modem fails once again, call Motorola Customer Support and report the error code.
Modem doesn’t come up Check DIP Switch #6 on
in ready state— “326X modem’s rear panel.
Ready” on front panel
display
• Ensure DIP Switch #6 is in the Off (up) position.
• Power cycle the modem.
While operating the 326X as a dial modem:
ACU CONFIGURATION
No response to ACU
command
• If light does not come on, check that cables are properly connected.
• Check the communications software package for
correct communications port configuration.
• Check that the communications software package’s
baud rate is set to a rate that the modem’s autobaud
feature supports.
Check modem's configuration:
• DTE Rate (AT DE)
• ACU Form
• Char Length
• Parity (AT RP)
• Result Code (ATQ)
• Ensure ACU is compatible with modem's
configuration.
• Make sure the DTE is set to a valid character format
to operate the modem’s autobaud feature (see
Chapter 5 for details on this feature).
• If modem still does not respond after modifying configuration, perform a local analog loopback (LAL)
test. (Refer to the end of this chapter for details on
tests supported, as well as instructions for initiating
tests.)
• If LAL fails, contact Motorola Customer Support.
*
*
Double echo on charac- Check echo setting on data
If both echo settings are on, turn one off. (In some data
ters typed
terminal equipment and modem. terminals, echo is sometimes referred to as half- or fullduplex.) If this does not solve the problem, contact
Motorola Customer Support.
Check the terminal setup of the
communications software.
CALL ESTABLISHMENT
Modem won’t answer
Check the modem's
configuration:
*
• Answer (AT AA)
Ensure that Answer is not set to Manual.
• DTR (AT&D)
Set DTR=High (AT&D0).
Troubleshooting Guide 6-3
Troubleshooting
Check that TD LED on front
panel lights when commands are
being sent to the modem.
326X Series Modem Troubleshooting Guide (Continued)
Problem
Diagnosis/Test
Possible Solution
Check the modem’s line setting
(AT&L).
Ensure Line=Dial (AT&L0).
Check that the TR LED on
modem’s front panel is steady
on.
If the TR LED is not steady on, ensure the DTE is supplying DTR.
Check that the RI/OH LED is on Check that the phone number you are calling is correct.
when ring is present on the line.
Check that the communications
package’s data rate is set to a
rate that the modem’s autobaud
feature supports.
Modem won’t dial
Ensure dial tone is present.
Check phone line and ensure it is properly connected to
the modem’s rear panel.
If using DTR dial, check:
Ensure default dial option is set to a location with a valid
phone number.
• Default dial option
(AT DA)
*
Troubleshooting
• Phone number at stored
location (presence of one)
• DTR option (AT&D)
Ensure that DTR=108.1 (AT&D5) or Tail (AT&D4).
Ensure the DTE is supplying DTR.
Check that the communications
package’s data rate is set to a
rate that the modem’s autobaud
feature supports.
Unable to establish a
connection
Check the disconnect code from Based on the disconnect reason, take the appropriate
the front panel or AT response. action.
Check the modulation
configuration:
*
• Mod (AT MM)
• Max Rate (AT MX)
• Min Rate (AT MN)
Ensure that Mod=C.Fast Auto or V32bis Auto.
*
*
*
*
Check EC/DC Mode (AT SM) Ensure Mode=AutoRel (AT SM3) on both the local and
option.
remote modems.
Software package disEnsure DCD=Normal (AT&C1). If DCD is not set to Normal, issue AT&C1 from the DTE
plays on-line connection
or set DCD=Normal from the front panel.
status before calling or
answering is performed
A call is established but Read the disconnect code.
not maintained
6-4 Troubleshooting Guide
Based on the disconnect reason, take the appropriate
action.
326X Series Modem Troubleshooting Guide (Continued)
Problem
Diagnosis/Test
Possible Solution
Cannot hear connecCheck Speaker (ATM) option.
tion through the speaker
(stand-alone units)
Check Volume (ATL) option.
If the speaker is not on, turn it on.
Adjust volume.
DATA MODE
The modem connects,
but cannot pass data
Check that the modem is in data If the modem is not in data mode, establish a connection
mode (“Data 9600”, for examwith the remote modem.
ple, displays).
Check that the TD LED is lit on
modem's front panel (steady or
flashing) indicating that the
modem is receiving data from
the DTE.
• Check DTE for EIA signal requirements.
• Ensure the modem is correctly cabled to the DTE
(with a straight-through cable for your electrical
interface—V.35 or RS-232).
• Check that the correct communications port is being
used.
Check the DTE rate of the local
modem.
Ensure that the DTE rate matches the modem’s terminal
rate setting.
Check the DTE's flow control
method.
*
*
If in normal mode, check for
Turn modem flow control off.
modem-to-modem flow control.
Verify line quality:
Premature disconnect
• Run a remote digital
loopback (RDL) or RDL
with pattern test.
After running the RDL, if no errors occur, your line is
good.
If errors occur, perform a manual retrain, or retry the
phone call.
• If you are still receiving
errors, disconnect the
modem from the line and
perform a local analog
loopback (LAL) or LAL
with pattern test (with
modem flow control off).
If the LAL or LAL with pattern test fails, contact Motorola Customer Support.
If the LAL or LAL with pattern test passes, you may have
a line problem (contact your telephone company) or a
problem with your application (check with your software
vendor).
Ensure that the remote modem
supports error correction.
If the remote modem does not support error correction,
set the modem to normal mode and retry the call.
Check the disconnect reason
from the modem's front panel.
Based upon the disconnect reason, take the appropriate
action.
Troubleshooting Guide 6-5
Troubleshooting
• Ensure that the DTE's flow control is the same as the
modem’s setting
(for example, XON-XOFF, RTS/CTS).
• If your communications software package’s file
transfer protocol is used, and the package supports
RTS/CTS Flow control, set Flow=RTS/CTS
(AT FL3). If the package does not support RTS/
CTS flow control, set Flow=Off (AT FL0).
326X Series Modem Troubleshooting Guide (Continued)
Problem
Diagnosis/Test
Possible Solution
Data is garbled or lost
Check the modem’s flow control
settings.
• Ensure that the DTE's flow control is the same as the
modem setting
(for example, XON-XOFF, RTS/CTS).
• If your communications package’s file transfer protocol is used, and the package supports RTS/CTS
Flow control, set Flow=RTS/CTS (AT FL3). If the
package does not support RTS/CTS flow control, set
Flow=Off (AT FL0).
*
*
Check that the modem’s DTE
If they do not match, adjust as necessary.
rate, parity, and character length
match the DTE’s settings.
Troubleshooting
If in normal mode, check line
quality:
• Check CQMS parameters
(signal quality and error
probability).
Data stops passing
The modem connects at
a lower rate than the
maximum (as set in the
Max Rate (AT MX)
option)
• Run a remote digital
loopback (RDL) or RDL
with pattern test.
If no errors occur, the line is good.
If errors occur, perform a manual retrain, or retry the
phone call.
• If you are still receiving
errors, disconnect the
modem from the line and
perform a local analog
loopback (LAL) or LAL
with pattern test (with
modem flow control off).
If the LAL or LAL with pattern test fails, contact Motorola Customer Support.
If the LAL or LAL with pattern test passes, you may have
a line problem (contact your telephone company) or a
problem with your application (check with your software
vendor).
Modem could be in “flow off”
condition (modem set for XONXOFF and DTE set for hardware
flow control).
Check CQMS parameters for
line quality.
• Set the modem for hardware flow control.
• Set Flow=Off (AT FL0).
*
Line quality is not sufficient to support higher data rate. If
line quality improves, the modem will increase its speed
automatically.
*
Ensure that the remote modem
supports the DCE rates you
anticipate.
Excessive modem
retrains
Retry call.
6-6 Troubleshooting Guide
Continuous retrains indicate a line problem. Contact your
telephone company.
326X Series Modem Troubleshooting Guide (Continued)
Problem
Diagnosis/Test
Possible Solution
CALL TERMINATION
Modem takes too long to Check to see if remote modem
disconnect
supports PSTN cleardown.
Modem doesn’t disconnect when DTR drops,
or
Modem doesn’t disconnect when communications software package
does
Check modem’s DTR option for
correct setting.
If remote modem doesn’t support PSTN cleardown, try to
change the setting of DCD Loss Disconnect (AT CD)
to a smaller number.
*
• Set DTR to an option other than High.
• Set DTR=Discon (AT&D2).
Communications softCheck the delay between issuing Ensure the escape sequence (+++) complies with the
ware package won’t sig- the escape sequence (+++) and modem’s guard time requirements (refer to Line feed
nal the modem to return the ATH command.
character:S-Register 4 for details).
to command state when
escape sequence (+++)
is issued
FILE TRANSFER
Can’t transfer all of a
file or a file aborts in
the middle of transfer
It takes longer than
expected to transfer a
file
Check the modem’s flow control Ensure that the DTE's flow control is the same as the
settings.
modem’s setting (for example XON-XOFF, RTS/CTS).
Check whether your
communications package
supports speed conversion.
If your communications software supports speed conversion, set modem’s Speed Conver=On (AT SC1).
Confirm which file transfer
protocol you are using.
Use different protocol, for example, YMODEM,
Y-GMODEM.
*
If operating the 326X-SDC modem in SDC mode, and you experience this type of problem...
BER tests do not work
BER tests do not work in SDC
mode because data is not framed.
Modem won’t pass data
Ensure your DTE protocol is
HDLC/SDLC-like data.
If your protocol is not HDLC/SDLC-like, use direct
mode.
Check for data format mismatch Set data format option to match the DTE [NRZ
(AT DF0) or NRZI (AT DF1)].
between modem and DTE
(AT DF).
*
Check clocking requirements.
*
*
Set modem for internal or external clock as required by
your application.
Troubleshooting Guide 6-7
Troubleshooting
Check whether the modem is set Set ACU Select=AT (ACU OPT's menu).
for AT ACU.
326X Series Modem Troubleshooting Guide (Continued)
Problem
Diagnosis/Test
Possible Solution
Check whether modem is set for If your DTE cannot handle Tx clock stopping, set
Flow=Off (AT FL0) or use CTS flow control.
Flow=Tx Clk (AT FL5).
*
*
Check if TpDlyMin=Rx Clk
(AT TD1).
*
If your DTE equipment cannot handle Rx clock stopping,
set TpDlyMin=Off (AT TD0) or set TpDlyMin=RxD
Dly (AT TD2).
*
*
If both modems are 326X-SDC,
check to ensure option sets are
the same in both modems.
If the option sets are not the same, select the same option
sets in both modems using Select Options (ATZ) command.
Check if one of your modems
If the local or remote modem is a 326X-SDC modem, set
(local or remote) is a 326X-SDC Fast Call=Off (AT FC0) in it.
unit.
*
Poor throughput
performance
Check your applications protocol:
• If a window size of one is
used (half duplex protocol)...
Increase window size.
• If using Novell IPX...
Ensure burst mode is selected.
Check whether TpDlyMin=Off
(AT TD0) or TpDlyMin=RxD Dly (AT TD2).
If your DTE can handle Rx clock stopping, set
TpDlyMin=Rx Clk.
Check if modem is set for
Flow=Off (AT FL0).
If your DTE can handle Tx clock stopping, set Flow=Tx
Clk (AT FL5). If it does not support Tx clock stopping,
use CTS.
Troubleshooting
*
*
*
*
If performance is not satisfacThe optimum frame size for most applications is between
tory, experiment with frame and 128 and 1024 bytes.
window sizes.
The optimum window size for most applications is 7 to 4.
Poor throughput delay
If link utilization is low
(as shown in the front panel
throughput and link utilization
status display)...
Increase the DTE rate.
Check the setting of the flow
control option.
Use Tx clock or CTS for flow control and Rx clock for
throughput minimization delay.
6-8 Troubleshooting Guide
326X Series Modem Troubleshooting Guide (Continued)
Problem
Diagnosis/Test
Possible Solution
If operating the 326X Series Modem on a leased line, and you experience this type of problem...
Modem won’t connect
Check leased line cable for
NOTE: CQMS parame- conformance to 2- or 4-wire
ters are only valid once pinouts (U.S./Canada only).
the modems are
connected (in data
mode)
• For a 3261 2-wire leased line cable, pinouts should
be Pin 1 (ring) and Pin 2 (tip)
• For a 3261 4-wire leased line cable, pinouts should
be:
— Pins 1 (TX Ring) and 2 (TX Tip)
— Pins 7 (RX Tip) and 8 (RX Ring)
For pinouts for your country and model, refer to
Appendix C.
• Confirm the Tx and Rx connections for your leased
line jack.
Ensure one modem is set for
answer and one for originate.
Ensure modem is set to match
line type (2- or 4-wire).
If you are still experiencing
problems, run an LAL pattern
test on both modems.
*
Ensure the local and remote modem’s modulation modes
are compatible with the maximum and minimum rate
options.
*
*
Check the leased line transmit
If this setting is adjustable in your country, adjust translevel option in both the local and mit level to approximately -15 dB.
remote modems (LL TX Level,
TELCO OPTS).
Troubleshooting Guide 6-9
Troubleshooting
Check the modulation
configuration:
• Mode (AT CA)
• Max Rate (AT MX)
• Min Rate (AT MN)
• If errors are found on either end, contact Motorola
Customer Support.
• If the LAL pattern test passes, you may have line
problems; contact your telephone company.
326X Series Modem Diagnostic Tests
The modem supports loopback, busy out, and retrain tests to assist you in isolating
network problems. These tests analyze the telephone line and the local and remote
modem’s performance. These tests can be initiated from the modem’s front panel,
using AT commands from an attached PC or terminal, or from a network
management system.
The following table shows the AT commands to initiate and terminate tests. The
steps following the table describe how to initiate and terminate each test from the
front panel. (Refer to your network management system documentation for
instructions on initiating and terminating tests from the network management
system.)
IMPORTANT: The tests described in this section cannot be run simultaneously.
Because each test interrupts data flow in a network, notify equipment users at both
the local and remote sites before starting tests.
Troubleshooting
For details on tests, refer to Chapter 4 of the 326X Series Modem Reference Guide.
Test
Local Analog
Loopback
Local Analog
Loopback Pattern
Remote Digital
Loopback
Remote Digital
Loopback Pattern
Data Mode Pattern
Local Digital
Loopback
Busy Out
Retrain
(Terminate)
6-10 Troubleshooting Guide
Description
Tests the local modem’s transmit and receive circuits
by looping local DTE data from the modem’s
transmitter to its receiver.
Tests the local modem’s transmit and receive circuits
with an internally generated test pattern.
Using local DTE data, this test examines the transmit
and receive circuits of the local and remote modems
and the telephone line.
Tests the transmit and receive circuits of the local and
remote modems and the telephone line.
The modem uses internally generated test patterns to
provide data and separately test the inbound and
outbound halves of the transmission path.
Using the remote DTE data for the test, the telephone
lines and the remote modem circuits are tested.
Allows the modem to appear busy to incoming calls.
Lets you manually retrain local and remote modems.
Terminates any test in progress.
AT
Command
&T1
&T8
&T6
&T7
Not
applicable
&T3
H1
O1
&T0
Initiating and Terminating Tests from the Modem’s Front Panel
To initiate a test from the modem’s front panel:
1) Press
until you reach the TEST OPTS category.
2) Press
until you reach Test=End Test.
3) Press
until Test=LAL (for example)
4) Press
to start the test.
To terminate a test from the modem’s front panel:
1) Press
until Test=End Test.
2) Press
to stop the test.
Synchronous Data Compression (SDC) Testing
When performing diagnostic tests in SDC mode, note the following:
• All tests are supported
• When initiating the following “online” tests:
— Remote digital loopback
— Remote digital loopback pattern
— Local digital loopback
during SDC connection, the modem falls back to Direct mode (Mode=Direct,
AT SM) to run the test. If the modem is set for internal timing
(Clock=Internal, AT&X) the DTE clock is changed to match the DCE rate. If
the modem is set for external timing (Clock=External, AT&X), the clock rate
provided may not match the DCE rate and the test will not function. (Set
Clock=Internal temporarily to complete testing, and then reset to External.)
*
• To test the synchronous data path’s integrity while running loopback tests, set
the modem for one of the asynchronous buffered modes (Mode=Normal,
Reliable, Auto Reliable, or Speed Auto Reliable).
Troubleshooting Guide 6-11
Troubleshooting
— Data mode pattern
Appendix A
Configuration Quick Reference
Contents
Configuration Quick-Reference—Menu Trees ............................................
For More Detail.........................................................................................
Audience and Assumptions ......................................................................
Performing Numeric Entry ............................................................................
Cross-Referenced List of S-Registers ...........................................................
Dial Modifiers for Special Dialing Requirements ........................................
Result Codes ..................................................................................................
Configuring the Modem’s Dual In-line Package (DIP) Switches ................
A-2
A-2
A-2
A-37
A-38
A-39
A-41
A-44
Configuration
Quick-Reference
Configuration Quick Reference A-1
Configuration Quick-Reference—Menu Trees
This appendix contains information useful for configuring and operating the modem:
• Configuration options and functions:
— Table A-1 lists AT commands. Commands are cross-referenced to front
panel options. Parameters whose options are restricted due to country
requirements are shaded gray.
— Table A-2 lists configuration options that do not have AT equivalents.
These options are organized by the main menu in which they appear.
• The menu structure (Figures A-1 to A-4): front panel options, option settings,
and AT, AT&, AT command equivalents, and default settings. (The Reference
Card shows the menu tree as well.)
*
• Numeric entry information: how to use the front panel control keys to change
numeric values of configuration settings.
• S-Registers, cross-referenced to AT Commands and front panel options.
• Dial modifiers
• Result codes: numeric (short form) and word (long form)
• Instructions for configuring Dual In-line Package (DIP) switches, which let
you override configuration settings normally selected through AT commands or
the front panel.
Configuration
Quick-Reference
For More Detail
For more information on configuration, order the 326X Series Modem Reference
Guide by contacting your Motorola sales representative or local distributor.
Audience and Assumptions
This chapter assumes you understand AT command syntax and use. (To review, refer
to Chapter 5, Using the AT Automatic Calling Interface.)
This chapter assumes you understand how to use the front panel to navigate the
configuration menus, and how to alter configuration options. (To review, refer to
Chapter 3, Getting Started.)
A-2 Configuration Quick Reference
ATI
AT&V
AT ST
Data (DCE Rate) T/D?
Pressing at this
display toggles modem
between talk/data
states
ATDS
AT DS
AT&V
AT ST
ATZ
AT&W
AT&Y
Rx = nnnn
*
DTE (Rate) EC Mode
PhaseJitter=0dg
Select Options=1
Save Changes=1
Power Up In=Old (D)
Dial From#=1
View Phone#=1
Tx = mmmm
EC=(Mode)DC=(Mode)
Frq Offset=0Hz
:2
:2
:1
:n
:n
Tx
0%
Tx Level=0dbm
:3
:3
:2
:9
:9
0%
Rx Level=-0dbm
:4
:4
:3
Rx
Kb
Kb
*
AT&F
AT ND
*
Reinit Memory?
*
:4
DCD RTS CTS
Retrains 0
DSR DTR
Echo Delay=0ms
AOP DLP ALP
Far Echo Lvl=0
DR=0 TI=0 O D
Nr Echo Lvl=0
AT&Z
AT CN
AT LN
ATD
Link Phone#=1
Enter Then Dial
*
*
Enter Phone#=1
Display Modem ID
Phase Roll=0
(s/w rev lvl)
Eqlzr SNR=0dB
:n
:n
SQ=0
:9
:9
EP=0%
AT DR
ATS
*
Auto Redial=Off (D)
S-Reg nnn=xxx
:1
:n
:15
AT&T
ATH
ATO
AT&T
AT LL
*
Accept RDL=On
TEST=End Test
TEST OPT’S
LAL Busy Out=On
:Off
:LAL
:Off
:RDL
:LDL
:Pattern
:LAL Pat
:RDL Pat
:Busy Out
:Retrain
MODULATION OPT’S
AT&L
AT MM
Line=Dial (1,2,3,4d)
Mod=V.34 Auto (A,F)
*
:2W Lease (4L)
:V.34 Only
:4W Lease
AT AY
AT LS
*
AT MX
*
Auto Type=CCITT (A)
Low Speed=Bell
AT MN
*
*
Max Rate=14.4(S)/28.8† (A,F)
:CCITT
:Codex
:33.6
:1200
:V32bis Auto (A,S)
:31.2
:300
:Auto V32
:26.4†
:1200
AT FC
Fast Call=Off (A)
:26.4†
*
:Lvl1
:Off
:2400
:28.8†
:Lvl2
:4800
:31.2
:Lv i3 (2,3,4L SDC)
:7200
:33.6
:9600 (2,3,4L SDC)
:V32 Only
:24.0†
:21.6†
:V32 Uncoded
:19.2†
:12.0
:V22bis Only
:16.8†
:14.4
:212 Only
:14.4 (A,S)
:16.8†
:103 Only
:12.0
:19.2†
:V21 Only
:9600
:21.6†
:7200
:24.0†
:V32bis Only
AT AR
V.34 Asym=On
*
Min Rate=300 (A)
:4800
:2400
AT AP
*
AdaptiveRate=On (A)
AT CA
AT&X
AT RT
ATY
Mode=Originate (1,3)
Clock=Internal (A)
Retrain=High BER
Longspace=Off (A)
:Off
*
*
:Answer (2,4)
:External (2 SDC)
:Off
:External
:Loopback
:Low BER
AT MD
*
PSTN=On (A)
:On
AT&G
Guard Tone=Off
:550
:Off
:1800
:Auto A in O
*
Restore=Off (1,2,3,4d)
AT DI
*
LtoD=Low/Fast (A)
AT LE
*
D to L=Manual (1,2,3,4d)
AT HD
*
Hold Dialine=Off (A)
:1 min
:FP Only
:Low/Slow
:15 min
:FP/108.1
:High/Fast
:30 min
:2 min
:FP/116
:High/Slow
:1 hour
:3 min
:FP/Auto (4L)
:2 hour
:4 min
:FP/108.ACU
:4 hour
:5 min (4L SDC)
AT AS
*
Ans Rest=LL Fail (A)
:Always
KEY
:FP/116.ACU
Note:
When you select Modulation Mode
(AT*MM), you must ensure that the
Max Rate (AT*MX) and Min Rate
(AT*MR) parameter options are within
the valid range for the mode.
=
Option Included
in Option Sets
=
Country Specific
Option
(A)
=
Default for All Option Sets
(D)
=
Default for Options Not Included in Option Sets
(1-4) = Default for Option Set n (n=1-4)
(L)
=
Option Set Default for 3261, 3263, 3266, 3268 Modems
(d)
=
Option Set Default for 3260, 3262, 3265, 3267 Modems
(S)
=
Default for 326X V.32bis Modem
(F)
=
Default for 326XFAST Modem
(†)
=
Available with 326XFAST Only
(SDC) = Sync Data Compression (available for 326XFAST-SDC only)
For example, in the Min Rate (AT *MN) option,
:9600 (2,3,4L SDC) means 9600 is the default for option sets
2, 3 and 4L (models 3261FAST, 3263FAST, 3266FAST
and 3268FAST) with the Sync Data Compression product.
Otherwise, the default is 300 bps for all option sets.
Figure A-1. The 326X Series Modem Menu Structure - Part 1 of 4
Configuration Quick Reference A-3
Configuration
Quick-Reference
AT RE
RESTORAL OPT'S
AT SM
EC/DC OPT’S
AT NB
*
AT EC
*
*
AT DC
EC=V.42 (A)
Buffers=Regular (A)
Mode=Direct (2,3,4L)
:Normal
*
DC= Enabled (A)
: LAPM
:Reduced
:Reliable
AT DF
AT BK
AT MF
Data Form=NRZ (SDC)
Break=Destruct (A)
:Expedited
Modem Flow=On (A)
*
:Disabled
:NRZI
*
:MNP
*
:Off
:Standard
:Auto Rel (1,4d)
(2,3,4L SDC)
:Spd AutoRel
AT DB
*
AT SL
Delay=Off (A)
EC ID=Default (A)
*
:Buf or S38 (3 SDC)
:Codex
:Buf & S38
:S38
AT&M
ACU OPT’S
AT DA
AT Form=Async (A)
V25Form=Async
:V25b (3)
:SyncData
:AsynSync
:LPDA2
:None (2,4)
:DTR Dial
:Bitsync (A)
ACU Select=AT (1)
NoAcu Form=Async (1,4d)
:Sync (2,3,4L)
AT AA
*
Answer=Manual
ATE
Async Echo=On (A)
:Off
:Ring #1
:1 (4L)
Char Length=8
:9
V25 Char=ASCII (A)
:EBCDIC
:Ring #2
:10 (A)
:n
:Ring #4
:11
:9
:Ring #8
(2,3 SDC)
:Charsync
:Man Dial
*
Default Dial=Off (1,2,3,4d)
:Using S0
AT RP
*
Sync Idle=Mark
V25 Resp=V25bis
:Char (A)
:V25rate
Parity=V.25bis
:Even
:VALOnly
:Odd
:None
:Mark
AT MS
*
AT Msg=Before CD (A)
:After CD
ATQ
RsltCode=Enable (A)
:Disable
ATV
RsltForm=Numeric
:Verbose (A)
:Orig
AT CM
*
Con Msg=DTE Rate (D)
AT XC
*
Rel Msg=Off (A)
:DCE Rx
:Short
:DCE Tx
: Long
LPDA2 Addr=FF
:Space
ATX
LPDA2 ID=326X
:7855
LPDA2 Det=Enab
:Disab
Call Progress = 4
:1
:2
:3
:4
KEY
Configuration
Quick-Reference
=
Option Included
in Option Sets
=
Country Specific
Option
(A)
=
Default for All Option Sets
(D)
=
Default for Options Not Included in Option Sets
(1-4) = Default for Option Set n (n=1-4)
(L)
=
Option Set Default for 3261, 3263, 3266, 3268 Modems
(d)
=
Option Set Default for 3260, 3262, 3265, 3267 Modems
(S)
=
Default for 326X V.32bis Modem
(F)
=
Default for 326XFAST Modem
(†)
=
Available with 326XFAST Only
(SDC) = Sync Data Compression (available for 326XFAST-SDC only)
For example, in the Min Rate (AT*MN) option,
:9600 (2,3,4L SDC) means 9600 is the default for option sets
2, 3 and 4L (models 3261FAST, 3263FAST, 3266FAST
and 3268FAST) with the Sync Data Compression product.
Otherwise, the default is 300 bps for all option sets.
Figure A-2. The 326X Series Modem Menu Structure - Part 2 of 4
A-4 Configuration Quick Reference
AT DE
*
TERMINAL OPT'S
DTE Rate=Auto (1)
:128.0†
AT TD
*
AT SC
*
AT&D
AT RS
AT&R
AT CT
TpDlyMin=Rx Clk (2,3,4L SDC)
Speed Conver=On (A)
DTR=High (1,4L)
RTS=High (1)
:Normal (2,3,4)
CTS=High
:Normal (2,3,4)
AT FL
*
Flow=Off
:XON/XOFF (A)
:Off
:RxD Dly
115.2†
:DTR/CTS
:96.0†
:RTS/CTS
:76.8†
:XON/XOFF PT
:72.0†
:Tx Clk (2,3,4L SDC)
:Escape
:Remote
:Discon (4d)
:Off
(Displayed only for
326XFAST -SDC products)
*
*
:Reset
:ACU On
:AsyncSync (1)
:Tail (2 SDC)
:RTS
:108.1 (3 SDC)
:64.0† (2,3,4L SDC)
:108.2/Bsy (2,3)
:57.6
:56.0† (2,3,4L SDC)
(U.S.A/Can. only)
:48.0†
:38.4
AT DL
AT&C
*
Rts/Cts Delay=0 (A)
AT SR
DCD=High (1)
AT CD
AT&S
AT MR
*
AT OS
DCD Loss Dis=Off
:3s
DSR=High (1)
:Normal (3,4d L)
Overspeed=1% (A)
*
*
RemRTS/DCD=Codex (A)
:V.13
:28.8†
:15
:Normal (2,3,4)
:26.4†
:60
:ACU On
:7s
:24.0† (2,3,4L,F)
:90
:Remote
:S10
:21.6†
:S26
:Wink
*
:2.5%
(2 SDC)
:DTR
:Drop On Disc (2)
:Simulate LL
:19.2 (4d)
:16.8
:14.4 (2,3,4L,S)
:12.0
AT DT
*
AT LD
*
AT LA
*
AT LT
:7200
DTR Delay=S25 (A)
DTE Ct 140=Off (D)
DTE Ct 141=Off (D)
DTE Pin 25=Busy
:4800
:10 sec
:On
:On
:Test
:2400
:15 sec
:9600
AT OP
*
AT OC
*
*
Ext Select=Off (D)
:1H/2L
Ext Cntrl=Pin 20
:Pin 14
AT SI
*
Inactivity=Off
:3min
:1H/3L
:10min
:1200
:1H/4L
:20min
:300
:2H/1L
:30min
:2H/3L
:S30min
:2H/4L
:3H/2L
:3H/4L
:4H/1L
:4H/2L
:4H/3L
Figure A-3. The 326X Series Modem Menu Structure - Part 3 of 4
Configuration Quick Reference A-5
Configuration
Quick-Reference
:3H/1L
AT&J
TELCO OPT’S
Telco=RJ11C
*
ATM
ATL
Speaker=Dialing (D)
:On
Volume=Medium (D)
:Loud
DL TX Level=0
:-1
LL TX Level=0
:-1
:RJ16C
: -n
: -n
:Security
:RJ4MB
: -15
: -15
:Off
AT DP
ATP
ATT
AT PT
AT DD
*
DIALING OPT’S
AT LC
Line Compen=Off
:On
:RJ45S
*
AT TT
*
*
Dial Wait=2
:4
Dial=Tone
:Pulse
:45
:9
:6
:Auto
:60
:12
*
:Lvl1
:Soft
:Lvl2
AT BD
AT&P
AT TL
Blind Dial=2
:4
Pulse Cycle=40%
Tone Length=72
*
Call Timeout=30
Pause Delay=3
:6
AT NC
Netwrk Comp=Off (D)
*
:33%
:S6
:S11
:38%
:90
:S7
:S8
:180
:S7
AT PN
AT PE
AT PF
Enter Password?
Password=Disable (D)
Set Protection?
*
FP SECURITY
*
AT PW
*
*
Change Password?
:Enable
ACCESS SECURITY
AT ZV
AT ZC
AT ZR
AT ZI
PW Verify = Dis (D)
Callback=Off (D)
Rmt Num Rqrd=Off
Enter Group PW?
*
*
*
*
Group PW=Disable
AT ZP
*
AT ZS
*
AT ZD
Tone=None (D)
:Prompt Only
Sim Ring=Disable (D)
DialRstrct=Off (A)
:Intern
:Intern 1
:Mngr
:Intern n
:Ack Only
:Intern 9
:Prompt/Ack
:On
:Enable
*
:Enable
:LV11
:LV12
:Remote
:Manager
:Rmt Ind
NETWK CNTL OPT’S
OverrideMode=Off (D)
NC Address=000
:On
NC Port Rate=75 (D)
Pass Thru=opt 1
NC Line Disc=Off
:opt 2
:On
:110
:150
:1200
KEY
:2400
Configuration
Quick-Reference
:4800
=
:9600
RMT CONFIG OPT’S
AT RC
*
AT RA
Init Rmt Cnfg?
RmtAcc=Enable (D)
*
:Disable
Option Included
in Option Sets
=
Country Specific
Option
(A)
=
Default for All Option Sets
(D)
=
Default for Options Not Included in Option Sets
(1-4) = Default for Option Set n (n=1-4)
SET RMT LL ADDR
New Address=nnn
RmtNest Modem=No
Rmt Ser#=nnnnnnn
:A
’Enter’ to Set
(L)
=
Option Set Default for 3261, 3263, 3266, 3268 Modems
(d)
=
Option Set Default for 3260, 3262, 3265, 3267 Modems
(S)
=
Default for 326X V.32bis Modem
(F)
=
Default for 326XFAST Modem
(†)
=
Available with 326XFAST Only
:B
SRCH RMT LL ADDR
Rmt Ser#=nnnnnnn
RmtNest Modem=No
’Enter’ to Search
:A
:B
(SDC) = Sync Data Compression (available for 326XFAST-SDC only)
For example, in the Min Rate (AT*MN) option,
:9600 (2,3,4L SDC) means 9600 is the default for option sets
2, 3 and 4L (models 3261FAST, 3263FAST, 3266FAST
and 3268FAST) with the Sync Data Compression product.
Otherwise, the default is 300 bps for all option sets.
Figure A-4. The 326X Series Modem Menu Structure - Part 4 of 4
A-6 Configuration Quick Reference
Table A-1.
AT Commands, Cross-Referenced to Front Panel Options
AT
Command
Parameter &
Option
Description
+++
—
Escape Data Mode
Enter command mode (does not require AT prefix or <CR>. The character is determined by the
content of S-Register 2.
A/
—
Re-Execute Last Command
Re-executes the last AT command string issued to the modem, including redialing a telephone
number. (Does not require AT prefix or <CR>.) The modem has a redial security feature. See
the AT ZD command for details.
AT=x
—
*
Change S-Register Value (x=new value)
Lets you change the setting of the S-Register that was last accessed with an S-Register
command.
AT?
—
AT
—
Display S-Register Value
Displays the contents of the last S-Register accessed.
Attention Code
Precedes all commands except (+++) and A/.
ATA
—
ATDn
Enter Then Dial
Manual Answer
Causes the modem to answer a call regardless of the ring count.
Dialing an Unstored Telephone Number (n=phone number)
Lets you dial a telephone number of up to 50 characters without storing it in the modem’s
telephone book.
ATDSn,
ATDS=n, or
Dial From
Stored #=n
Dial telephone number stored in address n. Before using this option, enter a telephone number
into the modem address book. See AT&Z, AT CN to learn how to enter telephone numbers.
If you enter ATDS or ATDS= without a number following, the modem dials the number in
Address 1.
*
*DS=n
*
AT
Dialing a Stored Telephone number (n=1-9)
DSn,
AT
*
To dial a number using AT Commands, enter ATDS, ATDS=, or AT DS followed by the
telephone book address number and a carriage return. For example: ATDS2<CR>
NOTE: You can include dial modifiers to instruct the modem how and when to dial a call. The
dial modifiers used with the AT ACU are described in Table A-4.
Async Echo
Asynchronous Echo
ATE0
=Off
The modem does not echo asynchronous commands to the DTE.
ATE1
=On
The modem echoes asynchronous commands to the DTE.
TEST
Busy Out Test
ATH0
=End Test
If busy out is enabled, ATH0 disconnects the busy out condition. In “escape mode” (modem
has transitioned to command state from data state), ATH0 disconnects the modem.
ATH1
=Busy Out
Makes the modem appear busy to incoming calls.
Gray shading indicates country-specific options. See Appendix C for your country’s options.
Configuration Quick Reference A-7
Configuration
Quick-Reference
To dial a number using AT commands, enter ATD, followed by the telephone number and a
carriage return. Example: ATD5551234<CR>
Table A-1.
AT Commands, Cross-Referenced to Front Panel Options (Continued)
AT
Command
Parameter &
Option
Description
ATIn
—
Display Software Information (n= 0, 1, 2, 9)
0=displays 960
1=displays 000
2=displays OK
9=displays reason for last disconnect
These messages are sent with OK, when AT command processing is complete.
Volume
Speaker Volume
ATL0/ATL1
=Soft
The speaker volume is set to soft.
ATL2
=Medium
The speaker volume is set to medium.
ATL3
=Loud
The speaker volume is set to loud.
Speaker
Speaker Control
ATM0
=Off
The speaker is always off.
ATM1
=Dialing
The speaker is on when dialing and training, and off when the modem enters data mode.
ATM2
=On
The speaker is always on.
ATM3
=Security
The speaker is on when dialing is complete and off when the modem enters data mode.
Retrain
ATO0
—
The modem leaves command mode and returns online (to data mode).
ATO1
TEST=Retrain
The modem leaves command mode, returns online, and initiates a retrain with the remote
modem.
Dial
Dial Type
=Pulse
The modem uses pulse dialing unless otherwise specified by the T or P modifiers.
RsltCode
Result Codes
ATQ0
=Enable
Result codes are displayed at the DTE.
ATQ1
=Disable
Result codes are not displayed at the DTE.
ATQ2
=Orig
Result codes are output to the DTE only when operating as an originate modem.
S-Regxxx
S-Register
=nnn
Lets you view and set S-Registers (where xxx equals the S-Register to change and nnn equals
the value of the register). The value must be within the specified range (see Chapter 5 for a full
description of S-Registers).
Dial
Dial Type
=Tone
The modem uses tone dialing unless otherwise specified by the T or P modifiers.
RsltForm
Result Code Format
ATV0
=Numeric
Result codes are sent to your DTE as numbers (short form).
ATV1
=Verbose
Result codes are sent to your DTE as full words (long form).
Call Progress
Call Progress
Configuration
Quick-Reference
ATP
ATS
ATT
Determines whether the modem waits for call progress signals or blind dials when establishing
calls.
ATX0
=0
The modem uses only NO CARRIER and CONNECT result codes.
ATX1
=1
The modem uses only NO CARRIER, CONNECT, and CONNECT <Rate> result codes.
Gray shading indicates country-specific options. See Appendix C for your country’s options.
A-8 Configuration Quick Reference
Table A-1.
AT Commands, Cross-Referenced to Front Panel Options (Continued)
AT
Command
Parameter &
Option
ATX2
=2
The modem waits for dial tone and uses only NO CARRIER, CONNECT, CONNECT <Rate>
and NO DIALTONE result codes.
ATX3
=3
The modem detects busy signal and uses NO CARRIER, CONNECT, CONNECT <Rate>, and
BUSY result codes.
ATX4
=4
The modem waits for dial tone and detects busy signal. Only NO CARRIER, CONNECT,
CONNECT <Rate>, BUSY, and NO DIAL TONE result codes are used.
Longspace
Longspace Disconnect
ATY0
=Off
The modem does not disconnect when it receives space longer than 1.6 seconds. When
terminating a call, the modem does not send continuous space for 4 seconds.
ATY1
=On
The modem disconnects when it receives space longer than 1.6 seconds. When terminating a
call, the modem sends continuous space for 4 seconds.
Select Options
Selecting an Option Set
Description
The new option set takes effect immediately.
ATZ0/ATZ1
=1
The modem uses Option Set 1.
ATZ2
=2
The modem uses Option Set 2.
ATZ3
=3
The modem uses Option Set 3.
ATZ4
=4
The modem uses Option Set 4. NOTE: The modem disconnects from the line when ATZ is
entered. Any test in progress is terminated. Since any AT command that follows ATZ is
ignored by the modem, ensure that ATZ is the last command entered in a command string. Use
the AT&Y command to select the option set in which the modem powers up.
DCD
DCD Control
AT&C0
=High
DCD is always on.
AT&C1
=Normal
DCD is off during dialing and while the modem is training with the remote modem. DCD is on
in data mode. It is off when the modem is disconnected from the telephone line.
AT&C2
=ACU On
DCD is on when the modem is disconnected so that terminals requiring this signal can use the
ACU. During dialing, DCD goes off until both modems train and are ready to pass data. DCD
is on in data mode. DCD drops on a disconnect momentarily.
AT&C3
=Remote
This setting applies to simulated half-duplex applications and works only if the remote modem
also supports RTS/DCD signaling. When the remote DTE turns RTS on, DCD is forced on at
the local modem. The local modem can receive data only during this period. Once the remote
DTE drops RTS, DCD at the local modem follows. The Rem RTS/DCD option lets you choose
the type of RTS/DCD signaling.
AT&C4
=Wink
DCD is always on; however, it drops after disconnect and remains low momentarily.
DTR
DTR Control
This command determines how the modem interprets the DTR signal. The local DTE uses
DTR (Pin 20) to signal the modem.
AT&D0
=High
The modem ignores DTR from the DTE. The modem reads DTR as always high. Choose this
option for DTR/CTS flow control with error correction, or if the DTE does not provide DTR
signal.
AT&D1
=Escape
When ACU Select=AT and AT Form=Async (AT&M), the modem enters the AT Escape mode
(+++) when DTR goes off while the modem is in data or test mode.
Gray shading indicates country-specific options. See Appendix C for your country’s options.
Configuration Quick Reference A-9
Configuration
Quick-Reference
Determines how the modem sets DCD signals. The modem signals the DTE with DCD on
EIA/TIA 232-D Pin 8 (V.24 Circuit 109).
Table A-1.
AT Commands, Cross-Referenced to Front Panel Options (Continued)
AT
Command
Parameter &
Option
AT&D2
=Discon
The modem hangs up and enters command mode when an on-to-off DTR transition is detected,
while the modem is in data, test, or escape mode. If DTR is low, the modem does not auto
answer.
AT&D3
=Reset
The modem hangs up (if connected) and loads the specified option set when an on-to-off DTR
transition occurs. If DTR is low, the modem auto answers.
AT&D4
=Tail
This setting is similar to 108.1 except that the modem auto answers an incoming call even if
DTR is off. When DTR transitions from off to on, the modem connects to the telephone line
and dials (if the Default Dial option is enabled).
AT&D5
=108.1
The DTR signal emulates the function of the Talk/Data (
at the Home position) key on the
modem’s front panel. An off-to-on DTR transition instructs the modem to connect to the
telephone line. If the modem detects an incoming ring, it answers the call. If the modem does
not detect an incoming call, the modem dials the number specified by the Default Dial option.
An on-to-off DTR transition disconnects the modem from the telephone line.
AT&D6
=108.2
When the modem is disconnected from the telephone line, and DTR is turned on by the DTE,
the modem responds to all AT commands. When the DTE turns DTR off, the modem does not
respond to dialing and answering AT commands, but responds to all other AT commands. The
DTR signal must remain on throughout the connection. An on-to-off DTR transition
disconnects the modem from the telephone line. If DTE is low, the modem does not auto
answer.
AT&D7
=108.2/Bsy
When the modem is disconnected from the telephone line, and the DTE asserts DTR, the
modem responds to all AT commands. The DTR signal must remain asserted throughout the
connection.
Description
Configuration
Quick-Reference
When the DTE de-asserts DTR:
• The modem disconnects from the telephone line. If DTR is de-asserted, the
modem activates Busyout status.
• The modem does not respond to dialing and answering commands, but responds
to all other commands.
Reinitialize Memory
AT&F
Reinit Memory?
Resets the modem to factory default settings. The four factory default option sets are restored
to their original settings, and all stored telephone numbers are deleted.
Enter: AT&F<CR>. The modem displays 326x Initial and the terminal displays OK.
The factory-programmed option sets are now in place.
Guard Tone
Guard Tone
This command determines what type of guard tone the modem uses in V.22bis operation. The
proper guard tone (AT&G) option setting is required by your PTT.
AT&G0
=Off
The modem does not use a guard tone.
AT&G1
=550
The modem uses a guard tone of 550 Hz.
AT&G2
=1800
The modem uses a guard tone of 1800 Hz.
AT&I0
Modem ID# 1
Software part number.
AT&I1
Modem ID# 1
Factory product code.
AT&I2
Modem ID# 1
Country code
Display Modem ID
Gray shading indicates country-specific options. See Appendix C for your country’s options.
A-10 Configuration Quick Reference
Table A-1.
AT Commands, Cross-Referenced to Front Panel Options (Continued)
AT
Command
Parameter &
Option
Description
AT&I3
Modem ID# 1
Product code
AT&I4
Modem ID# 1
Network control address (optional)
AT&I5
Modem ID# 1
Device serial number
Telco
Dial Line Jack Type
AT&J0/
AT&J1
=RJ11C
This 6-pin modular jack type is the most common permissive data mode (voice) jack
arrangement found in the home or office and operates on a single-line bridged tip-and-ring
voice or low-speed data application service.
AT&J2
=RJ45S
This 8-pin modular jack type is the most common programmable jack arrangement and permits
the use of an exclusion key telephone. This jack also operates on a single-line bridged tip-andring voice or low-speed data application service.
NOTE: When installing the modem in a PBX environment, the interface to the PBX should be
a voice grade jack (RJ11). Although an RJ11 jack is installed, Motorola recommends that
Telco=RJ45S. This optimizes modem performance the when operating at high data rates over a
PBX. In a normal Telco-supplied loop situation, the telco options setting should match the jack
type installed.
AT&J3
=RJ16CS
This 6-pin modular jack type is a special permissive data mode jack arrangement that allows
use of an exclusion key telephone.
AT&J4
=RJ4MB
This 8-pin modular programmable data mode jack arrangement supports Make Busy operation.
Using this jack type, you can make the modem appear to be off-hook to the central telephone
office. Note: In modems in the U. S. A. and Canada, the Make Busy function operates only in
nest card modems. (Make Busy settings display in standalone modems, but are not active.)
Line
Line Type
=Dial
The modem communicates over dial lines in dial applications only.
AT&L1
=2W Lease
The modem communicates over a 2-wire leased line. The ACUs (AT and V.25bis) are not
functional when the modem is connected to a leased line.
AT&L2
=4W Lease
The modem communicates over a 4-wire leased line. The ACUs (AT and V.25bis) are not
functional when the modem is connected to a leased line.
AT Form
AT Data Format
Determines the format of the data when ACU Select is set to AT.
AT&M0
=Async
The modem communicates asynchronously in command and data mode.
AT&M1
=Sync Data
The modem communicates asynchronously when in command mode (disconnected from the
dial line), and synchronously when in data mode.
AT&M2
=DTR Dial
When an off-to-on DTR transition is detected, the modem dials the number stored in the
memory location designated by the Default Dial option. Once connected, the modems transmit
data synchronously. If DTR transitions from on-to-off, the modem hangs up and returns to the
asynchronous command mode.
AT&M3
=Man Dial
DTR signals toggle between talk and data mode. With DTR off, numbers can be dialed from a
telephone. Once an answer tone is heard, the telephone is hung up, and DTR is raised; the
modems connect and send data sychronously.
Pulse Cycle
Pulse Cycle
AT&P0
=40%
The make/break ratio is 40:60.
AT&P1
=33%
The make/break ratio is 33.5:66.5.
AT&P2
=38%
The make/break ratio is 38.5:61.5.
Gray shading indicates country-specific options. See Appendix C for your country’s options.
Configuration Quick Reference A-11
Configuration
Quick-Reference
AT&L0
Table A-1.
AT Commands, Cross-Referenced to Front Panel Options (Continued)
AT
Command
Parameter &
Option
Description
CTS
CTS Control
Determines how the modem sets the CTS signal. The modem signals the DTE with CTS on
EIA/TIA 232-D Pin 5 (V.24 Circuit 106). The CTS Signal discussed here is the state of the
CTS signal after the setting of the modem’s RTS option has been followed. For CTS to follow
the RTS signal from the DTE, set the modem RTS= Normal.
AT&R0/
=AsyncSync
CTS is on in asynchronous mode. CTS is off in synchronous, ACU mode. If the data transfer
mode is synchronous, CTS is off during training/retraining and follows RTS in data mode.
When CTS follows RTS in data mode, the setting of the RTS/CTS Delay option applies (if
Mode=Direct).
CTS=High
CTS remains high at all times. Use this option with RTS/CTS or DTR/CTS Flow control.
DSR
DSR Control
*CT3
AT
AT&R1/
*CT0
AT
Configuration
Quick-Reference
Determines how the modem sets the DSR signal. The modem signals the DTE with DSR on
EIA/TIA 232-D Pin 6 (V.24 Circuit 107).
AT&S0
=High
DSR is always on.
AT&S1
=Normal
DSR is controlled by the modem.
TEST
Test
AT&T0
=End Test
Ends the test currently in progress for each test listed below (except retrain).
AT&T1
=LAL
Initiates a local analog loopback test.
AT&T3
=LDL
Initiates a local digital loopback test.
Accept RDL
Accept RDL
AT&T4
=On
The local modem can be put into a remote digital loopback test.
AT&T5
=Off
The local modem cannot be put into a remote digital loopback test.
AT&T6
TEST=RDL
Initiates a remote digital loopback test.
AT&T7
TEST=RDL Pat
Initiates a remote digital loopback pattern test.
AT&T8
TEST=LAL Pat
Initiates a local analog loopback pattern test.
Status
Modem Status Display
Long Form
Lets you view modem status information, on the control terminal, in long form. The display
shows operating status, DTE/DCE rate/status, asymmetric rates status, connect message status,
the data form, throughput-delay minimization status, error correction status, data compression
status, EIA/TIA signal status, disconnect reasons, the software revision level, and CQMS
parameters. The long form also shows front panel options and corresponding AT commands.
AT&V0
Status
AT&V1
Short Form
Status
Lets you view modem status information, on the control terminal, in short form. This displays
a summary of AT command settings and S-register values.
Save Changes
Save Changes
When using AT Commands or front panel options to alter modem settings, if you do not save
the changes, the modem does not enter them into memory. After you have selected the option
set for your application (using the ATZn Command), and modified configuration settings,
enter: AT&Wn where n=(Option Set) 1 through 4. The modem displays Saving Options, then
Save Completed! signifying that the option set has been saved in nonvolatile memory.
AT&W0/
AT&W1
=1
Save changes to Option Set 1.
Gray shading indicates country-specific options. See Appendix C for your country’s options.
A-12 Configuration Quick Reference
Table A-1.
AT Commands, Cross-Referenced to Front Panel Options (Continued)
AT
Command
Parameter &
Option
Description
AT&W2
=2
Save changes to Option Set 2.
AT&W3
=3
Save changes to Option Set 3.
AT&W4
=4
Save changes to Option Set 4.
Clock
Clock
Sets modem timing and applies to synchronous applications only. For most dial applications,
use internal timing.
AT&X0
=Internal
The modem uses internal timing; timing signals are passed on EIA/TIA 232-D Pin 15 (V.24
circuit 114). Internal timing is used for most applications.
AT&X1
=External
The modem uses external timing; timing signals are passed on EIA/TIA 232-D Pin 24 (V.24
circuit 113). Internal timing is used for most applications.
AT&X2
=Loopback
The modem uses loopback timing; timing signals are passed on EIA/TIA 232-D Pin 17 (V.24
circuit 115). NOTE: This selection is not available in SDC mode. If you select loopback with
SDC mode enabled, the modem uses internal timing instead.
Power Up In
Power Up In Option Set
=Old
When you turn on the modem, it automatically uses the last saved option set.
AT&Y1
=1
When you turn on the modem, it automatically uses Option Set 1.
AT&Y2
=2
When you turn on the modem, it automatically uses Option Set 2.
AT&Y3
=3
When you turn on the modem, it automatically uses Option Set 3.
AT&Y4
=4
When you turn on the modem, it automatically uses Option Set 4.
Enter Phone #
Enter Telephone Numbers (where n=1-9)
=1–9
Lets you store up to nine telephone numbers in the modem’s “address book” of up to 50
characters each. To enter a number into the address book: enter the AT&Z or AT CN
command, the telephone book address (1-9), a comma, and the telephone number to store. For
example, to store the number 1-222-555-444 in memory location 3, enter:
AT CN3,12225554444<CR>
AT&Zn
*
*
*
If you enter AT&Z or AT CN without specifying a memory location, the modem stores the
number in address 1. If no telephone number follows AT&Z or AT CN, the specified memory
location’s telephone number is deleted. NOTE: When dialing telephone numbers, you can
include dial modifiers to instruct the modem how and when to dial a call. Refer to Table A-4.
*
Answer
Answer
AT
=Manual
An incoming call must be answered manually.
AT
Answer=Ring #
1
The modem automatically answers an incoming call after the first ring.
=Ring # 2
The modem automatically answers an incoming call after the second ring.
=Ring # 4
The modem automatically answers an incoming call after the fourth ring.
=Ring # 8
The modem automatically answers an incoming call after the eighth ring.
*AA0
*AAl
AT AA2
*
AT AA3
*
AT AA4
*
AT AA5
*
*AP0
AT
=Using S0
The modem automatically answers an incoming call according to the setting of S-Register S0.
Adaptive Rate
Adaptive Rate Feature
=Off
The modem does not use the adaptive rate feature.
Gray shading indicates country-specific options. See Appendix C for your country’s options.
Configuration Quick Reference A-13
Configuration
Quick-Reference
AT&Y0
Table A-1.
AT Commands, Cross-Referenced to Front Panel Options (Continued)
AT
Command
*AP1
AT
Parameter &
Option
=On
Description
The modem monitors telephone line signal quality and negotiates the highest possible rate for a
modem’s modulation mode. You must enable Retrain (AT RT) to use the Adaptive Rate.
Close rear panel switch 1 down so that the modem can inform the terminal of rate changes See
“Configuring the Modem’s Dual In-line Package (DIP) Switches” section in this appendix for
information.
*
Adaptive Rate Operation in V.34 Modulation Mode
In the V.34 modulation mode, with Adaptive Rate=On (MODULATION OPTS Menu, or
AT AP1), the modem selects the optimum data rate on the first connection. The modem then
monitors line conditions, and if conditions deteriorate (i.e., poor signal quality), the modems
retrain and determine the rate that the line can support, within the range specified in Max Rate
(AT MX) and Min Rate (AT MN). Under poor line conditions, the modem may fall back by
more than one rate.
*
*
*
For example, at a data rate of 28.8 kbps, under poor line conditions, the modem may retrain to
19.2 kbps instead of 21.6 kbps. ARS adjustment is based on the High/Low BER setting of the
AT RT (Retrain) option.
*
NOTES:
*
1) The AT RT (Retrain) command must be enabled (set to Low BER or High BER)
if you use the adaptive rate setting.
2) The modem does not fall forward in V.34 modulation mode with ARS enabled.
Line Probing Feature Operation in V.34 Mode
Configuration
Quick-Reference
The modem uses a line probing feature during the initial training sequence. Line probing
selects the maximum data rate that the line can support, as well as the optimal baud rate and
carrier frequency. Due to this, in the V.34 modulation modes (V.34 Auto and V.34 Only), the
modem may require a longer training sequence.
NOTE: For a summary of the supported data rates, baud rates and carrier frequencies, refer to
the “V.34 Modulation Mode Characteristics” section in Chapter 1.
If You Operate the Modem in V.34 Mode with ARS Disabled...
If you operate the modem in the V.34 modulation mode with the ARS option disabled
(AT AP0), the modem selects the optimum data rate that can be supported (as determined by
the line probing feature described above) on the first connection.
*
With ARS disabled, the modem does not automatically fall back when line conditions
deteriorate.
NOTE: When external timing is selected, configure the modem so that the minimum rate is
equal to the maximum rate. This will force the modems to come up at a specific data rate only.
Asym Rate
V.34 Asymmetric Rate
=Off
Asymmetric Rate
Controls whether the modem permits different transmit and receive DCE rates.
*AR1
*
AT
AR0
AT
=On
Ans Rest
Answer In Restoral
Controls whether the modem answers a call on the dial line while connected to the leased line.
*AS0
AT
=LL Fail
When connected on a leased line, the modem answers an incoming call only if the leased line
fails.
Gray shading indicates country-specific options. See Appendix C for your country’s options.
A-14 Configuration Quick Reference
Table A-1.
AT Commands, Cross-Referenced to Front Panel Options (Continued)
AT
Command
*AS1
AT
Parameter &
Option
Description
=Always
A dial call is always answered. As soon as the dial call is answered, the leased line connection
is dropped (with auto-answering, the leased line is dropped after the correct number of rings).
If training on the dial line fails, the modem returns to the leased line.
Auto Type
Auto Type
*AY0
=CCITT
During answer-back tone, the modem attempts to negotiate a connection in the V.32
modulation mode. As soon as answer-back tone ends, if a V.32 tone has not been detected
during ABT, the modem attempts to negotiate a connection in the V.22bis modulation mode.
*AY1
=Codex
During answer-back tone, the modem attempts to negotiate a connection in the V.32
modulation mode. After sending answer-back tone, the modem continues to attempt to
negotiate a connection in the V.32 modulation mode. If unsuccessful, the modem tries to
negotiate a connection in the V.22bis modulation mode.
Blind Dial
Blind Dial
AT
AT
Determines the time the modem waits before dialing; once time has expired, the modem dials
without waiting for a dial tone.
BD0
*
AT BD1
*
AT BD2
*
AT
=2
The modem waits 2 seconds before dialing.
=4
The modem waits 4 seconds before dialing.
=S6
The modem waits the amount of time specified by S-Register 6 before dialing.
Break
Break Handling
Controls how the modem handles the break signal in reliable and auto-reliable data modes.
Break signals are sent to the DTE for the duration specified in S-Register 97.
*BK0
=Destruct
The modem uses destructive and expedited break handling. It passes the break to the remote
site immediately and deletes all data from its buffers. NOTE: Destructive breaks reinitialize
data compression tables for MNP-5 and V.42bis.
*BK1
AT BK2
*
=Expedited
The modem uses nondestructive and expedited break handling. It passes the break to the
remote site immediately without deleting data from its buffers.
=Standard
The modem uses standard break handling. It passes the break to the remote site in sequence
with any transmit data from its buffers.
Mode
Answer/Originate Mode
=Orig
The modem operates as an originating modem in a manual answer/dial application.
=Answer
The modem operates as an answer modem in a manual answer/dial application.
=External
The signal from the DTE on EIA/TIA 232-D Pin 11 determines whether the modem is in
answer or originate mode. If the signal is off, the modem is in originate mode; if the signal is
on, the modem is in answer mode
=Auto A in O
The modem configures itself as an originating modem after auto-answering a call. In leasedline operation, the modem functions as if it is set to originate calls. NOTE: The functions
provided by this setting only apply when the modem auto-answers.
DCD Loss Dis
DCD Loss Disconnect
=Off
The modem will not disconnect due to loss of carrier.
=3 s
The modem hangs up if it loses carrier for 3 seconds.
=7 s
The modem hangs up if it loses carrier for 7 seconds.
=S10
The modem checks the value stored in S-Register 10 to determine when it disconnects due to
loss of carrier. See the “S-Registers” section in Chapter 5 for more information.
AT
CA0
*
AT CA1
*
AT CA2
*
AT
*CA3
AT
CD0
*
AT CD1
*
AT CD2
*
AT CD3
*
AT
Gray shading indicates country-specific options. See Appendix C for your country’s options.
Configuration Quick Reference A-15
Configuration
Quick-Reference
AT
Table A-1.
AT Commands, Cross-Referenced to Front Panel Options (Continued)
AT
Command
*CM0
AT CM1
*
AT CN1 –
*
9,(phone no.)
AT
CT0/
*
AT&R1
AT
*CT1
AT
Parameter &
Option
Description
Con Msg
Connect Message
=DTE Rate
Selecting DTE Rate results in the current DTE rate being displayed on your terminal after the
connect message.
=DCE Rate
Selecting DCE Rate results in the current DCE rate being displayed on your terminal after the
connect message.
Enter Phone #
See the AT&Z command description.
=1–9
CTS=High
CTS is always high. Use this setting if you plan to use RTS/CTS or DTR/CTS Flow control.
=Normal
The modem controls CTS as in normal handshaking. In V.25bis ACU operation, CTS follows
DTR in command state; CTS is off in training/retraining and follows RTS in data mode.
For AT ACU operation, CTS follows RTS in command state; CTS is off in training/retraining
and follows RTS in data mode. If an ACU is not selected, CTS is low.
CT2
*
AT CT3/
*
AT&R0
AT
*CT4
Configuration
Quick-Reference
AT
DA0
*
AT DA1 – 9
*
AT
=ACU On
CTS is on in ACU mode, goes off during training/retraining, and follows RTS in data mode.
=AsyncSync
CTS is on in asynchronous mode, and off in synchronous, ACU mode. In synchronous data
transfer mode, CTS is off in training/retraining and follows RTS in data mode. When CTS
follows RTS in data mode, the setting of the RTS/CTS Delay option applies (if Mode=Direct).
=RTS
CTS follows RTS. Use this setting if your application requires that CTS immediately follow
RTS. If one of these flow control methods is used: Flow=RTS/CTS or Flow=DTR/CTS, then
CTS does not follow RTS in a flow-off condition. When CTS=RTS, the RTS/CTS Delay
(AT DL) option is not available.
Default Dial
Default Dialing
=Off
The default dial feature is disabled.
=1 – 9
The modem direct dials the telephone number stored in the memory address selected (memory
addresses 1 – 9) when one of the following conditions occurs:
*
•DTR=108.1 or Tail, and the DTE turns the DTR signal from off to on.
•DTR=108.2, Esc, Discon, Reset, or High; the DTR signal is on; and either the front panel
Talk/Data key (
at the Home position) is pressed, or control of the dial is switched to
the modem with an exclusion key telephone.
•ACU Select=AT, AT Form=DTR Dial, and the DTR signal transitions from off to on.
This option also determines the telephone number dialed during restoral.
Delay
Buffer Delay
*
AT DB1
*
=Off
The Off setting disables the Delay option.
=Buf or S38
This setting starts the buffer delay timer immediately upon detection of the disconnect request.
When the timer is operating, the modem continues to process either the transmit or receive
buffers. The modem disconnects when the buffers are empty or the timer expires, whichever
occurs first. NOTE: When the modem is set for Direct mode, no data buffering occurs and the
disconnect is immediate.
*DB2
=Buf & S38
This setting prevents the timer from starting until either the transmit or receive buffers have
emptied. The modem then disconnects. Once the timer expires, when the modem is set to
Direct mode, data is not buffered and the timer starts immediately.
AT
AT
DB0
Gray shading indicates country-specific options. See Appendix C for your country’s options.
A-16 Configuration Quick Reference
Table A-1.
AT Commands, Cross-Referenced to Front Panel Options (Continued)
AT
Command
*DB3
AT
*DC0
*DC1
Parameter &
Option
Description
=S38
This setting allows the timer to start immediately upon detection of a disconnect request. The
request continues to process either its transmit or receive buffers. The modem disconnects
when the timer expires, regardless of the buffer states. NOTE: In Direct mode, no data
buffering occurs. However, the modem delays a disconnect until the timer expires.
DC
Data Compression
AT
=Disable
Data compression is not attempted.
AT
=Enable
Data compression is attempted.
If the modem is using LAPM error correction, it uses V.42bis data compression when
DC=Enabled. NOTE: In an application with SDC enabled, LAPM error correction and
V.42bis data compression only are used.
If your modem is using MNP error correction, it attempts to negotiate V.42bis and MNP-5 data
compression with the remote modem.
Depending on which data compression type can be accommodated by the remote modem,
V.42bis or MNP-5 is used. Otherwise, no data compression is used.
Dial Wait
DD0
*
AT DD1
*
AT DD2
*
AT DD3
*
AT DD4
*
AT DD5
*
AT DD6
*
AT DD7
*
AT DD8
*
AT DD9
*
=2 sec
The modem waits 2 seconds for a dial tone.
=3 sec
The modem waits 3 seconds for a dial tone.
=4 sec
The modem waits 4 seconds for a dial tone.
=6 sec
The modem waits 6 seconds for a dial tone.
=12 sec
The modem waits 12 seconds for a dial tone.
=15 sec
The modem waits15 seconds for a dial tone.
=20 sec
The modem waits 20 seconds for a dial tone.
=30 sec
The modem waits 30 seconds for a dial tone.
=40 sec
The modem waits 40 seconds for a dial tone.
AT
*DE2
DE4
*
AT DE5
*
AT DE6
*
AT DE7
*
AT DE8
*
AT DE9
*
AT DE10
*
AT DE11
*
AT DE12
*
AT DE13
*
AT DE14
*
AT DE25
*
AT DE26
*
AT DE15
*
=300
The DTE port is configured for 300 bps.
AT
=1200
The DTE port is configured for 1200 bps.
=2400
The DTE port is configured for 2400 bps (this is the lowest rate available in SDC mode).
=4800
The DTE port is configured for 4800 bps.
=7200
The DTE port is configured for 7200 bps.
=9600
The DTE port is configured for 9600 bps.
AT
=S7
Dial wait is determined by setting S-Register 7. (See the “S-Registers” section in Chapter 5).
DTE Rate
DTE Rate
=12.0
The DTE port is configured for 12,000 bps.
=14.4
The DTE port is configured for 14,400 bps.
=16.8
The DTE port is configured for 16,800 bps.
=19.2
The DTE port is configured for 19,200 bps.
=21.6
The DTE port is configured for 21,600 bps.
=24.0
The DTE port is configured for 24,000 bps.
=26.4
The DTE port is configured for 26,400 bps.
=28.8
The DTE port is configured for 28,800 bps.
=38.4
The DTE port is configured for 38,400 bps.
Gray shading indicates country-specific options. See Appendix C for your country’s options.
Configuration Quick Reference A-17
Configuration
Quick-Reference
Dial Wait
Table A-1.
AT Commands, Cross-Referenced to Front Panel Options (Continued)
AT
Command
Parameter &
Option
Description
AT
*DE23
DE24
*
AT DE16
*
AT DE17
*
AT DE18
*
AT DE19
*
AT DE20
*
AT DE21
*
AT DE28
*
AT DE22
*
=48.0
The DTE port is configured for 48,000 bps. Available with SDC feature only.
AT
=56.0
The DTE port is configured for 56,000 bps. Available with SDC feature only.
=57.6
The DTE port is configured for 57,600 bps.
=64.0
The DTE port is configured for 64,000 bps. Available with SDC feature only.
=72.0
The DTE port is configured for 72,000 bps. Available with SDC feature only.
=76.8
The DTE port is configured for 76,800 bps.
=96.0
The DTE port is configured for 96,000 bps.
=115.2
The DTE port is configured for 115,200 bps.
=128.0
The DTE port is configured for 128,000 bps.
=Auto
The modem uses the autobaud feature to determine the rate at which to operate. For details, see
Chapter 5. NOTE: The Autobaud feature is not supported in synchronous operating modes.
When configured for synchronous operation, if you select Auto, the DTE will be driven at the
previous DTE rate selected (the factory default is 9600 bps).
Data Form
Data Format
Lets you specify the data encoding format to be used during SDC connections. NOTE: This
option applies only to SDC data mode. It does not apply to synchronous ACUs (V.25bis or
LPDA2) while disconnected. In the online mode, LPDA2 commands must follow the format of
this option.
DF0
*
AT DF1
*
Configuration
Quick-Reference
AT
=NRZ
The modem uses the NRZ data encoding format.
=NRZI
The modem uses the NRZI data encoding format.
L to D
Leased to Dial
In an automatic restoral application, the originating modem uses the setting of this command as
a trigger for automatic restoral. You select a threshold for the number of retrains to occur over
a period of time. The originating modem initiates restoral if the number is exceeded.
*DI0
=Low/Fast
This is the most sensitive setting. It lets the modem initiate restoral when signal quality
deteriorates slightly. For V.34/V.32/V.32 Uncoded/V.32bis modulation modes, 3 retrains must
occur within 5 minutes before a dial restoral connection is established. For other modulation
modes, 6 retrains must occur within 5 minutes before a dial restoral connection is established.
*DI1
=Low/Slow
For V.34/V.32/V.32 Uncoded/V.32bis modulation modes, 6 retrains must occur within 10
minutes before a dial restoral connection is established. For all other modulation modes, 12
retrains must occur within 10 minutes before a dial restoral connection is established.
*DI2
=High/Fast
For V.34/V.32/V.32 Uncoded/V.32bis modulation modes, 5 retrains must occur within 5 minutes
before a dial restoral connection is established. For all other modulation modes, 10 retrains
must occur within 5 minutes before a dial restoral connection is established.
*DI3
=High/Slow
For V.34/V.32/V.32 Uncoded/V.32bis modulation modes, 10 retrains must occur within 10
minutes before a dial restoral connection is established. For all other modulation modes, 20
retrains must occur within 1 minute before a dial restoral connection is established.
AT
AT
AT
AT
RTS/CTS Delay RTS/CTS Delay
Sets the minimum interval for the delay time between RTS and CTS. These settings apply only
when operating in the asynchronous Direct or synchronous data modes.
*DL0
AT DL1
*
AT
RTS/CTS
Delay=0
There is no RTS/CTS delay.
=15
15-ms delay before the modem sends CTS to the DTE after receiving RTS from the DTE.
Gray shading indicates country-specific options. See Appendix C for your country’s options.
A-18 Configuration Quick Reference
Table A-1.
AT Commands, Cross-Referenced to Front Panel Options (Continued)
AT
Command
Parameter &
Option
Description
AT
*DL2
DL3
*
AT DL4
*
=60
60-ms delay before the modem sends CTS to the DTE after receiving RTS from the DTE.
AT
=90
90-ms delay before the modem sends CTS to the DTE after receiving RTS from the DTE.
=S26
RTS/CTS delay is determined by the value of S-Register 26.
Pause Delay
Pause Delay
Makes the modem pause when it encounters modifiers in a dial string or on the command line.
*DP0
DP1
*
AT DP2
*
AT DP3
*
AT DP4
*
AT
=3
Pause delay is 3 seconds.
AT
=6
Pause delay is 6 seconds.
=9
Pause delay is 9 seconds.
=12
Pause delay is 12 seconds.
=S8
Pause delay is determined by S-Register 8. See the “S-Registers” section in Chapter 5.
Auto Redial
Auto Redial
Determines how many times the modem redials a failed call. The modem waits for a countryspecific time between redials. If the AT LN option is enabled, the modem dials all of the
linked numbers before redialing.
*
DR0
*
AT DRn
*
AT DSn or
*
AT DS=n
*
AT
=Off
The modem does not redial an unsuccessful call.
=n
The modem redials an unsuccessful call n times (n=1-15).
Dial From
Stored#
Dialing a Stored Telephone number (n=1-9)
See the ATDS description earlier for information on using this command.
=n
DTR Delay
DTR Delay
*DT0
DT1
*
AT DT2
*
AT
=S25
The modem waits for the time specified by S-Register 25 before examining DTR.
AT
=10 sec
The modem waits 10 seconds before examining DTR.
=15 sec
The modem waits 15 seconds before examining DTR.
EC
Error Correction
*
The AT EC (EC) command determines which error-correction protocol is used. NOTE: This
option does not apply when the modem is configured for SDC operation. If both the local and
remote modems are operating in SDC mode, LAPM error correction with V.42bis data
compression only is used; no other setting is available.
*EC0
AT EC1
*
AT EC2
*
AT
=V.42
The modems negotiate the use of LAPM or MNP error correction. First, the modems attempt to
negotiate using LAPM. If unsuccessful, they attempt to negotiate using MNP.
=LAPM
The modems attempt to negotiate LAPM error correction.
=MNP
The modems attempt to negotiate MNP error correction.
Fast Call
Fast Call
Reduces the time for selected phases of the connect sequence.
*
AT FC1
*
AT
FC0
=Off
This option disables the Fast Call feature.
=Lvl1
The 2.15 second billing delay in the answer modem is eliminated. The length of time ABT is
sent is reduced by 1 second in all modulation modes except V.34.
Gray shading indicates country-specific options. See Appendix C for your country’s options.
Configuration Quick Reference A-19
Configuration
Quick-Reference
Determines how long the modem waits after connecting to the dial line before examining the
DTR signal from the DTE. If the DTR signal is low, the modem disconnects. This feature is
used when AT Form =SyncData or V25 Form=AsynSync.
Table A-1.
AT Commands, Cross-Referenced to Front Panel Options (Continued)
AT
Command
Parameter &
Option
*FC2
AT FC3
*
=Lvl2
Lvl2 applies to V.32 (coded or uncoded)/V.32bis modulation modes only. It includes the Lvl1
function and shortens training time by approximately 2 seconds.
=Lvl3
Lvl3 includes the Lvl1 and Lvl2 function and eliminates error-correction negotiation, saving
approximately an additional half second. For proper operation, enable this option and ensure
that AT SM (Mode), AT EC (Error Correction), and AT DC (Data Compression) (EC/DC
OPT’S category) are set the same in both modems.
NOTE: Selecting Lvl3 in the V.34 modulation mode bypasses error correction negotiation and
improves the connect time of the modems as described above.
If your local and remote modems are configured for SDC operation by selecting Fast Call Lvl3,
the modems use LAPM error correction with V.42bis data compression only. For proper
operation, enable this option in both modems, and ensure that the AT SM (Mode) is set the
same in both modems.
AT
Description
*
*
*
*
Flow
Flow Control
Allows the modems and DTEs in a link to control the flow of data when buffers near their
capacity. Use some type of flow control when operating in the Normal or Reliable mode.
Check the DTE’s manual to ensure that the DTE supports the type of flow control you select.
FL0
*
AT FLl
*
AT
*FL2
Configuration
Quick-Reference
AT
=Off
Flow control is disabled.
=XON/XOFF
The local modem and DTE operate flow control by passing characters embedded in the data
stream between them. The XOFF character signals the transmitting device to stop sending data.
The XON character lets the halted device start sending data. NOTE: XON/XOFF flow control
is not supported in SDC mode.
=DTR/CTS
In asynchronous applications, the local modem and DTE use DTR/CTS signals to operate flow
control.
In SDC applications, DTR/CTS flow control operates the same as asynchronous applications,
except flow control is unidirectional from the local modem to the DTE through the CTS signal;
the modem uses CTS to signal when the buffers are full. The DTR signal has no impact on flow
control in synchronous applications.
*FL3
AT
=RTS/CTS
In asynchronous applications, the local modem and DTE use RTS/CTS signals to operate flow
control. The terminal uses RTS to signal when its buffers are full. The modem uses CTS to
signal when its buffers are full. An on-to-off transition signals the transmitting device to stop
sending data; an off-to-on transition signals that data can flow.
In SDC applications, RTS/CTS flow control functions the same as asynchronous applications,
except flow control is unidirectional from the local modem to the DTE through the CTS signal;
the modem uses CTS to signal when the buffers are full. The RTS signal has no impact on flow
control in synchronous applications.
*FL4
AT
=XON/XOFF PT XON/XOFF Pass-Through Flow Control. The local modem and DTE operate flow control by
passing characters embedded in the data stream between them. Check your DTE manual to verify if the DTE recognizes XON/XOFF flow control.
NOTES:
1) Pass-through flow control must be used with caution when Mode=Normal and Modem
Flow=On because XON/XOFF characters are acted on by the remote modem at its DCE port.
2) Pass-through flow control is not applicable in 326X-SDC mode. If SDC is enabled, and you
select XON/XOFF PT, the modem operates as if flow control were disabled.
Gray shading indicates country-specific options. See Appendix C for your country’s options.
A-20 Configuration Quick Reference
Table A-1.
AT Commands, Cross-Referenced to Front Panel Options (Continued)
AT
Command
*FL5
AT
Parameter &
Option
Description
=TxClk
Transmit Clock. This option applies only in SDC mode. When the Tx Clk flow control option
is selected, the modem uses a transmit clock for flow control based on available buffer space.
The transmit clock is stopped when the buffers are full, inhibiting the flow of data from the
DTE. It is started again when buffer space is available. NOTE: This option is operational only
when internal timing has been selected (Clock=Internal, AT&X).
Hold DL Line
Hold Dial Line
This command forces the modem to hold a dial restoral connection while testing a leased line
connection. This command applies to modems configured for restoral.
*HD0
AT
=Off
The Hold Dialine option is disabled; a dial modem configured for restoral disconnects from the
dial line normally. A leased line modem configured for restoral disconnects from the dial line
as soon as it connects to the leased line.
*HD1
AT HD2
*
AT HD3
*
AT HD4
*
AT HD5
*
=1min
A dial modem configured for restoral holds the dial line for 1 minute. A leased line modem
configured for restoral holds the dial line for 1 minute while testing the leased line.
AT
=2min
=3min
=4min
=5min
DTE Ct. 141
DTE Circuit 141
Controls whether the local DTE can send the modem into a local analog loopback by sending a
signal on V.24 Circuit 141 (Pin 18) to the modem. The DTE must support Circuit 141 in order
to use this option.
=Off
The modem does not respond to a signal on Circuit 141 (Pin 18).
AT
=On
An off-to-on transition on Circuit 141 (Pin 18) causes the modem to initiate a local analog
loopback test.
An on-to-off transition on V.24 Circuit 141 (Pin 18) takes the modem out of a local analog
loopback test.
Line Compen
Line Compensation
Enables the modem to compensate for the effects of low loss in the End Office-to-End Office
connections.
*LC0
*LC1
AT
=Off
Disables the Line Compensation option.
AT
=On
Enables the Line Compensation option.
DTE Ct. 140
DTE Circuit 140
Controls whether the local DTE can put the modem into a remote digital loopback by sending a
signal on V.24 Circuit 140 (Pin 21) to the modem.
LD0
*
AT LDl
*
AT
=Off
The modem does not respond to a signal on V.24 Circuit 140 (Pin 21).
=On
An off-to-on transition on V.24 Circuit 140 (Pin 21) sends the modem into a remote digital
loopback test. An on-to-off transition on V.24 Circuit 140 (Pin 21) takes the modem out of a
remote digital loopback test.
D to L
Dial to Leased Option, Automatic Disconnect
Lets the modem automatically disconnect from the dial line and return to the leased line after a
specified period.
*LE0
AT
=Manual
Pressing the Talk/Data key (at the Home position) returns the modem to the leased line.
Gray shading indicates country-specific options. See Appendix C for your country’s options.
Configuration Quick Reference A-21
Configuration
Quick-Reference
*LA0
*LAl
AT
Table A-1.
AT Commands, Cross-Referenced to Front Panel Options (Continued)
AT
Command
Parameter &
Option
Description
AT
*LE1
LE2
*
AT LE3
*
AT LE4
*
AT LE5
*
=15 min
The modem returns to the leased line after 15 minutes.
AT
=30 min
The modem returns to the leased line after 30 minutes.
=1 Hr
The modem returns to the leased line after 1 hour.
=2 Hr
The modem returns to the leased line after 2 hours.
=4 Hr
The modem returns to the leased line after 4 hours.
LAL Busy Out
Local Analog Loopback Test Busy Out
Determines whether the modem appears busy to incoming calls during a local analog loopback
test. NOTE: Set AT&J (TELCO OPT’S Telco) to RJ4MB before enabling this option.
*LL0
AT LLl
*
AT LNm,n
*
AT
=Off
The modem does not busy out the line during a local analog loopback test, allowing incoming
calls to ring.
=On
The modem connects to the line during a local analog loopback test, making the line appear
busy to incoming calls.
Link Phone #’s:
#m to #n
Link Telephone Numbers
Lets you link telephone numbers stored in the modem’s telephone book. Some remote
locations provide more than one number to call in case one is busy. If a call fails and the
number is linked, the modem pauses and then calls the linked number. NOTE: With this
feature enabled, the modem dials linked numbers before redialing.
*
To link numbers using the AT Command, enter AT LN, followed by the memory location of
the number you want to link from (n), a comma, and the memory location of the number to link
(m). For example:
AT
*LN2,4
In this example, memory location 2 is linked to memory location 4. To clear the link between
the two memory locations, enter AT LN2. Effectively, memory location 2 is now linked to no
memory location.
Configuration
Quick-Reference
*
Low Speed
Low Speed
Determines which low-speed modulation mode is used when a higher (V.34, V.32bis, V.32, or
V.22bis) modulation mode connection cannot be made while Mod=V.34 Auto, V32bis Auto or
Auto V32.
LS0
*
AT LS1
*
AT
=Bell
Bell 103 modulation mode is used.
=CCITT
V.21 modulation mode is used.
DTE Pin 25
DTE Pin 25
Controls whether the modem uses EIA/TIA 232-D Pin 25 as an input or an output. Set rear
panel Switch 2 to match this setting (see Table A-6 for details on rear panel switches).
*LT0
=Busy
The DTE signals the modem on Pin 25 to make the modem appear busy to incoming calls. Set
rear panel DIP switch 2 to the off (up) position. Also, set AT&J (Telco) to RJ4MB. NOTE: In
modems in the U. S. A. and Canada, the Make Busy function operates only in nest card
modems. (Make Busy settings display in standalone modems, but are not active.)
*LTl
=Test
The modem signals the DTE on V.24 Circuit 142 (Pin 25) when a test is in progress.
AT
AT
PSTN Signaling PSTN Signaling
Determines how the modem handles disconnect signaling when operating in the V.34, V.32bis
or V.32 (coded or uncoded) modulation modes.
*MD0
AT
=Off
Your modem disconnects without signaling the remote modem.
Gray shading indicates country-specific options. See Appendix C for your country’s options.
A-22 Configuration Quick Reference
Table A-1.
AT Commands, Cross-Referenced to Front Panel Options (Continued)
AT
Command
*MD1
AT
Parameter &
Option
Description
=On
Your modem signals the remote modem to disconnect by sending a PSTN cleardown.
Modem Flow
Modem Flow Control
Lets the modem generate and respond to XON/XOFF flow control signals received at the
DIAL LINE or LEASED LINE port. NOTE: This option only applies to the Normal data
transfer mode.
MF0
*
AT MF1
*
AT
=Off
The modem flow control is not used.
=On
The modem periodically sends XON signals to the remote modem when it can receive data.
When the modem cannot receive data, it sends an XOFF signal to the remote modem.
Mod
Modulation Mode
Determines the modulation mode used by the modem in data transmission. Changing
modulation mode resets AT MX (Max Rate) and AT MN (Min Rate) to their defaults for
the modulation mode selected. When you select a mode, ensure that the Max Rate AT MX
(Max Rate) and AT MN (Min Rate) parameter options are within the valid range for the
mode.
*
*
*
*
=V32bis Auto
The modem negotiates the highest common connection in one of the following modulation
modes: V.32bis, V.32 (coded or uncoded), V.22bis, Bell 212, V.21 or Bell 103 (depending on
the Low Speed option).
AT
*MM1
=Auto V32
The modem negotiates the highest common connection in one of the following modulation
modes: V.32 (coded or uncoded), V.22bis, Bell 212, V.21 or Bell 103 (depending on the Low
Speed option).
*MM2
AT MM3
*
AT MM12
*
Mod=V32bis
Only
V.32bis or V.32 modulation mode is used.
=V32 Only
V.32 modulation mode is used.
=V32 Uncoded
V.32 modulation mode is used without the Trellis-coded Modulation (TCM) scheme. This
selection reduces end-to-end data delay. With this selection (while operating at 4.8 bps), you do
not have an embedded secondary channel (i.e., network management and remote configuration
capability are not available).
=V22bis Only
V.22bis modulation mode is used.
=212 Only
Bell 212 modulation mode is used.
=103 Only
Bell 103 modulation mode is used.
AT
MM4
*
AT MM5
*
AT MM6
*
AT MM7
*
AT MM10
*
AT
*MM11
AT
=V21 Only
V.21 modulation mode is used.
=V.34 Auto
The modem negotiates the highest common connection in one of the following modulation
modes: V.34, V.32bis, V.32 (coded or uncoded), V.22bis, Bell 212, V.21 or Bell 103 (depending
on the Low Speed option). This option does not display on the 3264 V.32bis Series Modem.
=V.34 Only
The modem negotiates the highest common connection in the V.34 modulation mode. This
option does not display on the 3264 V.32bis Series Modem.
Min Rate
Minimum Rate
Sets the minimum communication rate. Options vary with the modulation mode.
*MN1
*
AT MN2
*
AT MN3
*
AT MN4
*
AT
AT
MN0
=300
=1200
=2400
=4800
=7200
Gray shading indicates country-specific options. See Appendix C for your country’s options.
Configuration Quick Reference A-23
Configuration
Quick-Reference
*MM0
AT
Table A-1.
AT Commands, Cross-Referenced to Front Panel Options (Continued)
AT
Command
*MN5
MN6
*
AT MN7
*
AT MN8
*
AT MN9
*
AT MN10
*
AT MN11
*
AT MN12
*
AT MN13
*
AT MN14
*
AT MN15
*
Parameter &
Option
AT
=9600
AT
=12.0
Description
=14.4
=16.8
(V.34 modems only)
=19.2
(V.34 modems only)
=21.6
(V.34 modems only)
=24.0
(V.34 modems only)
=26.4
(V.34 modems only)
=28.8
(V.34 modems only)
=31.2
(V.34 modems only)
=33.6
(V.34 modems only)
DSR
DSR Control
Determines how the modem sets the DSR signal.
Configuration
Quick-Reference
*MR0
*MRl
AT MR2
*
AT MR3
*
AT MR4
*
AT
=Normal
AT
DSR=High
DSR is controlled by the modem.
DSR is always on.
=DTR
DSR follows DTR.
=Drop on Disc
The same as the normal setting except that when a disconnection is initiated from the local end,
DSR is dropped immediately.
=Sim LL
The same as the DTR setting except DSR is dropped when the remote modem requests a
disconnect.
AT Msg
AT Message
=After CD
The AT connect message is sent to the DTE after DCD is raised.
=Before CD
The AT connect message is sent to the DTE before DCD is raised.
Max Rate
Maximum Rate
Determines when the AT connect message is sent to the DTE.
*MS1
*
AT
MS0
AT
Sets the maximum rate at which the modems communicate over the analog network. Options
available vary with the modulation mode.
*MX0
*MX1
AT MX2
*
AT MX3
*
AT MX4
*
AT MX5
*
AT MX6
*
AT MX7
*
AT MX8
*
AT MX9
*
AT MX10
*
AT MX11
*
AT MX12
*
AT
=300
AT
=1200
=2400
=4800
=7200
=9600
=12.0
=14.4
=16.8
(V.34 modems only)
=19.2
(V.34 modems only)
=21.6
(V.34 modems only)
=24.0
(V.34 modems only)
=26.4
(V.34 modems only)
Gray shading indicates country-specific options. See Appendix C for your country’s options.
A-24 Configuration Quick Reference
Table A-1.
AT Commands, Cross-Referenced to Front Panel Options (Continued)
AT
Command
Parameter &
Option
Description
AT
*MX13
MX14
*
AT MX15
*
=28.8
(V.34 modems only)
AT
=31.2
(V.34 modems only)
=33.6
(V.34 modems only) (default)
Buffers
Buffer Option
Lets you specify whether normal or reduced size buffers store data received from a local DTE.
Use this parameter if you have DTE-to-DTE flow control enabled, to reduce the amount of data
sent to the remote DTE when a flow-off condition is received at the local DTE.
*NB0
*NB1
AT
=Regular
Normal capacity buffers are used.
AT
=Reduced
Reduced sized buffers are used allowing less data to accumulate in the modem.
When the SDC modem is operating in synchronous reliable mode, selecting Buffers=Reduced
reduces throughput delay while transmitting data.
Netwrk Comp
Network Compensation
Lets you enhance modem performance reliability when operating with network equipment.
AT
*NC0
*NC1
=Off
Off should be selected when making most normal connections within a continent.
AT
=Lvl1
Select Lvl1 if the modem is experiencing performance problems when connected to a line
terminating equipment via a short loop, having low loop loss with below normal receive signal
levels (for example, when operating behind a low grade PBX). NOTE: This option limits the
maximum DCE data rate to 21,600 bps.
*NC2
=Lvl2
Lvl2 is recommended when performance problems are encountered making intercontinental
calls. NOTE: This selection limits the maximum DCE data rate to 19,200 bps.
AT
When operating in an environment where the conditions described for Lvl1 and Lvl2 exist,
Lvl2 is recommended to enhance performance.
View Phone #
=n
Ext Cntrl
View Stored Telephone Numbers
Lets you view the telephone numbers stored in the modem’s nine telephone book addresses.
Enter AT ND<CR>
*
External Control
Lets you select which pin the AT OP (Ext Select) command responds to. NOTE: If AT
is set to 0, this command has no effect.
*
*OC0
AT OC1
*
AT
*OP1
*
OP0
AT
OP2
*
AT OP3
*
AT
*RE
=Pin 14
Loads an option set based on the transition of Pin 14. This setting overrides the AT
(Restore) command setting FP/116 or FP/116.ACU.
=Pin 20
Loads an option set based on the transition of Pin 20. When using this setting, set the AT&D
(DTR) command to High. This setting overrides the AT RE (Restore) command settings FP/
108.1 and FP/108.ACU and all AT&D (DTR) command settings except High.
*
Ext Select
AT
*OP
=Off
=1H/2L
External Option Set Select (also known as 116 Select)
Controls how the modem uses an external pin to select option sets. The pin used is defined by
the AT OC (Ext Cntrl) command.
* OP command is disabled.
*
There are 12 settings with the format nH-mL, where n=1, 2, 3, or 4, and m=1, 2, 3, or 4. When
The AT
the pin specified by the Ext Cntrl option (14 or 20) transitions from low to high, the modem
loads the “H” option set. When the pin specified by the Ext Cntrl option (14 or 20) transitions
from high to low, the modem loads the “L” option set.
=1H/3L
=1H/4L
Gray shading indicates country-specific options. See Appendix C for your country’s options.
Configuration Quick Reference A-25
Configuration
Quick-Reference
*ND
AT
Table A-1.
AT Commands, Cross-Referenced to Front Panel Options (Continued)
AT
Command
Parameter &
Option
AT
*OP4
OP5
*
AT OP6
*
AT OP7
*
AT OP8
*
AT OP9
*
AT OP10
*
AT OP11
*
AT OP12
*
=2H/1L
AT
=2H/3L
OS0
*
AT OS1
*
AT
Description
=2H/4L
=3H/1L
=3H/2L
=3H/4L
=4H/1L
=4H/2L
=4H/3L
Overspeed
Overspeed
Lets modem compensate when an async DTE sends data to the modem faster than specified.
=1%
The modem compensates for DTE overspeed up to 1.0%.
=2.5%
The modem compensates for DTE overspeed up to 2.5%.
Password
Enable/Disable Password Protection
Enables and disables the Password function. Once you have enabled the Password function, set
protection in order to lock the modem (see AT PF).
*PE1
*
AT PF
*
AT PN
*
AT
PE0
Disables the Password function.
=Enable
Enables the Password function.
Set Protection
Lets you set protection to lock the modem. Refer to AT
Unlock Password Protection
Configuration
Quick-Reference
AT
*
=Disable
PN for details.
*
If you know your password, to unlock a password-protected modem and gain access to all
modem functions, use the AT PNxxxx command (where xxxx is the password).
*
If you forget your password, you can regain access to all modem functions by performing the
following procedure.
IMPORTANT: When you unlock a modem with this procedure, option settings and
telephone numbers are deleted from modem memory. Before using the modem again,
reconfigure option settings and re-enter stored telephone numbers.
1)Close Switch 4 on the rear panel (set it to down position). See Table A-6 for details.
2)In the Status/Option Sets/Dialing menu, press
3)When you press
4)Press
until Reinit Memory? displays
, the modem displays Reinit All Mem?
again. The modem displays 326x Initial
5)The modem is now reset to factory default settings and all electronic telephone book entries
are deleted. Password protection is disabled and the password is set to 0000.
6)To use the password protection feature again, open Switch 4 on the modem rear panel (set it
to up position).
*PT0
AT PTl
*
AT
Dial
Dial Type
=Tone
The modem uses tone dialing unless otherwise specified by the T or P dial modifiers in a
telephone number.
=Pulse
The modem uses pulse dialing unless otherwise specified by the T or P dial modifiers in a
telephone number.
Gray shading indicates country-specific options. See Appendix C for your country’s options.
A-26 Configuration Quick Reference
Table A-1.
AT Commands, Cross-Referenced to Front Panel Options (Continued)
AT
Command
*PT2
AT
Parameter &
Option
=Auto
Description
The auto-call unit attempts to tone dial when initiating a call. If tone dialing is not possible,
pulse dialing is used.
For this feature to work correctly, the first character in a dial string must be a digit. A T or P in
the dial string overrides this setting, for that dial string.
*PWx/y
AT
Change Password
Lets you change the modem’s password. Enter:
AT
*PWold password/new password<CR>
If successful, the modem responds with OK
Rmt Acc
Remote Access
*RA1
*
=Disable
The local modem cannot be configured by a remote modem.
=Enable
The local modem can be configured by a remote modem.
Rmt Cnfg
Initiate/Terminate, or Abort Remote Configuration Session
*
=Terminate
The modem terminates a remote configuration session with the connected modem. Changes to
the remote modem’s configuration are saved. This setting is not displayed unless you are
already in a remote configuration session.
*RC1
=Abort
The modem aborts a remote configuration session with the connected modem. Changes made
to the remote modem’s configuration are not saved. This setting is not displayed unless you are
already in a remote configuration session.
*RC2
Init Rmt Cnfg?
The modem attempts to initiate a remote configuration session with the connected modem. For
instructions on initiating a remote configuration session with a dial/leased line modem, or
terminating or aborting a remote configuration session, refer to Chapter 1 of the 326X Series
Modem Reference Guide.
*RDn
Redial Last
Number
With this command, the modem redials a call until a successful connection is made or the call
has been attempted n times. This command causes your modem to redial the last number
dialed.
Restore
Initiate/Terminate Restoral
Determines whether your modem can be configured by a remote modem.
RA0
AT
AT
Lets you initiate, terminate, or abort a remote configuration session with the connected modem.
AT
RC0
AT
AT
Determines how modems operating on a leased line handle initiation of a dial restoral session.
The modem has four ways of initiating restoral: automatic, manual, DTE signal, or DTE ACU.
The restoral option is available in models: 3261, 3263, 3266, and the 3268.
*RE0
*RE1
AT RE2
*
AT
=Off
AT
Restore=FP Only Manual initiation lets you initiate and terminate restoral by pressing the Talk/Data key (
in the Home position) on the modem’s front panel.
Disables the initiation of restoral.
key
=FP/108.1
The modem lets the DTE initiate restoral using DTR. In DTR restoral, an off-to-on DTR
transition from the DTE interface initiates restoral. This option is provided for DTEs that
cannot manipulate Circuit 116 for restoral purposes.
*RE3
=FP/116
The modem allows the DTE to initiate restoral with Circuit 116. Circuit 116 lets you use off-toon transitions of this signal from the DTE to initiate restoral, according to ITU V.24
specifications.
*RE4
=FP/Auto
In automatic restoral, the originating modem on the leased line determines when restoral takes
place. The answer modem cannot automatically initiate restoral; it can only answer an inbound
call, thus ensuring that both modems do not try to call each other at the same time. Such an
occurrence would result in a failed restoral attempt.
AT
AT
Gray shading indicates country-specific options. See Appendix C for your country’s options.
Configuration Quick Reference A-27
Configuration
Quick-Reference
AT
Table A-1.
AT Commands, Cross-Referenced to Front Panel Options (Continued)
AT
Command
Parameter &
Option
*RE5
=FP/108.ACU
With this option, off-to-on transitions of this signal from the DTE activate the ACU. This lets
the modem accept dial commands. With this option, either modem can enable the ACU when
the connected DTE turns Circuit 116 from off to on.
*RE6
=FP/116.ACU
With this option, off-to-on transitions of this signal from the DTE activate the ACU. This lets
the modem accept dial commands to initiate restoral. With this option, either modem can
enable the ACU when the connected DTE turns Circuit 116 from off to on.
Parity
Parity
AT
AT
Description
When using the ASCII character set, you must select the parity used by the modem and DTE.
The Parity option applies to asynchronous and character-synchronous data formats.
When set to V.25, the following applies:
Async: 7 Data Bits, Parity=even, Stop Bits=1
Bitsync: 7 Data Bits, Parity=space, Stop Bits=1 or 8 Data Bits, Parity=none, Stop Bits=1
*
AT RP1
*
AT RP2
*
AT RP3
*
AT RP4
*
AT
RP0
=V.25
Charsync: 7 Data Bits, Parity=odd, Stop Bits=1
=Even
7 Data Bits, Parity=even, Stop Bits=1
Parity=Odd
7 Data Bits, Parity=odd, Stop Bits=1
=Mark
7 Data Bits, Parity=mark, Stop Bits=1 or 7 Data Bits, Parity=none, Stop Bits=2
=Space
7 Data Bits, Parity=space, Stop Bits=1 or 8 Data Bits, Parity=none, Stop Bits=1
RTS
RTS Control
*
The AT RS command determines how the modem interprets the RTS signal. The DTE
signals the modem with RTS on EIA/TIA 232-D Pin 4 (V.24 Circuit 105).
RS0
*
AT RS1
*
=Normal
The DTE controls data transmission with RTS.
=High
The modem sets RTS high. Use this setting if the DTE does not provide RTS. If you are using
Normal or Reliable data transfer mode and you are using RTS/CTS flow control, this setting is
overridden and RTS operates as if RTS=Normal.
*RS2
=Remote
This setting applies to simulated half-duplex applications and works only if the remote modem
also supports RTS/DCD signaling. For this application to work properly, the DCD option at the
remote site must be set to Remote. Coordinate your setting with the remote site.
Retrain
Auto Retrain
Configuration
Quick-Reference
AT
AT
Enables the auto-retrain feature. When enabled, the modem retrains if the specified bit error
rate is exceeded. Enable Retrain for most applications because retrains allow the modem to
compensate for changing line conditions.
*RT0
AT RTl
*
AT
=Off
The modem does not automatically initiate retrains, but responds to retrains from the remote
modem.
=Low BER
The Low BER setting is more sensitive than the High BER setting.
Using V.34, V.32bis, V.32, or V.32 Uncoded, the modem retrains when the bit error rate (BER)
-4
exceeds approximately 10 for eight seconds.
-4
Using V.22bis, the modem retrains when the bit error rate (BER) exceeds approximately 10
for one second.
Gray shading indicates country-specific options. See Appendix C for your country’s options.
A-28 Configuration Quick Reference
Table A-1.
AT Commands, Cross-Referenced to Front Panel Options (Continued)
AT
Command
*RT2
AT
Parameter &
Option
=High BER
Description
The High BER setting is less sensitive than the Low BER setting. NOTE: Motorola recommends this setting for most applications.
Using V.34, V.32bis, V.32, or V.32 Uncoded, the modem retrains when the bit error rate (BER)
-3
exceeds approximately 10 for eight seconds.
-3
Using V.22bis, the modem retrains when the bit-error rate (BER) exceeds approximately 10
for one second. When ARS is enabled, bit error rate is always used.
Speed Conver
Speed Conversion
Determines whether the modem uses the speed conversion feature. This option does not apply
when the modem is in the Direct or synchronous data transfer mode.
SC0
*
AT SC1
*
AT
=Off
The modem adjusts its DTE port speed to match the speed of the negotiated data link.
=On
DTE-to-modem speed remains constant, regardless of the negotiated data link speed. (The
exception is Direct data mode, where the DTE-to-modem speed always matches the modemto-modem speed.)
Inactivity
DTE Inactivity
Lets you select how long the modem waits before disconnecting, when no data is transferred.
This option does not apply when the modem is set for the synchronous data transfer mode.
=Off
The Off option disables the inactivity timer.
=3min
The modem disconnects if 3 minutes elapses without data transfer to or from the DTE.
Inactivity=10min The modem disconnects if 10 minutes elapses without data transfer to or from the DTE.
=20min
The modem disconnects if 20 minutes elapses without data transfer to or from the DTE.
=30min
The modem disconnects if 30 minutes elapses without data transfer to or from the DTE.
=S30min
The inactivity timeout is controlled by the value set in S-Register 30.
EC ID
Error Correction ID
Sets the ID number that modems exchange when they attempt to establish an MNP link.
*SL0
AT SLl
*
AT
=Default
The modem identifies itself with a generic MNP identification number. Use this option unless
you are certain that the remote modem(s) is a Motorola modem.
=Codex
The modem identifies itself with a special MNP identification number. This allows one
Motorola modem to recognize another during an MNP link negotiation.
Mode
Data Transfer Mode
Sets the data transfer mode for asynchronous applications, or for synchronous applications
with the 326X-SDC. The setting governs the modem’s use of error correction. NOTE: To
enable SDC, select one of the reliable data transfer modes (Mode=Reliable, Auto Reliable, or
Speed Dependent Auto Reliable).
*SM0
=Direct
In Direct mode (asynchronous or synchronous), the modem does not use error correction. In
Direct mode, EC/DC OPT’s menu options are disabled. In data mode, the DTE speed must
match the modem speed.
*SM1
=Normal
In normal mode (asynchronous), the modem does not use error correction or data compression.
The break type is assumed to be standard. In data mode, the modem uses speed conversion (if
enabled). This lets the modem automatically accommodate DTEs of different speeds.
AT
AT
Enable terminal flow control and Modem Flow when operating in Normal mode. Selecting
Mode=Normal results in a Direct synchronous connection in the SDC mode.
Gray shading indicates country-specific options. See Appendix C for your country’s options.
Configuration Quick Reference A-29
Configuration
Quick-Reference
SI
*
AT SI1
*
AT SI2
*
AT SI3
*
AT SI4
*
AT SI5
*
AT
Table A-1.
AT Commands, Cross-Referenced to Front Panel Options (Continued)
AT
Command
*SM2
AT
Parameter &
Option
=Reliable
Description
In an asynchronous application, once the local modem connects with the remote modem, it
attempts to establish an error-corrected link. In Reliable data mode, the modem uses speed
conversion (if enabled). The local modem disconnects if it cannot establish an error-corrected
link. Enable the terminal flow control when operating in reliable mode. If the modem
negotiates a connection in the V.21 or Bell 103 modulation mode, it terminates the call.
If operating with SDC enabled in both modems, once the local modem connects with the
remote modem, it attempts to establish an error-corrected link. In SDC mode, the Data
Compression (AT DC) and Error Correction (AT EC) options are ignored; a connection is
attempted using V.42bis data compression and LAPM error correction. The local modem
establishes a synchronous Reliable connection or disconnects if it cannot establish an error-corrected link. In Reliable data mode, the modem uses speed conversion (if enabled). Enable the
terminal flow control when operating in reliable mode. If the modem negotiates a connection in
the V.21 or Bell 103 modulation mode, it terminates the call.
*
*
In Reliable data mode, leased-line operation, the modem initiates a retrain if the error-correction function does not establish a reliable link within 30 seconds.
*SM3
AT
=Auto-Reliable
Once the local modem connects with the remote modem, it attempts to establish an errorcorrected link. In Auto-Reliable data mode, the modem uses speed conversion (if enabled).
This lets the modem automatically accommodate DTEs of different speeds. The modem reverts
to Normal mode if it cannot establish an error-corrected link. In SDC mode, with the Auto Rel
option, the modem reverts to Direct mode if it cannot establish an error-corrected link.
Enable terminal flow control when operating in the Auto-Reliable mode. If the local modem
negotiates a connection in the V.21 or Bell 103 modulation mode, Normal mode is used in
asynchronous applications; Direct mode is used in synchronous applications.
*SM4
Configuration
Quick-Reference
AT
=Spd AutoRel
Speed-Dependent Auto-Reliable. Once the local modem connects with the remote modem, it
attempts to establish an error-corrected link. If a connection is established at 1200 bps or less,
Normal mode is used in async applications; Direct mode is used in sync applications.
In data mode, the Speed-Dependent Auto-Reliable mode uses speed conversion (if enabled).
This lets the modem automatically accommodate DTEs of different speeds. Enable terminal
flow control when operating in the Auto-Reliable mode.
RemRTS/DCD
RTS/DCD Remote Signaling
This command allows for two types of PN signaling. It is valid when RTS or DCD=Remote.
*SR0
SR1
*
AT ST0
*
AT ST1
*
AT
= Codex
The Codex setting lets you configure the modem for Motorola proprietary signaling.
AT
= V.13
This setting allows ITU V.13-compliant signaling for synchronous applications only.
*ST command.
Long-form status Refer to AT&V for a description of the AT
Short-form status
TpDlyMin
Throughput Minimization Delay
Lets you improve modem performance in SDC mode by minimizing delays during data
transmission. This feature, when enabled, lets the remote modem, only, begin transmitting
synchronous data to its DTE, before an entire frame of data has been received from the local
modem. This option applies only when the modem is operating in SDC mode.
*TD0
AT
=Off
Throughput Delay Minimization is disabled. With this setting, the remote modem waits until it
has received an entire frame of data before beginning to transmit the data to its DTE.
Gray shading indicates country-specific options. See Appendix C for your country’s options.
A-30 Configuration Quick Reference
Table A-1.
AT Commands, Cross-Referenced to Front Panel Options (Continued)
AT
Command
*TD1
AT
Parameter &
Option
=Rx Clock
Description
With this setting, the remote modem uses its internal Rx Clock to control the flow of data from
the modem to the DTE, preventing a loss of synchronization during data transmission. This
setting lets the remote modem begin transmitting data before an end-of-frame has been
received from the local modem. If the rate of data transmission slows, the clock stops,
temporarily ceasing the flow of data.
Motorola recommends that the Rx Clock setting be used in most applications. NOTE: This setting is operational only when Clock=Internal (AT&X).
*TD2
AT
=RxD Dly
With this setting, the remote modem continuously monitors and adjusts line traffic to estimate
(based on time) when to transmit data to the DTE. The modem calculates a delay time based on
variables such as frame size, DTE rate, DCE rate, and data compression ratio. The remote
modem waits this time before transmitting data to its DTE. NOTE: Due to variable line
conditions or varying types of data, frame losses could result with this selection.
Tone Length
Tone Length
Determines the time duration of the DTMF (Dual Tone Multifrequency) tone. This command is
operational only when tone dialing is selected using dial modifiers or the ATT command.
*TL0
*TL1
AT
=72
Tone length is 72 ms.
AT
=S11
The tone length is determined by S-Register 11. See Appendix C for your country’s options.
Call Timeout
Call Timeout
Determines how long the modem waits from the time it completes dialing to the time it detects
answer-back tone from the remote modem. If the modem does not receive answer-back tone
from the remote modem within the specified time, the modem disconnects.
*XC0
AT XCl
*
AT
*XC2
AT
=30
The modem waits 30 seconds for a call to succeed.
=45
The modem waits 45 seconds for a call to succeed.
=60
The modem waits 60 seconds for a call to succeed.
=90
The modem waits 90 seconds for a call to succeed.
=180
The modem waits 180 seconds for a call to succeed.
=S7
The modem waits the amount of time specified by S-Register 7 for a call to succeed. See
Appendix C for your country’s options.
RelMsg
This command applies to the Reliable and Auto-Reliable data transfer modes only. The local
modem can send a reliable message to the DTE along with the normal connect message if both
modems negotiated a reliable (error-corrected) connection.
=Off
If enabled, the modem sends a connect message to the DTE, but it does not send the reliable
portion of the connect message. A typical connect message is CONNECT 9600.
=Short
The modem sends a reliable connect message to the DTE when a reliable connection is
successful. The message indicates the local DTE-to-modem data rate, but no error correction or
data compression is included. A typical short reliable connect message is CONNECT 9600
RELIABLE.
=Long
The modem sends a reliable connect message to the DTE when a connection is successful. The
message indicates that the local DTE-to-modem data rate, as well as the error-correction and
data-compression schemes, are being used. A typical long reliable connect message is
CONNECT 9600 RELIABLE EC=(LAPM) DC=(V42bis).
Gray shading indicates country-specific options. See Appendix C for your country’s options.
Configuration Quick Reference A-31
Configuration
Quick-Reference
TT0
*
AT TT1
*
AT TT2
*
AT TT3
*
AT TT4
*
AT TT5
*
AT
Table A-1.
AT Commands, Cross-Referenced to Front Panel Options (Continued)
AT
Command
Parameter &
Option
Description
Callback
Callback Feature
Determines the source of the telephone number that your modem calls when it receives a valid
access security password from the remote modem.
NOTE: For details on access security and call features, see Chapter 2 of the 326X Series
Modem Reference Guide.
AT
*ZC0
*ZC1 – 9
AT ZC10
*
=Off
Callback is disabled.
AT
=Intern 1 – 9
The answer modem performs the callback using the phone number stored in the specified
location (even if the calling modem provides a callback number).
=Remote
The answer modem performs the callback using a number provided by the remote user. If the
calling modem does not provide a callback number and the password is valid, the modem
attempts a connection, without hanging up or calling back.
Only accessible from an
NMS
=Manager
The NMS performs the callback using a phone number stored in its database that is associated
with the received ID code. This option is not accessible from the front panel or AT ACU and
displays only when selected by an NMS.
*ZC12
=Rmt Ind
The answer modem performs the callback using the phone number stored at the specified
phone number index provided by the remote user (1 – 9). If the remote device does not provide
a callback index, the modem attempts to establish a connection without hanging up or calling
back if AT ZR0 (Rmt Num Rqrd=Off) is set.
DialRstrct
Dial Restricted
AT
*
Configuration
Quick-Reference
This command defines dial command limitations.
AT
*ZD0
*ZD1
=Off
No dial restrictions exist.
AT
=Lvl1
The auto redial command is not allowed. The A/ command is not allowed if the previous
command was a dial command. In both cases, the modem reports an ERROR message to the
DTE.
*ZD2
=Lvl2
Lvl2 has the same function as Lvl1. In addition, only stored phone numbers may be dialed. The
ATD, V.25bis CRN, LPDA2 Hex 21, and the front panel Enter Then Dial options are not
allowed.
*ZI
Enter Group
PW?
Enter Access Security Group Password
AT
AT
Lets you enter the password that your modem uses for access security.
*ZIx<CR>, where x=maximum 10 characters; minimum one character
Enter AT
From the front panel, enter alphanumeric characters.
NOTE: For a detailed description of the modem’s access security and call features, refer to
Chapter 2 of the 326X Series Modem Reference Guide.
Tone
Select Tones with Access Security
Controls the type of tones used by your modem to alert the caller to expect a callback and to
enter the access security password.
*ZP0
*ZP1
AT
=None
No tones are generated by the answer modem.
AT
=Prompt Only
Upon answering a call, the local modem sends the caller a dial tone. This is a prompt for the
caller to enter the access security password. This setting is intended for manual dialing only.
The dial tone lasts for the amount of time specified by S-Register 45. The caller must enter the
access security password in the amount of time specified by S-Register 46.
Gray shading indicates country-specific options. See Appendix C for your country’s options.
A-32 Configuration Quick Reference
Table A-1.
AT Commands, Cross-Referenced to Front Panel Options (Continued)
AT
Command
Parameter &
Option
Description
*ZP2
=Ack Only
After validating the password, the modem generates an acknowledgment tone before hanging
up. This indicates to the caller that the access security password is valid and that the modem
should expect to receive a callback. Upon hearing the tone, the caller should hang up
immediately. This setting is intended for callback only.
*ZP3
=Prompt/Ack
Upon answering a call, the local modem generates both the prompt and acknowledgment tone
at the appropriate times. This setting is intended for manual dialing only.
NOTE: For a detailed description of how the modem’s access security and call features
operate, refer to Chapter 2 of the 326X Series Modem Reference Guide.
AT
AT
Rem Num Rqrd Remote Number Required
Specifies whether a remote callback number is required when using AT ZC (Callback).
NOTE: For a detailed description of how the modem’s access security and call features
operate, refer to Chapter 2 of the 326X Series Modem Reference Guide.
*
*ZR0
AT ZR1
*
AT
*ZS0
*ZS1
=Off
A remote callback number is not required. If the calling modem does not provide a callback
number, the modem attempts to establish a connection without hanging up or calling back.
=On
A remote callback number is required. The modem does not attempt to make a connection or
callback if no callback number is provided.
Sim Ring
Simulated Ringback
Determines whether the answer modem sends a ringback tone to the calling modem prior to
sending an answer-back tone immediately after entering the access security password.
NOTE: For a detailed description of how the modem’s access security and call features
operate, refer to Chapter 2 of the 326X Series Modem Reference Guide.
=Disable
No ringback tone is sent to the remote modem prior to sending an answer-back tone.
AT
=Enable
After receiving the access security password, the answer modem sends a ringback tone to the
remote modem (prior to sending an answer-back tone).
PW Verify
Password Verification
This command determines whether the access security feature is enabled. If access security is
enabled, this option selects the method used to verify a password.
NOTE: For a detailed description of how the modem’s access security and call features
operate, refer to Chapter 2 of the 326X Series Modem Reference Guide.
*ZV0
*ZV1
AT
=Dis
Password and callback features are disabled.
AT
=Intern
A single password, stored in modem memory, is checked against the received password. This
password is stored in modem memory using the AT ZI (Enter Group PW?) command.
Only
accessible
with an NMS
Mngr
The network management system verifies the received password. Although displayed at the
modem, this selection is not accessible by the front panel or AT ACU.
*
Gray shading indicates country-specific options. See Appendix C for your country’s options.
Configuration Quick Reference A-33
Configuration
Quick-Reference
AT
Table A-2.
Front Panel Configuration Options
326X Menu
Parameter &
Option
ACU OPT’S
ACU Select
Determines which Auto-Call Unit (ACU) the modem uses. To enable SDC: select an ACU
(ACU Select), a bit-synchronous data format (for the AT and V.25bis ACUs), and
Mode=Reliable, Auto Reliable, or Speed Auto Reliable (AT SM).
=AT
The AT auto-call unit is used.
Description
*
To enable SDC: after selecting AT ACU, select a data format (AT&M). The options are: Sync
Data, DTR Dial, or Man Dial. Refer to the AT&M option description in Table A-1.
:V25b
The V.25bis auto call unit is used.
To enable SDC: after selecting V25b, select a data format (AT&M). The options are: AsynSync
or Bitsync (see next parameter, below).
:LPDA2
The LPDA-2 auto-call unit is used.
After selecting LPDA (LPDA transmits data synchronously), to enable SDC, select
Mode=Reliable, Auto Reliable, or Speed Auto Reliable (AT SM).
:None
No auto call unit is used.
*
To enable SDC: after selecting None, choose a synchronous data format using the NoACU Form
option (discussed later in this table).
V25Form
Determines the format of data when the ACU Select option is set to V25b.
Configuration
Quick-Reference
To enable SDC: after selecting V.25bis ACU, choose one of the synchronous data formats
(AsynSync or Bitsync). Select Mode=Reliable, Auto Reliable, or Speed Auto Reliable
(AT SM).
*
=Async
Modem is compatible with asynchronous DTEs.
: AsynSync
Modem dials calls asynchronously, but data is passed synchronously.
:Bitsync
The DTE uses the bit-synchronous, HDLC-like protocol outlined in the ITU V.25bis
specification.
: Charsync
The DTE uses the character-synchronous protocol outlined in the ITU V.25bis specification.
NOTE: Charsync is not available for the SDC operating mode.
NoAcu Form
This option determines the format of data when ACU Select=off.
To enable SDC: after selecting ACU Select=None, choose NoAcu Form=Sync. Select
Mode=Reliable, Auto Reliable, or Speed Auto Reliable (AT SM).
=Async
Asynchronous data is passed in data mode.
*
:Sync
Synchronous data is passed in data mode.
Char Length
Applies to asynchronous data applications that use the direct data transfer mode (no error
correction). The modem ignores this option in the normal, reliable, or auto-reliable data transfer
modes.
Do not change this option unless your application requires it. If you must change it, select the
option that corresponds to the number of bits that your DTE uses to code a character (start bit,
data bits, parity bit, and stop bit) NOTE: Autobauding works only with 10-bit characters.
=8
Modem is compatible with 8-bit characters.
:9
Modem is compatible with 9-bit characters.
:10
Modem is compatible with 10-bit characters.
:11
Modem is compatible with 11-bit characters.
V25 Char
Determines the type of character the V.25bis ACU uses.
=ASCII
The V.25bis ACU uses ASCII character format.
:EBCDIC
The V.25bis ACU uses EBCDIC character format.
Gray shading indicates country-specific options. See Appendix C for your country’s options.
A-34 Configuration Quick Reference
Table A-2.
Front Panel Configuration Options (Continued)
326X Menu
Parameter &
Option
Description
Sync Idle
Applies to synchronous applications only (direct synchronous or SDC operating modes). Your
modem sends Marks or Characters on EIA/TIA 232-D Pin 3 (V.24 Circuit 104) to the DTE when
it has no messages to send.
=Mark
Modem sends continuous Marks (or one bits) on EIA/TIA 232-D Pin 3 (V.24 Circuit 104) to the
DTE when it has no messages to send.
:Char
Applies to V.25bis, and LPDA2 ACUs.
If the modem is configured for V.25bis and V25Form=Charsync, it sends a continuous stream of
SYN (synchronizing) Characters on EIA/TIA 232-D Pin 3 (V.24 Circuit 104) when it has no
messages to send. If V25Form=Bitsync, it sends continuous flags (7E hexadecimal) when it has
no messages to send.
If the modem is configured for LPDA2, it sends continuous flags (7E hexadecimal) when it does
not have a message to send.
When using the V.25bis ACU, the modem always indicates a valid connection after the local
modem and remote modem switch to data mode. You can receive an indication of call progress
at your DTE. The V25 Resp option chooses the response you receive.
=V25bis
The modem sends a VAL message upon receipt of the dial command and a CNX message once
an answer-back tone is received from the remote modem.
:V25rate
The modem sends a VAL message upon receipt of the dial command and a CNX message
followed by the data rate once the modem switches to data mode.
:VALOnly
The modem sends a VAL message when the modems switch to data mode.
V25 Resp:
The modem does not send a message to the DTE.
LPDA2 Addr
Lets you select the modem’s address. (See Chapter 2 of the 326X Series Modem Reference
Guide for details.)
LPDA2 ID
Allows the modem type to be returned in the data field response field.
=326X
Sends 3260 in data response.
:7855
Sends 7855 in data response.
LPDA2 Det
=Enab
TELCO
OPT’S
LPDA2 commands are recognized in the data stream and the commands are processed.
:Disab
LPDA2 command frames are not recognized as commands.
DL TX Level
Displays the modem’s dial line transmit level, which is set for your country’s requirements.
=0 to -15
The modem is set to transmit at a level in the 0 to -15 dBm range.
LL TX Level
Displays the modem’s leased line transmit level, which is set for your country’s requirements.
=0 to -15
The modem is set to transmit at a level in the 0 to -15 dBm range.
Adjustable Transmit Levels—V.34 Modulation Mode
In the V.34 modulation mode, the local and remote modems negotiate a transmit level (for the
dial/leased line) during the training sequence. This allows the modems to select the lowest
possible transmit level in order to maximize the signal to echo level in the receiver. A typical
range for the reduction of the transmit level is 0 to -14 dBm.
NOTE: Although the modem negotiates a transmit level that may differ from the rate indicated
for your country, the front panel DL TX and LL TX Levels options remain the same. The CQMS
parameter, Tx Level, however, displays the actual transmit level in use for a connection.
Gray shading indicates country-specific options. See Appendix C for your country’s options.
Configuration Quick Reference A-35
Configuration
Quick-Reference
V25 Resp
Table A-2.
Front Panel Configuration Options (Continued)
326X Menu
ACCESS
SECURITY
Parameter &
Option
Group PW
Description
*
Determines if the modem can verify a received password when PW Verify=Mngr (AT ZV) and
the network management system is unable to perform the verification. This option is not accessible from the front panel or the AT ACU. It is displayed for status purposes only.
=Disable
The modem cannot verify the password.
:Enable
The modem can verify the password using its Group PW stored internally.
NETWK
OverrideMode
CNTL OPT’S
Determines whether your modem can be controlled by the network manager.
=Off
The network manager can attach your modem. When it has attached, front panel control is
locked out. You can display options and status in the front panel menu tree, but you cannot
change options. If you attempt to change a setting, the modem displays Net Man Attached.
:On
The network manager cannot attach your modem.
NC Address
Lets you set the modem’s network control address. This is the address that modems use with the
SET RMT LL ADDR and SRCH RMT LL ADDR functions. The range of addresses is 0 to 254.
To set a network control address, see “Performing Numeric Entry” in this appendix.
NC PortRate
Set the NC Port Rate option to match the speed of your network manager. This option controls
the speed of the NC ports on your modem’s rear panel.
= 75
Configures the network control port for speeds indicated in bits per second (bps).
: 110
: 150
:1200
:2400
:4800
Configuration
Quick-Reference
:9600
Pass Thru
The modem uses an in-band secondary channel to pass network management data to the remote
modem. The channel is not disruptive to main channel user data. Pass Thru controls how
network control data is passed to the remote modem when the modem is configured as DIAL.
=opt 1
The local modem (connected to a network manager through the NC port) does not forward all
network management data received from the NC port to the remote modem over the in-band secondary channel. Only commands from the network manager to the remote modem are passed
through. Only remote-modem responses are passed to the network manager.
=opt 2
The modems do no filtering. They pass all network management data received from the NC port
to the in-band secondary channel and from the in-band secondary channel to the NC port.
SET RMT LL New Address=nnn The SET RMT LL ADDR menu is for use with remote configuration on leased lines. Using this
ADDR
option, you can set the remote modem’s address.
Rmt Ser#=
nnnnnnn
Rmt Nest
Modem=No, A, B.
SRCH RMT
LL ADDR
Rmt
Ser#=nnnnnnn
The SRCH RMT LL ADDR menu is for use with remote configuration on leased lines. Using
this option, you can search for the remote modem’s address.
Rmt Nest
Modem=No, A, B.
Gray shading indicates country-specific options. See Appendix C for your country’s options.
A-36 Configuration Quick Reference
Performing Numeric Entry
The following options require you to enter information using the front panel or ACU.
Front Panel Option
Enter Phone #=n
Enter Then Dial
S-Reg xxx=nnn
LPDA-2 Addr=nnn
Enter PW:nnnn
Old PW:nnnn
New PW:nnnn
Verify PW:nnnn
Enter Group PW:
NC Address:nnn
New Address:nnn
Rmt Ser:nnnnnnn
Description
Stores phone number to phone book memory in location n.
Lets you dial from the front panel.
Lets you set S-Register xxx to nnn.
Lets you set the LPDA2 address.
Lets you unlock a modem’s password protection.
Lets you enter old password.
Lets you configure new password.
Lets you verify new password.
Lets you verify group password.
Lets you set network control address.
Lets you set remote modem’s leased line address.
Lets you enter remote modem’s serial number.
The keystrokes to set the numeric entry for these options are as follows:
1) Step across the front panel menu by pressing
change displays.
2) Press
until the option you want to
. You are now ready to key in the numeric entry.
3) Press
until the digit or character you want appears in the leftmost position
of the display.
4) Press . The display shifts one position to the left, and the second character
position is displayed.
5) Repeat Steps 3 and 4 until you have completed keying in the numeric entry. To
re-enter a number or character, press
to place the cursor at the beginning of
the line, then re-enter the number or character.
6) Press
to save your selection.
Configuration Quick Reference A-37
Configuration
Quick-Reference
Example: 1xxxxx
S-Register/AT Command Cross-Reference
This section shows the modem’s S-Registers cross-referenced with AT Commands
and front panel options. (For details on S-Registers, refer to Chapter 5, Using the AT
Automatic Calling Interface.)
Configuration
Quick-Reference
Table A-3.
S-Register Cross-Reference
S-Register
S0—Ring Count to Answer On
S1—Ring Count
S2—Escape Code Character
S3—Carriage Return Character
S4—Line Feed Character
S5—Backspace Character
S6—Wait for Dial Tone
S7—Wait for Data Character
S7—Wait for Data Character
S8—Pause Time for Pause Delay Dial
Modifiers
S10—Carrier Loss Hang Up Delay
S11—DTMF Tone Duration
S12—Escape Code Guard Time
S18—Test Timer
S25—Delay Before Looking for DTR
S26—RTS/CTS Delay
S30—DTE Inactivity Disconnect
S38—Disconnect Buffer Delay
S45—Access Security Tone Duration
S46—Access Security Lead Digit Delay
Timeout
S96—Signalling System #5
S97—Break Signal Duration
S98—AC Detect
S99—V.32 Training Time
A-38 Configuration Quick Reference
AT Command
AT AA5
—
—
—
—
—
AT BD2
AT DD9
AT TT5
AT DP4
*
*
*
*
*
AT CD3
*
AT TL1
*
—
—
Front Panel Option
Answer=Using S0
—
—
—
—
—
Blind Dial=S6
Dial Wait=S7
Call Timeout=S7
Pause Delay=S8
DCD Loss Dis=S10
Tone Length=S11
—
—
—
—
AT DL4
*
*
AT DB3
*
—
RTS/CTS Delay=S26
AT SI5
Inactivity=S30
AT
AT
AT
AT
=0 to 1
*S96
*S97
*S98
*S99
Delay=S38
—
=0 to 39
=0 to 1
=0 to 216
Dial Modifiers for Special Dialing Requirements
When entering telephone numbers into modem memory or dialing directly from the
modem’s front panel, you can add dial modifiers to telephone numbers. Table A-4
lists the dial modifiers used in AT ACU applications.
Table A-4.
Dial Modifiers
Modifier Function Description
W
Dial Wait Instructs the modem to stop and wait for a dial tone. If the modem
does not detect a dial tone after a specified period, it aborts the
w
call. The factory default for dial wait is country-specific (refer to
:
Appendix C for details). In the U. S. A., the default is two seconds.
You can change this interval using the Dial Wait option.
K
Pause
When any of these modifiers are encountered in a dial string or
Delay
command line, the modem pauses. The factory default pause delay
k
is three seconds. This default can be extended with the Pause
<
Delay command. The comma modifier can be used as a command
,
outside the dial string.
P
Pulse
When either of these modifiers are encountered in a dial string, if
Dial=Auto (AT PT—DIALING OPTS menu), the Dial setting is
p
not changed from Auto. If set to other than Auto, the pulse/tone
setting is modified to force pulse dialing.
*
T
Tone
When either of these modifiers are encountered in a dial string, if
Dial=Auto (AT PT—DIALING OPTS menu), the Dial option
setting is not changed from Auto. If set to other than Auto, the
pulse/tone setting is modified to force tone dialing.
*
t
If no tone dial modifier is inserted in the number stream, the
modem dials according to the pulse/tone setting or the Dial option
in the front panel DIALING OPT’S menu. These modifiers can
also be used as a command outside of the dial string.
&
Flash
Instructs the modem to flash hook (a control signal used by many
PBXs to enable special dial features, such as transferring a call).
Return to
command
state after
dialing
Instructs the modem to return to command state after dialing, without breaking the connection. The modem can dial but cannot train,
and no call progress messages are received. This modifier is used
when calling an electronic service that permits the user to transmit
numbers using tones, once a connection is established.
!
;
Configuration Quick Reference A-39
Configuration
Quick-Reference
If no pulse dial modifier is inserted in the number stream, the
modem dials according to the pulse/tone setting of the Dial option
in the front panel DIALING OPT’S menu. These modifiers can
also be used as commands outside the dial string.
Table A-4.
Dial Modifiers (Continued)
Configuration
Quick-Reference
Modifier Function Description
@
Quiet
Makes the modem look for one or more ringbacks (followed by
Answer
five seconds of silence) within the delay time specified by Call
Timeout. If five seconds of delay silence is detected, the modem
continues to dial the string. If the line is busy, the modem hangs up
and sends a BUSY message to the DTE. If the modem does not
detect delay silence or a busy signal, the modem hangs up and the
screen displays NO ANSWER.
R
Reverse
Must be the last character in the dial string before a carriage return.
The R modifier makes the modem originate the call in answer
mode and is used to dial an originate-only modem. Immediately
after the dial command is processed, an answer-back tone is generated and the modem attempts to complete the connection for the
length of time specified by Call Time-out.
H
DisconMakes the modem disconnect from the dial line. This must be the
nect
last modifier in the dial string, and must also be preceded by a
h
semicolon. If this modifier is not preceded by a semicolon, it is
ignored by the modem. The modifier can be entered through the
front panel, the AT ACU, or network manager.
(space)
PresenThese characters do not act as modifiers. They are presentation
. (period) tation
characters that are ignored.
- (dash)
characters
( ) parentheses
A-40 Configuration Quick Reference
Result Codes
Result codes are responses sent to the terminal by the AT ACU. Result codes may be
sent in word form (RsltForm=Verbose or ATV1), numeric form (RsltForm=Numeric
or ATV0), or disabled (RsltCode=Disable or ATQ1). When numeric form is selected,
the modem issues only a number code.
The rate displayed in a CONNECT message depends on the Connect Message option
(ACU OPTS menu). If Con Msg=DTE Rate, the DTE-to-modem rate is displayed. If
Con Msg=DCE Rate, the modem-to-modem rate is displayed. If Speed Conversion=Off (AT SC0), or if the modem is operating in Direct or synchronous modes,
the CONNECT message speed reflects both the DTE-to-modem and the modem-tomodem rate, which are the same.
*
Table A-5 provides a listing of word- and numeric-form result codes.
Table A-5.
Result Codes
Numeric Form Response
0
1
2
3
4
5
6
7
8
40
50
51
52
53
54
55
56
57
58
60
13
10
11
15
12
16
17
18
14
19
Configuration Quick Reference A-41
Configuration
Quick-Reference
Word Form Response
OK
CONNECT
RING
NO CARRIER
ERROR
CONNECT 1200
NO DIALTONE
BUSY
NO ANSWER
PASSWORD PROTECTED
INITIATING RC
RC NOT AVAILABLE
RC FAILED
RC DENIED
RC ESTABLISHED
UNDER RMT CONFIG
RC COMPLETE
RC ABORTED
RC SESSION IN PROGRESS
NETWORK MANAGEMENT INHIBITED
CONNECT 600
CONNECT 2400
CONNECT 4800
CONNECT 7200
CONNECT 9600
CONNECT 12000
CONNECT 14400
CONNECT 16800
CONNECT 19200
CONNECT 21600
Configuration
Quick-Reference
Table A-5.
Result Codes (Continued)
Word Form Response
CONNECT 24000
CONNECT 26400
CONNECT 28800
CONNECT 31200
CONNECT 33600
CONNECT 38400
CONNECT 48000
CONNECT 56000
CONNECT 57600
CONNECT 64000
CONNECT 72000
CONNECT 76800
CONNECT 96000
CONNECT 115200
CONNECT 128000
CONNECT RELIABLE
CONNECT 600 RELIABLE
CONNECT 1200 RELIABLE
CONNECT 2400 RELIABLE
CONNECT 4800 RELIABLE
CONNECT 7200 RELIABLE
CONNECT 9600 RELIABLE
CONNECT 12000 RELIABLE
CONNECT 14400 RELIABLE
CONNECT 16800 RELIABLE
CONNECT 19200 RELIABLE
CONNECT 21600 RELIABLE
CONNECT 24000 RELIABLE
CONNECT 26400 RELIABLE
CONNECT 28800 RELIABLE
CONNECT 31200 RELIABLE
CONNECT 33600 RELIABLE
CONNECT 38400 RELIABLE
CONNECT 48000 RELIABLE
CONNECT 56000 RELIABLE
CONNECT 57600 RELIABLE
CONNECT 64000 RELIABLE
CONNECT 72000 RELIABLE
CONNECT 76800 RELIABLE
CONNECT 96000 RELIABLE
CONNECT 115200 RELIABLE
CONNECT 128000 RELIABLE
CONNECT RELIABLE EC=(xxx) DC=(yyy)
CONNECT 600 RELIABLE EC=(xxx) DC=(yyy)
CONNECT 1200 RELIABLE EC=(xxx) DC=(yyy)
A-42 Configuration Quick Reference
Numeric Form Response
20
63
64
67
68
22
61
62
23
24
26
27
28
29
65
21
33
25
30
31
35
32
36
37
38
34
39
41
84
85
87
88
42
82
83
76
77
78
79
80
81
86
21
33
25
Table A-5.
Result Codes (Continued)
Word Form Response
CONNECT 2400 RELIABLE EC=(xxx) DC=(yyy)
CONNECT 4800 RELIABLE EC=(xxx) DC=(yyy)
CONNECT 7200 RELIABLE EC=(xxx) DC=(yyy)
CONNECT 9600 RELIABLE EC=(xxx) DC=(yyy)
CONNECT 12000 RELIABLE EC=(xxx) DC=(yyy)
CONNECT 14400 RELIABLE EC=(xxx) DC=(yyy)
CONNECT 16800 RELIABLE EC=(xxx) DC=(yyy)
CONNECT 19200 RELIABLE EC=(xxx) DC=(yyy)
CONNECT 21600 RELIABLE EC=(xxx) DC=(yyy)
CONNECT 24000 RELIABLE EC=(xxx) DC=(yyy)
CONNECT 26400 RELIABLE EC=(xxx) DC=(yyy)
CONNECT 28800 RELIABLE EC=(xxx) DC=(yyy)
CONNECT 31200 RELIABLE EC=(xxx) DC=(yyy)
CONNECT 33600 RELIABLE EC=(xxx) DC=(yyy)
CONNECT 38400 RELIABLE EC=(xxx) DC=(yyy)
CONNECT 48000 RELIABLE EC=(xxx) DC=(yyy)
CONNECT 56000 RELIABLE EC=(xxx) DC=(yyy)
CONNECT 57600 RELIABLE EC=(xxx) DC=(yyy)
CONNECT 64000 RELIABLE EC=(xxx) DC=(yyy)
CONNECT 72000 RELIABLE EC=(xxx) DC=(yyy)
CONNECT 76800 RELIABLE EC=(xxx) DC=(yyy)
CONNECT 96000 RELIABLE EC=(xxx) DC=(yyy)
CONNECT 115200 RELIABLE EC=(xxx) DC=(yyy)
CONNECT 128000 RELIABLE EC=(xxx) DC=(yyy)
Numeric Form Response
30
31
35
32
36
37
38
34
39
41
84
85
87
88
42
82
83
76
77
78
79
80
81
86
1) When CONNECT messages are displayed, xxx indicates which errorcorrection scheme (LAPM or MNP 1-4) the modems are using, and yyy
indicates which data compression scheme (V.42bis or MNP-5) the modems are
using.
2) When a reliable connection has been established with the remote modem, the
RELIABLE result code is displayed only when the Mode option (under the
EC/DC OPT’S menu) is configured for Reliable (AT SM2), Auto Rel
(AT SM3), or Spd AutoRel (AT SM4). Also, the Rel Msg option (under the
ACU OPT’S menu) must be set for Long (AT XC2) or Short (AT XC1).
*
*
*
*
*
Also, you receive error-correction and data-compression information in your result
code only when the Rel Msg option is set to Long.
Configuration Quick Reference A-43
Configuration
Quick-Reference
NOTES:
Configuring the Modem’s Dual In-line Package (DIP) Switches
The standalone modem has a 6-position DIP switch that lets you “hard” configure
certain aspects of the modem’s operation. The modem is shipped from the factory
with all switches in the Off (up) position. DIP switch selections cannot be overridden
using the remote front panel configuration.
DIAL
LINE
PHONE
NC
123456
1 ON 6
OUT
IN
Factory Preset 6-Position DIP
switches, in Off (up) position.
1
2 3
4 5 6
The switches are numbered from left to right (1 to 6). Table A-6 lists the switches
and explains their function. NOTE: For information on the DIP switch on 3262,
3263, 3267, and 3268 Modem cards, see the addendum, 326X Series Modem Cards,
shipped with your modem’s backplane.
Table A-6.
Rear Panel Switches
Configuration
Quick-Reference
Switch
Number Setting
1
Off (up)
2
On (down)
Off (up)
Function
EIA/TIA 232-D Pin 23 is set for data rate input. Setting Switch 1
to this position has no effect on modem operation. NOTE: When
operating with a V.35 electrical interface, leave switch S1 in the
off (up) position at all times.
EIA/TIA 232-D Pin 23 is set as a data indicator.
Busy Out select. A signal on EIA/TIA 232-D Pin 25 makes the
modem appear busy to incoming calls.
NOTES:
*
1) You must set DTE Pin 25=Busy (AT LT, TERMINAL
OPT’s category) to enable Busy Out Select.
2) The AT&J Telco option command must be set to RJ4MB.
On (down)
Test Indicator Signal (V.24 Circuit 142) Select. The modem
signals to the terminal on EIA/TIA 232-D Pin 25 (V.24 Circuit
142) when a test is in progress.
NOTES:
*
1) You must set DTE Pin 25=Test (AT LT, TERMINAL
OPT’s category) to enable Busy Out Select.
2) The AT&J Telco option command must be set to RJ4MB.
A-44 Configuration Quick Reference
Table A-6.
Rear Panel Switches (Continued)
Switch
Number Setting
3
Off (up)
On (down)
4
Off (up)
On (down)
5
Off (up)
On (down)
6
Off (up)
Function
Front panel enable. The front panel functions normally.
Front panel disable. You can check only the status displays.
NOTE: If the modem is under remote configuration control, the
controlling modem retains full front-panel control.
Normal password protection applies.
Reinitializes modem to its factory settings. Use this when you
forget your password, to unlock password protection. (See
Table A-1, under AT PN.)
The AT and V.25bis, or LPDA-2 command sets can be used from
an attached terminal.
AT and V.25bis commands cannot be used from an attached
terminal. NOTE: If the modem is under remote configuration
control, the controlling modem retains AT ACU control.
Factory use only. For proper operation, this switch must be off.
*
Configuration
Quick-Reference
Configuration Quick Reference A-45
Appendix B
Cabling and Interface Pinouts
Contents
Introduction ..................................................................................................
EIA/TIA 232-D (Modem to Computer) Interface ........................................
ITU Recommendation V.35 Modem-to-Computer Interface .......................
ITU Rate V.35 Modem-to-Computer Interface Pinouts ............................
Differences, EIA/TIA 232-D and ITU Rate V.35 Interfaces ....................
DIAL LINE, LEASE (PRIVATE) LINE, PHONE Connector Pinouts ........
NC (Network Control) Port Pinouts .............................................................
Cabling ..........................................................................................................
Cable Considerations ...............................................................................
DTE Cable Diagnostics ................................................................................
B-2
B-2
B-4
B-5
B-6
B-6
B-7
B-7
B-7
B-10
Interface
Pinouts
Cabling and Interface Pinouts B-1
Introduction
This appendix describes the following:
• Interface pinouts common to all modem models, including:
— EIA/TIA 232-D, and ITU V.35 Recommendation modem-to-computer
interfaces
— NC IN and OUT network control port interfaces
• 326X/326X-SDC cabling requirements and diagnostics
Audio connector (DIAL LINE, LEASE/PRIVATE LINE, and PHONE) pinouts vary
by country. See Appendix C for your country's pinouts.
EIA/TIA 232-D (Modem to Computer) Interface
The modem’s digital interface conforms to the EIA/TIA 232-D standard and ITU
V.24, ITU V.28, and ISO 2110; the modem should be connected to a data terminal
with a compatible digital interface (Table B-1). NOTE: For DTE rates greater than
38.4 kbps, refer to the “Cabling” section to determine cables and lengths.
Table B-1.
Modem/Computer Interface Connections
Interface
Pinouts
EIA/TIA
Pin 232-D
ITU V.24
1
—
—
2
BA
103
Signal
—
Transmitted Data
(TXD)
Received Data
(RXD)
Request To Send
(RTS)
Clear To Send
(CTS)
Data Set Ready
(DSR)
Signal Ground
Definition
Not used.
Digital data transmitted from the local terminal to the remote modem.
3
BB
104
4
CA
105
5
CB
106
6
CC
107
7
AB
102
8
CF
109
Data Carrier
Detect (DCD)
Passed from the local modem to the local DTE when an acceptable
carrier signal is received by the modem.
9
—
—
—
Not Used.
10
—
—
—
Not Used.
11
—
—
Answer/
Signal passed from terminal to modem to select answer/originate
status. When signal is on, answer signal is selected. When signal is off,
originate signal is selected. This signal works with Mode=External.
Originate Select
B-2 Cabling and Interface Pinouts
Demodulated data received by the local terminal from the remote
modem.
Sent from local terminal to local modem to ready it for data
transmission.
Passes from the local modem to the local terminal when the data port is
clear to transmit data. Occurs in response to Request To Send.
Indicates the local modem is ready to transmit and receive data.
Common signal. Provides a common ground reference point for
interface circuitry.
Table B-1.
Modem/Computer Interface Connections (Continued)
EIA/TIA
Pin 232-D
ITU V.24
12 CI
112
Signal
Data Signal Rate
Indicator
13
—
110
Signal Quality
14
—
—
Ext Select
Definition
CI (112) is passed from modem to terminal, indicating signaling rate.
When signal is on, modem operates at 2400 bps or greater. When
signal is off, modem operates below 2400 bps.
Signal passes from modem to terminal indicating signal quality of
telephone line. When signal is on, signal quality is acceptable. When
signal is off, signal quality is poor.
(All models.) Signal passed from terminal to modem to select between
two option sets. Works in conjunction with Ext Select option.
(Models 3261/3263/3266/3268 only.) Signal passed from terminal to
modem indicating whether to use a dial line or a leased line. When
signal is on, modem uses a dial line. When signal is off, modem uses a
leased line. This signal is used in Restoral mode only.
15
DB
114
Transmitter
Signal Element
Timing
Local modem sends an internally generated transmit timing signal to
local terminal to synchronize transmitted data (TXD). See
Clock=Internal.
16
—
117
Standby Indicator
(Models 3261/3263/3266/3268 only.) Signal passed from modem to
terminal indicating type of line in use. When signal is on, modem is on
a dial line. When signal is off, modem is on a leased line. This signal is
used in Restoral mode only.
17
DD
115
Receive Signal
Element Timing
Timing signal extracted from the received carrier. Local modem
transmits this signal to the DTE to synchronize received data (RXD).
18
—
141
Local Analog
Loopback Test
Initiated at local terminal and passed to local modem, causing it to
initiate local analog loopback test.
19
—
—
—
Not used.
20
CD
108.1/
108.2
Data Terminal
Ready (DTR)
108.1—Sent by DTE; causes the modem to connect to the phone line.
21
—
140
Remote Digital
Loopback Test
Signal initiated at local terminal and passed to local modem, causing it
to initiate remote digital loopback test (V.54 Loop 2).
22
CE
125
Ring Indicator
(RI)
Passed from local modem to local terminal. On during ringing, off
between rings and when no ring received.
23
CH/CI
111/112
Data Signal Rate
Select/Indicator
CI passed from modem to terminal indicating signaling rate. CI is set
high for data rates greater than 2400 bps; otherwise, it is set low. CI is
also set low while the modem is disconnected. The function of this pin
is determined by the setting of rear panel Switch 1. CH (input) signal
has no effect on modem operation.
24
DA
113
External Signal
Element Timing
Transmit timing signal generated by some synchronous DTEs,
providing clock to the local modem. See Clock=External setting.
25
—
142
Test Indicate (TI)
Local modem signals to local terminal when local modem is in test.
The terminal can initiate a Busy Out condition on this circuit. The
status of this signal is determined by the status of rear panel Switch 2
and front panel option DTE Pin 25 configured for Test or Busy.
108.2—Sent by DTE; allows the modem to connect to the phone line.
Interface
Pinouts
Cabling and Interface Pinouts B-3
ITU Recommendation V.35 Modem-to-Computer Interface
For compatibility with DTEs operating with a V.35 interface, the 326XFASTSDC Series Modem supports an optional ITU Recommendation V.35 Modemto-Computer interface. Connection is made through the modem’s DTE port
(see Figure B-1).
NOTE: The 326XFAST-SDC Series Modem with a V.35 interface is currently
available in the U. S. A. and Canada.
Caution
The 326XFAST-SDC Series Modem, if ordered with ITU’s V.35
Recommendation, supports connection to external equipment also
operating with a V.35 electrical interface. If your DTE does not
have a V.35 interface, do not, under any circumstances, connect the
modem to a non-V.35 device. If you make such a connection, you
may seriously damage the modem. Motorola makes no guarantee
of the equipment’s integrity if you do not ensure that compatible
interfaces are used. If your DTE does not have a V.35 interface, use
an external converter cable.
I
O
DIAL
LINE
PHONE
NC
Interface
Pinouts
1 ON 6
OUT
IN
DTE
V.35
Factory Preset 6-Position DIP to Off(Up)
Figure B-1. 326XFAST-SDC Series Modem with ITU V.35 Interface
NOTES:
1) The modem is configured at the factory for an EIA/TIA 232-D interface or
ITU rate V.35, and is shipped according to what you specify. Both interfaces
are not available in the same unit.
2) When operating with the V.35 interface, switch S1 must be set to the off (up)
position.
B-4 Cabling and Interface Pinouts
ITU Rate V.35 Modem-to-Computer Interface Pinouts
The modem’s digital interface conforms to ITU Rate V.35. The modem should be
connected to a data terminal with a compatible digital interface (see Table B-1).
Table B-2.
ITU V.35 Modem/Computer Interface Connections
Cabling and Interface Pinouts B-5
Interface
Pinouts
Pin V.35 Signal
Definition
1
Frame Ground
Frame (or protective) ground.
2
Transmit Data (A) Digital data transmitted from the local terminal to the remote
modem.
3
Receive Data (A) Demodulated data received by the local terminal from the
remote modem.
4
Request To Send
Sent from local terminal to local modem to ready it for data
(RTS)
transmission.
5
Clear To Send
Passes from the local modem to the local terminal when the data
(CTS)
port is clear to transmit data. Occurs in response to RTS.
6
Data Set Ready
Indicates the local modem is ready to transmit and receive data.
(DSR)
7
Signal Ground
Common signal. Provides a common ground reference point for
interface circuitry.
8
Data Carrier
Passed from the local modem to the local DTE when an
Detect (DCD)
acceptable carrier signal is received by the modem.
9
—
Not Used.
10 —
Not Used.
11 —
Not Used.
12 Receive Clock (B) Timing signal extracted from the received carrier. Local modem
transmits this signal to the DTE to synchronize received data.
13 Transmit Clock
Local modem sends an internally generated transmit timing
(B)
signal to the local terminal to synchronize transmitted data.
14 Transmit Data (B) Digital data transmitted from the local terminal to the remote
modem.
15 Transmit Clock
Local modem sends an internally generated transmit timing
(A)
signal to the local terminal to synchronize transmitted data.
16 Receive Data (B) Demodulated data received by the local terminal from the
remote modem.
17 Receive Clock (A) Timing signal extracted from the received carrier. Local modem
transmits this signal to the DTE to synchronize received data.
18 Loop 3 Control
Initiated at the local terminal and passed to local modem,
causing it to initiate a local analog loopback test.
19 —
Not Used.
20 Data Terminal
108.1—Sent by the DTE, this signal causes connection of the
Ready (DTR)
modem to the phone line.
108.2—Sent by the DTE, this signal allows connection of the
modem to the phone line.
Table B-2.
ITU V.35 Modem/Computer Interface Connections (Continued)
Pin V.35 Signal
21 Loop 2 Control
22
23
24
25
Definition
Signal initiated at local terminal and passed to local modem,
causing it to initiate remote digital loopback test (V.54 Loop 2).
Ring Indicator (RI) Passed from local modem to local terminal. On during ringing,
off between rings and when no ring received.
External Transmit Transmit timing signal generated by some synchronous DTEs,
Clock (B)
providing clock to the local modem.
External Transmit Transmit timing signal generated by some synchronous DTEs,
Clock (A)
providing clock to the local modem.
Test Indicate (TI) Local modem signals to local terminal when local modem is in
test. The terminal can initiate a Busy Out condition on this
circuit.
Differences, EIA/TIA 232-D and ITU Rate V.35 Interfaces
There are some differences in how your modem operates when using EIA/TIA
232-D and ITU Rate V.35 electrical interfaces. These differences, and settings
to use when operating with a V.35 interface, are as follows.
When a V.35 Electrical
Interface is Selected...
Pin 11 is not supported.
The Following Options
Cannot Be Selected...
Mode=External
(AT CA2)
*
Set:
Mode=
*
*
Originate (AT CA0)
Answer (AT CA1), or
*
Auto (AT CA3)
Pin 12 is not supported
—NA—
—NA—
Pin 13 is not supported
—NA—
—NA—
Pin 14 is not supported
Ext Cntrl=Pin 14
(AT OC0)
Ext Cntrl=Pin 20
(AT OC1—default).
Restore=FP/116
(AT RE3)
—NA—
Interface
Pinouts
*
*
*
*
Restore=FP/116.ACU
(AT RE6)
Pin 16 is not supported
—NA—
—NA—
Pin 23 is not supported
—NA—
Switch S1 on modem rear
panel to the Off (up) position.
DIAL LINE, LEASE (PRIVATE) LINE, PHONE Connector Pinouts
DIAL LINE, LEASE (PRIVATE) LINE, and PHONE connector pinouts vary by
country. Consult Appendix C for your country’s pinouts.
B-6 Cabling and Interface Pinouts
NC (Network Control) Port Pinouts
Table B-3 describes the pinouts for the IN and OUT NC (Network Control) ports.
Table B-3.
Network Control Port Connector Pinouts
Pin
In
Out
1
Not Connected
User Special In
2
TXD In
TXD Out
3
RXD In
RXD Out
4
RTS In
RTS Out
5
Not Connected
Not Connected
6
Not Connected
User Special Out
7
Ground
Ground
8
DCD In
DCD Out
“In” signals use a DCE-type interface. This type of interface connects directly to the
DTE-type interface provided by Motorola Network Management Systems.
“Out” signals use a DTE-type interface. This type of interface may connect to a Motorola
network-managed product.
Cabling
This section provides important information about cabling and operating the modem
at DTE rates greater than 19.2 kbps.
NOTE: 326XFAST and 326XFAST-SDC Series Modems are referred to as 326X
Series Modems here.
Caution
Cable Considerations
Motorola has specified a maximum allowable cable capacitance for use with the
expanded data rates of 326X modems. You must determine the correct capacitance
of the cable you intend to use with the modem.
Cabling and Interface Pinouts B-7
Interface
Pinouts
When operating the modem at DTE rates higher than 19.2
kbps, carefully follow the information here to determine the
cables to use with your application. For the modem to operate
as specified, Motorola has indicated the maximum capacitance
of cables to be used when operating at data rates higher than
19.2 kbps. If this method is not followed, your modem may
cause errors in data transmission. Motorola makes no guarantee of proper modem operation if you do not use a cable with
the correct capacitance.
Table B-4 shows a range of data rates and maximum allowable capacitances. The
maximum capacitance is a total of the inter-conductor capacitance (between the
conductors represented as Cc in Table B-4), and the capacitance between the shield
and the conductor (represented as Cs in Table B-4).
Table B-4.
Maximum Cable Capacitance per Data Rate
Data Rate
(kbps)
0-20.0
20.0-64.0
64.0-96.0
115.2
Notes:
Maximum Cable Capacitance (Cc+Cs) in
Pico Farads (pF)*
2400 pF
900 pF
400 pF
200 pF
*(1) The total capacitance in this column is the total allowable cable capacitance.
(2) Maximum resistance of cable conductors is 25 Ohms.
The maximum allowable cable capacitance decreases as DTE rates increase. The
more capacitance in the cable, the shorter the allowable length at a DTE rate.
Similarly, the allowable lengths become shorter as DTE rates increase.
Since newer PCs support EIA 232-D type receivers/drivers at higher rates, you must
use information in this section to determine cable length.
To determine the per foot capacitance of your cable:
Interface
Pinouts
1) Determine the length of the cable you require for your application.
2) Determine the range of rates that the modem will use. (For example, to
routinely operate the modem’s DTE port between 20.0 and 96.0 kbps,
determine the cable capacitance for the higher rate. You can operate the
modem up to, but not exceeding, the maximum rate capacitance that you
calculate.)
3) Refer to Table B-4 for the maximum allowable cable capacitance for a given
rate. (For example, to operate the modem at 64.0 kbps, the maximum
capacitance is 900 pF.)
4) Divide the maximum cable capacitance by the length of the cable. This results
in the total cable capacitance per foot. The formula below illustrates how to
calculate the per-foot capacitance:
Maximum Cable Capacitance (pF)
Total Cable Length in Feet
B-8 Cabling and Interface Pinouts
=
Maximum Cable Capacitance (pF)
per Foot
For example, assume you require a 30-foot cable. You intend to operate your
modem at 64.0 kbps. After looking at Table B-4, you determine that the
maximum capacitance for the cable is 900 pF. According to the formula above,
divide 900 pF by 30 feet. The result is 30 pF per foot:
900 pF
30 ft
= 30 pF/ft
Motorola recommends you use Motorola cables to attach your 326X modem(s) to
DTE(s). Use Table B-5 to select cable(s) for your application.
To use non-Motorola cables, Table B-6 provides examples of vendor cable wire
length versus DTE rates for 326X stand-alone units. NOTE: The part numbers
specified in Table B-6 are not for complete cables, but for the wires that are available
with the correct capacitance to support the higher rates of the 326X Modem.
Table B-5.
Motorola DB-25 Low Capacitance Cables for 326X
Description
Motorola
Male 25-Male 25
Straight-through
Motorola
Product Up to 19.2 Up to 64.0 Up to 96.0 Up to 115.2
Code
kbps (ft)
kpbs (ft)
kbps (ft)
kbps (ft)
92153
50
30
10
6
92152
92151
92150
Motorola
92157
Male 25-Female 25 92156
Straight-Through
92155
50
30
10
6
50
30
10
6
92154
92158
NOTE: Motorola DB-25 Cables have a conductor capacitance of 11 pF/ft and a shield
capacitance of 20 pF/ft for a total capacitance of 31 pF/ft. For example, operating at 19.2
kbps, a 50-ft length of cable multiplied by a total capacitance of 31 pF/ft yields a maximum
allowable cable capacitance of 1550 pF, which is acceptable in accordance with Table B-4.
Cabling and Interface Pinouts B-9
Interface
Pinouts
Motorola
92161
Male 25-Female 25 92160
Crossover
92159
Table B-6.
Vendor Wire for 326X
Vendor
Belden
Manhattan
Madison
Part
Number
9948
9671
8125
9937
8155
Conductor
Capacitance
(pF)
35
30
12.5
12
11
Shield
Capacitance
(pF)
63
55
22
22
20
Up to 19.2
kbps (ft)
24.49
28.24
69.57
70.59
77.42
Up to 64.0
kbps (ft)
9.18
10.59
26.09
26.47
29.03
Up to 96.0
kbps (ft)
4.08
4.71
11.59
11.76
12.90
Up to
115.2
kbps (ft)
2.04
2.35
5.80
5.88
6.45
M39026
33
65
24.49
9.18
4.08
2.04
M13201
30
50
30
11.25
5.00
2.50
M2414
26
47
32.88
12.33
5.48
2.74
M3431
12.5
22
69.57
26.09
11.59
5.80
M2434
12
22
70.59
26.47
11.76
5.88
25QF10BTI
14.6
26.3
58.68
22
9.78
4.89
25QF15BTI
12.4
22.4
68.97
25.86
11.49
5.75
NOTE: To determine cable length, add the conductor and shield capacitance specified above to determine the total
wire capacitance. For example, if you are using a Belden wire (Part Number 9671), add the conductor capacitance of
30 pF/ft and the shield capacitance of 55 pF/ft for a total capacitance of 85 pF/ft. If you are operating at a rate of 19.2
kbps, the maximum allowable cable length to attain throughput of 19.2 kbps is 28.24 feet. Multiplying 28.24 by the
total cable capacitance of 85 pF/ft yields a maximum allowable cable capacitance of 2410.4 pF, which is acceptable in
accordance with Table B-4.
Interface
Pinouts
DTE Cable Diagnostics
This section helps determine whether there is a problem with a DTE cable. Perform
the following steps before continuing with installation. If you continue to experience
problems with data transmission after choosing a cable and running the diagnostics
in this section, the problem may be with your DTE or modem.
If the modem is not installed at a host site, perform the following steps:
1) Enable the AT ACU (if not already enabled) with async echo on (reinitializing
the modem will also enable the AT ACU with async echo set to on). Ensure
that rate and parity of the modem and the DTE are identical.
2) Send data to the modem from the DTE. NOTE: Do not substitute test
equipment for the DTE, as the DTE’s receivers/drivers are used in this test.
3) If echoed data from the modem (as received by the DTE) matches the
transmitted message, send the status screen (AT ST<CR>) command.
*
4) If there are no errors in either of the previous tests, the cable is appropriate for
your application.
B-10 Cabling and Interface Pinouts
5) If the transmitted and received messages are different (i.e., character or
framing errors), verify the cable length to the limit specified in Table B-4.
Reduce the cable length or capacitance of the cable to the theoretical limit and
retry the steps listed in this section. (If the same cable length is required, it is
recommended that a low capacitance type cable be used.)
If the modem is installed at a host site, perform the following steps:
*
1) Set the Mode option AT SM (EC/DC OPT’S category) to Reliable. (Reliable
mode ensures data is transmitted during this test.) NOTE: Do not initiate loop
tests while performing the diagnostic procedures in this section.
2) Follow Steps 1 to 3 in the section above to verify the cable at a remote site.
3) Once the cable at the remote site has been verified, initiate a dial connection
with the host site.
4) If there are no errors in data transmission, the cable at the host site is most
likely appropriate for the application.
5) If the transmitted and received messages are different, the cable at the host site
is most likely incorrect for the application. Verify the cable length to the limit
specified in Table B-4. Reduce the cable length or capacitance of the cable to
the theoretical limit and retry Steps 1 to 3 in the section above. (If the same
cable length is required, it is recommended that a low capacitance type cable
be used.)
NOTE: These tests should be done prior to a Local Analog Loopback (LAL) or
Remote Digital Loopback (RDL) test when troubleshooting.
Interface
Pinouts
Cabling and Interface Pinouts B-11
Appendix C
Country-Specific Information
Contents
C-3
C-3
C-3
C-4
C-4
C-4
C-11
C-11
C-12
C-12
C-12
C-13
C-13
C-14
C-14
C-14
C-15
C-15
C-16
C-16
C-16
C-17
C-17
C-17
C-17
C-18
C-18
C-19
C-19
C-20
C-20
C-20
C-21
C-21
C-22
C-22
C-22
C-23
C-23
C-24
C-24
C-25
C-25
C-26
Country-Specific Information C-1
Country-Specific
Information
Introduction ...................................................................................................
Country Support .......................................................................................
Installation Notes...........................................................................................
Models 3265/3266 ...............................................................................
All Models ............................................................................................
Restricted Features Summary........................................................................
Operating Notes ............................................................................................
Stand-alone Modem Rear Panel Views ........................................................
3260 Dial Only Modem ...........................................................................
3260 Modem Rear Panel (Dial Only) ..................................................
3261 Modem Rear View (Leased Line, Dial Restoral) ............................
3265 Dial Only Modem ...........................................................................
3265 Modem Rear Panel—View A .....................................................
3265 Modem Rear Panel—View B .....................................................
3265 Modem Rear Panel—View C .....................................................
3265 Modem Rear Panel—View D .....................................................
3266 Modem (Leased Line with Dial Restoral) .......................................
3266 Modem Rear Panel—View A .....................................................
3266 Modem Rear Panel—View B ......................................................
3266 Modem Rear Panel—View C .....................................................
For an Illustration of the Enclosure Card Backplane... ........................
Rear Panel Interface Pinouts ........................................................................
Stand-alone Models 3260/65 and 3261/66 Interface Pinouts ..................
Dial Line Interface (Models 3260/3265) ..............................................
2-Wire Leased Line Interface (Models 3260/3265)..............................
Phone Connector Interface (Models 3260/3265)..................................
Dial Line Interface (Models 3261/3266) ..............................................
2-Wire Leased Line Interface (Models 3261/3266)..............................
4-Wire Leased Line Interface (Models 3261/3266) .............................
Phone Connector Interface (Models 3261/3266)..................................
Card Models 3262/67, 3263/68 Backplane Interface Pinouts...................
Dial Line Interface (All Card Models) ................................................
2-Wire Leased Line Interface (Models 3262/3267) .............................
2-Wire Leased Line Interface (Models 3263/3268) .............................
4-Wire Leased Line Interface (Models 3263/3268)..............................
Delayed and Forbidden Lists.........................................................................
Australia—Delayed Call Lists .................................................................
Austria—Forbidden Call Lists ..................................................................
Belgium—Delayed Call Lists ...................................................................
Finland—Delayed Call Lists ....................................................................
France—Delayed and Forbidden Call Lists ..............................................
Hong Kong—Delayed Call Lists .............................................................
Ireland—Delayed Call Lists .....................................................................
Netherlands—Delayed Call Lists .............................................................
Country-Specific
Information
Norway—Delayed Call Lists ....................................................................
Spain—Delayed Call Lists .......................................................................
Other Country-Specific Information ............................................................
Canada ..........................................................................................................
DOC Registration and Requirements .......................................................
DOC Regulations ......................................................................................
Rear Panel Pinouts ...................................................................................
3265 Modem .........................................................................................
3266 Modem .........................................................................................
Telco Option (AT&J) ................................................................................
Denmark—Blind Dialing ..............................................................................
Hong Kong and United Kingdom—BABT Regulations ..............................
Compliance with BS6328: Part 1: 1982 Section 8.3.................................
Compliance with BS6328: Part 1: 1982 Section 8.7.................................
Compliance with BABTSITS/82/01/C and BABT/SITS/82005S/D .......
Compliance with BS6305 Clause 6.2, BS6320 Clause 7.2 ......................
Ringer Equivalence Number (REN) ........................................................
Compliance with BABT/SITS/83/08/A Clause 1.2 ..................................
Compliance with BS6789: Section 6.1:1986 Clause 5.2 .........................
Compliance with BS6789: Section 6.1:1986 Clause 7.3.1.3 ...................
Compliance with BS6789: Section 6.1:1986 Clause 7.3.1.4 ...................
Compliance with DTI 83/009I ..................................................................
Compliance with BS6301 ........................................................................
Compliance with BABT SITS 83/009 Section D ....................................
Installation of Telephone Socket ..................................................................
Application for Installation of Telephone Socket..........................................
U. S. A. .........................................................................................................
FCC Registration ......................................................................................
FCC Regulations ......................................................................................
Dial Line Jack Types .................................................................................
6-Pin Voice Jack (Permissive) .............................................................
8-Pin Data Jack (Programmable)..........................................................
Rear Panel Pinouts ...................................................................................
3260 Modem .........................................................................................
3261 Modem .........................................................................................
Dial and Leased Line Transmit Levels .....................................................
Dial Line Transmit Level......................................................................
Leased Line Transmit Level .................................................................
Making Telephone-to-Modem Connections..............................................
Connecting an Exclusion Key Telephone ............................................
Telco Option (AT&J).................................................................................
Declaring the Jack Type ...............................................................................
Using the Modulus Backplane’s Busy Out Feature ......................................
C-2 Country-Specific Information
C-26
C-27
C-27
C-27
C-27
C-28
C-29
C-29
C-30
C-31
C-31
C-31
C-31
C-31
C-32
C-32
C-32
C-33
C-33
C-33
C-33
C-34
C-34
C-34
C-35
C-35
C-35
C-35
C-36
C-37
C-37
C-37
C-38
C-38
C-39
C-40
C-40
C-40
C-40
C-40
C-41
C-41
C-42
Introduction
This appendix provides information for operating the modem, by country, including:
• Restricted features summary, describing modem features that are restricted
or limited by regulatory agencies in some countries
• Installation Notes, containing information useful when installing the modem
in countries other than the U. S. A. and Canada
• Modem standalone rear panel views, and the countries supporting each view
• Modem rear panel interface pinouts
• Cables shipped to each country along with pinouts
• Delayed/Forbidden list operation in each country
• Country-specific information that applies only to: Canada, Denmark, Hong
Kong, the United Kingdom and the U. S. A.
Use the Universal International section if your country is not one of the following:
Australia
Belgium
Canada
Czech Republic
Denmark
Finland
France
Germany
Hong Kong
Ireland
Israel
Italy
Japan
Malaysia
Netherlands
Norway
Portugal
South Africa
Spain
Sweden
Switzerland
United Kingdom
U. S. A.
NOTE: References to the 326X Series Modem apply to 326X V.32bis, 326X, and
326X-SDC Series Modems, unless stated otherwise.
Country Support
Country approval is an ongoing process. If you have questions about approval and
availability in your country, contact a Motorola sales representative or distributor.
Country-Specific
Information
Country-Specific Information C-3
Installation Notes
This section provides information useful when installing the modem in countries
other than the U. S. A. and Canada.
Models 3265/3266
Warning
Ports that are capable of connecting to other apparatus are
defined as SELV. To ensure conformity with EN60950 - ensure
that these ports are only connected to ports of the same type on
other apparatus.
Avertissement
Les ports qui sont susceptibles d’être connectés à des équipements sont désignés comme TBTS. Pour garantir la conformité
à la norme EN 60950, n’interconnecte ces ports qu’avec des
ports du même type sur des autres matériels.
Warnung
Anschlusse, die mit anderen Geraten verbindet werden konnen, sind als SELV beschrieben. Um Konformitat mit EN
60950 zu versichern, sichern Sie es, daß diese Anschlusse nur
mit den des selben Type auf anderen Geraten verbindet werden.
All Models
These units are not suitable for connection to an IT power distribution system, nor
for use in a host device which is connected to an IT power distribution system.
Country-Specific
Information
Restricted Features Summary
This section summarizes restricted features, by country, as follows:
• If an entry is blank, the feature is unrestricted.
• If an entry reads “Restricted,” the feature is not allowed.
• If the entry says that a feature is Always=x, the feature is enabled and cannot be
changed by the user. X is also the default option.
• If the entry shows front panel settings and AT command settings, only the listed
settings are allowed. (Settings not listed are restricted.)
C-4 Country-Specific Information
In the following example, Answer can be set only to Manual (AT AA0), Ring
#1 (AT AA1), and Ring #2 (AT AA2). Other settings are restricted.
*
*
Setting
AT Command
Manual
AT
Ring #1
Ring #2
*
AA0
*
AT AA1
*
AT AA2
*
NOTE: Refer to later sections in this appendix for information on using the
modem in the U. S. A.
Country-Specific
Information
Country-Specific Information C-5
Feature
Australia
Austria
ATH
Test
ATX
Call Progress
AT&D7
108.2/Bsy
AT&G
Guard Tone
Test=Busy Out (ATH1)
Restricted in 3265/6
Test=Busy Out (ATH1)
Restricted in all models
AT&J
Telco
AT&P
Pulse Cycle
AT AA
Answer
Country-Specific
Information
Restricted
Always=1800 (AT&G1)
in 3265/67
550
1800
in:
Restricted
550
1800
in
Always=33%, AT&P1
*AA0
*AA2
Restricted
Restricted
Always=40%, AT&P0
Always=33%, AT&P1
*
*
*
Always=4 sec
AT BD1
*
*
Always=4 sec
*
*
*
*
Restricted in 3265/6
Restricted
AT
AT
*
Manual
AT
Ring #1
AT
Ring #2
AT
Always=4 sec
AT BD1
7 sec
AT
3 sec
AT
6 sec
AT
4 sec
AT
3 sec
AT
*AA0
*AA1
*AA2
Manual
Ring #1
Ring #2
Restricted
*CD2
*CD1
*DD3
*DD2
*DD1
Always=20 sec
AT DD6
Off
1
2
...
8
*DR0
*DR1
*DR2
*DR8
*
Always=6 sec
AT DD3
*
Off
1
2
3
AT&G1
AT&G2
3266/8
AT&G1
AT&G2
3266/8
Manual
Ring #2
AT DP
Pause Delay
AT DR
Auto Redial
Canada
Test=Busy Out (ATH1)
Restricted in 3268
Always=4, ATX4
*
AT BD
Blind Dial
AT CD
Loss Dis
AT DD
Dial Wait
Belgium
*DR0
*DR1
*DR2
*DR3
AT
AT
AT
AT
AT
AT
AT
...
AT
AT LL
LAL Busy Out
AT LN
DTE Pin 25
AT TL
Tone Length
AT TT
Call Timeout
DL TX Level
Restricted in 3265/6
Restricted
Always=72 ms
AT TL0
30 sec
AT
60 sec
AT
Always=-10dBm
Always=72 ms
AT TL0
30 sec
AT
60 sec
AT
Always=-9dBm
LL TX Level
Always=-13dBm
Always=-9dBm
*
*TT0
*TT2
C-6 Country-Specific Information
*
AT
AT
AT
*AA0
*AA1
*AA2
2 sec
4 sec
6 sec
S7
*
Off
1
2
3
AT
AT
AT
AT
*DD0
*DD2
*DD3
*DD9
*DR0
*DR1
*DR2
*DR3
AT
AT
AT
AT
Restricted in 3268
Restricted in 3268
*TT0
*TT2
Always=72 ms
AT TL0
30 sec
AT
60 sec
AT
Always=-6dBm
*
Always=-6dBm
*TT0
*TT2
*
*
30 sec
AT TT0
45 sec
AT TT1
Not supported. Select dial
line transmit level using
Telco option (TELCO
OPTS menu)
Set to 0dBm; adjustable
from
0 to -15 dBm
Feature
Czech Republic and
Poland
ATH
Test
Test=Busy Out (ATH1)
Restricted in all models
ATX
Call Progress
AT&D7
108.2/Bsy
AT&G
Guard Tone
AT&J
Telco
AT&P
Pulse Cycle
*
AT DR
*Redial
Auto
Restricted
Always=4, ATX4
Restricted
Restricted
Always=33%
AT&P1
Always=40%
AT&P0
AT
AT
AT
AT
AT
AT
*AA0
*AA1
*AA2
*AA5
*BD0
*BD1
Manual
Ring #2
Using S0
2 sec
AT
AT
4 sec
AT
6 sec
AT
15 sec
AT
20 sec
Always=3 sec
*DD0
*DD2
*DD3
*DD5
*DD6
4 sec
6 sec
15 sec
Using S7
Manual
Ring #1
Ring #2
Using S0
2sec
4sec
2 sec
4 sec
6 sec
Using S7
*DD1
*DD2
*DD3
*DD9
AT
AT
AT
AT
AT DP
Pause Delay
Off
1
2
...
8
*
*
... *
AT DR8
*
AT DR0
AT DR1
AT DR2
Restricted
DL TX Level
Always=-9 dBm
LL TX Level
Always=0 dBm
Off
1
2
...
8
Restricted
AT
AT
AT
AT
AT
AT
AT
AT
AT
AT
...
AT
*AA0
*AA2
*AA5
*DD2
*DD3
*DD5
*DD9
*DR0
*DR1
*DR2
*DR8
Always=72 ms
AT TL0
Always=72 ms
AT TL0
*
Always=33%
AT&P1
Manual
Ring #2
Restricted
AT
AT
*AA0
*AA2
Off
3 sec
AT
AT
*CD0
*CD1
6 sec
12 sec
*DD3
*DD4
AT DP0
AT*DP1
AT*DP2
AT*DP3
*
3 sec
6 sec
9 sec
12 sec
AT
AT
Restricted
Restricted
Restricted
30 sec
60sec
90 sec
Using S7
AT&G0
AT&G1
AT&G2
*
*
*
*
AT
AT
AT
AT
TT0
TT3
TT2
TT5
*
Always=72 ms
AT TL0
Always=72 ms
AT TL0
*
*
*
*
Always=-11dBm
Always=-11dBm
Always=-11 dBm
Always=-13dBm
AT
AT
TT0
TT2
30 sec
60 sec
90 sec
Using S7
AT
AT
AT
AT
TT0
TT3
TT2
TT5
AT
AT
*TT1
*TT2
*
*
*
*
Always=-11 dBm
45 sec
60 sec
30 sec
60 sec
Always=-10dBm
Country-Specific Information C-7
Country-Specific
Information
*
*
*
AT TT
Call*Timeout
AT LL
LAL Busy Out
AT LN
DTE Pin 25
AT TL
Tone Length
France
Test=Busy Out (ATH1)
Restricted in all models
550
1800
*
*
*
*
Finland
Restricted
AT AA
Answer
AT BD
Blind Dial
AT CD
Loss Dis
AT DD
Dial Wait
Denmark
Test=Busy Out (ATH1)
Restricted in Rel. 4.0 &
earlier; not restricted in
Rel. 4.1 & later
Always=4, ATX4
Feature
ATH
Test
ATX
Call Progress
AT&D7
108.2/Bsy
AT&G
Guard Tone
Germany
Hong Kong
Test=Busy Out (ATH1)
Restricted all models†
Ireland
Israel
Test=Busy Out (ATH1)
Restricted in 3265/6
Restricted
550
1800
in:
AT&G1
AT&G2
3265/7
Always=1800 (AT&G2)
in 3266/8
AT&J
Telco
AT&P
Pulse Cycle
*
AT AA
Answer
*
*
AT BD
Blind Dial
AT CD
Loss Dis
*
AT DD
Dial Wait
Restricted
Restricted
Restricted
Restricted
Always=40%
AT&P0
Always=33%
AT&P1
Always=33%
AT&P1
Always=40%
AT&P0
Manual
Ring #1
Ring #2
Ring #4
2 sec
4 sec
Off
3 sec
7 sec
2 sec
4 sec
6 sec
15 sec
20 sec
*AA0
*AA1
*AA2
*AA4
*BD0
*BD1
*CD0
*CD1
*CD2
*DD0
*DD2
*DD3
*DD5
*DD6
AT
AT
AT
AT
AT
AT
AT
AT
AT
AT
AT
AT
AT
AT
*
*
Country-Specific
Information
AT DP
Pause Delay
AT DR
Auto Redial
Manual
Ring #2
AT
AT
*AA0
*AA2
Always=6 sec
AT DD3
*
Off
1
2
3
AT
AT
AT
AT
*DR0
*DR1
*DR2
*DR3
Manual
Ring #1
Ring #2
AT
AT
AT
*AA0
*AA1
*AA2
Manual
Ring #2
AT
AT
*AA0
*AA2
3 sec
4 sec
6 sec
AT
AT
AT
*DD1
*DD2
*DD3
2 sec
4 sec
6 sec
Using S7
AT
AT
AT
AT
*DD1
*DD2
*DD3
*DD9
*DR0
*DR1
*DR2
*DR3
Restricted in 3265/6
Off
1
2
3
AT
AT
AT
AT
*
*
*
AT TT
Call*Timeout
Restricted
DL TX Level
Always=-10dBm
Always=-9dBm
Always=-8dBm
LL TX Level
Always=-6dBm
Always=-11dBm
Always=-12dBm
AT LL
LAL Busy Out
AT LN
DTE Pin 25
AT TL
Tone Length
Restricted
Restricted in 3265/6/8
Restricted in 3265/6
Always=72 ms
AT TL0
Always=72 ms
AT TL0
Always=72 ms
AT TL0
*
30 sec
60 sec
*TT0
*TT2
AT
AT
*
30 sec
60 sec
90 sec
180 sec
AT
AT
AT
AT
*TT0
*TT2
*TT3
*TT4
*
30 sec
60 sec
AT
AT
Always=72 ms
AT TL0
*
*
TT0
TT2
*
*TT0
*TT3
*TT2
TT5
*
Always=-9 dBm
30 sec
60 sec
90 sec
Using S7
AT
AT
AT
AT
Always=0 dBm
† NOTE: If you issue the ATD command without an attached telephone number, the modem responds: ERROR.
C-8 Country-Specific Information
Feature
Italy
Japan
Malaysia
ATH
Test
Netherlands
Test=Busy Out (ATH1)
Restricted all models
ATX
Call Progress
Always=4
ATX4
AT&D7
108.2/Bsy
Restricted
AT&G
Guard Tone
Restricted
AT&J
Telco
Restricted
Restricted
Restricted
Restricted
AT&P
Pulse Cycle
Always=38%
AT&P2
Always=33%
AT&P1
Always=33%
AT&P1
Always=38%
AT&P2
AT AA
Answer
*
Manual
Ring #2
Ring #4
*
AT CD
*Dis
Loss
AT DD
*Wait
Dial
4 Sec
Using S6
AT BD
Blind Dial
*
AT DR
*Redial
Auto
4 sec
6 sec
15 sec
Using S7
*AA0
*AA2
*AA4
AT BD1
*
AT BD2
*
AT
AT
AT
3 sec
4 sec
6 sec
*DR0
*DR1
*DR2
*DR3
*DR4
Off
1
2
AT
AT
AT
AT
AT
AT LL
LAL Busy Out
AT
AT
AT
AT
AT
AT
*DD1
*DD2
*DD3
*DR0
*DR1
*DR2
2 sec
4 sec
6 sec
Using S7
Off
1
...
8
*DD1
*DD2
*DD3
*DD9
AT
AT
AT
AT
15 sec
30 sec
40 sec
AT
AT
AT
*DD5
*DD7
*DD8
Always=3 sec
*DR0
*DR1
*DR8
AT
AT
...
AT
Restricted
Restricted
Always=72 ms
AT TL0
*
30 sec
Using S7
Always=72 ms
AT TL0
*
*
AT
AT
TT0
TT5
*
30 sec
45 sec
AT
AT
Always=72 ms
AT TL0
*
*
TT0
TT1
*
30 sec
60 sec
90 sec
Using S7
*
Always=-9 dBm
LL TX Level
Always=-13 dBm
Set to -15dBm; adjustable
from 0 to -15 dBm
Set to 0dBm; adjustable
from 0 to -15 dBm
*
*
*
*
AT
AT
AT
AT
AT PT
Dial
DL TX Level
Always=72 ms
AT TL0
TT0
TT3
TT2
TT5
*
Dial=Auto
Restricted
Always=-9 dBm
Always=-6dBm
Always=0 dBm
Always=-6dBm
Country-Specific Information C-9
Country-Specific
Information
*
AT LN
*Pin 25
DTE
AT TL
*Length
Tone
AT TT
Call*Timeout
Off
1
2
3
4
Restricted
*
*DD2
*DD3
*DD5
*DD9
AT
AT
AT
AT
AT DP
Pause Delay
Always=4 sec
AT BD1
Feature
Norway
ATH
Test
South Africa
Test=Busy Out (ATH1)
Restricted in all models
ATX
Call Progress
AT&D7
108.2/Bsy
AT&G
Guard Tone
Portugal
Test=Busy Out (ATH1)
Restricted in all models
Always=4, ATX4
Restricted
Restricted
Restricted
Always=1800 (AT&G1)
Models 3265/7
550
1800
in:
AT&G1
AT&G2
3266/8
AT&J
Telco
Restricted
Restricted
Restricted
Restricted
AT&P
Pulse Cycle
Always=40%, AT&P0
Always=33%, AT&P1
Always=33%, AT&P1
Always=33%, AT&P1
AT AA
Answer
*
Manual
Ring #1
Ring #2
Using S0
*
AT CD
*
Loss Dis
Restricted
AT BD
Blind Dial
*
AT DD
Dial Wait
Off
3 sec
7 sec
2 sec
4 sec
6 sec
15 sec
20 sec
*
AT DR
*
Auto Redial
AT DP
Pause Delay
Country-Specific
Information
Spain
*
AT LN
*
DTE Pin 25
AT TL
*
Tone Length
AT TT
*
Call Timeout
*AA0
*AA1
*AA2
*AA5
Manual
Ring #2
AT
AT
AT
AT
*CD0
*CD1
CD2
*
AT DD0
*
AT DD2
*
AT DD3
*
AT DD5
*
AT DD6
*
Always=4 sec
AT BD1
2 sec
4 sec
6 sec
Using S7
AT
AT
AT
AT
*DD0
*DD2
*DD3
*DD9
Always=72 ms
AT TL0
*
3 sec
4 sec
6 sec
*
AT
AT
AT
AT
*DR0
*DR1
*DR2
*DR3
Off
1
2
3
4
Restricted
Restricted
Restricted
Restricted
*
AT
AT
AT
AT
AT
*DR0
*DR1
*DR2
*DR3
*DR4
Always=72 ms
AT TL0
Always=72 ms
AT TL0
30 sec
AT
60 sec
AT
Always=-11dBm
Always=-6dBm
*
DL TX Level
30 sec
AT TT0
60 sec
AT TT2
Always=-10dBm
Always=-9dBm
*TT0
*TT2
Always=-9 dBm
LL TX Level
Always=-10dBm
Always=0dBm
Always=-13 dBm
C-10 Country-Specific Information
*CD1
*CD2
AT DD1
*
AT DD2
*
AT DD3
*
AT
AT
Always=4 sec
Always=72 ms
AT TL0
*
*
3 sec
7 sec
Always=6 sec
AT DD3
Off
1
2
3
AT LL
LAL Busy Out
*AA0
*AA2
Restricted
*
AT
AT
AT
AT
AT
30 sec
60 sec
AT
AT
*
*TT0
*TT2
Feature
Sweden
Switzerland
ATH
Test
ATX
Call Progress
AT&D7
108.2/Bsy
United Kingdom
Test=Busy Out (ATH1)
Restricted in Rel. 4.0 and
earlier; not restricted in
Rel. 4.1 and later
Always=4 ATX4
Universal
Test=Busy Out (ATH1)
Restricted
Always=4 (ATX4)
AT&G
Guard Tone
550
1800
in:
AT&G1
AT&G2
3265/7
Always=1800 (AT&G2)
in 3266/8
AT&J
Telco
Restricted
AT&P
Pulse Cycle
Always=40%
AT&P0
*
AT BD
* Dial
Blind
AT CD
*Dis
Loss
AT DD
*Wait
Dial
Restricted
Restricted
Always=33%
AT&P1
AT AA
Answer
Manual
Ring #2
AT
AT
Restricted
*AA0
*AA2
Always=4 sec
AT BD1
*
15 sec
30 sec
40 sec
*DD5
*DD7
*DD8
AT
AT
AT
*
AT DR
*Redial
Auto
AT DP
Pause Delay
6 sec
12 sec
AT
AT
*DD3
*DD4
Always=3 sec
Always=6 seconds
AT DD3
*
*
Always=4 sec
Off
1
2
3
AT
AT
AT
AT
AT LL
LAL Busy Out
*
*
*
2 sec AT DD0
4 sec AT DD2
6 sec AT DD3
S7 AT DD9
*DR0
*DR1
*DR2
*DR3
Restricted
Restricted
Always=72 ms
AT TL0
Always=72 ms
AT TL0
*
30 sec
*
*
DL TX Level
AT
60 sec
AT
Always=-13dBm
LL TX Level
Always=-13dBm
TT0
TT2
*
30 sec
AT
60 sec
AT
Always=-9dBm
Always=-6dBm
Always=72 ms
AT TL0
*
*
TT0
TT2
*
30 sec
Always=72 ms
AT TL0
AT
60 sec
AT
Always=-9dBm
*
*
Always=-13dBm
TT0
TT2
*
Set to -9dBm; adjustable
from
0 to -15 dBm
Set to 0dBm; adjustable
from
0 to -15 dBm
Country-Specific Information C-11
Country-Specific
Information
*
AT LN
*Pin 25
DTE
AT TL
*Length
Tone
AT TT
Call*Timeout
Restricted
Operating Notes
This section summarizes useful operating information.
• Restricted front panel option settings do not appear in front panel menus
• PC software communication packages often send fixed initialization strings to
the modem (via AT commands). These strings do not account for countryspecific modem restrictions.
To make software communication package installation easier, the modem
responds as follows:
— If you enter a restricted AT, AT , or AT& command for an option that is
completely restricted, the modem displays OK instead of ERROR. The
modem, does not, however, modify its configuration in this case.
*
IMPORTANT: The command does not change the modem
configuration. An OK lets the software package continue
communication with the modem. Some software packages may be
affected by this new functionality. Motorola recommends that you
change the initialization string of your software communication
package for the restricted options or option settings that may apply
in your country. Refer to the software package documentation for
further information.
— If you enter a restricted AT, AT , or AT& command for an option that
has some restricted settings, the modem displays ERROR
*
— If you enter a restricted V.25 bis command, the modem responds with the
INValid message, INV
Standalone Modem Rear Panel Views
Country-Specific
Information
This section shows rear panel views for models 3260, 3261, 3265, and 3266.
Following each illustration is a list of the countries that use that modem version.
NOTE: For Models 3262, 3263, 3267 and 3268, the addendum, 326X Series Modem
Cards (shipped with the modem backplane), contains enclosure card and backplane
information.
C-12 Country-Specific Information
3260 Dial Only Modem
3260 Modem Rear Panel (Dial Only)
Figure C-1 shows the rear panel of the 3260 dial only modem. This version is used
in:
• U. S. A. (Model 3260)
• Canada (Model 3265)
• Japan (Model 3265)
DIAL
LINE
PHONE
NC
1 2 3 4 5 6
1 ON 6
OUT
DTE
IN
Figure C-1. Rear Panel Layout - 3260 (Dial Only)
3261 Modem Rear View (Leased Line, Dial Restoral)
Figure C-2 shows the rear panel view of the 3261 leased line modem with dial
restoral. This version is used in:
• U. S. A. (Model 3261)
• Canada (Model 3266)
• Japan (Model 3266)
NOTE: 326X Series Modems for Canada and Japan are identical to Model 3261 for
the U. S. A. The model number of the modem for Canada and Japan is 3266. Canada
and Japan are included in this section with the view of the U.S.A. 3261 modem.
LEASE
LINE
Country-Specific
Information
PHONE
DIAL
LINE
NC
1 2 3 4 5 6
1 ON 6
OUT
IN
DTE
Figure C-2. Rear Panel Layout - 3261 (Leased Line with Dial Restoral)
Country-Specific Information C-13
3265 Dial Only Modem
This section shows rear panel views of the 3265 dial only modem, and the countries
using the layout.
3265 Modem Rear Panel—View A
Figure C-3 shows View A of the 3265 Modem. This version is used in:
• Australia
• Belgium
• Czech Republic
• Denmark
• Finland
• Ireland
• Israel
• Italy
• Malaysia
• Netherlands
• Norway
• Portugal
• South Africa
• Spain
• Universal International
DIAL
LINE
PHONE
NC
Country-Specific
Information
1 ON 6
OUT
IN
DTE
Figure C-3. View A Rear Panel Layout - 3265 (Dial Only)
C-14 Country-Specific Information
3265 Modem Rear Panel—View B
Figure C-4 shows View B of the 3265 Modem. This version is used in Germany and
Austria.
DIAL
LINE
NC
1 ON 6
OUT
IN
DTE
Figure C-4. View B Rear Panel Layout - 3265 (Dial Only)
3265 Modem Rear Panel—View C
Figure C-5 shows View C of the 3265 Modem. This version is used in Hong Kong
and the United Kingdom.
DIAL
LINE
PHONE
NC
1 ON 6
OUT
IN
DTE
Figure C-5. View C Rear Panel Layout - 3265 (Dial Only)
3265 Modem Rear Panel—View D
Figure C-6 shows View D of the 3265 Modem. This version is used in France,
Sweden, and Switzerland.
Country-Specific
Information
DIAL
LINE
NC
1 ON 6
OUT
IN
DTE
Figure C-6. View D Rear Panel Layout - 3265 (Dial Only)
Country-Specific Information C-15
3266 Modem (Leased Line with Dial Restoral)
This section shows three rear panel views of the 3266 leased line modem with dial
restoral, and the countries using the layout.
3266 Modem Rear Panel—View A
Figure C-7 shows View A of the 3266 Modem. This version is used in:
• Australia
• Belgium
• Czech Republic
• Denmark
• Finland
• France
• Ireland
• Israel
• Italy
• Malaysia
• Netherlands
• Norway
• Portugal
• South Africa
• Spain
• Sweden
• Switzerland
• Universal International
Country-Specific
Information
DIAL
LINE
PRIVATE
LINE
NC
1 ON 6
OUT
IN
DTE
Figure C-7. View A Rear Panel Layout - 3266 (Leased Line with Dial Restoral)
C-16 Country-Specific Information
3266 Modem Rear Panel—View B
Figure C-8 shows View B of the 3266 Modem. This version is used in Germany and
Austria.
DIAL
LINE
PRIVATE
LINE
NC
1 ON 6
OUT
IN
DTE
Figure C-8. View B Rear Panel Layout - 3266 (Leased Line with Dial Restoral)
3266 Modem Rear Panel—View C
Figure C-9 shows View C of the 3266 Modem. This version is used in Hong Kong
and the United Kingdom.
DIAL
LINE
PRIVATE
LINE
NC
1 ON 6
OUT
IN
DTE
Figure C-9. View C Rear Panel Layout - 3266 (Leased Line with Dial Restoral)
For an Illustration of the Enclosure Card Backplane...
Refer to the addendum, 326X Series Modem Cards, shipped with the backplane.
Country-Specific
Information
Country-Specific Information C-17
Rear Panel Interface Pinouts
This section shows the rear panel interface pinouts for the modem stand-alone
models 3260, 3261, 3265, and 3266, and enclosure card models 3262, 3263,
3267, and 3268.
Standalone Models 3260/65 and 3261/66 Interface Pinouts
This section shows the pinouts for the standalone modem’s rear panel connectors.
Dial Line Interface (Models 3260/3265)
Dial line connection is made via the DIAL LINE interface on the modem’s rear
panel. Table C-1 describes DIAL LINE connector pinouts.
Table C-1.
Dial Line Interface (Models 3260/3265)
Dial Line
Connector Pin
Canada/
U. S. A.*
Hong Kong/
United Kingdom
Germany/
Austria
All Other
Countries
1
MB
Not Used
LA
Not Used
2
MB1
Telset B
Not Used
Not Used
3
MI
Bell Shunt
Ring Indicator
Telset Ring
4
Ring
Not Used
LB
Ring
5
Tip
Telset A
b2
Tip
6
MIC
Not Used
Not Used
Telset Tip
7
PR
Not Used
Not Used
8
PC
a2
Not Used
*Refer to Canada/U. S. A. country-specific sections for rear panel pinouts cross-referenced with telco
jack selections.
2-Wire Leased Line Interface (Models 3260/3265)
2-wire leased line connections are made via the DIAL LINE interface on the rear
panel. Table C-2 describes 2-wire leased line interface pinouts.
Country-Specific
Information
Table C-2.
2-Wire Leased Line Interface (Models 3260/3265)
Leased Line
Connector Pin
Canada/
U. S. A.*
Hong Kong/
Germany/
United Kingdom Austria
All Other
Countries
1
Not Used
Not Used
Not Used
LA
2
Not Used
B
Not Used
Not Used
3
Not Used
Not Used
Not Used
Not Used
4
Ring
Not Used
LB
Ring
5
Tip
A
Not Used
Tip
6
Not Used
Not Used
Not Used
Not Used
7
Not Used
Not Used
Not Used
8
Not Used
Not Used
Not Used
*Refer to Canada/U. S. A. country-specific sections for rear panel pinouts cross-referenced with telco
jack selections.
C-18 Country-Specific Information
Phone Connector Interface (Models 3260/3265)
Connection to an external telephone can be made using the PHONE connector on the
modem’s rear panel. Table C-3 describes PHONE connector interface pinouts.
Table C-3.
Phone Line Interface (Models 3260/3265)
Phone Line
Connector Pin
Canada/
U. S. A.*
Hong Kong/
United Kingdom
All Other
Countries
1
Not Connected
Not Used
Not Used
2
Not Connected
B
Not Used
3
MI
Bell Shunt
Not Used
4
Ring
Not Used
Telset Ring
5
Tip
A
Telset Tip
6
MIC
Not Used
7
Not Connected
Not Used
8
Not Connected
Not Used
Not Used
*Refer to Canada/U. S. A. country-specific sections for rear panel pinouts cross-referenced with telco
jack selections.
Dial Line Interface (Models 3261/3266)
Dial line connection is made via the DIAL LINE interface on the modem’s rear
panel. Table C-4 describes DIAL LINE connector pinouts.
Table C-4.
Dial Line Interface (Models 3261/3266)
Germany/
Austria
Hong Kong/
United Kingdom Japan
All Other
Countries
1
MB
LA
Not Used
Not Used
Not Used
2
MB1
Not Used
B
Not Used
Not Used
3
M1
Ring
Indicator
Bell Shunt
Not Used
Telset Ring
4
Ring
LB
Telset Ring
Ring
Ring
5
Tip
b2
A
Tip
Tip
6
MIC
Not Used
Telset Tip
Not Used
Telset Tip
7
PR
Not Used
Not Used
Not Used
8
PC
a2
Not Used
Not Used
2-Wire Leased Line Interface (Models 3261/3266)
2-wire leased line connections are made via the LEASE LINE interface on the
modem’s rear panel. Table C-5 describes 2-wire leased line interface pinouts.
Table C-5.
2-Wire Leased Line Interface (Models 3261/3266)
Leased Line
Connector Pin
Canada/
U. S. A.
Germany/ Hong Kong/
Austria
United Kingdom Japan
All Other
Countries
1
Ring
Tip
Tip
Ring
Ring
2
Tip
Ring
Not Used
Tip
Tip
Country-Specific Information C-19
Country-Specific
Information
Dial Line
Connector Canada/
Pin
U. S. A.
Table C-5.
2-Wire Leased Line Interface (Models 3261/3266)
Leased Line
Connector Pin
Canada/
U. S. A.
Germany/ Hong Kong/
Austria
United Kingdom Japan
All Other
Countries
3
Not Used
Not Used
Not Used
Not Used
Not Used
4
Not Used
Not Used
Not Used
Not Used
Ring
5
Not Used
Not Used
Not Used
Not Used
Tip
6
Not Used
Not Used
Ring
Not Used
Not Used
7
Not Used
Not Used
Not Used
Not Used
8
Not Used
Not Used
Not Used
Not Used
4-Wire Leased Line Interface (Models 3261/3266)
4-wire leased line connections are made via the LEASE LINE interface on the
modem’s rear panel. Table C-6 describes 4-wire leased line interface pinouts.
Table C-6.
4-Wire Leased Line Interface (Models 3261/3266)
Canada/
U. S. A.
Germany/
Austria
Hong Kong/
United Kingdom Japan
All Other
Countries
1
TX Ring
TX Tip
TX Tip
TX Ring
TX Ring
2
TX Tip
TX Ring
RX Tip
TX Tip
TX Tip
3
Not Used
Not Used
Not Used
Not Used
RX Tip
4
Not Used
Not Used
Not Used
Not Used
TX Ring
5
Not Used
RX Tip
RX Ring
Not Used
TX Tip
6
Not Used
RX Ring
TX Ring
Not Used
RX Ring
7
RX Tip
Not Used
RX Tip
RX Tip
8
RX Ring
Not Used
RX Ring
RX Ring
Country-Specific
Information
Leased Line
Connector
Pin
C-20 Country-Specific Information
Phone Connector Interface (Models 3261/3266)
Connection to an external telephone can be made using the PHONE connector on the
modem’s rear panel. Table C-7 describes PHONE connector interface pinouts.
Table C-7.
Phone Line Interface (Models 3261/326)
Phone Line
Connector Pin
Canada/U. S. A.
Japan
1
Not Connected
Not Used
2
Not Connected
Not Used
3
MI
Not Used
4
Ring
Telset Ring
5
Tip
Telset Tip
6
MIC
Not Used
7
Not Connected
Not Used
8
Not Connected
Not Used
Card Models 3262/67, 3263/68 Backplane Interface Pinouts
Dial Line Interface (All Card Models)
Dial line connection is made via the DIAL LINE A and DIAL LINE B interfaces.
Table C-8 describes DIAL LINE connector pinouts.
Table C-8.
Dial Line Interface (All Card Models)
Dial Line A and
Dial Line B
Connector Pin
All Other
Countries
1
MB
Not Used
Not Used
2
MB1
U.K. Bell
Not Used
3
MI
Telset Ring
Telset Ring
4
Ring
Ring
Ring
5
Tip
Tip
Tip
6
MIC
Telset Tip
Telset Tip
7
PR
Not Connected
Not Used
8
PC
Not Connected
Not Used
Country-Specific Information C-21
Country-Specific
Information
Canada/U. S. A.
Hong Kong/
South Africa/
United Kingdom
2-Wire Leased Line Interface (Models 3262/3267)
2-wire leased line connections are made via the 2W LEASE interface for modem A,
and via the 2W/4W LEASE interface for modem B. Table C-9 describes 2-wire
leased line interface pinouts.
Table C-9.
2-Wire Leased Line Interface (Models 3262/3267)
2-Wire Lease and
2- and 4-Wire Lease
Connector Pin
Canada/U. S. A.
Hong Kong/
South Africa/
United Kingdom
All Other
Countries
1
Not Used
Not Used
Not Used
2
Not Used
Not Used
Not Used
3
Not Used
Not Used
Not Used
4
Ring
Ring
Ring
5
Tip
Tip
Tip
6
Not Used
Not Used
Not Used
7
Not Used
Not Connected
Not Used
8
Not Used
Not Connected
Not Used
2-Wire Leased Line Interface (Models 3263/3268)
2-wire leased line connections are made via the 2W/4W LEASE interface.
Table C-10 describes 2-wire leased line interface pinouts.
Country-Specific
Information
Table C-10.
2-Wire Leased Line Interface (Models 3263/3268)
2- and 4-Wire Lease
Connector Pin
Canada/Japan/
U. S. A.
Hong Kong/
South Africa/
United Kingdom
All Other
Countries
1
Ring
Not Used
Ring
2
Tip
Not Used
Tip
3
Not Used
Not Used
Not Used
4
Not Used
Tip
Ring
5
Not Used
Ring
Tip
6
Not Used
Not Used
Not Used
7
Not Used
Not Connected
Not Used
8
Not Used
Not Connected
Not Used
4-Wire Leased Line Interface (Models 3263/3268)
4-wire leased line connections are made via the 2W/4W LEASE interface.
Table C-11 describes 4-wire leased line interface pinouts.
Table C-11.
4-Wire Leased Line Interface (Models 3263/3268)
Dial Line
Connector Pin
Canada/Japan/
U. S. A.
Hong Kong/
South Africa/
United Kingdom
All Other
Countries
1
TX Ring
Not Used
TX Ring
2
TX Tip
Not Used
TX Tip
C-22 Country-Specific Information
Table C-11.
4-Wire Leased Line Interface (Models 3263/3268)
Dial Line
Connector Pin
Canada/Japan/
U. S. A.
Hong Kong/
South Africa/
United Kingdom
3
Not Used
RX Tip
RX Tip
4
Not Used
TX Tip
TX Ring
5
Not Used
TX Ring
TX Tip
6
Not Used
RX Ring
RX Ring
All Other
Countries
7
RX Tip
Not Connected
RX Tip
8
RX Ring
Not Connected
RX Ring
Delayed and Forbidden Lists
When operating in certain countries, the modem processes call attempt failures as
delayed and forbidden calls. This section describes how delayed/forbidden lists
operate in each country that supports this feature.
Australia—Delayed Call Lists
The modem processes call attempt failures as delayed calls, according to PTT
regulations. Before dialing a number, the modem determines whether:
• The number is on the delayed list
• The delayed list is full (the list holds 10 numbers)
In either case, the number is not dialed. When the modem is turned off and then on
again, the lists are cleared, and the numbers can be dialed.
After dialing, the modem processes the following call failures as delayed calls:
• The modem receives a busy tone after dialing a call
• The call is not answered within the time in the Call Timeout (AT TT) option
*
Austria—Forbidden Call Lists
The modem processes call attempt failures as forbidden calls, according to PTT
regulations. Before dialing a number, the modem determines whether:
• The number is on the forbidden list
• The forbidden list is full (the list holds 16 numbers)
In either case, the number is not dialed. When the modem is turned off and then on
again, the lists are cleared, and the numbers can be dialed.
Country-Specific Information C-23
Country-Specific
Information
For these call failure conditions, nine subsequent redial attempts are allowed. If the
redial call attempts are unsuccessful after a total of 10 calls, the number is placed on
the delayed list. Then it cannot be dialed for 30 minutes. After 30 minutes, the
number is available for dialing.
After dialing, the modem processes the following call failures as forbidden calls:
• The modem receives a busy tone after dialing a call, or
• The call is not answered within the time in the Call Timeout (AT TT) option
*
For these call failure conditions, 11 subsequent redial attempts are allowed. If either
of the above call failure conditions occur more than 12 times, the number is placed
on the forbidden list, and calls to this number are not allowed.
Belgium—Delayed Call Lists
The modem processes call attempt failures as delayed calls, according to PTT
regulations. Before dialing a number, the modem determines whether:
• The number is on the delayed list
• The delayed list is full (the list holds 16 numbers)
In either case, the number is not dialed. When the modem is turned off and then on
again, the lists are cleared, and the numbers can be dialed.
After dialing, the modem processes the following call failures as delayed calls:
• The modem receives a busy tone after dialing a call
• The call is not answered within the time in the Call Timeout (AT TT) option.
*
Country-Specific
Information
For these call failure conditions, three subsequent redial attempts are allowed. If the
redial call attempts are unsuccessful after a total of four calls, within one hour, the
number is placed on the delayed list. Then it cannot be dialed for 60 minutes. After
60 minutes, the number is available for dialing.
C-24 Country-Specific Information
Finland—Delayed Call Lists
The modem processes call attempt failures as delayed calls, according to PTT
regulations. Before dialing a number, the modem determines whether:
• The number is on the delayed list
• The delayed list is full (the list holds 16 numbers)
In either case, the number is not dialed. When the modem is turned off and then on
again, the lists are cleared, and the numbers can be dialed.
After dialing, the modem processes the following call failures as delayed calls:
• The modem receives a busy tone after dialing a call
• The call is not answered within the time in the Call Timeout (AT TT) option
*
For these call failure conditions, four subsequent redial attempts are allowed. If the
redial call attempts are unsuccessful after a total of five calls, within one hour, the
number is placed on the delayed list. Then it cannot be dialed for 60 minutes. After
60 minutes, the number is available for dialing.
France—Delayed and Forbidden Call Lists
The modem processes call attempt failures as delayed and forbidden calls, according
to PTT regulations. Before dialing a number, the modem determines whether:
• The number is on the delayed or forbidden list
• The delayed or forbidden lists are full (the list holds 16 numbers)
In either case, the number is not dialed. When the modem is turned off and then on
again, the lists are cleared, and the numbers can be dialed.
The following criteria determine on which list the number is placed:
• Delayed List. The modem detects one of the following “delay conditions:”
— The modem receives a busy tone after dialing a call
— The call is not answered within the time in the Call Timeout (AT TT)
option
*
• Forbidden List. The modem detects a “forbidden condition:”
— A call is dialed by the modem, and answered by a remote modem, but an
Answer Back Tone (ABT) is not detected by the calling modem
— A call is manually aborted via the front panel or the V.25 bis ACU
If the modem detects two occurrences of a forbidden condition for a number
within a 2-minute period, the number is placed on the forbidden list and no
calls are allowed to this number. If the call is successfully dialed within the
Country-Specific Information C-25
Country-Specific
Information
If one or both of these conditions is detected for six consecutive calls, the
number is placed on the delayed list. Then it cannot be dialed for 60 minutes.
After 60 minutes, the number is available for dialing.
2-minute period, the forbidden condition is cleared. If not, the number remains
on the forbidden list, and calls to this number are not allowed until the modem
is powered down and then turned on again.
Hong Kong—Delayed Call Lists
The modem processes call attempt failures as delayed calls, according to PTT
regulations. Before dialing a number, the modem determines whether:
• The number is on the delayed list
• The delayed list is full (the list holds five numbers)
In either case, the number is not dialed. When the modem is turned off and then on
again, the lists are cleared, and the numbers can be dialed.
After dialing, the modem processes the following call failures as delayed calls:
• The modem receives a busy tone after dialing a call
• The call is not answered within the time in the Call Timeout (AT TT) option
*
For these call failure conditions, three subsequent redial attempts are allowed. If the
redial call attempts are unsuccessful after a total of four calls, the number is placed
on the delayed list. Then it cannot be dialed for 15 minutes. After 15 minutes, the
number is available for dialing.
Ireland—Delayed Call Lists
The modem processes call attempt failures as delayed calls, according to PTT
regulations. Before dialing a number, the modem determines whether:
• The number is on the delayed list
• The delayed list is full (the list holds 16 numbers)
In either case, the number is not dialed. When the modem is turned off and then on
again, the lists are cleared, and the numbers can be dialed.
Country-Specific
Information
After dialing, the modem processes the following call failures as delayed calls:
• The modem receives a busy tone after dialing a call, or
• The call is not answered within the time in the Call Timeout (AT TT) option
*
For these call failure conditions, three subsequent redial attempts are allowed. If the
redial call attempts are unsuccessful after a total of four calls, within one hour, the
number is placed on the delayed list. Then it cannot be dialed for 60 minutes. After
60 minutes, the number is available for dialing.
C-26 Country-Specific Information
Netherlands—Delayed Call Lists
The modem processes call attempt failures as delayed calls, according to PTT
regulations. Before dialing a number, the modem determines whether:
• The number is on the delayed list
• The delayed list is full (the list holds 16 numbers)
In either case, the number is not dialed. When the modem is turned off and then on
again, the lists are cleared, and the numbers can be dialed.
After dialing, the modem processes the following call failures as delayed calls:
• The modem receives a busy tone after dialing a call, or
• The call is not answered within the time in the Call Timeout (AT TT) option
*
For these call failure conditions, 14 subsequent redial attempts are allowed. If the
redial call attempts are unsuccessful after a total of 15 calls, within one hour, the
number is placed on the delayed list. Then it cannot be dialed for 60 minutes. After
60 minutes, the number is available for dialing.
Norway—Delayed Call Lists
The modem processes call attempt failures as delayed calls, according to PTT
regulations. Before dialing a number, the modem determines whether:
• The number is on the delayed list
• The delayed list is full (the list holds 16 numbers)
In either case, the number is not dialed. When the modem is turned off and then on
again, the lists are cleared, and the numbers can be dialed.
After dialing, the modem processes the following call failures as delayed calls:
• The modem receives a busy tone after dialing a call
• No dial tone was detected
• The call is not answered within the time in the Call Timeout (AT TT) option
*
Country-Specific Information C-27
Country-Specific
Information
For these call failure conditions, nine subsequent redial attempts are allowed. If the
redial call attempts are unsuccessful after a total of ten calls, the number is placed on
the delayed list. Then it cannot be dialed for 30 minutes. After 30 minutes, the
number is available for dialing.
Spain—Delayed Call Lists
The modem processes call attempt failures as delayed calls, according to PTT
regulations. Before dialing a number, the modem determines whether:
• The number is on the delayed list
• The delayed list is full (the list holds 16 numbers)
In either case, the number is not dialed. When the modem is turned off and then on
again, the lists are cleared, and the numbers can be dialed.
After dialing, the modem processes the following call failures as delayed calls:
• The modem receives a busy tone after dialing a call
• The call is not answered within the time in the Call Timeout (AT TT) option
*
For these call failure conditions, three subsequent redial attempts are allowed. If the
redial call attempts are unsuccessful after a total of four calls, the number is placed
on the delayed list. Then it cannot be dialed for 60 minutes. After 60 minutes, the
number is available for dialing.
Other Country-Specific Information
This section contains information that applies to the following countries:
• Canada
• Denmark
• Hong Kong
• Spain
• United Kingdom
• U. S. A.
Country-Specific
Information
Canada
DOC Registration and Requirements
To comply with the Department of Communications (DOC) registration
requirements, you must give the following information to the telephone company:
• Manufacturer and modem model number: 3265, 3266, 3267, or 3268
• Telephone number(s) to which the modem will be connected
• DOC Registration Number: 725-3906A (Model 3265), 725-3906AB
(Model 3266), 725 4124 AB (Models 3267/3268)
• Load Number: 4
C-28 Country-Specific Information
Industry Canada Equipment Attachment Limitations
The Industry Canada label on equipment means it has been tested and found to meet
requirements for telecommunications operation and safety in Canada. The label does
not guarantee, however, that the equipment will operate to your satisfaction.
Repairs to certified equipment should be made by an authorized Motorola agent. If
the equipment malfunctions due to any unauthorized repair or alteration, the
telecommunications company may request that you disconnect the equipment.
Ensure that connection to local telecommunications company facilities is permissible
and that the equipment is installed properly. Compliance with the above conditions
may not prevent degradation of service in some situations.
Ground connections for power and telephone lines should be wired to a single
ground line. This may be particularly important in rural areas. These connections
should be made by a qualified electrician. If already installed, the connections should
be inspected by the appropriate electrical inspection authority.
To prevent circuit overload, each piece of equipment is assigned a Load Number
(LN), which denotes the percentage of the total load used by the device in a
telephone loop. This equipment has a load number of 4. You may use any
combination of devices on a loop, subject only to the requirement that the total of
the load numbers of all the devices does not exceed 100.
The standard connecting arrangement codes for the equipment are as follows:
CA02B, CA11A, CA40A, CA41A, and CA45A.
Canadian Emissions Statement
This Class A digital apparatus meets all requirements of the Canadian Interference
Causing Equipment Regulations.
Cet appareil numérique de la classe A respecte toutes les exigences du Règlement
sur le mteriél brouilleur du Canada.
Country-Specific
Information
Country-Specific Information C-29
Rear Panel Pinouts
This section provides the rear panel pinouts for the 3265/3266 Modem,
cross-referenced to the pinouts for the telco jacks supported in Canada.
3265 Modem
Table C-12 describes dial line connector pinouts for RJ jack types.
Table C-12.
DIAL LINE Connector Pinouts for Jack Operation
Telco Jack Selection
Dial Line
Dial Line
Connector Jack
Pin No.
Function
RJ4MB
RJ45S
(CA45A)
RJ16C
RJ11C
(CA11A)
Leased
Line
1
MB
X
Not Used
Not Used
Not Used
Not Used
2
MB1
X
Not Used
Not Used
Not Used
Not Used
3
MI
X
X
X
Not Used
Not Used
4
Ring
X
X
X
X
X
5
Tip
X
X
X
X
X
6
MIC
X
X
X
Not Used
Not Used
7
PR
X
X
Not Used
Not Used
Not Used
8
PC
X
X
Not Used
Not Used
Not Used
X = active signal.
Table C-13 describes PHONE connector pinouts for RJ jack types.
Table C-13.
PHONE Connector Pinouts for Jack Operation
Country-Specific
Information
Telco Jack Selection
Phone
Connector
Pin No.
Phone Jack
Function
RJ4MB
RJ45S
(CA45A)
RJ16C
RJ11C
(CA11A)
1
N/C
N/C
N/C
N/C
N/C
2
N/C
N/C
N/C
N/C
N/C
3
MI
X
X
X
Not Used
4
Ring
X
X
X
X
5
Tip
X
X
X
X
6
MIC
X
X
X
Not Used
7
N/C
N/C
N/C
N/C
N/C
8
N/C
N/C
N/C
N/C
N/C
N/C = Not Connected. X = active signal.
C-30 Country-Specific Information
3266 Modem
Table C-14 describes dial line connector pinouts for RJ jack types.
Table C-14.
DIAL Line Connector Pinouts for Jack Operation
Dial Line
Connector Pin
No.
Dial Line
Jack
Function
RJ4MB
Telco Jack Selection
RJ45S
RJ11C
(CA45A)
RJ16C
(CA11A)
1
MB
X
Not Used
Not Used
Not Used
2
MB1
X
Not Used
Not Used
Not Used
3
MI
X
X
X
Not Used
4
Ring
X
X
X
X
5
Tip
X
X
X
X
6
MIC
X
X
X
Not Used
7
PR
X
X
Not Used
Not Used
8
PC
X
X
Not Used
Not Used
X = active signal.
Table C-15 describes the Phone connector pinouts for RJ jack types.
Table C-15.
PHONE Connector Pinouts for Jack Operation
RJ4MB
Telco Jack Selection
RJ45S
(CA45A)
RJ16C
RJ11C
(CA11A)
N/C
N/C
N/C
N/C
N/C
N/C
N/C
N/C
N/C
N/C
3
MI
X
X
X
Not Used
4
Ring
X
X
X
X
5
Tip
X
X
X
X
6
MIC
X
X
X
Not Used
7
N/C
N/C
N/C
N/C
N/C
8
N/C
N/C
N/C
N/C
N/C
Phone
Connector
Pin No.
Phone
Jack
Function
1
2
N/C = Not Connected. X = active signal.
Telco displays only on U.S.A. and Canadian 326X Series Modems. It is used to
select the RJ-jack type. Telco corresponds to the AT&J command as follows:
Front Panel
Option Setting
AT Command
Option Setting
RJ11C
0, 1
RJ45S
2
RJ16C
3
RJ4MB
4
Country-Specific Information C-31
Country-Specific
Information
Telco Option (AT&J)
Denmark—Blind Dialing
326X Series Modem users in Denmark must comply with the requirements in the
“Regulation Regarding Teleterminal Equipment” (No. 882, October 29, 1992),
available from the Danish Minister of Communications.
The setup of the modem must comply exactly with the restrictions within this
Denmark section and as specified in the Restricted Features Summary in this guide.
The factory default settings are in accordance with this requirement, and the modem
is shipped from Motorola with compliant settings.
Hong Kong and United Kingdom—BABT Regulations
The following sections outline the BABT regulations as they relate to Motorola
3265 and 3266 Modem operation in Hong Kong and the United Kingdom.
Compliance with BS6328: Part 1: 1982 Section 8.3
This modem is not suitable for use with circuits employing British
Telecommunications (BT) signaling of 2280 Hz.
The equipment detailed in this guide is designed for use on a 2- or 4-wire pointto-point private circuit. It is not suitable for omnibus or multipoint circuits.
The frequency range of DC to 200 Hz is not used.
Compliance with BS6328: Part 1: 1982 Section 8.7
Country-Specific
Information
There is no DC interaction between the modem and the British Telecommunications
private circuit.
C-32 Country-Specific Information
Compliance with BABTSITS/82/01/C and BABT/SITS/
82005S/D
The approval of this modem for connection to British Telecommunications private
speechband circuits is invalid if the apparatus is subject to any modification not
authorized by the British Approvals Board of Telecommunications (BABT) or if it is
used with or connected to any of the following:
• Internal software that has not been formally accepted by BABT.
• External software or external control apparatus that causes the operation of the
modem or associated call setup equipment to contradict the requirements of the
standards set out in BABT/SITS/82/01/C or BABT/SITS/82/005S/D.
All apparatus connected to this modem and thereby connected directly or indirectly
to British Telecommunications private speechband circuits must be approved
apparatus as defined in Section 16 of the British Telecommunications Act of 1981.
Compliance with BS6305 Clause 6.2, BS6320 Clause 7.2
The modem is suitable for connection to the public switched telephone network
(PSTN) provided by British Telecommunications PLC or Hull City Council
Telephone Department.
The modem is suitable for household, office, and general indoor use. It is not suitable
for use as an extension to a pay phone, shared service, or 1+1 carrier systems.
The modem has been approved for the use of the following facilities:
• Loop disconnect and MF signaling
• Auto answer
• Auto calling
You may connect the modem to a BT line that has loop-disconnect or MF signaling.
Ringer Equivalence Number (REN)
This modem has a REN value of 3.
Country-Specific Information C-33
Country-Specific
Information
The REN is a customer guide that indicates, in approximate terms, the maximum
number of items that may be connected simultaneously to a telephone line. The
REN, obtained by summing the REN values of each of the items of apparatus
connected to the exchange line, should not exceed 4. This value includes BTprovided instruments, each of which is assumed to have a REN of 1.0 unless
otherwise marked.
Compliance with BABT/SITS/83/08/A Clause 1.2
The modem cannot allow Auto Call using “999” or other PABX emergency
numbers.
Modes other than 1, 2, or 3 should not be used on the BT PSTN. This modem is a
mode 1 device.
Check the numbers entered during the Auto Call setup phase prior to dialing.
Compliance with BS6789: Section 6.1:1986 Clause 5.2
The modem should not be used in conjunction with other series-connected apparatus
such that the aggregate declared voltage drops of all this apparatus, together with the
voltage drop introduced at 40mA by any separate wiring used to link items of
apparatus, exceeds 2.0V.
For statutory purposes, apparatus connected to the PSTN via a Relevant Branch
System (RBS) is treated as if connected directly to the PSTN. Refer to BS6789
Section 6.1 para 2.4 for the definition of an RBS.
Compliance with BS6789: Section 6.1:1986 Clause 7.3.1.3
When making calls from other apparatus connected to the PSTN via the series
apparatus, difficulties may be experienced in:
• Making calls
• Telephone conversations (by both parties)
If you experience difficulty, refer to the modem supplier, not the network operator.
Compliance with BS6789: Section 6.1:1986 Clause 7.3.1.4
Country-Specific
Information
This modem causes a voltage drop of 1.7V at a line current of 40mA.
C-34 Country-Specific Information
Compliance with DTI 83/009I
This modem has been approved for use of the following facilities:
•
•
•
•
•
•
•
•
•
•
•
•
•
Loop disconnect and multifrequency signaling
Storage of telephone numbers for retrieval by a predetermined code
Detection of initial proceed indication
Operation of the absence of proceed indication
Automatic dialing facilities
Tone detection, i.e., Ring Tone, etc.
Multiple repeat attempt facility
Automatic clearing from call originating end
Call progress monitor
Series connection
Modem
PBX timed break register recall
Auto answer
Any other usage will invalidate the approval of the apparatus if, as a result, it ceases
to conform to the standards against which approval was gained.
This apparatus is only approved for compatible PBXs. Motorola Information
Systems Ltd. should be consulted for an up-to-date list of compatible PBXs.
There is no guarantee that the apparatus will work in all circumstances. Any
difficulty should be referred to Motorola Information Systems Ltd.
This apparatus is suitable for connection to a PABX which returns secondary
proceed indication.
Compliance with BS6301
Only apparatus conforming with BS6301 may be connected to the telephone socket
on the rear of the modem.
Compliance with BABT SITS 83/009 Section D
Caution
Do not enter more than two “4” second pauses following the
initial access digit (or digits). Failure to comply with this
requirement may result in unsatisfactory operation.
Country-Specific Information C-35
Country-Specific
Information
Any interconnection between the above socket and the other modem connections,
directly or by way of other apparatus, may produce hazardous conditions on the BT
network. Advice should be obtained from a competent engineer before any such
connection is made.
Installation of Telephone Socket
If you need to obtain a suitable British Telecom socket or extension, make a
photocopy of the following form, complete all the necessary information, and return
it to your local telephone sales office.
Application for Installation of Telephone Socket
Complete this application and send it to your local telephone sales office only if a
suitable British Telecom socket or extension is required.
I am the owner of a ____________________________________________ modem.
Model _____________________________________________________________
Approval Number ____________________________________________________
Please arrange to fit two new plan modular sockets as soon as possible.
Name ______________________________________________________________
Address ____________________________________________________________
___________________________________________________________________
Telephone Numbers __________________________________________________
___________________________________________________________________
___________________________________________________________________
Date _____________________ Signed ___________________________________
U. S. A.
Country-Specific
Information
FCC Registration
This equipment complies with Part 68 of the FCC rules. On the bottom of your 3260,
or 3261 Modem, the nameplate label contains the FCC registration number and
ringer equivalence number (REN) for your modem. If requested by the telephone
company, you must provide this information.
This equipment supports the following USOC service codes (switched analog dial):
RJ11C, RJ16C, RJ45S, and RJ4MB.
The REN is used to determine the number of devices that can be connected to the
telephone line. Excessive RENs on the telephone line may result in the devices not
ringing in response to an incoming call. In most, but not all areas, the sum of the
RENs should not exceed five.
To be certain of the number of devices that can be connected to the line, as
determined by the total RENs, contact the telephone company to determine the
maximum REN for the calling area.
C-36 Country-Specific Information
If this equipment causes harm to the telephone network, the telephone company will
notify you. If advance notice is not practical, the telephone company will notify you
as soon as possible. Also, you will be advised of your rights to file a complaint with
the FCC if you believe it is necessary.
The telephone company may make changes to its facilities, equipment, operations,
and procedures that can affect the operation of your modem. If this happens, the
telephone company provides you advance notice for making the necessary
modifications to your modem to maintain uninterrupted service.
Also, this equipment cannot be used on telephone company-provided coin service.
Connection to a party line is subject to state tariffs.
If you experience problems with this equipment, contact Motorola for repair and/or
warranty information. If the trouble is causing harm to the telephone network, the
telephone company may request that you remove the equipment from the network
until the problem is resolved.
FCC Regulations
The Federal Communications Commission (FCC) of the U. S. A. has published
regulations that govern the allowable limits of emissions of radio frequency energy
for computing devices and associated peripherals. These regulations are concerned
with interference to radio communications, such as radio and television. The
regulations require equipment for end use in the U. S. A. to be labeled and to be
accompanied by the warning which appears on the Notice page at the beginning of
this manual.
There is no guarantee, however, that interference will not occur in a particular
installation. If it does, you may be required, at your own expense, to take whatever
measures are necessary to correct the situation.
Interference to radio or television reception can be determined by turning the
equipment off and on. If interference is present, try the following:
Reorient the receiving antenna.
Relocate the equipment with respect to the receiver.
Move the equipment away from the receiver.
Plug the equipment into a different outlet so that the equipment and the receiver
are on different branch circuits.
• Consult the dealer or an experienced radio/television technician.
You may find the following booklet prepared by the FCC helpful: How to Identify
and Resolve Radio-TV Interference Problems, available from the U.S. Government
Printing Office, Washington, D.C. 20402 (Stock No. 004-000-00345-4).
Country-Specific Information C-37
Country-Specific
Information
•
•
•
•
Dial Line Jack Types
The Federal Communication Commission (FCC) is a telecommunications and
standards organization that specifies a series of registered jacks for use with a dial
line network or General Switched Telephone Network (sometimes referred to as
PSTN). These jacks are designated as RJxxx-type jacks, where RJ means Registered
Jack and xxx specifies the jack series. For example, RJ11 indicates a registered jack
from series 11. Sometimes the jack designation is followed by a letter (RJ11C) that
indicates the jack housing style. Jacks specified under FCC Part 68 fit into one of the
following categories: Permissive (voice) or Programmable (data).
6-Pin Voice Jack (Permissive)
This jack type primarily allows voice signals transmitted across lines designated for
voice transmission. This jack type also allows data signals to be transmitted across
voice-grade lines.
8-Pin Data Jack (Programmable)
This jack type is designed to ensure voiceband data transmission integrity across an
interface cable. The jack is referred to as “programmable” because it contains a
resistor that allows the phone company to adjust for the optimum output power level
before the DCE is connected to the line. The following jack types can be used with
your modem.
Country-Specific
Information
Jack Type Description
RJ11C
This 6-pin modular jack type is the most common permissive data mode (voice) jack
arrangement found in the home or office. This jack operates on a single-line bridged
tip-and-ring voice or low-speed data application service.
RJ16C
This 6-pin modular jack type is a special permissive data mode jack arrangement that
allows use of an exclusion-key telephone.
RJ45S
This 8-pin modular jack type is the most common programmable data mode (data) jack
arrangement; it permits the use of an exclusion-key telephone. This jack also operates
on a single-line bridged tip-and-ring voice or low-speed data application service.
RJ4MB
This 8-pin modular programmable data mode jack arrangement supports Make Busy
operation. Using this jack type, you can make the modem appear to be off-hook to the
central telephone office.
NOTE: Jack type is defined to the modem using the Telco option in the TELCO OPT’S menu. For
details, refer to “Declaring The Jack Type” section later in this appendix.
C-38 Country-Specific Information
Rear Panel Pinouts
This section provides modem rear panel pinouts, cross-referenced to the pinouts for
the telco jacks supported in the U. S. A.
3260 Modem
Table C-16 describes DIAL LINE connector pinouts for RJ jack types. X indicates
the signal is active.
Table C-16.
DIALLINE Connector Pinouts for Jack Operation
TELCO Jack Selection
DIAL Line
DIAL LINE
Jack
Connector Pin No. Function RJ4MB RJ45S RJ16C RJ11C
Leased
Line
1
MB
X
Not Used
Not Used
Not Used
Not Used
2
MB1
X
Not Used
Not Used
Not Used
Not Used
3
MI
X
X
X
Not Used
Not Used
4
Ring
X
X
X
X
X
5
Tip
X
X
X
X
X
6
MIC
X
X
X
Not Used
Not Used
7
PR
X
X
Not Used
Not Used
Not Used
8
PC
X
X
Not Used
Not Used
Not Used
Table C-17 describes PHONE connector pinouts for RJ jack types. X indicates the
signal is active.
Table C-17.
PHONE Connector Pinouts for Jack Operation
TELCO Jack Selection
RJ4MB
RJ45S
RJ16C
RJ11C
1
N/C
N/C
N/C
N/C
N/C
2
N/C
N/C
N/C
N/C
N/C
3
MI
X
X
X
Not Used
4
Ring
X
X
X
X
5
Tip
X
X
X
X
6
MIC
X
X
X
Not Used
7
N/C
N/C
N/C
N/C
N/C
8
N/C
N/C
N/C
N/C
N/C
N/C = Not Connected
Country-Specific Information C-39
Country-Specific
Information
PHONE Connector PHONE Jack
Pin No.
Function
3261 Modem
Table C-18 describes DIAL LINE connector pinouts for RJ jack types. X indicates
the signal is active.
Table C-18.
DIAL LINE Connector Pinouts for Jack Operation
PHONE Connector PHONE Jack
Pin No.
Function
TELCO Jack Selection
RJ4MB
RJ45S
RJ16C
RJ11C
1
MB
X
Not Used
2
MB1
X
3
MI
X
4
Ring
X
X
X
X
5
Tip
X
X
X
X
6
MIC
X
X
X
Not Used
7
PR
X
X
Not Used
Not Used
8
PC
X
X
Not Used
Not Used
Not Used
Not Used
Not Used
Not Used
Not Used
X
X
Not Used
Table C-19 describes PHONE connector pinouts for RJ jack types. X indicates the
signal is active.
Table C-19.
PHONE Connector Pinouts for Jack Operation
PHONE Connector PHONE Jack
Pin No.
Function
TELCO Jack Selection
RJ4MB
RJ45S
RJ16C
RJ11C
1
N/C
N/C
2
N/C
N/C
N/C
N/C
N/C
3
MI
X
X
X
Not Used
4
Ring
X
X
X
X
5
Tip
X
X
X
X
6
MIC
X
X
X
Not Used
7
N/C
N/C
N/C
N/C
N/C
8
N/C
N/C
N/C
N/C
N/C
Country-Specific
Information
N/C = Not Connected
C-40 Country-Specific Information
N/C
N/C
N/C
Dial and Leased Line Transmit Levels
Dial Line Transmit Level
Your 3260, 3261, 3262, or 3263 Modem does not support the DL TX option. You
select the dial line transmit level through the Telco option in the TELCO OPT’s
category. Use the following as a guide:
Telco Jack Selection
Dial Transmit Level
RJ11C (Permissive)
-9 dBm
RJ45S (Programmable)
Programmable transmit level. The transmit level is -12 dBm if pins 7
and 8 on the jack are open (not connected).
Otherwise, the transmit level will be determined by the programming
resistor value (contact the Telco for further information).
Leased Line Transmit Level
Front Panel Option: LL TX Level
Factory Default: 0 dBm
The leased line transmit level for the 3260, 3261, 3262, or 3263 Modem is adjustable
from 0 to -15 dBm in 1 dBm increments.
Making Telephone-to-Modem Connections
To use a telephone with your modem, connect the telephone cable to the PHONE
jack at the rear of the modem.
Connecting an Exclusion Key Telephone
In some cases, you can connect an exclusion key telephone to the modem for manual
dialing and answering or normal voice communication. This allows you to answer
and initiate calls manually with the telephone and then connect the modem to the line
by switching the exclusion key. Install an exclusion key telephone as follows:
1) Connect the exclusion key telephone to the RJ36 jack if your modem is
connected to an RJ4MB/RJ36, RJ45S/RJ36, or RJ16C/RJ36 combination.
Connect the exclusion key telephone to the PHONE jack on the rear panel if
your modem is not connected to an RJ36 jack combination.
3) From the TELCO OPT'S menu, set the Telco option to a jack type (RJ16C,
RJ45S, or RJ4MB) supporting the exclusion key feature.
Telco Option (AT&J)
Telco displays only on U. S. A. and Canadian 326X Series Modems. It is used to
select the RJ-jack type. Telco corresponds to the AT&J command as follows:
Option Setting
AT Command
RJ11C
0, 1
Country-Specific Information C-41
Country-Specific
Information
2) Connect the 8-pin modular cable from the modem DIAL LINE jack to the
RJ11C, RJ4MB, RJ45S, or RJ16C data jack.
RJ45S
2
RJ16C
3
RJ4MB
4
Declaring The Jack Type
Once 326x Ready displays, you must declare the jack type you used to connect your
modem to the dial/leased line so that the modem recognizes this connection (see
Tables C-16 or C-18). You can declare the jack type as follows:
1) Press
until TELCO OPT’S is displayed.
2) Use
to move through the TELCO OPT’S menu until Telco = jack type is
displayed. For example, you may see Telco = RJ16C in the display.
3) Press
until you see the jack type you used to connect your modem to the
dial/leased line. For example, you can select Telco:RJ11C.
4) Press
. In this example Telco = RJ11C is displayed.
You have now declared to the modem the jack type you are using.
If this is the first-time you are installing the modem, the modem is set
(factory default) for connection to an RJ11C permissive jack. Installation is
complete.
If this is not a first-time installation, connect the modem to an RJ45S
programmable jack and set the Telco option for this jack type. To use a
programmable jack, contact your telephone company to arrange for installation.
Country-Specific
Information
NOTE: You can also select the dial line jack type using the AT&J command.
Refer to Appendix A for details.
C-42 Country-Specific Information
Using the Modulus Backplane’s Busy Out Feature
This section applies to the following countries, which use the “Universal
International” (UI) Modulus enclosure backplane:
• Australia
• Belgium
• Canada
• Denmark
• Finland
• Ireland
• Israel
• Norway
• Sweden
• Switzerland
• U. S. A.
This section also is of interest to users in Hong Kong and the United Kingdom.
Make Busy versions of Modulus 9 and Modulus 21 backplanes (which install in a
Modulus enclosure with card modems) come equipped with the Busy Out feature.
This feature causes a Busy Out modem to “appear busy” to the central office when:
• Power is disconnected from the Modulus enclosure
• The modem card is not present in its slot
• Busy Out=ON (the option is set through the front panel menu, the AT ACU, or
a network manager)
Busy Out is intended for use with Model 3262 and 3267 dial modems. In some countries, it is also used in dial-restoral mode on Model 3263 and 3268 leased modems.
Country-Specific
Information
Country-Specific Information C-43
Make Busy backplanes are factory configured for Busy Out operation in their
country destination, as indicated in Table C-20 or Table C-21.
Table C-20. Backplane Pin Settings for Busy Out, Modulus 9
Pin Pair
Function
U. S. A. and Canada:
Other UI Countries:
Left1
TIP and RING
No jumper connector
Connected with jumper
Right1
Make Busy and Make
Busy 1
Connected with jumper
No jumper connector; not
applicable
1
Inner backplane surface, as viewed from the rear of the Modulus.
Table C-21. Backplane Pin Settings for Busy Out, Modulus 21
Pin Pair
Left
1
Right1
1Inner
Function
U. S. A. and Canada:
Other UI Countries:
Make Busy and
Make Busy 1
Connected with jumper
No jumper connector; not
applicable
TIP and RING
No jumper connector
Connected with jumper
backplane surface, as viewed from the rear of the Modulus.
Warning
Country-Specific
Information
Only qualified service personnel should remove pin
jumpers. A qualified service person is one who is familiar
with product operation, trained in the technology of
electrically powered information processing and business
equipment and adequately aware of the hazards associated
with this equipment. Removal by unqualified personnel
could result in personal injury or equipment damage,
which could jeopardize your warranty and maintenance
agreement.
Users who are not qualified to perform this action themselves should contact Motorola or an authorized distributor
regarding available upgrade services.
C-44 Country-Specific Information
Refer also to Figure C-10, which shows pin locations on Modulus 21 backplanes.
Modulus 9s have a similar layout.
Modem A
Modem B
Pins
Jumpers on
Left Pin Pairs
Pins
Modulus 21 Enclosure,
Rear View
Figure C-10. Modulus Backplane Pin Locations (Modulus 21 Shown)
Country-Specific Information C-45
Country-Specific
Information
In Hong Kong and the United Kingdom, Busy Out backplanes are hard-wired for
Busy Out operation. These backplanes do not use pin jumpers.
Country-Specific
Information
C-46 Country-Specific Information
Glossary
This glossary defines terms used in data communications and in the 326X Series Modem documentation set.
Automatic Calling Unit or Auto-Call Unit. Internal or external to the DCE, the ACU is a
command set interface between the attached DTE and the modem that uses the normal DTE/
DCE interface. The ACU allows for direct modem control and configuration by the DTE.
Analog signal
In data communications, a continuously varying signal (such as the human voice), which
conventional telephone lines are designed to transmit. For transmission on these lines, the
digital output from a computer or terminal must be converted to an analog signal.
ASCII
American Standard Code for Information Interchange. A method of coding digital signals
using seven bits (or eight bits with parity) to generate 96 different characters.
Asynchronous
Data without an accompanying time signal. Timing is derived from the asynchronous data
with character boundaries defined by start and stop bits.
Auto-answer
Automatic answering. A modem responds to an incoming call over a dial line and
establishes contact with a remote modem.
Baud
The rate at which discrete signal elements are transmitted. In asynchronous transmission,
baud rate=bit rate. In most synchronous transmissions, the baud rate is an integer submultiple of the bit rate. For example, in V.22 bis QAM modulation, four bits are sent in each
baud. If the baud rate is 600, V.22 bis transmits at 2400 (600 x 4) bits per second (bps).
Baudot code
A method of coding digital signals using five bits to generate 58 different characters.
Baud rate
See Baud.
BCC
Block check character. A unique number derived from data transmitted in a block. The
character is appended to data blocks for use in determining whether a block is received with
errors.
BER
Bit Error Rate. The percentage of bit errors relative to a specific number of bits received;
usually expressed as a number referenced to a power of 10.
Binary
A base two numerical representation system using two digits, 0 (zero) and 1 (one); in the
case of a computer, Off and On.
Bit
A blend of the two words binary and digit. The smallest unit in a byte of information,
expressed as 0 (zero) or 1 (one).
Bit-oriented
A communications protocol or transmission procedure in which control information is
encoded in fields of one or more bits. Compare with Character-Oriented.
Block error
(1) A specified number of transmitted data bits over which an encoding procedure is applied
for error-control purposes. A specified number of data characters or bits. (2) A quantity of
transmitted information, or data, usually determined by its own starting and ending control
characters.
bps
The rate at which data passes over the telephone line, in bits per second.
Glossary-1
Glossary
ACU
Glossary
Busy out
An indication to a Central Office that a subscriber line is not available to answer incoming
calls. The availability and implementation of Busy Out varies by country.
Byte
An 8-bit sequence of binary digits (bits) taken as a single unit by a computer.
CCITT. See ITU.
Consultative Committee on International Telephone and Telegraph. International data
communications standards group.
Character
A group of bits used to represent one digit, letter, or symbol (often in 7- or 8-bit groups).
Character-oriented
A communications protocol that carries control information encoded in fields of one or
more characters. Compare with Bit-Oriented.
Control characters
In data communications, any additional transmitted characters that control or facilitate data
transmission between data terminals.
CRC
Cyclic Redundancy Check. A BCC error-checking mechanism for link-level data
transmission.
Crossover cable
Special DTE/DCE interface cable that reassigns signals from specific pins, thus allowing
normal data transfer between two DTEs or two DCEs at the same site.
CTS
Clear To Send. The signal passed from the local modem to the local terminal when the data
port is ready to transmit data. Usually occurs in response to Request To Send (RTS).
Data compression,
synchronous
See Synchronous Data Compression.
dB
Decibel. A unit used to express relative difference in power between acoustic or electric
signals, equal to ten times the common logarithm of the ratio of the two power levels. An
increase of 3 dB is equal to doubling the power; a decrease of 3 dB is equal to halving the
power.
dBm
A measure of power in communications: the decibel referenced to one milliwatt into a
600-ohm load (0 dBm = 1 milliwatt).
DCD
Data Carrier Detect. Also known as the Received Line Signal Detector (RLSD). This signal
is passed from a local modem to a local DTE when an acceptable carrier signal is received
by the modem over the telephone line.
DCE
Data Communications Equipment. A modem or other data transmission device.
Demodulation
In data communications, retrieval of an original digital data signal from a modulated analog
signal.
Digital signal
The binary 0 (off) and 1 (on) output of a data terminal. Modems convert digital signals into
analog waves for transmission over conventional telephone lines.
DSR
Data Set Ready. This signal is passed from the local modem. Indicates that the local modem
is ready to enter the data transmission phase.
DTE
Data Terminal Equipment. End user devices that generate or receive data and that provide
data communications control functions. Examples include: central processing units (CPUs),
front-end processors (FEPs), high-speed multiplexers, PCs, user terminals, and so on.
2-Glossary
Dual Tone Multi-Frequency. A signaling method used for push-button telephones that
combines two output signals to create a unique tone for each of the 12 keys.
EBCDIC
Extended Binary Coded Decimal Interchange Code. A method of coding digital signals
using eight bits to generate 256 different characters.
Echo
Reflection back to the sender of a transmitted signal (as heard on telephone circuits
involving long distances, or poor transmission facilities).
EIA
Electronic Industries Association. The American electronics standards group.
EIA/TIA 232-D
The most commonly used computer/modem interface. An electrical standard for
interconnecting data communications equipment (DCE) and data terminal equipment (DTE)
established by EIA. (The pinout is the same as for EIA 232-C and is nearly equivalent to
ITU V.24.)
EOT
End-of-transmission control character in character-oriented protocols (applied to BISYNC).
Tells the receiver that all user data (text) has been sent.
ETX
End-of-text control character. Tells the receiver that the end of a message has been reached.
Exclusion key
telephone
Allows calls to be answered manually and transferred to the modem using an integral
exclusion key.
Fallback
Switching the data system to a lower transmission speed either for reduced traffic during
off-peak hours or because of distortion in the telephone system.
Fall forward
Switching from a lower to a higher data rate.
Flow control
Controls data transfer between endpoints in a data network; line signals or flow control
characters stop and start the flow of data.
Four-wire
A circuit containing two pairs of wires, one pair for each transmission direction.
Full-duplex
A signaling circuit that allows simultaneous 2-way transmission and reception.
Frame
A group of bits transmitted serially over a communications channel. The basic data
transmission unit used with bit-oriented protocols.
Gain
The amount by which an amplifier (or power) increases the amplitude of a signal passing
through it; often represented in dB.
Half-duplex
A circuit that allows alternating transmit and receive signals, but not both simultaneously.
HDLC
High-level data link control. ITU-specified, bit-oriented, data-link control protocol; any
related control of data links by specified series of bits rather than by control characters.
Hexadecimal
Base 16 number system with digits ranging from 0 to F.
ITU. See CCITT
International Telecommunications Union. Formerly CCITT.
ITU -T
Telecommunication Standardization Sector of ITU.
ITU V.13
V.13 signaling allows your modem to communicate with non-Motorola modems. This
signaling operates when the modem is configured for synchronous mode.
ITU V.22 bis
2400 bps modem standard for use with dial and leased-line circuits.
Glossary-3
Glossary
DTMF
Glossary
ITU V.24
An electrical standard for interconnecting data communications equipment and data
terminal equipment established by the ITU. It is the most commonly used computer/modem
interface. Nearly equivalent to EIA/TIA 232-D.
ITU V.25 bis
An ITU-specified serial Auto-Call Unit (ACU) for operation with both asynchronous and
synchronous DTE equipment.
ITU V.32
The standard for 2-wire, full-duplex modems operating at up to 9600 bps for use on the
general switched telephone network and on leased telephone circuits.
ITU V.32 bis
A modulation standard that extends the speed of 2-wire leased line and 2-wire dial line
modems to include 14.4 and 12.0 kbps. It is backwards-compatible with the V.32
modulation mode. When operating in the V.32 bis modulation mode, the modem supports
synchronous and asynchronous transmission rates of 4.8, 7.2, 9.6, 12.0, and 14.4 kbps.
ITU V.42
Used with full-duplex asynchronous data transmission, V.42 is an ITU-adopted standard
which specifies two methods of error correction for modems: MNP 4 and LAPM (Link
Access Protocol for Modems).
ITU V.42 bis
Used with full-duplex asynchronous data transmission, V.42 bis is a high-performance data
compression algorithm based on the Lempel-Ziv Data Compression algorithm. This
compression technique is not compatible with MNP 5 or other MNP levels. The theoretical
limit of V.42 bis is 4:1 compression. The actual compression (throughout) that is achieved
with any algorithm, including V.42 bis is data (file) dependent. Using V.42 bis, the modem
continuously monitors the compressibility of user data. If user data is not compressible, the
V.42 bis algorithm detects this condition and automatically turns data compression off, so
the data link rate is never less than the modem modulation rate.
ITU-TS V.34
V.34 is a four-dimensional trellis-coded modulation standard using precoding and
pre-emphasis equalization schemes.
Interface
A shared connection or boundary between two devices or systems. The point (logical or
physical) at which two devices or systems are linked.
LAPM
Link Access Protocol for Modems. An ITU link layer protocol for modems.
Leased line
A dedicated telephone-line circuit permanently connecting two or more locations and used
solely by one customer, who leases the line.
LED
Light Emitting Diode.
Loopback
(1) A method of feeding a received signal back from a point in a data link to the receiver at
the site where the data was originated. Commonly used to test portions of a data link to
isolate faulty equipment or data lines. (2) The feeding back of data from a point in a data
path to the transmitting source for testing. (3) A diagnostic procedure that sends a test
message back to the originator, which compares the message with the original transmission.
Loopback testing can occur within a locally attached device or can be conducted remotely
over a communications circuit.
LPDA2
Feature that enables the 326X to be used in an IBM dial and leased line restoral applications
using LPDA2 Dial and Disconnect commands.
Modem
Modulator/demodulator, enabling digital data to be sent over analog transmission facilities.
4-Glossary
Systematic changing of properties (e.g., amplitude, frequency, phase) of an analog signal to
encode and convey digital information.
MNP
Microcom Networking Protocol. An asynchronous communications protocol that provides
error correction.
Multiplexer
(1) Any multiport device that allows two or more users to share a common physical
transmission channel; employed in pairs, one at each end of the channel, where each device
performs both multiplexing of the multiple user inputs and demultiplexing of the channel
back into the separate user data streams. (2) A device that allows two or more analog data
signals to be transmitted simultaneously over a single telephone line.
Off-hook
The description for when a telephone or modem connects to the dial line and presents
electrical characteristics, similar to when a telephone handset is removed from the cradle.
Parity bit
An error-checking mechanism for asynchronous transmission. An additional nondata bit
added to a group of bits, that indicates whether the number of 1’s in the group is odd or even.
PBX
Private branch exchange. A telephone switching system located on a customer’s premises.
Phase jitter
The deviation in phase of the transmitted analog signal from its timing signal; often caused
by alternating current components in a telecommunications network. It is continuous,
long-term, and often nearly constant in frequency and severity.
Point-to-point
A line that directly connects two end points (e.g., a remote location to a host computer);
opposite of multipoint.
Port
A connector and associated circuitry enabling digital data to be injected into or retrieved
from a communications network.
Protocol
Formal set of rules governing the format, timing, sequencing, and error control of
exchanged messages on a data network.
PSTN
Public Switched Telephone Network.
PTT
Postal Telegraph and Telephone. Government authority (in many European companies) that
typically operates the public telecommunications network, sets standards and policies, and
negotiates communications issues internationally for a particular country.
QAM
Quadrature Amplitude Modulation. A type of modulation that varies both the phase and
amplitude of an analog wave.
RS-232-D
See EIA/TIA 232-D.
RTS
Request To Send. The signal from a terminal to its co-located modem that prepares the
modem for data transmission.
SDC
See Synchronous Data Compression.
SDLC
Synchronous data link control; bit-oriented protocol developed by IBM.
Start bit
A data bit used in asynchronous transmission to signal the beginning of a character.
Stop bit
A data bit used in asynchronous transmission to signal the end of a character.
STX
Start of text control character. Designates the start of a message's text as well as (usually) the
end of the message heading.
Glossary-5
Glossary
Modulation
Sync character. Establishes synchronism and fills time in the absence of any data or control
character to maintain synchronism.
Synchronous
Data accepted or provided with an accompanying time signal.
Synchronous Data
compression (SDC)
An algorithm that allows the modem to run at a DTE rate higher than the DCE rate. This is
accomplished by receiving frames of data at the originating end, compressing, and then
transmitting the data at the slower DCE rate, and decompressing the data at the receiving
side. The compression algorithm is derived from the V.42bis data compression algorithm.
SDC only applies when synchronous data is framed in HDLC-SDLC-like format.
Tail circuit
A point-to-point, second-tier circuit directly connected (back to back) to the remote modem
of the first-tier circuit. The connection is made using a DCE/DTE crossover cable.
Training
A technique that adjusts modems to current telephone line conditions. The transmitting
modem sends a special training sequence to the receiving modem, which makes necessary
adjustments for line conditions.
Transmission rate
Bits per second passing over the telephone line or other communications circuitry.
Two-wire
A circuit consisting of one pair of wires.
V.22bis
See ITU V.22bis.
V.24
See ITU V.24.
V.25bis
See ITU V.25bis.
V.32
See ITU V.32.
V.32bis
See ITU V.32bis.
V.34
See ITU-TS V.34.
V.42
See ITU V.42.
V.42bis
See ITU V.42bis.
Glossary
SYN
6-Glossary
Return Procedures
Contents
Equipment Return Procedures ...............................................................................
Expiration of Lease ...........................................................................................
Factory Repair ...................................................................................................
Packaging Guidelines for Equipment Return ....................................................
2
2
2
2
Return Procedures -1
The following sections apply to U.S.A. customers only. Other customers with
questions or concerns regarding return procedures should contact their Motorola
Information Systems Group subsidiary or distributor.
Equipment Return Procedures
If you have questions about equipment return procedures, call the Logistics
Administration Group at (508) 261-4495.
If you require on-site service or unit-exchange service, call the Customer Support
Center at (800)-544-0062.
Expiration of Lease
To return equipment upon expiration of a lease agreement, contact your Motorola
ISG Sales Office for return authorization and instructions. A list of these offices is
available on the Motorola website. When you contact the sales office, provide the
following information:
• Product name and description
• Serial number
• Customer order number
• Reason for return
Factory Repair
To return equipment for factory repair, call the Logistics Administration Group at
(508) 261-4495, for return authorization and instructions. When you call, you will be
given a Return Material Authorization (RMA) control number. Mark this number
clearly on the shipping container for ease of identification and faster service.
The RMA control number provides a convenient tracking reference for both parties.
Please have the following information available for each piece of equipment
you return:
• Product name and description
• Serial number
• Failure symptoms
Packaging Guidelines for Equipment Return
Data communications equipment or parts that are to be returned to Motorola ISG
must be properly packaged to prevent damage in shipment and handling.
If the original packing material and shipping container are available, reuse these
items to return equipment. If these items are not available, it is your responsibility to
package the contents in a manner that protects the equipment from damage during
normal shipping and handling. Responsibility for damage to equipment during
transit must be resolved between you and the carrier. The Logistics Administration
group can provide you with specific packaging instructions upon request.
2- Return Procedures
Index
3-5
Symbols
+++ (AT escape sequence) 5-5
, 5-13
<> 5-13
= 3-5
@ dial modifier 5-12
Numerics
35XX device 4-25
A
A/ 5-7
A/B LED 3-4
AC Detect (S-Register 98) 5-18
Access security
lead digit delay timeout (S-Register 46) 5-16
tone duration (S-Register 45) 5-16
Adaptive Rate System 1-7
Adaptive rate system 1-7
ALM LED 3-4
Always= C-4
answer incoming call 5-6
APPC/APPN 4-21
Application examples
SDC 4-24
V.32bis and V.34 4-22
asynch data format 3-2
asynchronous host computer 4-18
AT 5-3
AT ACU
configure and operate modem 3-8
AT co mmand set 5-2
AT commands 1-6
+++ (escape sequence) 5-5
=x, Change S-Register Value 5-10
?, Display S-Register Value 5-10
A, Manual Answer 5-7
A/, Autobaud 5-5, 5-7
and autobaud feature 5-5
cross-referenced to front panel options A-2
D, Dial 5-7
entering 5-3
errors in entry 5-4
H, Hang Up 5-8
I, Display Software Information 5-8
O, Leave Command Mode 5-8
result codes A-41
Sn=x, Change S-Register Value 5-10
Sn?, Display S-Register Value 5-9
X, Call Progress 5-7
Australia C-6
Austria C-6
Auto Call Unit (ACU)
LPDA-2 1-4
V.25bis 1-4
Autobaud 5-5
autobaud 5-5
Autobaud feature 5-5
using the A/ command 5-7
automatic call units (ACUs) 1-2
Automode/multimode feature 1-6
Avertissement xvi
B
BABT regulations
Hong Kong C-32
backplanes 2-5
Backspace character (S-Register 5) 5-12
bandwidth on demand 4-18
Belgium C-6
Bell 801C ACU 3-10
Besondere Hinweise
Beschreibung xvi
Blind dialing
Denmark C-32
blind dialing 5-12
bridge 4-18
British Telecom C-36
Buffer delay
during disconnect 5-16
bulletin board 4-18
BUSY message A-41
busy out 5-8, A-44
C
cables 2-4
Cabling
daisy-chain 2-13
modem 2-11
NMS 2-13
Cabling overview
Figure 2-5 3260/65 2-11
Figure 2-6 3261/66 2-12
Call establishment methods 3-10
Call progress
Index-1
and the ATD command 5-7
Canada C-6, C-28
card modem 2-2
card modems in enclosure 2-14
Carriage return character (S-Register 3) 5-11
Carrier loss hang up delay (S-Register 10) 5-13
central site 4-18
change S-Register value 5-10
Character formats
for autobaud 5-5
ci rcuit quality monitoring system (CQMS) 1-7
cluster controller 4-18
COM port 6-2
command line 5-4
Command mode
leaving 5-8
command mode 5-3
Communications software
equipment needed 2-4
using with AT ACU 5-3
communications software 2-4, 3-9, 4-2, 5-2, 6-2
computer connectors 2-5
Configuration options
listed by AT command A-2
listed by menus A-2
selecting from front panel 3-5
configure a modem 5-3
configure and operate the modem 3-2
CONNECT 1200 message A-41
CONNECT message A-41
connector pinouts B-6
Connectors 2-5
country regu latory agencies 1-8
Czech Republic C-7
D
data carrier 5-13
data compression A-43
data encoding 4-23
data format 3-2
Data rates 1-5
default (defined) 3-5
Defaults
front panel 3-5
option sets 3-5, 4-12
Delay before looking for DTR (S-Register 25) 5-15
delayed/forbidden lists C-23
Denmark C-7
di aling and storing numbers 5-2
Diagnostic tests 6-10
dial a telephone number 5-6
Dial line jack types
United States C-38
Index-2
Dial modifiers A-39
dial wait A-39
disconnect A-40
flash A-39
pause delay A-39
presentation characters A-40
pulse A-39
quiet answer A-40
return to command state A-39
reverse A-40
tone A-39
dial modifiers A-39
dial wait modifier 5-12
Dialing
from keyboard 5-7
dialing into a LAN 4-18
digital interface B-2
DIP switch 2-5
DIP switches 2-5
Direct mode 5-13
Disconnect buffer delay (S-Register 38) 5-16
displaying S-register value 5-9
DOC
requirements C-28
DTE connectors 2-5
DTE inactivity disconnect (S-Register 30) 5-15
DTE port 4-20
DTE rates 1-5
DTMF tone duration (S-Register 11) 5-14
DTR delay 5-15
E
efficiency 4-23
EIA/TIA 232-D interface 2-6, B-2
specification for B-2
electrical interface 6-2
Electrical interfaces 2-6
enclosure card modems 2-14
encoding 4-23
entering data on the front panel A-37
equipment damage 2-3
Error correction and data compression features 1-6
ERROR message A-41
Error messages
self-test 2-15
error messages 2-15
escape code 5-14
Escape code character (S-Register 2) 5-11
Escape code guard time (S-Register 12) 5-14
escape mode 5-3
escape sequence 5-5
Escape sequence (+++) 5-5
Example
Accessing a Configuration Option 3-6
Examples
V.32bis and V.34 4-18
exit command mode 5-6
exiting command mode 5-8
external dialer 3-11
F
FCC
registration number C-36
regulations C-37
FCC Registration C-36
ferrite cylinders 2-7
filters 2-7
Finland C-7
flow control 4-19, 4-21
frame sizes 4-23
framing 4-23
France C-7
front end processor 4-18
Front panel 3-2
configuration options A-2
defaults 3-5
options 3-5
G
Germany C-8
grounding 2-11
Guard time 5-6
guard time 5-5
H
hang up 5-6, 5-8
HDLC/SDLC 4-23
Hong Kong C-8, C-32
host computer 4-18
Ireland C-8
Israel C-8
Italy C-9
ITU interface B-4
ITU recommendation V.35 B-4
ITU V.35 interface 2-6
ITU-TS
V.34 modulation 1-5
J
jack type C-42
Jack types
Canada C-29
United States of America C-38
jacks 2-5
Japan C-9
K
k 5-13
Keys, front panel 3-5
Keys, how to use 3-5
L
LAPM A-43
LCD 3-2
Leaving command mode 5-8
LEDs 3-2
Line feed character (S-Register 4_ 5-11
line filters 2-7
Link Problem Determination Aid (LPDA-2)
LPDA-2 3-10
link utilization 4-23
liquid-crystal display 1-2
Loopback tests 6-10
LPDA2 1-4
M
I
IBM AS 400 3-10, 4-18, 4-21
initialization strings C-12
initiate and terminate tests 6-10
INITIATING RC message A-41
Installation
connecting a telephone to modem C-41
ferrite cylinder 2-7
setting DIP switch A-44
site selection 2-4
Interfaces
digital B-2
LEASE LINE B-6
PHONE B-7
Malaysia C-9
manual answering 5-7
manual dialing
using the ATD command 5-7
Menu tree
navigating 3-5
Messages
CONNECT A-41
self-test 2-15
messages 2-15
Messages spéciaux xvi
Important xvi
Mise en garde xvi
MNP A-43
Index-3
MNP-5 A-43
modem card 2-2
Modulus enclosure 2-7, 2-9, 2-10
Modulus enclosure (nest) 1-2
Motorola sales and service offices 2-3
Motorola website 2-3
Motorola’s extended AT command set 1-4
N
NC IN and NC OUT connectors 2-13
NC IN and NC OUT ports 2-5
NC port pinouts B-6
nest cards 1-2
Netherlands C-9
NetView LPDA-2 ACU 3-10
network configuration 4-2
Network Control Port
connector pinouts B-7
Network management 1-5
Network management cables 2-7
NETWORK MANAGEMENT INHIBITED
message A-41
network management system 1-2
network performance 1-7
NO ANSWER message A-41
NO CARRIER message A-41
NO DIALTONE message A-41
Normal mode 5-13
Norway C-10
NRZ/NRZI 4-23
Numeric entry A-37
O
OK message A-41
operation problems 6-2
optimizing network performance 4-23
option set 3-5
Option Set 1, SDC (async calls to central site) 4-8
Option Set 2 - Sync Answering Central Site 4-7
Option Set 2 (sync answering at central site) 4-7
Option Set 2, SDC (sync dial A/B restoral) 4-9
Option Set 3 - Sync Calls to Central Site 4-7
Option Set 4 (async answering at central site) 4-8
option sets 1-4
options 3-5
P
parameters 3-5
PASSWORD PROTECTED message A-41
password protection A-45
Pause delay dial modifiers (S-Register 8) 5-13
PHONE
Index-4
connector pinouts B-7
Pinouts
EIA/TIA 232-D B-2
interface
3260/65
2-wire leased line connector
dial line connector C-18
phone connector C-19
3261/66
2-wire leased line connector
4-wire leased line connector
dial line connector C-19
phone connector C-21
3262/67
2-wire leased line connector
3263/68
2-wire leased line connector
4-wire leased line connector
dial line connector C-21
ITU V.35 recommendation B-5
LEASE LINE B-6
NC (Network Control) port B-7
PHONE B-7
pinouts B-6, C-18, C-39
Portugal C-10
Postscript number 5-4
power cable 2-7, 2-9, 2-14
power connectors 2-5
C-18
C-20
C-20
C-22
C-22
C-23
R
RC ABORTED message A-41
RC COMPLETE message A-41
RC DENIED message A-41
RC ESTABLISHED message A-41
RC FAILED message A-41
RC NOT AVAILABLE message A-41
RC SESSION IN PROGRESS message A-41
RC/NC LED 3-4
rear panel views C-12
redial attempts C-23
redial telephone number 5-6
Redialing
last number 5-9
re-execute last command 5-6
Re-executing AT command (A/) 5-7
regulations 1-8, 2-2
Reinitializing the modem 4-5
Reliable connection
AT messages 5-5
Reliable mode 5-13
Remote Access Reset 4-29
remote configuration 5-8, A-45
REN C-33, C-36
restoral 4-9, 4-18, 4-22, 4-24, C-16
restricted commands C-12
restricted features C-4
Result codes
AT
word form A-41
Return character 5-11
return to data mode 5-6
RFI and ferrite cylinder 2-7
Ring count (S-Register 1) 5-11
Ring count to answer on (S-Register 0) 5-10
RING message A-41
Rockwell-based modems 5-18
router 4-18
RTS/CTS delay (S-Register 26) 5-15
S
SDC
configuring 4-23
operational requirements 4-23
pre-operation notes 4-23
SDC tests 6-11
Security features 1-7
Self-test
messages 2-15
self-test 2-15
Serial cable
equipment needed 2-4
Site selection 2-4
Software information
displaying using the ATI command 5-8
South Africa C-10
Spain C-10
Specifications
interfaces
ITU V.35 (modem to computer) B-5
NC port B-7
PHONE B-7
S-Register
04 (Line Feed Character) 5-11
S-Registers
00 (ring count to answer on) 5-7, 5-10
01 (ring) 5-11
02 (Escape code character) 5-11
03 (Carriage Return Character) 5-11
03 (carriage return character) 5-11
05 (backspace character) 5-12
06 (Wait for Dial Tone) 5-12
07 (Wait for data carrier) 5-12
08 (Pause delay dial modifiers) 5-13
08 (pause time for pause delay dial modifier) 513
10 (carrier loss hang up delay) 5-13
10 (Carrier loss hang-up delay) 5-13
11 (DTMF tone duration) 5-14
12 (Escape code guard time) 5-14
12 (escape code guard time) 5-14
12 (escape sequence guard time) 5-6
18 (Test Time) 5-14
25 (DTR Delay) 5-15
26 (RTS/CTS delay) 5-15
30 (DTE Inactivity Disconnect) 5-15
38 (Disconnect buffer delay) 5-16
45 (Access security tone duration) 5-16
46 (access security lead digit delay timeout) 516
98 (AC Detect) 5-18
changing values
with the AT=x command 5-10
displaying value 5-9
AT? command 5-10
S-registers
cross-referenced with AT commands and front
panel options A-38
standalone modems 1-2
Standalone rear panel view
model 3261 C-13
model 3265 C-14, C-15
model 3266 C-16, C-17
Status snapshots 1-7
Sweden C-11
Switzerland C-11
synch data format 3-2
Synchronous data compression (SDC) 1-6
T
Talk/data switch 3-6
telephone book 1-4
telephone connection to modem C-41
terminal server 4-18
Test timer (S-Register 18) 5-14
Tests
automatic self-test 2-15
Modem Diagnostic 6-10
tests 1-7, 6-10, A-44
Tests, SDC 6-11
timing 4-20, 4-24, 5-4
TR LED 3-4
training 5-18
training sequence 5-18
Troubleshooting
overview 6-2
RFI 2-7
V.54 and V.22bis tests 1-7
Troubleshooting Guide (table) 6-3
Index-5
U
UNDER RMT CONFIG message A-41
United Kingdom C-11, C-32
Universal C-11
UNIX workstation 4-18
Unpacking the modem 2-3
V
V.25bis ACU 3-10
V.34 modulation 1-5
V.34 operation and cabling 2-6
V.35 electrical interface A-44
V.35 interface B-4, B-6
V.42bis A-43
Vorsichtshinweis, Beschreibung xvi
W
w dial modifier 5-12
Wait for data carrier (S-Register 7) 5-12
Wait for dial tone (S-Register 6) 5-12
Warnhinweis, Beschreibung xvi
Warning statement
connecting ports C-4
website 2-3
WICHTIG-Hinweis, Beschreibung xvi
window sizes 4-23
with 2-7
X
X.25 network 4-18
X.25 node 4-18
Index-6