1
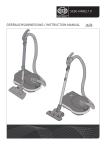
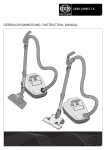
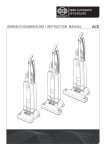
SEBO PROFESSIONAL D MADE IN GERMANY GEBRAUCHSANWEISUNG / INSTRUCTION MANUAL Inhaltsverzeichnis Seite A. Zubehör..............................................................................3 B. Service-Teile......................................................................3 1. Sicherheitshinweise..........................................................4 2. Hinweis zur Entsorgung....................................................5 3. Gerätebeschreibung..........................................................6 4. Inbetriebnahme.................................................................6 5. Handhabung.......................................................................7 6. Bodendüsen und Elektroteppichbürsten..........................8 7. Wartung und Pflege...........................................................9 8. Technische Daten...............................................................12 Table of contents A. Attachments.......................................................................3 B. Service Parts......................................................................3 1. Safety Instructions.............................................................4 2. Note on Disposal................................................................5 3. Machine Description..........................................................6 4. Assembly............................................................................6 5. Operating Instructions.......................................................7 6. Floor Cleaning Heads........................................................8 7. Maintenance and Servicing...............................................9 8. Technical Details . .............................................................12 2 A. Zubehör 1a 1b 2 1a 7290gs SEBO KOMBI ohne Raste 1b 7260GS SEBO KOMBI mit Raste 2 1397gs Standard-Kombibodendüse 3 Standarddüse 4a 7270gs SEBO PARQUET ohne Raste 4b 7200GS SEBO PARQUET mit Raste 5 3 8118ER 1495ER Verlängerungsschlauch 6 1084gs Verlängerungsrohr 7 6780ER Turbobürste SEBO TT-C 8 6179ER Polsterturbobürste SEBO PT-C 4a 4b L 9 8142gs Polsterdüse 11 1325gs Wand- und Polsterdüse 12 8066gs Fugendüse 6140 Turbobürste SEBO TT-C hellgrau R 7 L R 5 A. Attachments 1a 7290gs 1b 7260GS release button SEBO Kombi with release button 2 1397gs Vario Kombi 3 8118ER Standard Brush 4a 7270gs SEBO Parquet without 4b 7200GS release button SEBO Parquet with release button 5 1495ER Extension Hose 6 1084gs Straight Tube 7 6780ER Floor Turbo Brush SEBO TT-C 8 6179ER Stairs & Upholstery Turbo Brush SEBO PT-C 9 8142gs Upholstery Nozzle 11 1325gs Floor and Wall Brush 12 8066gs Crevice Nozzle 6140 8 SEBO Kombi without SEBO Turbo brush light grey 6 9 11 12 B 16 14 15 18 B. Service-Teile B. Service Parts 14 8120SE SEBO Filterbox D mit 10 x Ultra-BagTM Filtertüten 14 8120SE SEBO filter box D incl. 10 x Ultra BagTM Filterbag 15 8026ER 1x Hospital-Grade-Filter D 15 8026ER 1x Hospital-Grade-Filter D 16 8022ER 1x Motorschutzfilter D 16 8022ER 1x Motor filter D 17 6047ER Airbelt Stoßschutz 17 6047ER Airbelt bumper guard 18 819001 Anschlußleitung mit 18 819002 Mains cable GB plug Konturenstecker 17 3 Lesen Sie bitte diese Gebrauchsanweisung aufmerksam durch und beachten Sie die darin enthaltenen Sicherheits- und Warnhinweise, bevor Sie den Staubsauger in Betrieb nehmen. Bitte bewahren Sie die Gebrauchsanweisung unbedingt auf. Vielen Dank, dass Sie sich für einen SEBO entschieden haben. Wir sind sicher, dass Sie viel Freude an diesem Gerät haben werden. Für Ihre Hinweise und Wünsche stehen wir Ihnen gerne unter www.sebo.de zur Verfügung. Ihr neuer SEBO ist ein hochwertiges, langlebiges und innovatives Produkt, das nach neuester Technologie in Deutschland entwickelt und gefertigt wird. Seine effiziente Saugleistung und sein serienmäßig integriertes dreistufiges Filtrationssytem bieten Ihnen außergewöhnlich hohe Standards. Erleben Sie selbst das professionelle Saugerlebnis! 1. Sicherheitshinweise Die Gebrauchsanweisung bitte gut aufbewahren. Wird der Staubsauger an Dritte weitergegeben, muss unbedingt die Gebrauchsanweisung mit übergeben werden. Die Benutzung des Gerätes geschieht auf eigene Verantwortung. Der Hersteller haftet nicht für Schäden, die durch falsche Bedienung oder nicht bestimmungsgemäßen Gebrauch verursacht werden. Bestimmungsgemäße Verwendung Dieses Gerät kann von Kindern ab 8 Jahren und darüber und von Personen mit verringerten physischen, sensorischen oder mentalen Fähigkeiten oder Mangel an Erfahrung und/oder Wissen benutzt werden, wenn sie beaufsichtigt werden oder bezüglich des sicheren Gebrauchs des Gerätes unterwiesen wurden und die daraus resultierenden Gefahren verstanden haben. Kinder dürfen nicht mit dem Gerät spielen. Reinigung und Benutzerwartung dürfen nicht durch Kinder ohne Beaufsichtigung durchgeführt werden. Den Staubsauger nur an den vorgesehenen Griffen transportieren und bedienen. Handgriff während des Betriebes stets festhalten. Das Gerät erst abstellen sobald die rotierende Bürste* komplett zum Stillstand gekommen ist, der Netzschalter ausgeschaltet und der Netzstecker gezogen wurde Vor allen Arbeiten am Staubsauger: Erst das Gerät ausschalten und den Netzstecker ziehen. Reparaturen und Ersatzteileaustausch am Staubsauger dürfen nur von Fachkräften ausgeführt werden. Please read these instructions carefully before using the machine and save them for future reference. Thank you for choosing SEBO. Your new SEBO is an innovative, high quality product that has been developed and made in Germany utilising the most modern technology. The S-Class filter system and superb cleaning power ensure the highest standards of cleanliness for your home. To ensure you get the most from your SEBO vacuum cleaner, please take time to read these instructions. We value your feedback and if you have any suggestions, please contact us at www.sebo.co.uk. 1. Safety Instructions Please save these instructions. If you pass this vacuum to a third party, please pass these on as well. The use of the machine is at your own risk. The manufacturer/ supplier is not liable for any injury or damage caused by incorrect usage of the machine. This appliance can be used by children aged from 8 years and above and persons with reduced physical, sensory or mental capabilities or lack of experience and knowledge if they are given supervision or instruction concerning use of the appliance in a safe way and understand the hazards involved. Children should not play with the appliance. Cleaning and user maintenance should not be done by children without strict supervision. Only carry the vacuum cleaner by the carry handle. Always hold the hose handle when operating the vacuum cleaner. When you finish or interrupt your work, always turn off, unplug the machine and ensure the rotating brush has stopped.* Always turn off and unplug the machine before undertaking any maintenance. All repairs within the guarantee period should be performed by an authorized SEBO service representative. If your SEBO vacuum cleaner has a SEBO PT-C turbo brush or a SEBO TT-C turbo brush please do not touch the brush when it is turning as this will cause a risk of injury to the fingers. *depending on model Niemals bei angeschlossenem oder laufendem Gerät an die Bürste der SEBO PT-C*, SEBO TT-C* fassen! Es besteht Verletzungsgefahr durch Einklemmung. * Je nach Modell. 4 Sicherer Gebrauch Vor Inbetriebnahme des Staubsaugers ist dieser auf sichtbare Schäden zu untersuchen und bei Beschädigung nicht in Betrieb zu nehmen. Menschen oder Tiere nicht ab- bzw. aufsaugen. Nicht zur Aufnahme von gefährlichem oder gesundheitsgefärdenden Staub geeignet. Keine leicht entflammbaren, explosiven und gesundheitsschäd lichen Stoffe oder Gase aufsaugen.Nichts Glühendes oder Heißes aufsaugen. Dieser Staubsauger ist nur zur Trockenanwendung be stimmt und darf nicht im Freien und unter nassen Bedin gungen verwendet oder aufbewahrt werden. Achten Sie auf einen sicheren Stand des Staubsauger und wickeln Sie die Netzanschlussleitung nach dem Betrieb wieder auf, da durch sie eine Stolpergefahr für Personen entsteht. Den Staubsauger nur gemäß der Anschlusswerte des Typenschildes anschließen und betreiben. (Das Typenschild befindet sich auf der Unterseite des Gerätes) Die Netzanschlussleitung ist regelmäßig auf Beschädigung zu untersuchen, wie z.B. Rissbildung oder Alterung. Falls eine Beschädigung festgestellt wird, muss diese Leitung vor weiterem Gebrauch des Staubsaugers ersetzt werden, um Gefährdungen zu vermeiden. Hierzu darf nur der vom Hersteller festgelegte Leitungstyp verwendet werden. Benutzen Sie das Anschlusskabel oder den Saugschlauch nicht zum Tragen des Gerätes. Netzstecker nicht am Kabel aus der Steckdose ziehen. Netzkabel von scharfen Kanten fern halten. Achten sie darauf, dass das Netzkabel niemals eingequetscht wird. Den Staubsauger niemals ohne Filtertüte bzw. Filter benutzen. Der Filterdeckel schließt nur mit korrekt eingesetzter Filtertüte. Wenden sie keine Gewalt an. Beobachten Sie die Füllanzeige des Staubbeutels und wechseln Sie diesen bitte rechtzeitig. Motorschutz- und Abluftfilter bei Verschmutzung, spätestens aber nach 16 Filtertüten wechseln, um die optimale Saugleistung zu erhalten. Vor Hitzequellen, Feuchtigkeit und Wasser schützen und nur trocken oder mit einem leicht feuchten Tuch reinigen. Before plugging in the vacuum cleaner, always check for any signs of damage, especially to the mains cable. Do not use a damaged machine. Do not connect a damaged appliance to the power supply. With the machine unplugged, inspect the mains cable at regular intervals for damage or signs of wear, especially if it has been trapped, crushed or in contact with sharp edges. If the mains cable is damaged it must be replaced with a genuine SEBO part. Do not use on people or animals. This machine must not be used for picking up hazardous or harmful dust. Do not use in the presence of flammable, explosive or harmful materials and gases. Do not pick up hot material, such as fire ash. Ensure that the connection data on the data label (voltage and frequency) match the mains electricity supply. The data label is on the bottom of the machine. Always stand the machine on a stable surface. Rewind the mains cable if the machine is not in use to reduce the risk of tripping. Use on dry surfaces only. Do not store outdoors or in damp conditions. Do not carry the vacuum cleaner by the cable or hose. Only disconnect from the socket by pulling the plug. Keep the cable away from sharp edges and prevent it becoming trapped, crushed or overstretched. Do not use the vacuum cleaner without the filter bag or filters. If a filter bag is not fitted, the cover will not close. Never force it. Inspect the filter bag indicator regularly and change the filter bag when necessary. We recommend changing all filters regularly, either when they have become dirty, or once 16 filter bags have been used. Electrical appliance, do not expose to liquid, moisture or heat. Only clean with a dry or slightly damp cloth. This machine should only be operated with genuine SEBO filter bags, filters and replacement parts. The use of non-genuine parts will waive the warranty for this product and could pose a serious safety risk Der Staubsauger darf nur mit original SEBO Filtertüten und original SEBO Ersatz- und Verschleißteilen betrieben werden. Nur die Verwendung von Originalteilen für dieses Produkt berechtigt zu Garantieleistungen und gewährleistet die Betriebssicherheit des Gerätes. Änderungen am Staubsauger sind nicht zulässig. Attachments Use only genuine SEBO Attachments. 2. Hinweis zur Entsorgung Elektroaltgeräte gehören nicht in den Restmüll. Sie können dieses Gerät kostenlos an jeder öffentlichen Sammelstelle abgeben. Weitere Informationen erhalten Sie durch Ihre Kommune. 2. Note on Disposal For advice on disposal of used appliances, please contact your local authority. 5 6a 6b 5b 7 5a 9 8a 35 8 36 5b 12 2 1 23 32 20 10 16 17 18 13 11 14 8a 8 21 5a 15 5b 1 46 47 48 10 6 5a 6 35 3. Gerätebeschreibung 3. Machine Description 1 2 5a 5b 6a 6b 7 8 8a 9 10 11 12 13 14 16 17 18 20 23 32 35 36 1 2 5a 5b 6a 6b 7 8 8a 9 10 11 12 13 14 16 17 18 20 23 32 35 36 SEBO KOMBI* Fußschieber* Edelstahl-Teleskoprohr* Edelstahl-Steckrohr* Handgriff* Handgriff* Schlauch Schlauchstutzen Lasche Knopf Schaltknopf mit Leistungsregulierung Betriebsanzeige Filteranzeige Polsterdüse Fugendüse Parkhilfe Airbelt Stoßschutz Clip Filterdeckel Abstellhilfe Filterhalter Kabelhaken Standarddüse* SEBO Kombi* Hard floor/carpet Slider* Telescopic Tube* Insertion tube* Hose handle* Hose handle* Hose Hose end Cable strap Catch On/Off knob with power control LED light Bag full indicator Upholstery Nozzle Crevice Nozzle Parking groove Airbelt bumper Clip Filter bag cover Carrying /Parking groove Filter holder Cable hook Standard Brush* * je nach Modell * Depending on model. 4. Inbetriebnahme 4. Assembly Stecken Sie den Schlauchstutzen (8) in den Sauganschluss (21) bis er einrastet. Schieben Sie eine SEBO Bodendüse bis zur Rastung* auf das untere Ende des Edelstahlrohres (5a/b). Stecken Sie nun den Handgriff (6) in die andere Seite des Edelstahlrohres (5a/b) ein. Je nach Modell stecken Sie vorher das zweiteilige Edelstahl-Steckrohr zusammen. Zur Montage der Anschlussleitung setzen Sie den Kaltstecker (46) in die Buchse ein. Führen Sie die Anschlussleitung anschließend in die Zugentlastung (47) ein, bis es hörbar einrastet. Drücken Sie die Anschlussleitung nun in die Führungsschiene (48) zwischen der Buchse und der Zugentlastung ein. Push the hose end (8) into the neck (21). Fit the two-part tube together*. Push a SEBO floor head onto the lower end of the tube (5a/b)* until it locks*. Insert the tube (5a/b)* onto the hose handle (6/6b) until it locks into place. * je nach Modell * Depending on model. To assemble the mains cable to the machine, push the rubber plug (46) of the cable into the socket of the machine. Once the plug is fully connected to the socket, please insert the mains cable into the cable cleat (47). You can hear a „click“ when the mains cable is fully inserted. Finally insert the mains cable into the channel (48) which you will find between the machine socket and cable cleat. 22 5a 22 + 10 5a/b 6a 14 13 16 16 45 23 5. Handhabung 5. Operating Instructions Stellen Sie sicher, dass der Schaltknopf (10) ausgeschaltet ist. Danach die Anschlussleitung abwickeln und den Netzstecker einstecken. Das Teleskoprohr* (5a) sollte vor Arbeitsbeginn auf die gewünschte Arbeitshöhe eingestellt werden. Betätigen Sie dazu die Schiebetaste* (22). Schalten Sie nun das Gerät durch Drücken des Schaltknopfes (10) ein. Die gewünschte Saugkraft können Sie durch Drehen des Schaltknopfes (10) am Gerät von min. bis max. regulieren. Ihr SEBO PROFESSIONAL D ist mit einer Fugendüse und einer Polsterdüse ausgestattet. Das Zubehör ist hinten am Gerät eingesteckt und passt sowohl auf das Teleskoprohr (5a), das Steckrohr(5b), als auch auf den Handgriff (6a/b). Für kurze Saugpausen können Sie das Saugrohr mit der Bodendüse in der Parkhilfe (16) am Heck des Staubsaugers oder nach beendeter Arbeit in die Abstellhilfe (23) an der Unterseite des Gerätes einstecken. Der praktische Tragegriff (45) ermöglicht Ihnen jederzeit ein komfortables Tragen des Gerätes. Nach Ende des Gebrauchs, das Gerät durch Drücken des Schaltknopfes (10) ausschalten. Ziehen Sie dann den Netzstecker aus der Steckdose und wickeln Sie die Anschlussleitung wieder auf. Ziehen Sie nun die aufgewickelte Anschlussleitung über den Kabelhaken (35) und fixieren Sie das andere Ende der Anschlussleitung mit der Lasche am Schlauchstutzen. Please ensure that the on / off knob (10) is in the off position, unwind the mains cable und plug the cable into the mains socket. Before you start working adjust the telescopic tube (5a)*. Use the slide button (22)* to adjust the height of the telescopic tube. Start the machine by pressing the on/ off knob (10). To adjust the suction power, rotate the on / off power control knob (10). * je nach Modell * Depending on model. The upholstery and crevice upholstery nozzles are located in the rear of the machine, and fit on to the hose handle (6a/b) as well as on to the telescopic tube (5a) or the insertion tube (5b). When the vacuum cleaner is not in use, the telescopic tube with floor attachment can be parked in the parking groove (16) on the rear of the machine. For carrying the machine, the telescopic tube with floor attachment can be fitted into the carrying groove (23) on the underside. Push the on / off knob (10) to switch off the machine after use. Pull the plug out of the socket, wind the mains cable between the metal cable hook (35) and the cable strap fitted to the hose end and close the strap. 35 7 3 4 2 24 2 1 36 24 25 L 6. Bodendüsen und Elektroteppichbürsten 6. Floor Cleaning Heads Standard-Kombibodendüse*(3) / SEBO KOMBI*(1): Vario Kombi*(3) / SEBO Kombi*(1): Die SEBO KOMBI(1) bzw. die Standard-Kombibodendüse (3) können Sie jeweils mit den Fußrasten (2 bzw. 4) nach Bedarf auf Hartboden (Borsten raus) und Teppichboden (Borsten rein) einstellen. The SEBO Kombi (1) is equipped with the unique double-jointed “flex” neck (24) and offers a full range of manoeuvrability. It has natural bristles that can be easily replaced if worn out. Furthermore this head is equipped with heavy duty embedded stainless steel clamps and bottom plate for durability. The SEBO Kombi (1) or the Vario Kombi (3) can be adjusted for hard floors (bristles out) or carpet (bristles in) through the slider (2) or pedal (4). The Kombi heads are ideal for general purpose use and are the best choice for delicate carpets such as wool loop. Please remove fluff and fibre caught in the bristles by vacuuming them out with the crevice nozzle. SEBO PARQUET (25)/ Standarddüse (36)*: SEBO Parquet (25)/ Standard Brush (36)*: Die Standarddüse ist insbesondere für Hartböden geeignet. Mit einer Arbeitsbreite von 32 cm ist sie flexibel einsetzbar. The Standard Brush is particularly suitable for hard floors. The working width of 32 cm is ideal for efficient cleaning. Die spezielle Kombibodendüse SEBO KOMBI* (1) bietet mit ihrem einzigartigen Dreh-Kipp-Gelenk (24) größten Saugkomfort. Diese Düse verfügt über einen federnd gelagerten Naturborstenstreifen, der zudem einfach auswechselbar ist. Sie ist zusätzlich mit eingelassenen Verschleißbügeln und einem Bodenblech aus Edelstahl für hohe Beanspruchung ausgestattet. Die SEBO PARQUET ist speziell für Parkettböden und andere empfindliche, glatte Hartböden entwickelt worden. Ausgestattet mit dem gleichen wendigen Dreh-Kipp-Gelenk (24) wie die SEBO KOMBI und vier Laufrollen lässt sich die SEBO PARQUET ganz leicht führen. Sie verfügt zudem über zwei federnd gelagerte Naturborstenstreifen, die problemlos ausgetauscht werden können. R SEBO PARQUET SEBO has developed this effective and durable parquet brush for optimum hard flooring cleaning. The “flex” neck (24) design provides superb manoeuvrability. Natural bristles and soft wheels make the SEBO Parquet ideal for any type of hard flooring, especially delicate or uneven. The brushes adjust to surface undulations to achieve ultimate performance. The brushes are removable for easy replacement. Please remove fluff and fibre caught in the bristles by vacuuming them out with the crevice nozzle. * je nach Modell * Depending on model 8 Turbobürste SEBO TT-C* (27): 27 Die Bürstenwalze der Turbobürste SEBO TT-C wird durch den Luftstrom des Staubsaugers angetrieben. Sie befreit Teppiche und Teppichböden von Fusseln und Fäden. Detaillierte Informationen können Sie der separaten Gebrauchsanweisung entnehmen. The Floor Turbo Brush is powered by the air stream of the vacuum cleaner. It provides very effective removal of pet hairs and fibres from carpets and rugs and is designed to be suitable for use on hard floors. Please remove fluff and fibre caught in the bristles by vacuuming them out with the crevice nozzle. For more information please see the separate SEBO TT-C instruction manual. Polsterturbodüse SEBO PT-C* (28): Stair & Upholstery Turbo Brush SEBO PT-C* (28): Die SEBO PT-C wird vom Saugstrom des Staubsaugers angetrieben und ist ideal für die Reinigung von strapazierfähigen Polstermöbeln, Matratzen u.ä. 28 7. Wartung und Pflege Zur Gewährleistung der Sicherheit und richtigen Funktion nur original SEBO Ersatzfilter verwenden. Alle Filtermedien dürfen auf keinen Fall gewaschen werden. 12 11 Floor Turbo Brush SEBO TT-C* (27): Powered by the air stream, the Stair & Upholstery Turbo Brush is ideal for cleaning small or inaccessible areas of carpet. It lifts the pile and gives superior fibre/hair pick up. Please remove fluff and fibre caught in the bristles by vacuuming them out with the crevice nozzle. For more information please see the separate SEBO PT-C instruction manual. 7. Maintenance and Servicing Use only genuine SEBO replacement bags and filters to ensure performance, longevity and safety. Do not wash filters. Do not re-use bags. Filter- und Betriebsanzeige Bag full and Power indicator Die orangefarbene Filteranzeige (12) zeigt einen reduzierten Luftstrom an. Entweder muß die Filtertüte gewechselt werden oder es liegt eine Verstopfung vor (siehe Abschnitt Verstopfungen beseitigen). Je nach Art des Füllgutes kann ein Wechsel erforderlich sein, ohne dass die Filtertüte bis oben gefüllt ist. Die Filteranzeige erscheint nicht bei niedriger Saugkrafteinstellung. Sie sollte regelmäßig bei hoher Saugkraft überprüft werden. Ihr SEBO PROFESSIONAL D verfügt über eine Betriebsanzeige (11), die nach dem Einschalten blau leuchtet . When the orange bag full indicator (12) is showing, airflow is reduced. This could be because the filter bag is full, the filters are clogged, or there may be a blockage (see removing blockages). Vacuuming fine dust may require an earlier filter bag change even though the filter bag is not full. Fluff may overfill the filter bag without the light coming on. The bag full indicator only works correctly at full power. At lower levels, the indicator might not indicate correctly. Therefore please check the status regularly at full power. The SEBO PROFESSIONAL D features an LED light (11) which turns blue when the vacuum cleaner is on. 9 20 Wechsel der Ultra-Bag™ Filtertüte 30 Zum Wechsel der Filtertüte (29) 31 29 39 33 32 44 20 36 29 10 den Filterdeckel (20) durch Anheben der Entriegelungstaste (30) öffnen. Die Filtertüte mit dem Hygienedeckel (31) schließen und durch Kippen des Filterhalters aus der Filtertütenhalterung entnehmen. Schieben Sie den Filterhalter (32) der neuen Filtertüte von oben senkrecht in die Filtertütenhalterung (39) und kippen Sie die Filtertüte wieder ab. Bitte achten Sie hierbei auf die richtige Positionierung. Der grüne Filterhalter (32) muss dabei auf den Rastbügel (33) des Filtertütenhalters (39) geschoben werden. Der Filterdeckel (20) schließt nur mit korrekt eingesetzter Filtertüte. Changing the Filter Bag To change the filter bag (29) open the filter bag cover (20) by lifting the catch (30). Seal the filter bag with the sealing cap (31). Lift the filter bag out of the filter bag holder by tilting the green collar (32) up. Insert the green collar (32) of a new filter bag down into the filter bag holder (39). Please ensure that the green collar (32) is inserted properly over the U-shaped metal spring (33) of the filter bag holder (39) and tilt the green collar (32) down. The cover (20) can only be closed with a correctly fitted filter bag. Wechsel der Filter (Motorschutzfilter und Hospital-Grade-Filter D) Changing the Filters (Motor filter and HospitalGrade-Filter D) Der SEBO PROFESSIONAL D ist serienmäßig mit einem dreistufigen S-Klasse-Filtersystem ausgestattet, das die besonderen Ansprüche von Allergikern und Asthmatikern erfüllt. Die Luft strömt hierbei durch drei hochwirksame Filterstufen mit zwei Microfiltern: die Ultra-Bag™ Filtertüte (29), den Motorschutzfilter (44) und den Hospital-Grade-Filter (34). Wechseln Sie den Hospital-Grade- und den Motorschutzfilter spätestens nach 16 Filtertüten aus, oder wenn Sie stark verschmutzt sind auch schon eher. Den Motorschutzfilter können Sie nach Öffnen des Filterdeckels (20) abziehen und wechseln. Der neue Motorschutzfilter muss rundum in die Nut (36) eingedrückt und in der Mitte aufgeschoben werden. The SEBO PROFESSIONAL D comes with an S-Class filtration system, which makes it the perfect choice for customers with allergies or asthma. This system uses three high efficiency filters: the Ultra Bag™ (29), the motor filter (44) and the Hospital-Grade-Filter (34) to remove even microscopic particles. We recommend changing the Hospital-Grade and motor filter regularly, either if they have become very dirty, or once 16 filter bags have been used. To remove the motor filter, open the filter bag cover (20) and pull the motor filter out of the groove (36) which holds it. Fit the new filter into the groove (36) in the same position. 37 34 38 38 34 40 38 17 41 18 42 41 42 Den Hospital-Grade-Filter D (34) erreichen Sie auf der Unterseite des Gerätes. Dazu wird der Drehverschluss des Filterhalters (38) nach Lösen der Verrastung geöffnet und herrausgezogen. Zum Austauschen des Filters wird dieser aus der Aufnahme gezogen und abgenommen. Der neue Filter (34) wird über den Filterhalter (38) gestülpt, in den Aufnahmen festgerastet und nach innen gedrückt. Die Bügel der Dichtlippe müssen dabei hinter der Rippe (40) positioniert werden. Zum Schließen wird der Filterhalter (38) eingeschoben und nach rechts verriegelt. To change the Hospital-GradeFilter (34) press the release button (37) of the filter holder (38) on the bottom of the machine and turn the filter holder anti-clockwise. Remove the filter (34) from the filter holder (38) and fit a new Hospital-Grade-Filter (34). Please ensure that the lugs on the filter holder fit correctly to the cut-outs in the filter and that the lugs on the inner side of the filter fit over the frame of the filter holder at position 40. Re-fit the assembly to the machine and lock the holder by turning clockwise. Airbelt Stoßschutz Airbelt Bumper System Ihr neuer SEBO Bodenstaubsauger ist mit dem einzigartigen, patentierten AirbeltTM (17) Stoßschutz ausgestattet, der Ihre Einrichtung zuverlässig vor Beschädigungen schützt. Er sorgt auch dafür, dass die gefilterte Luft rundum besonders leise und sanft wieder ausgeblasen wird. Den AirbeltTM (17) können Sie austauschen, indem Sie den Clip (18) abnehmen und ihn einfach aus den Nuten ziehen. Der Schaumstoffträger (41) bleibt am Gerät. Führen Sie den neuen AirbeltTM mit den Verstärkungsstreifen so in die Nuten (42) ein, dass die weiße Fläche vom Gerät weg nach außen zeigt. Beginnen Sie an der Rückseite, fahren Sie rund um das Gerät fort und sichern Sie zum Schluss die Enden mit dem Clip (18). Your new vacuum cleaner is fitted with the patented AirbeltTM (17) shock absorber system, which protects your walls and furniture and eliminates exhaust air blast. The AirbeltTM (17) can easily be changed if necessary. Take off the clip (18) and remove the AirbeltTM. The foam part (41) stays on the machine. To fit the new AirbeltTM, slot the side rails into the grooves (42). Start at the back, ensuring the rails butt against the end of the groove and proceed round the machine. Secure the ends with the clip (18). 11 9 8 7 6a 43 5a 21 Verstopfungen beseitigen Removing Blockages Bei Verstopfungen im Schlauch (7) nehmen Sie den Schlauchstutzen (8) durch Zusammendrücken der beiden Knöpfe (9) ab und lösen das Teleskoprohr (5a)* durch Drücken der Taste (43)* vom Handgriff (6a). Stecken Sie dann den Handgriff bei eingeschaltetem Gerät in den Sauganschluss (21) und saugen ihn von der anderen Seite aus. Bitte beachten Sie hierbei, dass der SEBO PROFESSIONAL D mit einem konischen Schlauch ausgestattet ist und der Handgriff nicht exakt in den Sauganschluss passt. Beim Aussaugen sollte der Schlauch an der verstopften Stelle gedehnt werden und mit der flachen Hand auf die Öffnung des Schlauches geklopft werden. Anschließend stecken Sie den Schlauchstutzen (8) wieder in den Sauganschluss (21) bis er einrastet und saugen den Schlauch noch einmal aus. To remove a blockage in the hose (7) remove the hose end (8) by squeezing both buttons (9). Next, release the telescopic tube (5a)* from the hose handle (6a)* by pressing the catch (43)*.Turn the machine on at full power. Reverse the airflow through the hose by fitting the handle (6) into the neck (21). Please note that the SEBO PROFESSIONAL D is fitted with a cone-shaped hose, so the hose handle does not fit exactly in the neck (21). Straighten the hose in the spot where the blockage is and close the free end of the hose repeatedly with your hand. At the end of this procedure please re-fit your hose the correct way round. Reinigen Sie den Saugschlauch niemals mit einem Stab und tauchen Sie ihn niemals in Wasser. Never attempt to clear the hose by using a sharp object and do not immerse in water for cleaning. * Depending on model. * je nach Modell 8. Technische Daten * 8. Technical Details * Gebläsemotor............................................ 1200 Watt Luftmenge................................................. 41 l/s Ultra-BagTM Filtertüte................................ 6l, 3-lagig Gewicht................................................... 6,6 kg Aktionsradius............................................ 15,5 m Schalldruckpegel...................................... 61dB (A) Vacuum motor nominal............................. 1200 Watt Air Flow................................................... 41 l/s Ultra-BagTM Filter Bag............................. 6l, Electrostatic fleece Weight................................................... 6.6 kg Cleaning Range......................................... 15.5 m Sound pressure level................................. 61dB (A) Für technischen Service wenden Sie sich bitte an Ihren SEBO Fachhändler oder direkt an die SEBO Stein & Co. GmbH MADE IN GERMANY SEBO Stein&Co. GmbH, Wülfrather Straße 47-49, 42553 Velbert, Germany Telefon +49 (0) 20 53 / 89 81, Telefax +49 (0) 20 53 / 89 85, www.sebo.de ©2013 SEBO Stein&Co. GmbH ®Eingetragenes Warenzeichen. Technische Änderungen vorbehalten. 12 For Service please contact your supplier or the address: SEBO (UK) Ltd - The Merlin Centre Cressex Business Park, High Wycombe, Bucks HP12 3QL. Phone: 0 14 94 - 46 55 33 , Fax: 0 14 94 - 46 10 44, www.sebo.co.uk ©2013 SEBO Stein&Co. GmbH ®Registered Trademark. Subject to change. 06325H-09.2013