1
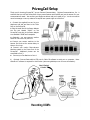
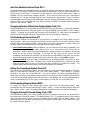
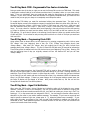
PrivacyCall Blocker ™ AUTOMATICALLY ROUTES FAXES AND SCREENED CALLS WITH CALLER ID AND PRIVACY CODES! U.S. Patents 5,490,210 and 5,602,908 Owner’s Manual Version 8.0.3.3 Copyright 1990-2007. All Rights Reserved. PrivacyCall Blocker, Digitone and Globalinx Personal Communicator are trademarks of Digitone Communications, Inc. PrivacyCall Setup Thank you for choosing PrivacyCall™ as your Personal Communicator. Digitone Communications, Inc. is confident that you will find PrivacyCall’s unique preset features and flexibility are just the answer for your communications needs. Just connect your telephone devices and you’re ready to go. You do not need to record a message or set any codes as PrivacyCall can operate right out of the box. 1. Connect the supplied line cord to your telephone wall jack and then to the Telco Port on the PrivacyCall. 2. Plug the small end of the Power Adapter into the port labeled "12VAC" on the PrivacyCall, next plug in the Power Adapter to a standard 120VAC wall receptacle. 3. Optionally, you can connect another Caller ID unit to the EXT/CID Port. 4. Connect your answer machine to the Answer Port and set the answer delay to three or four rings. 5. Connect your combo Phone-Answer Machine system to the Phone Port of the PrivacyCall. Additional phones can be connected to Port 3. 6. Connect your Fax Machine to Port 4. 7. Optional: Connect Data cable to CID port for Caller ID software to serial port on computer. Note: Globalinx PC software is required for this function (see www.globalinxpc.com for more information). 1 OutGoing Message – Main Greeting (Note: No Battery Backup is Needed) Follow the setup on page 1 to assist you in recording your OGM. Note: If you record your own personalized message, the pre-recorded announcement will be erased! Powered (speaker) phones make the best-recorded sound. You can repeat your recording as many times as you need until you get it just right. Your announcement (OGM) can be as long or as short as you want up to 45 seconds. The purpose of the statement “we do not accept telemarketing calls and please put us on your do not call list” is to inform your uninvited caller that he should not attempt to call you again and is legally binding. Review the following example: (Pre-recorded) Hello, if you know your party’s extension, enter it at any time. The number you’ve reached does not accept telemarketing calls or blocked numbers. Please unblock your number and try again. Also, you can inform your caller to “Start your fax now” during the main greeting if you want to auto route fax calls. Recording Your OutGoing Messages OGM 1 - To make the recording of your main greeting or OGM 1 you must enter the program mode of PrivacyCall via a touch tone telephone. Pick up the telephone handset as shown above and PRESS ## on the keypad. You will hear a <Beep> indicating you are in the program mode. To begin recording, PRESS 11 on the telephone keypad, listen in the telephone's handset for a <Beep, Beep, Beep> and speak into the telephone handset microphone. The best recordings are made speaking in your normal voice. Make your recording with silence in the background for best results. When finished recording PRESS * on the keypad hear a <Beep><Beep>. Your OGM 1 does not have to be the full 45 seconds, so when you are done recording, PRESS * on the telephone keypad to end your message. To playback your main greeting, stay in program mode and PRESS 21. Listen in the telephone's handset to monitor the playback of your message. OGM 2- To record your Call Forwarding Message or OGM 2, Press 12, listen for a <Beep, Beep, Beep> and record your message. Example: Please hold while I connect your call. Or Please hold while I transfer your call to my cell phone. This message informs your caller that his call is being forwarded and to wait for that connection. To playback your Call Forwarding Message, stay in program mode and PRESS 22. How PrivacyCall Operates Initially, when a caller calls in, he will hear your greeting, and if he knows your Privacy code (extension number), he can then enter it at anytime. However, if he is on the Invited callers list, his call will pass straight through to the shared Phone and Modem Ports. Also, all the phones throughout your home/office will continue to ring until the fifth ring then PrivacyCall hangs-up the call. If you have Call Forwarding enabled at the PrivacyCall, then your caller will be forwarded as well. Out Of Area, Private and Anonymous callers showing no phone number will be answered by the PrivacyCall for processing. If someone unfamiliar with your system calls in, the PrivacyCall will first answer with the OGM announcement and then ring-up your answering machine where he can leave a message on your answer machine. Alternatively, if your caller has one of the privacy (access) codes, he can enter one of them during the playing of the OGM and then cause your phones to ring. If you miss your Invited caller, your combo phone-answer machine attached to Port 2 will take a message for you. If your caller hangs-up during any part of the call, so will PrivacyCall to await another call. With Call Forwarding feature enabled, your caller will be first routed to your phone connected to the Phone Port where it will ring 3 times before the second OGM (Call Forwarding Message) is announced. Thereafter, he will be connected by 3-Way Calling to your cell phone or forwarded number. Automatic Caller ID Call Routing Automatic call routing will begin to work right after the first call when Caller ID information is displayed. Caller ID information is displayed on the front panel and simultaneously compared to the stored numbers you have entered, then routes the incoming calls accordingly. All Invited callers will continue to ring your phones, but blocked callers will be hung-up on. 2 Caller ID Display YELLOW BUTTON PRESS ONCE TO INVITE PRESS TWICE TO BLOCK Note: When Pressing the Yellow Button twice, the Caller’s ID will be erased from the Screen. Standard Caller ID Display Caller identification Caller ID Name and Number Service from your telephone company is required for the display to work. The unit has a clock and calendar built-in to the display along with the name and number of the caller. The first call to your PrivacyCall unit will initialize the clock and calendar to the current date and time. The display on the front of the PrivacyCall unit will show the number of calls, new calls, date and time of each call. Yellow Button Entry After an incoming call is displayed, you can automatically store the LAST number displayed on the LCD on the PrivacyCall front panel by pushing the Yellow button once briefly for an Invited caller, when you are either on the line with that caller or just after you hang-up. The Left Green LED will flash five times to indicate it has stored the number and a <Beep><Beep> can be heard in the handset. Note: If you have already entered this number, the LED will flash only once. THIS ONLY WORKS WITH THE LAST NUMBER DISPLAYED AT THE END OF THE LIST! To block the currently displayed number, press the left Yellow button on the PrivacyCall front panel twice and it will be entered into the Blocked Number list. The Right Green LED will flash five times to indicate it has stored the number and a <Beep><Beep> can be heard in the handset. Note: If you have received corrupted or non-distinguishable CID data, you will see the Yellow LED on the right, light five times to indicate the number was not stored and there was an error. Viewing Call History The middle button is the Up View button that displays the previous calls or Top of List. The right button is the Down View button that displays the last call or End of List. Caller ID Pass-Thru Mode If you want Caller ID info to show on all phones, PRESS ## then enter 751 hear <Beep><Beep>. To disable this feature, enter 750. Note: All phones will ring once on all phones before Caller ID is displayed. 3 Storing Invited and Blocked Numbers Adding Phone Numbers – Area Codes You can block or allow whole area codes, exchanges or parts of numbers using the (#) symbol as a replacement for any number. To invite a single area code, for example, enter 96 then 602 (for example) then ### ####. This will allow all callers from 602 area code to ring your phone and block all others. Conversely, if you want to block that area code, use code 97 then 602 ### ####. Remember you must create the Invited callers list First before you build the Blocked callers list! Global Invite “I want to INVITE all callers and block just one or more numbers” You can invite all callers who display a phone number and yet block a single number or area code. To do this, enter programming with ## and then 96 <Beep> then ### ### #### <Beep> <Beep>. Be sure to listen for the confirmation tones. This one command will allow ALL Invited callers who display a phone number to ring through. However, all Unknown callers will be greeted by the Outgoing Message. If you want to allow even the Unknown callers through, you will need to use the All Calls Invited method below where all calls except Blocked callers are forwarded to your phones. Note: If you have previously entered a specific Invited number, programming will beep only once to let you know it has already been entered. All Calls Invited Method (Including Unknown Callers) To allow all calls through except Blocked callers, enter programming with ## then the following numbers: 67 <Beep> # * * <Beep><Beep>, 781 <Beep><Beep>, 791 <Beep><Beep>, 54 <Beep><Beep>, 500 <Beep><Beep>, 96 <Beep> ### ### #### <Beep><Beep> and to remove the OGM, 11 <Beep><Beep><Beep> wait 1 second then * <Beep><Beep>. This method only works for locally answered calls within 3 rings to your Phone/Answer machine where the calls are answered. Invited Callers Indicator Blocked Callers Indicator Inviting Individual Callers “I want to BLOCK all callers and just allow one or more numbers” The PrivacyCall comes from the factory answering every call with the main greeting until you invite callers either one at a time through the Yellow button function or by pre-programming them in using the invite command 96. To enter single Invited phone numbers to storage, Press ##, then 96, followed by the ten digit phone number, (for example 602 555 1212) hear <Beep><Beep>. Note: If you have already entered this number, programming will beep only once. Blocking Individual Callers To enter single Blocked numbers Press ##, then 97, followed by the ten digit phone number, hear <Beep><Beep>. Do Not Use code 97 with ### ### #### because it will prevent all calls from getting through. Note: If you have previously entered a specific Blocked number, programming will beep only once to let you know it has already been entered. Deleting Invited and Blocked Numbers Caller List Deletion To delete a number you have stored, Press ##, then 98, followed by the ten digit phone number, hear <Beep><Beep>. To delete all numbers stored, enter ## 98 then ### ### #### hear <Beep><Beep>. WARNING: This will delete all numbers from both lists! 4 Inbound Call Indicator and Caller ID All PrivacyCalls show the line status with the front two Green lights (LEDs). When these two lights flicker quickly, it means there is an inbound call coming in from the phone company. These two lights will also come on when an identified caller on the Invited Caller List is calling in. They will stay on until the end of the ring count or if the line is answered. The Green LEDs also flash once quickly when there is a hang-up or a detected phone being taken offhook. The Four Types of Incoming Calls There are four categories of calls that will be processed: Answered, Invited, Blocked and Faxes. Note: If during the phone company’s delivery of the Caller Identification Number an “Error” is displayed, all callers will be treated as Answered calls. Answered Calls: PrivacyCall will answer and announce your OGM greeting for the following Caller ID names or numbers: Private, Out of Area, Unavailable, Anonymous, Unknown, Error or no number displayed at all and process them as a normal call to the answer machine if no privacy code is entered. Invited Calls: When an incoming Caller ID number matches a stored Invited number, your caller will not hear the Outgoing Message, but instead, PrivacyCall will allow all phones to ring, then after five rings PrivacyCall will hang-up, assuming the answer machine doesn’t answer the call. If Forwarding is enabled, the call will be answered and PrivacyCall will begin ringing the Phone Port only, three times, followed by your OGM 2 announcement and then, forwarded to your forwarding number, which could be your cell phone. Blocked Calls: Callers on your Blocked list cannot ring your phone, cannot leave a message or enter a code to gain access. Blocked numbers are numbers that you add and will be answered with ringing heard only by your caller, followed by a hang-up. Fax Calls: PrivacyCall Blocker automatically detects incoming fax calls, during OGM 1, that have the calling (CNG) signal. These calls are routed directly to Port 4 where your fax machine could be located or you can use this feature to dump junk fax calls on your regular line. In this case you would not have a fax machine installed on Port 4. The fax call would simply ring into Port 4 and then hang-up after 5 rings. Caller List Limits When the allocation for both Invited and Blocked numbers total 45, a BUZZ instead of a beep will be heard in the handset to indicate memory is full and the Red LED will flash five times. When a duplicate or entry error occurs a BUZZ can also be heard in the handset. J Callers List J Name/Number (Add your stored numbers here for future reference) J J Name/Number Name/Number Name/Number 5 Advanced User Features Internal Audible Ringer PrivacyCall models come with an internal audible ringer just like a phone has so you can hear your caller ringing in. The ringer only sounds when an invited or coded caller dials in. So when your caller who is on the Invited list calls, the ringer will sound off and port 2 will begin to ring any phones connected to it. You could use the PrivacyCall as a standalone ringer and leave the rest of your phones and answer machine connected as usual throughout your home or office. This ringer can be turned on and off with program code 941 (ON) or 940 (OFF). Enter programming with # # and then enter 940 hear <beep><beep> to turn it off. The ringer comes turned on from the factory. Whole House or Office Ringing All PrivacyCalls can ring up to 10 phones throughout the home or office with its built-in ring generator supplying the standard 90 volts at 20 Hz. which is compatible with all makes of telephonic equipment. If you want to install the PrivacyCall at your home or office in line with the terminal block (demarc) and the rest of your phones, then the PrivacyCall can ring your phones only when you want them to. Telephone Company Lines HOME or OFFICE DSL-VoIP Compatibility PrivacyCalls are completely compatible with Digital Subscriber Line (DSL) and/or VoIP carrier signaling from your phone company. You might have to use a DSL filter in line with the PrivacyCall if digital noise can be heard on the line. Distinctive Ring Call Routing Routing of a Distinctive Ring associated with a separate number from your phone company is supported on Ports 2 & 4 only on the PrivacyCall Blocker. The type of ring pattern you receive could be the double ring Short-Short, the triple slow ring Short-Long-Short, or the fast triple ring of Short-Short-Long. To change these assignments, enter programming using any phone, and dialing # #, <beep> then enter 7632 to set Double ring to port 2 and Short Long Short to Port 4. Combination Corded-Cordless/Answer Machine Phone System If you have a single combination phone, connect it to Port 2 to capture Invited callers only. You will need an optional second inexpensive answer machine for all other anonymous callers connected to Port 1. Alternatively, if you have Voice Mail service from the phone company, connect your combo phone to Port 1 so the phone company can capture your calls. If you want to just use the internal ringer and capture anonymous calls to the combo phone/answer machine, connect your combo phone to Port 1. Note: Call Forwarding rings only port 2 or 3, but you can answer any call through any port or from any extension phone in the home/office. 6 Auto Fax Detection Feature (Code 501) PrivacyCall Blocker can automatically detect incoming fax calls and route them to Port 4 after OGM 1 is announced. This feature is perfect for routing regular fax calls directly to your fax machine without your having to stay by the phone. Conversely, it is also handy for routing junk fax calls to Port 4 which is separate from your phones and answering devices. In this case you would not have a fax machine installed on Port 4. The fax call would simply ring into Port 4 and then hang-up after 5 rings. This feature can be disabled with code 500 and re-enabled with code 501 through programming. Using your phone in any port, PRESS ## then PRESS 500 hear <Beep> <Beep> to disable. To re-enable auto fax detection, enter 501 hear <Beep> <Beep>. Changing Extension (Distinctive) Ringing Styles (Code 72) PrivacyCall defaults to the normal USA ringing style to all ports from the factory. You can set distinctive ringing to each extension by using your phone in any port and PRESS ## then PRESS 72 hear <Beep> <Beep>. To change to the normal USA ring style to all ports PRESS 71. Note: When the combination phone Code 753 is enabled, distinctive ringing to ports will ring in normal (71) mode only. Call Forwarding Feature (Code 57) PrivacyCall can forward your PrivacyCall to your cell phone or anywhere with 3-Way Calling from your phone company. When your caller enters the Privacy code for extension 2, your phone will ring 3 times and then begin the forwarding process. Answer and carry on your conversation as normal. When you are done, simply hang-up and PrivacyCall will reset after your caller hangs-up. 1) Call Forward Interruption During forwarding, you can interrupt the call being forwarded in the event you are there locally by simply picking up on any of the phones on any of the ports on PrivacyCall. However, after the PrivacyCall DIALS the forwarding number, you will hear a busy signal telling you the line is busy forwarding. To interrupt the call, press any key once to end the forwarding process within two seconds. This will connect you immediately to the caller. You can also stop the forwarding process completely at the end of your cell call by pressing * # at anytime. 2) Timeout Features Once your caller is forwarded to your forwarding number, he will have a limit of 20 minutes to continue his call. Thereafter, you will hear a signal beep every 20 minutes and either party can simply press any key on the phone dial pad to continue for another 20 minutes. The timeout feature also limits the time a call can stay forwarded on by accident. Setting the Forwarding Number (Code 67) Use your phone in any port and PRESS ## then PRESS 67, enter the forwarding number to your cell phone, Ex. 602-996-5755 followed by the * key hear <Beep><Beep>. Then, PRESS 57 to enable forwarding. Ex. enter ##, 67, 602-996-5755 *, 57 (wait for beeps). To disable forwarding PRESS 56. Some phone company’s 3-way calling programs require a long delay in order to make the call connection so you can use time delay codes to slow down the timing. For example, use #2 in the dial string above to get a 2 second pause or use #5 to get a 5 second delay. Ex. enter ##, 67, #2 602-996-5755 * Call Forwarding Ringing Option (580) To remove the ringing of your phone locally before starting the Call Forwarding process, enter programming with ## and then code 580 hear <beep> <beep>. To turn this feature back on enter 581 hear <beep> <beep>. Note: The second OGM must be recorded to inform your callers of forwarding. Changing PrivacyCall Answer Delay (Code 792) The default answer delay is two rings to present Caller ID info and allow ringing to all your phones one to two times before PrivacyCall answers. The default setting is 792. To change the delay of the incoming ring to one ring, use your phone in any port and PRESS ## then PRESS 791 hear <Beep><Beep>. This allows the Caller ID to still work yet forces the ring interception to occur faster. Note: This may not work for certain phone line services. 7 Time Of Day Mode (TOD) - Programmable Time Feature Introduction During a certain time of the day or night you can set the PrivacyCall to enter into TOD Mode. This mode is designed to make all calls go to the answer machine when it is enabled, either on a one time or daily basis. If you run a business, then you would use this mode for after hours so all callers can leave a message. If your work or dinner times are different from regularly scheduled times, you would use this mode so that you can get your sleep or to completely avoid disruptive callers. To enable the TOD Mode, you must first understand military time presented here. The clock on the PrivacyCall display converts the telephone company’s supplied clock data into either AM or PM time. If the morning hours are 1:00am = 0100 hours, 2:00am = 0200 hours, etc. until noon = 1200 hours and then the afternoon hours are 1:00pm = 1300 hours, 2:00pm = 1400 hours, etc. until midnight = 2400 hours. So, to set a time for a business after hours beginning in the early evening until the next morning or 5:00pm to 8:00am you would use the military time of 1700 and 0800 as the two numbers for your TOD settings. To set a time for dinner in the evening from 6:00pm to 8:00pm you would use the times of 1800 and 2000. To set a time for early morning until lunch time or 1:00am to 12:00pm you would use 0100 and 1200. Time Of Day Mode – Programming (Code 530) Using military time as shown above, set this feature on by entering programming with ## then enter 530 <Beep> then your beginning time of day (Ex. 1700, 5:00pm from example above) hear <Beep><Beep>. Next enter 531 <Beep> then your ending time of day (Ex. 0800, 8:00am from example above) hear <Beep><Beep>. The Port 3 Green LED will flash every 30 seconds to indicate the Time Of Day period is enabled once the LCD clock arrives at your Beginning Time of Day. Entering 530 and the beginning time of day you originally entered will turn this feature OFF and you will hear <Beep><Beep>. After the time sequence expires, the PrivacyCall TOD will be reset to allow calls through normally. To start-up the time period again, re-enter either these same settings or new ones. Entering code 532 will enable the Time of Day Period to remain in effect from day to day. If the clock has not been initialized by the Caller ID you will need to call into the PrivacyCall to start it up, otherwise a BUZZ will indicate that there is no CID clock settings. If there is a power outage, all of the program settings remain intact, but the Caller ID display will be cleared of all data. After power comes back on, the first call into the PrivacyCall will resume the Time Of Day feature. Time Of Day Mode - Urgent Call Notification When using the TOD function, Invited, Blocked and Unfamiliar callers will be directed to your answer machine. However, in case of an emergency, you can give special callers a method of ringing your phone. When the answer machine answers the call, your caller can make your phone ring in Port 2 by entering # * 2 (or the access code you assigned for Port 2). You can keep this transfer code a secret or describe it to your caller in your answer machine message. For example, “If you have an urgent call and need to speak to someone right now, please enter # * 2, otherwise please leave a message”. If your caller enters this code, your phone in port 2 will ring and if call forwarding is enabled, your caller will be forwarded as well. Note: Additional phones or devices off-hook on the line or poor line conditions can prevent call transfer tones from working. 8 Changing Number of Rings To A Port (Code 8+) The PrivacyCall defaults to 5 rings to each port for all functions. If you want to increase or decrease this number of rings, then enter programming with your phone in any port and PRESS ## then PRESS 8, then the number of rings you want, Ex. 4 or 5 or 6, etc. hear <Beep><Beep>. Hang-up All Uninvited Callers (Code 601) PrivacyCall can terminate each call that has no dialed entry from your caller. This mode will block all telemarketing calls and will not ring your answer machine. Regular Invited callers will get through and can leave a message, while all others cannot. To enable the Hang-Up Mode, use your phone in any port and PRESS ## then PRESS 601 hear <Beep><Beep>. To return to allowing some calls through to your answer machine, PRESS ## then 600. Intercom Between Ports with Transfer Command PrivacyCall can intercom phone devices between ports off the main telephone line by using the transfer command of # * and the port you are calling. From Port 1 you can call Ports 2/3 or Port 4 and cause the phones there to begin ringing. This is useful for calling from one room or floor to another if you have installed the PrivacyCall with individual cabling from each port. This is also helpful for testing to see if the phones ring or for sending a fax scan to a modem. The fax machine can be used as a scanner when transferring the call to your modem. Just have the fax modem connected to port 3 auto answer the call. PrivacyCall Standby Mode (Functions Off) To change to Standby Mode, use your phone in any port and PRESS ## then PRESS 90 hear <Beep> <Beep>. To turn PrivacyCall back ON, PRESS ## then 91. Note: All four ports (phones, fax, etc.) will ring in Standby Mode. This feature allows you to leave PrivacyCall off whenever you like without disconnecting the device and the RED light will blink slowly. Changing Privacy Codes for Extensions 1, 2, 3 or 4 To change the access code to any extension, use your phone in any port and PRESS ## then PRESS 3 then enter the extension number you are changing. If it's Extension 1, PRESS 1; if it's Extension 2, PRESS 2, etc., hear <Beep>; then enter the access code you desire for that extension; when finished, PRESS * hear <Beep><Beep> (sample string: 3, 1, 567,* = Access code changed to 567 for Extension 1). Note: you cannot start all ports with the same extension number or change an extension number to the same number that is already in use on another port. Ex. Code 2 cannot be used on Port 1 when it is already installed on Port 2. You must uninstall the code in use at that port first to install the code you want. Remote Access (PIN) PrivacyCall can be remotely accessed for personal use or Digitone service work if you install a PIN code using Code 0. You can enter a PIN code at any time after you have established # # Beep. To do this, enter 0, hear <beep>, then a four to six digit number followed by *, hear <beep> <beep>. From then on you must always enter this PIN to access programming. To access programming remotely, call into the PrivacyCall and enter # #, then your PIN and hear <beep> <beep>. You are now in programming mode just as though you were locally connected. Once connected, you can make changes as necessary, for example, changing the forwarding number or adding or deleting a number to the caller list. PIN Code Reset You can also reset this PIN code in the event you accidentally install one and either don’t know you have installed it or forgot the code. You would notice this problem if you tried to enter programming and can’t get it to Beep after entering # #. To reset the code enter # # then enter 0 (zero) one at a time 9 (maximum of 6) until you hear a Beep, then enter * and hear <beep> <beep>, hang-up. Try to enter programming again with # # and hear <beep>. Troubleshooting Caller Lists You can check to see if you have stored Invited or Blocked caller lists by just taking the phone off the hook and then hanging back up. Right after you hang-up, the front two green lights will come on for a second to let you know that it has stored numbers. If you have stored only Invited callers, then just the left green light will come on. If you have stored only Blocked callers, then just the right green light will come on. Testing the PrivacyCall for Caller ID Reception To check if you are getting good Caller ID reception, call into the PrivacyCall from an outside line and see if the display shows the call. After this call has settled and with the Left Red light steady, press the Yellow button on the front panel once and watch to see if the Left Green light flashes five times. If so, then you have a good connection. If however, the Right Yellow light flashes five times then the PrivacyCall did not either receive the data or is not compatible with your phone company. Front Panel Caller ID Indicators Front view of the PrivacyCall showing the Green indicator for good Caller ID reception Front view of the PrivacyCall showing the Yellow indicator for bad Caller ID reception Dialing Monitor You can monitor inbound calls by watching the Left Yellow light flash as your caller enters touch tones during the outgoing message or any other time. It also can be used to show if the controller is receiving the touch tones as you dial. If you ever lose the ability to get your phones to ring with an access code entry or cannot enter programming, then this would be the first place to check. Just pick up the phone and dial any numbers and watch the Yellow light flash with the dialing. If it doesn’t flash then the unit needs repairing. User Settings Reset Sometimes you might forget your user settings, like port access codes and want to start over. You can reset the PrivacyCall to factory with the Code 99. Just enter programming with # # hear <beep> then 99 and hang-up. This will not erase your OGM’s or Caller Lists. 10 Limited One Year Warranty Digitone warrants to the original purchaser that its PrivacyCall device and the component parts thereof, are free from defects in workmanship and materials for a period of one year from the date of purchase. DO NOT INSTALL THIS UNIT OUTDOORS, IT IS NOT WEATHERPROOF! During the period of one year from the date of purchase, Digitone will repair, or at its option, replace defective component part(s) or product upon delivery to the Service Department accompanied by proof of purchase (sales receipt) without charge for parts or labor. In order to obtain warranty service you must maintain a record of purchase for the duration of the warranty period. This limited warranty does not apply if: the product is damaged by accident, misuse, improper installation, improper line voltage, lightning, fire, water, or other acts of nature, the product is altered or repaired by anyone other than Digitone, the serial number is altered, defaced, or removed. Digitone shall not be liable for any consequential damages, including without limitation, damages resulting from loss of use or cost of installation. Some states do not allow this exclusion or limitation of incidental or consequential damages, so the above exclusion or limitation may not apply to you. This warranty is in lieu of all other warranties, express or implied including any implied warranty of merchantability or fitness for a particular use or purpose. This limited warranty gives you specific legal rights; other rights may apply which vary from state to state. Limited Liability Notice Digitone Communications Inc. advises customers who use the PrivacyCall screening and blocking device that certain personal situations may arise out of the use of it which include but are not limited to: blocking certain individuals, businesses and telephonic devices that are calling into your home or business who might find the PrivacyCall offensive due the nature of its call blocking features which you have desired to use voluntarily. Other situations may arise out of the use of the Time Of Day feature when no callers can ring directly through and thereby result in missed opportunities or emergencies. Digitone shall not be liable for any consequential damages arising from these and other situations, including without limitation, damages resulting from the use of the PrivacyCall screening and blocking device or any of its associated hardware or software by the original purchaser, user, owner or anyone or any entity. Digitone further asserts that the user should use discretion when blocking his callers to avoid any potential problematic social or legal matters. PrivacyCall users accept these conditions with full knowledge of their actions and hold Digitone Communications Inc. harmless of the outcome. Service-Repair and FCC Registration Information In the event the product proves defective in workmanship or materials, the purchaser should call Digitone at 1-877-610-5693 to obtain a Return Merchandise Authorization (RMA). The purchaser would then put this code on the exterior of the package shipped to Digitone. Any unit returned without this code will be refused and returned at sender's expense. Product should be shipped freight prepaid along with evidence of authorization to: Digitone Communications, Inc. 6501 E. Greenway Pkwy. Ste. 103 Scottsdale, AZ 85254. Ship the unit freight prepaid to the above address. Your PrivacyCall is registered with the Federal Communications Commission and is in compliance with Parts 15 and 68 of the FCC Rules and Regulations. This device has been tested and found to comply with the limits for a "Class B" computing device in accordance with Part 15 of the FCC Rules. PrivacyCall Blocker Website Support Visit www.privacycallblocker.com for help with this device. Support can also be obtained at 1-877-610-5693 or via email at [email protected]. Copyright 1990-2007. All Rights Reserved.