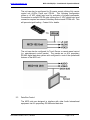
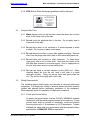
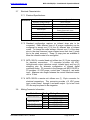
1
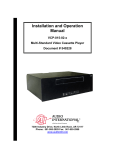
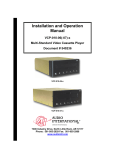
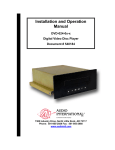
Installation & Operation Manual
MCD-102-RU(CH)-x
10 Disc CD Player/Changer
Document # 540031
a DeCrane Aircraft Company
7300 Industry Drive, North Little Rock, AR 72117
Phone: 501-955-2929 Fax: 501-955-2988
www.audiointl.com
Audio International, Inc.
MCD-102-RU(CH)-x Installation & Operation Manual
Document Revision History
Rev. Level
IR
A
B
Date
12/1997
05/1998
04/2000
C
09/2002
Description
Initial Release
ECN #2214
ECN #4854
Format Update, Add Photo, Update Wiring
Requirements, Removed MCD-104-01-x
Reference Documents
Document #
521906 Rev A
521887 Rev A
Description
MCD-102-CH-x Outline Drawing
MCD-102-RU-x Outline Drawing
Service Bulletin List
Service
Bulletin #
Subject
Manual
Revision
Revision
Date
Table of Illustrations
Section #
Description
Page #
2.2
Block Diagram
4-5
7.0
Reference Drawings
18-21
PROPRIETARY INFORMATION NOTICE: Despite any other copyright notice, this document
and information disclosed herein contains confidential, proprietary designs owned by Audio
International, Inc. Neither this document nor the data contained herein shall be reproduced,
used, or disclosed to anyone without the written authorization of Audio International, Inc.
Document # 540031, Rev C, 09/2002
Page 1 of 20
Audio International, Inc.
MCD-102-RU(CH)-x Installation & Operation Manual
Table of Contents
Section
1.0
1.1
1.2
1.3
1.4
Description
General Information . . . . . . . . . . . . . . . . . . . . . . . . . . . . .
Introduction . . . . . . . . . . . . . . . . . . . . . . . . . . . . . . . . . . . . .
Purpose of the Equipment . . . . . . . . . . . . . . . . . . . . . . . . . .
Operational Features . . . . . . . . . . . . . . . . . . . . . . . . . . . . . .
Optional Equipment . . . . . . . . . . . . . . . . . . . . . . . . . . . . . . .
Page
3
3
3
3
4
2.1
2.2
2.3
2.4
Application . . . . . . . . . . . . . . . . . . . . . . . . . . . . . . . . . . . . .
Introduction . . . . . . . . . . . . . . . . . . . . . . . . . . . . . . . . . . . . .
Block Diagram - Typical Application. . . . . . . . . . . . . . . . . . .
Multiple Unit Configurations . . . . . . . . . . . . . . . . . . . . . . . ..
Data Bus Control . . . . . . . . . . . . . . . . . . . . . . . . . . . . . . . . .
4
4
4
5
6
3.1
3.2
3.3
3.4
3.5
3.6
3.7
3.8
3.9
3.10
Installation . . . . . . . . . . . . . . . . . . . . . . . . . . . . . . . . . . . . .
Prior to Installation . . . . . . . . . . . . . . . . . . . . . . . . . . . . . . . .
Unpacking and Inspection . . . . . . . . . . . . . . . . . . . . . . . . . .
Cautions & Warnings . . . . . . . . . . . . . . . . . . . . . . . . . . . . .
Compact Disc Care. . . . . . . . . . . . . . . . . . . . . . . . . . . . . . .
Wiring Requirements . . . . . . . . . . . . . . . . . . . . . . . . . . . . . .
Physical Characteristics . . . . . . . . . . . . . . . . . . . . . . . . . .
Electrical Characteristics . . . . . . . . . . . . . . . . . . . . . . . . . .
Mating Connector Information . . . . . . . . . . . . . . . . . . . . . . .
Pinout Assignments and Descriptions . . . . . . . . . . . . . . . . .
Post Installation Test . . . . . . . . . . . . . . . . . . . . . . . . . . . . . .
6
6
7
7
8
8
9
10
11
11
12
4.1
4.2
4.3
Operation . . . . . . . . . . . . . . . . . . . . . . . . . . . . . . . . . . . . .
Introduction . . . . . . . . . . . . . . . . . . . . . . . . . . . . . . . . . . . . .
Operation . . . . . . . . . . . . . . . . . . . . . . . . . . . . . . . . . . . . . .
Optional Remote Operation. . . . . . . . . . . . . . . . . . . . . . . . .
12
12
13
14
5.1
5.2
5.3
Troubleshooting . . . . . . . . . . . . . . . . . . . . . . . . . . . . . . . .
Introduction . . . . . . . . . . . . . . . . . . . . . . . . . . . . . . . . . . . . .
General Troubleshooting Procedures . . . . . . . . . . . .. . . . .
Troubleshooting Chart . . . . . . . . . . . . . . . . . . . . . . . . . . . . .
16
16
16
17
6.0
Specifications . . . . . . . . . . . . . . . . . . . . . . . . . . . . . . . . . .
17
7.0
Reference Drawings . . . . . . . . . . . . . . . . . . . . . . . . . . . . .
18
2.0
3.0
4.0
5.0
Document # 540031, Rev C, 09/2002
Page 2 of 20
Audio International, Inc.
MCD-102-RU(CH)-x Installation & Operation Manual
MCD-102-RU(CH)-x
10 Disc CD Player/Changer
1.0
General Information
1.1
Introduction
This manual contains information for the installation of Audio International,
Inc. (AI) 10 Disc CD Player/Changer, Model Numbers MCD-102-CH-x
control head, MCD-102-RU-x remote unit.
The “-x” suffix included in the model number designates the type of
connector utilized; “1” = Positronic and “2” = D-Subminiature. Also
included are mechanical and electrical characteristics of the units.
1.2
Purpose Of The Equipment
The MCD 10 Disc CD Player/Changer is a high quality CD player/changer
specifically designed to meet the special requirements of aircraft use.
This CD player/changer has the capability of storing up to ten 5" CD discs
and can be mounted at various angles in the aircraft. Each CD
player/changer includes a control head for operating the unit and a remote
unit where the CDs are stored. Note that the MCD-102-CH-x and
MCD-102-RU-x must be ordered together in order for the MCD unit to
function, as the remote unit (-RU) will not function without the
corresponding control head (-CH).
1.3
Operational Features
DO-160C tested
G Operates directly from +28 VDC
G Compact, lightweight package
G Backlit LCD indicator (green) with front panel controls
G Optional infrared remote control capability
G AI proprietary RS-485 digital data bus compatible
G Frequency response of 20 Hz to 20 kHz (+/-1dB)
G Adjustable audio output level of 1 to 5 VRMS
G Standard plating options for front bezel
G No cooling requirements
G Specially designed to meet aircraft standards
G
Document # 540031, Rev C, 09/2002
Page 3 of 20
Audio International, Inc.
1.4
MCD-102-RU(CH)-x Installation & Operation Manual
Optional Equipment
Audio International, Inc. offers a comprehensive family of Cabin Control
Modules for PC interface. These modules provide convenient solutions
for a variety of frequently encountered interfacing needs or special
requirements and are an important part of AI’s “building block” system for
configuring total cabin management.
Contact your AI representative for details.
2.0
Application
2.1
Introduction
The MCD 10 Disc CD Changer/Player is a compact disc changer system
comprised of the remote unit and a CD changer. As noted previously, the
MCD-102-CH-x and MCD-102-RU-x must be ordered together in order for
the MCD unit to function as the remote unit (-RU) will not function without
the corresponding control head (-CH).
2.2
Block Diagram -Typical Application
This system is fully compatible with Audio International’s proprietary
RS-485 digital data bus system. It can be configured for IR remote control
utilizing AI’s remote control unit AI-RCx-17xxxx and IFR-485.
Document # 540031, Rev C, 09/2002
Page 4 of 20
Audio International, Inc.
MCD-102-RU(CH)-x Installation & Operation Manual
The unit can also be configured for IR remote control utilizing AI’s remote
control unit AI-RCx-17xxxx and IFR-9A. This following configuration
utilizes a +5 VDC digital logic level for activation of infrared commands.
Connection to multiple IFR-9A units utilizing the +5 VDC digital logic level
connection requires an external Schottkey diode at each IFR-9A unit. This
will prevent signal loading. Contact AI for details.
The unit can also be configured for Touch Screen or remote panel control
(i.e. entertainment control panels). The panels are on AI’s proprietary
RS-485 digital data bus system and configured to control the operational
features of the MCD unit.
2.3
Data Bus Control
The MCD units are designed to interface with other Audio International
equipment via AI’s proprietary RS-485 serial data bus.
Document # 540031, Rev C, 09/2002
Page 5 of 20
Audio International, Inc.
2.4
MCD-102-RU(CH)-x Installation & Operation Manual
Potentiometer Settings
Right and left output level adjustments are located on the rear of the unit.
The adjustment potentiometers allow the user to adjust the output
between 1 and 5 VRMS. To increase the level, turn the potentiometer
screw clockwise; to decrease turn the screw counterclockwise.
3.0
Installation
3.1
Prior to Installation
3.1.1 During the design and layout of the aircraft cabin, careful
consideration of the location of this and all other audio/video
modules is necessary. Some of the items to consider include:
•
•
•
•
•
•
•
•
Space
Proximity to other devices (i.e. source equipment)
Available power supply
Length of cable runs
Environmental conditions (temperature, humidity, etc.)
Location of other aircraft systems (i.e. oxygen delivery)
Access for service repair (if applicable)
Convenience for user interface (if applicable)
3.1.2 The MCD unit(s) shall be installed to conform to the standards
designated by the customer, installing agency, and existing
conditions as to the unit location and type of installation.
3.1.3 Temperature consideration of the installation area is important.
Operating temperature range for the unit is between -15° and +55°
Celsius.
3.1.4 The IFR unit experiences a large temperature change during
installation. It should be thoroughly cleaned before use. Also allow
the unit to cool to cabin temperature about four (4) hours before
use.
Document # 540031, Rev C, 09/2002
Page 6 of 20
Audio International, Inc.
3.2
MCD-102-RU(CH)-x Installation & Operation Manual
Unpacking and Inspection
3.2.1 Carefully open the packaging and remove the MCD unit. Verify that
all components have been included in the package per the packing
list. Inspect the unit for shipping damage.
3.2.2 If damage has occurred during shipping, a claim should be filed
with Audio International WITHIN 24 hours and a Return Request
Authorization Number shall be obtained from AI. Refer to the
front cover of this manual for address and telephone number of
Audio International, Inc.
Repackage the unit in its original
packaging materials and return it to AI following instructions given
by the AI representative. If no return is necessary, retain the
packing list and the packing materials for storage.
3.3
Cautions and Warnings
3.3.1 It is important to do a pin-to-pin power and ground check on all
connectors. Ensure that power and ground are applied only where
specified. Damage to the unit may result if power or ground is
applied to the wrong points.
3.3.2 DO NOT remove any factory-installed screws. Damage to the units
may result and void any warranties.
3.3.3 DO NOT install near heat sources such as direct sunlight, warm air
exhausts, or heaters.
3.3.4 The CD control head and CD remote units may not function
properly if they are more than 15 feet away from each other.
3.3.5 No scheduled maintenance is required to ensure continued
airworthiness.
3.3.6 DO NOT touch the liquid crystal fluid if the LCD case is damaged or
broken. It may be dangerous and cause serious harm. If your
body or clothing are exposed to the fluid, wash immediately with
soap and water.
3.3.7 All headphone amplifiers and line level amplifiers should be located
no more than three (3) feet away from source equipment.
3.3.8 The MCD unit shall NOT be mounted on its side, at an angle, or in
an inclined position.
Document # 540031, Rev C, 09/2002
Page 7 of 20
Audio International, Inc.
MCD-102-RU(CH)-x Installation & Operation Manual
3.3.9 ESD (Electro Static Discharge) guidelines shall be followed.
3.4
Compact Disc Care
3.4.1 When playing a disc for the first time, check that there are no burrs
stuck in the center hole of the disc.
3.4.2 Do not touch the playback side of the disc. Do not apply tape to
either side of the disc.
3.4.3 Do not store discs in hot locations or in areas exposed to direct
sunlight. Do not store in damp, moist areas.
3.4.4 Do not stack loose discs or prop them against anything. Remove
discs from the player and return them to their cases after each use.
3.4.5 Do not clean with solvents or other chemicals. To clean discs,
wipe gently with a soft, lint-free cloth. Start from the center of the
disc and wipe outward in a circular motion. Dust or fingerprints on
the disc may cause sound or picture difficulties.
3.4.6 Do not use liquid or aerosol cleaners on the MCD unit. When
cleaning heavy dirt from the unit, soak a soft cloth in a weak
detergent solution. Wring out excess liquid and gently wipe the
unit. Dry the unit thoroughly with a soft cloth.
3.5
Wiring Requirements
The installing agency shall supply and fabricate all external cables and
connectors. The length and routing of external cables should be carefully
studied and planned before attempting installation of the equipment.
Allow adequate space for installation of cable and connectors.
3.5.1 Power and Ground Wiring
All power and ground wires shall be 22 AWG, MINIMUM, shielded
twisted pair with the shield properly bonded at one end only. Power
ground wires shall be bonded to electrically conductive chassis
mounting point with <1 Ω resistance or <50 Ω impedance. Twisted
shielded pair cable shall be in accordance with the standard military
specification of NEMA WC 27500 or equivalent.
Document # 540031, Rev C, 09/2002
Page 8 of 20
Audio International, Inc.
3.5.2
MCD-102-RU(CH)-x Installation & Operation Manual
AI’s Proprietary RS-485 Data Bus
The MCD units are designed to interface with other Audio
International equipment via AI’s proprietary RS-485 serial data bus.
The data bus shall be implemented using a twisted shielded pair
cable in accordance with the standard military specification of
NEMA WC 27500 or equivalent. The wire size for the conductors
in this cable shall be 22 AWG, MINIMUM. Shield pins are available
for connecting data bus shields when required. Shield terminations
shall be made as close to the connector pin as possible.
All modules on AI’s proprietary RS-485 data bus shall be connected
in a ‘daisy-chain’ configuration. AI’s proprietary RS-485 data bus
specification is available upon request.
3.5.3 Audio Lines
All analog audio wiring shall be 24 AWG (MINIMUM) twisted,
shielded cable in accordance with the standard military
specification of NEMA WC 27500 or equivalent unless otherwise
specified.
3.6
Physical Characteristics
3.6.1 The MCD unit shall be located away from heat sources, magnetic
fields, direct sunlight, and areas with excessive dust. The unit shall
NOT be mounted to the skin of the aircraft.
3.6.2 Refer to Section 7.0 for unit dimensions and mounting hole sizes.
3.6.3 The unit shall be rigidly mounted to its location using the
appropriate fastening hardware supplied by the installing agency.
3.6.4 When mounting the unit to the aircraft’s frame, allow sufficient
space for mating connectors.
Document # 540031, Rev C, 09/2002
Page 9 of 20
Audio International, Inc.
3.7
MCD-102-RU(CH)-x Installation & Operation Manual
Electrical Characteristics
3.7.1 Electrical Specifications:
Electrical
Power
Operating Voltage Range
Data Bus Type
Audio Frequency Response
Audio Output
Audio S/N
Dynamic Range
Channel Separation
Infrared Input
1A Maximum @ +28 VDC
+18 to +30 VDC
AI Proprietary RS-485
20 Hz to 20 kHz
1 to 5 VRMS (2 kΩ minimum load)
Factory preset at 2 VRMS
93 dB (nominal)
>93 dB
>85 dB
+5 VDC Digital Logic Level
3.7.2 Standard configuration requires no infrared strap pins to be
connected. Each different type of AI source equipment can be
configured to accept one (1) of four (4) different sets of infrared
codes. To change the code settings, connect one (1) of the strap
pins to the strap common (never connect more than one (1) strap
pin to the strap common). Three (3) strap pins are available to
allow the infrared codes to be configured.
3.7.3 MCD-102-CH-x control head unit utilizes two (2) 15-pin connectors
for electrical connections. P1 connector provides +28 VDC,
left/right audio output, data bus control, infrared input, and four (4)
strapping pins for alternate configuration of infrared digital
command codes. P2 connects to the changer unit MCD-102-RU-x.
P2 provides +12 VDC power, control lines 1 through 4, and audio
input. Maximum wire length between the control head and remote
unit is 15 feet.
3.7.4 MCD-102-RU-x remote unit utilizes one (1) 15-pin connector for
electrical connections. This connector provides +12 VDC power
input, control lines 1 through 4, and audio output. Up to ten 5-inch
CD disc may be placed in the magazine.
3.8
Mating Connector Information
Model #
Pin #
Mating Connector
MCD-102-CH-1
P1
P2
P1
P2
P1
P1
RD15F10JVL0
RD15M10JV30
DAMA-15S
DAMA-15P
RD15F10JVL0
DAMA-15S
MCD-102-CH-2
MCD-102-RU-1 (-3)
MCD-102-RU-2 (-4)
Document # 540031, Rev C, 09/2002
Page 10 of 20
Audio International, Inc.
3.9
MCD-102-RU(CH)-x Installation & Operation Manual
Pinout Assignment and Descriptions
3.9.1 The MCD-102-CH-x pinout is as follows:
Pin #
1
2
3
4
5
6
7
8
9
10
11
12
13
14
15
P1
Description
+28 VDC Power In
Ground
R+ Audio Output
R- Audio Output
L+ Audio Output
L- Audio Output
Data Bus (A)
Data Bus (B)
Infrared Input +
Infrared Input IR Strap 2
IR Strap 3
IR Strap 4
IR Strap Common
Reserved
Pin #
1
2
3
4
5
6
7
8
9
10
11
12
13
14
15
P2
Description
+12 VDC Power Output
Ground
Control 1
Control 2
Control 3
Control 4
Reserved
Reserved
R+ Audio Input
R- Audio Input
L+ Audio Input
L- Audio Input
Reserved
Reserved
Reserved
3.9.2 The MCD-102-RU-x remote unit pinout is as follows:
Pin #
1
2
3
4
5
6
7
8
9
10
11
12
13
14
15
Document # 540031, Rev C, 09/2002
Description
+12 VDC Power Input
Ground Input
Control 1
Control 2
Control 3
Control 4
Reserved
Reserved
R+ Audio Output
R- Audio Output
L+ Audio Output
L- Audio Output
Reserved
Reserved
Reserved
Page 11 of 20
Audio International, Inc.
3.10
MCD-102-RU(CH)-x Installation & Operation Manual
Post Installation Test
3.10.1 With the aircraft power ON, apply power to the CD control head
and remote units (if applicable). Load the CD remote unit with
one to ten 5" CDs. Press the PL/ST (play/stop) button on the
control head to start playback.
3.10.2 Verify that audio can be heard through cabin speakers and/or
cabin headphones, depending upon the configuration of the
aircraft cabin. Adjust cabin audio to customer preference with
existing audio equipment; the MCD player does not feature
independent volume control.
3.10.3 Select a CD with the DISC ADV (disc advance) or DISC REV
(disc reverse) buttons. Select a specific track of the CD and
press the TRACK ADV (track advance) or TRACK REV (track
reverse) buttons. The LCD display will indicate the CD number
and track selected for playback as well as the elapsed time.
3.10.4 Utilize all the functions on the front panel of the MCD-102-CH-x
(see Section 4.2 for complete list of front-panel buttons and their
functionality) and ensure that the MCD player responds correctly.
I.e., the unit should fast-forward when that button is pressed,
paused when that is pressed, etc.
3.10.5 If applicable, utilize all the functions on the remote control for the
MCD-102-CH-x (see Sections 4.3 and 4.4 for complete list of
remote control functions) and ensure that the MCD player
responds correctly as with the front panel controls.
3.10.6 Press the PL/ST button on the control head. Press EJECT on the
remote unit. Remove the CDs from the CD magazine. If there is
a diagnostic error in the CD changer system, the LCD indicator
will display several different error codes. Refer to Section 4.0 for
definitions of error codes.
3.10.7 If problems arise with the performance of the MCD player, refer to
the Troubleshooting Guide in Section 5.0 for assistance.
Document # 540031, Rev C, 09/2002
Page 12 of 20
Audio International, Inc.
4.0
MCD-102-RU(CH)-x Installation & Operation Manual
Operation
4.1
Introduction
4.1.1 The MCD control head unit can be operated via front panel buttons
or optionally controlled by infrared remote or AI’s touch screen
panel. Digital codes allow the unit to interface with an infrared
handheld remote via an infrared receiver, IFR-9A or IFR-485.
Multiple units can be controlled independently using available
programming pins.
4.1.2 Although control options vary among units, standard commands are
with front button control, remote or touch screen include
play/pause, forward and reverse track search, forward and reverse
disc search, and shuffle.
4.1.3 Before setup or playing a CD, ensure that aircraft power is applied
to the player.
4.1.4 Load up to 10 CDs into the magazine with the label side up. Open
the door on the remote changer and carefully insert the magazine.
Observe the arrow on the magazine for proper orientation.
4.1.5 Push the magazine into the unit until it clicks. If the magazine does
not slide into the unit easily, check the orientation and retry. Do not
use excessive force. If the magazine does not lock properly, take
the magazine out, press the EJECT button inside the doorframe
and reinsert in accordance with the instructions above. Close the
door on the CD magazine compartment.
4.2
Operation
Press the OFF button to remove power to the MCD unit.
With a magazine loaded in the changer, press the PLAY/PAUSE
button on the unit or hand-held IR remote transmitter. The first CD
will begin to play. The display on the unit will indicate the number
of the CD and the track currently playing. Press the button a
second time to pause the CD. Press the same button to resume
play from the position the CD was paused.
Press the REVERSE DISC SEARCH button once and release. The
unit will return to the beginning of the previous CD and begin play
at the first track. Press the button repeatedly to reverse search
through multiple CDs. Stop pressing when the desired CD is
reached and playback will begin.
Document # 540031, Rev C, 09/2002
Page 13 of 20
Audio International, Inc.
MCD-102-RU(CH)-x Installation & Operation Manual
Press the FORWARD DISC SEARCH button once and release.
The unit will advance to the next CD and resume play at the first
track. Press the button repeatedly to advance through multiple
CDs. Stop pressing when the desired CD is reached and playback
will begin.
Pressing the REPEAT button toggles between Repeat Track 1
(REP 1), Repeat CD (REP2), or Cancel. Press the REPEAT button
until the desired setting appears (REP 1 or REP 2). After five (5)
seconds, the repeat play starts. REP 1 can be selected to repeat
the current track; REP 2 can be selected to repeat the current disc.
To go back to the normal playback mode, press the REPEAT
button until “REP” disappears from the digital display.
Press REVERSE TRACK SEARCH once and release and the unit
will return to the beginning of the current track on the CD and
resume play. To locate a previous track, press the button
repeatedly to reverse through multiple tracks. Stop pressing when
the desired track is reached and playback will begin.
Press FORWARD TRACK SEARCH once and release and the unit
will advance to the next track on the CD and resume play. Press
the button repeatedly to advance through multiple tracks. Stop
pressing when the desired track is reached and playback will begin.
While a CD is playing, press and HOLD the SHUFFLE button. The
CD player will scan through the current track and subsequent
tracks until released. The display will indicate elapsed time.
Release the button to resume play at the new position. Each time
the SHUFFLE button is pressed, the display toggles between
SHUFFLE modes. SHUF 1 can be selected to play the tracks on
the current disc in a random order; SHUF 2 can be selected to play
all the discs in a random order. After five (5) seconds, the shuffle
play starts. To go back to the normal playback mode, press
SHUFFLE until the “SHUF” disappears from the digital display.
Document # 540031, Rev C, 09/2002
Page 14 of 20
Audio International, Inc.
4.3
MCD-102-RU(CH)-x Installation & Operation Manual
Optional Remote Operation
The following functions can be controlled using Audio International’s
optional remote control unit customized for your system configuration.
4.3.1 To Play a CD:
With a magazine loaded in the changer, press the play/pause
button on the remote. The first CD will begin to play. The display
on the control head will indicate the numbers of the CD and track
that is playing. Press the play/pause button to pause the CD.
Press the same button to resume play from the position at which
the CD was paused.
4.3.2 To Advance or Repeat Tracks:
Press the track advance button on the remote once and release.
The unit will advance to the next track on the CD and resume play.
Press the track advance button repeatedly to advance through
multiple tracks. The unit will resume playback when the requested
track is reached. Press the track reverse button on the remote
once to start at the beginning of the current track. Press the track
reverse button repeatedly to reverse through multiple tracks.
4.3.3 To Scan Tracks:
While a CD is playing, press and HOLD the track advance button
on the remote. The CD player will scan through the current track
and subsequent tracks until released. Release the button to
resume play at the new position. Press and HOLD the track
reverse button to scan backward through the tracks. Release the
button to resume play at the new position.
4.3.4 To Advance or Repeat Disc:
Press the disc advance button on the remote once and release.
The unit will advance to the next CD and resume play at the first
track. Press the disc advance button repeatedly to advance
through multiple CDs. The unit will resume playback when the
requested CD is reached. Press the disc reverse button on the
remote once and release. The unit will return to the beginning of
the current CD and resume play at the first track. Press the disc
reverse button repeatedly to reverse through multiple tracks. The
unit will resume playback when the requested CD is reached.
Document # 540031, Rev C, 09/2002
Page 15 of 20
Audio International, Inc.
MCD-102-RU(CH)-x Installation & Operation Manual
4.3.5 To Use Shuffle Mode:
Press the shuffle button on the remote. The display on the control
head will indicate SHUF1. The unit will play all tracks on a CD in
random order and advance to the next CD that will play in
sequential order. Press the shuffle button a second time. The
display on the control head will indicate SHUF2. The unit will play
all tracks on all CDs in random order. Press the shuffle button a
third time to clear the display and return the unit to standard play.
4.3.6 To Use Repeat Mode:
Press the repeat play button on the remote. Display will indicate
REP1 and unit will repeat the current track indefinitely. Press the
repeat play button a second time. Display will indicate REP2 and
unit will repeat the current CD indefinitely. Press the repeat play
button a third time and the display will clear. Unit will return to
standard play.
4.4
Cleaning the unit
4.4.1 Turn the cabin power OFF and wipe the panel with a dry, lint free,
silicon cloth. Note: Use of rough cloth or volatile solvents such as
paint thinner or alcohol may damage the surface of the panel
and/or cause damage to the liquid crystal display.
4.4.2 The CD magazine in the remote changer should be cleaned
periodically as accumulated dust can scratch the surface of the
CDs when inserted or removed from the player.
4.4.3 In cold weather, condensation may form on the lenses inside the
remote changer when the unit is first turned on. This lens fogging
may make it impossible to play a CD. Remove the CD and wait for
the unit to warm and the condensation to evaporate before
attempting playback.
5.0
Troubleshooting
5.1
Introduction
Most functional problems are detected during the post installation test;
refer to 3.10, Post-Installation Test. Once the unit has passed these tests,
it can be functional for many years of service.
Document # 540031, Rev C, 09/2002
Page 16 of 20
Audio International, Inc.
5.2
MCD-102-RU(CH)-x Installation & Operation Manual
General Troubleshooting Procedures
Many problems can be isolated with the following general techniques:
•
•
•
•
Recheck +28 VDC power is applied to the proper pins on the unit. Use
a voltmeter to verify correct level.
Reset by removing power from the unit for at least one minute and
reapply power.
Recheck all connections to the unit for security and all harness runs for
possible pinching. Recheck all pinouts for application accuracy.
Utilizing a voltmeter, oscilloscope, or other voltage instrument, verify
proper input voltage on the data bus pins. Typical measurements with
no device(s) on bus transmitting are as follows:
A-to-Ground : 4.0 to 4.5 VDC
B-to-Ground : 0.1 to 1.0 VDC
•
If any device is transmitting (i.e., holding bus active), then these typical
measurements would be reversed for the A-to-Ground and B-toGround measurements. This troubleshooting tool can help indicate a
data bus lockup. If this occurs, remove the data bus from all other
equipment one piece at a time. As each is removed, check the bus
status to see if it is now functioning properly. Once you have removed
the piece or pieces of offending equipment, disconnect power and then
reconnect everything but the suspect component, reapply power and
test the functionality of the unit.
The RS-485 data bus is a bi-directional bus that does not have a ‘bus
controller’. The bus uses a differential digital signal that will transmit
only when commands are entered via switch selection or other system
synchronizing commands. The “A” leg of the bus is HI and the “B” leg
LOW.
Document # 540031, Rev C, 09/2002
Page 17 of 20
Audio International, Inc.
5.3
MCD-102-RU(CH)-x Installation & Operation Manual
Troubleshooting Chart
Problem
6.0
Possible Cause
Sound skips
Ø
CD is dirty or defective
DC magazine will not
lock in the changer
Ø
Magazine installed
incorrectly
Error Message –
E-01
Error Message –
E-02
Error Message –
E-04
Error Message –
E-99
Ø
CD magazine not
inserted into changer
CD not inserted in the
magazine
CD is dirty or inserted
upside down
Ø
Ø
Ø
Unit malfunctioning
Solution
•
•
Clean CD or replace it
Remove the CD magazine, press
EJECT, reinsert the magazine
until it is locked securely
•
Insert the magazine
•
Remove magazine and insert
CDs
•
Clean CD, reinsert correctly
•
Contact AI Customer Support
Specifications
Physical Specifications
Housing
Weight
MCD-102-CH(-x)
Dimensions
MCD-102-CH(-x),
(l x w x h)
Weight
MCD-102-RU(-x)
Dimensions
MCD-102-RU(-x)
(l x w x h)
Document # 540031, Rev C, 09/2002
Aluminum
2.06 lb / 0.93 kg
7.6" x 7.2" x 2.08"
19 cm x 18 cm x 5.28 cm
5.25 lb / 2.38 kg
7.3" x 12.6" x 3.6"
18.54 cm x 32 cm x 9.1 cm
Page 18 of 20
Audio International, Inc.
7.0
MCD-102-RU(CH)-x Installation & Operation Manual
Reference Drawings
7.1
The following diagrams show the unit dimensions, mounting locations, and
connector locations for the MCD-102-CH-x.
Document # 540031, Rev C, 09/2002
Page 19 of 20
Audio International, Inc.
7.2
MCD-102-RU(CH)-x Installation & Operation Manual
The following diagrams show the unit dimensions, mounting locations, and
connector locations for the MCD-102-RU-x.
Document # 540031, Rev C, 09/2002
Page 20 of 20