1
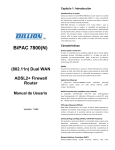
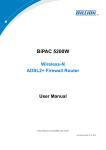
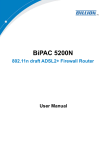
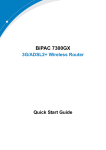
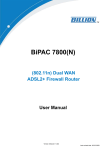
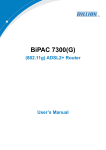
BiPAC 6404VP/VGP
VoIP/(802.11g) Broadband Firewall
Router
Quick Start Guide
VoIP/(802.11g) Broadband Firewall Router
For more detailed instructions on configuring and using the
VoIP/(802.11g) Broadband Firewall Router, please refer to the
on-line manual.
Package Contents
VoIP/(802.11g) Broadband Firewall Router
CD-ROM containing the online manual
Ethernet (CAT-5 LAN) Cable
Console Kit (RJ45-RS232)
AC-DC power adapter (BiPAC 6404VP - 12V DC, 1A) (BiPAC 6404VGP – 12V DC 1.2A)
This Quick Start Guide
Do not use this router in high humidity or high temperatures.
Do not use the same power source for this router as other
equipment.
Warning
Do not open or repair the case yourself. If this router is too hot,
turn off the power immediately and have it repaired at a qualified
service center.
Avoid using this product and all accessories outdoors.
Place this router on a stable surface.
Only use the power adapter that comes with the package. Using
different voltage rating power adaptor may damage this router.
a
Attention
1
Quick Start Guide
The Front LEDs
LED
Meaning
1
PWR
Lit when power is ON.
2
SYS
Lit when the system is ready.
3
WAN
Lit when connected to an ADSL modem or Cable modem's
Ethernet port well
4–6
LAN Port
1X
—
3X
(RJ-45 connector)
7
8–9
WLAN
Lit when connected to an Ethernet device.
Green for 100Mbps; Orange for 10Mbps.
Blinking when data is Transmitted / Received.
(Wireless Router only)
Lit green when the wireless connection is established.
Flashes when sending/receiving data.
Phone
1X
—
Lit green when the phone is off-hook.
2X
(RJ-11 connector)
10
12
13
2
LINE
VoIP Port
1X
—
2X
(RJ-11 connector)
PPP
Lit when the inbound and outbound calls transmitted
through PSTN.
Lit when the SIP Registration is OK.
Green for Phone 1; Orange for Phone 2.
Lit Green when there is a PPPoA / PPPoE connection.
VoIP/(802.11g) Broadband Firewall Router
The Rear Ports
3
8
4
7
1
2
The LAN 3 can be connected to the computer and console cable. You need a special
console kit in this package to connect the LAN cable of Port 3 when connecting to a PC’s
RS-232 port (9-pin serial port).
Port
Meaning
1
Power Switch
Power ON/OFF switch
2
PWR
Connect the supplied power adapter to this jack.
3
RESET
After the device is powered on, press it to reset the
device or restore to factory default settings.
1-3 seconds: reset the device
6 seconds above, and power off, power on the device:
restore to factory default settings (this is used when you
can not login to the router, e.g. forgot the password)
4
WAN
WAN 10/100M Ethernet port (with auto crossover
support); connect xDSL/Cable modem here.
5
LAN
1X
—
(RJ-45 connector)
Connect a UTP Ethernet cable (Cat-5 or Cat-5e) to one of
3X the three LAN ports when connecting to a PC or an
office/home network of 10Mbps or 100Mbps.
6
Phone
1X
─
2X
(RJ-11 connector)
Connect RJ-11 cable to this port when connecting to an
analog phone set.
7
LINE
Connect RJ-11 cable to this port when connecting to the
telephone wall jack.
8
Antenna
(Wireless Router only)
Connect the detachable antenna to this port.
3
Quick Start Guide
Connecting Your Broadband Router
1. (a) ATA Mode: Connect the ATA to a WAN (Connect to ADSL modem/router).
(b) Broadband Router Mode: Connect the Router to a LAN (Local Area Network) and WAN
(Connect to Cable or ADSL modem).
2. Power on the device.
3. Make sure the PWR and SYS LEDs are lit steadily and that the WAN and relevant LAN LED are lit.
4. Connect an RJ11 cable to VoIP port when connecting to an analog phone set.
5. Connect RJ-11 cable to LINE Port when connecting to the telephone wall jack
ATA Mode
Broadband Router Mode
4
VoIP/(802.11g) Broadband Firewall Router
Configuring PC in Windows XP
1. Go to Start / Control Panel (in Classic
View). In the Control Panel, double-click on
Network Connections
2. Double-click Local Area Connection.
3. In the Local Area Connection Status
window, click Properties.
4. Select Internet Protocol (TCP/IP) and click
Properties.
5. Select the Obtain an IP address
automatically and the Obtain DNS server
address automatically radio buttons.
6. Click OK to finish the configuration.
5
Quick Start Guide
Configuring PC in Windows 2000
1. Go to Start / Settings / Control Panel. In the
Control Panel, double-click on Network and
Dial-up Connections.
2. Double-click Local Area Connection.
3. In the Local Area Connection Status
window click Properties.
4. Select Internet Protocol (TCP/IP) and click
Properties.
5. Select the Obtain an IP address
automatically and the Obtain DNS server
address automatically radio buttons.
6. Click OK to finish the configuration.
6
VoIP/(802.11g) Broadband Firewall Router
Configuring PC in Windows 98/Me
1. Go to Start / Settings / Control Panel. In
the Control Panel, double-click on Network
and choose the Configuration tab.
2. Select TCP/IP ->
NE2000 Compatible, or the name of your
Network Interface Card (NIC) in your PC.
3. Select the Obtain an IP address
automatically radio button.
4. Then select the DNS Configuration tab.
5. Select the Disable DNS radio button and
click OK to finish the configuration.
7
Quick Start Guide
Configuring PC in Windows NT4.0
1. Go to Start / Settings / Control Panel. In the
Control Panel, double-click on Network and
choose the Protocols tab.
2. Select TCP/IP Protocol and click Properties.
3. Select the Obtain an IP address from a
DHCP server radio button and click OK.
8
VoIP/(802.11g) Broadband Firewall Router
Configuring Your Broadband Router
To configure this device, you must have IE 5.0 / Netscape 4.5 or
above installed
Verifying Your Local Network Connection with the Device
To see if this Router is visible on
the local network, go to Start /
Run. In the Run dialog box, type
“ping
192.168.1.254”
then
press OK.
A command prompt window will
pop out.
If your ping is
successful which means your
local network is able to reach to
the device, then the command
prompt window will close up
automatically.
Connection fails, when you see
“Request timed out” in the
command prompt window. You
may need to check your set up.
9
Quick Start Guide
Connecting to the Router
1.
Open the web browser and type
http://192.168.1.254 in the browser’s
address box. This number is the default IP
address for this router. Press Enter.
2. A username and password window will
appear. The default username and
password are admin and admin. Press
OK to proceed.
Product Support and Contact Information
Most problems can be solved by referring to the Troubleshooting section in the User’s
Manual. If you cannot resolve the problem with the Troubleshooting chapter, please contact
the dealer where you purchased this product.
Contact Billion
AUSTRALIA
http://www.billion.com.au
©2006 Billion Electric Co Ltd., PC Range P/L. All Rights Reserved.
WORLDWIDE
http://www.billion.com
Mac OS is a registered Trademark of Apple Computer, Inc.
Windows 98, Windows NT, Windows 2000, Windows Me and Windows XP are registered Trademarks of Microsoft
Corporation.
10