1
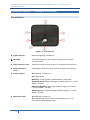
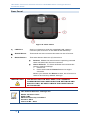
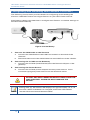
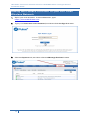
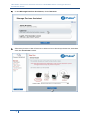
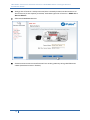
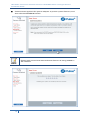
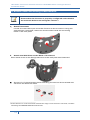
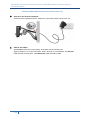
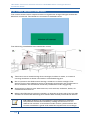
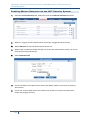
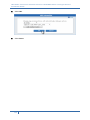
ADT Pulse® Interactive Solutions
iCamera-1000-ADT Indoor
Low-Light Camera
Installation Guide
ADT Pulse® Interactive Solutions iCamera-1000-ADT Indoor Low-Light Camera
Installation Guide
Table of Contents
WELCOME ..................................................................................................................... 1
Overview ....................................................................................................................... 1
iCamera-1000-ADT Features ................................................................................... 1
Package Contents ....................................................................................................... 2
Physical Details – iCamera-1000-ADT.................................................................... 3
Front Panel ............................................................................................................ 3
Rear Panel .............................................................................................................. 4
Configuring and Installing the iCamera-1000-ADT ............................................. 5
Adding the iCamera-1000-ADT to your ADT Pulse Wireless Network ........... 6
iCamera Wall Mounting Instructions ................................................................... 11
PIR Video Motion Detection ................................................................................... 14
Enabling Motion Detection via the ADT Security System ....................... 15
APPENDIX A SPECIFICATIONS ............................................................................. 17
Regulatory Approvals .............................................................................................. 17
CE Approvals ...................................................................................................... 18
License information available at www.ADT.com or by calling 800.ADT.ASAP.
CA ACO7155, 974443; PPO17232; FL EF0001121; LA F1639, F1407,
F1640; MA 172C; NY 12000305615; PA 090797;
MS 15019511
©2013 ADT LLC dba ADT Security Services. All rights reserved. ADT, the ADT
logo, 800 ADT.ASAP and the product/service names listed in this document are
marks and/or registered marks. Unauthorized use is strictly prohibited.
P/N: 956YFF0001
Document Version: 1.2
i
ADT Pulse® Interactive Solutions iCamera-1000-ADT Indoor Low-Light Camera
Installation Guide
Welcome
This installation guide provides step-by-step instructions for configuring
and installing your iCamera-1000-ADT Indoor Low-Light camera to your
ADT Pulse® wireless network. (Permanent mounting instructions for the
iCamera are also included.)
Overview
The iCamera-1000-ADT monitors your home or business in a low light or dark
environment. The iCamera can be used as either a wired or wireless camera
using Wi-Fi connectivity that easily installs to your ADT Pulse wireless network.
iCamera-1000-ADT Features
Requires only a power source and a connection to the gateway
Dust and Water Resistant
12 infrared LEDs allow you to view images in a dark or low light setting
Can be used as a wired or wireless device
Diagonal View Angle of 60 degrees
VGA (640x480)
View images in color
1
ADT Pulse® Interactive Solutions iCamera-1000-ADT Indoor Low-Light Camera
Installation Guide
Package Contents
1. The iCamera-1000-ADT Indoor Low-Light Camera
2. Stand
3. Y-Cable
4. PoE Cable
5. 12V Power Adapter
6. Assembly Back Plate with three screws (packaged separately)
7. Wall Mount Plate
8. Two Mounting Screws
9. Installation Guide
2
ADT Pulse® Interactive Solutions iCamera-1000-ADT Indoor Low-Light Camera
Installation Guide
Physical Details – iCamera-1000-ADT
Front Panel
Figure 1: Front Panel
1. Light Sensor
Detects lighting conditions.
2. IR LEDs
The LEDs help you see clearly at night or in a dark
environment.
3. Day Camera Lens
The Day Camera Lens is used in a bright environment.
4. Night Camera
Lens
The Night Camera Lens is used in a dark environment.
5. Power/Wi-Fi
On (Green) - Power on.
Off - Power off.
Blinking - Data is being transmitted or received.
Blinking Slow - Weak strength of Wi-Fi signal. (1/2 Hz,
SNR < 15 dB.)
Blinking Medium - Strength of Wi-Fi signal is normal.
(1/2 Hz, SNR < 15 dB.)
Blinking Fast - Good strength of Wi-Fi signal. (1/2 Hz,
SNR < 15 dB.)
6. Network LED
3
On (Green) - Power on.
Off - No Active connection on the LAN port, or not
associated with Wireless AP.
ADT Pulse® Interactive Solutions iCamera-1000-ADT Indoor Low-Light Camera
Installation Guide
Rear Panel
Figure 2: Rear Panel
1. LAN Port
Use in conjunction with the supplied LAN cable to
connect your iCamera to the ADT Pulse Gateway.
2. Stand Mount
The stand mount connects the stand to the iCamera.
3. Reset Button
The reset button has two (2) functions:
Reboot. When the reset button is quickly pressed
then released, the iCamera reboots.
Clear All Data. To Clear All Data and restore the
factory default settings:
1. Power On.
2. Press and hold the Reset Button for eight
seconds.
When you release the Reset button, the iCamera is
reset to the factory default settings.
IMPORTANT
THE RESET BUTTON WILL RESET THE iCAMERA
COMMUNICATION CONFIGURATION SETTINGS AND
SHOULD ONLY BE USED UNDER THE DIRECTION OF
ADT SUPPORT.
The default Wireless settings are:
NOTE
4
Mode: Infrastructure
SSID: ANY
Wireless Security: Disabled
Domain: USA
Channel No.: Auto
ADT Pulse® Interactive Solutions iCamera-1000-ADT Indoor Low-Light Camera
Installation Guide
Configuring and Installing the iCamera-1000-ADT
The following instructions provide details of configuring and installing the
iCamera-1000-ADT Indoor Low-Light Camera to your ADT Pulse network.
Initial setup is done only one time to configure the iCamera’s wireless settings to
the ADT Pulse Gateway.
Figure 3: Initial Setup
1. Connect the LAN Cable to the iCamera
a. Connect the LAN Cable to the LAN Port located on the back of the
iCamera.
b. Place the other end of the LAN Cable into the LAN Port of the Y-Cable.
2. Connecting the Y-Cable to the Gateway
c. Connect the Y-Cable (with Ethernet) into the Device LAN port of the
gateway.
3. Connecting the Power Source
d. Connect the Y-Cable power adapter into the power source. Once
connected, plug the power source into an electrical outlet.
IMPORTANT
NOTE
5
DO NOT USE ANY POWER ADAPTER OTHER THAN THE
ONE SPECIFIED. DOING SO MAY DAMAGE THE
DEVICE.
During start up, the Power LED displays for approximately 10 to 15
seconds. When installation is complete, the Power LED should
remain ON as well as the Network LEDs.
ADT Pulse® Interactive Solutions iCamera-1000-ADT Indoor Low-Light Camera
Installation Guide
Adding the iCamera-1000-ADT to your ADT Pulse
Wireless Network
1. Open your web browser. In the address bar, type:
https://Portal.ADTPulse.com.
2. Type your Username and Password, and then click the Sign In button.
3. Click the System tab, and then click the Manage Devices button.
6
ADT Pulse® Interactive Solutions iCamera-1000-ADT Indoor Low-Light Camera
Installation Guide
4. In the Manage Devices Assistant, click Cameras.
5. Click the picture of the iCamera or select it from the drop-down list, and then
click the Continue button.
7
ADT Pulse® Interactive Solutions iCamera-1000-ADT Indoor Low-Light Camera
Installation Guide
6. Assign the iCamera a unique name (this is usually based on the location of
the iCamera) in the space provided, and then type the iCamera’s MAC ID or
Server Name.
7. Click the Continue button.
8. Connect the camera to the Device Port of the gateway using the Ethernet
cable (attached to the Y-Cable.)
8
ADT Pulse® Interactive Solutions iCamera-1000-ADT Indoor Low-Light Camera
Installation Guide
9. Connect the supplied 12V power adapter to power up the iCamera, and
then click the Continue button.
NOTE
9
Please wait several minutes while the iCamera is being added to
the network.
ADT Pulse® Interactive Solutions iCamera-1000-ADT Indoor Low-Light Camera
Installation Guide
10. Click Finish after installation is complete.
Figure 4: Installation Using POE Cable
11. Unplug the Y-cable from the ADT Pulse Gateway, and then power off the
camera.
IMPORTANT
10
IF CAMERA WILL BE INSTALLED AS A ‘WIRED’ CAMERA,
USE THE LAN CABLE AND THE Y-CABLE. (REFER TO
FIGURE 3 ON PAGE 5 OF THIS GUIDE.) IF CAMERA WILL
BE INSTALLED AS A ‘WIRELESS’ CAMERA, USE THE POE
CABLE TO SUPPLY POWER TO THE CAMERA.
ADT Pulse® Interactive Solutions iCamera-1000-ADT Indoor Low-Light Camera
Installation Guide
iCamera Wall Mounting Instructions
NOTE
Ensure that the iCamera is properly configured and added to
the network before mounting the camera.*
1. Stand Placement
Locate an area where you want the iCamera to be mounted. Using the
wall plate as a template, make two small marks inside the mounting
holes of the wall plate.
2. Attach the Wall Plate to the Back of the Stand
Place each screw in the designated slot of the wall plate until fastened.
3. Screw in 2/3 of the length of the mounting screws into the wall and drill
a hole for the Ethernet cable.
__________________________
*If the iCamera is to be mounted outside the range of the wireless network, consider
including the WN2RP-ADT Wi-Fi Extender.
11
ADT Pulse® Interactive Solutions iCamera-1000-ADT Indoor Low-Light Camera
Installation Guide
iCamera Wall Mounting Instructions (Cont’d)
4. Hook the two mounting holes on the stand into the mounting screws.
5. Attach the iCamera Stand
Locate the stand mount on the back of the iCamera. Fasten the stand by
turning the iCamera counterclockwise until secured.
6. Mounting the iCamera
Connect the PoE cable into the LAN port of the device.
7. Connect the other end of the PoE cable to the adapter through the holes
of the stand and the wall. Adjust it to the desired position and secure the
iCamera firmly.
12
ADT Pulse® Interactive Solutions iCamera-1000-ADT Indoor Low-Light Camera
Installation Guide
iCamera Wall Mounting Instructions (Cont’d)
8. Connect the Power Adapter
Connect the supplied power adapter to the PoE cable and power up.
9. Check the LEDs
The Power LED turns on briefly, and then starts blinking for
approximately 15 to 20 seconds. After startup is completed, the Power
LED should remain ON. The Network LED should be ON.
13
ADT Pulse® Interactive Solutions iCamera-1000-ADT Indoor Low-Light Camera
Installation Guide
PIR Video Motion Detection
The motion event will be captured when a significant image changes within the
Window of Interest. The Window of Interest is defined below.
The following installation hints should be noted:
1. Take care not to install facing direct sunlight, bodies of water, or areas of
moving shadows as these can lead to unintended triggers.
2. Do not position the PIR camera facing a window or direct sunlight. The
device is also not suitable for using in draughty area where air conditioner or
fan is installed. The excessive wind may cause false video triggering.
3. Avoid aiming directly near heat sources, such as fires, radiators, boiler, air
conditioners and so on.
4. Mount the PIR camera where possible, so that the logical path of an intruder
would cut across the detecting area rather than directly towards the device.
NOTE
14
PIR video detection is susceptible to light reflection, shade or
tree/leaves movement caused by strong wind and so on. To
reduce the number of unwanted video events, please follow the
camera installation guide and make the adjustment accordingly.
ADT Pulse® Interactive Solutions iCamera-1000-ADT Indoor Low-Light Camera
Installation Guide
Enabling Motion Detection via the ADT Security System
1. Click the Automations tab, and then click the Add Automation button.
2. Select a trigger for this automation from the Trigger drop-down list.
3. Select Motion from the Event drop-down list.
4. Select the conditions under which you want the automation action to occur
from Active drop-down list.
5. Click Add Actions.
6. From the delay drop-down list, select the delay option you want to use for
this action.
7. From the action drop-down list, select the action you want to take place
when the trigger occurs.
15
ADT Pulse® Interactive Solutions iCamera-1000-ADT Indoor Low-Light Camera
Installation Guide
8. Click OK.
9. Click Save.
16
ADT Pulse® Interactive Solutions iCamera-1000-ADT Indoor Low-Light Camera
Installation Guide
Appendix A
Specifications
Model
iCamera
Dimensions
72mm (W) x 72mm (H) x 20mm (D) (without stand)
Operating
Temperature
Outdoor: -20 C to 45 C
Video compression
H.264, MPEG4 and MJPEG
Network Interface
1 Ethernet 10/100BaseT (RJ45)
Storage Temperature
-20 C to 60 C
LEDs
3 (CHECK)
Power Adapter
12V/1A
Indoor: 0 C to 45 C
Regulatory Approvals
This equipment generates uses and can radiate radio frequency energy and, if
not installed and used in accordance with the instructions, may cause harmful
interference to radio communications. However, there is no guarantee that
interference will not occur in a particular installation. If this equipment does
cause harmful interference to radio or television reception, which can be
determined by turning the equipment off and on, the user is encouraged to try to
correct the interference by one of the following measures:
Reorient or relocate the receiving antenna.
Increase the separation between the equipment and receiver.
Connect the equipment into an outlet on a circuit different from that to
which the receiver is connected.
Consult the dealer or an experienced radio/TV technician for help.
To assure continued compliance, any changes or modifications not expressly
approved by the party responsible for compliance could void the user's authority
to operate this equipment. (Example - use only shielded interface cables when
connecting to computer or peripheral devices).
FCC Radiation Exposure Statement
This equipment complies with FCC RF radiation exposure limits set forth for an
uncontrolled environment. This equipment should be installed and operated
with a minimum distance of 20 centimeters between the radiator and your body.
This device complies with Part 15 of the FCC Rules. Operation is subject to the
following two conditions:
(1) This device may not cause harmful interference, and
(2) This device must accept any interference received, including interference
that may cause undesired operation.
This transmitter must not be co-located or operating in conjunction with any
other antenna or transmitter.
17
ADT Pulse® Interactive Solutions iCamera-1000-ADT Indoor Low-Light Camera
Installation Guide
CE Approvals
The iCamera and the Ethernet iCamera meet the guidelines of the European
Union and comply with the 99/5/EEC and RTTE 99/5EG directives, including
the following standards:
EN60950
EN300 328-2
EN301 489-1
EN301 489-17
This is a Class B product. In a domestic environment, this product may cause
radio interference in which case the user may be required to take adequate
measures.
This product is UL and cUL certified and comply with UL60950-1 Information
Technology Equipment applicable requirement.
18