1
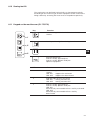
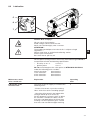
175 176 179 Spezialnähmaschine Betriebsanleitung D Instruction manual GB Postfach 17 03 51, D-33703 Bielefeld • Potsdamer Straße 190, D-33719 Bielefeld Telefon +49 (0) 521 / 9 25-00 • Telefax +49 (0) 521 / 9 25 24 35 • www.duerkopp-adler.com Ausgabe / Edition: 10/2010 Änderungsindex Rev. index: 02.0 Printed in Federal Republic of Germany Teile-Nr./Part.-No.: 0791 175740 Alle Rechte vorbehalten. Eigentum der Dürkopp Adler AG und urheberrechtlich geschützt. Jede, auch auszugsweise Wiederverwendung dieser Inhalte ist ohne vorheriges schriftliches Einverständnis der Dürkopp Adler AG verboten. All rights reserved. Property of Dürkopp Adler AG and copyrighted. Reproduction or publication of the content in any manner, even in extracts, without prior written permission of Dürkopp Adler AG, is prohibited. Copyright © Dürkopp Adler AG - 2010 Foreword This instruction manual is intended to help the user to become familiar with the machine and take advantage of its application possibilities in accordance with the recommendations. The instruction manual contains important information on how to operate the machine securely, properly and economically. Observation of the instructions eliminates danger, reduces costs for repair and down-times, and increases the reliability and life of the machine. The instruction manual is intended to complement existing national accident prevention and environment protection regulations. The instruction manual must always be available at the machine/sewing unit. The instruction manual must be read and applied by any person that is authorized to work on the machine/sewing unit. This means: – – – Operation, including equipping, troubleshooting during the work cycle, removing of fabric waste, Service (maintenance, inspection, repair) and/or Transport. The user also has to assure that only authorized personnel work on the machine. The user is obliged to check the machine at least once per shift for apparent damages and to immediatly report any changes (including the performance in service), which impair the safety. The user company must ensure that the machine is only operated in perfect working order. Never remove or disable any safety devices. If safety devices need to be removed for equipping, repairing or maintaining, the safety devices must be remounted directly after completion of the maintenance and repair work. Unauthorized modification of the machine rules out liability of the manufacturer for damage resulting from this. Observe all safety and danger recommendations on the machine/unit! The yellow-and-black striped surfaces designate permanend danger areas, eg danger of squashing, cutting, shearing or collision. Besides the recommendations in this instruction manual also observe the general safety and accident prevention regulations! General safety instructions The non-observance of the following safety instructions can cause bodily injuries or damages to the machine. 1. The machine must only be commissioned in full knowledge of the instruction book and operated by persons with appropriate training. 2. Before putting into service also read the safety rules and instructions of the motor supplier. 3. The machine must be used only for the purpose intended. Use of the machine without the safety devices is not permitted. Observe all the relevant safety regulations. 4. When gauge parts are exchanged (e.g. needle, presser foot, needle plate, feed dog and bobbin) when threading, when the workplace is left, and during service work, the machine must be disconnected from the mains by switching off the master switch or disconnecting the mains plug. 5. Daily servicing work must be carried out only by appropriately trained persons. 6. Repairs, conversion and special maintenance work must only be carried out by technicians or persons with appropriate training. 7. For service or repair work on pneumatic systems, disconnect the machine from the compressed air supply system (max. 7-10 bar). Before disconnecting, reduce the pressure of the maintenance unit. Exceptions to this are only adjustments and functions checks made by appropriately trained technicians. 8. Work on the electrical equipment must be carried out only by electricians or appropriately trained persons. 9. Work on parts and systems under electric current is not permitted, except as specified in regulations DIN VDE 0105. 10. Conversion or changes to the machine must be authorized by us and made only in adherence to all safety regulations. 11. For repairs, only replacement parts approved by us must be used. 12. Commissioning of the sewing head is prohibited until such time as the entire sewing unit is found to comply with EC directives. 13. The line cord should be equipped with a country-specific mains plug. This work must be carried out by appropriately trained technicians (see paragraph 8). It is absolutely necessary to respect the safety instructions marked by these signs. Danger of bodily injuries ! Please note also the general safety instructions. Index Page: Preface and general safety hints Part 1: Operating Instructions cl. 175 176 179 – Original Instructions (Edition 10/2010) 1 Product description . . . . . . . . . . . . . . . . . . . . . . . . . . . . . . . . . . . . . . . . . . . . 5 2 Designated use . . . . . . . . . . . . . . . . . . . . . . . . . . . . . . . . . . . . . . . . . . . . . . . 5 3 Subclasses . . . . . . . . . . . . . . . . . . . . . . . . . . . . . . . . . . . . . . . . . . . . . . . . . . 7 4 Optional equipment. . . . . . . . . . . . . . . . . . . . . . . . . . . . . . . . . . . . . . . . . . . . . 9 5 5.1 Technical data Technical data of the subclasses . . . . . . . . . . . . . . . . . . . . . . . . . . . . . . . . . . . . . 15 6 6.1 6.2 6.3 6.4 6.5 6.6 6.7 6.8 6.9 6.10 6.11 Operating Threading the needle thread . . . . . . . . . . . . Threading the looper thread . . . . . . . . . . . . Adjusting the needle thread tension . . . . . . . Needle thread quantity for safe stitch formation Adjusting the looper thread feeder . . . . . . . . Adjusting the feed length . . . . . . . . . . . . . . Changing the needles . . . . . . . . . . . . . . . . Adjusting the sewing foot pressure . . . . . . . . Adjusting the top feed foot pressure . . . . . . . Sewing foot lift . . . . . . . . . . . . . . . . . . . . Keypad on the machine arm . . . . . . . . . . . . . . . . . . . . . . . 12 13 14 14 15 16 18 19 20 21 21 7 Sewing . . . . . . . . . . . . . . . . . . . . . . . . . . . . . . . . . . . . . . . . . . . . . . . . . . . . . 22 8 8.1 8.2 Maintenance Cleaning and testing . . . . . . . . . . . . . . . . . . . . . . . . . . . . . . . . . . . . . . . . . . . . . Lubrication. . . . . . . . . . . . . . . . . . . . . . . . . . . . . . . . . . . . . . . . . . . . . . . . . . . 23 25 . . . . . . . . . . . . . . . . . . . . . . . . . . . . . . . . . . . . . . . . . . . . . . . . . . . . . . . . . . . . . . . . . . . . . . . . . . . . . . . . . . . . . . . . . . . . . . . . . . . . . . . . . . . . . . . . . . . . . . . . . . . . . . . . . . . . . . . . . . . . . . . . . . . . . . . . . . . . . . . . . . . . . . . . . . . . . . . . . . . . . . . . . . . . . . . . . . . . . . . . . . . . . . . . . . . . . . . . . . . . . . . . . . . . . . . . . . . . . . . . . . . . . . . . . . . . . . . . . . . . . . . . . . . . . . . . . . . . . . . . . . . . . . . . . . . . . . . . . GB 1 Product description The DÜRKOPP ADLER class 175 is a single needle flat bed double-chainstitch crossline sewing machine with differential foot top feed and bottom feed for linear seams according to stitch type 401 for processing light to medium-weight material. The class 176 is a single needle flat bed double-chainstitch crossline sewing machine with differential bottom feed. For linear seams according to stitch type 401 for processing light to medium-weight material. The class 179 is a single-needle flatbed single-chainstitch crossline sewing machine with bottom feed and differential upper foot feed for edge basting seams in jackets, blazers and coats. for linear seams according to stitch type 101 for processing light to medium-weight material. l l l l l l 2 Class 175 with 4 mm stitch length and by a needle stroke of 30 mm a max. top feed length of 8 mm. Class 176 with 4 mm stitch length and by a needle stroke of 30 mm a max. differential bottom feed length of 6 mm. Class 179 with 4 mm to 8 mm stitch length and a max. top feed length of 8 mm with a needle rise of 32 mm. Forward sewing only. Tested and approved top feed foot of the class 275 with an automatic stroke adjustment for good properties of climbing. An automatic adaptation of the looper thread quantity to the stitch length allows an optimum stitch formation in every stitch length, even with balloon stitch. Designated use Class 175/176/179 is a sewing machine head determined for processing light to medium-weight material, i.e. fabrics made of textile fibers or leather. Such sewing materials are used in the clothing industry and for the production of home upholstery. Furthermore, this sewing machine head can also sew so-called technical seams. However, in this case the user has to estimate the possible risks (preferably in cooperation with DÜRKOPP ADLER AG) because on the one hand such fields of application are comparatively rare and on the other hand there is an immense variety of application possibilities. According to the result of this estimation suitable safety measures may have to be taken. 5 GB Generally only dry fabrics must be processed on this sewing machine head. The material must not be thicker than 4 mm when compressed by the lowered sewing feet. It must not include any hard objects because otherwise the sewing machine head would be allowed to be operated with an additional eye protection only. Such an eye protection cannot be delivered at present. In general the seam is produced with sewing threads made of textile fibers up to 70/3 Nm (core thread). If other threads are to be used, it is indispensable also in this case to consider the possible risks and to take corresponding safety measures, if necessary. The sewing machine may be set up and operated only in dry, well-maintained premises. If the sewing machine is used in premises which are not dry and well-maintained it may be necessary to take further precautions (which should be agreed in advance - see EN 60204-31:1999). As manufacturers of industrial sewing machines we proceed on the assumption that personnel who work on our products will have received training at least sufficient to acquaint them with all normal operations and with any hazards which these may involve. 6 3 Subclasses 175-141621 Single needle double-chainstitch machine with bottom feed and differential top feed, with condensed stitches (electropneumatic), electropneumatic sewing foot lift and thread trimmer for needle and looper thread underneath the throat plate. The electropneumatic thread advancing device for needle and looper thread combined with the electropneumatically driven thread tension and the clamp spring on the looper allows a safe stitch formation. As standard equipped with a direct drive fitted to the sewing machine with the corresponding control unit. Stitch length, stitch length of the condensed stitch and the top feed value can be easily adjusted via setting wheel. Buttons for changing the needle position, stitch condensation and one-time suppression/activation of condensed stitches are part of the standard equipment. Equipped with the direct drive Efka DC 1500-DA220C (incl. connection cable). 176-141621 Single needle double-chainstitch machine with differential bottom feed, with condensed stitches (electropneumatic), electropneumatic sewing foot lift and electropneumatic thread trimmer for needle and looper thread under the throat plate. The adjustable electropneumatic thread advancing device for needle and looper thread combined with the electropneumatically driven thread tension and the clamp spring on the looper allows a safe stitch formation. As standard equipped with a direct drive fitted to the sewing machine with the corresponding control unit. Stitch length, stitch length of the condensed stitch and the differential bottom feed value can be easily adjusted via setting wheel. Buttons for changing the needle position, stitch condensation and one-time suppression/activation of condensed stitches are part of the standard equipment. Equipped with the direct drive Efka DC 1500-DA220C (incl. connection cable). 7 GB 179-171629 8 Single-needle flatbed single-chainstitch crossline sewing machine with bottom feed and differential upper foot feed, but with electropneumatic sewing foot lifting, adjustable electropneumatic thread advancing device, electropneumatic driven thread tension and with electropneumatic thread cutter for the needle thread below the stitch plate. The remaining thread on the material is long enough to prevent the seam’s unravelling. As standard equipped with a direct drive fitted to the sewing machine with the corresponding control unit. The bottom feed is set underneath the bed plate and the top feed via a setting wheel on the machine arm. The machine is equipped with the direct drive Efka DC 1500-DA220C (incl. connection cable). 4 Optional equipment Optional equipment 176-141621 Subclasses 0271 590024 Reflecting infrared light barrier for automatic sewing stop and end sensing of the fabric with the following functions: condensed stitches, thread trimming, sewing foot lifting. Can be mounted either on the right/left. x x 0275 590014 Mechanical device to increase the overfeed length during sewing (second pedal). x x 0175 590044 Electro-pneumatic device to increase the overfeed length during sewing via keystroke. x x 0175 590054 Retrofit kit “Height adjustment of the presser foot” x 0175 590064 Tape unwinder with tape guide for the attaching of endless zippers on the cloth fly without twisting. x 0175 590074 Double-needle kit for the transformation of a single-needle machine to a double-needle double chainstitch machine Without thread trimming function x N900 011035 Edge guide, right, can be swivelled aside, fastened on base plate x Adjustment range 0 - 20 mm. x x N900 012015 Edge guide, right, can be swivelled aside, fastened on base plate x Adjustment range 0 - 14 mm. x x N900 020038 Edge guide, right, can be swivelled upwards, fastened at casted stud of the machine arm. Adjustment range 0 - 40 mm. x x x N900 0040038 Edge guide, right, can be swivelled upwards, with preset stops 2 mm, 5 mm and 10 mm, fastened at casted stud of the machine arm. Adjustment range 0 - 20 mm. x x N023 009002 Guiding device for sewing fabric piping between two fabric layers. x (Global material number, the device will be manufactured according to the band size). 0942 004542 Tape-reel bracket - to be mounted under the table top x N900 001941 Swivel guide for device N023 009000 x 179-171629 Order number 175-141621 For the 175 176 179 the following optional equipment is available: x GB x = Optional equipment o = Standard equipment 9 N079 008533 Guiding attachment for closing seams x N900 002841 Swivel guide for device N079 008533 x N900 003601 Intermediate plate especially made for sewing intensively with fullness, swivelling. x 9780 000108 Maintenance unit x 0797 003031 Pneumatic connection package x x x 9822 510003 Halogen sewing lamp x x x 0798 500088 Sewing lamp transformer x x x 0APP 001041 Sewing lamp mounting kit x 0175 590024 Integral LED sewing lamp (not including the sewing lamp transformer) x x x 0175 590034 LED sewing lamp (not including the sewing lamp transformer) x x x 9850 001089 Sewing lamp transformer for sewing lamp 0175 590024 and 0175 590034. It is possible to connect both sewing lamps to one transformer. x x x 0176 590034 Tape-reel bracket for reinforcement tape x 0176 220304 Articulated foot with tape guide for reinforcement tape of 2,0 mm width. Can be used in combination with E1 or E3 and tape-reel bracket for reinforcement tape 0176 590034. The reinforcement tape will be cut manually. x 0176 220314 Articulated foot with tape guide for reinforcement tape of 3,0 mm width. Can be used in combination with E1 or E3 and tape-reel bracket for reinforcement tape 0176 590034. The reinforcement tape will be cut manually. x 0176 220324 Articulated foot with tape guide for reinforcement tape of 5,0 mm width. Can be used in combination with E1 or E3 and tape-reel bracket for reinforcement tape 0176 590034. The reinforcement tape will be cut manually. x x = Optional equipment o = Standard equipment 10 179-171629 Subclasses 176-141621 Optional equipment 175-141621 Order number x x x Optional equipment 176-141621 179-171629 Subclasses 0171 003502 Double-needle kit for the transformation of a single-needle machine to a double-needle double chainstitch machine (Without thread trimming function) x 9800 330009 Control panel Efka V810 x x x 9800 330010 Control panel Efka V820 x x x 9830 515064 L-Bracket for fastening the control panel to the sewing machine for Efka V810 and V820 x x x 175-141621 Order number x = Optional equipment o = Standard equipment GB 11 179-171629 Subclasses 176-141621 Optional equipment 175-141621 Order number MG53 400624 Stand set MG 53-3 Table top 1060 x 500 mm, with one pedal x x x MG53 400634 Stand set MG 53-3 Table top 1060 x 600 mm, with one pedal x x x MG53 400644 Stand set MG 53-3 Table top 1250 x 900/700 mm, with one pedal x x x MG53 400664 Stand set MG 53-3 Table top 1060 x 500 mm, with one pedal and rollers x x x MG53 400674 Stand set MG 53-3 Table top 1060 x 600 mm, with one pedal and rollers x x x MG53 400684 Stand set MG 53-3 Table top 1250 x 900/700 mm, with one pedal and rollers x x x Stand sets x = Optional equipment o = Standard equipment 12 Please contact our Application Center (APC) for further optional equipment. E-Mail: [email protected] Further documentation of class 175 176 179 available: 0791 0791 0791 0791 xxxxxx xxxxxx 100700 175701 0791 175702 0791 176701 Parts List Service Instructions Fitting Instructions for Sewing Lamp LED Fitting Instructions Integrated Sewing Lamp Kit 0175 590024 Fitting Instructions Electropneumatic Fullness Kit 0175 590044 Fitting Instructions Tape Feeder Kit 0176 590034 GB 13 5. Technical data Noise: Emission value per work place according to DIN 45635-48-A-1-KL-2 175-141621 LC = _dB (A) Stitch length: _ mm Workpiece: Sewing foot lift: ___ mm Speed: ____ min LC = _dB (A) Stitch length: _ mm Workpiece: Sewing foot lift: ___ mm Speed: ____ min LC = _dB (A) Stitch length: _ mm Workpiece: Sewing foot lift: ___ mm Speed: ____ min 176-141621 179-171629 14 - 1 - 1 - 1 Technical data of the subclasses Stitch type Chainstitch 401 Hook type Crossline Needle system 179-171629 176-141621 Subclasses 175-141621 5.1 101 933 934 RG Needle size [Nm] 80-130 Max. sewing thread sizes core thread [Nm] Stitch length forwards only [mm] 1-4 Max. feeding length top feed foot [mm] 8 Max. feeding length differential bottom feed [mm] 6 Max. number of stitches (Speed) [min ] 5000 5000 5000 No. of stitches upon delivery (Speed) [min ] 4500 4500 4500 Sewing foot stroke [mm] 9 9 9 Operating pressure [bar] 6 6 6 Air consumption per work cycle [NL] 0.1 Weight (machine head) [kg] 36 Gross weight (machine head, accessories, control unit, package) [kg] 58 70 / 3 - 1 - 1 1-4 [mm] 500 x 175 x 380 Dimensions (L x W x H) Package [mm] 780 x 370 x 790 Rated voltage upon delivery Rated load [V/Hz] 190-240V, 50/60Hz [V] 1 x 230V, 50/60 Hz [kVA] GB 8 Dimensions (L x W x H) Machine head Rated voltage 4-8 0.5 15 6. 6.1 Operating Threading the needle thread Caution: Risk of injury ! Switch the main switch off ! Thread the needle thread only with the sewing machine switched off. Thread the needle thread as shown in the illustrations. 16 6.2 Threading the looper thread (Cl. 175/176) Caution: Risk of injury ! Switch the main switch off ! Thread the looper thread only with the sewing machine switched off. 6 5 2 Thread the looper thread as shown in the illustrations – Lift the thread downholder 2 out of its catch mechanism. – Pull the thread through the boreholes 3 and 4. – Pull the thread through the looper boreholes 5 and 6. – Shut the thread downholder 2. 3 GB 4 17 6.3 Adjusting the needle thread tension The needle thread tension has to be tighter than that of the looper thread. Increase the needle thread tension: Turn setting wheel 1 clockwise. Reduce the needle thread tension: Turn setting wheel 1 counter-clockwise. Too tight thread tensions cause puckering of the material. A too loose looper thread tension may lead to skipped stitches. 1 6.4 Needle thread quantity for safe stitch formation In case of elastic sewing threads, e.g. synthetic fibre threads or monofilament threads, a certain needle thread quantity must be pulled to guarantee a safe stitch formation. This is done in thread lever position “down” in conjunction with the thread regulator 2. Adjust the thread regulator in position “down” of the thread lever 4 as follows: In case of elastic sewing threads the lower thread bore is visible. Thread the needle thread past the bow 3 on the left (see fig. a). In case of less elastic sewing threads, as e.g. cotton, the upper thread bore is visible. Thread the needle thread past the bow 3 on the right (see fig. b). 2 3 18 fig. a 4 3 fig. b 4 6.5 Adjusting the looper thread feeder (Cl. 175/176) The looper thread feeder 1 guarantees the automatic adaptation of the looper thread quantity to the set stitch length. This means an optimum stitch formation for every stitch length, even in case of condensed stitches. No gaping and ruffling of the seam. The looper thread quantity to be pulled can be quickly adjusted. Without changing the thread tensions you can realize: a) tight a) b) normal b) c) highly elastic (balloon stitch) seams c) GB 1 2 After loosening the screws 2 and adjusting the feeder 1 please make the following settings: – Loosen screws 2. – Adjust the thread feeder: towards 0 = tighter seam towards 5 = more elastic seam Important hints! 1) In case of an extreme adjustment, e.g. a very short stitch length and a very large thread quantity (elastic seam) it has to be observed that a safe needle penetration into the thread triangle is still possible. A too large looper thread quantity may lead to skipped stitches. 2) If the stitch length is increased considerably with the settings described under 1), e.g. to 4 mm, the thread guide has to be reset towards 0. Otherwise the looper thread might jump off the thread pick-up disc. The looper thread would not be pulled back by the thread pick-up disc as it is necessary during the retrograde motion of the looper. 19 6.6 6.6.1 Adjusting the feed length Adjusting the bottom feed / top feed Bottom feed (cl. 175) The feed length of the feed-dog is adjusted at the setting wheel 1. 1 Bottom feed (cl. 179) The feed length for the feed dog has to be adjusted manually. – Tilt the machine. – Loosen screw 3 and remove the cover 2. – After loosening the lock nut 5, adjust the lever 4: Adjusting lever 4: to the back (+) = Increase feed length to the front (-) = Reduce feed length – Tighten lock nut 5. 2 4 3 5 20 Top feed (Cl. 175/179) If the stitch length for forward sewing is changed with adjustment wheel 1, the overfeed is automatically changed in line with it. The overfeed length is adjusted with adjustment wheel 5 and can be read off at pointer 3. When using the mechanically or electropneumatically connectable fullness facility (optional equipment), the maximum top feed length can be limited using handle 4. The maximum top feed length is displayed by pointer 2. The function for the electropneumatically connectable fullness facility (optional equipment) is incorporated in the sewing-drive control unit. 1 4 2 5 GB 3 21 Notes: 22 6.6.2 Adjusting the condensed stitches (cl. 175/176) With the setting wheel 10 it is possible to select the desired condensed stitches. More condensed stitches: turn the setting wheel 10 clockwise. Less condensed stitches: turn the setting wheel 10 counter-clockwise. 10 Setting the differential bottom feed (cl. 176) The sewing machine class 176 has two adjustable feed dogs in a row independent from each other. Use the setting wheel 1 to adjust the feed length of the rear feed dog. If the feed length of the rear feed dog is altered, the front one will automatically be changed in line with it. Adjusting the front feed dog can be done using the setting wheel 5 and the value set can be read at the pointer 3. When using the mechanically or electropneumatically connectable fullness facility (optional equipment), the feed length of the front feed dog can be limited using handle 4. The maximum feed length is displayed by pointer 2. The function for the electropneumatically connectable fullness facility (optional equipment) is incorporated in the sewing-drive control unit. 1 4 2 5 3 23 GB 6.7 Changing the needles 1 2 3 Caution: Risk of injury ! Switch the main switch off. Change the needle only with the sewing machine switched off. – – – – – 24 Turn the handwheel until the needle bar 1 has reached its top position. Loosen screw 2. Pull the needle out of the needle bar 1 in downward direction. Push new needle in the bore of needle bar 1 as far as it will go. Align the needle in such a way that the hollow groove 3 shows in backward direction! Fasten screw 2. 6.8 Adjusting the sewing foot pressure Class 175/179 1 The desired sewing foot pressure is adjusted by means of the rotary knob 2. – Loosen the counter nut 3. – Increasing the sewing = Turn the rotary knob 2 foot pressure clockwise. – Reducing the sewing = Turn the rotary knob 2 foot pressure counter-clockwise. – Fasten the counter nut 3 again. 2 3 CAUTION: The sewing-foot pressure of the top feed foot must only be checked with the top feed foot in contact with the feeder. Class 176 4 GB The desired sewing foot pressure is adjusted by means of the rotary knob 4. – – Increasing the sewing foot pressure Reducing the sewing foot pressure = = Turn the rotary knob 4 clockwise. Turn the rotary knob 4 counter-clockwise. 25 6.9 Adjusting the top feed foot pressure Class 175/179 The required pressure for the top feed foot (grip-feed 4) is set with adjustment wheel 1. – Increasing the top feed= Turn adjustment wheel 1 foot pressure clockwise. Reducing the top feed = Turn adjustment wheel 1 foot pressure counter-clockwise. 1 2 4 3 5 CAUTION: The sewing-foot pressure and top feed foot contact pressure must only be checked with the top feed foot in contact with the feeder. 26 6.10 Sewing foot lift The sewing feet can be lifted mechanically or electropneumatically. According to the machine type and the equipment of the machine the lifting is done by actuating the knee lever or the pedal respectively. 6.11 Keypad on the machine arm (Cl. 175/176) Key Function One-time suppression/activation of condensed stitches 1 Needle position high/low during downtime. 2 Condensed stitches GB 3 Activate/deactivate Fullness facility (top feed)175 Fullness facility (bottom feed)176 Optional equipment LED Function 1 One-time suppression/activation of condensed stitches LED: ON suppression activated LED: OFF suppression deactivated 2 Indicator light of the main switch LED: ON sewing machine ON LED: OFF sewing machine OFF 3 Fullness facility (top feed)175 Fullness facility (bottom feed)176 LED: ON Electronically connectable fullness facility activated. LED: OFF Electronically connectable fullness facility deactivated. 27 7 Sewing Operating and function sequence when sewing: Sewing operation Operating / Explanation Before the sewing start Initial position - Pedal in idle position. Sewing machine is idle. Needle position high. Sewing foot down. Position the fabric at the seam beginning - Lifting the sewing foot. - Push the fabric close to the needle. - Lower the sewing foot. Sewing - Step forward on the pedal and hold it stepped. The machines moves forwards with the speed determined by the pedal. In the seam Center Interrupt the sewing operation - Release the pedal (position 0) . The machine stops. The sewing foot is down. Continue the sewing operation (after releasing the pedal) - Step forward on the pedal The machine continues sewing with the speed determined by the pedal. At the seam end Remove the fabric - Step the pedal back completely and hold it stepped. The final bar is sewn. The threads are cut. The needle is in position “high”. The sewing foot lifts. - Remove the fabric. to the front position 0 halfway back fully back 28 8. 8.1 Maintenance Cleaning and testing Caution: Risk of injury ! Switch the main switch off. The maintenance of the sewing machine must only be carried out when the machine is switched off. Maintenance work has to be done after the intervals indicated in the tables at the latest (see column “Operating hours”). The processing of fluffy material may require shorter maintenance intervals. A clean sewing machine is a trouble-free machine. Maintenance work to be carried out Explanation Operating hours Places to be cleaned especially carefully: -underside of the throat plate - area around the looper - area around the thread pick-up disc - thread trimmer - area around the needle 8 Machine head - Remove sewing dust and thread remainders. (e.g. with an air blow gun) GB ATTENTION ! Hold the air blow gun in such a way that the sewing dust is not blown into the oil pan. 29 6 4 8 2 10 1 2 Maintenance work to be carried out Explanation Operating hour Sewing drive Clean the air inlets from sewing dust and thread remainders 8 Check the water level in the pressure regulator. The water level must not rise up to the filter insert 1. - Drain water out of the water separator 2 under pressure after screwing out the drain screw 3. 40 Clean the filter insert. Dirt and condensed water are discharged through the filter insert 1. - Separate the machine from the compressed air supply. - Screw out drain screw 3. The pneumatic system of the machine must be pressureless. - Screw off the water separator 2. - Screw off the filter insert 1. Wash out dirty filter pan and filter insert with benzine (no solvent) and blow them clean. - Reassemble the maintenance unit. 500 Clean the motor ventilation grille (e.g. with an air blow gun) Pneumatic system Make leak test of the system. 30 500 8.2 Lubrication 4 5 6 7 Caution: Risk of injury ! Oil may cause skin eruption. Avoid a longer contact with the skin. Wash yourself thoroughly after a contact. ATTENTION ! The handling and disposal of mineral oils is subject to legal regulations. Deliver used oil to an authorized collecting station. Protect your environment. Be careful not to spill any oil. GB Oil the special sewing machine exclusively with lubricating oil DA-10 or an equivalent oil with the following specification: – Viscosity at 40° C: 10 mm²/s – Ignition point: 150° C DA-10 can be bought at the sales points of DÜRKOPP ADLER AG under the following parts numbers: 250 ml container: 9047 000011 1-litre container: 9047 000012 2-litre container: 9047 000013 5-litre container: 9047 000014 Maintenance work to be carried out Explanation Operating hour Lubrication of the machine head The check of the oil supply is limited to the following items: 8 - Fill the oil reservoir 4 up to the marking “Max” with the machine standing upright. - Check the oil reservoir in the looper drive casing 6 and fill up oil, if necessary. For this purpose screw out screw 5. When the machine is tilted to the back, the oil level must not drop below the lower long marking 7 of the inspection glass. The oil level must not exceed the upper marking. 31 Notes: 32