1
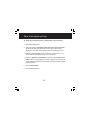
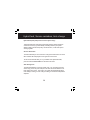
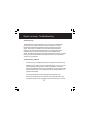
ComfortChoice Edge®
Owner’s Manual
This document is the property of Carrier Corporation and is delivered on
the express condition that it is not to be disclosed, reproduced in whole or
in part, or used for manufacture by anyone other than Carrier Corporation
without its written consent, and that no right is granted to disclose or so
use any information contained in said document.
Carrier reserves the right to change or modify the information or product
described without prior notice and without incurring any liability.
© 2008, Carrier Corporation
2
You will love this thermostat.
You have the Edge® thermostat. This unique device's state-of-the-art
technology makes it easier than ever for you to keep your home comfortable.
Designed to be as smart - and smart-looking - as any of the other electronics in
your home, your new Edge thermostat offers programming options to fit your
lifestyle - not anybody else's. The Edge thermostat can be set for 7-day, 5/2day, or 1-day programmable operation. Different heating and cooling set points
and times are programmable for 4 periods per day. The thermostat has no need
for batteries to store user-configured settings in memory. During power loss its
internal memory saves settings for unlimited time, and the clock continues to
run for at least 24 hours. Let this manual show you how easy it is to enjoy the
newest experience in home comfort.
1
Contents
Thermostat display ................................................................................ 4
Thermostat buttons ............................................................................... 6
Setting the time and date ....................................................................... 8
Setting or changing heating/cooling temperature setpoints ................... 10
Holding the temperature ....................................................................... 12
Programming the Thermostat ............................................................... 13
To Set up a different schedule when all days of the week will follow
the same schedule ...................................................................... 14
To Set up a schedule when all days of the week will not follow
the same schedule ...................................................................... 16
Programming a vacation schedule ................................................ 19
Overriding a Utility Curtailment ............................................................. 21
Turning heating/cooling system off/ Using fan ..................................... 22
Using the thermostat to turn the heating and cooling system off ... 22
Using the fan ............................................................................... 22
Using Emergency Heat ........................................................................ 23
Advanced Programming ...................................................................... 24
Advanced programming display codes ........................................ 25
Reset reminders .......................................................................... 26
2 2
Contents
Adjusting backlighting .................................................................. 27
Keypad lockout ............................................................................ 28
Real-time pricing .......................................................................... 30
Time-of-use/peak pricing ............................................................. 33
Special Features
Hybrid heat (heat pump systems only) ......................................... 36
Service reminders ....................................................................... 36
Auto changeover ......................................................................... 36
Smart Recovery ........................................................................... 37
Troubleshooting .................................................................................. 37
What If . . .
"Auxiliary heat on" is displayed (heat pump systems only) ....... 37
"Em heat" is displayed (heat pump systems only) ..................... 37
There is a power outage .......................................................... 38
A service reminder message is displayed ................................ 38
Thermostat Error Codes ....................................................... 39
3
Thermostat display
The thermostat display is shown in Figure 1. The following information can be
displayed on the screen:
• Day of the week
• Programming option - indicates which settings are being adjusted (clock,
calendar, daily schedule, vacation settings
• Filter reminder
• Current temperature
• Current program routine - follow scheduled programming, hold current
settings, or run vacation program
• Fan mode - on or auto
• Current system mode - heating, cooling, emergency heat, heat/cool (auto),
off
• FC - Fahrenheit display
• Advanced programming indicators
• Keypad is locked (no padlock means unlocked)
• System is in auxiliary (supplemental) mode
• Cooling set point; cooling on
• Heating set point; heating on (the 2 indicates second stage of heating or
cooling is active)
• Heating setpoint
• Year
• Vacation schedule return date
• Day
4 4
Thermostat display
•
•
•
•
•
Length of time for temporary temperature hold
Time left in utility curtailment/real-time pricing (temperature adjustment) events
Month
Time period start
Period of the day
Figure 1
Thermostat Display
5
Thermostat buttons
The thermostat
has occ
buttons
that are
accessible
holiday
holiday
unocc
occ3
occ2 aon the front panel when you
open the front cover. These buttons are used for various functions such as
raising or lower the desired setpoint and changing the current mode. See
Figure 2. Button functionality is summarized below.
SET BUTTON — Enters the thermostat programming schedule and allows you to
adjust the clock and vacation settings.
SCHEDULE BUTTON — Allows you to choose to follow a schedule, hold the
current set points, or go into vacation mode.
FAN BUTTON — Selects whether the fan operates continuously (on) or only
when needed for heating or cooling (auto)
MODE BUTTON — Selects whether the thermostat is set for heating, cooling,
emergency heat, auto (heat and cool as needed), or off modes.
DONE BUTTON — Saves the settings when completing a setup or programming
step.
UP BUTTON — Increments the currently chosen value (temperature, clock,
calendar, etc.).
DOWN BUTTON — Decrements the currently chosen value (temperature, clock,
calendar, etc.).
“SOFT” BUTTON — There are 6 soft buttons. The soft buttons are used to
select the onscreen indicator directly above the specific button. These
indicators can change based on user actions.
6 6
Thermostat buttons
Figure 2
Thermostat Buttons
7
Setting time and date
This thermostat communicates wirelessly with a communication network. It
automatically obtains the current time and date from the communication
network.
In the event of loss of network communication, you can manually set the
time and date by following the instructions below. If you notice that the time is
not adjusted for daylight saving time you can adjust the hour at any time by
following Steps 1,2, and 3 below.
1. Open the door.
2. Press the set button on the left. The screen will show the word clock on
the left of the display and the time will be shown on the bottom.
3. To set the hour, press the soft button below the hour, and then press
the up or down button to adjust the value.
4. To set the minutes, press the soft button below the minutes, and then
press the up or down button to adjust the value.
5. To set the date, press the set button until the screen displays the word
calendar and the date is shown on the bottom of the screen.
8 8
Setting time and date
6. To set the month, press the soft button below the letter M (month), then
press the up or down button to adjust the value. Stop at the desired month.
7. To set the day of the month, press the soft button below the letter D
(day), then press the up or down button to adjust the value. Stop at the
desired date.
8. To set the year, press the soft button below the letter Y (year), then
press the up or down button on the right. Stop at the desired year.
9. Close the door.
9
Setting or changing heating/cooling setpoints
Your thermostat is installed with pre-set heating and cooling temperature
setpoints. You can use these or change them so your home is as warm or as
cool as you would like it to be. You can also temporarily change the temperature after you've programmed your thermostat according to your specific
schedule needs.
Follow the steps below to temporarily hold the temperature where you set it for
two hours until the next programmed cycle begins.
1. Open the thermostat door. You will see an arrow next to the word off, heat
or cool in the upper right corner on the screen, depending on the mode your
system is in. (If it's the first time you've used the thermostat, it will say
heat.) The pre-programmed heating or cooling temperature is displayed in a
box at the bottom of the screen.
2. To change the displayed temperature, press the up or down button located
on the right side of the display until you reach the desired setting.
3. To change the other temperature setpoint, press the mode button above
the screen. The arrow will move to the word cool or heat and the screen
will show that temperature in a box in the lower right corner
10 10
Setting or changing heating/cooling setpoints
4. Press the up or down button, located to the right of the display, to change
the displayed setpoint. Stop on the desired setting.
5. When there are arrow indicators next to both the wordsheat and cool at
the top right of the screen, the heating and cooling temperatures are also
displayed at the bottom of the screen. You can change either one by
pressing the soft button below the setpoint temperature you want to
change, then pressing the up or down button to adjust the temperature.
Repeat the process for the other setpoint if necessary. Press the done
button when you are finished.
6. The thermostat will hold these changes for two hours or until the next
programmed cycle begins. The words hold for 2:00 will be displayed while
this temporary hold is in effect. To change the amount of time the temperature is on hold, press the soft button under the hold hours or
minutes. Then press the up or down button to adjust the hold time.
7. Close the thermostat door when done.
11
Holding the temperature
Follow the steps below to change your programmed temperature settings and
hold the temperature at a specific setting without the temperature changing
during the next programmed period.
1. Open the thermostat door.
2. Press the schedule button located at the top of the display. The arrow will
move to the word hold under the button.
3. The screen will display the setpoint temperature in the lower right. To
change the setpoint temperature, press the up or down button. The
temperature will stay at the new setting until you release the hold.
4. To change the heating setpoint temperature when the cooling temperature
is displayed - and vice versa - press the mode button located at the top
of the screen until the arrow moves to the desired mode - heat or cool.
Then press the up or down button to change the setpoint temperature.
5. To return the temperature to the pre-set level for that time period, press the
schedule button until the arrow moves to follow schedule.
6. Close the door.
12 12
Programming the thermostat
Unlike many thermostats, this one gives you the option of programming
every day of the week differently. It is pre-programmed at the factory with the
same settings for all seven days. See the table below.
MONDAY
TH R U
SUNDAY
TIME
HEATING
SETPOINT
COOLING
SETPOINT
Wake
6 AM
68
76
D ay
8 AM
60
85
Evening
5 PM
68
76
Sleep
10 P M
60
82
Table 1
Schedule Factory Settings
13
Programming the thermostat
To setup a different schedule where all seven days of the week are
the same:
1. Open the thermostat door.
2. Press and release the set button repeatedly until the screen displays the
words daily schedule in the center of the screen. The list of the days of the
week will be displayed on the left. All seven days of the week will be
displayed, indicating that you can program all seven days the same way
now.
3. Look at the column to the right of the days of the week. This column
displays the time period (day, eve, sleep, or wake). To set the wake time,
press the button under the time period until wake is displayed. To set
the wake time, press the button under the hour or minute and then
press the up or down button to set the desired wake time.
4. Next, set the heating temperature setpoint for that time period by pressing
the soft button under the heat set at: temperature on the right and
then pressing the up or down button to set the desired heating setpoint
temperature. (continued)
14 14
Programming the thermostat
5. Set the cooling temperature setpoint for that time period by pressing the
soft button under the cool set at: temperature on the right and then
pressing the up or down button until you reach the desired cooling
setpoint temperature.
6. Repeat this process for each of the three remaining time periods - day,
evening and sleep - for all days of the week by first pressing the soft
button under the time period to select it with the arrow. Then use the
soft keys to change the start time, heating setpoint, and the cooling setpoint
temperature.
7. Press the done button when complete.
8. Close the thermostat door.
15
Programming the thermostat
To setup a schedule where all days of the week will not follow the
same schedule.
Fill in Table 2, which follows this procedure, with the desired times and
setpoints for each day. Use this table as a guide during programming and for
future reference. (continued)
1. Open the thermostat door.
2. Press and release the set button repeatedly until the screen displays daily
schedule in the center of the screen. The list of the days of the week will
be displayed on the left.
3. Press the soft button under the days of the week until the day or days
you want to program are displayed.
4. Look at the column to the right of the days of the week. This column
displays the time period (day, eve, sleep, or wake). To set the wake time,
press the soft button under the time period until wake is displayed,
press the soft button under the hour orminute, and then press the up
or down button to change the time. (continued)
16 16
Programming the thermostat
5. Set the heating setpoint temperature for that time period by pressing the
soft button under the heat set at: temperature. Then press the up or
down button until the desired heat setpoint temperature is displayed.
6. Set the cooling setpoint temperature for that time period by pressing the
soft button under the cool set at: temperature. Then press the up or
down button until the desired cooling setpoint temperature is displayed.
7. Repeat this process for each of the three remaining time periods - day,
evening and sleep - by first pressing the soft button under the time period
to select it. Then use the soft buttons to change the start time, the heating
setpoint, and the cooling setpoint.
8. To set the schedule for another day, press the soft button under the days
of the week until the day or days you want to program are displayed.
9. Repeat steps 4 through 7 to program each day.
10. Press the done button when complete.
11. Close the thermostat door.
17
Programming the thermostat
EveningEvening
Evening
D ay
Evening
Day oTime/Heat/Cool
f
Wake
Sleep Start
Start
Start
Start
Week
Time/Heat/Cool
Time/Heat/Cool
Start Time/Heat/Cool Time/Heat/Cool Time/Heat/Cool
Mon
Tues
Wed
Thurs
Fri
Sat
Sun
Table 2
Daily Schedule Planner
Note: The cooling temperature setpoint must be higher than the heating
temperature setpoint. (The temperature difference can be changed by
the installer using the Advanced setup configuration.)
18 18
Programming a vacation schedule
To Program a vacation schedule:
You can program a special heating and cooling schedule for times
when you will be away for a vacation or an extended period of time.
1. Open the thermostat door.
2. Press and release the set button repeatedly until the screen displays
vacation settings on the right side of the display.
3. The selection box is around the heating temperature. Press the up or down
button to select the desired heating temperature setpoint.
4. To adjust your cooling temperature, press the soft button under the cool
set at temperature on the screen. The selection box will move to that
number.
5. Press the up or down button to select your desired cooling temperature
setpoint.
6. To change the fan from auto to on, press the fan button at the top.
7. To change the thermostat mode to heat, cool, or Em heat press the mode
button at the top until the arrow is next to the option you want. (continued)
19
Programming a vacation schedule
8. Press the done button.
9. Close the thermostat door.
Activating your vacation program:
You must schedule a return date to activate your vacation settings before
leaving. The thermostat will begin following the vacation schedule after you've
selected the return date. On 12:00 AM on the return date, the thermostat will
automatically switch back to the follow programmed schedule.
1. Press the schedule button at the top until the arrow is next to vacation.
2. You will see the next day's date at the bottom of the screen under the
words return on. There is a box around the day. To set the date (D) you will
return home, press the up button and stop on the desired date.
3. If you need to change the month (M) for your return, press the button
under the month on the screen. The selection box will move to the month
number.
4. Press the up button to set the desired month.
5. Repeat this process to change the year (Y) if necessary.
.
Press the done button. This will instruct the thermostat to begin the
vacation schedule immediately.
7. Close the thermostat door.
20 20
Overriding a Utility Curtailment
The thermostat allows your local utility to remotely adjust (curtail) the operation
and temperature of your air conditioning or heating system for short periods of
time - only when absolutely necessary, to help minimize the load on the electric
system during periods of peak usage in your area. You always have the ability
to override (cancel) the adjustment if needed.
If a utility curtailment is active, the words saving mode will be displayed,
indicating you are helping to save energy. The clock display will show the time
remaining in the curtailment.
To override/cancel a utility curtailment:
1. Open the thermostat door.
2. Press the soft button below override. The words saving mode will
disappear. The thermostat will be out of curtailment mode and your setpoint
will return to its previous user-programmed value.
3. Close the door. The clock display will indicate the current time of day.
21
Turning heating/cooling system off / Using fan
Using the thermostat to turn the heating and cooling system off:
1. Open the thermostat door.
2. Press the mode button repeatedly until the arrow under the button is next
to off.
3. Close the thermostat door.
Using the fan:
When the fan is on, it helps distribute air throughout your home for a more even
temperature in all spaces. You can set the thermostat so that the fan runs only
during your heating and cooling cycles (auto mode) or to run continuously.
1. Open the thermostat door.
2. Press the fan button on the top. The arrow below the button moves from
auto to on.
3. When you want to return the fan to auto mode, press the fan button again.
You will see the arrow next to auto under the button.
4. Close the thermostat door.
22 22
Using Emergency Heat
Using Emergency Heat:
Emergency heat is useful when the automatic auxiliary heat system can't keep
up with demand. (Systems with heat pumps use "auxiliary heat" when it's too
cold outside for the heat pump to heat the house without help. The thermostat
display indicator for this is auxiliary heat on.)
If the heat pump compressor that works with auxiliary heat fails, or if the heat
pump isn't working at all, you can turn on the emergency heat for that extra
help. (You'll know there's a problem if the house can't seem to get warm when
it's very cold outside.) You want to avoid using emergency heat, though,
because it's the most expensive option. And, of course, if you suspect a
problem with your heat pump, call for service immediately.
Here's how to set your thermostat to use emergency heat.
1. Open the thermostat door.
2. Press and release the mode button repeatedly until the arrow under the
button moves to Em heat on the screen.
3. Close the thermostat door.
23
Advanced Programming
Advanced Programming:
You can customize several features of your thermostat. See Table 3 on the
page which follows.
24 24
Advanced Programming
Option
Number
Configuration
Option
Number
Configuration
01
Reset
Reminders
07
Unused
02
Unused
08
Unused
03
Backlighting
09
Real-Time Pricing
(Medium price)
Setpoint Offset
04
Keypad
Lockout
10
Real-Time Pricing
(High price)
Setpoint Offset
05
Unused
11
Real-Time Pricing
(Peak price)
Setpoint Offset
06
Number of
Programming
Periods
12
Time-of-Use/
Peak Pricing
Setpoint Offset
Table 3
Thermostat Advanced Programming Display Codes
25
Reset reminders
The thermostat will display a check filter message when it is time to change the
furnace filter. When the reminder is displayed on the screen, pressing and
holding the done button for about three seconds will clear the reminder.
To reset the check filter reminder:
1. Open the thermostat door.
2. Press and simultaneously hold the soft buttons below the heat and
cool setpoints (the two bottom buttons on the right). The screen will
display 01 and the check filter reminder. The display will also show the
percentage of time used by the filter. When the percentage reads toward
100%, this means that it is nearing time for filter replacement.
3. Repeatedly press and release the set button until the check filter reset
reminder flashes.
4. Press and hold the done button for about three seconds to remove the
reminder. The percentage associated with it will go down to zero.
5. Press the done button.
6. Close the thermostat door.
26 26
Adjusting backlighting
Adjusting or turning off the continuous backlighting:
You can setup your thermostat so that it uses a low level amount of backlighting until you press any button, which increases the lighting temporarily. You can
adjust the intensity of the backlighting or turn if off completely. The range is off
(OF) 1 to 5 brightness.
1. Open the thermostat door.
2. Press and simultaneously hold the buttons below the heat and cool
setpoints until the screen displays 01 in the lower right corner and the
filter reset reminder.
3. Press the up arrow button until 01 changes to 03. The number 3 (default
backlight setting) will be displayed next to it.
4. To increase the backlight level, press the rightmost lower button and
then press the up arrow button until 4 or 5 appears. To decrease the
backlight level, press the rightmost lower button then press the down
arrow button until 2 or 1 is shown. Change the setting to OF to completely
remove backlighting.
5. Press the done button.
6. Close the thermostat door.
27
Keypad Lockout
The keypad lockout feature lets you "lock" the thermostat at one of three levels.
These levels increasingly limit anyone's ability to make changes. The levels are:
0F - The feature is turned off.
1 - You can change temperature settings, time of day, and day of the week
only
2 - You can change temperature settings only
3 - The entire keypad is locked, allowing no changes
To set the lockout level of the thermostat:
1. Open the thermostat door.
2. Press and simultaneously hold the buttons below the heat and cool
setpoints (the two bottom buttons on the right) until the screen displays
01 in the lower right corner. The filter reset reminder will also be displayed.
3. Press the up arrow button until 01 changes to 04 with the number 4
(keypad lockout) next to it.
4. Press the rightmost soft button and then press the up arrow button
until the desired lockout level is displayed: 1, 2 or 3. (continued)
28 28
Keypad Lockout
5. Press the done button.
6. Close the thermostat door.
You will see a padlock icon on the screen.
To temporarily unlock the keypad:
1. Open the thermostat door.
2. Press and hold the up and down buttons simultaneously for about five
seconds.
The padlock icon will disappear. This means the keypad is unlocked and can
be used. The keypad will revert back to the locked state after you've
stopped pushing buttons for two minutes.
3. Close the door.
Note: To permanently unlock the keypad, follow Steps 2 through 5 of the
Keypad Lockout procedure above, but in Step 4, press the down arrow
button until the screen displays 0F.
29
Real-time pricing
Your utility may offer real-time pricing, which is an electric rate pricing strategy
where rates vary over short time intervals, typically hourly. You, as a consumer, can benefit from real-time pricing if you are able to shift or reduce your
electric consumption during high cost periods. Your thermostat will help you do
this by notifying you when real-time pricing is in effect and automatically
adjusting your temperature setpoint by a user-selected number of degrees.
Your utility will provide you with details regarding the pricing associated with
the different pricing periods. During the different real-time pricing periods your
thermostat will display the words energy price med $$, energy price high $$$,
or peak energy price $$$$.
In addition to displaying the real-time pricing notification, the thermostat will also
automatically adjust the temperature setting of your air conditioning or heating
system in accordance with any "offsets" (setpoint adjustments) that you
program into the thermostat, as described in the section which follows. When a
real-time pricing setpoint adjustment is in effect, the words saving mode will be
displayed, in addition to the real-time pricing notification message. If this is
critical peak price, the word critical will also be displayed. In addition, the clock
display will show the time remaining in the pricing event, if that is known.
If you are uncomfortable during a real-time pricing event you always have the
power to override (cancel) the setpoint adjustment.
30 30
Real-time pricing
To override/cancel temperature setpoint adjustment during a realtime pricing event:
1. Open the thermostat door.
2. Press the soft button below override. The words saving mode or
critical saving mode will disappear. The thermostat temperature setpoint
will return to your previous user-programmed value.
3. Close the door. The clock display will indicate the current time of day.
Note that the screen will continue to display the words energy price med
$$, energy price high $$$, or peak energy price $$$$. This indicates that
real-time pricing rates are still in effect (but keep in mind that because you
pressed the override button in Step 2 above, your setpoint is not being
adjusted). You could manually adjust your setpoint again, if desired.
To setup real-time pricing setpoint temperature offsets:
During real-time pricing events you retain ultimate control over your comfort as
you, the consumer, select the number of degrees that you want your temperature setting to be adjusted (0 to 10) based on the type of pricing signal received
(medium, high, critical).
31
Real-time pricing
1. Open the thermostat door.
2. Press and simultaneously hold the soft buttons below the heat and
cool setpoints (the two bottom buttons on the right) until the screen
displays the check filter reset reminder and 01 in the lower right corner.
3. Press the up arrow button until 01 changes to 09 with 1 next to it. You
will also see the words energy price med on the screen.
4. Press the rightmost lower button then press the up or down arrow
button until the screen displays the number of degrees (0 to 10) that you
want to automatically adjust your thermostat's programmed setpoint when
your utility issues a pricing signal.
5. Press the done button.
6. Close the thermostat door.
To setup temperature offsets for periods when your utility issues a high or
peak pricing signal, follow Steps 1 to 6 above, but in Step 3 press the up
arrow button until 01 changes to 10 (for high) or 11 (for peak). You will see
the words energy price high or peak energy price on the screen.
32 32
Time-of-use/peak pricing
Your utility may offer time-of-use pricing, which is an electric rate pricing
strategy where rates vary dependent on utility-designated peak and non-peak
time of day. Your utility will provide you with pricing details. You, as a consumer, can benefit from time-of-use/peak pricing if you are able to shift or
reduce your electric consumption during peak price periods. Your thermostat
will help you do this by notifying you when time-of-use/peak pricing is in effect
and automatically adjusting your temperature setpoint by a user-selected
number of degrees.
During peak pricing periods (which are determined by your utility) your
thermostat will display the words peak energy price $$$$.
In addition to displaying the peak pricing notification, the thermostat will also
automatically adjust the temperature setting of your air conditioning or heating
system in accordance with any "offsets" (setpoint adjustments) that you
program into the thermostat. When a peak pricing setpoint adjustment is in
effect, the words saving mode will be displayed, in addition to the peak energy
price $$$$ notification message.
If you are uncomfortable during a peak pricing event you always have the
power to override (cancel) the setpoint adjustment. See the instructions which
follow.
33
Time-of-use/peak pricing
To override/cancel temperature setpoint adjustment during a peak
pricing event:
1. Open the thermostat door.
2. Press the soft button below override. The words saving mode will
disappear. The thermostat temperature setpoint will return to your previous
user-programmed value.
3. Close the thermostat door. The clock display will indicate the current time of
day.
Note that the screen will continue to display the words peak energy price
$$$$. This indicates that peak pricing rates are still in effect (but keep in
mind that because you pressed the override button in Step 2 above, your
setpoint is not being adjusted).You could manually adjust your setpoint
again, if desired.
During peak pricing events you retain ultimate control over your comfort as you,
the consumer, select the number of degrees that you want your temperature
setting to be adjusted (0 to 10)
34 34
Time-of-use/peak pricing
To setup time-of-use/peak pricing temperature setpoint offsets:
1. Open the thermostat door.
2. Press and hold the soft buttons below the heat and cool setpoints
simultaneously (the two bottom buttons on the right) until the screen
displays the check filter reset reminder and 01 in the lower right corner.
3. Press the up arrow button until 01 changes to 12 with 0 next to it. You
will also see the words peak energy price on the screen.
4. Press the rightmost lower button then press the up or down arrow
button until the screen displays the number of degrees (0 to 10) that you
want to automatically adjust your thermostat's programmed setpoint during
peak pricing times.
5. Press the done button.
6. Close the thermostat door.
35
Hybrid heat, Service reminders, Auto change
Hybrid Heat (heat pump with a furnace system only):
This thermostat works with Carrier Hybrid Heat systems offering maximum
comfort and economy by automatically controlling whether your system
delivers heating with the heat pump, with the furnace, or with both options
working together.
Service Reminders:
The thermostat tells you when it's time to change the furnace filter. The check
filter reminder will be displayed on the upper left of the screen.
To remove the reminder after you or your dealer have replaced the filter,
press and hold the done button for about three seconds.
Auto Changeover:
The thermostat displays one of five modes: heat, cool, Em heat (heat pump
version only), heat cool (auto mode) and off. When the mode selection is for
both heating and cooling - auto mode - the system will automatically switch
from heating to cooling, or from cooling to heating, to maintain the temperature
setpoints.
36 36
Smart recovery, Troubleshooting
Smart Recovery:
The Smart Recovery feature transitions your home from one temperature
period (wake, day, evening, sleep) to the next so that the your home's
temperature matches the temperature setpoint at the start of each time
period. This means, for example, that if your sleep period temperature
setting is lower than the period that precedes it, the thermostat will start
cooling down the home before the beginning of the scheduled sleep
period. The thermostat does this at an energy-efficient rate. This not only helps
make your home as comfortable as possible, it also makes your thermostat
usage more cost effective.
Troubleshooting - What If:
•
Auxiliary heat on is displayed (heat pump and Hybrid Heat systems only):
Auxiliary heat on applies only to the heat pump version. If it is on, you will
see the message auxiliary heat on. When it is displayed, it means the
system has determined that it's too cold outside for your heat pump to heat
the house without help, so it's getting help from the electric heaters. This
happens automatically.
•
Em heat is displayed (heat pump and Hybrid Heat systems only):
Em heat is the display term for emergency heat and applies only to the
heat pump systems. When emergency heat has been turned on, Em heat
37
Troubleshooting
is displayed. You have to turn on emergency heat manually - it doesn't
happen automatically - so if you see Em heat on the display, it means
someone has turned it on.
•
There is a Power Outage:
If you lose electricity, you will not need to reprogram your thermostat. The
settings are retained in memory.
•
A service reminder message is displayed:
The check filter service reminder message tells you that it's time to change
the furnace filter. Make the indicated changes and reset/remove the
reminder rmessage by pressing and holding the done button for about
three seconds.
•
A system error message is displayed:
Table 4 below lists system error messages that may appear on the
thermostat display.
38 38
Troubleshooting
ERROR
CODE
DESCRIPTION
E1
The system isn't communicating properly. Call your service provider.
--
The temperature sensor has failed. Call your service provider.
E4
There is an internal memory failure. Call your service provider
Table 4
Thermostat Error Codes
39
Notes Page
40 40
41
42 42
11-808-443-01 11/08