1
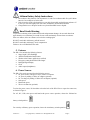
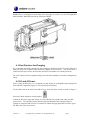
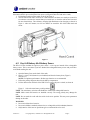
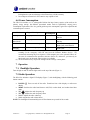
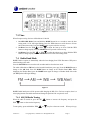
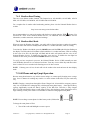
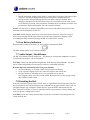
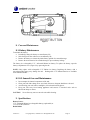
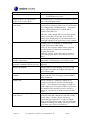
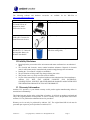
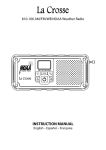
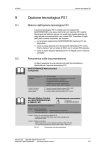
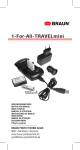
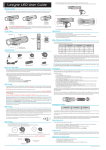
Ambient Weather WR-333A User Manual Table of Contents 1. 2. 3. 4. Introduction ..................................................................................................................................... 2 Controls ........................................................................................................................................... 2 Cables.............................................................................................................................................. 3 Important Notes and Warnings ........................................................................................................ 5 4.1 Before You Get Started ........................................................................................................... 5 4.2 Warnings................................................................................................................................. 5 5. Features ........................................................................................................................................... 6 6. Power Sources ................................................................................................................................. 6 6.1 Best Practices for Charging .................................................................................................... 7 6.2 DC and AC Power .................................................................................................................. 7 6.3 Solar Power ............................................................................................................................ 8 6.4 Hand Crank Power ................................................................................................................. 8 6.5 Dry Cell Battery AAA Battery Power .................................................................................... 9 6.6 Power Consumption ............................................................................................................. 10 7. Operation....................................................................................................................................... 10 7.1 Flashlight Operation ............................................................................................................. 10 7.2 Radio Operation ................................................................................................................... 10 7.3 Time ..................................................................................................................................... 11 7.4 Radio Band Mode................................................................................................................. 11 7.4.1 AM/FM Radio Tuning...................................................................................................... 11 7.4.2 Weather Band Tuning ....................................................................................................... 12 7.4.3 Weather Alert Mode ......................................................................................................... 12 7.5 Cell Phone and mp3/mp4 Operation .................................................................................... 12 7.6 Low Battery Indication ......................................................................................................... 13 7.7 Audio Output / Head Phones ................................................................................................ 13 7.8 Resetting the Unit ................................................................................................................. 13 8. Care and Maintenance ................................................................................................................... 14 8.1 Battery Maintenance............................................................................................................. 14 8.2 8.2 General Care and Maintenance ...................................................................................... 14 9. Specifications ................................................................................................................................ 14 10. Troubleshooting Guide ............................................................................................................. 15 11. Accessories ............................................................................................................................... 17 12. Liability Disclaimer .................................................................................................................. 17 13. Warranty Information ............................................................................................................... 17 14. FCC Statement.......................................................................................................................... 18 15. Battery Recycle Statement........................................................................................................ 19 If any feature is not working, Press the reset button with an open-ended paper clip (Figure 1, Reference 22) Version 2.6 ©Copyright 2013, Ambient LLC. All Rights Reserved. Page 1 1. Introduction Thank you for your purchase of the Ambient Weather WR-333A Emergency Solar Hand Crank Radio, Flashlight with AM/FM/NOAA Weather Band, Certified Weather Alert and Smart Phone/PDA Charger. To download the latest full size manual (for easy viewing) and additional troubleshooting tips, please visit: http://ambientweather.wikispaces.com/wr333 2. Controls No 1 2 3 4 5 6 Description Flashlight ON/OFF button No 7 LCD Display Clock/Radio Tune Up ( Volume Up (+) button Solar Panel Power On/Standby ( ) button 8 9 10 11 Description Clock/Radio Tune Down ( ) button Volume Down (-) button Radio Mode Select and Clock Set button Weather Alert Indicator Speaker ) Figure 1 Version 2.6 ©Copyright 2013, Ambient LLC. All Rights Reserved. Page 2 No 13 14 15 Description Telescopic Antenna Metal Clasp Battery Compartment 16 17 Rubber Dust Cover Mini USB DC Input Port (under the Rubber Dust Cover) Charging Indicator (under the Rubber Dust Cover) 18 No 19 20 21 22 23 Description USB Charging Port (under the Rubber Dust Cover) Headphone Jack (under the Rubber Dust Cover) Power Source Selector (located under the Rubber Dust Cover) Reset button (under the Rubber Dust Cover) Crank Handle Figure 2 3. Cables There are two cables included: 1. Power Input (from USB, AC or DC converter) to charge the radio 2. Power Output (10-in-1 smart phone connector) to charge smart phone and PDA devices. Version 2.6 ©Copyright 2013, Ambient LLC. All Rights Reserved. Page 3 Figure 3 Cable 1 2 Description Mini USB to USB power input cable 10 in 1 power output smart phone cables for: A. Apple IPhone/Ipod/Ipad® B. Motorola V3 C. Motorola V8 D. Nokia 8250 E. Nokia N90 F. Sony Ericcson K750 G. Samsung 1900 H. Samsung D800 I. LG KK90 J. PSP ® Registered trademarks of Apple Inc. NOTE: The tip for the IPhone5 is not included, but you can connect the IPhone5 USB cable that came with your IPhone5 directly into the WR-333A USB power output port. If your smart phone included a USB cable, you can substitute this cable for the conversion cables in Figure 3 and plug directly into the WR-333A USB power output port. Version 2.6 ©Copyright 2013, Ambient LLC. All Rights Reserved. Page 4 4. Important Notes and Warnings 4.1 Before You Get Started Remove the plastic battery pull tab that was included during shipping to energize the rechargeable battery. Set the power switch (Figure 1, Reference 21) to the left Lithium Ion position to energize the rechargeable battery. Press the reset button with an open-ended paper clip (Figure 1, Reference 22) battery switch 4.2 Warnings When used in the directed manner, this unit has been designed and manufactured to ensure your personal safety. However, improper use can result in potential electrical shock or fire hazards. Please read all safety and operating instructions carefully before use, and keep these instructions handy for future reference. Take special note of all warnings listed in these instructions. Before using this product, please read the following warning and cautions: 1. Read these instructions – All the safety and operating instructions should be read before the unit is operated. 2. Keep these instructions – The safety and operating instructions should be kept for future reference. 3. Heed all warnings – All warnings on the device and in the operating instructions should be adhered to. 4. Follow all instructions – All operation and use instructions should be followed 5. Do not use this item near water – The device should not be used near water; for example, near a bath tub, washbowl, kitchen sink, laundry tub, in a wet basement, or near a swimming pool. 6. Clean only with dry cloth – The device should be cleaned only as recommended by the manufacturer. 7. Do not install near any heat sources such as radiators, heat registers, stoves, or other device (including amplifiers) that produce heat. The battery can explode. 8. Do not place near a fire. The battery can explode. 9. Only use attachments / accessories recommended by the manufacturer. 10. Refer all servicing to qualified service personnel. Servicing is required when the device has been damaged in any way, such as liquid has been spilled or the device has been exposed to rain or moisture, does not operate normally, or has been dropped. 11. This device shall not be exposed to dripping or splashing water and that no object filled with liquids such as vases shall be placed on the device. 12. Unplug immediately if liquid has been spilled or any object has fallen into the unit. 13. Power Sources – The device should be connected to a power supply only of the type described in the operating instructions or as marked on the device. Do not overload wall outlet. 14. Danger of explosion if battery is incorrectly replaced. Replace only with the same or equivalent type. 15. Do not attempt to dismantle, open or repair this product yourself. If a fault occurs, seek advice from Ambient Weather support only. Only the rechargeable battery can be replaced or serviced. 16. Only operate within specified temperature range (32 °F to 131 °F). 17. Do not store the AAA batteries for extend periods of time. They may leak or rupture and damage the unit. Version 2.6 ©Copyright 2013, Ambient LLC. All Rights Reserved. Page 5 Lithium Battery Safety Instructions Do not burn or bury batteries. Do not puncture or crush. Do not disassemble. Recycle Lithium batteries. Do not dispose of in the trash. If the electrolyte in the cells should get on your skin, thoroughly wash with soap and water. If in the eyes, rinse thoroughly with cool water. Immediately seek medical attention. Charge batteries on a fireproof surface away from flammable items or liquids. Hand Crank Warning To prevent overheating of the dynamo hand crank and permanent damage, do not crank faster than approximately two revolutions per second. Do not crank continuously for more than two minutes. After two minutes, allow two minutes of rest before cranking again. DO NOT crank radio with battery pull tab inserted. DO NOT crank radio with battery out of compartment. Failure to do so will DAMAGE the radio. 5. Features The WR-333A includes the following features: Super bright 3 LED flashlight AM/FM with Weather Band Feature Weather Alert Feature (public alert certified) Emergency smart phone/PDA/USB charger Backlight digital display Clock Audio output (headphones) 6. Power Sources The WR-333A can be powered from the following sources: DC power from a USB power source, such as a computer AC power by adding a USB to AC adaptor (optional) DC car charger by adding a USB to DC car adaptor (optional) Solar power Hand crank power Three AAA batteries (optional) To select the power source, lift the rubber tab on the back of the WR-333A to expose the connectors, as shown in Figure 2. For AC, DC, USB, solar power and hand crank power source operation, choose the Lithium Ion battery switch position: For AAA dry cell battery power operation, choose the AAA battery switch operation: Version 2.6 ©Copyright 2013, Ambient LLC. All Rights Reserved. Page 6 NOTE: There is a charging LED on the back of the unit (Figure 4, reference 18). The LED lights RED during charging. When fully charged, the LED turns GREEN. Figure 4 6.1 Best Practices for Charging We recommend periodically charging the radio completely through the WR-333A’s mini USB power input port (from your computer or the optional AC adaptor or DC converter). You can also leave it connected to this power source all of the time (the WR-333A includes over current protection). The solar collector will not completely charge your unit and is intended to extend the existing battery charge. 6.2 DC and AC Power Prior to using the WR-333A, we recommend you fully charge the rechargeable battery through the mini USB Power Input Port (Figure 2). This may take up to four hours. Lift the rubber tab on the back of the WR-333A to expose the power switch, as shown in Figure 2. Select the Lithium Ion battery switch position: Connect the DC power input cable (Figure 3) to the USB mini jack, and the other end to the USB power source. The red battery charge indicator light will illuminate when charging (Figure 2). Continue to charge the WR-333A for several hours or until the charging light turns from red to green. The WR-333A is now ready for use. Version 2.6 ©Copyright 2013, Ambient LLC. All Rights Reserved. Page 7 NOTE: Use 5.0V USB power source (from a computer or appropriate AC or DC adaptor). Over-voltage may result in damaging the WR-333A. 6.3 Solar Power Lift the rubber tab on the back of the WR-333A to expose the power switch, as shown in Figure 2. Select the Lithium Ion battery switch position: Place the WR-333A in direct (or indirect) sunlight with the solar panel facing upwards. The green battery charging light may illuminate when charging, as shown in Figure 1. NOTE: There is not enough solar energy to turn on the red charging light. Thus, no light or a faint green light (which consumes less energy) may be present during solar charging. NOTE: If the display heats up outside the operational range, the display will fade. NOTE: The solar collector will not completely charge your unit and is intended to extend the existing battery charge. The solar collector efficiency is significantly impacted by direct vs. indirect sunlight, angle of the solar collector, angle of the sun and weather conditions, including your latitude, time of year (winter vs. summer), time of day, and cloud cover. Figure 5 6.4 Hand Crank Power Lift the rubber tab on the back of the WR-333A to expose the power switch, as shown in Figure 2. Select the Lithium Ion battery switch position: To operate the hand crank, perform the following: IMPORTANT NOTE: Disconnect the smart phone or PDA first from the USB charging port first Version 2.6 ©Copyright 2013, Ambient LLC. All Rights Reserved. Page 8 before cranking (the crank charges the internal battery and by design, the smart device must be disconnected first to prevent the phone from power cycling and reduce the load on the crank). 1. Lift the hand crank from the cradle, as shown in Figure 2. 2. Turn the hand crank either clockwise or counterclockwise at about two cranks per second for two minutes to activate the internal battery for initial use, or when the unit has not been used for more than 60 days. The red battery charging light illuminates when charging, as shown in Figure 1. After two minutes, rest for two minutes to extend the life of the hand crank and repeat. Figure 6 6.5 Dry Cell Battery AAA Battery Power The WR-333A also includes the option to power from 3 x AAA power instead of the rechargeable battery source. This is convenient if you have drained the rechargeable battery source and you wish to avoid hand cranking the unit. 1. Open the Battery Door on the back of the radio. 2. Insert 3 x AAA (UM-4) batteries (not included) and close the battery door (Figure 2, reference 15). NOTE: For optimum performance, alkaline-type batteries are recommended. 3. Follow the polarity diagrams shown in the battery compartment. 4. Lift the rubber tab on the back of the WR-333A to expose the power switch, as shown in Figure 2. Select the AAA battery switch position: . NOTE: The AAA battery selection will disable the Lithium Ion rechargeable batteries. NOTE: Make certain the batteries are installed correctly. The wrong polarity may damage the unit. NOTE: Do not crank the radio with the switch in the AAA position. This may cause permanent damage to the radio. WARNING: Do not mix old and new batteries. Do not mix alkaline, standard (carbon-zinc) or rechargeable (nickel-cadmium) batteries. Only batteries of the same or equivalent type as recommend are to be used. Version 2.6 ©Copyright 2013, Ambient LLC. All Rights Reserved. Page 9 If the unit is not to be used for an extended period of time, remove the batteries. Old or leaking batteries can cause damage to the unit and may void the warranty. Do not dispose of batteries in fire, batteries may explode or leak. 6.6 Power Consumption The WR-333A includes a 3.7V rechargeable Lithium Ion large battery capacity (600 mAh) as the primary energy storage, but different operational modes result in significantly varying power consumption requirements. Here is a general guide on power consumption, typical user operation and recommend power sources. Mode Flashlight Typical User Operation Emergency or remote use Power Consumption Low Recommend Power Source Solar, Hand Crank, AAA Batteries AM/FM/Weather Emergency or remote use Low Solar, Hand Crank, AAA Band Radio Batteries Weather Alert Continuous monitoring (1) High AC, USB (from computer), Hand Crank, AAA Batteries Smart phone Short term emergency use (2) High AC, USB (from computer), charging Hand Crank (1) The weather alert mode consumes a significant amount of power because it is constantly scanning for the emergency 1050 Hz tone from the National Weather Service. We recommend connecting the power input to a USB computer port or the optional USB to AC converter for continuous alert operation (reference Section 11). Otherwise, you must rely on hand crank power in this mode when no power is available. (2) The AAA batteries may not provide enough current to charge a smart phone. 7. Operation 7.1 Flashlight Operation Turn the light on and off with the light switch on the top of the unit (Figure 1). 7.2 Radio Operation The WR-333A includes a digital LCD display (Figure 7) with backlighting, with the following push button controls: POWER . Turns on and off the radio. Transitions from clock display to radio tuner display. MODE. Switches the radio band between AM, FM, weather band, and weather band alert mode. TUN : Adjusts the radio frequency up TUN : Adjusts the radio frequency down VOL+: Adjusts the radio volume up VOL-: Adjusts the radio volume down NOTE: The backlight will automatically turn off if no buttons are pressed for 20 seconds. Version 2.6 ©Copyright 2013, Ambient LLC. All Rights Reserved. Page 10 Figure 7 7.3 Time When first powered up, the time will default to 12:00 AM. 1. Set 12Hr/24Hr Mode. Press and hold the MODE button for two seconds to enter the time setting mode. 12 Hr will begin flashing. Press the TUN+ button to switch between 12 hour and 24 hour time mode. Press the MODE button to proceed to the next step. 2. Set Hour. Press the TUN or TUN to adjust the hour up or down. Hold the TUN button to change rapidly. Press the MODE button to proceed to the next step. 3. Set Minute. Press the TUN or TUN to adjust the minute up or down. Hold the TUN button to change rapidly. Press the MODE button to exit the time setting mode. 7.4 Radio Band Mode NOTE: Radio reception is dramatically reduced when charging from USB. Disconnect USB power when listening to the radio. Press the POWER button to turn the radio on and transition from the time mode. The radio will default to FM band (or the last radio band since power up). Press the MODE button to change to the AM band. Press the MODE button to change to the Weather Band (WB). While displaying the Weather Band, press the MODE button again to change to Weather Band Alert mode (the WB symbol will begin flashing). Figure 8 NOTE: Radio interference will be present while charging the WR-333A. For best reception, there is a telescoping antenna. Extend the antenna and change the position if the reception is weak. 7.4.1 AM/FM Radio Tuning When the radio is turned on, press the TUN TUN button to decrease the frequency. To tune quicky, press and hold the TUN ( Version 2.6 or button to increase the frequency and press the ) key for at least one second. When you let go, ©Copyright 2013, Ambient LLC. All Rights Reserved. Page 11 the radio will automatically tune to next radio station with sufficient reception. 7.4.2 Weather Band Tuning There are seven distinct weather channels. The frequencies are 162.400 MHz, 162.425 MHz, 162.450 MHz, 162.475 MHz, 162.500 MHz, 162.525 MHz and 162.550 MHz. For a complete list of weather radio broadcasting stations, please visit the National Weather Service website: http://www.nws.noaa.gov/nwr/indexnw.htm Our recommendation is to tune to the station with the best reception using the TUN button. You will hear the “Voice of the National Weather Service”, an automated voice that provides forecast information, weather statements, watches and warnings. 7.4.3 Weather Alert Mode When you enter the Weather Alert Mode, your radio will be silenced and enter weather alert standby mode. The radio will remain in standby mode until there is a weather statement, watch or warning. To activate the Weather Alert Mode, press the MODE button until the WB symbol begins flashing on the display. The WB symbol will continue to flash until there is a weather statement, watch or warning. In the event of an alert, the alert light will flash and the radio will sound (with the voice of the National Weather Service). To disable the alert light, press any key. To disable the alert light but continue in alert mode, press and hold the MODE button to two seconds. To verify you have reception in your area, the National Weather Service (NWS) normally run tests each Wednesday between 10 a.m. and noon local time. Tests may occur at other days and times when there is a threat of severe weather in the listening area or for other reasons. NOTE: If battery power is low, the unit will exit the weather alert mode and enter the time display mode. 7.5 Cell Phone and mp3/mp4 Operation Because smart phone batteries vary in their current ratings, we cannot specify charging rates or usage time. 10 to 15 minutes of cranking may result in 1 or more minute of talk-time, but your results may vary. NOTE: Charging a smart phone through the Phone Charger Jack is intended for emergency purpose only. It is not intended for recharging fully a discharged smart phone battery. Smart phone battery capacity significantly exceeds the battery capacity of the WR-333A. Therefore, a fully charged WR-333A will only partially charge a smart phone or PDA. After the battery stops charging the device, begin cranking if a DC power source is not available to continue recharging the smart phone. NOTE: You can charge a smart phone in either battery mode (Lithium Ion or AAA To charge the smart phone or PDA: 1. Turn off the radio and flashlight to conserve power. Version 2.6 ©Copyright 2013, Ambient LLC. All Rights Reserved. Page 12 ). 2. Lift the rubber tab on the back of the WR-333A to expose the connectors, as shown in Figure 2. 3. Plug the smart phone charging cable (Figure 3) into the WR-333A charge USB output (Figure 4 reference 19). Plug the appropriate tip into the smart phone’s charging connector. 4. If the phone does not begin charging, disconnect the phone and begin cranking. When charging a smart phone via the smart phone charger, it is important to turn the crank at least two revolutions per second. After two minutes of cranking at two revolutions per minute, wait two minutes to begin cranking again. This will extend the crank life. NOTE: You may receive a charging compatibility error on your smart phone, but your device may still charge and it will not harm your device. CAUTION: Before charging, please refer to the user manual of the device you wish to charge to make sure the charging current required does not exceed 1Amp (1,000 mA) of charging current. Overloading the charge circuit may damage the WR-333A and void the warranty. 7.6 Low Battery Indication When the battery voltage is less than 3.0V, the low battery indication will flash: The radio will not operate in a low battery condition. 7.7 Audio Output / Head Phones The WR-333A includes an audio output jack. This allows you to listen with headphones or connect to an auxiliary input source, such as an amplifier. CAUTION: Guard your ears against hearing damage. When listening with headphones, start at the lowest volume and gradually increase until you can hear it comfortably and clearly. Read this Important Information before Using Your Earbuds: Avoid extended play at very high volume as it may impair your hearing. If you experience ringing in your ears, reduce the volume or shut off the unit. Keep the volume at a reasonable level even if your headset is an open-air type designed to allow you to hear outside sounds. Please note that excessively high volume may still block outside sounds. 7.8 Resetting the Unit If the unit experiences a power surge or electric shock, it is possible that the internal micro-controller may lock up and the unit will not respond to any commands from the panel controls. In this event, use a straightened paper clip, toothpick or similar objects to press the RESET button located on the back of the unit (see Figure 9). The reset operation clears the system memory to factory default, and all of your previous settings will be erased. CAUTION: Do not use a sharp or pointed object to press the reset button. It may damage the reset switch inside the unit. Version 2.6 ©Copyright 2013, Ambient LLC. All Rights Reserved. Page 13 Figure 9 8. Care and Maintenance 8.1 Battery Maintenance To maintain the battery: Periodically charge the battery to extend battery life Switch off power after radio use to extend battery life Remove the battery or reinsert the plastic battery pull tab for extended storage Remove the AAA batteries for extended storage to prevent battery leakage The battery is a rechargeable 3.7V / 600 mAh lithium ion battery. To replace the battery, open the battery compartment cover (Figure 2) by squeezing the tab. NOTE: Only replace with rechargeable 3.7V lithium ion battery. Replacing the battery with a non-rechargeable battery may damage the unit. Rechargeable 3.7V lithium batteries are available from Ambient Weather. 8.2 8.2 General Care and Maintenance Do not tamper the internal components of the unit. Clean your unit with a damp (never wet) cloth. Solvent or detergent should never be used. Avoid leaving your unit in direct sunlight or in hot, humid or dusty places. Keep your unit away from heating appliances and sources of electrical noise such as fluorescent lamps or motors CAUTION: Never allow any water to enter the unit while cleaning. 9. Specifications Battery Power: 3.7V / 600 mAh lithium ion rechargeable battery (replaceable) or 3 x AAA (UM-4) batteries Radio Bands: Version 2.6 ©Copyright 2013, Ambient LLC. All Rights Reserved. Page 14 AM: 525 KHz to 1710 KHz FM: 88 MHz to 108 MHz WeatherBand: 162.400 to 162.550 MHz Flashlight: 3-LED Flashlight Size and Dimensions: Dimensions: 7.75" x 3.75" x 2.0" Weight: about 1 lb. Temperature Range: Working temperature range: 32 to 131 °F (0 to 55 °C) Storage temperature range: 14 to 140 °F (-10 to 60 °C) 10.Troubleshooting Guide If your question is not answered here, you can contact us as follows: 1. Email Support: mailto:[email protected] 2. Live Chat Support: http://www.ambientweather.com/chat.html (M-F 8am to 4pm Arizona Time) 3. Technical Support: 480-283-1644 (M-F 8am to 4pm Arizona Time) Problem The unit will not power up. Solution Make sure the Lithium Ion battery is properly installed and the switch is in the proper position Phone generates an error message when plugged into the WR-333A. My Ipod / IPhone does not display the charge signal. The WR-333A will no longer hold a charge. The Weather Band reception is poor. Version 2.6 . If the switch is in the AAA position , make sure batteries are installed with the proper polarity. Replace the batteries if low battery voltage. A lower voltage output may result in error messages on the phone but should still charge the phone. The output voltage of the WR-333A is lower than the operating voltage of the IPod / IPhone, and will not charge these devices until the battery is fully discharged. The device is only intended for emergency charges and not for topping off already charged devices. Replace the 3V lithium ion rechargeable battery (LIR123A). Typically, this battery will hold 2000 charge cycles. Important note: ALWAYS replace with rechargeable batteries, available from AmbientWeather.com. Weather band reception can be poor inside a metal building, structure or where electronic noise is present. Try moving outside to improve reception Check local reception by driving to a different location and testing the weather band reception. Radio reception is dramatically reduced when ©Copyright 2013, Ambient LLC. All Rights Reserved. Page 15 Problem My smart phone connector is not supported. Where can I purchase the proper tip for my smart phone? The WR-333A will not fully charge my smart phone. I never receive weather alerts. How can I receive warnings only and not watches or statements? The WR-333A is locked up and will not respond to commands. How do I reset it? The red charging light does not illuminate during solar charging. The display fades when placed in direct sunlight. The WR-333A exits the alert mode and displays time. The radio does not fully charge with the solar collector. Version 2.6 Solution charging from USB. Disconnect USB power when listening to the radio. Contact Ambient Weather with your smart phone model and connector type. The connectors included cover about 95% of the smart phone market. Charging a smart phone through the Phone Charger Jack is intended for emergency purpose only. It is not intended for recharging fully a discharged battery. Smart phone battery capacity significantly exceeds the battery capacity of the WR-333A. Therefore, a fully charged WR-333A will only partially charge a smart phone or mp3/mp4 device. After the battery stops charging the device, disconnect the device and begin cranking if a DC power source is not available. Verify you receive the test alert from the National Weather Service on Wednesday as described in the weather alert section of this manual. Verify you have tuned the weather band to your local area and you have reception before activating the Weather Alert feature. Make sure you have good weather radio reception. If your radio reception is poor, you will not receive any alerts. Selective filtering of statements, watches and warnings is not possible. You will always receive all three levels. Remove the battery. Press the reset button with a paperclip. There is not enough solar energy to drive the red charging light. For solar charging, you will see a faint green light. The brighter the sunlight, the brighter the green charging light. If the display heats up outside the operational range, the display will fade. For solar charging, partial sunlight or shade is sufficient. The weather alert mode consumes a significant amount of power because it is constantly scanning for the emergency 1050 Hz tone from the National Weather Service. We recommend connecting power input to a USB computer port or the optional USB to AC converter for continuous alert operation (reference Section 11). Otherwise, you must rely on hand crank power in this mode. The solar collector will not completely charge the ADVENTURER and is intended to extend the existing battery charge. The solar collector efficiency is significantly impacted by direct vs. indirect sunlight, angle of the solar collector, angle of the sun and weather conditions, including your latitude, time of year (winter vs. summer), time of day, and cloud cover. ©Copyright 2013, Ambient LLC. All Rights Reserved. Page 16 11.Accessories The following software and hardware accessories are available for the WR-333A at http://www.ambientweather.com/ . Accessory Ambient Weather WR-AC1 UL Rated USB to AC Adaptor for Small Electronics Devices Image Description AC power adaptor Ambient Weather WR-DC1 USB to DC Converter for Small Electronic Devices DC power adaptor Ambient Weather WR-BATT 3.7V / 800 mAh Rechargeable Battery for Weather Alert Radios Replaces rechargeable battery after end of life (LIR123A rechargeable). 12.Liability Disclaimer Please help in the preservation of the environment and return used batteries to an authorized depot. The electrical and electronic wastes contain hazardous substances. Disposal of electronic waste in wild country and/or in unauthorized grounds strongly damages the environment. Reading the “User manual” is highly recommended. The specifications of this product may change without prior notice. This product is not a toy. Keep out of the reach of children. No part of this manual may be reproduced without written authorization of the manufacturer. Ambient, LLC WILL NOT ASSUME LIABILITY FOR INCIDENTAL, CONSEQUENTIAL, PUNITIVE, OR OTHER SIMILAR DAMAGES ASSOCIATED WITH THE OPERATION OR MALFUNCTION OF THIS PRODUCT. 13. Warranty Information Ambient, LLC provides a 1-year limited warranty on this product against manufacturing defects in materials and workmanship. This limited warranty begins on the original date of purchase, is valid only on products purchased and only to the original purchaser of this product. To receive warranty service, the purchaser must contact Ambient, LLC for problem determination and service procedures. Warranty service can only be performed by Ambient, LLC. The original dated bill of sale must be presented upon request as proof of purchase to Ambient, LLC. Version 2.6 ©Copyright 2013, Ambient LLC. All Rights Reserved. Page 17 Your Ambient, LLC warranty covers all defects in material and workmanship with the following specified exceptions: (1) damage caused by accident, unreasonable use or neglect (lack of reasonable and necessary maintenance); (2) damage resulting from failure to follow instructions contained in your owner’s manual; (3) damage resulting from the performance of repairs or alterations by someone other than an authorized Ambient, LLC authorized service center; (4) applications and uses that this product was not intended (5) the products inability to receive a radio signal due to any source of interference, metal obstructions or other reception issues. This warranty covers only actual defects within the product itself, and does not cover the cost of installation or removal from a fixed installation, normal set-up or adjustments, claims based on misrepresentation by the seller or performance variations resulting from installation-related circumstances. 14. FCC Statement This device complies with Part 15 of the FCC Rules. Operation is subject to the following two conditions: (1) this device may not cause harmful interference, and (2) this device must accept any interference received, including interference that may cause undesired operation. NOTE: This equipment has been tested and found to comply with the limits for a Class B digital device, pursuant to Part 15 of the FCC Rules. These limits are designed to provide reasonable protection against harmful interference in a residential installation. This equipment generates, uses and can radiate radio frequency energy and, if not installed and used in accordance with the instructions, may cause harmful interference to radio communications. However, there is no guarantee that interference will not occur in a particular installation. If this equipment does cause harmful interference to radio or television reception, which can be determined by turning the equipment off and on, the user is encouraged to try to correct the interference by one or more of the following measures: Reorient or relocate the receiving antenna. Increase the separation between the equipment and receiver. Connect the equipment into an outlet on a circuit different from that to which the receiver is connected. Consult the dealer or an experienced radio/TV technician for help Version 2.6 ©Copyright 2013, Ambient LLC. All Rights Reserved. Page 18 15. Battery Recycle Statement Recycle Rechargeable Batteries Recycle your old rechargeable batteries at one of the many collection sites in the U.S. and Canada. To find the site nearest you, visit http://www.call2recycle.org/ or call toll-free 1-877-2-RECYCLE. Version 2.6 ©Copyright 2013, Ambient LLC. All Rights Reserved. Page 19