1
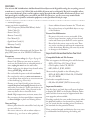
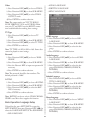
®
PK-1290 ROADWIZ
80-Watt Portable Sound System with Digital Recording
User Manual
NOTE: To ensure this system works safely and to its fullest potential, please read the User Manual carefully
before use, and keep it handy for future reference. See important Safety Information on pages 19-20.
Thank you for purchasing Acesonic’s PK-1290 Roadwiz
80-Watt Portable Sound System with Digital Recording. Acesonic takes pride in providing its customers
with only the most advanced and highest quality products on the market. With proper care and use you will
get many years of satisfying use from your Acesonic
product.
Be sure to keep original packaging in case re-shipping
is required for returns or repairs.
Care and cleaning: Use a slightly damp cloth to clean
the front panel and other surfaces of the Roadwiz.
Do not use the device in areas that are wet or prone
to dampness. Always allow enough room below and
around the device to provide sufficient air flow for cooling when it is being used.
First Things First
Included Accessories
Please check that you have all of the following accessories supplied to you. If anything is missing, please
> > continued on page 2 > >
Table of Contents
First Things First..................................................1
Basic Operation: Language Setup......................11
Compatible Video Formats..................................3
Basic Operation: MP3 Recording......................14
Important Information Before You Start..............2
Basic Operation: Recording MP3+Gs................13
Front Panel Operations........................................4
Advanced Playback Operations..........................15
Player Connections...............................................7
Troubleshooting Chart 1....................................17
Remote Control Functions...................................6
Other Advanced Operations..............................16
Basic Operation: Playback....................................9
Troubleshooting Chart 2....................................18
Playback from USB and SD Cards......................9
Technical Specifications.....................................18
Safety, Warnings and Precautions.......................19
Basic Operation: Karaoke...................................10
Company Contact Information..........................20
Basic Operation: System/TV Setup...................10
1
FEATURES
Your Acesonic PK-1290 Roadwiz 80-Watt Portable Sound System with Digital Recording has everything you need
to make music, convert (“rip”) CD+G files to the MP3+G format and record digitally. The built-in amplifier allows
you to connect keyboards, guitars and microphones to play through the 80-watt speaker. With numerous front- and
back-panel inputs, including three stereo RCA-jack AUX IN connections, you can connect any standard audio
equipment. If you are familiar with audio equipment, use the Quick Start Guide for setup.
> > continued from page 1 > >
contact your dealer immediately.
• Leave sufficient distance between the TV and unit.
• RCA Composite (Yellow/Red/White) Audio/
Video Cable (1)
• Do not leave heavy or liquid-filled objects on top
of the Roadwiz.
• Power Cable (1)
Prevent Unit Malfunction
• Remote Control (1)
• No parts in this unit are user-serviceable. If the
unit no longer functions, unplug it from the wall
outlet and contact your dealer for service options.
• User Manual (1)
• Quick Start Guide (1)
• Never block the various vents on the unit. These
are used to circulate air and keep the temperature
of the device down. Blocking the vents may result
in damage to the Roadwiz.
• Warranty Card (1)
About This Manual
The display window information and On Screen Display (OSD) items are all in UPPER CASE letters.
Important Information Before You Start
Precautions
Compatible Media and File Formats
• Select the correct voltage (see Figure C, page 9).
This unit supports the following disc and file formats:
• Power Cord: When you are away on travel or
won’t use the Roadwiz for an extended period of
time, unplug the unit from the wall outlet.
• DVD, AVI, Video CD, Video CD 2.0
• CD+Graphics, Audio CD, HDCD
• MP3, MP3+G, JPEG, MPEG
• When unplugging the player from the wall outlet,
always pull the plug, not the cord.
Above media is playable on the following discs:
• Do not handle the power cord with wet hands.
• DVD±R, DVD±RW, DVD±R DL, DVD±RW
DL, CD-R/RW
• Do not place the unit in a moist environment or
in area where there might be an excessive amount
of dust build up (e.g. near a fan).
Card reader compatible formats:
• SD, Mini SD, MMC (FAT32 format only).
• If water or any liquid should get into the unit,
turn off the power and unplug the unit from the
wall outlet immediately. Consult your dealer or an
authorized repair station. Using the unit in this
state may lead to fire or electrical shock.
Important Reminders
Any disc that is not listed above will cause the player
to display NO DISC in the Display Window. Future
media and disc formats may be supported with firmware upgrades, when available.
• Avoid: High temperatures, moisture, water, dust.
• Do not expose the front panel/player component
to direct sunlight or place near heating devices.
Encoding methods for some media formats may affect
the playback (unable to fast forward, long load time,
etc.) so ensure that the encoding process conforms to
the standards for that particular format.
Notes on Usage
• Select a place where the unit will be level, dry, and
not too cold or hot.
Dirty, scratched, warped and defective discs may cause
a considerable time delay during the loading and
• Do not use unit on its side or where subject to
vibrations (e.g., too close to other speakers).
2
may render the disc unreadable.
reading of data. In extreme cases, such conditions may
render the disc completely unreadable by the player.
• Store discs in a clean and dry environment. Storing CDs vertically will also help prevent warping.
Video Signal Formats
• After use, insert CD into jacket or case to minimize wear and tear. Do not stack CDs on top of
one another.
This player accommodates both NTSC and PAL systems, with automatic detection and override settings.
• Do not bend or press discs. Do not expose discs to
direct sunlight or any heat source.
Digital Audio Formats
This player accommodates stereo, analog and several
high-resolution digital audio signals.
Cleaning
• Wipe the discs from time to time using a soft
cloth. Always wipe from the center toward the
edges, not in circular motions.
Note: Depending on AUDIO SETUP > SPDIF settings, digital audio signals may not be output as they
are recorded on the disc.
• Do not clean with any cleaning solution unless it
is specifically made for disc cleaning.
Notes Regarding Discs
• CDs revolve at very high speeds inside of players.
Never attempt to play cracked or warped CDs,
since doing so may cause the disc to shatter or the
player to malfunction.
With some DVDs, the player starts the playback
automatically after inserting the disc, whether the
PLAYBACK CONTROL is on or off.
The image may be poor, noisy or grainy due to defects
on the actual disc, and some functions as described in
this manual may not be possible on all discs.
Power Cord
Handle the power cord only by its plug, and do not
unplug it by yanking. Touching the cord with wet
hands may lead to an electric shock or a short circuit.
Maintenance of Discs
Handling
If the cord becomes damaged or its wires become exposed, replace it as soon as possible in order to prevent
an electric fire or shock. Check the power cord every
few months to ensure it is functioning properly.
• When handling discs, always hold them from
their edges and/or by the circle in the center.
• NEVER write on the any surface of a disc as it
Compatible Video Formats
Type
DivX 4.12 (AVI)
DivX 5.02 (AVI)
DivX 5.20 (AVI)
DivX 5.21 (AVI)
XVID (AVI)
DivX 6.0 (AVI)
DivX 5.11 (AVI)
DivX 3.11 (AVI)
DivX 7.0
MP4
MPEG-1
MPEG-2
VOB
DAT
CD+G
MP3G
USB/SD Card
Supported?
Yes
Yes
Yes
Yes
Yes
Yes
Yes
No
No
Yes
Yes
Yes
No
Yes
No
Yes
3
Disc
Supported?
Yes
Yes
Yes
Yes
Yes
Yes
Yes
No
No
Yes
Yes
Yes
Yes
Yes
Yes
Yes
5
1
6
2
7
8
3
4
ing to the destination selected in Item #4 below.
5
4. Selects USB, SD/MMC card or recordable disc in
the tray as recording destination. In Roadwiz mode,
switches among USB, disc and memory card inputs.
5. USB and SD/MMC/MS SLOTS: Play or record
MP3+G songs. We recommend high speed (class 4
or higher) SDHC (SecureDigital High Capacity)
cards for smooth recording and playback. With USB
flash drives, external hard drives, SD/MMC cards
and Sony MemorySticks, you can play MP3, VCD
and MP3+G files, as well as record in MP3 format.
Note: USB or SD/MMC/MS media must be FAT32
format.
Front Panel Functions & Operations
Master Volume, Microphone Effects, Recording &
USB/Card Section (above)
1. MICROPHONE EFFECTS: These controls allow
you to set tone, echo, repeat and delay effects for the
microphone inputs (both front panel and rear panel
inputs are affected).
Player Control Section (above)
2. MASTER VOLUME: Controls the volume of microphones, plus the front panels inputs where guitars
and keyboards can be connected.
5. DISPLAY WINDOW: Displays player status such
as time, disc format and song number. If no disc (or
an unsupported one) is in the tray, the display window
will display NO DISC. Detailed information will also
3. RECORD: The RECORD button engages record4
be shown on the TV screen if connected.
6. PLAYER CONTROLS: Here are your standard
disc player controls for open, start, stop, pause, etc.
7. KEY & MUTE CONTROLS: Control pitch by
halftones with sharp and flat buttons, and return to
the original pitch with the natural symbol. MUTE
button will toggle between mute and normal output.
9
8. DISC TRAY & TRACK SELECT: Input oneand two-digit numbers and press ENTER. The
) in Item #2 above
OPEN/CLOSE button (
opens and closes disc tray.
Music Equalizer, Source Inputs, Music Volume (right)
11
9. MUSIC EQUALIZER: Sliding controllers with
center detents for seven bands of EQ to tailor sound.
10
10. SOURCE INPUTS: Select the source for the
inputs that you wish to hear and/or record.
11. MUSIC VOLUME: Standard knob for manual
volume control in Roadwiz mode, not for inputs.
Power and Inputs Section (below)
14-15. MIC INPUTS: Plus volume control.
12. POWER: Press button for on/off (indicator light
shows system power status).
16-17. GUITAR AND KEYBOARD INPUTS: Plus
individual gain controls.
13. MASTER REC VOLUME: Sets recording level.
18. HEADPHONE JACK: Plus volume control.
12
13
14
15
16
17
18
You Are Not Alone
Acesonic is unique among audio and high-tech firms for offering Lifetime Tech Support to users of its equipment. We understand that entirely new groups of people are discovering the enjoyment of performing with karaoke equipment, and working with both analog and digital sound for recording, “ripping” discs, mixing different
sound sources and creating their own repertoires (even original music).
There is only so much that can be learned by reading, so we encourage you to explore your Roadwiz while going
through this User Manual (and/or the Quick Start Guide for more experienced users). As long as you are careful
to select the correct voltage on the rear panel (see Figure C at the top of page 9), there is little chance that you
will harm your equipment. Just proceed carefully, always plug appropriate devices in with the correct cables,
keep fresh batteries in the remote and use all functions as they are described in the User Manual and Quick
Start Guide. Do not open the unit or attempt any repairs or modifications, as this will void your warranty.
If you need help, that’s what we’re here for. Call Acesonic Technical Support at (626) 820-0645.
5
Remote Control Functions
1. POWER BUTTON: Turn the player on or off.
1
2. OPEN/CLOSE: Opens/closes disc tray.
3
3. STEP: Plays the video frames step by step. Press the PLAY button to return to normal playback.
SUBTITLE: If disc supports it, turns titles on/off.
ZOOM: Enlarge a section of video or image currently being viewed.
PBC/GUI: In MP3+G mode, switch between
windows and playback display mode. The PBC
function is only available for Video CD (VCD)
version 2.0 or higher. The function of PBC may
differ with different discs. When PBC mode is
on, you can select items in the menu by using the
PREVIOUS/NEXT keys (see Item #18 below).
When PBC mode is off, you cannot select items
in the menu but can use the numeric keys directly
or the PREVIOUS/NEXT buttons.
4
2
5
6
7
8
9
10
11
12
4. MUSIC VOL: Up/down (+, -) for Music volume.
REC VOL: Same controls for Recording volume.
KEY: Go # or b in halftone steps.
13
14
15
5. SEARCH: Directly enter a time to search a disc, and the disc starts playing from that point.
6. MUTE: Turn the sound on or off.
7. CUE/PASS: Cue switches the mode between
Karaoke and DVD. In Karaoke mode, player will
be paused after one track has finished playing. In
DVD mode, all tracks will be played continuously.
Karaoke mode = Cue on; DVD mode = Cue off.
Pass: When playing a DVD disc, you can press
PASS to skip the menu and play the audio track
or movie directly.
A-B REPEAT: The A-B REPEAT function lets
you repeat a segment of a track until stopped. To
use: (a) Set starting point A. (b) Set end point B.
After making the settings, the unit plays from A
to B. (c) Press A-B button again until A-B disappears from display.
ANGLE: With DVDs, select multi-angle views.
AUDIO: Select audio soundtrack options when
playing DVD discs
8. DISC: Selects disc as Music source.
USB: Selects USB-connected device for source.
SD CARD: Selects card slot as source.
AUX IN: Selects rear panel AUX IN sources as
Music source, use button to switch among them.
16
17
18
19
9. NUMBER/MENU: Press this key once to return to
the root menu for DVDs. You can search by song
number using number keys in USB/SD mode.
10. TITLE: DVDs have numbers that make it easy to
identify and locate chapters. You can search by using
alphanumeric keys in USB/SD mode.
11. DIRECTION KEYS & ENTER (⬆⬇⬅ ➡): The
arrows let you navigate the menus, ENTER selects
or okays the choice.
12. RETURN: Works with the PCB function to return
6
to a menu screen while playing.
and letters. “0” key adds 10.
13. DISPLAY: Shows disc info, if disc supports this.
16. CANCEL: Clears current screen or field entry.
14. RECORD: Record singing (audio MP3 file only)
from CD/VCD discs or record MP3+G (A/V
files) from CD+G/MP3+G discs or files. You
can change the titles of the recorded files before
beginning to record. To rip a single file from
CD+G or MP3+G disc, press REC button to
start recording. To rip entire CD+G or MP3+G
discs to MP3+G files, press REPEAT button until
the screen shows REC ALL and then press the
RECORD button. The title of the songs cannot
be modified when ripping an entire disc.
PLAY/PAUSE: Press to begin playback of selected Music source, or to close disc tray and begin
playing automatically. Press again to PAUSE.
When paused, press also to resume playing.
STOP: Stops Music playing.
MPX: Toggles among stereo, left and right channels for output.
17. RESERVATION: Puts song in waiting list.
18. REW (<<) and FWD (>>): REW will move the
play location back, FWD will move it forward.
PREV skips to previous track, NEXT skips to the
upcoming track.
19. SETUP: Press for SETUP menu.
EQ: Select from seven (7) types of equalizers or
define your personal one.
REPEAT: Repeat a track or disc. (a) To repeat
a track, press REPEAT; the screen shows REP
ONE and the unit plays the current track. (b) To
repeat all tracks, press REPEAT until the screen
shows REP ALL. The unit plays all the tracks on
the disc.
N/P: Switches between NTSC and PAL TV output formats. Press the button then press ENTER
within two (2) seconds to switch setting, confirming with the on-screen display.
15. NUMERIC KEYPAD: Direct entry of numbers
Player Connections
For SURROUND SOUND, see Figure A, Item #7 for
the various RCA connections you will make to your
assorted speakers.
Refer to Figure A of the left rear panel, on the following page, to acquaint yourself with the various Roadwiz connections.
Note: SCORE INPUTS support the scoring function from such outside audio inputs as amplifiers and
receivers, or can be used as vocal inputs. Scoring only
works with discs, and only when a song plays. Score
is given at end of song. Make changes to the SETUP
menu before use, as follows:
A/V Connection
Make sure all power is disconnected from each component before connecting. Plug all cords securely to
prevent unwanted noise.
SETUP > AUDIO SETUP > SCORE > ON
You cannot connect this player to a TV that does not
contain a video input jack. The player must be connected to a TV or an amplifier that is connected to a
TV or monitor. The TV or amplifier must also contain
RCA audio input jacks (left and right channel).
For VIDEO OUT, see Figure A, Item #8 for your options, which are Component (YUV), Composite and
S-video. There is also have a digital OPTICAL audio
output you can use (Item #9).
Karaoke Connections
Back Panel Connections (see Figure A, next page)
Refer to Figure A, left rear panel, on the following
page to acquaint yourself with the connections you
will need to use to set up your Roadwiz for Karaoke
use. First ensure that you have the correct cables for
the KARAOKE mode, for both video and audio connections as shown below. In Figure A, Item #6 you will
see the stereo mix outputs for sending just the audio
program material plus subs to an external device for
signal processing, recording or other use.
1. XLR INPUT, KEYBOARD
2. XLR INPUT, GUITAR
3. AUX VIDEO RCA INS: Three (3) video inputs.
4. AUX AUDIO RCA INS: Stereo (L/R, white/red)
RCA cables connect here for Audio In.
5. AUX RCA OUTS: Composite signals Out, both
7
Video (yellow) and Audio (red/white).
COMPOSITE VIDEO OUT and S-VIDEO
OUT. Note: Coaxial connects to digital amp or
receiver for 5.1 channel sound. Change SETUP
menu first: SETUP > AUDIO SETUP > SPDIF
OUTPUT > SPDIF/RAM OR SPDIF/PCM.
Note: Karaoke doesn’t work with COAXIAL.
5. AUX OUT: Additional RCA A/V outs to send
line-level signal(s) to other devices, like amps.
6. KARAOKE MIX RCA OUTS: Stereo lines out
and two (2) Subwoofer Outs.
9. OPTICAL OUT: Digital Audio Out for optical
cable. Note: Karaoke does not work with OPTICAL.
7. MULTIFORMAT KARAOKE PLAYER OUTS:
First three pairs of RCA outputs at left are for
SURROUND output. To use Surround, press Remote key (see pages 6-7) or change settings in the
SETUP menu: SETUP > SPEAKER SETUP >
DOWNMIX > OFF, SUBWOOFER >ON.
Connecting Roadwiz and Surround Sound
Make sure to connect your Roadwiz to your surround
sound speakers appropriately (FR, FL, Center, etc.).
Note: There is NO microphone audio output in SURROUND SOUND mode. Other instances where mic
audio will not be available include Optical out, and
there is no vocal mixing with DVD music.
SCORE INS: Inputs 1 and 2 support scoring
function from outside audio inputs like amplifiers
or receivers. Change setting in the SETUP menu:
SETUP > AUDIO SETUP > SCORE > ON.
External Speakers, Output Select (Figure B, next page)
8. OTHER VIDEO OUTS:
You can connect your Roadwiz to external speakers
with the two pairs of wiring posts on the rear panel, as
(see Figure B, next page). The Speaker Output Select
• Y, U and V are Component Video Outs.
• Beneath Y, U and V are COAXIAL OUT,
Figure A, left rear panel
1
2
5
3
4
6
7
8
9
8
allows you to choose between the Internal or External
speakers (External speakers, max 100W each).
right). You can also plug in another device into the top
receptacle to power it.
Power Connections (Figure C, below right)
Input Voltage Select: The Roadwiz power supply is
100V-240V, 50/60Hz. Make sure the voltage of the
AC outlet matches the requirements of your Roadwiz.
Connect the power cord from an AC outlet to the receptacle at the bottom of illustration (Figure C, below
Figure B, center rear panel
Figure C, right rear panel
Basic Operation: Playback (Roadwiz mode)
or PAUSE to pause playback. To resume, press either
the PLAY or PAUSE button.
Power Up Roadwiz: Use front panel Power switch.
To Stop Playback Completely
Loading a Disc: Press EJECT to open the disc tray,
place a disc in the tray, press EJECT to close the disc
tray – the disc will play automatically.
Press the STOP button twice. Now when you press
the PLAY button, it will start at the beginning of the
disc. Also, if you eject the disc, the playback completely stops and the unit ejects the disc.
If a Menu Is Shown on the TV Screen
When inserting a DVD or VCD disc, a menu may be
displayed before playback. From the menu, you may
select a desired item to be played back.
Playback from USB and SD Cards
Note: The Roadwiz is not a computer system and it
cannot support large external hard drives or any storage device containing more than 2,000 files (for example, 2,000 MP3 files or 1,000 MP3+G songs (each
MP3+G contains has two files, a .cdg and an .mp3).
The Roadwiz may support 2.5” external hard drives
that do not require an external power source but we
cannot guarantee it will support all models. Acesonic
recommends using a USB flash drive formatted to
FAT32, but we cannot guarantee that every USB flash
drive will work. Please try another brand if you are
experiencing compatibility issues.
For DVD Video
1. Use the arrow keys to select the desired track.
2. Press ENTER to play back the selected track.
For Video CD
1. Press the numeric buttons to select a desired item.
The player starts playback of the selected item.
Note: Do NOT insert a damaged disc. If a disc takes
more time than usual to read, or the DISPLAY WINDOW shows LOAD for an extended period of time,
press EJECT on the Remote or from the front panel
and check disc for any dirt, fingerprints or defects.
USB Port and Operation
You can play your own video and audio files as the
Roadwiz supports MP3, CD+G, MP3+G, DVD, AVI
and DivX formats that are stored in external memory
devices (flash drives, card readers). Note: These de-
To End, Pause and Resume Playback
On DVDs and VCDs, press STOP to end playback,
9
vices must be in FAT32 format to play content. (See
bottom of page 3 for compatible file formats.)
If no disc is being played, the unit will automatically
select audio and video files from external memory
devices. Note: Devices must be in FAT32 format.
If no disc is being played, audio and video files from
a connected external memory device (USB device or
SD card) will automatically be selected and played.
Otherwise, switch to USB playback:
If you need to switch to memory card playback:
1. Press STOP.
1. Press the STOP button.
2. Press SD CARD button to make the SD CARD
menu appear on the screen.
2. Press USB PORT button to make the USB menu
appear on the screen.
3. Select a song from the list and press ENTER to
play your selection.
3. Select a song from the song list.
4. Press ENTER to play.
Note on External Storage
5. Press DVD DISC to return to DVD playback.
If the USB device or memory card has an excessive
number of files, or some/all the files are in a strange or
unsupported format, the Roadwiz may not be able to
load them all or may take an exceptionally long time
to react. Use supported formats on high-quality cards
and devices for the best results.
SD, MMC and Mini-SD Cards
You can play video and audio files (MP3, CD+G,
MP3+G, DVD, AVI and DivX formats) stored on
SD, MMC and Mini-SD cards by inserting any one
of such devices into the slots.
Basic Operation: Karaoke
2. Load a Karaoke Disc.
3. Press PLAY button to start playing.
Using Microphone(s)
4. Adjust MASTER VOLUME on the Remote
controller or front panel.
The system has three (3) front-panel microphone
inputs, with capability for simultaneous input.
5. Adjust Microphone volume on the Remote controller or front panel.
Microphone Mixing
6. Starting singing while the song is playing.
When a microphone is plugged in, the system mixes
prerecorded music playback with your voice.
7. Adjust ECHO level on the Remote controller or
front panel to the desired echo level.
1. Press POWER button to turn on the system.
Basic Operation: System/TV Setup
TEM.
2. Press Direction KEY [▶] to show SUB-MENU.
3. Press Direction KEY [▲/▼] to select the TV
system [NTSC/ PAL/AUTO].
Screen Saver
1. Press Direction KEY [▲/▼] to choose SCREEN
SAVER.
2. Press Direction KEY [▶] to show SUB-MENU.
3. Press Direction KEY [▲/▼] to select ON or
OFF.
Press SETUP KEY to open the SETUP Menu.
4. Press ENTER to confirm selection.
TV System
If ON option is selected, the DVD will play the
SCREEN SAVER when in stand-by mode.
1. Press Direction KEY [▼] to choose TV SYS10
Video
• AUDIO LANGUAGE
1. Press Direction KEY [▲/▼] to choose VIDEO.
• SUBTITLE LANGUAGE
2. Press Direction KEY [▶] to show SUB-MENU.
• MENU LANGUAGE
3. Press Direction KEY [▲/▼] to select VIDEO
OUTPUT mode.
4) Press ENTER to confirm selection.
Note: The output modes are YUV, TV-RGB, PSCAN, YPBPR, PC-VGA and S-VIDEO. Make
sure your TV and DVD have the RIGHT connections established before making these settings.
TV Type
1. Press Direction KEY [▲/▼] to choose TV
TYPE.
OSD Language
1. Press Direction KEY [▲/▼] to choose OSD
LANGUAGE.
2. Press Direction KEY [▶] to show SUB-MENU.
3. Press Direction KEY [▲/▼] to select TV TYPE.
2. Press Direction KEY [▶] to show SUB-MENU.
4. Press ENTER to confirm it.
3. Press Direction KEY [▲/▼] to select the language.
Note: TV TYPE is 4:3PS, 4:3LB or 16:9. Some discs
cannot be played at some settings.
4. Press ENTER to confirm selection.
Password
Audio Language
1. Press Direction KEY [▲/▼] to choose “PASSWORD.”
1. Press Direction KEY [▲/▼] to choose AUDIO
LANGUAGE.
2. Press Direction KEY [▶] to show SUB-MENU.
2. Press Direction KEY [▶] to show SUB-MENU.
3. Press the Numeric KEY to input new password if
necessary.
3. Press Direction KEY [▲/▼] to select the language (ENGLISH, GERMAN, FRENCH,
SPANISH).
4. Press ENTER to confirm selection.
4. Press ENTER to confirm selection.
Note: The password should be four numbers. The
default password is “0000.”
Subtitle Language
1. Press Direction KEY [▲/▼] to choose SUBTITLE LANGUAGE.
RATING
1. Press Direction KEY [▲/▼] to choose RATING.
2. Press Direction KEY [▶] to show SUB-MENU.
2. Press Direction KEY [▶] to show SUB-MENU.
3. Press Direction KEY [▲/▼] to select the language (ENGLISH, GERMAN, FRENCH,
SPANISH).
3. Press Direction KEY [▲/▼] to select the RATING if necessary.
4. Press ENTER to confirm selection.
4. Press ENTER to confirm selection.
Note: RATING can be set only in UNLOCK PASSWORD state. Most discs support this function.
Menu Language
1. Press Direction KEY [▲/▼] to choose “MENU
LANGUAGE”.
Basic Operation: Language Setup
2. Press Direction KEY [▶] to show SUB-MENU.
Unload the disc, press SETUP KEY to open the
SETUP MENU, then press Direction KEY [◀/▶] to
select the LANGUAGE SETUP.”The SUB-MENU:
3. Press Direction KEY [▲/▼] to select the language (ENGLISH, GERMAN, FRENCH ,
SPANISH).
• OSD LANGUAGE
11
4. Press ENTER to confirm selection.
Speaker Setup
Note: AUDIO LANGUAGE, SUBTITLE LANGUAGE and MENU LANGUAGE should be supported by a DIC function.
Audio Setup
Unload disc, press SETUP KEY to open the SETUP
MENU, then press Direction KEY [◀/▶] to select
SPEAKER SETUP. The SUB-MENU contains:
• DOWN MIX (LT/RT, STEREO, 5.1CH)
• FRONT (LARGE/SMALL)
Unload the disc, press SETUP KEY to open the
SETUP MENU, then press Direction KEY [◀/▶] to
select the AUDIO SETUP. The SUB-MENU contains:
Digital Setup
• AUDIO OUT
• MIC SETUP
• ECHO
• MIC VOL
• KEY
Video Setup
Unload the disc, press SETUP KEY to open SETUP
MENU, then press Direction KEY [◀/▶] to select
DIGITAL SETUP. The SUB-MENU contains:
• OP MODE (LINE OUT/RF REMO)
• DYNAMIC RANGE (FULL, 6/8, 4/8, 2/8 and
OFF)
• DUAL MONO (STEREO, MONO L/R, MIX
MONO)
Unload the disc, press SETUP KEY to open the
Setup MENU, then press Direction KEY [◀/▶] to
select VIDEO SETUP (see image above). The SUBMENU contains:
REMEMBER...
• Fill out and return your Warranty Card right
away to protect your investment.
• Keep shipping materials in case of return.
• BRIGHTNESS
• CONTRAST
• Save all invoices, receipts and your portion
of the Warranty Card for your records.
• SATURATION
• Contact your dealer or Acesonic Tech Support if you encounter operating problems
that you cannot resolve yourself.
• HUE
• SHARPNESS
12
Basic Operation: Recording MP3+Gs
record a performance with that track. The procedure
would be as follows:
What Is MP3+G?
1. Insert a USB carrier with a memory card inserted,
or a USB thumb drive, with the MP3+G files you
would like to record your performance with. Also,
insert an SD card into the slot directly underneath the USB port on your Roadwiz. This is
where your recordings will be stored.
An MP3+G file is a karaoke-based file format that
consists of two parts, an audio file in MP3 format and
a graphics file that displays on-screen lyrics. These two
files combined are called an MP3+G file. An MP3+G
file will occupy about the same disc space required for
a standard CD+G track.
2. Press the USB mode button on the Roadwiz
or on the Remote control. A window will open
displaying all files that are on the memory card.
Using the directional keys, select a file for playback and press ENTER.
The recording function on the Roadwiz offers two
applications: (1) Record your vocal performance in
MP3+G format and (2) transfer your existing CD+Gs
to MP3+G format.
3. Simply press the RECORD button on the Roadwiz or the Remote control. When you do this, the
song will stop playing and a window will appear
asking what you would like to title this recording.
You can give it a number or a title, whatever you
want. Once you have entered the title, go ahead
and press the ENTER button.
Recording a Performance in Roadwiz Mode
With a memory card already inserted, allow the
Roadwiz to play a CDG in disc mode. You should
hear audio and see graphics on your screen. (At this
point, you will want to make any special settings that
you want with echo, key change, etc.).
4. At this point, the pop-up window will disappear
and the Roadwiz will restart the song from the
beginning with your user settings applied. There
will be a recording indicator symbol in the upper
left corner of the screen letting you know the device is recording. You can now begin singing and
the Roadwiz will record your performance.
Next, simply press the RECORD button on the
Roadwiz or the Remote control. When you do this,
the audio will stop playing and a window will appear
asking what you would like to title this recording.
You can give it a number or a title, and once you have
input it, press ENTER. You can also skip the naming
step by pressing ENTER without entering any info,
and the system will assign a name.
Note: When recording from USB drive to an SD
card, the file will be sent to the RECORD FOLDER. When you are in USB mode, pressing the GUI
SWITCH button on the Remote will toggle between
the two windows.
At this point the pop-up window will disappear and
the Roadwiz will re-start the song from the beginning
with your user settings applied. There will be a recording indicator symbol in the upper left corner of the
screen letting you know the unit is recording. Now
you can begin singing and the Roadwiz will record
your performance.
Transfer CDG to MP3+G
The Roadwiz can also be used to transfer CD+Gs to
MP3+G files. Since an MP3+G file only occupies
about one-eighth of the space required for a CD+G,
this is great way to back up your CD+Gs and protect
your investment. Storing MP3+G files gives you more
options. For karaoke jockeys and people that frequent
karaoke venues, you can now leave your CD+Gs at
home and travel with just your USB flash drive.
Now you have recorded a track and you want to hear
it. With memory card inserted, press the USB mode
button on the Roadwiz or the Remote. A window will
display all files on the card. Using the directional keys,
select a file for playback and press ENTER. The song
should begin to play, displaying the recorded graphic
files on the screen. AUX IN recording records audio
only. (See next page, bottom right, for more information
on AUX IN and other recording features.)
1. With the Roadwiz in disc mode, insert the CDG
that you would like to rip. Make sure your desired
memory card is also inserted properly.
2. Go ahead and allow the disc to play. If you want
to rip the entire CDG, press the REPEAT button on the Roadwiz Remote until REP ALL is
Recording from USB to SD
Let’s say you have a file that is already on your memory card in MP3+G format and you would like to
13
displayed. This ensures that the entire disc will be
ripped to the memory card.
window all the songs in the selected folder are listed.
You can only switch folders in Window 2 mode.
3. If you only want to record a single track, press
REPEAT until REP ONE is displayed. This ensures only the selected track will be recorded.
4. Next, simply press the RECORD button on the
Roadwiz or the Remote control. When you do
this, the song should stop playing and a window
will appear asking what you would like to title
this recording. You can give it a number or a title,
whatever you want. Once you have entered the
title, go ahead and press the ENTER button.
5. At this point the pop-up window will disappear
and the Roadwiz will restart the song from the
beginning with your user settings applied. There
will be a recording indicator symbol in the upper left corner of the screen letting you know the
device is recording.
Window 1: Song listing.
Note: When recording multiple tracks at once, you
will not be able to change individual file names. Recording takes place in real time.
Switch Between Two File Viewers (GUI SWITCH)
In the USB or SD card mode, there are two file viewers that you can choose. With Window 1 (top right),
you can see all the songs listed. With Window 2 (bottom right), you see two windows on the screen – in the
left window see all folders are listed, and in the right
Window 2: Folders at left, songs at right.
Basic Operation: MP3 Recording
One of the best ways to familiarize yourself with the
recording functions of the Roadwiz is to experiment
with the various inputs, directing them to record to
the several possible locations (recordable disc, USB
device or memory cards). Points to remember:
Built-In System Recording Functions
In addition to “ripping” CD+G discs and recording them to a USB device, SD/MMC/MS card or a
recordable CD/DVD, your Roadwiz will also record
MP3 files from the various inputs to the various
outputs.
• There are both 1/4-inch front-panel jacks and
rear-panel XLR inputs for guitars and keyboards.
• AUX IN recording will record the audio from the
rear-panel inputs but will not record your vocal
simultaneously.
You can record from DVD player, USB port and card
slot on the Roadwiz, or use outside sources connected
to AUX INPUTS 1, 2 and 3 on the rear panel. You
may record your vocal, guitar or keyboard in DVD or
AUX-in recording mode. Everything will be recorded
to MP3 format, making your Roadwiz
• Consult pages 4 and 5 for instructions on making
your source and destination selections for recording live and/or prerecorded audio signals.
• Consult pages 8 and 9 to review the various input
options and determine how to accomplish the
recording task you want.
• a fully functional player,
• a recorder with aux-in recording and
Do not confuse “ripping” and recording MP3+G files
with audio recording as these are separate functions.
• an instrument and microphone amplifier with
basic mixing functionality.
14
Advanced Playback Operations
tion and the time search function may not work. This
function does not work when there are programmed
tracks.
Playing from a Specific Position
Locating a Desired Scene from the DVD Menu: DVD
discs generally have their own menus showing the
contents of the disc. These menus contain various
items such as the titles of movies, names of songs or
artist information, and display them on the TV screen.
You can locate a desired scene using the DVD menu.
Zooming into Pictures
During playback or paused playback, press ZOOM.
Each time you press ZOOM, the magnification is
changed from 1.5x to 2x and 3x. You can use the arrow keys to move to the desired zoomed position.
1. Insert a DVD disc into the tray.
Repeating Playback
2. Use the arrow keys to select a desired item and
press ENTER.
Press REPEAT. If you press REPEAT in stop mode,
press PLAY to start playback. Each time you press
REPEAT, the repeat mode cycles among REP-ALL,
REP ONE and OFF. A window indicating the current repeat mode will be displayed on the TV screen.
To Locate a Desired Scene from the Video CD Menu
with Playback Control: Some VCDs support the PBC
function and have their own menus built in. You can
locate a specific scene by using the PBC menu.
To Stop Repeat Playback
1. Press STOP then press PBC. PBC ON should
appear in the right corner of you screen.
Press STOP. The unit stops playback but does not quit
the repeat mode.
2. Using the NUMERIC KEYS 0-9, enter the song
number and press ENTER to begin playback.
To Exit Repeat Playback
To Locate a Desired Position in the Current Title or
Track Using Time Search: With Audio CDs, VCDs
and DVD Video Discs you can play from a desired
location by specifying the time during playback.
Press REPEAT until REPEAT OFF is displayed.
To Repeat a Desired Section (A-B Repeat)
By programming tracks, you can play up to 99 tracks
in any order. You may also repeat a track by itself.
1. Press the SEARCH button (twice for DVDs).
2. Using the NUMERIC KEYS 0-9, key in the
desired song number and press ENTER.
1. Press A-B once where you wish to begin the repeat (Point A). A-B SET A appears on screen.
2. Press A-B again where you wish to end the repeat
(Point B). A-B SET B appears on screen. The
player will now begin to repeat playback between
A and B.
Example for DVD Video: To play back from
Chapter 3 of a DVD, press 3 then press ENTER.
TITLE 01/01 CHAPTER 003/11
To Exit A-B Repeat Playback
To play back from 1 hour 21 minutes 00
seconds, press SEARCH again, enter 121 or
12100, then press ENTER.
Press A-B a third time to turn off the A-B repeat
mode.
Note: The A-B points must be set within the same
title/chapter/track. When you press STOP twice during DVD playback, A-B repeat is canceled.
TIME _1:21:00
Example for VCD or Audio CD: To play back
from 17 minutes 15 seconds, press 1715, then
press ENTER.
NOTE: After 3 minutes of a static (still) picture
displayed on the television screen (i.e., Karaoke DVD
paused halfway through playback or at the menu), the
unit will automatically activate the screen saver. This
prevents images from being “burned” into the screen
over time. To disable the setting, go to GENERAL
SETUP > SCREEN SAVER, where you have the option of enabling or disabling the screensaver.
TIME 17:15
3. Press ENTER to begin playback. To dismiss the
time search, press SEARCH again.
Note: Some DVDs do not contain time informa15
Other Advanced Operations
ed songs by pressing CLEAR on the Remote.
3. In the PLAYLIST screen, you can switch song
order by pressing SEARCH on the Remote.
Searching by Song Number
In the USB/SD CARD mode, you can play songs
from USB/SD devices by the song number that the
unit assigns to each song automatically.
4. To leave the PLAYLIST screen, press TITLE
button on the Remote while PLAYLIST screen
is open.
In the USB/SD CARD mode, press the NUMBER
button on the Remote to start the song number ordering screen as shown below.
Song Searching by Title
In USB/SD Card mode, you can search songs by song
title (file name).
1. Press TITLE button on the Remote to call up the
Song Searching by Title screen as shown below.
1. Press number buttons on the Remote to enter
song number.
2. Press CLEAR button to delete the number that
you want to delete.
2. To input the song title, use the number/letter
buttons on the Remote control (see pages 6-7) and
use the CLEAR button to delete any unwanted
characters.
3. After entering a song number, press TITLE to
add the song into the play list (see more detail
below).
3. To select songs, you can use UP/DOWN button,
then press ENTER or PLAY to play the selected
song. Or press TITLE button to save the song in
the PLAYLIST.
4. If you want to play the song right now, press
PLAY/ENTER button instead and the song will
start playing right away, but it will not be added
into the play list.
4. You can also use the virtual keyboard to input
song titles. To call up the virtual keyboard, press
TITLE then the A-B button on the Remote.
Playlist
In USB/SD CARD mode, you can have a programmable song playlist. Press TITLE on the Remote to
enter PLAYLIST screen as shown below.
Song Deleting
In USB/SD Card mode, select unwanted song and
press CLEAR button on the Remote control. There
will be a pop-up window to ask you to confirm the
process as shown in the picture below.
1. To add songs into the play list, you can use either
song searching by number or by title.
2. In the PLAYLIST screen, you can delete unwant16
Troubleshooting Chart 1
Incorrect user operations are often mistaken for and system malfunctions. If you suspect that something is
wrong, check the Troubleshooting Charts on the next few pages, as sometimes the problems lie within other audio
components and their settings. Remember to troubleshoot any other components that you are using with the
Roadwiz. If the trouble cannot be rectified even after exercising the steps listed in the Troubleshooting Charts,
call our Acesonic U.S.A. service center at (626) 820-0645 for technical support. We will make every effort to
restore you unit to full operability. If a Roadwiz under warranty cannot be repaired, we will replace it per the
warranty agreement.
17
Troubleshooting Chart 2
NOTE: If you experience long pauses when recording a performance, you should consider reformatting the
memory card or reducing the number of files on it, whether it is being used alone or in a USB carrier. Too
many files on the memory card can occasionally delay the recording process. Always use high-quality memory cards, Class 4 or better.
Technical Specifications
Roadwiz Amplifier
Disc Player & A/V Components
Internal Speaker Power: 40W x 2
Power Source: 100V~240V, 50/60Hz
External Speaker Power: 80W @ 8 ohms
Power Consumption: ≤14W
Total Harmonic Distortion (THD): ≤0.5%
Video: Component (Y, Cb, Cr); Composite (Choice
of Screen Ratio, 16:9, 4:3); PAL/NTSC Compatible;
Progressive Scan (500-p)
Input Impedance: 47K
Input Sensitivity: ≤250mV
Maximum Input Signal: 2.5Vp-p
Signal to Noise (S/N) Ratio: ≥90dB
Frequency Response: 20Hz~20KHz ± 3dB
Microphone Treble Adjustment: ±10dB
Microphone Bass Adjustment: ±10dB
Microphone Input Sensitivity: ≤20mV
Echo Delay: ≥200ms
Audio: Output Level 0Vrms~1.5Vrms; DA Converter
24 bit; Frequency Response, DVD (PCM 96KHz),
2-44KHz (±0.5dB); S/N Ratio 100dB (DVD), >98dB
(CD); THD 0.003%
Operating Temperature: +5 tp +38 degrees, 10-75%
humidity
Multimedia Source: MP3G, CD+G, AVI, CD, VCD,
MPEG, JPG/JPEG
Interface: USB 1.1 Port for MP3, AVI playback and
JPG/JPEG viewing
18
Safety, Warnings and Precautions
• If necessary, consulting the dealer or an
experienced radio/TV technician for help
Mises en garde, precautions et procedures de sûreté
2. IMPORTANT: When connecting the Roadwiz
to audio equipment, use only high-quality, shielded
cables such as what is supplied with this product.
Follow all installation instructions do not modify the
equipment in any way, as this could void your FCC
authorization to use the device in the U.S.
FOR CANADA/POUR LE CANADA
The lightning-with-arrowhead symbol inside
a triangle alerts the user that potentially
dangerous voltage in the product enclosure
may constitute a risk of electric shock.
Caution: To prevent electric shock, match the wide
blade of the plug to the wide slot, and fully insert.
Attention: Pour eviter les chocs electriques, introduire la
lame la plus large de la fiche dans la borne correspondante
de la prise et pousser jusquau fond.
The exclamation point within a triangle
alerts the user to important operating,
maintenance, and servicing information in
this User Manual.
This product does not exceed the Class B limits for
radio noise emissions from digital devices as set out
in the Canadian standard for interference-causing
equipment (“Digital Apparatus, ICES-003” from the
Department of Communications).
CAUTION
To reduce the risk of electrical shocks, fire, and
possible injuries, you should not
Cet appareil numerique respecte les limites de bruits
radio electriques applicables aux appareils numeriques de
Classe B prescrites dans la normesur le materiel brouilleur
(“Appareils Numeriques, NMB-003” edictee par le
Ministre des Communications).
• remove screws, buttons, antennae, jacks, or any
part of the enclosure; or
• expose the product to rain or moisture.
FCC ADVISORY (U.S.A.)
Important Safety Procedures
1. This equipment has been tested and found to
comply with the limits for a Class B digital device,
pursuant to part 15 of the FCC Rules. These limits
are designed to provide reasonable protection against
harmful interference in a residential installation.
1. Read and follow these instructions, keep them
handy for reference, familiarize yourself with the
product’s operation, and heed all safety warnings.
2. Do not use this product near water, on wet surfaces,
or in places where moisture may accumulate. Do not
expose the device to dripping or splashing, and do
not place items filled with liquids – such as vases,
beverages, etc. – on top. Clean only with a dry cloth.
This equipment generates, uses, and can radiate radio
frequency energy and, if not installed and used in
accordance with the instructions, may cause harmful
interference to radio communications. However, there
is no guarantee that interference will not occur in a
particular installation. If this equipment does cause
harmful interference to radio or television reception,
which can be determined by turning the equipment
off and on, the user is encouraged to try correcting the
problem by one or more of the following measures:
3. Do not block any ventilation openings or set device
on carpets or rugs. Maintain sufficient room on all
sides for airflow.
4. Do not position the device on or near radiators,
stoves, or other electrical equipment (such as
amplifiers) that produce heat.
• Reorienting and/or relocating the receiving antennae
5. Do not defeat the safety purpose of a polarized or
grounding-type plug. A polarized plug has two blades
with one wider than the other, while a grounding-type
plug has two blades and one prong. The wide blade
and the prong are safety features. If the provided plug
does not fit into your outlet, consult an electrician for
replacement of the obsolete outlet.
• Increasing the distance between the radio/TV
equipment and the Roadwiz
• Connecting the radio/TV equipment to an outlet
on a different circuit than the one into which the
receiver is plugged
19
6. Protect the power cord from being walked on or
pinched, particularly where it is plugged in to an
electrical socket and the point where it exits from the
rear of the device.
outside antenna system, be extremely careful not to
touch such power lines or circuits, as contact with
them could be fatal.
8. Use only with a cart, stand, tripod, bracket or table
specified by the manufacturer or sold with the device.
When using a cart, use caution when moving the cart.
15. When replacement parts are required, be sure the
service technician has used replacement parts specified
by the manufacturer or with the same characteristics
as the original part. Unauthorized substitutions may
result in fire, electric shock or other hazards.
14. Do not overload wall outlets or extension cord
as this can increase the risk of fire, power outages or
electrical shock.
7. Only use the attachments and accessories specified
by the manufacturer.
9. Unplug the product during lightning storms or
when it will not be used for long periods of time.
16. Following any servicing or repair of this product,
ask the service technician to perform the appropriate
safety checks to ensure the product is in proper
operating condition.
10. Refer all servicing to qualified service personnel.
Servicing is required when the unit has been damaged
in any way, such as when the power-supply cord or
plug is damaged, liquids have been spilled or objects
introduced into the enclosure, the device has been
exposed to rain or moisture, the product does not
operate normally or it has been dropped.
17. The product should not be mounted to walls or
ceilings except as recommended by manufacturer, with
mounting hardware approved by manufacturer.
11. Never push objects of any kind into this product,
through jacks or other openings, as they may contact
dangerous voltage points or short-circuit components,
thus causing fire or electrical shock.
18. If your product is not operating correctly or
exhibits a marked change in performance, and you
are unable to restore normal operation by following
procedures in this User Manual, do not attempt to
service it yourself. Opening the enclosure may expose
you to dangerous voltage or other hazards. Refer all
servicing to qualified service personnel.
12. This product should be operated only from the
type of power source indicated on the product label
and in this User Manual. If you are not sure of the
type of power supplied to your home, consult your
product dealer or local utility.
Note: With the proper care and maintenance, your
Roadwiz will give you years of dependable, enjoyable
use. Make sure you are using proper power sources
and good cables at all times.
13. An outside antenna system should not be located
in close proximity to overhead power lines, or other
electric light or power circuits, or where it can fall
into such power lines or circuits. When installing an
®
Note: Any alterations or user repairs performed on the
device voids your warranty.
PK-1290 ROADWIZ
80-Watt Portable Sound System with Digital Recording
PK-1290 Roadwiz 80-Watt Portable Sound
System with Digital Recording
One (1) Year Manufacturer Warranty
Lifetime Technical Support
Designed in U.S.A.
Technical Support: (626) 820-0645
[email protected]
Web site: www.acesonic.com
Acesonic USA, Inc.
161 S. 8th Avenue
City of Industry
CA 91746-3208
U.S.A.
© 2010 Acesonic USA, Inc. • All rights reserved
20