1
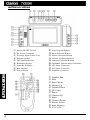
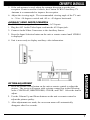
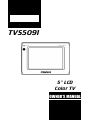
TVS5091
5” LCD
Color TV
OWNER’S MANUAL
INTRODUCTION
The Clarion TVS5091 is a full-featured 5" LCD Color TV. It can be used as a
stand-alone unit or integrated into a mobile multimedia system.
ABOUT THE MANUAL AND WARRANTY
To start enjoying your new Clarion TVS5091, please read the instructions listed
in this manual. Keep all instructions for future reference. Please fill out and
send in the enclosed warranty card to protect your purchase and aid in warranty
service. Also, save your original sales receipt as proof of purchase.
TABLE OF CONTENTS
Precautions • • • • • • • • • • • • • • • • • • • • • • • • • • • • • • • • • • • • • 2
Package Contents • • • • • • • • • • • • • • • • • • • • • • • • • • • • • • • • • 3
Button Locations • • • • • • • • • • • • • • • • • • • • • • • • • • • • • • • • • 4
Car Stand Installation • • • • • • • • • • • • • • • • • • • • • • • • • • • • • • 5
Remote Control Battery Installation • • • • • • • • • • • • • • • • • • • • • 6
Installation • • • • • • • • • • • • • • • • • • • • • • • • • • • • • • • • • • • • • 6
TV Operation • • • • • • • • • • • • • • • • • • • • • • • • • • • • • • • • • • • 6
Auxiliary Video Inputs Operation • • • • • • • • • • • • • • • • • • • • • • 7
Picture Adjustment • • • • • • • • • • • • • • • • • • • • • • • • • • • • • • • • 7
Audio Adjustment • • • • • • • • • • • • • • • • • • • • • • • • • • • • • • • • 8
FM Transmitter • • • • • • • • • • • • • • • • • • • • • • • • • • • • • • • • • • 8
Care and Maintenance • • • • • • • • • • • • • • • • • • • • • • • • • • • • • • 8
Troubleshooting • • • • • • • • • • • • • • • • • • • • • • • • • • • • • • • • • • 8
Product Specs • • • • • • • • • • • • • • • • • • • • • • • • • • • • • • • • • • 10
Notes • • • • • • • • • • • • • • • • • • • • • • • • • • • • • • • • • • • • • • • • 10
PRECAUTIONS
• This set is for use in DC 12V, negative ground vehicles.
• Do not operate the set in ways other than described in this guide. Doing so
may damage it and may void your warranty.
• SAFETY FIRST! For rear seat use only. Do not install on dashboard or
anywhere else that would permit monitor to be viewed by the driver.
Monitor must not be located in the motor vehicle at any point forward of
the back of the front seats. Monitor must never be used in any manner that
will distract driver or interfere with driver’s safe operation of the motor
vehicle.
• Be careful not to run down the car battery while using the set with the car
stopped.
2
• Do not disassemble or modify the set. Doing so may damage it and voids
your warranty.
•. Keep drinks and drops from umbrellas away from the set. Water may
damage the internal circuitry
• Do not let lit cigarettes or other hot objects touch the set. Doing so may
damage or deform the cabinet.
• Do not let the set become hot. If temperature in the car is high or the set has
been exposed to direct sunlight and is hot, lower the temperature before
using it. (The liquid crystal panel will work properly within a temperature
range of 30 – 113 degrees F.)
• In extremely cold temperatures, the movement of the picture may be slow
and the picture may be dark, but this is not a malfunction. The set will work
normally once the temperature increases.
• Small black and shiny dots inside the liquid crystal panel are normal for
liquid crystal products.
PACKAGE CONTENTS
The Clarion TVS5091 comes with the following items:
• IR Remote Control
• Car Stand
• A/V Input Cord
• Power Cord
• AC Power Adapter
Available Options:
• Additional A/V Input Cord for second A/V Input (AV100)
•
Additional Car Mount Antenna for optimum TV reception (ZCB003)
3
BUTTON LOCATIONS
1
2
3
4
5
6
7
8
9
Power ON/OFF Switch
DC Power Connector
Diversity Input (Future Use)
Internal Speaker
FM Transmit Switch
IR Remote Sensor
Stand-By Indicator
Rod Antenna
Power Button
0 Auto Program Button
q Input Selection Button
w Picture Selection Button
e Volume Up/Down Buttons
r Channel Up/Down Buttons
t Optional Antenna Input Connector
y AV1 Input Connector
u AV2 Input Connector
i Earphone Connector
1 Number Pad
2 Skip
3 Erase/Write
4 Volume Up
5 Volume Down
6 TV/Video
7 Power
8 Channel Up
9 Mute
0 Channel Down
q Picture Select
w Auto Memory
e TV/CATV
4
CAR STAND INSTALLATION
1. Choose the proper place to install. Make sure the surface is dry and clean.
• If mounting on a flat surface, use a screwdriver to remove the two screws
on the bottom of the stand to take away the support bracket.
• If mounting on an angled surface, bend the support bracket to fit the
curve of the install surface.
2. Tear off the protective paper of the adhesive tape from the car stand and
press the stand to the install surface.
• For installations on an angled surface, two additional screws can be
added at the end of the stand for added support.
3. Put the TV on the stand.
• Insert the TV lockscrew on the stand into the hole on the bottom of the
TV and tighten to secure the TV to the stand.
4. Use the pedestal lock-knob on the side of the stand to adjust the viewing
angle of the TV.
5. To dismount TV from the stand, loosen the TV lockscrew and remove the
TV.
1 TV pedestal
2 TV lockscrew
3 Pedestal holder
4 Support bracket
5 Pedestal lock-knob
6 Base
5
REMOTE CONTROL BATTERY INSTALLATION
• Insert 2 AAA batteries into the compartment located on the back of the unit,
following the polarities as shown.
NOTES:
• Each time you change the batteries, you must reprogram the unit.
• We suggest you use alkaline batteries; do not use rechargeable batteries.
• Always change all the batteries at the same time.
INSTALLATION
1. One of the following power sources can be used.
• AC Power Adapter
• 12V Car Cord
2. Place the POWER ON/OFF switch to the "ON" position. This puts the TV
in stand-by mode as indicated by the Stand-By indicator light.
3. Press the POWER button on the unit or remote control to turn the unit ON.
Press the button again to return the TV unit to stand-by mode.
TV OPERATION
1. Press the Input selection button on the unit or remote control to select TV
mode. TV mode is selected when channel number appears on the screen.
2. Pull out the rod antenna or connect an external antenna to the antenna jack
for better reception.
3. Press the Auto Program button on the unit or remote control to scan for
available TV channels. The unit will automaticcaly scan for available
channels. The screen will display AUTO MEMORY as it searches for
channels.
4. Once channels are memorized, press the Channel Up or Down buttons on
the unit or remote control to select the desired channel.
6
5. If the rod antenna is used, adjust the antenna direction to get the best
reception. If unit is used in a vehicle, the Clarion ZCB301 Auxilliary TV
Antenna is recommended to improve the reception.
6. Adjust the viewing angle. The recommended viewing angle of the TV unit
is – 30 to +10 degrees vertical and +45 to –45 degrees horizontal.
AUXILIAR Y VIDEO INPUTS OPERATION
The TVS5091 is equipped with two auxiliary A/V Inputs.
1. Plug the AV1 Audio/Video Input cord into the AV1 Input jack.
2. Connect Audio/Video Connectors to the Auxiliary Source.
3. Press the Input Selection button on the unit or remote control until VIDEO1
is displayed.
4. Unit is now ready to display auxiliary video information.
PICTURE ADJUSTMENT
1. Press the Picture Select button on the unit or remote control to adjust the
picture. The screen will appear with a picture control bar in the following
order: CONTRAST, BRIGHTNESS, COLOR, and TINT. Select the item to
adjust.
2. Use the Volume Up and Down buttons on the unit or remote control to
adjust the picture quality.
3. After adjustments are made, the on-screen menu will automatically
disappear after five seconds.
7
AUDIO ADJUSTMENT
1. Press the Volume Up and Down buttons on the unit or remote control to
adjust the volume output level.
2. To mute the unit, press the Mute button on the remote control. Press button
again to restore audio.
FM TRANSMITTER
When used in a vehicle that has a FM radio, the TVS5091 can broadcast audio
which is received through the FM antenna of the radio.
1. Place the FM Transmit switch to the setting “1”.
2. Turn the car radio ON and tune the FM dial to 88.7. The TVS5091 audio
will now broadcast through the car’s audio system.
NOTE: If 88.7 is occupied with a local FM station, tune FM dial to 89.1 and place
the FM Transmit switch to the setting “2”.
CARE AND MAINTENANCE
Cleaning the cabinet:
• Use a soft, dry cloth to gently wipe off any dirt.
• Do not use benzene, thinner, car cleaner, etc., as these substances may
damage the cabinet or cause the paint to peel.
Cleaning the LCD panel:
• Use a soft, dry cloth to gently wipe off any dust.
• The surface is easily scratched; do not rub it with hard objects.
TROUBLESHOOTING
Before assuming malfunction of the TV, check the following:
Problem:
No power.
Solution:
• The AC Adapter or car cord may not be properly connected – Connect it
correctly.
• The car cord fuse may be burned out – Replace fuse.
• The may be off. Check that both the Power switch and Power button are
“ON”.
Problem:
The remote control unit does not work.
Solution:
• The batteries in the remote control may be inserted incorrectly or the
batteries are dead – Check batteries and replace if necessary.
• The remote distance may be too far – Distance must be less than 2 meters.
• The direction of the remote may be improper – Point the remote control unit
directly to the remote sensor.
8
Problem:
No picture or sound on unit.
Solution:
• TV/AV1/AV2 mode may be selected incorrectly – Press the Input Selection
button to the correct mode.
• The TV and AV sources may be incorrectly connected – Check the
connection and correct it.
Problem:
The picture is blurry and noisy.
Solution:
• The external antenna may not be properly connected or the rod antenna may
not be extended – Check the connection and extend rod antenna.
• The TV may not be properly tuned – Press the Auto Program button again.
• There may be interference from automobiles, electric appliances, etc. –
Change antenna position and move further away appliances causing the
interference.
• Reception is bad due to weak signals, buildings, mountains, etc. – in some
locations it may not be possible to get a clear picture or any picture at all.
Problem:
The picture is all white or dark, but you can hear sound.
Solution:
•The brightness control is not set properly – Adjust the brightness setting.
Problem:
The picture is light, but you can hear sound.
Solution:
•The color control is not set properly – Adjust the color setting.
Problem:
The picture is visible, but there is no sound.
Solution:
• The mute function may be on – Turn the mute function off on the remote
control.
• The volume control may be turned too low – Turn up the volume on the unit
or remote control.
• The earphones may be inserted – Disconnect the earphones.
9
Problem:
Sound is poor with FM transmission (the TV sound through car audio
system).
Solution:
• Make sure the FM transmitter is switched to setting 1 or 2 and the correct
station for FM transmitter is set. (88.7 for setting 1 or 89.1 for setting 2)
• The monitor may be too far away from the radio antenna. Adjust to bring it
closer.
PRODUCT SPECS
Size:
Element:
Format:
Total:
Backlight
Power supply
Power consumption
Reception channels
Input terminals
Output terminals
Operation temperature
Dimensions
Weight
FM frequency
NOTES
10
5"
TFT LCD (Thin Film Transistor)
600 (W) x234 (H)
140,400 dots
Cold cathode fluorescent lamp
AC 12V adapter, 12V Car Cord
DC 12V 5": 7W
VHF channels 2-13, UHF channels 14-69
External power jack, External antenna jack
AV1/2 input jack, Diversity antenna
Earphone jack
30 – 113 degrees F
5.71 x 4.33 x 1.57 inches
1.3 pounds
Channel 1 88.7 MHz, Channel 2 89.1 MHz
NOTES
11
661 W. Redondo Beach Blvd.
Gardena, CA 90247
1-800-GO-CLARION
www.clarion-usa.com
TVS5091-10 Rev.2 (03/00)