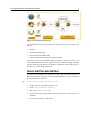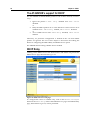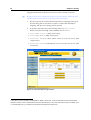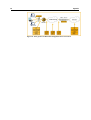
1
Copyright © 2003 Allied Telesyn International, Corp.
960 Stewart Drive Suite B, Sunnyvale CA 94086, USA.
All rights reserved. No part of this publication may be reproduced without
prior written permission from Allied Telesyn.
Allied Telesyn International, Corp. reserves the right to make changes in
specifications and other information contained in this document without
prior written notice. The information provided herein is subject to change
without notice. In no event shall Allied Telesyn be liable for any incidental,
special, indirect, or consequential damages whatsoever, including but not
limited to lost profits, arising out of or related to this manual or the
information contained herein, even if Allied Telesyn has been advised of,
known, or should have known, the possibility of such damages. All
trademarks are the property of their respective owners
AT-AR250E ADSL Router Web Interface User Manual
Contents
Purpose of this Manual....................................................................................................... 1
Intended Audience.............................................................................................................. 1
Structure of this Manual...................................................................................................... 2
Standards and Protocols .................................................................................................... 2
Supported Standards and Protocols................................................................................... 2
Obtaining Copies of Internet Protocols and Standards ...................................................... 3
Background Reading .......................................................................................................... 4
Publicly Accessible Documents.......................................................................................... 4
Conventions........................................................................................................................ 5
CHAPTER 1
Overview .............................................................................................................. 6
Introduction......................................................................................................................... 6
Overview of the AT-AR250E ADSL Router ........................................................................ 6
How to start the web interface ............................................................................................ 7
Performing Basic Tasks...................................................................................................... 9
Status ................................................................................................................................. 9
User Management ............................................................................................................ 10
Error Log........................................................................................................................... 11
Save Configuration ........................................................................................................... 12
Restart .............................................................................................................................. 13
CHAPTER 2
Configuring the ADSL Interface ....................................................................... 14
Introduction to ADSL ........................................................................................................ 14
Internet Connectivity......................................................................................................... 14
Branch Office Connectivity ............................................................................................... 14
Telecommuting ................................................................................................................. 14
Business-to-Business ....................................................................................................... 15
Content Delivery ............................................................................................................... 15
ADSL services .................................................................................................................. 15
MULTI (AUTO) ................................................................................................................. 15
ANSI T1.413 and G.DMT.................................................................................................. 15
G.Lite ADSL...................................................................................................................... 16
ATM Parameters............................................................................................................... 16
ATM Channel Parameters ................................................................................................ 17
ATM Quality of Service Parameters ................................................................................. 17
Configuring the Connection type ...................................................................................... 19
Encapsulation ................................................................................................................... 19
AT-AR250E connections .................................................................................................. 20
RFC1483 connection........................................................................................................ 20
IP over ATM connection ................................................................................................... 22
Configuration Example for an IP over ATM Connection................................................... 22
PPP over ATM connection ............................................................................................... 23
Configuration Example for a PPP over ATM Connection ................................................. 23
PPP Over Ethernet Routed Connection ........................................................................... 25
PPP Over Ethernet introduction ....................................................................................... 25
Configuration Example for a PPP over Ethernet Routed Connection............................... 26
CHAPTER 3
LAN ..................................................................................................................... 28
IP Protocol Introduction .................................................................................................... 28
The Internet ...................................................................................................................... 28
Addressing........................................................................................................................ 30
i
ii
Subnets ............................................................................................................................ 33
Changing the AT-AR250E LAN IP address...................................................................... 34
IP Routing......................................................................................................................... 35
CHAPTER 4
DHCP .................................................................................................................. 37
The Dynamic Host Configuration Protocol........................................................................ 37
The AT-AR250E’s support for DHCP ............................................................................... 38
DHCP Relay ..................................................................................................................... 38
DHCP Server.................................................................................................................... 40
CHAPTER 5
DNS..................................................................................................................... 42
DNS introduction .............................................................................................................. 42
DNS Relay........................................................................................................................ 43
DNS Client........................................................................................................................ 44
CHAPTER 6
Security .............................................................................................................. 45
Introduction....................................................................................................................... 45
Application Gateway......................................................................................................... 45
Stateful Inspection ............................................................................................................ 46
Security interfaces ............................................................................................................ 48
Firewall ............................................................................................................................. 50
Precedence rule for overlapping filters ............................................................................. 55
Configuration example 1 for Firewall ................................................................................ 55
Dynamic Port Opening ..................................................................................................... 57
FTP protocol operation ..................................................................................................... 57
Specific features ............................................................................................................... 59
Configuration example 1 for Dynamic Port Opening ........................................................ 61
Configuration example 2 for Dynamic Port Opening ........................................................ 64
Attack Detection and Blocking.......................................................................................... 65
NAT .................................................................................................................................. 66
Configuration example 1 for NAT ..................................................................................... 69
Configuration example 2 for NAT ..................................................................................... 71
Configuration example 3 for NAT ..................................................................................... 72
Configuration example 4 for NAT ..................................................................................... 73
Interactions of NAT and other security features. .............................................................. 75
Firewall filters and reserved mappings. ............................................................................ 75
NAT and Dynamic Port Opening ...................................................................................... 75
CHAPTER 7
SNMP .................................................................................................................. 76
Introduction....................................................................................................................... 76
Simple Network Management Protocol (SNMP)............................................................... 76
Communities and Views ................................................................................................... 76
AT-AR250E Console ........................................................................................................ 77
How to close the console.................................................................................................. 79
HELP on SNMP console commands................................................................................ 80
Command Reference........................................................................................................ 81
CHAPTER 8
APPENDIX A ...................................................................................................... 83
ATM .................................................................................................................................. 83
Factors underlying the design of ATM.............................................................................. 83
LAN/WAN/Voice integration.............................................................................................. 84
Cell multiplexing ............................................................................................................... 84
Other significant features of ATM ..................................................................................... 85
Traffic engineering features.............................................................................................. 85
Encapsulation of protocols ............................................................................................... 85
Scalability ......................................................................................................................... 85
AT-AR250E ADSL Router Web Interface User Manual
Basic Structure of ATM Network ...................................................................................... 85
ATM Services ................................................................................................................... 86
ATM Virtual Connections.................................................................................................. 87
ATM and Quality of Service.............................................................................................. 87
UBR (unspecified bit rate)................................................................................................. 88
CBR (constant bit rate) ..................................................................................................... 88
Real time VBR .................................................................................................................. 88
Non-real time VBR............................................................................................................ 89
ABR (available bit rate) and QFC ..................................................................................... 89
Traffic Parameters ............................................................................................................ 89
Peak Cell Rate (PCR)....................................................................................................... 89
Minimum Cell Rate (MCR)................................................................................................ 90
Sustainable Cell Rate (SCR) ............................................................................................ 90
Maximum Burst Size (MBS) and Burst Tolerance (BT) .................................................... 90
CHAPTER 9
APPENDIX B ...................................................................................................... 91
RFC1483 Bridged/Routed ................................................................................................ 91
Data processing sequence ............................................................................................... 91
CHAPTER 10
APPENDIX C ...................................................................................................... 93
IP Over ATM..................................................................................................................... 93
The inherent complexity in defining an IP network over ATM........................................... 93
Connection-oriented vs. Connectionless .......................................................................... 93
QoS-aware vs. Best Effort ................................................................................................ 94
How IPoA operates........................................................................................................... 94
Routing between LISs ...................................................................................................... 95
CHAPTER 11
APPENDIX D ...................................................................................................... 96
Point to Point Protocol ...................................................................................................... 96
PPP over ATM.................................................................................................................. 97
CHAPTER 12
APPENDIX E....................................................................................................... 99
Network Address Translation............................................................................................ 99
Address conservation ....................................................................................................... 99
Security........................................................................................................................... 100
How does NAT work?..................................................................................................... 100
What about protocols other than UDP and TCP?........................................................... 101
How can you let sessions into servers on the private LAN?........................................... 102
CHAPTER 13
APPENDIX F..................................................................................................... 104
Troubleshooting.............................................................................................................. 104
Troubleshooting Tips ...................................................................................................... 104
iii
iv
List of Figures
Figure 1. ADSL Network topology ........................................................................................................................................ 7
Figure 2. Web interface Status Page ................................................................................................................................... 9
Figure 3. Web interface User Management page .............................................................................................................. 10
Figure 4. Web interface Error Log page ............................................................................................................................. 11
Figure 5. Save Configuration.............................................................................................................................................. 12
Figure 6. Configuration saved ............................................................................................................................................ 12
Figure 7. Web interface Restart page ................................................................................................................................ 13
Figure 8. ATM parameters ................................................................................................................................................. 17
Figure 9. RFC1483 Routed Connection ............................................................................................................................. 21
Figure 10. IP over ATM Connection ................................................................................................................................... 22
Figure 11. PPP over ATM Connection ............................................................................................................................... 23
Figure 12. PPPoE allows ISPs to monitor the volume of traffic that their users generate.................................................. 25
Figure 13. PPPoE on a Local Network............................................................................................................................... 26
Figure 14. PPP over Ethernet Routed Connection............................................................................................................. 26
Figure 15. IP packet or datagram....................................................................................................................................... 29
Figure 16. Subdivision of the 32 bits of an Internet address .............................................................................................. 31
Figure 17. How to change the LAN IP Address.................................................................................................................. 34
Figure 18. How to add a new Static Route......................................................................................................................... 36
Figure 19. DHCP service web page ................................................................................................................................... 38
Figure 20. DHCP relay ....................................................................................................................................................... 39
Figure 21. DHCP relay setting............................................................................................................................................ 39
Figure 22. DHCP server ..................................................................................................................................................... 40
Figure 23. DHCP server settings........................................................................................................................................ 41
Figure 24. Domain Name System ...................................................................................................................................... 42
Figure 25. DNS relay settings ............................................................................................................................................ 43
Figure 26. Security configuration web page ....................................................................................................................... 47
Figure 27. Interfaces List.................................................................................................................................................... 48
Figure 28. Security level..................................................................................................................................................... 51
Figure 29. Low Security level ............................................................................................................................................. 51
Figure 30. Medium Security level ....................................................................................................................................... 52
Figure 31. High Security level ............................................................................................................................................ 52
Figure 32. Current Firewall Policies ................................................................................................................................... 53
Figure 33. Firewall Port Filters ........................................................................................................................................... 54
Figure 34. Adding a new TCP filter .................................................................................................................................... 54
Figure 35. Firewall configuration example.......................................................................................................................... 55
Figure 36. Firewall Add TCP port filters ............................................................................................................................. 56
Figure 37. TCP flows in FTP .............................................................................................................................................. 57
Figure 38. Dynamic port opening: connecting to an external RealServer .......................................................................... 61
Figure 39. New Dynamic port opening ............................................................................................................................... 61
Figure 40. Dynamic port opening configuration.................................................................................................................. 62
Figure 41. Dynamic Port Opening settings for Real Player Applications ........................................................................... 63
Figure 42. Dynamic port opening: establishing a Netmeeting session............................................................................... 64
Figure 43. Dynamic port opening settings for Netmeeting applications ............................................................................. 64
Figure 44. Attack Detection and Blocking web page.......................................................................................................... 66
Figure 45. NAT configuration Web Page............................................................................................................................ 67
Figure 46. NAT enabling Web Page................................................................................................................................... 67
Figure 47. NAT related setting ........................................................................................................................................... 68
Figure 48. NAT services: ftp access from external............................................................................................................. 69
Figure 49. Reserved Mapping Configuration...................................................................................................................... 69
Figure 50. Reserved Mapping settings............................................................................................................................... 70
Figure 51. NAT services: ftp and http access from external............................................................................................... 71
Figure 52. NAT services: IPSec connection....................................................................................................................... 72
AT-AR250E ADSL Router Web Interface User Manual
Figure 53. NAT services: using two public IP adresses ..................................................................................................... 73
Figure 54. Global Address Pool settings ............................................................................................................................ 74
Figure 55. AT-AR250E console login ................................................................................................................................. 78
Figure 56. AT-AR250E console.......................................................................................................................................... 78
Figure 57. AT-AR250E console – SNMP module .............................................................................................................. 79
Figure 58. How to close the console .................................................................................................................................. 80
Figure 59. SNMP commands online help........................................................................................................................... 80
Figure 60. The relationship between Virtual Circuits and Virtual Paths ............................................................................. 87
Figure 61. Data path in an RFC1483 Bridged/Routed Connection .................................................................................... 92
Figure 62. IP over ATM architecture .................................................................................................................................. 94
Figure 63. PPP is used by Internet Service Providers (ISPs) to allow dial-up users to connect to the Internet................. 97
Figure 64. Address Conservation using NAT ..................................................................................................................... 99
Figure 65. External access to a FTP server and a Web Server ....................................................................................... 103
Figure 66. Internet Protocol (TCP/IP) Properties Dialogue Box ....................................................................................... 105
v
vi
List of Tables
Table 1: Protocols and standards supported by the AT-AR250E ADSL Router. ................................................................. 3
Table 2: Typographic conventions used in this manual. ...................................................................................................... 5
Table 3: G.DMT features.................................................................................................................................................... 16
Table 4: G.Lite features...................................................................................................................................................... 16
Table 5: Functions of the fields in an IP datagram ............................................................................................................. 30
Table 6: Internet Protocol address classes and limits on numbers of networks and hosts. ............................................... 31
AT-AR250E ADSL Router Web Interface User Manual
1
Preface
Purpose of this Manual
This manual is the complete reference for the AT-AR250E ADSL Router web
interface that allows the user to initialise, view and modify the router
configuration in order to match the characteristics of the related network
environment. Using this web interface the user has the ability to configure the
following services:
ADSL
Security
DHCP Client-Server/Relay
DNS Client/Relay
LAN interface
IP Routing
Using the web it is also possible to:
Save the configuration
Restart the router
Check the system status
View error log
Define new users for management
The AT-AR250E Console is provided to configure and show the status of the SNMP
module.
Intended Audience
This manual is intended for the system administrator, network manager or
communications technician who will configure and maintain the AT-AR250E.
It is assumed that the reader is familiar with:
The topology of the network in which the AT-AR250E is to be used.
2
Basic principles of computer networking, ADSL protocols, IP protocols
and routing, and interfaces.
Administration and operation of a computer network.
This manual is not intended for users who will use the computer network
to access network services from their terminal, personal computer or
workstation.
Most of the configurations
Administrator privilege.
described
in
this
manual
require
Structure of this Manual
This manual is organised into the following chapters:
Chapter 1, Overview introduces the AT-AR250E ADSL Router, its Web
interface and the related network environment.
Chapter 2, Configuring the ADSL interface gives an introduction to the
ADSL technology, describes the main concepts of an ATM network, its
Quality of Service parameters and all the protocols supported by the
AT-AR250E to establish an ADSL connection.
Chapter 3, LAN gives a brief introduction to the IP protocol and describes
how to configure the LAN interfaces on the AT-AR250E. It describes also
how to add/modify/remove static routes within the router.
Chapter 4, DHCP gives a brief introduction to the Dynamic Host
Configuration Protocol and describes how to configure the DHCP
server/relay services on the AT-AR250E
Chapter 5, DNS gives an introduction to the Domain Name System and
describes how to configure the DNS client/relay services on the
AT-AR250E
Chapter 6, Security describes all the supported features concerning the
Firewall, the “Dynamic Port Opening”, the “Attack Detection and
Blocking” and the NAT services on the AT-AR250E
Chapter 7, SNMP gives an introduction to the SNMP protocol and
describes how to access to the AT-AR250E Console for configuring the
SNMP module
Standards and Protocols
Supported Standards and Protocols
Table 1 lists the protocols and standards supported by the AT-AR250E ADSL
Router and the references where these protocols and standards are defined.
Protocol/standard
Reference
DHCP
RFCs 1541, 1542.
3
AT-AR250E ADSL Router Web Interface User Manual
Encapsulation over ATM
RFC 1483
IP
RFCs 791, 821, 950, 951, 1009, 1055, 1122, 1144,
1349, 1542, 1812, 1858.
IP addressing
RFC 1597.
IP over ATM
RFC 1577
PPP over ATM
RFC 2364
PPP over Ethernet
RFC 2516
SNMP, MIBs
RFCs 1155, 1157, 1213, 1239, 1315, 1398, 1493,
1514, 1573, 2233.
Table 1: Protocols and standards supported by the AT-AR250E ADSL
Router.
Obtaining Copies of Internet Protocols and Standards
The Internet Protocols are defined in Requests For Comments (RFCs). RFCs are
developed and published under the auspices of the Internet Engineering
Steering Group (IESG) of the Internet Engineering Task Force (IETF). For more
information about the IESG and IETF, visit the IETF web site at
http://www.ietf.org/.
For more information about RFCs and Internet Drafts (the starting point for
RFCs), visit the RFC Editor web site at http://www.rfc-editor.org/.
This site has information about the RFC standards process, archives of RFCs
and current Internet Drafts, links to RFC indexes and search engines, and a
list of other RFC repositories.
RFCs can be obtained electronically from many RFC repositories, mail
servers, World Wide Web (WWW), Gopher or WAIS sites. A good starting
point for finding the nearest RFC repository is to point your Web browser at
http://www.isi.edu/in-notes/rfc-retrieval.txt.
To obtain a copy of an RFC using FTP, FTP to the host and login as user
anonymous, and a password of either guest or your email address. The FTP
server will usually prompt you for one or the other. Use the get command
to retrieve the desired RFC. Most sites have a file, usually rfc-index.txt,
which lists the titles and file names of all available RFCs. Most sites have a
file, usually rfc-retrieval.txt, which gives detailed information about
RFC repositories and how to retrieve RFCs via FTP, mail servers, WWW,
Gopher and WAIS.
To learn how to obtain a copy of an RFC via email from a mail server, point
your browser at http://www.isi.edu/in-notes/rfc-editor/rfcinfo.
4
To obtain a copy of an RFC from a Web site, or to search RFC repositories for
a specific RFC or all RFCs relating to a topic, point your Web browser at
http://www.rfc-editor.org/rfc.html.
Background Reading
For an introduction to the Internet Protocols refer to:
DDN Protocol Handbook, Elizabeth J. Feinler, 1991, DDN Network
Information Center, SRI International, 333 Ravenswood Avenue, Menlo Park,
CA 94025, USA. Email: [email protected].
Internetworking with TCP/IP ------ Volume I: Principles, protocols and
architecture (2nd Edition), Douglas E. Comer, 1991, Prentice-Hall
International, Inc., New Jersey. ISBN 0-13-474321-0.
Internetworking with TCP/IP ------ Volume II: Design, implementation, and
internals, Douglas E. Comer and David L. Stevens, 1991, Prentice-Hall
International, Inc., New Jersey. ISBN 0-13-472242-6.
Internetworking with TCP/IP ------ Volume III: Client-server programming and
applications, Douglas E. Comer and David L. Stevens, 1993, Prentice-Hall
International, Inc., New Jersey. ISBN 0-13-474222-2.
For a description of layered protocols refer to:
Computer networks (2nd Edition), Andrew S. Tanenbaum, 1989, PrenticeHall International, Inc., New Jersey. ISBN 0-13-162959-0.
For an introduction to network management refer to:
The simple book ------ An introduction to management of TCP/IP-based
Internets, Marshall T. Rose, 1991, Prentice-Hall International, Inc. ISBN
013812611-9.
For an introduction to ADSL refer to:
ADSL: Standards, Implementation and Architecture, Charles K. Summers,
CRC Press Advanced and Emerging Communication Technologies Series CRC
Press; ISBN: 084939595X; (June 1999).
For an introduction to PPP refer to:
Using and Managing PPP, Andrew Sun, O’Reilly; ISBN: 1565923219;
(March 1999).
Publicly Accessible Documents
Allied Telesyn maintains an online archive of documents and files that
customers can access via the World Wide Web or via anonymous FTP. For
WWW
access,
point
your
Web
browser
at
http://www.alliedtelesyn.com.
AT-AR250E ADSL Router Web Interface User Manual
5
Conventions
A number of symbols, typographic and stylist conventions are used
throughout this manual to aid learning and make information easier to find
(Table 2).
This typeface Is used for
Italic
Referring to another section in this manual or another
manual, or to introduce and emphasise new terms. For
example, “See Chapter 2, ADSL”.
Monospace
Text as it appears on-screen, or anything you must type.
0xFF
Numbers starting with the 0x prefix are hexadecimal
values.
Attention
A special keystroke known as the attention character,
which will be either [Break] or [Ctrl/P].
Table 2: Typographic conventions used in this manual.
Note. A note like this presents additional information or interesting sidelights.
Warning. A warning alerts you to situations in which you could do something that
might result in a loss of data, or cause damage to the equipment.
6
Chapter 1 - Overview
Chapter 1
Overview
Introduction
Overview of the AT-AR250E ADSL Router
The AT-AR250E ADSL Router provides data access for multiple users in
Small Office/Home Office (SOHO), Small to Medium Enterprise (SME) or
Branch Offices wanting very fast download speeds or who need to combine
broadband access with a telephone service (see Figure 1).
ADSL, a high bit rate digital subscriber line access technology, provides
asymmetrical data over a single pair of local loop copper. Users can access the
Internet, corporate LAN or Video on Demand services, downloading at
speeds up to 8Mbps and uploading data at speeds of up to 1Mbps.
The AT-AR250E ADSL Router implements the ITU standards G.992.1
(G.DMT), G.922.2 (G.lite) and ANSI (T1.413) for operation over mixed gauge
two-wire circuits and is interoperable with all major DSLAM and Multi
Service Access Systems. When used with a POT’s Splitter the AT-AR250E
ADSL Router can be used in conjunction with a telephony service using the
same two-wire local loop circuit.
Affordable broadband access is provided
performance, security or routing capability.
without
compromising
The Router provides a 10Mbps Ethernet Interface for connection to the office
LAN and it supports automatic assignment of IP addresses to personal
computers via a built-in Dynamic Host Configuration Protocol (DHCP)
server.
AT-AR250E ADSL Router Web Interface User Manual
7
Figure 1. ADSL Network topology
An advanced Security system provides the following services (see Chapter 6 for
details):
Firewall
Dynamic Port Opening
Attack Detection and Blocking
Advanced Network Address Translation (NAT)
Customers using the AT-AR250E ADSL Router may decide to create up to
four independent routed ADSL connections (each with full routing capability
and selectable QoS parameters). IP address assignment can be either static or
dynamic per virtual ATM connection.
How to start the web interface
To run the AT-AR250E web interface, ensure that your Web Browser is
Microsoft® Internet Explorer 5.0 (or later) and disable any proxy settings on
your Web Browser as follows:
Steps may vary, depending on the Browser version.
Double-click on the Internet Explorer icon.
Click Tools > Internet Options.
Select the “Connections” tab.
Click on the LAN Settings button. Ensure that the use of Proxy Server is
disabled.
Click OK for changes to take effect.
8
Chapter 1 - Overview
The default IP address on the AT-AR250E is 192.168.1.1.
The IP address on your PC has to be in the same subnet as 192.168.1.1. It is
outside the scope of this manual to explain how to achieve this setting on
your PC.
After connecting to the default IP address http://192.168.1.1:8080 the Web
interface will ask for the username and password to access the system.
Default settings for these parameters are:
Username: manager
Password: friend
Please note that the Ethernet cable(s) can be plugged into any of the four ports.
AT-AR250E ADSL Router Web Interface User Manual
9
Performing Basic Tasks
Status
The AT-AR250E has a virtual LED representing the ADSL port. A GREEN
virtual LED indicates the presence of the link; otherwise a RED virtual LED is
shown.
The STATUS web page also provides some useful statistics on all the created
ADSL connections (see Chapter 2 for details); it is also possible to check the
status of the LAN interface.
The STATUS web page provides a view on the AT-AR250E Security system
through the following buttons: ---- ʹFirewall', ʹDynamic Port
Openingʹ, ʹAttack Detection and Blockingʹ and 'NAT' (see Chapter
1 for details).
Figure 2. Web interface Status Page
10
Chapter 1 - Overview
User Management
Clicking on ʹUsers Managementʹ enables the definition of new users. Two
kind of users are defined (see Figure 3):
Normal User
Administrator
A normal user is only able to view and check the status of the AT-AR250E without
having any configuration privileges.
To add or modify a User the following parameters have to be added:
Username: a string with a length in the range [1,60]
Password : a string with a length in the range [1,60]
Permission: two choices are available: User or Administrator
Comment: a max 60 chars string
Figure 3. Web interface User Management page
AT-AR250E ADSL Router Web Interface User Manual
Error Log
Clicking on ʹError Logʹ displays a table as shown in Figure 4.
This table shows some useful information on configuration errors:
When: time in seconds since last reboot
Process: the process that caused the error
Error: the error description
Figure 4. Web interface Error Log page
11
12
Chapter 1 - Overview
Save Configuration
The ʹSave Configurationʹ section provides the opportunity to store into
the internal flash all the configuration settings made by the AT-AR250E
administrator (see Figure 5).
Figure 5. Save Configuration
There will be a delay (approximately 15 secs) for saving the configuration.
After the configuration has been saved the following web page will appear:
Figure 6. Configuration saved
AT-AR250E ADSL Router Web Interface User Manual
13
Warning: It is VERY important that the AT-AR255E is not switched off until
AFTER the Configuration saved web page has appeared.
Restart
Clicking on ʹRestartʹ forces a Software restart on the AT-AR250E (see Figure
7 ).
Figure 7. Web interface Restart page
Warning: If you restart without first saving your configuration all changes since you
last saved your configuration will be lost.
14
Chapter 2 – Configuring the ADSL Interface
Chapter 2
Configuring the ADSL Interface
Introduction to ADSL
ADSL, short for Asymmetric Digital Subscriber Line, is an exciting new
technology that utilizes existing telephone lines for multimedia and highspeed data communications in parallel with the regular telephone voice
services.
It operates over a single, twisted copper pair of wires and provides the
connection using a pair of modems, one at the user end and the other at the
Exchange. The modems/routers are designed to exploit the physical
transmission capabilities of copper lines beyond the frequencies used for
normal telephony services to achieve data rates higher than can be achieved
by analogue voiceband modems.
The asymmetric in ADSL is due to the fact that the downstream (towards the
customer) data rate is much higher than the upstream (towards the network)
data rate. ADSL can be viewed as a high speed data pipe that can be used to
transmit any high speed data application, such as video conferencing, fast
Internet access, interactive multimedia, on-line home banking, remote office
or remote LAN applications, telecommuting.
Internet Connectivity
The explosion of interest in the Internet has created a clear opportunity to
provide high-speed Internet access to homes and small businesses. ADSL can
deliver not only higher speed, but also an ʺalways onʺ service that does not
risk call blocking in the telephone network.
Branch Office Connectivity
Most business PC applications, such as file access, e-mail, terminal, and
terminal emulation, perform asymmetric communication, making ADSL an
appropriate technology to connect a remote office to the enterprise.
Telecommuting
Telecommuting is another ripe opportunity for ADSL technology. With highspeed connectivity to employeesʹ homes, a ʺvirtual officeʺ experience to
telecommuters can be offered. This is attractive because more and more
AT-AR250E ADSL Router Web Interface User Manual
15
corporations are embracing telecommuting as an effective means of reducing
facility expenses and complying with environmental quality regulations.
Business-to-Business
Todayʹs connected information society is creating new types of business
relationships and providing new opportunities in more traditional business
contexts. Businesses that have a common bond may want to share a private
and secure network infrastructure. A virtual private network can be created
using ADSL in conjunction with existing backbone networks to interconnect
businesses.
Content Delivery
Although a high-bandwidth network connection is attractive in itself, it can
be made even more compelling by enhancing the quality and quantity of
content accessed. Content can take many forms: shopping catalogues,
reference materials, real estate listings, yellow pages, travel services, games,
music, video, etc. The combination of high-speed networks and enriched
content presents an attractive offering to business and residential consumers.
ADSL services
Using the web interface of the AT-AR250E it is possible to configure four
different ADSL services that are:
Multi (Auto)
ANSI ( T1.413)
G.DMT
G.Lite
Your service provider will most likely have specified which service you
should choose. If in doubt choose MULTI(AUTO). The characteristics of each
service are briefly described below.
MULTI (AUTO)
Using this setting, the DSL configuration is automatically configured during
the ADSL link establishment.
ANSI T1.413 and G.DMT
ANSI T1.413 and G.DMT are very similar. G.DMT really is the International
variant of the original American ANSI standard.
They both define what is referred to as ʹFull Rateʺ ADSL. This means a service
that provides downstream data rates up to 6Mbps and upstream data rates
up to 1.5M bps. Note that these are the maximum possible data rates on such
a service. They are not necessarily the data rates that every subscriber to the
service will receive.
16
Chapter 2 – Configuring the ADSL Interface
Just like all other flavours of DSL, data rates decrease as distance from the CO
(Central Office) increases.
At 3,700 m (12,000 ft) to 5,500 m (18,000 ft) away from the CO, G.DMT ADSL
delivers up to 1.5Mbps downstream and up to 384 Kbps upstream. G.DMT is
excellent for Web surfing and applications that involve downloading large
files from the Internet.
G.DMT
Asymmetric
Speeds Range
1.5 to 6 Mbps
Downstream;
16 to 640 Kbps
Upstream
Best Applications
Maximum Distance
from CO
Internet/Intranet access, Web
surfing, large files download,
video-on-demand, VPN. Analog
voice support via installation of a
splitter.
5,500 m
(18,000 feet or 3.4
miles)
Table 3: G.DMT features.
G.Lite ADSL
G.Lite ADSL is also known as universal ADSL. G.Lite ADSL is a new
standard for ADSL service that does not require your local phone company to
send a technician to your site for installation, thus passing on the savings to
end-customers.
G.Lite offers maximum downstream speeds at up to 1.5 Mbps and maximum
upstream speeds at up to 384 Kbps. G.Lite is excellent for Web surfing and
applications that involve downloading large files from the Internet.
G.Lite
Asymmetric
Speeds Range
Up to 1.5 Mbps
Downstream; up
to 384 Kbps
Upstream
Best Applications
Maximum Distance
from CO
Internet/Intranet access,
Web surfing, large files
download, video-ondemand, VPN. Analog
voice support via filter only
(no need to install splitters)
5,500 m
(18,000 feet or 3.4 miles)
Table 4: G.Lite features.
ATM Parameters
It is necessary to set the ATM parameters on the AT-AR250E. These
parameters (see Figure 8) are used to configure the ATM service that runs over
your ADSL line. Your service provider may have specified the values to
choose.
AT-AR250E ADSL Router Web Interface User Manual
17
Figure 8. ATM parameters
The following is a brief explanation of each of these parameters.
ATM Channel Parameters
The following parameters identifies the ATM channel:
Name: an identifier of the connection
VPI/VCI: Virtual Path Identifier and Virtual Channel Identifier identify
the ATM channel
ATM Quality of Service Parameters
These parameters are normally left at default settings. For advanced users the
following information may be useful.
The following parameters are used for setting the quality of Service on the
ATM Channel. You need to specify the Peak Cell Rate, and then choose one of
the six possible bit-rate options.
PCR (PEAK CELL RATE)
The maximum speed at which it is possible to send traffic on the connection.
It is defined within this range [3,2500]
18
Chapter 2 – Configuring the ADSL Interface
BIT-RATE OPTIONS
UBR (Unspecified Bit Rate): may be interpreted as “best effort
service”
CBR (Constant Bit Rate): this service class is intended for real
time applications requiring constrained delay and delay variation
VBRrt/VBRnrt (Real time/Non real time Variable Bit
Rate): the first is intended for real-time applications (voice and video
applications), the second is for non-real time applications (file transfer).
These services are also characterized by:
SCR (Sustainable Cell Rate): defined in the range [2,2499]
MBR (Maximum Burst Size): defined in the range [0,5000]
ABR (Available Bit Rate): this service supports instantaneous
access to unused network bandwidth with very low cell loss rates
comparable to link error rates.
QFC (Quantum Flow Control): is an ATM protocol supporting the
ABR necessary to support bursty applications for which bandwidth
requirements are difficult to predict in advance.
For a full explanation of ATM, and the meaning of these parameters, see
Appendix A.
AT-AR250E ADSL Router Web Interface User Manual
19
Configuring the Connection type
A common parameter that is required for several of the available connection
types is ʹencapsulationʹ. Here is a brief explanation of encapsulation.
Encapsulation
The purpose of encapsulation is to enable several different data protocols to
share an ATM line. The encapsulation provides a method of determining
which packets belong to which protocol.
VCMux
In VC Based Multiplexing, the transmitted network interconnect protocol is
identified implicitly by the VC connecting the two ATM stations, i.e. each
protocol must be carried over a separate VC.
There is therefore no need to include explicit multiplexing information in the
payload of the frame. This results in minimal bandwidth and processing
overhead.
VC Based Multiplexing will be dominant in environments where dynamic
creation of large numbers of ATM VCs is fast and economical.
Use Bridged VCMux to create a connection that causes Ethernet headers to
be retained, while Routed VcMux should be used for connections in which
Ethernet headers are discarded.
LLC/SNAP
LLC/SNAP Encapsulation is used when several protocols are carried over the
same VC. In order to allow the receiver to properly process the incoming
frame, the Payload Field must contain information necessary to identify the
protocol of the routed or bridged PDU.
In LLC/SNAP Encapsulation this information is encoded in an LLC/SNAP
header placed in front of the carried PDU. LLC/SNAP Encapsulation is
desirable when it is not practical for one reason or another to have a separate
VC for each carried protocol.
This is the case, for example, if the ATM network only supports (semi)
Permanent Virtual Circuits (PVCs) or if charging depends heavily on the
number of simultaneous VCs.
Use Bridged LLC/SNAP to create a connection that causes Ethernet
headers to be retained, while Routed LLC/SNAP should be used for
connections in which Ethernet headers are discarded.
20
Chapter 2 – Configuring the ADSL Interface
AT-AR250E connections
The AT-AR250E can be used as an ADSL router device.
Acting as a router the AT-AR250E makes available the following connection
types:
RFC1483, IPoA, PPP over ATM (PPPoA), PPP over Ethernet (PPPoE)
RFC1483 connection
If your Connection type is RFC1483 then choose the RFC1483 radio button
as shown below (see Figure 9).
You will also need to specify:
the Encapsulation (see discussion on Encapsulation on page 27)
for RFC1483 Bridged connection:
bridged LLC/ SNAP or VcMux
for RFC1483 Routed connection:
routed LLC/ SNAP or VcMux
the Global IP and the Global Mask. These may need to be manually
set or may be automatically configured using the DHCP service provided
by your service provider.
if they are to be manually configured, then fill in the fields
the Global IP
the Global Mask
if they are to be automatically configured, then just check the
Use DHCP checkbox.
AT-AR250E ADSL Router Web Interface User Manual
Figure 9. RFC1483 Routed Connection
21
22
Chapter 2 – Configuring the ADSL Interface
IP over ATM connection
An explanation of IP over ATM can be seen in Appendix C.
Configuration Example for an IP over ATM Connection
Figure 10. IP over ATM Connection
If your Connection type is IP over ATM than choose the IPoA radio button
as shown above (see Figure 10).
You will also need to specify:
The Global IP and the Global Mask. These may need to be manually
set or may be automatically configured using the DHCP service provided
by your service provider.
If they are to be manually configured, then fill in the fields
the Global IP
the Global Mask
If they are to be automatically configured, then just check the
USE DHCP checkbox.
23
AT-AR250E ADSL Router Web Interface User Manual
PPP over ATM connection
An explanation of PPP and PPP over ATM can be seen in Appendix D.
Configuration Example for a PPP over ATM Connection
Figure 11. PPP over ATM Connection
If your Connection type is PPP over ATM then choose the PPP radio button
and check the PPPoA Routed option as shown above (see Figure 11).
You will also need to specify:
the Authentication Option: PAP, CHAP or NONE (e.g. CHAP)
the Authentication Parameters:
Username
Password
the Encapsulation
page 27)
(see discussion on Encaspulation method on
24
Chapter 2 – Configuring the ADSL Interface
the Global IP. This may need to be manually set or may be
automatically configured using the service provided by your service
provider
if it is to be manually configured, then fill in the field Global
IP Address
if it is to be automatically configured, then just check the
Dynamic IP checkbox
The purpose of AutoDNS Discovery is to automatically obtain the
address of a DNS server that the router can use
the Create as Default Route radio button, if checked, will create
the default route via this connection
AT-AR250E ADSL Router Web Interface User Manual
25
PPP Over Ethernet Routed Connection
PPP Over Ethernet introduction
PPP, which was designed for serial communications, has now been adapted
to Ethernet, and is appropriately called PPP over Ethernet (PPPoE). Since PPP
was designed to do things that were either impossible or unnecessary with
Ethernet, users are often confused as to why one would want to use PPP over
Ethernet at all.
If we were to compare TCP/IP traffic to vehicle traffic, the basic TCP/IP
protocol would be comparable to a network of city streets. Streets can serve
many access points. It is easy to get on to and off the street.
Additional access points can be added with little disruption. It is hard to tell
how many cars are actually using each street. PPP, on the other hand, would
be comparable to a railway. Travel is generally between two well defined
points. You canʹt get on and off anywhere. It is relatively easy to count and
monitor passengers. You need a ticket to board.
If this is true, then is not PPPoE like running railway tracks down main
street? In fact, yes, it is. That is what tramways do. Without disturbing main
street traffic, they bring the advantages of railways. They offer speedy access
between two well defined points and allow you to count passengers. And you
need a ticket to board.
Figure 12. PPPoE allows ISPs to monitor the volume of traffic that their
users generate.
PPP over Ethernet brings this sort of functionality to ISPs that do not use
serial links to connect their users. Serial ISPs already use PPP over modem
communications. DSL providers on the other hand use Ethernet, not serial
communications. Because of this, many require the added functionality of
PPP over Ethernet, which allows them to secure communications through the
use of user logins and have the ability to measure the volume of traffic each
user generates.
26
Chapter 2 – Configuring the ADSL Interface
Figure 13. PPPoE on a Local Network.
Configuration Example for a PPP over Ethernet Routed
Connection
Figure 14. PPP over Ethernet Routed Connection
If your Connection type is PPP over Ethernet Routed then choose the PPP
radio button and check the PPPoE Routed option as shown above (see
Figure 14).
AT-AR250E ADSL Router Web Interface User Manual
27
You will also need to specify:
the Authentication Option: NONE,PAP or CHAP
the Authentication Parameters:
Username
Password
the Encapsulation (see discussion on Encaspulation on page 27)
The Global IP. This may need to be manually set or may be
automatically configured using the service provided by your service
provider
If it is to be manually configured, then fill in the field Global
IP
If it is to be automatically configured, then just check the
Dynamic IP checkbox.
The purpose of AutoDNS Discovery is to automatically obtain the
address of a DNS server that the router can use.
the Create as Default Route radio button, if checked, will create a
default route via this connection.
the Access Concentrator (optional): can be used to identify the
PPPoE Server (Access Concentrator). It may be a combination of
trademark, model, and serial ID information.
Note: Only specify this if instructed to by your service provider.
the Service Name (optional): can be used to indicate the name of the
service you connect to on the Access Concentrator.
Note: Only specify this if instructed by your service provider.
28
Chapter 3 – LAN
Chapter 3
LAN
The main task in configuring LAN interfaces is configuring the IP parameters.
The following is an introduction to IP.
IP Protocol Introduction
IP protocols are widely used and available on nearly every hosts and PC
systems. They provide a range of services including remote login, file transfer
and Email.
The Internet
The Internet (with a capital “I”) is the name given to the large, worldwide
network of networks based on the original concepts of the ARPAnet. A large
number of government, academic and commercial organisations are
connected to the Internet, and use it to exchange traffic such as Email. The
Internet uses the TCP/IP protocols for all routing. Recently the term internet
(with a lowercase “i”) has also come to refer to any network (usually a wide
area network) that utilises the Internet Protocol. The remainder of this chapter
will concentrate on the latter definition, i.e. that of a generalised network
which uses IP as the transport protocol.
The basic unit of data sent through an internet is a packet or datagram. An IP
network functions by moving packets between routers and/or hosts. A packet
consists of a header followed by the data (see Figure 15, Table 5). The header
contains the information necessary to move the packet across the Internet. It
must be able to cope with missing and duplicated packets as well as possible
fragmentation (and reassembly) of the original packet.
Packets are sent using a connectionless transport mechanism. A connection is
not maintained between the source and destination addresses; rather, the
destination address is placed in the header and the packet is transmitted on a
best effort basis. It is up to the intermediate systems (routers and gateways) to
deliver the packet to the correct address, using the information in the header.
AT-AR250E ADSL Router Web Interface User Manual
29
Successive packets may take different routes through the network to the
destination. There is a strong analogy with the postal delivery system in
which letters are placed in individually addressed envelopes and put into the
system in the ‘hope’ that they will arrive. Like the postal system, an internet is
very reliable. In an internet, higher layers (such as TCP and Telnet) are
responsible for ensuring that packets are delivered in a reliable and
sequenced way.
In contrast to a connectionless transport mechanism, a connection-oriented
transport mechanism requires a connection to be maintained between the
source and destination for as long as necessary to complete the exchange of
packets between source and destination. X.25 is an example of a connectionoriented protocol. A good analogy to X.25 would be a telephone call, in which
both parties verify that they are talking to the correct person before
exchanging highly sequenced data (if they both talk at once then nothing
intelligible results!), and the connection is maintained until both parties have
finished talking. It is not hard to imagine the chaos if the telephone system
delivered words in the wrong order.
Figure 15. IP packet or datagram
30
Chapter 3 – LAN
Field
Function
Ver
The version of the IP protocol that created the
datagram.
The length of the IP header in 32-bit words (the
minimum value is 5).
The quality of service (precedence, delay,
throughput, and reliability) desired for the
datagram.
The length of the datagram (both header and user
data), in octets.
A 16-bit value assigned by the originator of the
datagram, used during reassembly
Control bits indicating whether the datagram may
be fragmented, and if so, whether other later
fragments exist
The offset in the original datagram of the data
being carried in this datagram, for fragmented
datagrams
The time in seconds the datagram is allowed to
remain in the Internet system
The high level protocol used to create the message
(analogous to the type field in an Ethernet packet)
A checksum of the header
32-bit IP address of the sender
32-bit IP address of the recipient
An optional field primarily used for network
testing or Debugging.
All bits set to zero—used to pad the datagram
header to a length that is a multiple of 32 bits.
The actual data being sent.
IHL
Type of service
Total length
Identification
Flags
Fragment offset
Time to live
Protocol
Header checksum
Source IP address
Destination IP address
Options
Padding
User data
Table 5: Functions of the fields in an IP datagram
Addressing
Internet addresses are fundamental to the operation of the TCP/IP internet.
Each packet must contain an internet address to determine where to send the
packet. Most packets also require a source address so that the sender of the
packet is known. Addresses are 32-bit quantities that are logically divided
into fields. They must not be confused with physical addresses (such as an
Ethernet address); they serve only to address Internet Protocol packets.
Addresses are organised into five classes (Table 6).
31
AT-AR250E ADSL Router Web Interface User Manual
Class
Maximum number of
possible networks
Maximum number of
hosts per network
A
127
16,777,216
B
16,384
65,536
C
2,097,152
255
D
Reserved Class
E
Reserved Class
Table 6: Internet Protocol address classes and limits on numbers of
networks and hosts.
Each class differs in the number of bits assigned to the host and network
portions of the address (see Figure 16).
Figure 16. Subdivision of the 32 bits of an Internet address
The addressing scheme is designed to allow routers to efficiently extract the
host and network portions of an address. In general a router is only interested
in the network portion of an address.
Class A sets the Most Significant Bit (MSB) to 0 and allocates the next 7 bits to
define the network and the remaining 24 bits to define the host. Class B sets
the two MSBs to 10 and allocates the next 14 bits to designate the network
while the remaining 16 refer to the host. Class C sets the three MSBs to ‘110’
and allocates the next 21 bits to designate the network while the remaining 8
are left to the user to assign as host or subnet numbers. Classes D and E are
reserved addresses (for mulitcast applications); these addresses cannot be
assigned to hosts.
32
Chapter 3 – LAN
The term host refers to any attached device on a subnet, including PCs,
mainframes and routers. Most hosts are connected to only one network. In
other words they have a single IP address. Routers are connected to more
than one network and can have multiple IP addresses. The IP address is
expressed in dotted decimal notation by taking the 32 binary bits and forming
4 groups of 8 bits, each separated by a dot.
For example:
10.4.8.2 is a class A address
10 is the DDN assigned network number
.4.8 are (possibly) user assigned subnet numbers
.2 is the user assigned host number
172.16.9.190 is a class B address
172.16 is the DDN assigned network number
.9 is the user assigned subnet number
.190 is the user assigned host number
The value 0.0.0.0 is used to define the default address, while a value of all
ones in any host portion (i.e. 255) is reserved as the broadcast address. Some
older versions of UNIX use a broadcast value of all zeros, therefore both the
value ‘0’ and the value ‘255’ are reserved within any user assigned host
portion. The address 172.16.0.0 refers to any host (not every host) on any
subnet within the class B address 172.16. Similarly 172.16.9.0 refers to any
host on subnet 9, whereas 172.16.9.255 is a packet addressed to every host on
subnet 9. The router uses this terminology to indicate where packets are to be
sent.
An address with ‘0’ in the host portion refers to ‘this particular host’ while an
address with ‘0’ in the network portion refers to ‘this particular network’. As
mentioned above a value of all ‘1’ (255) is a broadcast. To reduce loading, IP
consciously tries to limit broadcasts to the smallest possible set of hosts, hence
most broadcasts are ‘directed’. For example 172.16.56.255 is a broadcast to
subnet 56 of network 172.16. A major problem with the IP type of addressing
is that it defines connections not hosts. A particular address, although it is
unique, defines a host by its connection to a particular network. Therefore if
the host is moved to another network the address must also change. The
situation is analogous to the postal system. A related problem can occur when
an organisation which has a class C address finds that they need to upgrade
to class B. This involves a total change of every address for all hosts and
routers. Thus the addressing system is not scalable.
AT-AR250E ADSL Router Web Interface User Manual
33
Subnets
Related to the two issues discussed above, the rapid growth of the Internet
has meant a proliferation in the number of addresses which must be handled
by the core routers. More addresses means more loading and tends to slow
the system down. This is overcome by minimising the number of network
addresses by sharing the same IP prefix (the assigned network number) with
multiple physical networks. Generally these would all be within the same
organisation, although this is not a requirement.
A subnet is formed by taking the host portion of the assigned address and
dividing it into two parts. The first part is the ‘set of subnets’ while the second
refers to the hosts on each subnet. For example the DDN may assign a class B
address as 172.16.0.0. The system manager would then assign the lower two
octets in some way which makes sense for this particular network. A common
method for class B is simply to use the higher octet to refer to the subnet.
Thus there are 254 subnets (0 and 255 are reserved) each with 254 hosts. These
subnets need not to be physically on the same media. Generally they would
be allocated geographically with subnet 2 being one site, subnet 3 another and
so on. Some sites may have a requirement for multiple subnets on the same
LAN.
This could be to increase the number of hosts or simply to make
administration easier. In this case it is normal (but not required) that the
subnets be assigned contiguously for this site. This makes the allocation of a
subnet mask easier.
This mask is needed by the routers to ascertain which subnets are available at
each site. Bits in the mask are set to ‘1’ if the router is to treat the
corresponding bit in the IP address as belonging to the network portion or set
to ‘0’ if it belongs to the host portion. This allows a simple bit-wise logical
AND to determine if the address should be forwarded or not. Although the
standard does not require that the subnet mask must select contiguous bits, it
is normal practice to do so. Otherwise it can make the allocation of numbers
rather difficult and prone to errors. Some example masks are:
11111111.11111111.11111111.00000000 = 255.255.255.0
<----network--------> <subnet> <-host->
This would give 254 subnets on a class B network, each with 254 hosts.
11111111.11111111.11111111.11110000 = 255.255.255.240
<------network-----> <----subnet----><host>
This would give 4094 subnets on a class B network, each with 14 hosts or, 14
subnets on a class C network each with 14 hosts.
34
Chapter 3 – LAN
Changing the AT-AR250E LAN IP address
By default, the LAN IP address is set at 192.168.1.1.
To change the default LAN port IP address:
i)
ii)
Enter the new address in the IP address and Subnet mask fields in the
Default LAN IP Configuration and click Apply.
Allow some time (approximately 1 minute) for your Router to
complete the change of IP address.
If a different LAN IP address (as determined by your System Administrator) is
entered, you will be prompted with a dialog box, indicating the need to change your
system’s (Ethernet Card) IP Address. Click OK at the prompts and proceed to change
your system’s IP Address.
Figure 17. How to change the LAN IP Address
Upon changing the LAN IP settings, the DHCP server related settings are also
automatically updated to remain consistent with the new configuration.
AT-AR250E ADSL Router Web Interface User Manual
35
IP Routing
The IP routing section allows the AT-AR250E Administrator to create new
static routes (see Figure 18). In order to create a new static route the following
information are required:
Destination Network ID: the network Address of the destination subnet
(0.0.0.0 is the default route that will be used if none of the specific routes
defined matches the destination IP).
Destination subnet mask: the subnet mask of network subnet (for the
case of the default route the subnet mask is 0.0.0.0).
Input Specific Gateway: the IP Address of the gateway via which
packets would leave the local network in order to reach the destination
subnet.
Choose an Interface: an already created interface can be selected as the
interface via which packets for the destination subnet would leave the router.
Cost: Enter the value for cost. It refers to the number of hops counted as the
cost of the route, which may affect the choice of route when the route is
competing with routes acquired from RIP. (But note that using a mixture of
RIP and static routing is not advised).
NOTE: If you are creating a route that is via a WAN interface (ie a route
directed out over the ADSL) then you should specify the Interface for the
route, rather than specifying the gateway address. This is particularly so in
the case that the IP address on the WAN interface is dynamically assigned.
Conversely, if you are creating a route that is via the LAN interface, then you
MUST specify the gateway address for the route. It is important that the
gateway address you specify is the IP address of the other router on the LAN
via which data will be sent to the destination subnet. The gateway address is
NOT the IP address on the LAN interface of the AT-AR250E itself.
When you have entered the required information, click ADD, and the route
will be created. The lower part of the page displays previously created routes.
Clicking on the DELETE button beside a given route will delete it.
The Timeout value, which specifies the length of time before the route entry times out
is set to 0 by default. This means the route entries will never timeout.
If the Input Specific Gateway field has the default value ("0.0.0.0")
AND the interface selection list box shows NONE THEN the route under creation will
use the default gateway. This happens under the condition that a default gateway has
been already created.
36
Chapter 3 – LAN
If an invalid route is created, then upon entering the IP routing page a warning
message will inform you that the wrong route will be deleted.
Figure 18. How to add a new Static Route
AT-AR250E ADSL Router Web Interface User Manual
37
Chapter 4
DHCP
The Dynamic Host Configuration Protocol
The Dynamic Host Configuration Protocol (DHCP) is defined in RFC 1541
and provides a mechanism for passing configuration information to hosts on
a TCP/IP network. DHCP is based on the Bootstrap Protocol (BOOTP) defined
in RFC 1542, but adds automatic allocation of reusable network addresses and
additional configuration options. DHCP is based on a client–server model,
where the server is the host that allocates network addresses and initialisation
parameters, and the client is the host that requests these parameters from the
server.
There are a number of parameters that a DHCP server can supply to clients in
addition to assigning IP addresses. They can supply addresses of DNS server,
WINS Server, Cookie server etc… Also, they can supply the gateway address
for the LAN.
DHCP supports three mechanisms for IP address allocation. In the automatic
allocation mechanism, DHCP assigns a permanent IP address to a host. In the
dynamic allocation mechanism, DHCP assigns an IP address to a host for a
limited period of time, or until the host explicitly relinquishes the address. In
the manual allocation mechanism, the network administrator assigns a host’s
IP address, and DHCP is used simply to convey the assigned address to the
host. A particular network will use one or more of these mechanisms,
depending on the policies of the network administrator.
Dynamic allocation is the only one of the three mechanisms that allows
automatic reuse of an address that is no longer needed by the host to which it
was assigned. Dynamic allocation is particularly useful for assigning an
address to a host that will be connected to the network only temporarily, or
for sharing a limited pool of IP addresses among a group of hosts that do not
need permanent IP addresses. Dynamic allocation may also be a good choice
for assigning an IP address to a new host being permanently connected to a
network where IP addresses are sufficiently scarce that it is important to
reclaim them when old hosts are retired.
The DHCP server facility in the AT-AR250E only supports dynamic
allocation.
38
Chapter 4 – DHCP
The AT-AR250E’s support for DHCP
The AT-AR250E can handle DHCP packets in one of three mutually exclusive
ways:
1.
2.
3.
Ignore the packets --- DHCP relay disabled and DHCP Server
disabled
or
Relay the DHCP packets on to some other device that is known to be
a DHCP server – DHCP Relay enabled, DHCP Server disabled
or
Act as a DHCP server itself - DHCP Relay disabled, DHCP Server
enabled
Obviously, no particular configuration is needed in the case that DHCP
packets are ignored. The rest of this chapter is devoted to describing the
details of configuring the DHCP Relay and DHCP Server option.
The AR250E default setting is DHCP Server enabled.
DHCP Relay
Clicking on the DHCP item in the Web interface Side Menu will present the
DHCP Service page illustrated in Figure 19.
Figure 19. DHCP service web page
To configure the router as a DHCP relay, click on the Enable/Configure
button in the DHCP Relay field of the DHCP Service page. The DHCP Relay
page, illustrated in Figure 20, will be presented.
AT-AR250E ADSL Router Web Interface User Manual
39
Figure 20. DHCP relay
Click on EDIT, and the DHCP Relay Configuration page, illustrated in Figure
21, will be presented.
This page has only one configurable item. Namely the address of the DHCP
server to which the router will relay DHCP packets. For example, in order to
set a new configuration for relaying the DHCP requests to the address
151.38.135.51:
• insert the IP address 151.38.135.51 in the Server IP address
field
• click on APPLY
Figure 21. DHCP relay setting
40
Chapter 4 – DHCP
DHCP Server
The AT-AR250E DHCP Server only supports dynamic address allocation. It is
not possible to configure static IP assignments. The server can supply up to 25
clients with two parameters in addition to an assigned address. The
parameters are DNS address and Gateway address.
To configure the router as a DHCP Server, click on the enable/configure
button in the DHCP Server field of the DHCP Service page. The DHCP Server
page illustrated in Figure 22 will appear.
Figure 22. DHCP server
In order to change the DHCP server settings, click on the related
Enable/Configure button. A web page as in Figure 23 will appear.
It is possible to modify the setting of the DHCP server on the LAN.
To modify the DHCP server settings, click on EDIT. The following parameters
are required:
Starting IP address: refers to the first IP address of the range
available to be assigned to requesting PC’s.
Ending IP address: refers to the last IP address of the range available
to be assigned to requesting PC’s.
Subnet Mask: to specify the subnet mask that will be assigned to the
clients
Default lease time: to specify the default length of time a DHCP
client (your PCs) can use an assigned IP address before it must renew its
configuration with the DHCP server (Router).
AT-AR250E ADSL Router Web Interface User Manual
41
Maximum lease time: to specify the maximum length of time a
DHCP client (your PCs) can use an assigned IP address before it must
renew its configuration with the DHCP server (Router)
DNS: this is the DNS address that will be sent, along with an assigned IP
address, to the requesting PC’s.
The value displayed is the DNS server address that is configured on the
DNS configuration page (see chapter 5).
Gateway: this is the gateway address that will be sent to requesting
PC’s. The value cannot be configured on this page.
The value displayed is the router’s LAN IP address. I.e. it is assumed that
PC’s that are sending DHCP requests to the router will be using the router
as their gateway.
Figure 23. DHCP server settings
42
Chapter 5 – DNS
Chapter 5
DNS
DNS introduction
DNS is an abbreviation for Domain Name System, a system for naming
computers and network services that is organized into a hierarchy of
domains. DNS naming is used in TCP/IP networks, such as the Internet, to
locate computers and services through user-friendly names. When a user
enters a DNS name in an application, DNS services can resolve the name to
other information associated with the name, such as an IP address.
For example, most users prefer a friendly name such as “alliedtelesyn.com” to
locate a computer such as a mail or web server on a network. A friendly name
can be easier to learn and remember. However, computers communicate over
a network by using numeric addresses. To make use of network resources
easier, name services such as DNS provide a way to map the user-friendly
name for a computer or service to its numeric address. If you have ever used
a Web browser, you have used DNS.
The following graphic shows a basic use of DNS, which is finding the IP
address of a computer based on its name.
Figure 24. Domain Name System
AT-AR250E ADSL Router Web Interface Manual
43
In this example, a client computer queries a server, asking for the IP address
of a computer configured to use host.alliedtelesyn.com as its DNS domain
name. Because the server is able to answer the query based on its local
database, it replies with an answer containing the requested information,
which is a host (A) resource record that contains the IP address information
for host.alliedtelesyn.com. The example shows a simple DNS query between a
single client and server. In practice, DNS queries can be more involved than
this and include additional steps not shown here.
DNS Relay
The AR250E can act as a DNS relay. So, DNS packets which arrive at the
router, addressed to the router, will be relayed on to a known DNS Server. So,
the devices on the LAN can treat the router as though it were the DNS Server.
Only the router needs to know the address of the real DNS Server.
If you have manually set the WAN IP address (see Chapter 2: Configuring the
ADSL Interface), then in order to browse the Internet it will be necessary to set
the DNS Relay Server field with the address of the DNS server to which
the requests will be relayed.
If you receive the WAN IP address dynamically (via the ISP) you don’t need
to set the field above, because the DNS information will be set automatically.
Figure 25. DNS relay settings
44
Chapter 5 – DNS
DNS Client
The AT-AR250E is provided with an internal DNS client. It is possible to add
DNS server addresses that will be used by the router ONLY for its own
lookups. It is possible also to define a list of domain names using the ʺDomain
Search Orderʺ field. This list will be used by the router ONLY for its own
lookups.
It is important to understand that the items configured in the DNS client
section will NOT be used by the DNS relay. So, for example, the domain
names in the “Domain Search Order” will NOT be appended to domain name
requests received by the relay from hosts on the LAN.
AT-AR250E ADSL Router Web Interface Manual
45
Chapter 6
Security
Introduction
This chapter describes the AT-AR250E router’s built-in security facilities, and
how to configure and monitor them.
The Internet is a network that allows access to vast amounts of information
and potential customers. However, the Internet is not controlled and certain
individuals use it destructively. These individuals attack other users’
computer systems for entertainment and/or profit.
The security system is designed to allow safe access to the Internet by
enforcing a set of access rules between the various interfaces of the product.
To configure these rules at least two interfaces have to be defined — one
interface is attached to the public network (e.g., the Internet), and the other
interface is attached to an internal private network (intranet) that requires
protection. The security prevents unrestricted access to the private network
and protects the computer systems from attack.
The security system provides a single link between the private network and
the public network, it is also uniquely positioned to provide a single point
where all traffic entering and leaving the private network can be logged and
monitored. This information is useful for providing a security audit trail.
Currently, two main security technologies are recognized that are briefly
explained in the following.
Application Gateway
This is the traditional approach used to build a firewall, where every
connection between two networks is made via an application program (called
a proxy) specific for that protocol. A session from the private network is
terminated by the proxy, which then creates another separate session to the
end destination.
Typically, a proxy is designed with a detailed knowledge of how the protocol
works and what is allowed or not. This approach is very CPU intensive and
very restrictive. Only protocols that have specific proxies configured are
46
Chapter 6 – Security
allowed through the security system; all other traffic is rejected. In practice
most third-party proxies are transparent proxies, which pass all traffic
between the two sessions without regard to the data.
Stateful Inspection
A more recent approach to security design uses a method called “stateful
inspection”. Stateful inspection is also referred to as dynamic packet filtering or
context-based access control (CBAC).
In this technology, an inspection module understands data in packets from
the network layer (IP headers) up to the application layer. The inspection
module checks every packet passing through the security system and makes
access decisions based on the source, destination and service requested. The
term stateful refers to the security system’s ability to remember the status of a
flow. For example, whether a packet from the public Internet is returning
traffic for a flow originated from the private intranet. The TCP state of TCP
flows is also monitored, allowing inappropriate traffic to be discarded. The
benefit of this approach is that stateful inspection security systems are
generally faster, less demanding on hardware, and more adaptive to new
Internet applications.
The AT-AR250E router’s security system implementation has the following
features:
Dynamic packet filtering (stateful inspection) technology.
Application of dynamic filtering to traffic flows, using the base rule that
all access from the outside (i.e., public interfaces) is denied unless
specifically permitted and all access from the inside (i.e., private
interfaces) is allowed unless specifically denied.
The firewall will open only the required ports for the duration of a user
session.
The firewall can be configured to limit internal access to the public
network based on a policy setting.
Figure 26 shows the main web page for security configuration.
AT-AR250E ADSL Router Web Interface Manual
47
Figure 26. Security configuration web page
The security features in the AT-AR250E are divided into four areas:
Firewall
This covers the creation of policies and filtering rules.
Dynamic Port Opening
This is a companion feature to the filtering rules. There are a number of
Internet applications that require secondary ports to be open in order for a
session to operate. For example, an FTP control session operates on port 21,
but FTP uses port 20 as a secondary port for the data transfer process. The
more ports that are open, the greater the security risk. So, the “Dynamic Port
Opening” service enables you to designate certain secondary ports that will
only be opened when there is an active session on their associated primary
port.
Because FTP is such a very common application, the dynamic port opening for FTP is
enabled in the software by default, and does not have to be configured by the user.
Attack Detection and Blocking
The purpose of this feature is to look for traffic patterns that correspond to
certain known types of attack: port scans, host scans, Ping floods etc ...
48
Chapter 6 – Security
Upon detecting such a traffic pattern, the router can take certain configurable
actions.
NAT
The AT-AR250E implements Port-based network Address Translation. The
NAT can be configured to enable incoming sessions to particular private
hosts.
We will now examine the details of configuring these four features.
Security interfaces
The first step to configure any of the security features is to enable the security
module. This is done by clicking the Enabled radio button on the Security
page. Then click APPLY.
The next step is to associate some interfaces with the Security module.
Once the security module has been enabled, as described above, the security
page presents Interfaces List fields as illustrated in Figure 27. These
fields are used for associating interfaces to the security module. Each line
contains two drop-down menus.
Figure 27. Interfaces List
AT-AR250E ADSL Router Web Interface Manual
49
The name field lists of all the IP interfaces currently created on the router. The
Type field contains a choice of the roles that these interfaces can take within
the security module. The choices are:
Internal: an interface to a private network. Hosts on a private network
are considered to be benign, but in need of protection from incoming
attacks.
External: an interface to on public network (typically the Internet)
which may contain hosts which will launch attacks.
Once an external interface is defined (e.g. PPPoE) it is necessary to define the
LAN interface in order to enable the NAT services between pairs of interfaces.
50
Chapter 6 – Security
Firewall
Clicking on the Firewall Configure button, a web page as in Figure 28 will
appear. The firewall service can be configured using three pre-defined levels
that are:
1. LOW: setting this level all output traffic is allowed; incoming traffic is
blocked only for http, ftp, telnet, smtp, pop3, nntp and icmp. To enable
this security level:
click on LOW
a page as in Figure 29 will appear where the GREEN rectangles
refer to allowed traffic, and the RED rectangles refer to
blocked traffic
Click on the APPLY button
2. MEDIUM: setting this level, incoming traffic from external interfaces is
blocked with the exception of real audio/video; all output traffic is
allowed. To enable this security level:
click on Medium
a page as in Figure 30 will appear where the GREEN rectangles
refer to allowed traffic, and the RED rectangles refer to
blocked traffic
Click on the APPLY button
3. HIGH: setting this level all incoming traffic from external interfaces is
blocked; output traffic is allowed only for http, dns, sntp, pop3 and icmp.
To enable this security level:
click on High
a page as in Figure 31 will appear where the GREEN rectangles
refer to allowed traffic, and the RED rectangles refer to
blocked traffic
Click on the APPLY button
AT-AR250E ADSL Router Web Interface Manual
Figure 28. Security level
Figure 29. Low Security level
51
52
Chapter 6 – Security
Figure 30. Medium Security level
Figure 31. High Security level
AT-AR250E ADSL Router Web Interface Manual
53
Otherwise it is possible to configure the firewall using a User Defined
configuration. A User defined Configuration will consist of a number of
Firewall policies.
To add a new policy:
1.
click on User Defined button and a web page as in Figure 32 will
appear
2.
the firewall policy between the two interfaces will then be defined
You can configure/delete this policy by clicking on Configure policy
which will bring up a web page as in Figure 33 . From here, for
example, it is possible to ADD a TCP filter (see Figure 34).
Figure 32. Current Firewall Policies
54
Chapter 6 – Security
Figure 33. Firewall Port Filters
Figure 34. Adding a new TCP filter
AT-AR250E ADSL Router Web Interface Manual
55
By default, no packets are allowed in through an external interface. All packets are
allowed out through an internal interface.
So, typically, on a User-Defined firewall service, if we are changing default
behaviour, we are allowing certain traffic types in through external and we
are blocking certain traffic types from going out through internal interface
Precedence rule for overlapping filters
If multiple filters are configured on a policy, it is possible that they might
overlap. For example, it is possible to configure:
a filter to allow incoming TCP for ports 12 – 67
a filter to block incoming TCP for ports 17-21
With a pair of filters like this, it is not immediately obvious what will happen
to an incoming TCP packet to port 18 – will it be allowed or blocked?
To deal with situations like this, it is necessary to have a precedence rule for
choosing between conflicting filters.
The rule is:
The packet will always be treated according to the most specific filter, regardless of the
order in which the filters were added.
So, in the above case, an incoming TCP packet to port 18 will be blocked.
Configuration example 1 for Firewall
Suppose that we want to allow only Web sessions from remote hosts towards
a local web server. Also, suppose that we do not allow access from local hosts
on the LAN interface to remote hosts or remote servers.
Figure 35. Firewall configuration example
56
Chapter 6 – Security
Using the Web interface this Firewall Service will be created as follows1:
By default, no packets are allowed in through an external interface. Packets for most
common applications are allowed out through an internal interface.
1.
The first step will be to delete the filter that allows outgoing TCP to port
80; after doing this we will have to replace it with a filter that blocks
outgoing, and allows incoming, TCP for port 80
2.
To perform this latter step; after clicking on the Add TCP Filter
button, insert the following values and then click on APPLY:
Port Range Start: 80 (http session port)
Port Range End: 80 (http session port)
Direction Inbound: Allow (allow access to local web server from
remote hosts)
Direction Outbound: Block(block access to remote web servers from
local hosts)
Figure 36. Firewall Add TCP port filters
Note that we have already established an ADSL connection, we have defined external and internal
interfaces and we have enabled NAT between the interfaces. Also, the Firewall has been enabled, and
a user-defined policy created between Internal and External interfaces.
1
AT-AR250E ADSL Router Web Interface Manual
57
Dynamic Port Opening
To gain an understanding of the purpose of the Dynamic Port Opening
feature, let us look at the operation of the FTP protocol
FTP protocol operation
FTP is rather a difficult protocol for firewalls to deal with, for two reasons:
1.
Whilst the management session of a FTP connection is an outgoing
session to port 21, the data transfer session is an incoming session from
port 20, so the firewall device has to handle incoming TCP sessions.
2.
To add to the complexity, the TCP port to which the incoming
connections will be made is not known in advance, but is communicated
by the client to the server in a PORT command.
Here is a summary of the TCP packets exchanged in FTP:
To FTP serverʹs port 21 from a port > 1024 (Client initiates connection)
From FTP serverʹs port 21 to a port > 1024 (Server responds to clientʹs
control port)
From FTP serverʹs port 20 to a port > 1024 (Server initiates data
connection to clientʹs data port, which the client has specified to the
server in a PORT command)
To FTP serverʹs port 20 from a port > 1024 (Client sends ACKs to serverʹs
data port)
When drawn out, the connection appears as follows:
Figure 37. TCP flows in FTP
58
Chapter 6 – Security
So, to allow clients on the private LAN to successfully interact with external
FTP servers, the firewall must implicitly allow incoming TCP sessions to all
manner of port numbers.
To have these ports permanently open on the firewall would be a significant
security risk.
The standard approach to dealing with the problem of applications like FTP
has been for the firewall to have special code that understands the format of
FTP packets. This code would intercept FTP packets as they went past, and
extract information about which ports have been requested to be opened.
However, the problem with this approach is that every time a new Internet
Application is developed, there potentially has to be new code added to the
firewall to handle the new application.
The Dynamic Port Opening method used on the AT-AR250E takes a quite
different approach. It is able to handle these port-number embedding
applications without having to know the details of the format of the packets
used in the application. It achieves this in the following way:
The user configures the router with a list of primary port numbers for the
applications that they want the router to handle. The ʹprimary port numberʹ
refers to the TCP/UDP port number to which the primary (starting) session of
the application is established.
Every time the router detects that an outgoing session has been established to
one of these primary port numbers, it creates an entry in a table of currently
open primary sessions. The table entry contains the IP addresses of the
devices at each end of the session.
Subsequently, if an incoming session-establishment packet arrives at the
router, the source and destination addresses of the packet are compared
against the entries in the table of currently open primary sessions.
If there are no matches, the packet is discarded. If there are one or more
matches, then the router carries out a port-probing process.
In the port-probing process, the router runs through the list of matching
sessions. For each session, it sends a packet to the private IP address in the
table entry. The destination port number in this packet is the destination port
number in the incoming packet.
For the case of TCP, the packet is a TCP SYN packet. For the case of UDP, the
packet is just a small UDP packet.
Depending on the response that the router gets back from the probe packet, it
can work out whether the local host was expecting to receive an incoming
session to that port number.
If the port probing process does find a local host that was expecting the
incoming session, then the session is established. If a local host is not found,
then the packet is discarded.
AT-AR250E ADSL Router Web Interface Manual
59
This mechanism enables the router to allow in only those incoming secondary
sessions that should be allowed in, and can reject malicious attempts to
establish incoming sessions.
Although FTP is given as an example of a protocol that requires dynamic port
opening, because FTP is such a very common application, the dynamic port opening
for FTP is enabled in the software by default, and does not have to be configured by
the user.
Specific features
Non-Activity Timeout
The dynamic port opening process opens secondary ports, as described
above. Typically, it will detect when a session using a secondary ports is
being closed (i.e. an exchange of FIN, FIN/ACK packets) and stop passing
packets for that session.
However, UDP sessions do not have a specific close-down process. Also, TCP
sessions might be terminated without a proper close-down (for example, the
host at one end of the session might be simply turned off). So, there needs to
be a criterion for deciding when to remove a session in these cases. The
method that the router uses is for the user to configure an inactivity time. If
there has been no activity (no exchange of packets) on the secondary session
for the specified period of time, the session is closed (ie the router will no
longer forward any packets for that session).
Session Chaining
There are some applications (Netmeeting is the most well-known of these) in
which the secondary sessions may, themselves, spawn their own secondary
sessions. This process is known as session chaining. If a dynamic port
opening definition is being configured for such an application, then the user
needs to configure this definition to have session chaining on.
In this case, when secondary sessions are successfully established, the
source/destination addresses of the session will also be added to the table of
currently open primary sessions.
Binary address replacement
Some of the port-number embedding applications also embed IP addresses in
packets. When NAT has been enabled, these embedded IP address will
typically require translation (between Global IP address and appropriate local
IP address). So, for these applications, the dynamic port opening definition
needs to be configured with Binary address replacement on.
The binary address replacement process operates by searching right through
each packet in the session for the address that is to be replaced. This will
60
Chapter 6 – Security
either be the global address or the local address, depending on which
direction the packet is going. Every time the address is found, it is replaced
with the corresponding address. So, this process does not require code that
specifically understands the format of the packets. It simply searches for any
occurrence of the address it is interested in.
The parameters that can be set when configuring a dynamic port opening
entry on the AR250E are:
Protocol: TCP or UDP
Port Range: this defines a range of UDP or TCP destination port
numbers. Sessions to these port numbers will be treated as primary
sessions – ie sessions that will be put into the table that is examined
when deciding whether to allow in a new session.
Allow Multiple Hosts: this parameter sets if a secondary session
(data session) with dynamic port opening can be started from different
remote hosts.
Max Activity Interval: this parameter specifies the time range
during which the secondary port (data port) can be inactive before it is
closed. Time is shown in milliseconds. Max value is 4 x 10⁹.
Enable Session Chaining: this parameter enables TCP session
chaining. I.e. secondary sessions opened by the dynamic port opening
process are, in turn, treated as primary sessions.
Enable UDP Session Chaining: this parameter enables UDP
session chaining using a dynamic port opening for data sessions. You
must set Enable Session Chaining before setting this parameter.
Binary Address Replacement: this parameter enables the address
replacement for the incoming packets. This process is only operational if
NAT is enabled. The purpose is to translate addresses that have been
embedded in the payload of packets.
Address Translation Type: this parameter specifies for what type
of packets (TCP packets, UDP packets or both) there will be the address
replacement. You must enable Binary Address Replacement
before setting this parameter.
AT-AR250E ADSL Router Web Interface Manual
61
Configuration example 1 for Dynamic Port Opening
Suppose that a user connected to the LAN interface of the AT-AR250E wants
to receive audio or video via RealPlayer from a remote RealServer (see Figure
38).
Figure 38. Dynamic port opening: connecting to an external RealServer
Using the Web interface this Dynamic Port Opening Service will be created as
follows2:
Clicking on the Dynamic Port Opening Configure button a web page as in
Figure 39 will appear
Figure 39. New Dynamic port opening
Note that we have already established an ADSL connection, we have defined external and internal
interfaces and we have enabled NAT between the interfaces.
2
62
Chapter 6 – Security
1.
After clicking on New Dynamic Port Opening a web page as in Figure 40
will appear:
Figure 40. Dynamic port opening configuration
2.
Insert the following values related to TCP port 554 and click on APPLY:
Protocol: TCP
Port Number Start: 554 (RealPlayer control session port)
Port Number End: 554 (RealPlayer control session port)
Multiple hosts: Enable
Max Activity Interval: 3000 (seconds)
Session Chaining: Enable
UDP Session Chaining: Enable
Address Replacement: Enable
Address Translation Type: none
3.
Insert the following values related to TCP port 7070 and click on APPLY:
Protocol: TCP
Port Number Start: 7070 (RealPlayer control session port)
Port Number End: 7070 (RealPlayer control session port)
Multiple hosts: Enable
Max Activity Interval: 3000 (seconds)
Session Chaining: Enable
UDP Session Chaining: Enable
Address Replacement: Enable
Address Translation Type: none
AT-AR250E ADSL Router Web Interface Manual
Figure 41. Dynamic Port Opening settings for Real Player Applications
63
64
Chapter 6 – Security
Configuration example 2 for Dynamic Port Opening
Suppose that a user connected to the LAN interface of the AT-AR250E wants
to establish a Netmeeting session with a remote host (see Figure 42)
Figure 42. Dynamic port opening: establishing a Netmeeting session
Using the Web interface this Dynamic Port Opening Service will be created as
follows3:
The first two steps are the same of the previous configuration example.
1.
To define the Dynamic Port Opening insert the following values and click
on APPLY (see Figure 43):
Protocol: TCP
Port Number Start: 1720 (H.323 control session port)
Port Number End: 1720 (H.323 control session port)
Multiple hosts: Enable
Max Activity Interval: 3000 (seconds)
Session Chaining: Enable
UDP Session Chaining: Disable
Address Replacement: Enable
Address Translation Type: TCP
Figure 43. Dynamic port opening settings for Netmeeting applications
Note that we have already established an ADSL connection, we have defined external and internal
interfaces and we have enabled NAT between the interfaces.
3
AT-AR250E ADSL Router Web Interface Manual
65
Attack Detection and Blocking
Clicking on the Attack Detection and Blocking Configure button,
a web page as in Figure 44 will appear.
The following parameters can be set:
Use Blacklist: this parameter enables the use of a blacklist where the
router blocks a host IP address if it detects an intrusion from that host. All
packets from the host are dropped for ten minutes.
Use Victim Protection: this parameter enables the protection from
spoofing attacks. When a spoofing attack towards an internal host is
detected, the router discards the packets arriving from the attacking host.
Dos Attack Block Duration: this parameter sets the block duration
(in seconds) for access to router from an attacking host that has
performed a DOS attack. Max value is 4 x 10⁹
Scan Attack Block Duration: this parameter sets the block
duration (in seconds) for access to router from an attacking host that has
performed a Scan attack. Max value is 4 x 10⁹
Victim Protection Block Duration: this parameter sets the block
duration (in seconds) for access to router from an attacking host that has
performed a spoofing attack. Max value is 4 x 10⁹
Maximum TCP Open Handshaking Count: this parameter sets the
maximum number of unfinished TCP handshaking sessions per second
allowed before a SYN flood (DOS attack) is detected. Max value is 4 x 10⁹
Maximum Ping Count: this parameter sets the maximum number of
Pings per second allowed before an Echo storm (DOS attack) is detected.
Max value is 4 x 10⁹
Maximum ICMP Count: this parameter sets the maximum number of
ICMP packets per second allowed before an ICMP flood (DOS attack) is
detected. Max value is 4 x 10⁹
66
Chapter 6 – Security
Figure 44. Attack Detection and Blocking web page
NAT
An introduction to NAT can be found in Appendix E.
On the AT-AR250E, NAT policies are created between the internal and
external interfaces.
So, let us look at configuring NAT.
If you click on the Configure NAT button, a web page as in Figure 45 will
appear.
AT-AR250E ADSL Router Web Interface Manual
67
Figure 45. NAT configuration Web Page
Suppose that we want to enable the NAT between the PPP over Ethernet
(external) and LAN (internal) interface. Click on the corresponding
Configure button, and the following web page will appear.
Figure 46. NAT enabling Web Page
68
Chapter 6 – Security
After clicking on Enable NAT to Internal Interface a NAT policy between
these two interfaces is created. So now:
all sessions originating from hosts on the internal LAN destined for the
external interface will have their source address replaced by the IP
address on the external interface.
It will not be possible to initiate incoming sessions from beyond the
external interface to hosts on the LAN.
This is the default behaviour for a NAT policy between an internal and an
external interface. But you may wish to add non-default facilities to this
policy.
The NAT configuration page (see Figure 47) enables you to do so. The items
that this page enables you to configure are:
Global Address Pool: this is a pool of addresses that are associated
with the external interfaces. The addresses can be used as source address
for outgoing sessions and with the right Reserved Mappings, destination
addresses for incoming sessions.
Note: you need to make special arrangements with your service provider
in order to obtain the addresses to be used in a global address pool
Reserved Mapping: this is a mapping to enable incoming sessions to
access hosts on the internal LAN. The mapping configures the router so
that packets arriving from outside to a particular global address will be
forwarded to a particular internal host.
Figure 47. NAT related setting
AT-AR250E ADSL Router Web Interface Manual
69
The best way to illustrate the use of Global address pools and Reserved
Mapping is to look at some configuration examples.
Configuration example 1 for NAT
Suppose that an FTP server is running on a host on the internal side of the
AT-AR250E and you want to permit the access to this server from remote
hosts (see Figure 48).
Figure 48. NAT services: ftp access from external
Using the Web interface this Reserved Mapping Service will be created as
follows4:
1.
Clicking on the Add Reserved Mapping button a web page as in
Figure 49 will appear
Figure 49. Reserved Mapping Configuration
Note that we have already established an ADSL connection, we have defined external and internal
interfaces and we have enabled NAT between the interfaces.
4
70
Chapter 6 – Security
Insert the following values:
Global IP Address: 136.10.2.45 (ADSL interface IP address)
Internal IP Address: 192.168.1.10 (FTP server IP address)
Protocol: TCP
Port Number: 21 (ftp control session port)
Figure 50. Reserved Mapping settings
Clicking on APPLY, the Reserved Mapping will be created.
Now, any TCP packets arriving at the external port with destination IP
address 136.10.2.45 and destination port 21 will be forwarded to the local host
192.168.1.10.
AT-AR250E ADSL Router Web Interface Manual
71
Configuration example 2 for NAT
Suppose that a user connected to the LAN interface of the AT-AR250E has an
FTP server on a local host and a Web server on another local host and he
wants to permit the access from remote hosts (see Figure 51)
Figure 51. NAT services: ftp and http access from external
Using the Web interface this Reserved Mapping Service will be created as
follows5:
The same steps as in the previous configuration example should be followed
using these values:
Global IP Address: 136.10.2.45 (ADSL interface IP address)
Internal IP Address: 192.168.1.10 (FTP server IP address)
Protocol: TCP
Port Number: 21 (ftp control session port)
The FTP server reserved mapping configuration, and
Global IP Address: 136.10.2.45 (ADSL interface IP address)
Internal IP Address: 192.168.1.11 (Web server IP address)
Protocol: TCP
Port Number: 80 (Http session port)
The WEB Server reserve mapping configuration.
Note that we have already established an ADSL connection, we have defined external and internal
interfaces and we have enabled NAT between the interfaces.
5
72
Chapter 6 – Security
Configuration example 3 for NAT
Suppose that a user connected to the LAN interface of the AT-AR250E wants
to connect to a remote Private LAN (i.e Company Intranet) using an IPSEC
tunnel.
Figure 52. NAT services: IPSec connection
To enable the tunnel to operate, IPSEC packets must to able to reach the
IPSEC gateway device, so a reserved mapping for incoming IPSEC packets
must be defined.
Using the Web interface this Reserved Mapping Service will be created as
follows6:
The same steps as in the previous configuration example should be followed
using these values:
Global IP Address: 136.10.2.45 (ADSL interface IP address)
Internal IP Address: 192.168.1.10 (PC host IP address)
Protocol: IPSEC
Port Number: 0 (i.e. a null port number as the protocol is not TCP or
UDP)
Note that we have already established an ADSL connection, we have defined external and internal
interfaces and we have enabled NAT between the interfaces.
6
AT-AR250E ADSL Router Web Interface Manual
73
Configuration example 4 for NAT
Suppose that a user connected to the LAN interface of the AT-AR250E has
two FTP servers on two different local hosts and two public IP addresses
(provided by its ADSL service provider).
Suppose that he wants to permit the access to both the FTP servers from
remote hosts using both public addresses (see Figure 53)
Figure 53. NAT services: using two public IP adresses
First a Global address pool will need to be created, containing the address
136.10.2.45 – 136.10.2.46:
1.
Click on Add Global Address Pool, insert the following values
and click on APPLY (see Figure 54):
Start IP Address: 136.10.2.45 (first public IP address)
End IP Address: 136.10.2.46 (second public IP address)
Interface Type: internal
74
Chapter 6 – Security
Figure 54. Global Address Pool settings
Add a reserved mapping following the steps described in the Configuration
example 3 using the following values:
Global IP Address: 136.10.2.45 (ADSL interface IP address)
Internal IP Address: 192.168.1.10 (FTP server IP address)
Protocol: TCP
Port Number: 21 (ftp control session port)
The same steps have to be followed for configuring the second FTP server
using the following values:
Global IP Address: 136.10.2.46 (ADSL interface IP address)
Internal IP Address: 192.168.1.11 (FTP server IP address)
Protocol: TCP
Port Number: 21 (ftp control session port)
AT-AR250E ADSL Router Web Interface Manual
75
Interactions of NAT and other security features.
Firewall filters and reserved mappings.
So far, the NAT reserved mappings have been considered independently of
the firewall. If the firewall is not enabled, then all that is required to enable
NAT to allow in TCP sessions to a certain port number is to create a reserved
mapping for that particular TCP port number.
However, if the firewall is enabled, we have a matter of precedence to
consider. If:
a reserved mapping has been created for a particular TCP port
the firewall is not configured to allow in TCP data for that port
then which will take precedence? Will NAT’s desire to allow the data in be
overruled by the firewall’s desire to keep it out?
The answer is that the blocking by the firewall will take precedence.
So, when the firewall has been enabled, then care must be taken to ensure that
when NAT reserved mapping are created, the firewall is also configured to
allow in the traffic for which the reserve mapping is defined.
NAT and Dynamic Port Opening
The description of Dynamic Port Opening discussed that feature in the
context of the firewall – i.e. the Dynamic Port Opening feature was presented
as being required to allow secondary sessions in through the firewall.
It should be noted that, by default, incoming sessions are not allowed through
by NAT either. So, if NAT is enabled, even if the firewall is not enabled, then
if you wish to be able to access services that involve incoming secondary
sessions, then you will need to create Dynamic Port Opening definitions for
those services.
So, for example, if you have NAT enabled on the router, and wish for users
on the LAN to be able to successfully access external RealServers, it will be
necessary to create a dynamic port opening definition as shown in
Configuration Example 1 for Dynamic Port Opening.
76
AT-AR250E
ADSL Router Web Interface Manual
Chapter 7
SNMP
Introduction
Simple Network Management Protocol (SNMP)
The AT-AR250E device can be monitored/configured using the SNMP
protocol.
The Simple Network Management Protocol (SNMP) is the network
management protocol of choice for the Internet and IP-based internetworks.
The SNMP protocol provides a mechanism for management entities, or
stations, to extract information from the Management Information Base (MIB)
of a managed device.
The standard way of accessing information contained in a MIB file is to use a
Network Management Station (NMS), typically a PC or workstation, to send
commands to the managed device using the SNMP protocol.
SNMP can use a number of different protocols as its underlying transport
mechanism, but the most common transport protocol is UDP.
SNMP trap messages are sent to UDP port 162; all other SNMP messages are sent to
UDP port 161.
Communities and Views
A community is a relationship between an NMS and an agent. The
community name is used like a password for a trivial authentication scheme.
An SNMP MIB view is an arbitrary subset of objects in the MIB. Objects in the
view may be from any part of the object name space, and not necessarily the
same sub-tree.
An SNMP community profile is the pairing of an SNMP access mode (readonly or read-write) with the access mode defined by the MIB for each object
in the view. A pairing of an SNMP community and an SNMP community
profile determines the level of access that the agent affords to an NMS that is
a member of the specified community. When an agent receives an SNMP
AT-AR250E ADSL Router Web Interface Manual
77
message it checks the community name encoded in the message. If the agent
knows the community name, the message is deemed to be an authentic
SNMP message and the sending SNMP entity is accepted as a member of the
community.
The community profile associated with the community name then determines
the sender’s view of the MIB and the operations that can be performed on
objects in the view.
AT-AR250E Console
The AT-AR250E console is used for configuring the SNMP module.
A TELNET session has to be established to access the AT-AR250E console.
To start a TELNET session, do one of the following:
From your Windows PC open a DOS shell and type the following
command: telnet x.y.z.u where x.y.z.u is the AT-AR250E
LAN/WAN IP address and press [Enter]; after a while the AT-AR250E
login prompt appears.
From your Linux PC open a BASH shell and type the following
command: telnet x.y.z.u where x.y.z.u is the AT-AR250E
LAN/WAN IP address and press [Enter]; after a while the AT-AR250E
login prompt appears.
Login into the AT-AR250E using an Administrator account, for example the factory
default has a manager account with an initial password friend.
Enter your login name at the login prompt (Figure 55).
login: manager
Enter the password at the password prompt:
password: friend
78
Chapter 7 – SNMP
Figure 55. AT-AR250E console login
The SNMP related commands are a subset of the AT-AR250E console; to have
access to these settings first of all enter the following command and press
[enter] twice (see Figure 56):
console enable
Figure 56. AT-AR250E console
AT-AR250E ADSL Router Web Interface Manual
79
The prompt will change indicating the LAN interface IP address (e.g.
192.168.2.1); now enter the following command in order to access to the
SNMP module and press [enter] (see Figure 57):
192.168.2.1> snmp
Figure 57. AT-AR250E console – SNMP module
How to close the console
To close a session enter the following commands (see Figure 58):
home + [enter]
(for moving from the SNMP console section to the main console section)
exit + [enter] + [enter]
(for moving from the console section to the home section)
user logout + [enter]
(to close the telnet session)
80
Chapter 7 – SNMP
Figure 58. How to close the console
HELP on SNMP console commands
An online help is provided for all the SNMP provided commands that are:
access
config
trap
To have access to the Online help (see Figure 59) simply type help followed
by the command name (e.g. help config)
Figure 59. SNMP commands online help
81
AT-AR250E ADSL Router Web Interface Manual
Command Reference
SNMP ACCESS
Syntax
snmp access [read | write]
<community> [<IP addr>]
snmp access delete <community> [<IP
addr>]
snmp access flush
snmp access list
Description
These commands are used for the following scopes:
To allow read-only or read-write access for some <IP addr>
based on the community string value
To revoke specified address
To revoke all access
To list all the allowed access
Defaults
By default the SNMP is provided for read and write with the following
accesses:
snmp read public
snmp write friend
Examples
To allow the snmp read access for IP address 151.30.21.22 using “testsnmp”
as community string:
snmp access read testsnmp
151.30.21.22
To change from the default value (that is “friend”) to the new value “test”
the SNMP write community string:
snmp access delete friend
snmp access write test
82
Chapter 7 – SNMP
SNMP CONFIG
Syntax
Description
SNMP CONFIG SAVE
This command saves the SNMP configuration into the flash.
SNMP TRAP
Syntax
snmp trap add <community> <IP addr>
[<port>]
snmp trap delete <community> <IP
addr> [<port>]
snmp trap flush
snmp trap list
Description
These commands are used for the following scopes:
To add a trap destination using an IP addr and port
To delete a trap destination
To delete all trap destinations
To list trap destinations
Examples
To add the 151.30.21.22 as destination for trap using “testsnmp”
as community name:
snmp trap add snmptest 151.30.21.22
SNMP VERSION
Syntax
Description
SNMP VERSION
This command shows that software varsion of the SNMP module.
This is not related to the SNMP version supported that is v.1
83
Appendix
APPENDIX A
ATM
ATM is a standard that supports the integration of voice, data, & video, and
allows for the guarantee of service quality from end-to-end.
The following describes the reasons why ATM has become a popular service,
and goes on to describe some of the details of the operation of ATM.
Factors underlying the design of ATM
Traditionally there have been quite separate networks for different types of
traffic. Telephone companies had their synchronous networks for carrying
phone calls (ie ‘voice traffic’). Wide-area data traffic was carried over Frame
Relay, X.25 and PPP networks. Local-area traffic was carried on an Ethernet
or token-ring network.
All these different network types have developed to be well suited to the sort
of traffic that they most frequently carry.
For example, voice traffic is very intolerant to delays and changes in timing.
So when many voice calls are combined (multiplexed) onto a single line, the
method used is “Time-Divided Multiplexing” (TDM). I.e. the transmission
medium is logically divided into a series of time slots, and each call is
allocated a slot. Therefore, each call is guaranteed to be able to send a specific
amount of data every second – i.e. a constant fixed end-to-end bandwidth.
A frame-relay network, on the other hand, multiplexes different data streams
in a packet-switched manner – individual packets from different streams are
interleaved onto a single transmission line. If the transmission line becomes
over-subscribed, then packets have to be dropped. The decision of which
packets to drop is made on the basis of the different service agreements that
have been made with different customers (ie what Quality of Service the
customers have bought). So, there is not a constant end-to-end bandwidth,
but the more money you pay, the more likely you are to get your data
through at peak times. Given that wide-area bandwidth is typically
expensive, a significant premium is usually charged for a high Quality of
Service. So, the majority of customers have to simply accept the fact that file
transfers, etc will take longer at peak times.
84
Appendix
An Ethernet is treated as a network of peers – every workstation has equal
access to the line. At peak times, itʹs just first-in-first-served. Also, Ethernet is
an asynchronous medium – a workstation can start transmitting data at any
moment it chooses; it does not need to wait for a particular clock signal.
LAN/WAN/Voice integration
The Internet is the first multimedia source to the desktop and this
immediately breaks all the pre-existing rules. Internet applications such as
voice and real-time video require better, more predictable LAN and WAN
performance. I.e. for successful transmission of voice and data, LANs and
WANs need to be able to provide a service more closely akin to the fixed,
constant end-to-end bandwidth of a telephone network.
So, a need arose for a transport mechanism that could achieve the reliable
transmission required by voice and video, but also made optimum use of
available bandwidth.
Cell multiplexing
ATM was designed as the transport mechanism to satisfy these conflicting
requirements. One of the key elements in ATM is the concept of the data cell.
A stream of bits is broken up into discrete packets or cells, each of which has
a header indicating its path and other worthwhile information. If the cell size
is made small, and the overall throughput of the circuit is high, delaysensitive traffic can be carried along with bursty types of data successfully,
and everyone gets what they need from the data link. Voice and video work
without glitches, and data customers (potentially) get bandwidth-on-demand.
Cells are multiplexed onto a line – each of the competing data streams gets
turns at putting cells onto the line. The decision as to who gets the next turn is
governed by the Quality-of-Service rules that have been configured on the
multiplexing switch.
So, “Cell multiplexing” provides a compromise between:
the time-divided multiplexing of voice networks, which does not make
optimum use of the available bandwidth, as it simply leaves time-slices
empty if there are periods of silence on the call
the packet switching of frame relay or X.25, which introduces delays if a
small packet gets caught behind some large packets.
Each ATM cell consists of 53 bytes. The first 5 bytes contain cell header
information, and the remaining 48 contain the “payload” or user information.
AT-AR250E ADSL Router Web Interface Manual
85
Other significant features of ATM
Traffic engineering features
ATM offers improved performance through an ability to offer performance
guarantees and robust WAN traffic management that support the following
capabilities:
Large buffers that guarantee Quality of Service (QoS) for bursty data
traffic and demanding multimedia applications
Per-Virtual Circuit (VC) queuing and rate scheduling
Feedback congestion notification
Encapsulation of protocols
Standards have been developed to enable ATM to encapsulate all manner of
protocols – layer2 and layer3. So, IP can be directly encapsulated in ATM, or
IP can be sent encapsulated in Ethernet, which, in turn is encapsulated in
ATM.
This provides a flexibility in network design – Ethernets can be transparently
bridged across an ATM network, or data can be routed, depending on what
best suits the application that is being used.
Scalability
ATM was designed in such a way that it could be, and in fact has been,
adapted to a variety of different physical media and data rates. At the
physical layer, ATM supports multimode optical fibre, single mode fibre,
STP, coaxial cable, and UTP, at throughputs as high as 10Gbits/sec.
ATM traffic can readily fit into SONET or SDH (Synchronous Digital
Hierarchy, the international superset of SONET standards) data streams - the
155Mbits/sec single - and multimode fibre physical layer standards are based
on SONET frames. A 45Mbits/sec standard for the DS3 interface, which uses
coaxial cable, has also been defined. DS3 facilities are much more widely
installed in North America than SONET facilities. At 100Mbits/sec, ATM can
use the physical standards defined for FDDI.
An ATM network is also scalable in terms of the number of network nodes.
I.e. the performance of the network does not significantly decrease as the
number of nodes and circuits in the network increases, because the cells are
rapidly switched, using the information contained in the cell header.
Basic Structure of ATM Network
ATM is based on the concept of two end-point devices communicating by
means of intermediate switches. An ATM network is made up of a series of
switches and end-point devices. The end-point devices can be ATM-attached
end stations, ATM-attached servers, or ATM-attached routers.
86
Appendix
There are two types of interfaces in an ATM network:
User to Network Interface (UNI)
Network to Network Interface (NNI)
The UNI connection is made up of an end-point device and a private or
public ATM switch. The NNI is the connection between two ATM switches.
The UNI and NNI can be carried by different physical connections.
The connection-oriented nature of ATM is an important reliability and quality
feature. As a packet enters the ATM network, the packet destination is
signalled and the network negotiates the reachability and quality of packet
delivery. This packet “contract” guarantees the originator of reaching its
intended destination with the required quality of service. If the network is
unable to meet the demand or contract, the packet will not enter the network
and a rejection message will be sent back, allowing the originator to pursue
alternative paths.
Because ATM is connection-oriented, a connection must be established between two
end points before any data transfer can occur. This connection is accomplished
through a signalling protocol. The connection is referred to as a virtual channel, and
is assigned a Virtual Channel Identifier (VCI) when it has been established.
ATM Services
Three types of ATM services exist: Permanent Virtual Circuits (PVC),
Switched Virtual Circuits (SVC), and connectionless service. PVCs allow
direct connectivity between sites. In this way, a PVC is very similar to a
leased line.
Among its advantages, a PVC guarantees the availability of a connection and
does not require call setup procedures between switches.
Disadvantages of PVCs include static connectivity and manual setup.
An SVC is created and released dynamically and remains in use only as long
as data is being transferred. In this sense, it is similar to a telephone call.
Dynamic call control requires a signalling protocol between the ATM
endpoint and the ATM switch.
The advantages of SVCs include connection flexibility and call setup that can
be handled automatically by a networking device (and does not need to be
manually configured).
Disadvantages include the extra time and overhead required to set up the
connection.
AT-AR250E ADSL Router Web Interface Manual
87
ATM Virtual Connections
ATM networks are fundamentally connection oriented, which means that a
virtual channel (VC) must be set up across the ATM network prior to any
data transfer. (A virtual channel is roughly equivalent to a virtual circuit.)
Two types of ATM connections exist: virtual paths, which are identified by
virtual path identifiers (VPI), and virtual channels, which are identified by the
combination of a VPI and a virtual channel identifier (VCI). This is usually
written VPI/VCI.
Figure 60. The relationship between Virtual Circuits and Virtual Paths
Routing is performed using a two layer hierarchical scheme. The higher layer
involves virtual paths and switching according to the VPI only. A particular
virtual path may carry a number of different virtual channels corresponding
to individual connections. When switching is performed according to the VPI
all cells on that particular virtual path are switched regardless of VCI. An
ATM switch may route according to VCI, VPI or VCI and VPI.
An example of how this routing scheme may be useful is setting up a virtual
path across a public ATM network between two sites. All cells from one site
to the other will follow the same virtual path. Within each site routing will be
performed according to the VCI.
ATM and Quality of Service
ATM Networks are designed to transmit data with varying characteristics.
Different applications need various Qualities of Service (QoS). Some
applications like telephony may be very sensitive to delay, but rather
insensitive to loss, whereas others like compressed video are quite sensitive to
loss.
88
Appendix
Using the Web interface it is possible to define the following different
connection types, each of which is characterized by a different expected
Quality of Service (QoS):
UBR (Unspecified Bit Rate)
CBR (Constant Bit Rate)
VBRrt (real-time Variable Bit Rate)
VBRnrt (non-real-time Variable Bit Rate)
ABR (Available Bit Rate)
Let us look at the characteristics of these connection types.
UBR (unspecified bit rate)
The UBR service class is intended for delay-tolerant or non-real-time
applications, i.e., those which do not require tightly constrained delay and
delay variation, such as traditional computer communications applications.
Sources are expected to transmit non-continuous bursts of cells.
UBR service supports a high degree of statistical multiplexing among sources.
UBR service includes no notion of a per-VC allocated bandwidth resource.
Transport of cells in UBR service is not necessarily guaranteed by
mechanisms operating at the cell level. However it is expected that resources
will be provisioned for UBR service in such a way as to make it usable for
some set of applications. UBR service may be described by interpretation of
the common term ʺbest effort service ʺ. The user does not have to provide
some characterization of the source.
CBR (constant bit rate)
The CBR service class is intended for real-time applications, i.e. those
requiring tightly constrained delay and delay variation (jitter), as would be
appropriate for voice and video applications. The consistent availability of a
fixed quantity of bandwidth is considered appropriate for CBR service. Cells
which are delayed beyond the value specified by CTD (cell transfer delay) are
assumed to be of significantly less value to the application.
During a connection setup CBR connection reserves a constant amount of
bandwidth. The source is allowed to send at the negotiated rate any time and
for any duration. It may temporarily send at a lower rate as well.
Real time VBR
The real time VBR service class is intended for real-time applications, i.e.,
those requiring tightly constrained delay and delay variation, as would be
appropriate for voice and video applications. Sources are expected to transmit
at a rate which varies with time. Real-time VBR service may support
AT-AR250E ADSL Router Web Interface Manual
89
statistical multiplexing of real-time sources, or may provide a consistently
guaranteed QoS.
An rt-VBR connection negotiates the Peak Cell Rate (PCR), the Sustainable
Cell Rate (SCR) and the Maximum Burst Size (MBS) and an upper bound
delay (Max CTD).
Non-real time VBR
The non-real time VBR service class is intended for non-real time applications
(file transfer, etc.). Non-real time VBR service supports statistical multiplexing
of connections.
The connection nrt-VBR are characterized from a value of peak (PCR), one
relative to medium band (SCR) and from another one of the maximum
dimension of acceptable Burst (MBS). The difference from the rt-VBR
connection is that for the nrt-VBR connection, a Max CTD is not required.
ABR (available bit rate) and QFC
Many applications have the ability to reduce their information transfer rate if
the network requires them to do so. Likewise, they may wish to increase their
information transfer rate if there is extra bandwidth available within the
network. There may not be deterministic parameters because the users are
willing to live with unreserved bandwidth. The ABR service is designed to fill
this need. Is very like the UBR service, except that it provides some feedback
to the sending device. The network provides information about the available
bandwidth and the state of congestion. The sourceʹs transmission rate is
adjusted in function of this feedback information. This more efficient use of
bandwidth alleviates congestion and cell loss. For ABR service, a guaranteed
minimum bandwidth (MCR) is negotiated during the connection setup
negotiations.
Traffic Parameters
The above descriptions of the connection types mention a number of
parameters that have to be negotiated for various of the connections. These
are collectively referred to as the Traffic Parameters. Let us look in more
detail at how these parameters are implemented on the AT-AR250E.
Peak Cell Rate (PCR)
The parameter PCR of a virtual ATM connection represents the maximum
speed at which it is possible to send traffic on the connection.
This parameter has the same limits for all traffic classes.
Maximum: the value of PortSpeed (i.e. the maximum rate in cells per
second of the port).
90
Appendix
Minimum: this is configurable. By default the minimum is
PortSpeed/1000 per second. So this is about 2cps (cells per second) for an
ADSL rate port. (The range of values on the AT-AR250 is: [3,2500])
Minimum Cell Rate (MCR)
None of the traffic classes available on the AT-AR250E implement MCR.
There is a channel attribute, but this is just a place-holder: setting it has no
effect.
Sustainable Cell Rate (SCR)
This is ignored unless the traffic class is VBR. For VBR, the SCR limits are the
same as the PCR limits (see above). But SCR must be set less than PCR (this is
enforced by the parameter checking code).
(The range of values on the AT-AR250 is: [2,2499])
Maximum Burst Size (MBS) and Burst Tolerance (BT)
These only affect VBR classes.
The two are not independent variables. The burst tolerance is a time (as per
the traffic management spec.), the units being in cell times at the port speed.
So the two are related by:
BT =
MBS * PortSpeed MBS * PortSpeed
−
SCR
PCR
The basic limits are:
the MBS cannot exceed 5000
the BT is stored internally by the shaping code as a 16-bit value in
microseconds, so the maximum burst time in practice is about 0.065s.
So the practical maximum burst size at 2000cps is about 130 cells. The
minimum is zero.
The values of both BT and MBS will reflect whichever of the two was last set.
(The range of AT-AR250 is: [0,5000])
91
Appendix
APPENDIX B
RFC1483 Bridged/Routed
RFC1483 defines the encapsulations used for multiplexing multiple protocols
over ATM. The RFC1483 Bridged/Routed connections both use the
encapsulations defined in that RFC to send the data across the ADSL line.
The difference between a bridged connection and a routed connection lies in
the way that the packets are encapsulated. In a bridged connection, the entire
Ethernet packet that arrives from the LAN is encapsulated and sent over the
wide-area link. On the other hand, in a routed connection, the IP data is first
extracted out of the Ethernet packet. It is only the IP data that is then
encapsulated in the ATM.
Data processing sequence
In an RFC1483 connection the user data coming from the PC enters the
AT-AR250E LAN Port. The Ethernet packet (in the case of a bridged
connection) or IP packet (in the case of a routed connection) can be then
encapsulated into a Logical Link Control/Subnetwork Access Protocol
(LLC/SNAP) header, or not (VCMUX) which in turn is encapsulated in ATM
adaptation layer 5 (AAL5) and handed over to the ATM layer.
Figure 61 shows the data path when an LLC/SNAP header is used.
The ATM cells are then modulated by the ADSL transmission technology,
and sent over the wire to the DSLAM. At the DSLAM, these modulated
signals are first received by the POTS splitter, which is used to differentiate
phone calls from data.
After it identifies the signals as belonging to a data connection, it passes them
to the ADSL Transmission Unit Central Office (ATU-C) in the DSLAM.
The ATU-C demodulates the signal and retrieves the ATM cells, which are
then passed to the network interface card (NIC) in the multiplexing device
(MUX). The NIC looks at the subscriber side VPI/VCI information in the ATM
header and makes the switching decision to another VPI/VCI which will be
forwarded to the service destination router.
92
Appendix
Figure 61. Data path in an RFC1483 Bridged/Routed Connection
AT-AR250E ADSL Router Web Interface Manual
93
APPENDIX C
IP Over ATM
In Appendix B, there is a description of the RFC1483 routed connection, in
which an IP packet is encapsulated in ATM and send over the line.
Here we will describe the more elaborate IPoA service, in which an ATM
network acts as a multi-drop IP network, and the ARP protocol can be used to
find the network node that has a particular IP address.
The inherent complexity in defining an IP
network over ATM
The success of Asynchronous Transfer Mode (ATM) lies largely in its ability
to transport legacy data traffic, mostly IP, over its network infrastructure. The
complexity of interoperating IP with ATM originates from following two
major differences between them.
Connection-oriented vs. Connectionless
ATM is connection-oriented, that is, a connection needs to be established
between two parties before they can send data to each other. Once the
connection is set up, all data between them is sent along the connection path.
On the contrary, IP is connectionless so that no connection is needed and each
IP packet is forwarded by routers independently, on a hop-by-hop basis.
When we need to transport IP traffic over an ATM network, we have two
options.
1.
2.
A new connection is established on demand between two parties;
The data is forwarded through preconfigured connection or connections.
With the first approach, when the amount of data to be transferred is small,
the expensive cost of setting up and tearing down a connection is not
justified. On the other hand, with the second approach the preconfigured
path(s) may not be an optimal path and may become overwhelmed by the
amount of data being transferred.
94
Appendix
QoS-aware vs. Best Effort
Quality of Service is an important concept in ATM networks. It includes the
parameters like the bandwidth and delay requirements of a connection. Such
requirements are included in the signalling messages used to establish a
connection.
Current IP (IPv4) has no such concepts and each packet is forwarded on a
best effort basis by the routers. To take advantage of the QoS guarantees of
the ATM networks, the IP protocol needs to be modified to include that
information.
How IPoA operates
IP over ATM treats the ATM network as a number of separate IP subnets
connected through routers. Such an IP subnet is called a logical subnet (LIS)
as shown in Figure 62.
Figure 62. IP over ATM architecture
A LIS has the following properties
End systems in an LIS share the same IP prefix and address mask. In this
way LIS is quite similar to a traditional IP subnetwork over a broadcast
LAN. However, traditional IP subnetworks are separated from each
other by routers while LISs are actually connected to the same ATM
network. This explains why it is called logical subnet: the membership of
an LIS is defined by software configuration, not by hardware settings.
AT-AR250E ADSL Router Web Interface Manual
95
Also this implies that inter-LIS communication need not necessarily go
through a router.
End systems in an LIS communicate with each other through end-to-end
ATM connections. When an end system A needs to communicate with
an end system B, which is in the same LIS, it needs to establish a
connection with B first. A has B ʹs IP address but does not know its ATM
address. To resolve the IP addresses into ATM addresses, as in
traditional IP subnets, each LIS contains an ARP server, called an
ATMARP server. A sends a ARP query packet that contains B ʹs IP
address to the ATMARP server and the server will reply to it with B ʹs
ATM address. A then establishes a connection with B through P-NNI
signaling.
Routing between LISs
End systems in different LISs communicate with each other through a router.
As in traditional IP subnets, a router is a member of multiple LISs and
forwards IP traffic between them. Typically, each LIS contains a router and all
IP packets that are not destined for an end system in the same LIS are
forwarded to the router. If the router is in the same LIS as the destination end
system, it forwards the packet to the destination end system using the scheme
described above (intra-LIS). Otherwise it forwards the packet to another
router and the packet is routed to the destination on a hop-by-hop basis.
Traffic across LIS boundaries must be forwarded by a router which is a
member of both LISs even though it might be physically possible to establish
a direct VC connection between the source and destination (i.e. they have a
physical connection at the ATM level).
This is not desired since each router has to reassemble and disassemble the IP
packet and this introduces unnecessary delay. This is universally
acknowledged as one of the weaknesses of the IPoA model.
96
Appendix
APPENDIX D
Point to Point Protocol
The arrival of low cost broadband technologies in general and DSL (Digital
Subscriber Line) in particular has greatly increased the number of computer
hosts that are permanently connected to the Internet. This has increased
concerns on the part of DSL service providers about security. Computers
connected to the Internet via DSL do so through an Ethernet link. As such,
plain TCP/IP has been used, with no additional protocols. Modem dial-up
connection, on the other hand, use PPP (Point to Point Protocol) which
provides secure login, and traffic metering among other advanced features.
PPPoE (PPP over Ethernet) was designed to bring the security and metering
benefits of PPP to Ethernet connections such as DSL.
PPP is an acronym for Point to Point Protocol. It is a member of the TCP/IP
suite of network protocols.
PPP is an extension to TCP/IP that adds two additional sets of functionality: it
can transmit TCP/IP packets over a serial link and it has login security TCP/IP
by itself cannot be transmitted over a serial link. This makes it unsuitable for
WANs (Wide Area Networks).
Telecommunications companies however offer serial communications links
around the globe right now and have done so for many years. To make
TCP/IP work over these serial links, it was necessary to create a protocol that
could transmit TCP/IP packets over serial lines. The two protocols that do this
are:
SLIP (Serial Line Internet Protocol)
PPP
PPP is more feature rich and has largely supplanted SLIP.
When serial links that are part of the public telephone system are used, care
must be taken to ensure the authenticity of all communications. To this end
PPP incorporates user name and password security. Thus, a router or server
receiving a request via PPP where the origin of the request is not secure,
would require authentication. This authentication is part of PPP. Because of
its ability to route TCP/IP packets over serial links and its authentication
AT-AR250E ADSL Router Web Interface Manual
97
capabilities, PPP is generally used by Internet Service Providers (ISPs) to
allow dial-up users to connect to the Internet.
Figure 63. PPP is used by Internet Service Providers (ISPs) to allow dial-up
users to connect to the Internet.
PPP over ATM
With ATM over ADSL, the residential and small business office customers
have access to broadband Internet environments. ATM over ADSL provides
seamless connections from remote users to any ATM distribution network, to
any ATM backbone, to any corporate intranets, or to the Internet. In addition,
ATM provides direct connection to Internet/intranet servers, such as a
security server, an Internet content caching server, or a video server. This
enhances Internet services, in terms of performance, load sharing, and
redundancy.
Furthermore, the use of ATM as the layer 2 protocol over the ADSL access
network offers some distinct advantages.
Protocol transparency: The network is independent of the layer 3 protocol
(IP, IPX, etc.) used. In some countries, protocol transparency is also
required by regulatory constraints.
Support of multiple QoS classes and capability to guarantee levels of QoS:
ATM delivers the capability for the network operator to differentiate the
network services based on QoS classes mapped to user profiles or
applications.
The fine-grained bandwidth scalability of ATM: The scalability of ATM
matches the rate adaptiveness of ADSL, hence allowing optimal use of
each copper loop.
Evolution to different xDSL members: Using ATM with ADSL is an
opportunity to pave the way for evolving access technologies, such as
VDSL.
Once ATM layer connectivity is established between the customer premise
and the service provider network, the session setup and release phases at the
98
Appendix
link level and network level can be established using PPP. The definition of a
standard for PPP over ATM will increase the utility of ATM as an access
technology.
Essential operational functions can be delivered over ATM using features
well established in PPP:
Authentication (PAP, CHAP, token-based systems)
Layer 3 address autoconfiguration (e.g., domain name autoconfiguration,
IP address assignment by the destination network)
Multiple concurrent destinations (i.e., multiple PPP sessions)
Layer 3 transparency (e.g. both IP and IPX are currently supported on
PPP)
Encryption
Compression
Billing, usage metering, and interaction with RADIUS servers
Adapting the PPP suite to ADSL can happen with little or no extra effort and
will accelerate delivery of interoperable service architecture. PPP over ATM is
even more valuable because it adheres to the narrowband service model
currently driving the ISP business.
AT-AR250E ADSL Router Web Interface Manual
99
APPENDIX E
Network Address Translation
NAT stands for Network Address Translation. In short, it is a mechanism by
which the IP addresses of packets are changed as they go through a routing
device. The reason for doing such a translation is to enable a device to appear
to have one address to hosts on one side of the NATing router, and another
address to hosts on the other side of the NATing router.
At first glance, it might seem a very strange thing to want to change the
addresses inside IP packets. However, there are some useful applications for
this, briefly explained in the following.
Address conservation
The most common application of NAT is to make better use of the
increasingly scant resource that is the public IP address. As the number of
people connecting to the Internet has exploded, it has reached the stage where
there are just not enough IP addresses available to give an individual address
to every Internet-connected device. So, a prime purpose of NAT is to enable a
whole network to access the Internet using just a single public IP address (see
Figure 64).
Figure 64. Address Conservation using NAT
100
Appendix
Security
The security provided by NAT is really a by-product of the address
conservation purpose. The fact is that NAT aims to translate the source
addresses of packets originating from within the local private network; when
reply packets come back from the Internet, they can be passed back to the
hosts on the Private network as the NAT process keeps an internal table that
enables it to know which replies are actually destined to which private hosts.
So, if a packet comes from the Internet that is not a reply to a packet sent from
the inside, then that NAT process does not know who to forward it to, and
has to drop it.
So, this makes it very difficult for devices on the Internet to initiate incoming
sessions to hosts on the private network; when the packet that is trying to
initiate the session arrives at the NAT device, it gets dropped.
In addition, because the NAT process has to process all the packets passing
through it, in order to pass them to the right internal host, it is quite easy to
build in an ability to look for attacks – SYN floods, Pings of Death, IP
Spoofing etc are quite easy to recognize as packets are being examined on the
way through the NAT device.
How does NAT work?
The trick to NAT is to make use of the Port fields in TCP and UDP.
In TCP and UDP packets, there are 4 fields that identify a particular session:
The particular value of the source port number in a session is not important,
so the NAT device is free to change the source port numbers in packets. This
freedom to change the source port number is the central key to NAT. This
enables it to make sure that every TCP or UDP session that it sends out to the
Internet has a UNIQUE source port number.
Consider the problem that would occur if the NAT device was not free to
change the source port number; only the source address:
If two hosts on the private LAN happened to create sessions using the same
source port number, and same destination address and same destination port
number, then the only thing that would be different between the packets in
one session and those in the other session would be the source IP addresses.
However, once the NAT device had changed the source IP addresses to the
global IP address, there would be nothing to differentiate the packets. The
host at the other end of the connection would think that all the packets were
from the same session, which would cause chaos.
AT-AR250E ADSL Router Web Interface Manual
101
So, it is very important that the NAT device is also able to change the source
port number, so that the problem described above will never happen.
Therefore the NAT device can intercept TCP and UDP sessions coming from
Private hosts, change the source addresses AND source port numbers in the
packets, and store away the original IP address and port number in a table,
along with the newly substituted port number (so that the original values can
be restored in the reply packet when it comes).
So, the process that occurs is:
the NAT device receives the packet
changes the source IP address in the packets to the global IP address
looks up in its table for an entry containing the source port number and
original source address of the packet
if it finds an entry, it takes the substitution port number in the table
entry, and changes the source port number of the packet to this
substitution number
if it does not find an entry, it generates a new substitution port number,
and creates a new table entry containing the original source IP address
of the packet, its original source port number, and the newly generated
substitution port number. Changes the source port number of the packet
to this substitution number.
Sends the packet on out the public interface.
the packet goes off to the destination host, which sends a reply, in which
source and destination IP address are swapped, and source and
destination port number are swapped
the reply packet arrives back at the NAT device, which receives it
the destination port number is looked for in the table
if it is found, the packet is recognized as being a reply for an existing
session, and the source IP and source Port number in the table entry are
put into the destination IP address and destination port number fields of
the packet, and the packet is then sent onto the private LAN.
If it is not found, then it is not clear where the packet should be sent, and
so it is dropped.
What about protocols other than UDP and TCP?
The description above involves a lot of use of port numbers. Unfortunately,
the port-number fields are only present in TCP and UDP packets. For other IP
protocols, like ICMP, OSPF, GRE, IPSEC, etc other methods have to be used.
In the case of ICMP, things are a little more complicated. For Ping packets,
there is an identifier field in the packet, that uniquely identifies each ping –
NAT can make use of this field in a similar way to the UDP/TCP port number.
For other ICMP information messages (port unreachable, host unreachable,
102
Appendix
etc) there are often IP addresses of the hosts inside the data section of the
packet - there is extra work required for the NAT device to look inside the
ICMP packet, and translate these addresses as necessary.
For most other IP protocols, though, there usually is not a field in the packet
that can uniquely identify a communication session (and therefore, which
host on the LAN to send the replies to). So, usually, a static mapping
(probably user configured) has to be used – e.g. a mapping like ‘all GRE
packets arriving at the public interface, with a particular destination address,
will be sent to a particular address on the private LAN’.
So, there typically just is not the flexibility with the other protocols that there
is with TCP and UDP.
How can you let sessions into servers on the private
LAN?
Up until now, we have been looking at the situation where a host on the
private LAN initiates a session to some external host. So, the NAT device
intercepts the packets on the way out, and is associating source port numbers
with internal IP addresses.
However, what about the case where an external host wants to connect a host
on the Private LAN? This session will, of course, be initiated by an incoming
packet arriving at the public interface. It has been stated above that in general,
such a packet will have to be dropped – if it is not a reply to an outgoing
packet, there is no information about which internal host to forward it to.
However, you may wish to actually make it possible for incoming sessions to
access certain hosts on the private LAN. This has to be done by configuring
specific static port mappings. For example, a mapping can be configured such
that any TCP session coming into port 80 on the public interface is forwarded
to a particular host on the private LAN; and any TCP session coming into
port 25 on the public interface is forwarded to another (or maybe the same)
host on the private LAN, and so on.
In this way, servers on the private LAN can be made available for connections
from external hosts. Of course, for any given port number, only one mapping
is possible – so it is only possible to make one Web Server, one Mail Server,
one FTP server, etc available.
In the diagram below, we see a case of allowing external access to an FTP
server and a WWW server. This would be achieved by have two static
mappings on the NAT device:
Incoming sessions to TCP port 21 are mapped to internal IP address
192.168.0.3
Incoming sessions to TCP port 80 are mapped to internal IP address
192.168.0.2
AT-AR250E ADSL Router Web Interface Manual
Figure 65. External access to a FTP server and a Web Server
103
104
Appendix
APPENDIX F
Troubleshooting
This section of the manual is to help you to resolve some operational
problems that you could meet when using the AT-AR250E.
Troubleshooting Tips
Following are answers to common end-user problems.
Noise on phone line.
Verify that the noise is audible through more than one phone. Noise on a
single phone is typically a result of the phone itself and not DSL service.
Determine if a DSL filter is installed at the premises. DSL filters are
required to use the AT-AR250E with all telephony devices.
Determine if other data transmitting devices are present. Fax machine
and analog modem transmissions often ʺbleedʺ over substandard wiring.
No lights on the AT-AR250E are lit, or lights are indicating an
error.
If the power led is not lit, verify that there is power to the AT-AR250E. If
you have plugged the AT-AR250E into a power outlet, verify if there is a
switch that may control the power outlet in use.
If the ADSL led is not lit, verify the ADSL cable is plugged into the
AT-AR250E line connector, and then if the ISP has the ADSL service
enabled on your line.
If the Ethernet led(s) corresponding to the occupied Ethernet port(s) are
not lit, verify that an Ethernet cable(s) connect the AT-AR250E to your
PC, this cable has to be connected between the AT-AR250E Ethernet
connector and the PC Ethernet connector. Then verify if the PC Ethernet
card is enabled. If the problem is still present try to use another Ethernet
cable.
If the five leds present on the AT-AR250E are all lit, but neither the ADSL
port nor the Ethernet ports are connected to anything, try to reset the
AT-AR250E ADSL Router Web Interface Manual
105
device, turn it off and then on again, if the problem is still present please
contact the supplier of your AT-AR250E.
It is impossible to comunicate with the AT-AR250E.
Verify the AT-AR250E is on, and the Ethernet cable is correctly connected
to both the PC and the AT-AR250E.
Verify the IP address and the subnet of your PC. It has to be in the same
IP subnet as the AT-AR250E. The default IP subnet of the AT-AR250E is
192.168.1.0 for the LAN interface.
Note: the Web Server in the AT-AR250 is not accessed on the usual WWW
TCP port (port 80), but is accessed on a special port number – 8080.
Therefore
it
is
important
that
the
full
string
http://192.168.1.1:8080 is typed into the address field of the web
browser when making a connection to the AT-AR250. If you leave off the
http:// part, or leave off the :8080 part, the connection will fail.
It is impossible to obtain an IP address from the AT-AR250E
DHCP Server.
Verify if your PC is set up for dynamic IP assignment (use DHCP).I.e. the
TCP/IP properties for your Ethernet card should look as below:
Figure 66. Internet Protocol (TCP/IP) Properties Dialogue Box
106
Appendix
Verify if the AT-AR250E DHCP server is enabled; to do this you will have
to:
set on your PC a static IP address that belongs at the same IP subnet as
the AT-AR250E (the default IP subnet is 192.168.1.0) for example, use
192.168.1.2 when using an Ethernet connection to the AT-AR250E
use your by IE browser to navigate to the AT-AR250E GUI(192.168.1.1),
check the DHCP Server cofiguration
If the DHCP Server is enabled, and no address is assigned to the PC, try to
reset the device - turn it off and then on again.
It is impossible to browse to internet sites or ping hosts on the
WAN network.
On the AT-AR250E GUI check the following:
If the virtual led for the ADSL line is green. (On the status page.)
If an IP address has been assigned to the WAN connection. (If dynamic IP
assignment is being used.)
The VCI, VPI values are the same as those given to you by the ISP
If the RX and TX values on the ATM connection are non zero.
If, in the DNS Relay section of the DNS page, the IP address for the DNS
Server is correct. (This value is obtained automatically when you choose
“use DHCP” for RFC1483 routed and IpoA connections, or choose
“autoDNS discovery” for PPP routed connections. In any case it has to be
set to a value given by the ISP).
If you are using a routed ADSL connection on the AT-AR250E, and your
WAN interface has been assigned a public IP address, then you will need
to enable the NAT functionality in order to be able to reach the Internet.
Verify if you are using the AT-AR250E Firewall functionality, there is a
filter for the TCP port 80 that is set to “allow” for outbound sessions (to
browse on internet), or there is a filter for the ICMP protocol to allow
outgoing ICMP messages (to allow outbound pings).
It is impossible for external hosts to access a Server on the
internal network.
Verify that, if you are using the NAT functionality, a Reserved Mapping
entry is present in the NAT section, to specify the destination address for
incoming sessions to the server (e.g. a reserved mapping for TCP port 80
for a WWW server, or TCP port 21 for an FTP server, etc).
Verify that, if you are using the AT-AR250E Firewall functionality, there
is a filter to allow incoming TCP sessions to the relevant TCP port. (e.g. a
AT-AR250E ADSL Router Web Interface Manual
107
filter to allow incoming TCP to port 80 for a WWW server, or incoming
ICMP to ping the server etc)
If you are using the NAT or firewall functionality, and the connections to
the Internal server are FTP or Netmeeting connections, then check that
that Dynamic Port Opening items have been defined for the relevant
connection types.