1
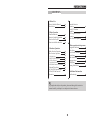
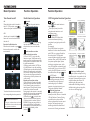
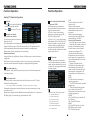
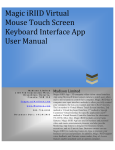
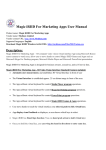
CONTENTS
1.Before Use
How to Read this Manual
Reset Device
02
02
2.Basic Operation
Panel Introduction
Remote Controller Operation
Turn the Unit On/Off
Enter into the Main Interface
03
06
08
Bluetooth Function
Operation
Analog TV Function
Operation
GPS Navigation Function
Operation
Other Function Operations
14
16
17
18
08
4.Basic operation of setup menu
3.Function Operation
Radio Function Operation
Disc Function Operation
.Play/Eject Disc
.DVD/VCD Disc Playback
.CD Disc Playback
.Touch Menu Function
.MP3/WMA Format Disc Playback
Calendar/Time Setup
AUX1/AUX2 External Input
U Disc/SD Card Function
Operation
08
10
10
10
10
11
11
12
Navigation Path Setup
Video Setup
Touch Screen Calibration
Sound Setup
Radio Area Setup
Language Setup
Backlighting
Steering Wheel Setup
18
18
19
20
20
21
21
22
12
5.Additional Information
13
Troubleshooting
To properly and safely use the product, please read through this instruction
manual carefully, and keep it in a safe place for future reference.
23
Before Use
Additional Information
How to Read This Manual
Trouble shooting
This manual uses illustrations to explain its operations.
The pictures shown in this manual are for reference only, the actual items are
the standards.
Warning
To ensure your safety and the safety of your car and others, please make sure you
follow the basic requirements below:
Before using the unit, please read all the relative instructions carefully.
Warranty does not apply to any damage caused by noncompliance with the
instruction.
To ensure driving safety and avoid breaking traffic regulation, please do not
watch program or operate the unit while you are driving.
Do not expose the unit to rainwater in case of short circuit.
To prevent a short circuit, never put or left any metallic objects (such as coins
or metal tools) inside the unit.
Please use the unit according to this instruction manual. Do not open the
unit to repair by yourself. If necessary, please go to the professional repair
station for help.
Do not use the car audio for a long time after the engine is turned off,
otherwise the battery shall be used up.
Do not insert any object into the ventilation slot or other openings.
Do not touch, rub or knock the screen with sharp objects.
Reset Device
If the unit or the connected unit fails to operate properly, press the reset hole with
a pointed tool. The unit returns to factory settings after the unit is restarted.
Applying spray cleaner directly to the unit may affect its mechanical parts.
Wiping the faceplate with a hard cloth or using a volatile fluid such as thinner
or alcohol may scratch the surface or erase characters.
Basic operation of setup menu
Basic Operation
Steering Wheel Setup
Panel Introduction
You can also perform control to the unit by the steering wheel of the car. Connect the
positive and negative terminal of the car SWC cable with the positive and negative
terminal of the SWC cable of the unit respectively.
Touch [Setup] icon in the main interface.
Enter into setup interface.
Switch page, touch [Steering Wheel Setup] icon.
Enter into steering wheel setup
nterface.
22
Setup method
Click buttons on the steering wheel one by one and keep a record of relevant
sequences. Click appropriate function setup (such as: VOL-) to save the settings.
Basic Operation
Basic operation of setup menu
Language Setup
Backlight
During use, you can select your familiar
language to display menu by language
setup.
Touch [Setup] icon in the main
interface.
Enter into setup interface.
Switch page, touch [Language Setup]
icon.
Enter into language setup interface.
Via backlight setup interface, you can
manually adjust the display screen
brightness according to the intensity
of light of the environment to achieve
satisfactory effect. At the same time, to
ensure that the driver's sight will not
be affected during night driving and
driving safety, you can also set the time
for display screen to enter into sleeping
status.
Touch [Setup] icon in the main
interface.
Enter into setup interface.
Touch [Backlight] icon.
Enter into backlight setup interface.
Setup method
Click appropriate language icon, the
selected language will be displayed as
the menu language.
Brightness: 4 brightness values are
available: 100%, 75%, 50%, 25%.
Auto close: you can select 15s, 30s,
60s or close.
Basic operation of setup menu
Basic Operation
Sound Setup
Touch [Sound Setup] icon to enter sound setup interface as is shown below:
Sound effect setup: select general, pop, classic or rock, you can adjust to the best
audio effect according to your preferences.
System volume: adjust volume level of the whole unit
Bluetooth volume: adjust volume level of bluetooth mode
Navigation volume: adjust volume level of navigation mode
16.MENU
Press this button to back to the main menu in any mode.
Reverse volume: adjust volume level of reverse mode
17. NAVI
Press the button to enter/exit navigation interface.
Screen click sound: select to turn screen click sound on/off. After click sound is
turned off, there is no beep sound when you touch the screen.
18.RESET
Tweeter/woofer/subwoofer: adjust volume level of tweeter/woofer/subwoofer.
Left front speaker attenuate: adjust volume level of left front speaker
Right front speaker attenuate: adjust volume level of right front speaker
19.
Left rear speaker attenuate: adjust volume level of left rear speaker
Right rear speaker attenuate: adjust volume level of right rear speaker
20.SD
Radio Area Setup
You need to select your radio area before you use radio function.
Switch page, touch [Radio] icon.
Touch [Setup] icon in the main interface.
Enter into the radio area setup
Enter into setup interface.
interface.
21.Disc loading slot
22.PIC
Basic Operation
Basic operation of setup menu
Remote Controller Operation
Touch Screen Calibration
1.PWR
Press the button to turn the power
on/off.
2.MUTE
Press the button to turn the volume
output on/off, repress it to resume
previous volume level.
3.NAVI
Press the button to enter/exit the
navigation interface.
4.SOURCE/IR-SW---mode switch
Short press the button to switch the
mode.
Long press the button to switch between
foreground/background controls for the
remote controller.
Only effective when the background
mode is enabled.
5.EQ/
preset equalizer select/answer
Press the button to select different
sound effect mode.
When the unit supports bluetooth
function, press the button can answer
a call.
6. SEEK
In playback mode, short press the button
to select the previous/next file; long press
the button to fast forward/backward play.
In radio mode, short press the button to
fine-tune and search station manually;
long press the button to scan station
automatically.
Under analog TV status, short press the
button to fine-tune and search station
manually; long press the button to scan
channel automatically.
7.VOL
Press the button to increase/reduce the
volume.
8.SEL---sound feature
Press the button to select sound feature.
9.LOUD/
---equal loudness
compensation/hang up
Press the button to turn the LOUD
function on/off.
When the unit supports bluetooth
function, press the button to hang up
a call after the call is completed.
10.BAND/P/N
in radio mode, press the button to
switch the band. Under playback and
TV status, press the button to switch
the system.
11.LOC/RDM
In radio mode, press the button to switch
between local/distant. In playback mode,
press the button to start random play.
12.STOP
Press the button once to pause, press it
twice to completely stop.
13.
---Play/pause
Press the button to switch between play
and pause; under stop status, press the
button to start playback.
If errors occur in touch position, you
can calibrate touch coordinates.
Touch [Setup] icon in the main
interface.
Enter into setup interface.
Switch page, touch [Touch
Calibration] icon.
Enter touch calibration interface.
Perform calibration with a touch pen.
Touch method:
Use a touch pen to click the central area
of symbol “+”, calibrate the screen in
the moving sequence of the central area
of “+”. After calibration is completed,
system will automatically save data and
exit the screen.
Function Operation
Basic operation of setup
menu
Other Functions Operation
Navigation Path Setup
CCD system (back rearview function)
During back, if your rearview mirror
device has been connected, after the car
is put in reverse, system automatically
switches to the rearview mirror function
screen and display the back scene video
shot by your rearview mirror.
Navigation path is already set when
you buy the product. Do not enter into
the navigation setup interface to change
path arbitrarily. Otherwise you may
cause navigation program abnormal.
Reverse field simulation
Rearview backup image
Video setup
Warning
Do not rely on CCD system completely,
please make sure your car is safe by your
eyes during driving. Back rearview system
only assists in driving. As the distance
range of rearview system is limited,
completely relying on the rearview system
during driving may cause accidents.
You can adjust screen brightness and
contrast etc. by operating
button
on the panel. Setup method is follows:
In DVD/AV/TV mode, when the volume
display has not disappeared, press
to switch to video setup function of
brightness and contrast etc. After you
switch to the video parameter you wish
to adjust, rotate the button to adjust its
level.
Basic Operation
14.ST/PROG---stereo/programmed
playback
In radio mode, press the button to select
stereo or mono station; in playback
status, work with number buttons to
start programmed playback.
15. 0-10+---number button
In radio mode, press number buttons
to select to play pre-stored stations;
long press the number button (1-6) to
store the current frequency in the prestored position.
In playback mode, press number buttons
to directly select songs and chapters.
In analog TV mode, press number
button (1-9) to select station.
16.AMS/RPT
Long press the button to search for
station automatically. In radio mode,
press the button to browse memory
stations; in playback status, press the
button to select repeat to play mode.
17.TITLE
In DVD mode, press the button to
return to the top menu of the disc.
18.AUDIO
In DVD mode, press the button to
switch the dialogue language of the
played program. Under VCD status,
press the button to select L/R channel/
stereo.
19.GOTO---play time setup
Under playback status, after the button
is pressed, work with number buttons
to select track/time play.
20.SUB-T
In DVD mode, press the button to
switch subtitle language.
21.PBC
In VCD mode, press the button to
display all tracks menu of the disc, work
with a number button to select a track.
In DVD mode, press the button to return
to the root menu.
22.
Enter
In DVD mode, press the button to move
the cursor up/down/left/right to select
an item in the system setup menu, and
press the ENTER button to confirm the
selected item.
23.SLOW
Under playback status, press the button
to start slow forward playback.
24.ANGLE
In DVD mode, press the button to change
the shooting angle of the played program.
25.SETUP
In playback mode, press the button to
switch among different setup options.
26.OSD
Press the button to display title, chapter,
playing time and remaining time.
27.ZOOM
Under VCD/DVD reading status, press
the button to zoom the image in/out.
28.MENU
Press the button to switch between the
main interface and the current mode.
Battery Change
If the remote controller operates only over shorter distances or does not operate at all, replace
the battery with a new one, and confirm polarities before you change the battery.
One hand press stopper,
then pull out battery.
Put battery into battery
holder.
Put the holder into the
remote controller.
Basic Operation
Function Operation
Function Operation
Turn the unit on/off
Radio Function Operation
GPS Navigation Function Operation
On
When the ignition switch is turned to
the ACC or ON position, press
button on the panel to turn the unit on.
Enter/exit
Touch
icon in the main interface
to enter into the radio interface.
Enter/exit
Touch
in the main interface to
enter navigation.
Touch [Exit System] icon in the
navigation main interface to exit
navigation system.
Navigation PPT
You can enable DVD/video/radio
function simultaneously during
navigation by navigation push-to-talk
function.
For example:
Press [NAVI] button in navigation
interface to switch to the main interface,
select DVD icon, system will read the
disc and switch to DVD playback
screen while the navigation tone output
continues. Then, press [NAVI] button on
the system operation panel, system
switches to navigation screen, at this
time, DVD playback continues but only
sound output. If you wish to exit DVD
mode, press [NAVI] button to switch to
the main interface, then press
icon
to exit DVD mode.
Navigation function operation
The unit supports enquiry function
of destination by touch input and
handwriting input. For detailed
operation of navigation function, see
“Navigation Operation Manual”.
Receiving signal error
When the satellite signals can be
normally received, the error of standard
GPS shall be about 7 meters. Driving
on parallel sections, there shall be
error even the product has auto-correct
function. The normal receiving of
satellite signals shall be affected and
cause error in following environment:
Off
After the unit is started, hold
button for 3 seconds or more to turn
the unit off.
Enter into the Main Interface
When the unit is turned on, press
button on the panel to switch to the
main interface.
Touch each function icon to enter into
the corresponding function operation.
If a function icon listed above
appears grey, it indicates there is no device
get connected to the unit under the current
status, operation is ineffective.
After touching
icon and entering
into the radio main interface, touch
other function icons to exit the radio
mode.
Search/store/browse station
Auto search and store station
(1) Touch [AUTO] icon in the radio
interface or press [AMS] button on the
panel to search for station automatically.
During search, the searched stations will
be stored automatically.
(2) During search, retouch [AUTO] icon
or [ AMS] button to stop auto searching.
(3)After stations are searched and stored,
the unit will start browsing each station
for 5 seconds. During browse, when you
find your favorite program and need to
stop browsing, touch any button on the
screen to stop.
Manual search and store station
(1)Touch [Search+/-] button in the radio
interface to search for station manually.
Touch [Search-] button to search for a
station upward; Touch [Search+] button
to search for a station downward.
During search, after a station is searched,
the unit will stop searching automatically
and play the searched station radio.
(2) Directly touch
icon in the radio
interface to fine-tune station frequency.
(3) After a station is searched, (such as:
98.00MHZ), long press any position in
the pre-stored station list in the radio
main interface, the searched station will
be stored in the selected position
(such as:
).
In tune
Among tall buildings
At the boulevard
The antenna is sheltered
Underground parking
Overpass or viaduct
Receiving of satellite signals
Navigation system can keep receiving
8 satellite signals. As a general rule, the
navigation system can figure out your
accurate location after received 3-4
satellite signals. But some times,
weather and tall buildings in the city
shall affect the signal receiving effect,
as is shown n following figure:
Scope for receiving satellite signals
Angle of
elevation
Angle of
elevation
Function Operation
Function Operation
Analog TV Function Operation
Enter/exit
Touch
icon in the main interface to
enter the TV playback interface.
Touch
icon to exit TV mode.
Search & save channel
Auto search & save channel
You may need to search for station first
before you use TV.
Touch [Auto] button in the interface to automatically start searching for TV
channels within the scope of all the TV channels, effective TV channels searched
will be automatically memorized in the preset channels in ascending order.
During search, retouch [Auto] button to stop searching.
Manual search channel
Long touch [Search +] and [Search -] button on display screen to search for station in
a single step.
Hold [Search +/-] button on display screen for 2 seconds or more to automatically
search for effective stations in the frequency ascending/descending direction.
Select channel and play
Touch [Search +] and [Search -] button on display screen to select the next/previous
aved channel to play.
Select station/band switch/switch
between LOC/DX
(1) Directly touch any station in the
pre-stored station list in radio interface
to play the selected station.
(2) Touch ﹝Band﹞button in radio
interface to switch band among FM1,
FM2, FM3, AM1 and AM2.
(3) Touch ﹝LOC﹞icon to switch search
mode between LOC and DX. When LOC
function is turned on, only those radio
stations with strong signals and good
reception can be received; When DX
function is turned on, distant weak radio
signals can be received.
RDS function
RDS provides a series of information
(such as traffic information and station
name), and can automatically switch to
a station with strong signals and carries
the same program.
Sound system switch
Touch the position of sound system switch on display screen to switch TV sound
system in the following order:
PAL 1→ NTSC→ SECAM→ DK→SECAM-BG→ PAL-DK→ PAL-M→ PAL-N→ PAL-BG
If abnormal sound appears, that may be because the sound system setup is wrong,
you need to reset it.
(Sound system adopted in China: Mainland areas except Shenzhen etc.: 1; other areas:
DK; Hong Kong: 1 Users should pay special attention to this.)
RDS data contains the following contents:
P1---program identification
TA---traffic announcement
PS---program service name
PTY---program type name
AF---alternative frequencies
EON---enhanced other network
TP---traffic program
1. AF
Touch the button to turn the AF
function on/off.
When the received station
signals become weak, the radio will
automatically fine-tune to other
frequencies.
When receiving an emergency
announcing, the screen will display
warning message “ALARM“.
Receive traffic information
①Press [TA] button to open TA mode.
② When the traffic station is turned on,
the radio will automatically search
for traffic stations. After a station is
searched, screen displays “TP”.
Only when traffic information is
broadcasted can it be received, after
traffic information is completed, the
radio will automatically switch to the
previous mode.
③ Repress [TA] button to close
TA function. In other modes, traffic
announcement will automatically
switch to radio mode, after the traffic
announcement is completed, it will
automatically switch to the previous
mode.
2. PTY
PTY function allows searching for
special program types.
① Touch PTY button to select searched
program type.
② Three seconds after the program
type is selected, the radio will
automatically search for station to the
selected program type.
3. EON
ON: Open EON function, another AF
list is received.
OFF: Close EON function.
4. REG
ON: Open REG function, only local
RDS stations can be received.
OFF: Close REG function.
Function Operation
Function Operation
Disc Function Operation
Play/eject disc
Play disc
Insert the disc into the disc slot with
the printing surface up, system will
detect the disc and automatically take
it in to read and play.
Eject disc
(1) Click
button on the panel to
eject the disc.
(2) If a disc has not been took away
15 seconds after it is ejected, system
will automatically take in the disc but
not play.
During playback of disc, touch the
middle lower area of the screen to pop
up the touch menu, operate the touch
menu to perform various playback
controls.
6
1. Play/pause
2. Stop
3. The previous/next song
4. Enter into DVD setup menu
5. Numeric keypad
6. Fast backward /forward
Do not insert two discs or more.
Note: Touch the top left corner of the
screen to return to the main interface.
DVD/VCD disc playback
CD Disc Playback
When there is a disc in the unit, touch
icon in the main interface, system
enters into disc reading status. After
disc format is read, the screen will
display the CD playback interface,
system will automatically read the disc
contents and display on the screen,
You can directly click song name to
select and play, you can also click the
numeric keypad button and enter song
number to selected your favorite song
to play.
When there is a disc in the unit, touch
icon in the main interface, system
enters into disc reading status. When the
disc does not have play menu, system
will automatically read the disc and
directly play; when the disc has play
menu, system displays DVD menu, you
can touch appropriate options on the
screen to access the corresponding items.
During playback of disc, touch the
bottom center area of the screen to pop
up touch menu, operate touch menu to
perform various playback controls.
Receive a call
In any mode, when a call arrives,
system will automatically switch to
bluetooth function interface, and switch
from speaker to phone ring.
Touch
button in the bluetooth
interface to answer a call;
touch
button to refuse a call.
Switch
During a call, touch
button to
switch voice output between car speaker
and cellphone.
Hang up
After conversation with the other party
completed, touch
button in the
bluetooth interface to hang up the
phone.
Phonebook
After the cellphone gets connected to
the unit, you can read records in the
phonebook of your cellphone and store
information in the phonebook of the
unit. Touch [Download] icon in the
phonebook interface, the unit will
automatically download phone
numbers and put them in order.
Call records
Recent dialed calls, received calls and
missed calls can be saved in call records.
Select missed/
dialed/received calls
Clear all
Delete a selected item
Bluetooth music playback
Bluetooth player can play music
files in cellphone via wireless audio
device on condition that the cellphone
supports relevant bluetooth protocol.
After bluetooth device gets
connected to the unit, audio system
will automatically link with the paired
cellphone.
In some cases, you need to enable the
playback of audio files by phone keypad
due to different phone models.
Stop
Play/pass the previous/next song
Function Operation
Function Operation
Bluetooth Function Operation
Enter/exit
The system provides bluetooth handsfree communication function, if your
cellphone supports bluetooth function,
you can establish a point-to-point
connection between your cellphone and
the system. The system can also achieve
the dialing, answering function and the
function of phonebook on the screen.
Touch
icon in the main interface
to enter the bluetooth interface.
A virtual keypad is displayed on the
screen; enter the numeric code (0000)
and press [OK] button.
③A prompt is displayed on the screen
of the phone, to accept pair, enter the
same numeric code on the phone and
press [OK] button.
④ After the pair is completed, the name
of the connected cellphone is displayed
on the screen.
⑤ After recharged, the bluetooth
system will automatically get connect to
the lastly disconnected cellphone.
4 Touch Menu Function Description
During playback of disc, touch the
middle lower area of the screen to
pop up the touch menu below, operate
the touch menu to perform various
playback controls.
Touch the button to pause, retouch it
to continue to play.
Fast forward/backward
Phonebook
Dial/answer
Touch
interface.
Music playback
Reset/link
Switch
Hang-up/refuse
icon to exit bluetooth
Pair/link
The first time you pair your cellphone
with the unit, the procedures below
should be followed:
① Turn the bluetooth function of your
callphone on.
Press
button on the unit.
Screen displays “Searching”.
Recognized phones will be displayed.
Select the phone you wish to connect
on the phone list. Only one phone can
be connected.
②The cell phone searches for bluetooth
device and connect.
After the successful pair, the icon
that indicates connecting status will
be lighted, otherwise, it will appear
dimmed.
Touch [Disconnect] to disconnect the
current connection; after disconnected,
touch [Connect] to connect the
disconnected bluetooth device.
Touch [Reset] icon to clear all pair
records.
Dial/answer/switch/hang up
Dial a call
After the cellphone gets connected
to the unit, enter a phone number by
touching number buttons on the screen,
and then touch
to dial a call.
During dialing, if wrong numbers are
entered, you can click
to delete
one by one, touch
to delete all.
During dialing, touch
to hang
up the connecting phone.
Put the MP3/WMA disc in DVD player,
after the disc is read, system enters into
the interface as is shown below:
Play/pause
Touch the button to select fast forward/
backward playback.
Dial
Call records
MP3/WMA format disc playback
Stop
Touch the button to enter into prestop
status, and then touch
to continue
to play.
Double touch
button to enter into
completely stop status, then touch
button to restart playing in the song
sequence of disc.
The previous/next song
Touch the button to select the previous/
next song.
Numeric keypad
Touch the button to pop up the numeric
keypad. Directly select a song to play by
touching the numeric keypad.
Enter into DVD setup menu
System setup modes contain basic setup,
audio setup, video setup and code setup.
During playback of USB storage
device/SD card,
icon appears
on the screen.
Playback
Touch the file name icon and the song
to read and play. Touch
to
select the previous/next file.
Touch
icon between
and
to
return to the master category of folder.
Function Operation
Function Operation
Calendar/time setup
AUX 1/AUX 2 external input
Touch
icon in the main interface
to enter into the calendar setup interface.
Put video/audio input plugs into AUX
video/audio input jacks respectively.
Touch
/
icon in the multimedia
interface to enter into AUX status.
Setup method:
Click the display position of years/
months/days/hours/minutes and drag
upward/downward to reset the current
parameters as is shown below:
Drag upward
U Disc/SD Card function operation
When there is a USB device/SD card connected, the unit can conduct the playback of
audio/video/image files in the USB device/SD card.
Insert/Eject USB storage device
1. Connect a U disc recorded with media information to the unit by a USB connecting
cable.
2. When there is a need to eject the USB device, exit the USB device playback screen
first, and then take out the device.
Insert/eject SD card
1. Insert a SD card recorded with media information into the SD card slot in the unit
correctly until it is locked.
2. When there is a need to eject the SD card, exit the SD card playback status first,
then press the SD card, after the SD card is unlocked, it will automatically pop up.
Enter/exit
Insert a USB storage device or SD card to automatically play data contained in it. If
the unit has connected with a USB device or SD card, touch
icon in the multimedia
interface to enter into the external storage playback interface; Touch
icon to enter
nto the SD card playback interface. During playback, touch the top center area of the
screen to pop up the touch menu, operate touch menu to perform various playback
controls.