1
AXEL Platine Terminal
Ethernet TCP/IP Models
Installing Platine Terminals
on UNIX Systems
May 1997 - Ref.: TCPE105/701-2
The reproduction of this material, in part or whole, is strictly prohibited. For
additional information, please contact:
Zone d'activité d'Orsay-Courtabœuf
16 Avenue du Québec
BP 728
91962 LES ULIS Cedex - France
Tel.: 33 1 69 28 27 27
Fax: 33 1 69 28 82 04
The information in this document is subject to change without notice. AXEL
assumes no responsibility for any errors that may appear in this document.
All trademarks and registered trademarks are the property of their respective
holders.
© - 1995-1997 - AXEL - All Rights Reserved.
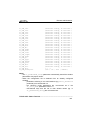
1 - INTRODUCTION ........................................................................................1
1.1 - OVERVIEW ..........................................................................................2
1.1.1 - Serial Connection ...........................................................................2
1.1.2 - Network Connection .......................................................................3
1.1.3 - Multiple Logical Links .....................................................................3
1.2 - MAIN FEATURES.................................................................................4
1.3 - EXAMPLE CONFIGURATION ..............................................................5
2 - TERMINAL CONFIGURATION...................................................................7
2.1 - TCP/IP SET-UP....................................................................................8
2.2 - SETTING THE NETWORK ENVIRONMENT........................................9
2.2.1 - Ethernet Addresses ......................................................................11
2.2.2 - IP Address and RARP Protocol.....................................................11
2.2.3 - Host Management ........................................................................13
2.2.4 - Router Management .....................................................................13
2.3 - SETTING MULTI-SESSION PARAMETERS ......................................15
2.3.1 - Setting the Sessions .....................................................................15
2.3.2 - Status Line ...................................................................................16
2.3.3 - View/Host Association ..................................................................16
2.4 - SETTING THE PROTOCOL ...............................................................17
2.4.1 - 'mss' Option..................................................................................17
2.4.2 - 'window' Option.............................................................................18
2.4.3 - 'ttl' Option .....................................................................................18
2.4.4 - 'noise' Option................................................................................18
2.4.5 - 'tcp port' Option ............................................................................19
2.5 - STATISTICS.......................................................................................20
2.5.1 -'Ethernet' Option............................................................................20
2.5.2 - 'ARP' Option.................................................................................20
2.5.3 - 'TCP Client' Option .......................................................................21
2.5.4 - 'TCP Server' Option......................................................................21
2.6 - SETTING EMULATIONS ....................................................................22
Example 1 ...............................................................................................24
Example 2 ...............................................................................................24
3 - CONFIGURING THE UNIX HOST ............................................................25
3.1 - SETTING NETWORK PARAMETERS................................................26
3.2 - CONFIGURING THE OPERATING SYSTEM .....................................27
3.2.1 - Overview......................................................................................27
3.2.2- TERM Value..................................................................................27
3.2.3 - Scancode Mode............................................................................28
3.3 - TUNING THE OPERATING SYSTEM.................................................30
3.3.1 - SCO UNIX 3.2v4 ..........................................................................30
3.4 - CONFIGURING A RARP SERVER.....................................................31
4 - USING MULTI-SESSION..........................................................................33
4.1 - USING WITH VIEW/HOST ASSOCIATIONS .....................................34
4.2 - USING WITH SET-UP........................................................................36
4.2.1 - Opening a Network Session..........................................................37
4.2.2 - Switching Between Sessions ........................................................37
4.2.3 - Closing a Network Connection......................................................37
5 - STANDARD PRINT SERVERS.................................................................39
5.1 - SET-UP THE PLATINE TERMINAL....................................................40
5.1.1 - Selecting Port Monitoring .............................................................40
5.1.2 - Serial Port Setting ........................................................................42
5.1.3 - Exiting the Set-Up ........................................................................42
5.2 - CONFIGURING THE UNIX SYSTEM .................................................42
5.2.1 - Using lpd ......................................................................................43
5.2.2 - Using rcmd ...................................................................................45
6 - THE TERMINAL SERVER........................................................................47
6.1 - TERMINAL SET-UP ...........................................................................48
6.1.1 - Select the Network Service...........................................................48
6.1.2 - Serial Port Setting ........................................................................49
6.1.3 - Exiting the Set-Up ........................................................................50
6.2 - TCP/IP SET-UP..................................................................................50
6.3 - USING THE TERMINAL SERVER......................................................51
7 - AXEL TTY SERVER .................................................................................53
7.1 - INTRODUCTION ................................................................................54
7.2 - SETTING UP THE AX3000.................................................................55
7.2.1 - Terminal Set-Up ...........................................................................55
7.2.2 - TCP/IP Set-Up .............................................................................57
7.2.3 - Open a Connection.......................................................................57
7.3 - UNIX CONFIGURATION ....................................................................58
7.3.1 - Installing.......................................................................................58
7.3.2 - Using............................................................................................59
7.3.3 - Uninstalling...................................................................................60
8 - THE AXEL PROPRIETARY NETWORK SERVERS .................................61
8.1 - INTRODUCTION ................................................................................62
8.1.1 - Overview......................................................................................62
8.1.2 - The Three AXEL Servers: printd, ttyd and rprint ...........................63
8.1.3 - Device: Pseudo-Terminal or Named Pipe.....................................64
8.1.4 - TCP Port Number.........................................................................64
8.1.5 - Summary......................................................................................65
8.1.6 - Caution.........................................................................................68
8.1.7 - Configuration................................................................................68
8.2 - SET-UP THE PLATINE TERMINAL ....................................................69
8.2.1 - Enter Set-Up.................................................................................69
8.2.2 - Auxiliary Port Monitoring...............................................................69
8.2.3 - Serial Port Setting ........................................................................71
8.2.4 - Exit the Set-Up .............................................................................71
8.3 - CONFIGURING THE UNIX SYSTEM .................................................71
8.3.1 - Platine/Device Association ...........................................................73
8.3.2 - IBM AIX: Platine/Printer Association .............................................74
9 - TCP/IP MULTI-SHELL..............................................................................76
9.1 - INSTALLATION ..................................................................................77
9.2 - SETTING UP THE AX3000.................................................................78
9.3 - USING MULTISHELL .........................................................................79
9.3.1 - Running tcpmsh............................................................................79
9.3.2 - Creating a View or Moving to a View ............................................79
9.3.3 - Deleting a View ............................................................................80
9.3.4 - Exiting tcpmsh..............................................................................80
9.4 - TCPMSH OPTIONS ...........................................................................80
9.4.1 - '-b' Option: Select Pttys ................................................................80
9.4.2 - '-c' Option: Overscan Colour.........................................................81
9.4.3 - '-f' Option: Initial Scripts................................................................81
9.4.4 - '-h' Option: On-Line Help ..............................................................82
9.4.5 - '-L' Option: Status Line on Line 26 ................................................82
9.4.6 - '-l' Option: Status Line on line 25 ..................................................83
9.4.7 - '-m' Option: Silent Mode ...............................................................84
9.4.8 - '-n' Option: Number of Views ........................................................84
9.4.9 - '-p' Option: Predefined Pseudo-Terminals.....................................85
9.4.10 - '-S' Option: Select a Shell ...........................................................85
9.4.11 - '-x' Option: Circular Buffers.........................................................86
9.5 - LIMITATIONS OF THE ANSI STANDARD..........................................86
10 - REMOTE ADMINISTRATION .................................................................89
10.1 - OVERVIEW ......................................................................................90
10.2 - SETTING-UP A PLATINE .................................................................91
10.3 - OBTAINING A CONFIGURATION ....................................................92
10.4 - ERROR MESSAGES........................................................................92
10.5 - CONFIGURATION FILE FORMAT ...................................................96
Header ....................................................................................................97
Ethernet Parameters ...............................................................................98
TCP/IP Parameters .................................................................................98
AUX1 and AUX2 Parameters................................................................. 100
Parallel Port Parameters ....................................................................... 101
Multi-session Parameters ...................................................................... 101
Terminal Parameters............................................................................. 102
'Session' Parameters ............................................................................. 102
End of File............................................................................................. 106
11 - DOWNLOADING FIRMWARE .............................................................. 107
11.1 - RCMD OVERVIEW......................................................................... 109
11.2 - DOWNLOADING BY TFTP PROTOCOL........................................ 109
11.2.1 - Remote Administration ............................................................. 109
11.2.2 - Downloading Through Set-Up ................................................... 111
11.3 - DOWNLOADING BY BOOTP AND TFTP PROTOCOLS................ 112
11.3.1 - Remote Administration ............................................................. 114
11.3.2 - Downloading Through Set-Up ................................................... 115
11.4 - IN CASE OF PROBLEMS............................................................... 116
11.4.1 - Bootp Stage.............................................................................. 116
11.4.2 - Tftp Stage ................................................................................ 116
Introduction
-1INTRODUCTION
________________________________________________________________
TCP/IP AXEL Platine Terminal
1
Introduction
This chapter introduces the concept and the main features of the AXEL TCP/IP
Platine terminal.
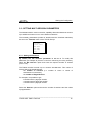
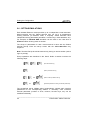
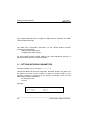
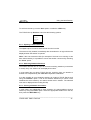
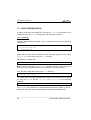
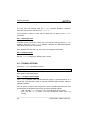
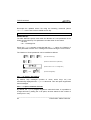
1.1 - OVERVIEW
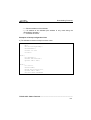
Under UNIX, the connection between a host and a terminal uses a device file
called tty (or ptty for pseudo-terminals). Through this device, an application
running on the host can exchange data with a terminal. The application is thus
isolated from the actual physical link over which data transmission takes place.
The tty or ptty device is thus a logical link between the host and the
terminal:
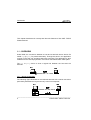
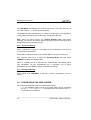
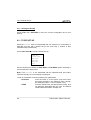
1.1.1 - Serial Connection
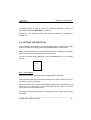
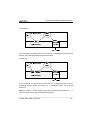
The following figure illustrates a conventional terminal with a serial connection
(technically described as “asynchronous”) to the host computer:
________________________________________________________________
2
TCP/IP AXEL Platine Terminal
Introduction
The host uses a software ‘driver' to manage a serial I/O (input/output) controller
(for example COM1 on the serial I/O board).
The terminal has a dedicated circuit associated with each serial port, which
transmits and receives characters over the asynchronous line.
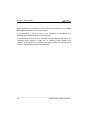
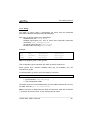
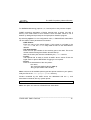
1.1.2 - Network Connection
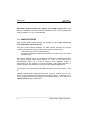
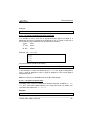
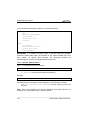
An AXEL TCP/IP Platine terminal operates quite differently from a conventional
terminal.
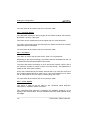
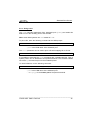
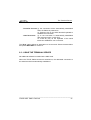
The following figure illustrates the Ethernet data communication process
between an AXEL TCP/IP Platine terminal and a UNIX host:
On the host a network 'package' is used to manage the Ethernet controller with
Telnet (host) and TCP/IP protocols. Each connected terminal is addressed via
a pseudo-terminal (ptty).
Each Axel terminal has an embedded Ethernet controller with built-in Telnet
(client) and TCP/IP protocols.
1.1.3 - Multiple Logical Links
________________________________________________________________
TCP/IP AXEL Platine Terminal
3
Introduction
Each AXEL Platine terminal can support up to EIGHT logical links. This
feature, called Multi-connection, lets any AX3000 user run up to 8 simultaneous
working sessions, on one or several hosts.
1.2 - MAIN FEATURES
Each TCP/IP AXEL Platine terminal can operate as up to eight concurrent
and independent virtual terminals.
With this virtual terminal capability, an AXEL Platine terminal can provide
multiple connections across a network. Each virtual terminal can be:
- connected to any TCP/IP networked host,
- set, using independent parameters (emulation, function keys, color video
attributes, etc).
By means of a simple set-up, it is possible to associate any networked host with
any virtual terminal (also called “session” or “view” in this manual) and
automatically connect to a host at start-up. This capability makes it
unnecessary for the operator to connect manually, and permits selection of
specific sessions and automatic connection to pre-selected applications.
The number of virtual terminals per Platine terminal can be set between 1 and
8.
AX3000 TCP/IP Platine terminals also have a built-in network print and tty
server. This embedded TCP/IP print server allows a printer, connected to any
of the auxiliary ports (serial or parallel) of the Platine terminal, to be seen as a
system printer by any network user.
________________________________________________________________
4
TCP/IP AXEL Platine Terminal
Introduction
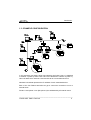
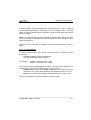
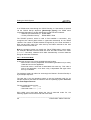
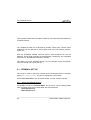
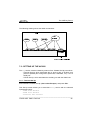
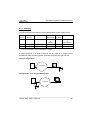
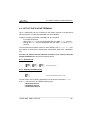
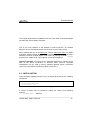
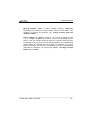
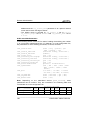
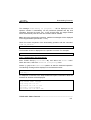
1.3 - EXAMPLE CONFIGURATION
!
'#('
'&(' %& !
#$
"
'&(' !
'&(' "
%& "
In this example, two distinct local area networks are linked. Host 1 is attached
to network 1 (class C) while hosts 2 and 3 are attached to network 2 (class C).
Host 4 is attached to networks 1 and 2 and acts as a router between them.
Numbers in brackets represent the IP address of each networked device.
Each of the four Platine terminals can get a concurrent connection to one or
several hosts.
Printers 1 and printer 2 can (like printer 3) be addressed by all network users.
________________________________________________________________
TCP/IP AXEL Platine Terminal
5
Setting the Configuration
-2TERMINAL CONFIGURATION
________________________________________________________________
TCP/IP AXEL Platine Terminal
7
Setting the Configuration
This chapter provides the general information needed to install and configure
TCP/IP AX3000 Platine terminals on an Ethernet network.
The main steps to install a Platine terminal are:
- assign an Internet address matching the network topology,
- define the network environment accessible from this Platine terminal
(Telnet hosts, routers, etc),
- associate a host with each Platine terminal session,
- set terminal parameters (emulation, function keys, etc) for each available
Platine terminal session.
The first three steps use the terminal’s TCP/IP Set-Up, as described below. The
fourth step is invoked from Terminal Set-Up.
Note: the following pages describe the installation and use of TCP/IP
Platine terminals. This procedure assumes that a UNIX TCP/IP package
has been correctly installed.
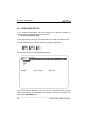
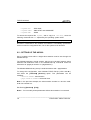
2.1 - TCP/IP SET-UP
The following command sequence is used to enter TCP/IP Set-Up:
Note: use the <> key on the numeric keypad.
________________________________________________________________
8
TCP/IP AXEL Platine Terminal
Setting the Configuration
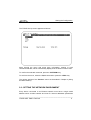
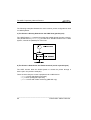
The TCP/IP Set-Up screen appears as follows:
Move through the menu with arrow keys. Information, relating to each
command selected, will be automatically displayed at the bottom of the screen.
To confirm the selected command, press the <RETURN> key.
To exit from the menu, select the 'Quit' command or press the <ESC> key.
The various options of the 'Session' menu are described in Chapter 4 (Using
the Multi-Session).
2.2 - SETTING THE NETWORK ENVIRONMENT
Every device connected to an Ethernet network must have a single 32-bit
address which encodes network and host ID. Internet addresses (sometimes
________________________________________________________________
TCP/IP AXEL Platine Terminal
9
Setting the Configuration
called “IP addresses”) are usually written as four decimal numbers separated by
decimal points ('.' character).
There are three main classes of IP address:
Class A
0
Class B
1 0
Class C
7 bits
Network
1 1 0
24 bits
Host
14 bits
Network
16 bits
Host
21 bits
Network
8 bits
Host
Thus every IP address occupies 4 bytes and contains both:
- a network address, and
- a host address.
even though these may be of varying lengths.
Note: all devices attached to the same network must have the same class and
the same network address. Each must have a different host address.
Example: a Platine terminal connected, over a network, to a host with an IP
address 192.1.168.40 (class C: three bytes for the Network address) must have
the three first bytes of its address set to 192.1.168. The fourth byte cannot be
equal to 40.
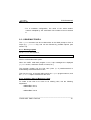
The 'Network' menu of the TCP/IP Set-Up is used:
- to select the Platine terminal IP address,
- to read the Platine terminal Ethernet address,
- to define which hosts and routers the Platine terminal will be allowed to
access.
________________________________________________________________
10
TCP/IP AXEL Platine Terminal
Setting the Configuration
Add Host
Drop Host
Add Route
Drop Route
AX3000 IP
AX3000 Ether
2.2.1 - Ethernet Addresses
Platine terminals (like other devices equipped for Ethernet networking) have a
unique hardware address which is issued by the manufacturer and cannot
thereafter be modified. The address is in the form of six hexadecimal bytes,
separated by colons, thus:
Example:
00:A0:34:01:02:09
To find a Platine terminal’s Ethernet address, select the 'AX3000 Ether' option.
2.2.2 - IP Address and RARP Protocol
Each networked device also has an IP address (rules for which are described
above). This is not fixed but can be set either:
- through the TCP/IP Set-Up ('AX3000 IP' option),
- automatically, when the AX3000 is turned on for the first time (RARP
protocol).
Note on RARP:
The RARP (Reverse Address Resolution Protocol) allows a networked device
(client) to discover its IP address from a host machine which is acting as a
RARP server. The client broadcasts a request which contains its Ethernet
Address. The server maintains an internal table that maps Ethernet addresses
to IP addresses. It looks up that Ethernet address in the table and replies with
the IP address that the client should use. RARP may be needed for remote
administration of Platine terminals (see Chapter 10).
RARP server:
Section 3.4 explains how to configure a UNIX host as a RARP server.
________________________________________________________________
TCP/IP AXEL Platine Terminal
11
Setting the Configuration
RARP protocol on the AXEL Terminal:
If the AX3000 IP address has not been set (it has the value 0.0.0.0) the
following screen will be displayed when the AX3000 is turned on:
F I R S T
I N S T A L L A T I O N
Press <Ctrl><Alt><*> to enter set-up
or
press <spacebar> to search for the AX3000 IP address (RARP protocol)
AX3000 TCP/IP Terminal Base
TB105.3.M55.FR.9701.a
00:A0:34:xx:xx:xx
Pressing <spacebar> will automatically trigger the RARP protocol. The AX3000
sends 8 RARP requests, at intervals of 3 seconds. There are two possible
results:
A host replies:
The RARP protocol is stopped, the AX3000 IP address is automatically set and
the following message is displayed:
AX3000 IP found: xxx.xxx.xxx.xxx
Press any key to continue.
No reply is received after 8 requests:
The following message is displayed:
AX3000 IP not found.
In this case there are two options for setting the AX3000 IP address:
- through TCP/IP Set-Up or
- configure a RARP server, then power-cycle the AX3000.
________________________________________________________________
12
TCP/IP AXEL Platine Terminal
Setting the Configuration
2.2.3 - Host Management
To connect a Platine terminal to a host on the Ethernet network, using TCP/IP
or TELNET protocols, the host must be identified with 2 parameters:
- a name (any alphanumeric character string beginning with a letter),
- an IP address,
- a telnet port: the TCP port used by the telnet service of Unix (default
value 23).
These parameters can be found in the /etc/hosts file of the host to which
you want to connect.
Select the 'Add Host' option from the TCP/IP Platine terminal Set-Up and
enter the 2 parameters. The host address you select must be identical to the
value listed in the host’s /etc/hosts file. However the host name (used by
AX3000) may be different. For example you would use a different host name if
you wished to connect to two different hosts which, by coincidence, had been
given the same host name.
The 'Drop Host' option is used to cancel a host assignment. You will be
presented with a sub-menu listing all currently declared hosts. Select the one to
be dropped, from this sub-menu list, and press <RETURN>.
2.2.4 - Router Management
Depending on the network topology, the Platine terminal and the host may be
installed on different physical networks and linked through one or several
routers. In this configuration, any router that is to be declared in the Network
menu of the TCP/IP Set-Up must belong to the same physical network as
the AX3000.
To declare a router, use the 'Add Route' option and enter the three following
parameters:
- Gateway Address: router IP address. This router must be connected to
the same network as the terminal.
- Host IP Address: IP address of the host to be reached.
- Mask: logical mask on the host IP address. The default value of this
mask distinguishes the host segment from the network segment of the IP
address.
________________________________________________________________
TCP/IP AXEL Platine Terminal
13
Setting the Configuration
Note: the router list must always include the router named 'default'. If this
router name is canceled in error, it will be generated again, automatically, when
the Platine terminal is next switched-on.
From the example configuration (cf. chapter 1.3): adding the router through the
set-up of the AX3000 '192.168.1.201':
Gateway Address: 192.168.1.2 (Router)
Host IP Address: 192.1.1.3 (Host 3)
Mask:
255.255.255.0 (Class C)
The option 'Drop Route' is used to remove a router connection. You will be
presented with a sub-menu listing all currently declared routes. Select the
option and press <RETURN>.
________________________________________________________________
14
TCP/IP AXEL Platine Terminal
Setting the Configuration
2.3 - SETTING MULTI-SESSION PARAMETERS
The AX3000’s built-in multi-connection capability allows simultaneous access to
up to 8 different hosts on one or more Ethernet networks.
The necessary parameters (number of sessions and the view/host association)
are set in the 'Terminal' menu of the TCP/IP Set-Up:
Sessions
Status Line
Add View
Add AUX1
Add AUX2
Drop
2.3.1 - Setting the Sessions
By default, the 'Nb sessions' parameter is set to 8. To modify this
parameter (for example to prevent a user from launching too many sessions),
select the 'Nb sessions' option and enter the required number of sessions
(from 1 to 8).
The Platine terminal controls up to 8 screens simultaneous. This number of
screens has to be shared between:
- the number of sessions (i.e. number of views or number of
simultaneous connections),
- the number of Pages/Session.
For example, it is possible to get:
- 8 sessions with 1 page per session
- 4 sessions with 2 pages per session
- 3 sessions with 1 page per session
- ...
Select the 'Session' option and enter the number of sessions and the number
of pages/session.
________________________________________________________________
TCP/IP AXEL Platine Terminal
15
Setting the Configuration
Note: it is impossible to modify these two parameters when one or more telnet
sessions are active.
2.3.2 - Status Line
th
A status line (i.e. a 26 line) can be used to identify each session of the TCP/IP
AX3000. The label associated with each session is either the name of the
associated UNIX Host or a user-defined label.
To set this label refer to the next chapter.
Note: the 26-line display can be not supported by certain monitors.
2.3.3 - View/Host Association
Any available Platine terminal view can be associated automatically with one of
the declared hosts. When the view is accessed, the connection to the selected
host is automatically made. This saves making the connection manually each
time and provides a convenient, dedicated link between each view and its
corresponding host.
To set the View/Host association, select the 'Add View' option and enter the
five following parameters:
- View
enter the view number (from 1 to 8)
- Hostname
enter the name of a host (which must have been
previously declared in the 'Network' menu through
the 'Add Host' option - refer to Chapter 2.2.3).
- TERM
enter the TERM value (an alphanumeric string:
ansi, for example) associated with this view. The
default TERM values are listed in Chapter 3.2.
- Status Label
This field appears when the status line is enabled.
Enter the label associated with this session. If no
label is entered, the default value is the hostname.
- PowerOn Connect 'y': the connection will be automatically established
when the Platine is powered on.
'n': Press <Alt><Fx> to establish the connection.
- Auto Reconnect 'y': a new connection is automatically established
after a disconnection (<Ctrl><D>).
'n': Press <Alt><Fx> to establish a new connection.
________________________________________________________________
16
TCP/IP AXEL Platine Terminal
Setting the Configuration
The 'Drop' option is used to remove a View/Host association. Select the
association and press <RETURN> to remove it.
Operation of the Platine terminal with View/Host facilities is described in
Chapter 4.1.
2.4 - SETTING THE PROTOCOL
The Axel Platine terminal uses five internal parameters to optimize the TCP/IP
protocol to match the existing networking and applications environments.
Note: these parameters have factory-default settings. Familiarity with TCP/IP
protocols is essential before attempting to modify them.
To read or modify these parameters, use the 'Protocol' menu in the TCP/IP
Set-Up:
mss
window
ttl
noise
tcp port
2.4.1 - 'mss' Option
This option is used to set the 'Maximum Segment Size' parameter.
This parameter defines the maximum packet size (in bytes) of the TCP layer.
By default, it is set to 512 bytes.
As the maximum size of the IP layer datagram (Maximum Transmission Unit)
has been set to 1200 bytes, it is recommended that the value of the 'mss'
option should not exceed 1200 bytes.
If too many frames are rejected on the network, the 'mss' option value may be
decreased.
________________________________________________________________
TCP/IP AXEL Platine Terminal
17
Setting the Configuration
The new value will be used for the next connection made.
2.4.2 - 'window' Option
This parameter defines the size (in bytes) of the Platine terminal TCP window.
By default, it is set to 1000 bytes.
This value can be modified but must be higher than the 'mss' parameter.
If too many (received) frames are rejected by the Platine terminal, the 'window'
parameter may be decreased.
The new value will be used for the next connection made.
2.4.3 - 'ttl' Option
This option is used to set the value of the 'Time To Live' parameter.
Depending on the network topology, the Platine terminal can address a host via
several sub-networks linked together with routers.
To prevent lost frames circulating, for ever, around the network, a limit is set to
the maximum number of routers a frame can pass through. This parameter is
called 'ttl' and set to 255 by default.
Every frame transmitted by the Platine terminal has a ‘ttl’ value set. Each time
such a frame passes through a router, its 'ttl' value is decreased by one. When
the 'ttl' value reaches zero, the frame is destroyed by the router.
The new value will be used for the next connection made.
2.4.4 - 'noise' Option
This option is used to set the value of the 'Threshold Noise Rejection'
parameter for '10BaseT' Platine Terminals.
This 'Threshold Noise Rejection' represents the AX3000’s sensitivity to the
signals of the network cable. The two available values are 'Low' (default value)
and 'High'.
________________________________________________________________
18
TCP/IP AXEL Platine Terminal
Setting the Configuration
A 'High' threshold, sets an AX3000's high reception sensitivity. Then, in case of
an unexpected attenuation of signals (due to a low quality wiring, a too long
cable, etc) this parameter allows the Platine to receive and process the network
frames normally.
Note: it is recommended that this parameter be modified with caution, because
the more sensitive the AX3000 is to data reception, the more sensitive it is to
external interference.
This new value is used after the AX3000 is power-cycled (switched off and on
again).
2.4.5 - 'tcp port' Option
A TCP/IP session (telnet, print server, terminal server) is identified by two
parameters:
- AX3000 IP address (used in all sessions),
- TCP Port (different for each session).
For example:
session 1 (192.168.1.241 / 1024)
session 2 (192.168.1.241 / 1025)
The TCP port number associated with a session can either be a predefined or a
random value. This choice is made using the 'tcp port' option:
- random (default): when the AX3000 is switched on, a random x value is
computed. The 14 TCP ports needed by the AX3000 are from x to x+13.
- fixed: The 14 TCP ports needed by the AX3000 are from 1024 to 1037.
This new value will be set after the AX3000 is power-cycled.
________________________________________________________________
TCP/IP AXEL Platine Terminal
19
Setting the Configuration
2.5 - STATISTICS
The Platine terminal monitors network performance from the time it is switched
on. The logs record details of exchanged frames, rejected frames, etc. The
'statistics' menu may be used to access these logs.
Ethernet
ARP
IP
ICMP
TCP Client
TCP Server
These statistics are mainly intended for network administration tasks, such as
error diagnosis or network optimization. This manual only describes the
Ethernet, the ARP and the TCP (Client and Server) options.
2.5.1 -'Ethernet' Option
This option provides statistics relating to the embedded AX3000 Ethernet
controller. Out of 16 parameters, the main ones are:
- intr: number of interrupts received by the Platine terminal. Generally,
one interrupt is raised for each received frame (but sometimes one
interrupt is raised for multiple frames).
- short: number of received frames with a truncated (too short) header.
- dribble: number of received frames with an incorrect header.
- crc: number of received frames with an incorrect CRC.
- good: number of correct frames received.
- unktype: number of non-IP or non-ARP frames received (IPX frames,
for example).
- output: total number of frames sent by the Platine terminal.
- drop: number of dropped frames (because the input queue overflows).
- nomem: number of dropped frames (because of shortage of memory).
2.5.2 - 'ARP' Option
This option is used to display statistics about 'ARP' requests (Address
Resolution Protocol) which have been sent to, or received from, the Platine
________________________________________________________________
20
TCP/IP AXEL Platine Terminal
Setting the Configuration
terminal. An ARP request is a request to determine the Ethernet number of a
host, whose IP address has been given for a terminal-to-host connection.
- received: number of received ARP frames. This value is equal to the
sum of the following parameters:
- replies: number of responses to ARP requests sent from the
Platine terminal,
- badtype: wrong frames,
- request-in: number of received ARP requests,
- request out: number of ARP requests sent from the Platine terminal.
The recognized 'IP Address/Ethernet Address' associations are listed under
these parameters.
2.5.3 - 'TCP Client' Option
This option is used to display statistics about telnet connections:
- conout: number of connection requests sent by the Platine terminal.
- reset-out, runt and chksum-err: miscellaneous errors.
- bdcsts: number of broadcast messages received by the Platine terminal.
Each current session is listed under these parameters.
2.5.4 - 'TCP Server' Option
This option is used to display statistics about connection requests from the print
and tty servers:
- conin: number of connection requests received by the Platine terminal.
- reset-out, runt and chksum-err: miscellaneous errors.
- bdcsts: number of broadcast messages received by the Platine terminal.
Each opened printer or tty session is listed under these parameters.
________________________________________________________________
TCP/IP AXEL Platine Terminal
21
Setting the Configuration
2.6 - SETTING EMULATIONS
Each AX3000 Ethernet model provides up to 8 independent virtual terminals.
Multi-connection lets any Platine terminal user run up to 8 simultaneous
working sessions (on different hosts, if required). Virtual terminals have
independent set-up parameters (emulation, function keys, video attributes, etc).
For example, an RS/6000 ANSI emulation can be used on one view while a
VT220 emulation is being used on another.
The set-up of parameters for each virtual terminal is done with the Platine
terminal Set-Up. Enter the set-up screen with the <Ctrl><Alt><Esc> key
sequence.
Note: Terminal Set-Up should be entered only during an active session (active
login or prompt).
Set-up operations are described in the User's Guide. A session involves the
following steps:
(select pre-defined set-up )
(enter terminal set-up)
then
then
(select a UNIX pre-defined set-up)
(optional duplication and saving of selected parameters)
The pre-defined set-up (<F10> option) automatically initiates main terminal
parameters for the corresponding session. If necessary, each individual
terminal parameter (number of lines, columns, function keys, etc) can be
modified individually.
________________________________________________________________
22
TCP/IP AXEL Platine Terminal
Setting the Configuration
If all sessions will use identical settings, those of one active session can be
duplicated automatically to ALL other sessions, by a propagation option
invoked by <F12>.
Note: modifications to this setting will affect current sessions immediately.
Other sessions will not be modified until they are activated.
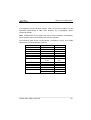
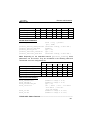
The following table shows recommended, pre-defined, set-up and TERM
values for the various operating systems:
Operating System
Pre-defined set-up
TERM
SCO UNIX 3.2v2
SCO UNIX 3.2v4
OpenServer SCO
SCO XENIX
IBM AIX 3.1
IBM AIX 3.2
IBM AIX 4.x
SCO UNIX 3.2.2
SCO UNIX 3.2.4
SCO OPENSERVER
SCO XENIX
ANSI RS/6000
ANSI RS/6000
ANSI RS/6000
or HFT
UNIX SVR4
ANSI INTERACTIVE
SVR4 UNIX
VT AS400
ANSI
VT220
ansi
ansi
ansi
ansi
hft-c
hft-c-old
hft-c-old
hft-c
AT386
AT386
AT386
vt220
ansi
VT220
UNIX Ware
Interactive UNIX
SUN - Solaris 2.x
OS400
Other
________________________________________________________________
TCP/IP AXEL Platine Terminal
23
Setting the Configuration
Example 1
This example assumes operational connection of the following views to the
following hosts:
view 1: SCO UNIX 3.2v4 host,
view 2: IBM AIX host,
The following procedure is used to establish the sessions:
<Alt><F1>
invoking view 1
<Ctrl><Alt><Esc> entering Terminal Set-Up
<F10>
selecting SCO 4.0 UNIX pre-defined set-up
<F12>
saving new setting
<Alt><F2>
invoking view 2
<Ctrl><Alt><Esc> entering Terminal Set-Up
<F10>
selecting ANSI RS/6000 pre-defined set-up
<F12>
saving new setting
Example 2
This example assumes the following Platine terminal settings and that view 1 is
operational:
view 1: IBM AIX host,
view 2: IBM AIX host,
view 3: IBM AIX host,
view 4: IBM AIX host.
The sessions can be set up as follows:
<Alt><F1>
invoking view 1
<Ctrl><Alt><Esc> entering Terminal Set-Up
<F10>
selecting ANSI RS/6000 pre-defined set-up
<F12>
saving setting and PROPAGATION to other sessions
________________________________________________________________
24
TCP/IP AXEL Platine Terminal
Setting the UNIX System
-3CONFIGURING THE UNIX HOST
________________________________________________________________
TCP/IP AXEL Platine Terminal
25
Setting the UNIX System
This chapter describes how to configure a UNIX host for operation with AXEL
TCP/IP Platine terminals.
The UNIX host configuration procedure, for the TCP/IP Platine terminal,
involves two major steps:
- setting network parameters,
- configuring the UNIX system.
On some UNIX systems, default settings may need adjustment (tuning), to
optimize performance with TCP/IP terminals.
3.1 - SETTING NETWORK PARAMETERS
This step modifies only one host file: /etc/hosts.
This file lists all the devices (host computers, terminals, printers, etc) which can
be linked to the host via the network. (It does not contain entries for any
terminals, printers or modems that are serially connected). There are two
parameters to define each device:
- an IP address, and
- a name.
Example:
192.1.1.200
192.1.1.240
192.1.1.241
vangogh
axel-1
axel-2
________________________________________________________________
26
TCP/IP AXEL Platine Terminal
Setting the UNIX System
The /etc/hosts file must be updated in order to use the embedded TCP/IP
print server capability of the Platine terminal (see Chapters 5 and 7).
3.2 - CONFIGURING THE OPERATING SYSTEM
3.2.1 - Overview
Unlike a serial terminal, a networked terminal is not assigned to one dedicated
device. Instead a pseudo-terminal device file is allocated, dynamically,
according to the sequence in which networked peripheral devices are
connected.
As a result, it is not possible to use mapping files to associate a device name
with a dedicated function (for example: /etc/ttytype for System V or
/etc/default/mapchan for SCO UNIX).
3.2.2- TERM Value
The AX3000 Platine terminal can use exactly the same emulation as is used by
the main console.
To achieve this, the terminal parameters (number of lines and columns,
function keys, etc) must be defined by setting the TERM variable to a value
that is described in /etc/termcap or /usr/lib/terminfo, the terminal
capability description files.
The TERM value can be set through the AX3000’s TCP/IP Set-Up. Use the
[Add View] option to associate a view with a UNIX host and a
[Terminal]
TERM value.
Because the 8 sessions are independent, a different TERM value can be
associated with each session.
The value of this variable is 'negotiated', between the host and the AX3000
Platine terminal, when opening a session (i.e. making a connection).
________________________________________________________________
TCP/IP AXEL Platine Terminal
27
Setting the UNIX System
If no TERM value is set through the TCP/IP Set-Up, or if the session is opened
[Open]), the TERM value
via the TCP/IP Set-Up sequence ([Session]
'negotiated' depends on the pre-defined set-up that has been selected:
- ANSI like pre-defined set-up: TERM=ANSI
- VT like pre-defined set-up:
TERM=DEC-VT220
The TELNET protocol, which is used to first establish a connection, only
recognizes two values (both written in uppercase characters) for the TERM
variable. The values of TERM variables recognized by ALL hosts are listed in
RFC 930 and RFC 1060. The value sent by the Platine terminal to the host
must be chosen from this list.
Note: the operating system can modify the Telnet TERM value in some cases.
For example, IBM AIX converts 'ANSI' into 'ansi' and 'DEC-VT220' into 'vt220'
(termdef command), whereas SCO UNIX automatically converts character
strings to lowercase characters.
3.2.3 - Scancode Mode
A terminal can have one of two possible keyboard modes:
- ASCII mode: each key depressed and released generates one (or more)
characters sent to the application.
- Scancode mode: a scancode is associated with each key. This code is
sent to the application, once when a key is depressed and again when
the key is released.
The keyboard mode can either be set through the Platine’s Terminal Set-Up or
by an escape sequence.
The best way is for the operating system to set the keyboard mode (by an
escape sequence) because the terminal and the operating system must use
the same keyboard mode.
The two escape sequences are:
- ASCII mode:
Esc [<1A
- Scancode mode: Esc [<0A
SCO UNIX 3.2v4 (and later) allows the use of scancode mode. So, the
following applies to scancode mode with SCO UNIX.
________________________________________________________________
28
TCP/IP AXEL Platine Terminal
Setting the UNIX System
To switch scancode mode on or off, the ansi terminfo entry must include the
smsc and rmsc capabilities.
Create the ansi terminfo source file:
# cd /usr/lib/terminfo <RETURN>
# infocmp ansi > ansi.src <RETURN>
Add the following line to this file, at any position except the beginning or end of
the file:
smsc=\E[<0A, rmsc=\E[<1A, xonc=e, xoffc=g,
Exit from the editor and save these modifications, then enter the following
command at the UNIX prompt:
# tic ansi.src <RETURN>
This modified ANSI emulation will now support switching between ASCII and
scancode mode.
Note: the xonc and xoffc capabilities describe XPC handshaking. This form
of handshaking is not used with TCP/IP terminals.
To switch on scancode mode for a single session only, issue the following
commands at the UNIX prompt before beginning the session:
$ tput smsc ; stty isscancode xscancode <RETURN>
$ mapkey /usr/lib/keyboard/ps.ibm.ukd <RETURN>
Note: the mapkey command sets the keyboard language. The keyboard
language files are located in the /usr/lib/keyboard directory.
To switch on ASCII mode for a session, issue the following command from the
command line, prior to beginning the session:
$ tput rmsc ; stty -isscancode <RETURN>
________________________________________________________________
TCP/IP AXEL Platine Terminal
29
Setting the UNIX System
When scancode mode is switched on, the keyboard LEDs can be turned on or
off by means of an escape sequence (CSI < p1;p2;p3 O). For more
information, refer to the User's Guide.
3.3 - TUNING THE OPERATING SYSTEM
The operating system TCP/IP package may not default to an optimized
configuration for the use of TCP/IP terminals. In this situation, the system
parameters may be adjusted by means of a 'tuning' procedure.
Note: to accumulate sufficient, significant information to analyze the
performance of terminals, it is necessary for the system to run, under realistic
operating load conditions, for several hours.
3.3.1 - SCO UNIX 3.2v4
Analysis of the SCO UNIX TCP/IP package is done with the following
command:
# netstat -m
This command lists characteristics of all intermediate class buffers used by
TCP/IP.
The two parameters to check are the number of buffers per class (configure
column) and the number of failures (fail column).
If a class has a non-zero 'fail' number, the number of buffers must be increased
for this class.
To modify the parameter setting for a class, enter sysadmsh and select the
following menu options:
[System] [Configure] [Kernel]
Within the menu, select 'Parameters - Tune kernel params'. A second menu
is displayed. Select option 11: Streams Data.
________________________________________________________________
30
TCP/IP AXEL Platine Terminal
Setting the UNIX System
Adjust the parameter values.
The Kernel must be 're-linked' after these modifications.
3.4 - CONFIGURING A RARP SERVER
For a UNIX host to act as a RARP server it must:
- run the RARP daemon - /etc/rarpd,
- have a list of paired Ethernet addresses and associated host names (for
the relevant Platine terminals and any other devices) in the file
/etc/ethers.
- have a list of paired IP addresses and associated host names (for the
relevant Platine terminals and any other devices) in the file
/etc/hosts (see Section 3.1).
Example of /etc/ethers:
00:01:34:22:00:44
00:A0:34:02:45:03
00:A0:34:02:45:04
vangogh
axel1
axel2
Note on SCO UNIX: the SCO default configuration doesn't launch the RARP
daemon. To use this daemon, modify the /etc/tcp file and reboot the SCO
UNIX host.
________________________________________________________________
TCP/IP AXEL Platine Terminal
31
Using the Multi-Session
-4USING MULTI-SESSION
________________________________________________________________
TCP/IP AXEL Platine Terminal
33
Using the Multi-Session
This chapter describes the use of the TCP/IP AX3000 Multi-session and the
View/Host associations.
AXEL TCP/IP Platine terminals provide multiple and concurrent
connections. This feature allows simultaneous access to multiple hosts and
applications.
To switch between views (sessions), use the following keystroke combination:
Where <Fx> represents whichever of the <F1> to <F8> function keys
corresponds to the view number required.
Notes:
- These keystrokes can be changed through the Terminal Set-Up (for more
information refer to the User's Guide).
- If a session uses the VT AS400 emulation, the multi-session keystrokes
are <Alt><Shift><Fx>.
The settings for a session may differ according to the View/Host association
declared during TCP/IP Set-Up.
4.1 - USING WITH VIEW/HOST ASSOCIATIONS
The association, of views with one or more hosts, provides automatic
connections and makes the Platine terminal very easy to use. Automatic
connections are performed when the Platine terminal is turned-on (refer to
chapter 2.3.2) and when switching from one view to another.
________________________________________________________________
34
TCP/IP AXEL Platine Terminal
Using the Multi-Session
These View/Host associations provide two major benefits:
- they enable users to make quick, automatic and faultless connections,
- they initialize connection parameters without the need to enter set-up.
When the Platine terminal is turned-on, automatic connections are made for
the session, if the 'PowerOn Connect' parameter is set to 'y' (yes).
If no session is set in this way, the View/Host association list is displayed. For
example:
session 1
session 2
session 3
Site1
Site1
Site2
ansi
vt220
hft-c
Using the proper key sequence will then initiate a new, automatic connection to
one of the hosts.
When switching from one view to another, using (<Alt><Fx>), an automatic
connection is made to the host associated with the new view.
When the user invokes the disconnect sequence (<Ctrl><D>), and closes the
current session, the behavior of the Platine terminal depends on the 'Auto
Reconnect' parameter for the current session.
If this parameter is set to 'y' (yes), a new connection is immediately and
automatically established with the current session.
If this parameter is set to 'n' (no), the Platine terminal displays the first of the
remaining active sessions. If there are no remaining active sessions (for
example, when the disconnect capability has been invoked from the last active
view), the View/Host association list is displayed.
________________________________________________________________
TCP/IP AXEL Platine Terminal
35
Using the Multi-Session
4.2 - USING WITH SET-UP
If no View/Host association has been defined, the following message is
displayed when the Platine terminal is turned on:
No Pre-programmed View
In this case, the connection to a host will have to be made via TCP/IP Set-Up.
To enter TCP/IP Set-Up, use the following keystroke combination:
The TCP/IP Set-Up menu is displayed as follows:
The TCP/IP Set-Up appears as a menu bar and several pull-down menus.
Within these menus, use the arrow keys to select a function and confirm it by
pressing the <RETURN> key.
________________________________________________________________
36
TCP/IP AXEL Platine Terminal
Using the Multi-Session
To exit from the set-up, use the 'Quit' option or strike the <ESC> key.
The TCP/IP Set-Up 'Session' menu lists the following options:
Open
Close
Resume
Quit
4.2.1 - Opening a Network Session
The 'Open' option is used to select a host from the host list.
The screen is fully cleared, immediately after host selection. A login will then be
displayed when the session is opened.
Note: if the host connection fails (for example if the host is not running or has
been disconnected), it is possible to cancel the session concerned by selecting
the 'Close' option.
4.2.2 - Switching Between Sessions
The Platine terminal can run up to 8 concurrent working sessions (connections
or views). Only one session can be displayed at a time.
In most cases (but not during TCP/IP Set-Up), switching from one session to
another is accomplished by the <Alt><Fx> keystroke combination.
It is also possible to move between sessions by entering TCP/IP Set-Up and
using the 'Resume' option. Look at the sessions status list (on which a star
identifies the active session), and select another active session. The selected
new view is displayed when exiting Set-Up.
4.2.3 - Closing a Network Connection
In most cases, use (<Ctrl><D>) to close a session. It is also possible to close a
session by using the 'Close' option. Select the appropriate session from the list,
then press the <RETURN> key.
________________________________________________________________
TCP/IP AXEL Platine Terminal
37
Using the Multi-Session
After disconnection, the behavior of the Platine terminal depends on the 'Auto
Reconnect' parameter of the current session.
If this parameter is set to 'y' (yes), a new connection is immediately and
automatically established with the current session.
If this parameter is set to 'n' (no), the Platine terminal displays the first of the
remaining active sessions. If there are no remaining active sessions (for
example, when the disconnect capability has been invoked from the last active
view), the View/Host association list is displayed.
________________________________________________________________
38
TCP/IP AXEL Platine Terminal
Standard Print Servers
-5STANDARD PRINT SERVERS
________________________________________________________________
TCP/IP AXEL Platine Terminal
39
Standard Print Servers
This chapter provides the information needed to use printers attached to a
Platine terminal.
The lpd and rcmd utilities allow standard monitoring of network printers.
This chapter provides information for installing and using these utilities to
control printers attached to the Platine terminal.
Note: the auxiliary ports of the Platine terminal can be also controlled by three
AXEL proprietary servers. Written in C language, these servers may be
compiled and linked (for the UNIX System in use) if the executable binary files
are not available. Refer to the Chapter 7 for installation and use of these
servers.
Use of lpd or rcmd is a two-stage process:
- AX3000 Terminal Set-Up configuration,
- UNIX System configuration.
5.1 - SET-UP THE PLATINE TERMINAL
Terminal Set-Up can be used to establish a monitor on the auxiliary port (lpd
service, rcmd service or others) and to set communication parameters for the
two serial ports.
From an active session, press <Ctrl><Alt><Esc> to enter Terminal Set-Up.
5.1.1 - Selecting Port Monitoring
Press <F5> to set the 'Terminal Mode' set-up screen.
________________________________________________________________
40
TCP/IP AXEL Platine Terminal
Standard Print Servers
The three following fields allow a network lpd or rcmd service to be associated
with the auxiliary ports:
- AUX1 Port Service,
- AUX2 Port Service,
- Parallel Port Service.
Use the arrow keys to select the auxiliary port, then press <SPACE>. If the
current service is printd, rtty, rcmd or lpd, the following dialog box
appears:
Service : printd
TCP Port : 2048
Filter
: none
Press <SPACE> again to select the service. The following menu appears:
None
printd
rtty
lpd
rcmd
rtelnet
Note: if the current service is None or rtelnet, the menu appears
immediately and the dialog box is omitted.
Within this menu, use the vertical arrow keys to select the service and press
<RETURN>. The following dialog box appears:
Service : lpd
PRN Name: parallel
Filter : NL=CR+NL
Within this dialog box, use the vertical arrow keys to select a field, use
<SPACE> to modify a field value and press <RETURN> to confirm.
________________________________________________________________
TCP/IP AXEL Platine Terminal
41
Standard Print Servers
The PRN Name field displays the auxiliary port name. This name will also be
the name used by lpd for the connected printer.
The Filter field (only available with lpd) allows line feed (NL) to be mapped to
carriage return plus line feed (CR NL). 0Ah is mapped to 0Dh 0Ah.
Note: within this set-up screen, the 'Default Auxiliary Port' field allows
selection of the port to be used to perform hardcopy and local printing through
escape sequences (CSI 4i and CSI 5i).
5.1.2 - Serial Port Setting
When a serial port is used, it is necessary to set its operating mode and its
communication parameters.
Press <F3> to set-up the AUX1 port or press <F4> to set-up the AUX2 port.
First, use the arrow keys to select the Operating Mode field and press
<SPACE> to select the 'Printer' value.
When an operating mode is selected, the communication parameters (baud
rate, handshake, etc) are automatically set. If necessary, any of these
parameters can be modified to match the peripheral settings.
5.1.3 - Exiting the Set-Up
Press <F12> then <RETURN> to save the current configuration and exit
Set-Up.
5.2 - CONFIGURING THE UNIX SYSTEM
Two utilities are available to control an AX3000's printers:
- lpd: the AX3000's printer is seen as a remote system printer (accessed
by the lp, lpstat and cancel commands) but some options of the lp
command are not available.
________________________________________________________________
42
TCP/IP AXEL Platine Terminal
Standard Print Servers
- rcmd: the AX3000's printer is accessed by the rcmd command. This
command must be added to a printer interface program or associated
with a pseudo-terminal to create a system printer.
5.2.1 - Using lpd
a - Overview
Use the UNIX System Management Tool to add a remote printer. At least, two
parameters are required:
- the name of the remote host: enter the AX3000's name (refer to
/etc/hosts),
- the name of the printer: this name is the PRN name entered when the
AX3000 was set up.
Run the lp command to use this printer.
Note: some options of the lp command (number of copies, banner, etc) cannot
be used, because the Platine terminal is not a UNIX host system and has no
hard disk on which to run a spooler.
b - Using lpd under IBM AIX V3.x
Enter the SMIT fast path smit mkrque. Four parameters are required:
- Name of Queue to Add:
name of the printer accessed by the lp command
- DESTINATION HOST for Remote Jobs:
name of the Platine terminal (refer to /etc/hosts)
- Name of QUEUE on Remote Printer:
PRN name associated with the AX3000's port
- Name of Device to Add:
device name of printer on AIX
The AX3000's printer can now be used by the lp command.
c - Using lpd under IBM AIX V4.x
Enter the SMIT fast path smit spooler then select 'Add a Print Queue'
and 'Remote'.
________________________________________________________________
TCP/IP AXEL Platine Terminal
43
Standard Print Servers
Two type of printer can be added:
- Standard Processing: AIX sends a raw file to the AX3000. You can use
a filter by setting the CR-NL filter through the AX3000's set-up. Three
parameters are required:
- Name of Queue to Add: name of the printer accessed by the lp
command
- DESTINATION HOST for Remote Jobs: name of the Platine
terminal (refer to /etc/hosts)
- Name of QUEUE on Remote Printer: PRN name associated with
the AX3000's port (set-up of AX3000)
- Local Filter: AIX uses a formatter filter to send a file processed for the
printer. Then no filter is needed at the AX3000 level.
The first parameter required is the type of the printer. Select the printer in
the list of supported printer. Three parameters are required:
- Name of Queue to Add: name of the printer accessed by the lp
command
- DESTINATION HOST for Remote Jobs: name of the Platine
terminal (refer to /etc/hosts)
- Name of QUEUE on Remote Printer: PRN name associated with
the AX3000's port (set-up of AX3000)
Note: the best way is using the Local Filter method.
The AX3000's printer can now be used by the lp command.
d - Using lpd under SCO UNIX
Run scoadmin and select [Printer][Printer Manager]. Then select
[Printer][Add Remote...][UNIX]. A dialog box is displayed. Two
parameters are required:
- Host: name of the AX3000 (refer to /etc/hosts)
- Printer: PRN name associated with the AX3000's port (AX3000 set-up)
The AX3000's printer can now be used by the lp command.
________________________________________________________________
44
TCP/IP AXEL Platine Terminal
Standard Print Servers
5.2.2 - Using rcmd
The rcmd command reads data from 'standard input' (stdin) and sends this
data to one of the auxiliary ports of the AX3000.
Note: some UNIX systems use rsh instead of rcmd.
To print a file, issue the following command at the UNIX prompt:
$ cat file | rcmd ax3000 nport <RETURN>
where: - ax3000 is the name for the AXEL terminal (refer to /etc/hosts),
- port is the PRN name of the AX3000's port.
The onlcr parameter can be used to print a file with mapping NL to CR NL:
$ cat file | rcmd ax3000 nport onlcr <RETURN>
It is possible to associate the rcmd command with a pseudo-terminal. Then a
system printer can be attached to this pseudo-terminal. This method enables
use of the lp command to print on the AX3000's printer.
To use this feature, run the following command:
$ rcmd ax3000 port < /dev/ptypx &
where: - ax3000 is the name of the AXEL terminal (refer to /etc/hosts),
- port is the PRN name of the AX3000's port.
- /dev/ptypx is the master part of the pseudo-terminal.
________________________________________________________________
TCP/IP AXEL Platine Terminal
45
Standard Print Servers
The printer must be attached to the slave part of the pseudo-terminal. For
example, if the printer is attached to /dev/ttypf, then /dev/ptypf is used
with the rcmd command.
Note: the rcmd command can be added within a boot script which should be
placed in the /etc/rc2.d directory.
________________________________________________________________
46
TCP/IP AXEL Platine Terminal
The Terminal Server
-6THE TERMINAL SERVER
________________________________________________________________
TCP/IP AXEL Platine Terminal
47
The Terminal Server
This chapter provides the information needed to use serial terminals attached to
a Platine terminal.
The AX3000 provides two bi-directional auxiliary serial ports. Various serial
peripherals can be attached to these serial ports: bar code readers, printers,
scales, etc.
With the embedded AX3000 Terminal Server, serial terminals can also be
attached. These serial terminals are automatically controlled by the embedded
telnet service. No additional software is needed.
This feature must be declared through the two AX3000 set-up procedures:
Terminal Set-Up and TCP/IP Set-Up.
6.1 - TERMINAL SET-UP
This set-up is used to define the network service associated with the auxiliary
ports (lpd, rcmd, rtelnet, etc), and to configure the serial ports.
Press <Ctrl><Alt><Esc> from an active session to enter Terminal Set-Up.
6.1.1 - Select the Network Service
Press <F5> to enter the 'Terminal Mode' set-up screen. The 2 following fields
allow a network service to be associated with the serial ports:
- AUX1 Port Service,
- AUX2 Port Service.
________________________________________________________________
48
TCP/IP AXEL Platine Terminal
The Terminal Server
Use the arrow keys to select the auxiliary port, then press <SPACE>. If the
current service is printd, rtty, rcmd or lpd, the following dialog box
appears:
Service : printd
TCP Port : 2048
Filter
: none
Press <SPACE> again to select the service. The following menu appears:
None
printd
rtty
lpd
rcmd
rtelnet
Note: if the current service is None or rtelnet, the menu appears
immediately and the dialog box is omitted.
Within this menu, use the vertical arrow keys to select the rtelnet service
and press <RETURN>.
6.1.2 - Serial Port Setting
It is necessary to set the operating mode and the communication parameters of
the selected serial port.
Press <F3> to set-up the AUX1 port or press <F4> to set-up the AUX2 port.
First, use the arrow keys to select the Operating Mode field and press
<SPACE> to select the 'Bi-directional Peripheral' value.
When an operating mode is selected, the communication parameters (baud
rate, handshake, etc) are automatically set. If necessary, any of these
parameters can be modified to match the peripheral settings.
________________________________________________________________
TCP/IP AXEL Platine Terminal
49
The Terminal Server
6.1.3 - Exiting the Set-Up
Press <F12> then <RETURN> to save the current configuration and to exit
Set-Up.
6.2 - TCP/IP SET-UP
When the rtelnet service is associated with one serial port, it is necessary to
associate this port with a UNIX host (in the same way, a session is also
associated with a UNIX host).
Press <Ctrl><Alt><> to enter TCP/IP Set-Up.
Sessions
Status Line
Add View
Add AUX1
Add AUX2
Drop
Use the arrow keys to select the 'Add AUX1' or 'Add AUX2' option according to
which serial port is being used.
Note: if the rtelnet is not associated with the selected serial port (within
Terminal Set-Up), an error message is displayed.
To set an association, enter the following four parameters:
- Hostname
enter the name of a host (which must have been
previously declared in the 'Network' menu, through
the 'Add Host' option - refer to Chapter 2.2.3).
- TERM
enter the TERM value (an alphanumeric string, ansi
for example) associated with this view. The default
TERM values are listed in Chapter 3.2.
________________________________________________________________
50
TCP/IP AXEL Platine Terminal
The Terminal Server
- PowerOn Connect 'y': the connection will be automatically established
when the Platine is powered on.
'n': Press any key on the serial terminal keyboard to
establish the connection.
- Auto Reconnect 'y': a new connection is automatically established
after a disconnection (<Ctrl><D>).
'n': Press any key on the keyboard of the serial
terminal to establish a new connection.
The 'Drop' option allows an association to be removed. Select the association
and press <RETURN> to remove it.
6.3 - USING THE TERMINAL SERVER
No additional software is needed at the UNIX level.
When the TCP/IP Platine terminal is switched on, the dedicated connection to
the serial terminal is automatically established.
________________________________________________________________
TCP/IP AXEL Platine Terminal
51
The AXEL tty Server
-7AXEL TTY SERVER
________________________________________________________________
TCP/IP AXEL Platine Terminal
53
The AXEL tty Server
This chapter describes the AXEL tty server and explains its installation and use.
It does not apply to terminals connected via a serial port, which were covered in
the previous chapter, Chapter 6.
7.1 - INTRODUCTION
The AXEL tty server associates a UNIX device (ptty) on the host with an
auxiliary port on the AX3000 terminal. This enables data written to the UNIX
host device to be sent to the AX3000 port, and data received via the AX3000
port to be read through the UNIX host device.
For a UNIX host to act as a terminal server:
- The UNIX host must run the AXEL tty server daemon (axttyd). The
configuration file axttyd must contain a list of AX3000 ports and the
pttys associated with each.
- On the AX3000 the tty service must be selected. This is done through
the AX3000 Set-Up.
Note: this service can be associated with both serial and parallel ports.
When an AX3000, which has been configured with the tty server, is switched
on, an automatic connection to the required UNIX host is sought. If the AXEL
tty server on the UNIX host accepts this connection, the AX3000 port and the
ptty are linked. Thereafter any UNIX software can use the ptty to access the
AX3000 port.
________________________________________________________________
54
TCP/IP AXEL Platine Terminal
The AXEL tty Server
The following drawing shows the UNIX mechanisms:
7.2 - SETTING UP THE AX3000
The tty service must be initiated by means of two AX3000 Set-Up procedures:
- Terminal Set-Up, which associates the tty service with an auxiliary port
(serial or parallel) and configures it (baud rate, handshake, etc.) if it is a
serial port.
- TCP/IP Set-Up, which associates the auxiliary port with the UNIX host.
7.2.1 - Terminal Set-Up
Enter AX3000 Terminal Set-Up (<Ctrl><Alt><Escape>) and press <F5>.
This Set-Up screen allows you to associate a tty service with the selected
input/output port(s):
- AUX1 Port Service
- AUX2 Port Service
- Parallel Port Service
________________________________________________________________
TCP/IP AXEL Platine Terminal
55
The AXEL tty Server
Use the arrow keys to select the auxiliary port, then press <SPACE>. The
following dialog box appears:
Service : lpd
PRN Name: parallel
Filter : NL=CR+NL
Press <SPACE> again to select the service. The following menu appears:
None
printd
rtty
lpd
rcmd
rtelnet
tty
Within this menu, use the vertical arrow keys to select the required tty service
and press <RETURN>.
If the selected port is a serial one, press <F3> to configure AUX1 (or <F4> to
configure AUX2). Parallel ports need no configuration.
The Operating Mode parameter set-up defines the mode of the serial port
selected. Press <Space> to select the operating mode:
- Printer: uni-directional communication (except for handshaking
characters, all data received by the Platine terminal is dropped)
- Bi-directional peripheral: to connect PostScript printers, touch screens,
etc.
When the Operating Mode is selected, the communication parameters (baud
rate, handshaking, etc.) are automatically set. If necessary, any of these
parameters can be modified to match the peripheral settings.
Press <F12> then <CR> to save modifications and exit Set-Up.
________________________________________________________________
56
TCP/IP AXEL Platine Terminal
The AXEL tty Server
7.2.2 - TCP/IP Set-Up
Enter the AX3000 TCP/IP Set-Up (<Ctrl><Alt><>).
Select the vertical menu [Terminal] then select the item for the relevant
input/output port: Add AUX1 or Add AUX2 or Add Parallel. Enter the following
parameters:
- Hostname
enter the name of a host (which must have been
previously declared in the 'Network' menu, through
the 'Add Host' option - refer to Section 2.2.3).
- Auto Reconnect 'y': a new connection is automatically established
after a disconnection.
'n': if a connection is closed, the AX3000 must be
power-cycled to establish a new connection.
Exit Set-Up ([Session][Quit]).
Note: during the test period, do not use the auto-reconnection option.
7.2.3 - Open a Connection...
A tty connection will be established:
- when the AX3000 is powered on,
- after a disconnection, if the auto-reconnection option is used (a
reconnection is performed after 12 seconds).
On the UNIX side, this connection is performed on TCP Port 2048. The AXEL
tty server (axttyd) listens on this TCP port.
When the connection is established, the AX3000 sends a character string
containing the AX3000 IP address and the name of the AX3000 auxiliary port
(separated by the NULL character). With this information, the AXEL tty server
can identify the pair 'AX3000/auxiliary port'. If this pair is not an authorised
association (see next chapter), the AXEL tty server drops the connection.
Otherwise a link is made between the ptty and the AX3000 port.
________________________________________________________________
TCP/IP AXEL Platine Terminal
57
The AXEL tty Server
7.3 - UNIX CONFIGURATION
A UNIX host accepts an AX3000 tty connection if axttyd is launched on the
UNIX host and if the axttyd configuration file lists this connection.
7.3.1 - Installing
Insert the floppy diskette provided. Log in as superuser and enter the following
commands:
# cd /tmp <CR>
# tar xvf /dev/fdx <CR>
# cd ttyserver <CR>
(where fdx is the local name for the floppy disk drive device)
Select the binary file that corresponds to the operating system you are using
(axttyd.XXX). Then copy it into the /etc directory
For example, on IBM’s AIX:
# cp axttyd.AIX /etc/axttyd <CR>
Note: the source file and the makefile are also provided. If the binary file
required for your operating system is not provided, it can be generated.
Copy the AXEL association file into the /etc directory:
# cp axfile /etc <CR>
To run the AXEL tty server automatically, whenever the UNIX host is powered
on, copy the S91axel file into /etc/rc2.d (or /etc/rcd.3 for some UNIX
systems):
# cp S91axel /etc/rc2.d <CR>
The S91axel file contains a command which launches the AXEL tty server.
Modify this command line to use parameters other than the default ones.
________________________________________________________________
58
TCP/IP AXEL Platine Terminal
The AXEL tty Server
7.3.2 - Using
The AXEL tty server uses a configuration file which lists the authorised
associations between AX3000 ports and UNIX pttys.
Each entry in this file contains four parameters:
- AX3000 name (see /etc/hosts)
- AX3000 input/output port. One of these three keywords (lowercase
characters): aux1, aux2 or parallel,
- the master part of the ptty (/dev/ptypx)
- the slave part of the ptty (/dev/ttypx)
Example:
# AXEL association file
axel1
aux1
/dev/ptyp12
axel1
parallel
/dev/ptyp13
ax3000
aux2
/dev/ptyp0
/dev/ttyp12
/dev/ttyp13
/dev/ttyp0
Note: lines beginning with '#' are ignored.
This configuration file is read when the AXEL tty server is launched.
Errors (syntax error, unknown AX3000 name, ptty not available, etc.) are
recorded in a log file.
To start the AXEL tty server, issue the following command:
/etc/axtty_serv [-f file] [-l log] [-n port] &
-f: configuration file (default: /etc/axfile).
-l: log file (default: /tmp/axttylog).
-n: TCP port (default: 2048).
The AXEL tty server can be started either from the UNIX command line or from
the AXEL boot file (/etc/rc2.d/S91axel).
Note: if the server is started from the shell command line, take care to add the
'&' character at the end of line, so the shell prompt will return.
________________________________________________________________
TCP/IP AXEL Platine Terminal
59
The AXEL tty Server
The authorised associations, connections and disconnections are all recorded
in the specified log file.
Modify the association file:
If the association file is modified while the AXEL tty server is running, the AXEL
tty server must re-read the configuration file. This is done by sending the signal
16 to the AXEL tty server process. For example:
# kill -16 pid <CR>
- pid is the process ID for the AXEL tty server process.
7.3.3 - Uninstalling
Remove the AXEL files from /etc and /etc/rc2.d and kill the AXEL tty
server process (by using the signal 15):
# kill -15 pid <CR>
- pid is the AXEL tty server process.
________________________________________________________________
60
TCP/IP AXEL Platine Terminal
The AXEL Proprietary Network Servers
-8THE AXEL PROPRIETARY
NETWORK SERVERS
________________________________________________________________
TCP/IP AXEL Platine Terminal
61
The AXEL Proprietary Network Servers
This chapter introduces the TCP/IP AX3000 print and tty servers.
This chapter is dedicated to the three AXEL proprietary network servers. These
servers are used to control AX3000's printers. They are written in the C
language and may be compiled and linked (for whichever UNIX System is
being used) if the binary executable files are not available.
Note: refer to the Chapter 5 to install the standard UNIX print servers: lpd and
rcmd.
8.1 - INTRODUCTION
8.1.1 - Overview
Three auxiliary ports are available on TCP/IP AX3000 models:
- 2 serial ports,
- 1 parallel port.
These ports can be managed either by escape sequences (as on any serial
terminal) or by the AXEL print and tty servers.
The AX3000 embedded TCP/IP servers associate a UNIX device with one of
the three auxiliary ports on the Platine terminal. The peripheral attached to the
Platine terminal is then accessed through this UNIX device. When using
auxiliary peripherals, the AX3000 will still maintain a normal screen display
capability.
For example, this feature allows a printer, connected to any of the auxiliary
ports, to be treated as a system printer. This printer can be used by any
________________________________________________________________
62
TCP/IP AXEL Platine Terminal
The AXEL Proprietary Network Servers
network user and is managed by the UNIX spooler with the lp and associated
commands.
Every auxiliary port can be accessed through a print or a tty AXEL server. It is
possible to control 3 system printers attached to a single Platine terminal.
8.1.2 - The Three AXEL Servers: printd, ttyd and rprint
AXEL has developed three different servers:
printd: the uni-directional print server (PlatinePeripheral)
This server uses a proprietary protocol to establish the connection
with the AX3000 terminal.
The printd service must be activated through the AX3000's Set-Up.
The printd server is a background process. It reads data from a
UNIX device (named pipe or pseudo-terminal).
When the Platine auxiliary port is not used by printd, this port is
available for other applications (local printing for example).
ttyd:
the bi-directional tty server (PlatinePeripheral)
No protocol is used to establish the connection (the ttyd server is
transparent between the UNIX System and the peripheral).
The rtty service must be activated through the AX3000's Set-Up.
The ttyd server is a background process. It reads and writes data
from/to a UNIX device (a pseudo-terminal only).
In contrast to the printd server, once the connection has been
established, the Platine auxiliary port controlled by the ttyd server is
not available for other applications until the ttyd has disconnected.
rprint: the uni-directional print server (PlatinePeripheral)
No protocol is used to establish the connection (the ttyd server is
really transparent between the UNIX System and the peripheral).
The rtty service must be activated through the AX3000's Set-Up.
The printd server is not a background process but a simple
program. It reads data from standard input (stdin), not from a
UNIX device.
When the Platine auxiliary port is not used by rprint, this port is
available for other applications (local printing for example).
________________________________________________________________
TCP/IP AXEL Platine Terminal
63
The AXEL Proprietary Network Servers
8.1.3 - Device: Pseudo-Terminal or Named Pipe
The device used by the printd server can be either a pseudo-terminal or a
named pipe. Consider the following when choosing:
Named Pipe:
The use of a named pipe is very versatile. Because named pipes are not
attached to UNIX kernel drivers, it is possible to create as many as
necessary. However, these devices only provide uni-directional
communication.
Pseudo Terminal:
This is a pair of devices (master and slave parts) set and used, as a
standard feature, by UNIX systems. As the number of devices is limited, it
is possible that other software may compete with the printd server for a
given pseudo-terminal. However, under most UNIX versions, it is easy to
increase the number of pseudo-terminals.
Notes:
- The printd server controls both named pipes and pseudo-terminals.
- The ttyd server controls only pseudo-terminals.
- No UNIX device is used by the rprint server.
8.1.4 - TCP Port Number
As an AXEL server can control three ports of the same Platine terminal, each
port on a Platine must be identified.
This identification is done by assigning a TCP port number to each port. The
port can then be identified by the pair: Platine terminal IP address, TCP port
number.
Note: the three ports of a Platine terminal must each have a different port
number.
IMPORTANT: a TCP port number must be entered through:
- Terminal Set-Up on the Platine terminal,
- and the AXEL server configurator (/etc/axconf).
________________________________________________________________
64
TCP/IP AXEL Platine Terminal
The AXEL Proprietary Network Servers
8.1.5 - Summary
The following table describes the main characteristics of each AXEL Server:
AXEL
Server
AX3000
Service
Communication
UNIX
Monitoring
Port
Sharing
UNIX Device
printd
printd
uni-directional
Yes
ttyd
rprint
rtty
rtty
bi-directional
uni-directional
daemon
or
Piobe (*)
daemon
program
pseudo-terminal
or
named pipe (*)
pseudo-terminal
None
No
Yes
(*) IBM AIX allows both daemon monitoring and Piobe monitoring.
When Piobe monitoring is used, no UNIX device is needed.
A printer attached to a Platine terminal can be used as a system printer
because the UNIX operating system accesses the printer through a device.
Actual Configuration:
ETHERNET
Configuration 'seen' by the UNIX System:
ETHERNET
________________________________________________________________
TCP/IP AXEL Platine Terminal
65
The AXEL Proprietary Network Servers
The following examples illustrate the most common printer configurations used
on UNIX Systems.
a) The Printer is Directly Attached to the UNIX Host (parallel port)
The UNIX System (lp program) accesses the parallel printer through a device.
This parallel device (/dev/lp0), provided as a standard feature of the UNIX
system, controls the parallel port of the host.
!"
b) The Printer is Attached to the Platine terminal (serial or parallel port)
The AXEL servers allow the UNIX System to access the printer through a
device (as in the previous example).
There are three ways to access a peripheral via a UNIX device:
- printd server (background process),
- ttyd server (background process),
- printd server with Piobe monitoring (IBM AIX only).
________________________________________________________________
66
TCP/IP AXEL Platine Terminal
The AXEL Proprietary Network Servers
printd Server:
"#
"
In this example, the UNIX device being used is a named pipe (uni-directional
device), but a pseudo-terminal could be used also.
ttyd Server:
In this example, the UNIX device being used is a pseudo-terminal. This bidirectional device allows connection of a PostScript printer (or a serial
terminal).
Note: be careful: lp uses the slave part of the pseudo-terminal and the ttyd
server uses the master part of the pseudo-terminal.
________________________________________________________________
TCP/IP AXEL Platine Terminal
67
The AXEL Proprietary Network Servers
printd Server - Piobe Monitoring (AIX only):
"#
"$
The main advantage of this method of monitoring is that no UNIX device is
used.
Note: the rprint server works in the same way.
8.1.6 - Caution
The Platine terminal is not operating as a simple terminal but as a print and tty
server. So, caution must be used in switching off the Platine terminal.
The best way is never to switch off the Platine terminal (like a terminal server).
However there is no reason why the VGA monitor should not be switched off.
If you want to switch off the Platine terminal:
- check no printing is in progress,
- check no application is running on any serial terminal attached to the
Platine terminal. Each serial terminal should be displaying a login
message.
8.1.7 - Configuration
To run an AXEL server, proceed as follows:
- set the AX3000 Terminal Set-Up,
- configure the UNIX System through the AXEL utility (/etc/axconf).
________________________________________________________________
68
TCP/IP AXEL Platine Terminal
The AXEL Proprietary Network Servers
8.2 - SET-UP THE PLATINE TERMINAL
Up to 3 peripherals can be connected to the Platine terminal (2 bi-directional
serial ports and 1 uni-directional parallel port are available).
A Platine auxiliary port (serial or parallel) can be controlled:
- by escape sequences
- through the printd service (associated with the AXEL printd server)
- through the rtty service (associated with the AXEL ttyd and rprint
servers)
The Terminal Set-Up allows control of each auxiliary port (printd, rtty, etc)
and setting of serial port communication parameters (baud rate, handshake,
etc).
At least one Platine terminal network connection (one session) must be
already established to perform the following steps.
8.2.1 - Enter Set-Up
(enter terminal set-up)
8.2.2 - Auxiliary Port Monitoring
(enter the Terminal Modes screen set-up)
On this screen, the 3 following parameters can be used to associate printd
and rtty services with an available auxiliary port:
- AUX1 Port Service
- AUX2 Port Service
- Parallel Port Service
________________________________________________________________
TCP/IP AXEL Platine Terminal
69
The AXEL Proprietary Network Servers
Use the arrow keys to select the auxiliary port, then press <SPACE>. If the
current service is printd, rtty, rcmd or lpd, the following dialog box
appears:
Service : lpd
PRN Name: parallel
Filter : NL=CR+NL
Press <SPACE> again to select the service. The following menu appears:
None
printd
rtty
lpd
rcmd
rtelnet
Note: if the current service is None or rtelnet, the menu appears
immediately and the dialog box is omitted.
Within this menu, use the vertical arrow keys to select the service and press
<RETURN>. The following dialog box appears:
Service : printd
TCP Port : 2048
Filter
: none
Within this dialog box, use the vertical arrow keys to select a field, use
<SPACE> to modify a field value and press <RETURN> to confirm.
The TCP Port field displays the auxiliary port number. This number (in the
range 1 to 65535) is used to identify the port.
The Filter field allows line feed (NL) to be mapped to carriage return plus line
feed (CR NL). 0Ah is mapped to 0Dh 0Ah.
________________________________________________________________
70
TCP/IP AXEL Platine Terminal
The AXEL Proprietary Network Servers
Note: within this set-up screen, the 'Default Auxiliary Port' field allows
selection of the port to be used to perform hardcopy and local printing through
escape sequences (CSI 4i and CSI 5i).
8.2.3 - Serial Port Setting
or
(select the auxiliary port configuration)
Operating Mode:
These parameters allow a choice of operating mode for the
selected serial port (AUX1 or AUX2). Two values are available:
- Printer: uni-directional communication (except for
handshaking characters, all data received by the
Platine terminal is dropped)
- Bi-directional peripheral: to connect PostScript
printers, touch screens or serial terminals.
When the Operating Mode is selected, the communication
parameters (baud rate, handshaking, etc) are automatically set.
If necessary, any of these parameters can be modified to match
the peripheral settings.
8.2.4 - Exit the Set-Up
then
(save the current configuration)
8.3 - CONFIGURING THE UNIX SYSTEM
The UNIX System must be configured in MULTI-USER mode with the print
scheduler running.
________________________________________________________________
TCP/IP AXEL Platine Terminal
71
The AXEL Proprietary Network Servers
Change to the /tmp directory, then copy the AXEL diskette files to the hard
disk:
# cd /tmp <CR>
# tar xvf /dev/fdx <CR>
where fdx is the device name for the diskette.
Invoke the installation script:
# ./install
From the menu, select the language to be used (English or French) and the
UNIX operating system (AIX, SCO, etc) under which the servers are to run. The
two servers and the AXEL configurator will then be copied to the /etc
directory.
The AXEL configuration utility (/etc/axconf) is automatically run. The
following menu appears:
1) Help
2) Show the Current Configuration
3) Add a Platine/Device Association
4) Add a System Printer
5) Remove a Platine/Device Association
6) Remove a System Printer
7) Quit
Note: the configuration process depends on which UNIX system has been
selected. This menu is different when this AXEL utility is run under AIX (refer to
Chapter 8.3.3).
________________________________________________________________
72
TCP/IP AXEL Platine Terminal
The AXEL Proprietary Network Servers
8.3.1 - Platine/Device Association
Option 3 allows a Platine/Device Association to be added. Five parameters are
required:
- AXEL Server:
Select the required AXEL server (printd or ttyd) according to the
Terminal Set-Up of the Platine terminal.
- AXEL Platine:
Enter the name of the target Platine. If this name is not listed in the
/etc/hosts file, the axconf utility adds it, with its associated IP
address.
- TCP Port Number:
Enter the TCP Port Number for the auxiliary port to be used. This is the
number entered through the Platine terminal Set-Up.
- Device:
Enter the device type (pseudo-terminal or named pipe), then enter the
name of the device.
Note: if the printer is a pseudo-terminal, the device filename used should
be the master part name (such as /dev/ptypx).
- Logfile:
This optional file is used to record AXEL server events. Enter the logfile
name or press <RETURN> if logging is not required.
Every association created is stored in the file /etc/rc2.d/S90axel
(/etc/rc.axel under AIX). The associations are then made by running this
file automatically during system start-up
It is also possible to run the daemon immediately (so as not to wait until the
system is rebooted).
Note: to remove a Platine/Device association, use option 5.
The UNIX System can now access the peripheral, attached to the Platine
terminal, through the device controlled by the AXEL server.
Note: if this device is a pseudo-terminal, the slave part (/dev/ttypx) of the
device name must be used.
________________________________________________________________
TCP/IP AXEL Platine Terminal
73
The AXEL Proprietary Network Servers
a) Using a Printer
The most common requirement is to declare a printer attached to the Platine
terminal. This printer can be added using the UNIX System Management Tool.
Note: a printer can also be created or removed through options 4 and 6 of the
AXEL utility. Use these options only when the printer device is a named pipe
and use the UNIX System Management Tool when the printer device is a
pseudo-terminal.
Note: on Solaris 1 and 2, a system printer may only be attached to a pseudoterminal, not to a named pipe.
b) Other uses
Peripherals, other than simple printers, can be attached to the Platine terminal.
For example, bi-directional peripherals such as PostScript printers, touch
screens and serial terminals, can be controlled through the ttyd AXEL server.
These peripherals may be monitored in a totally standard manner, because
they are accessed through a device.
8.3.2 - IBM AIX: Platine/Printer Association
Under IBM AIX, the /etc/axconf main menu is displayed as follows:
1) Help
2) Show the Current Configuration
3)
4)
5)
6)
DAEMON Monitoring
Add a Platine/Device Association
Add a System Printer
Remove a Platine/Device Association
Remove a System Printer
PIOBE Monitoring
7) Add a Platine/Printer Association
8) Remove a Platine/Printer Association
9) Quit
________________________________________________________________
74
TCP/IP AXEL Platine Terminal
The AXEL Proprietary Network Servers
For DAEMON Monitoring (options 3, 4, 5 and 6) refer to the previous chapter.
PIOBE monitoring associates a Platine terminal with a printer (not with a
device). The main benefit of this method is that the AXEL server is not a
daemon (a background process) but a simple printer interface program.
By selecting option 7 in the configuration menu, a Platine/Printer Association
can be created. Three parameters are needed:
- AXEL Platine:
Enter the name of the target Platine. If this name is not listed in the
/etc/hosts file, the axconf utility adds its name to the associated IP
address.
- TCP Port Number:
Enter the TCP port number for the auxiliary port to be used. This is the
number entered through the Platine terminal Set-Up .
Note: the chosen port must be controlled by the printd service.
- Logfile:
This optional file is used to record all AXEL server events. Enter the
logfile name or press <RETURN> if logging is not required.
- Printer:
Enter the characteristics of the new printer:
- the name,
- the model (the default value is 4201-3).
- the type (the default value is asc).
Note: to discover all available printer types and printer models on your system,
study the files in the /usr/lpd/pio/predef directory.
Printers controlled by the AXEL server are addressed with the lp and
associated commands, like any system printer:
$ lp -d printer_name file
Note: use option 8 to remove a Platine/Printer Association.
________________________________________________________________
TCP/IP AXEL Platine Terminal
75
TCP/IP Multishell
-9TCP/IP MULTI-SHELL
________________________________________________________________
76
TCP/IP AXEL Platine Terminal
TCP/IP Multishell
This chapter deals with the installation and use of the AXEL multi-shell software
provided with TCP/IP AXEL Terminals.
One of the main features of the AX3000 is multi-connection. An AX3000
supports up to 8 simultaneous telnet connections to one or many hosts.
When sessions are run on the same host, with the same user name, the AXEL
multi-shell software allows duplicate telnet sessions to be run from the shell,
without the need for multiple logons. This is done by running the AXEL tcpmsh
program from a UNIX shell. This supports up to 8 telnet sessions.
Operating example: you could run four multi-shell sessions (or “views”) across
each of two telnet connections to different hosts. Function keystroke
combinations can be used to hot-key between different telnet connections
(<Alt><Fx>) and different multi-shell views (<Ctrl><Fx>).
9.1 - INSTALLATION
Insert the floppy diskette provided. Log in as superuser and enter the following
commands:
# cd /tmp <CR>
# tar xvf /dev/fdx <CR>
# cd multishell <CR>
(where fdx is the local name for the floppy disk drive device)
A choice of binary files is provided to match the various host operating
systems:
- tcpmsh.AIX
: IBM AIX
________________________________________________________________
TCP/IP AXEL Platine Terminal
77
TCP/IP Multishell
- tcpmsh.SCO
- tcpmsh.SVR4
- tcpmsh.SNX
: SCO UNIX
: UNIX AT&T and UNIXWARE
: SINIX
To rename the required file tcpmsh, and to copy it to /usr/bin, enter the
following command with “OS” replaced by the operating system suffix:
# cp tcpmsh.OS /usr/bin/tcpmsh <CR>
Because it is dedicated to the AX3000, the software is immediately operational.
It has no need for configuration files, nor for the system to be rebooted.
9.2 - SETTING UP THE AX3000
Use of multiple views within a single telnet session must be set through the
AX3000 Set-Up.
The AX3000 supports 8 virtual screens, which may be shared, between telnet
sessions and multi-shell views. In the AX3000 Set-Up, multi-shell views are
referred to as “pages per session” or “page/session”).
The AX3000 default factory set-up is 8 telnet sessions and 1 page/session.
To change this configuration, enter AX3000 TCP/IP Set-Up (<Ctrl><Alt><>)
and select the [Terminal][Session] option. Two parameters can be
modified:
- session number: telnet session
- page/session number: multi-shell view
Note: in the previous example, the telnet session number is 2 and the multishell view number is 4.
Exit Set-Up ([Session][Exit]).
Notes: - Do not modify these parameters while a telnet session is connected.
________________________________________________________________
78
TCP/IP AXEL Platine Terminal
TCP/IP Multishell
- For a consistent configuration, 'the value of the ‘telnet session
number' multiplied by the 'multi-shell view number' must not exceed
8.
9.3 - USING MULTISHELL
The tcpmsh command can be invoked either at the UNIX prompt or from a
script (e.g. .profile file), and can be followed by possible options (see
section 9.4).
9.3.1 - Running tcpmsh
To run tcpmsh, the syntax is:
$ tcpmsh [-options] <CR>
Section 9.4 describes each option.
When the AXEL multi-shell program is run, help messages are displayed
(tcpmsh version, maximum number of views, etc.)
The program creates only the first view (view 1). A pseudo-terminal is
automatically associated with this view.
This view is a copy, of the shell within which the tcpmsh program was run, and
the .profile script is executed for this view.
9.3.2 - Creating a View or Moving to a View
To create a new view or to move to an existing view, use the following
keystrokes:
- <Ctrl><F1>: view 1
- <Ctrl><F2>: view 2
- ...
...
- <Ctrl><F8>: view 8
________________________________________________________________
TCP/IP AXEL Platine Terminal
79
TCP/IP Multishell
If a view does not already exist, the tcpmsh program allocates a pseudoterminal, launches the view and runs .profile.
The maximum number of views may be altered by an option to the tcpmsh
command.
9.3.3 - Deleting a View
To delete a view, move to it (<Ctrl><Fx>) and exit the shell (by typing exit or
pressing <Ctrl><D>). The tcpmsh software releases the associated pseudoterminal and moves to the first view.
If the deleted view was the only active view, the program terminates.
9.3.4 - Exiting tcpmsh
Exit the tcpmsh program by deleting all the views.
9.4 - TCPMSH OPTIONS
To launch tcpmsh, the option syntax is:
$ tcpmsh [-bchlLmnpSx] <CR>
Each option is described below.
9.4.1 - '-b' Option: Select Pttys
The tcpmsh program uses pseudo-terminals (pttys). A pseudo-terminal is a
device file. The filenames used for pseudo-terminals differ between different
operating systems.
The '-b' option is used to set the generic name of pseudo-terminals and must
be followed by a parameter which may have three possible values:
- 'b 0': use with ttypx (where x is any decimal value from 0 to 63),
- 'b 1': use with ttypy (where y is any hexadecimal value from 0 to
3Fhex),
________________________________________________________________
80
TCP/IP AXEL Platine Terminal
TCP/IP Multishell
- 'b 2': use with ttypz, ttyqz, ttyrz and ttysz (where z is any
hexadecimal value from 0 to F).
By default, tcpmsh uses the '-b 0' option.
Note: this option is not compatible with use of the '-p' option (see section 9.4.8)
and is not available for AT&T UNIX.
9.4.2 - '-c' Option: Overscan Colour
When tcpmsh software is active, the status line may be used to identify the
current view.
Another way to identify the current view is to associate a different overscan
colour with each view. This can be done using the '-c' option.
The following table lists views and associated overscan colours:
View
1
2
3
4
Colour
Blue
Light yellow
Green
Cyan
View
5
6
7
8
Colour
Red
Magenta
Yellow
White
9.4.3 - '-f' Option: Initial Scripts
A list of command scripts (one per view) can be stored, in a file whose filename
is provided as the argument to the '-f' option.
This command file has a maximum of 8 lines. Each line lists the command
associated with one view:
view 1
1st line
... ...
...
view 8
8th line
If a view does not have an initial command, its associated line must start with a
dash character (2Dhex character).
________________________________________________________________
TCP/IP AXEL Platine Terminal
81
TCP/IP Multishell
Example: the cmd file:
smit
client
This file is used through the following command:
$ tcpmsh -f cmd
In this example, the smit utility is invoked within view 1 and the client
application within view 3. Views 2, 4, 5, 6, 7 and 8 do not have initial
commands. Instead the shell remains active.
9.4.4 - '-h' Option: On-Line Help
This option displays the tcpmsh syntax and gives a brief description of every
option.
9.4.5 - '-L' Option: Status Line on Line 26
The tcpmsh can use line 26 to display a status line which specifies the active
session and the number of declared views.
A string must be associated with the -L option. This character string is a
generic label (max. length: 6 characters). The character string '/n' is appended
to this label, where n represents the number of the active view.
Note on the TCP/IP status line:
Normally, the TCP/IP status line is handled by the AX3000 itself and not by
software. However, when tcpmsh is running, one 10-character cell of the
TCP/IP status line is associated with each telnet session. Each cell contains a
host name or a user-defined label (entered through Set-Up or set by escape
sequence). The cell of the active session is displayed in reverse video mode.
AX3000 Set-Up:
To display line 26, enter the AX3000 TCP/IP Set-Up (<Ctrl><Alt><>) and
select the [Terminal][Status Line] option.
________________________________________________________________
82
TCP/IP AXEL Platine Terminal
TCP/IP Multishell
Example: following the command:
$ tcpmsh -n 4 -L UNIX <CR>
the status line cells will display UNIX/1 for view 1, UNIX/2 for view 2, UNIX/3
for view 3 and UNIX/4 for view 4.
9.4.6 - '-l' Option: Status Line on line 25
This option '-l' (lowercase L) allows the use of line 25 to display a status line
which specifies the active session and the number of declared views.
Note: a character string can be added following this option to display a label at
the right of this line.
Example:
$ NOM=`tty` <CR>
$ tcpmsh -n 4 -l $NOM -m <CR>
Generally, ansi entries in a terminfo file specify the behaviour of a 25-line
terminal. To display the status line on line 25, a terminfo entry for a 24-line
terminal must be available.
If no entry for a 24-line terminal is provided, the terminfo database must be
modified.
Updating the terminfo database:
Terminfo files describe the behaviour of each type of terminal. They are to be
found in the usr/lib/terminfo directory and end with a .src or .ti suffix.
If no such file is provided, enter the following command to create one:
# infocmp emul > /usr/lib/terminfo/emul.src <CR>
- where emul is the emulation being used (ansi or at386, for example)
Edit this terminfo file with the vi text editor. Set the proper variable (li# or
lines# depending on the UNIX version) to 24 lines. Save these modifications.
________________________________________________________________
TCP/IP AXEL Platine Terminal
83
TCP/IP Multishell
Recompile the updated source file using the following command (where
emul.src is the name of the modified source file):
# tic /usr/lib/terminfo/emul.src <CR>
AX3000 Set-Up:
The 25th status line option must match the ‘Number of Lines’ parameter of the
Platine terminal Set-Up. This parameter can take either of two values:
- 25 lines,
- 24 + 1 message line.
When the tcpmsh program is launched with the '-l' option, the 'Number of
Lines' parameter is set to '24+1 message line' without saving the current value.
The 'Number of Lines' parameter can be modified as follows:
(enter terminal Set-Up)
(select the 'number of lines' parameter)
(select '25 lines' or '24 + 1 message line')
then
(save this configuration)
9.4.7 - '-m' Option: Silent Mode
By default, help messages (number of views, active keys, etc.) are
automatically displayed when tcpmsh is launched. This '-m' option suppresses
these messages.
9.4.8 - '-n' Option: Number of Views
By default, the tcpmsh program supplies 2 multi-shell views. It is possible to
change this limit by setting the '-n x' option, where x stands for the number of
views (from 1 to 8).
________________________________________________________________
84
TCP/IP AXEL Platine Terminal
TCP/IP Multishell
Example:
$ tcpmsh -n 4 <CR>
9.4.9 - '-p' Option: Predefined Pseudo-Terminals
It is possible to use a fixed set of pseudo-terminals, which are listed in a
parameter file which is named as the argument to the ‘-p’ option. Each line of
the file lists the ptty dedicated to its view (8 lines maximum):
view 1
1st line
view 2
2nd line
... ...
...
view 8
8th line
Example: the predef file
ptyp2
ptyp5
ptyp6
ptyp8
The command line would be as follows:
$ tcpmsh -p predef <CR>
In this example, 4 views are defined by the predef file: ptyp2 is assigned to
view 1, ptyp5 is assigned to view 2, ptyp6 is assigned to view 3 and ptyp8 is
assigned to view 4.
Note: this option is not available with the AT&T UNIX System.
9.4.10 - '-S' Option: Select a Shell
According to the version of UNIX used, different shells are available (sh, ksh,
rsh, etc.). This option allows selection of a shell other than the default one.
The shell name follows the -S option.
Example:
$ tcpmsh -S ksh <CR>
________________________________________________________________
TCP/IP AXEL Platine Terminal
85
TCP/IP Multishell
9.4.11 - '-x' Option: Circular Buffers
A view is considered to be inactive when it is not the current view. Within a
session, when n views are used, there is always one active view (the current
one) and n-1 inactive views.
By default, it is impossible to display data through an inactive view. When an
attempt is made to send data to an inactive view, it is immediately locked
(using XOFF) so that the flow of data is stopped. Data transmission is not
resumed until it is unlocked by being made active again.
By use of the ‘x’ option, these locks and the interruption of data transmission
can be prevented, by assigning a circular buffer to each view. Data transmitted
to an inactive view is then not stopped, but stored in the corresponding circular
buffer. When the view is reactivated, the buffer contents are displayed.
By default, the size of each circular buffer is 2 Kbytes. This size can be
modified using the '-x n' option where n stands for the buffer size in kilobytes
and can have values from 1 KB to 9 KB.
The circular buffer feature saves only the latest data transmitted to an inactive
view. If the volume of data transmitted exceeds the buffer limits, incoming data
may overwrite the existing contents of the buffer and cause incomplete data
display when the view is reactivated (see next chapter).
9.5 - LIMITATIONS OF THE ANSI STANDARD
If an output escape sequence is interrupted, by another output escape
sequence or by any unexpected data, it may leave the terminal display in an
indeterminate state. In ANSI mode, the characters of any unknown escape
sequence (for example an interrupted or incomplete sequence) are displayed
(and not ignored).
This ANSI characteristic may cause multiscreen display problems in the two
following cases:
________________________________________________________________
86
TCP/IP AXEL Platine Terminal
TCP/IP Multishell
- Moving between views: a switch between screens (<Alt><Fx>
keystroke) may interrupt an output escape sequence and disturb view
contents. To prevent this problem, only change screens when the
display is stable.
- Using buffers ('-x' option): When a new screen is activated, the
tcpmsh program displays the contents of the corresponding circular
buffer. If the first escape sequence within the circular buffer has been
interrupted, in the course of circular data processing, the corresponding
screen display is corrupted. This can happen, for example, if a circular
buffer is too small, the inactive view receives too many characters and
older data is overwritten. To prevent this problem, use larger circular
buffers ('-x n' option).
________________________________________________________________
TCP/IP AXEL Platine Terminal
87
Remote Administration
- 10 REMOTE ADMINISTRATION
________________________________________________________________
TCP/IP AXEL Platine Terminal
89
Remote Administration
This chapter deals with TCP/IP AX3000 remote administration.
10.1 - OVERVIEW
This feature permits remote administration (Set-Up) of the TCP/IP AX3000.
This AX3000 Set-Up is performed by the rcmd command. A text file (given as
an argument to the rcmd command) contains the value of each Set-Up
parameter.
This text file may contain some or all AX3000 Set-Up parameters. It can be
either:
- created with a text editor (vi for example) or
- obtained by a rcmd command on an AX3000 already set-up.
Remote administration allows:
- fast and safe installation, by setting up multiple AX3000s with the same
text file,
- convenient site maintenance, supported by an archived configuration file
for each AX3000,
- remote set-up capability and reduced support costs.
The rcmd command is used both to set-up, and to obtain the configuration of,
an AX3000. The rcmd command parameters for remote administration are:
- a host name: the AX3000 terminal name (listed in the file /etc/hosts),
- a command: one of the 3 following keywords.
- setup_send
: set-up an AX3000,
- setup_get
: get an AX3000 configuration,
- ax_reboot
: reset an AX3000 .
________________________________________________________________
90
TCP/IP AXEL Platine Terminal
Remote Administration
Note: rcmd command is also called rsh on some UNIX systems.
Example:
# rcmd axname ax_reboot <CR>
Note: to access an AX3000 with the rcmd command, the IP address of the
AX3000 must already be set. The AX3000 IP address can be set:
- through the AX3000 TCP/IP Set-Up, or
- automatically by the RARP protocol (see section2.2.2).
10.2 - SETTING-UP A PLATINE
To set-up an AX3000, use the rcmd command together with the setup_send
keyword. Use a pipe to read data from standard input:
# cat conf_file | rcmd axname setup_send <CR>
Note: the configuration file conf_file can be created using a text editor or
obtained using the command 'rcmd setup_get' (see next chapter). Refer to
section 10.5 for a detailed description of the configuration file.
The message 'Store set-up in progress...' is displayed on the
operator console when the rcmd command is processing. If a connection
problem occurs, a time-out error message is displayed.
When the configuration has been successfully performed, the message 'OK,
set-up updated' is displayed on the operator console. If other messages are
displayed, refer to Section 10.4.
The AX3000 must read this new Set-Up before it will take effect. This can be
achieved either by power-cycling the AX3000 or by the following rcmd
command:
# rcmd axname ax_reboot <CR>
________________________________________________________________
TCP/IP AXEL Platine Terminal
91
Remote Administration
The message 'Reboot in progress...' is then displayed on the operator
console, the AX3000 is reset and the new Set-Up is implemented. If a
connection problem occurs, a time-out error message is displayed.
10.3 - OBTAINING A CONFIGURATION
To obtain an AX3000 configuration, use the rcmd command together with the
setup_get keyword. This command sends a list of all AX3000 parameters to
standard output, which may be redirected to a file:
# rcmd ax_name setup_get > /tmp/fic <CR>
The message 'Load set-up in progress...' is displayed on the operator
console when the rcmd command is processing. If a connection problem
occurs a time-out error message is displayed.
When the Set-Up parameters are loaded, the message 'OK, set-up sent'
is displayed on the operator console. If other messages are displayed, refer to
Section 10.4.
The configuration file lists each Set-Up parameter. Refer to Section 10.5 for a
detailed description of this file.
10.4 - ERROR MESSAGES
This chapter explains the error messages which may appear (displayed on
'standard error') during operation of the rcmd command.
Two error groups are distinguished:
- fatal errors: numbered from 100 to 106
- warning errors: numbered from 200 to 213
________________________________________________________________
92
TCP/IP AXEL Platine Terminal
Remote Administration
10.4.1 - Fatal Errors
Fatal errors stop the rcmd command. The following fatal errors may occur:
ERR 101: header label expected.
Command:
Cause:
setup_send
the AXEL header label (BEGIN_AX_SETUP) is not the first
line of the configuration file.
Consequence: the rcmd command is aborted, the AX3000 Set-Up is not
modified.
Solution:
check the file. Replace it with a correct AXEL configuration
file.
ERR 102: bad header label protocol version.
Command:
Cause:
setup_send
the protocol version (included in the header label) cannot be
processed by the current AX3000 firmware.
Consequence: the rcmd command is aborted, the AX3000 Set-Up is not
modified.
Solution:
use a configuration file with a compatible protocol.
ERR 103: trailer label not found. Default factory set-up reloaded
Command:
Cause:
setup_send
the trailer label (END_AX_SETUP) is not found (either this
label is not included in the configuration file or the rcmd
connection failed).
Consequence: the default factory Set-Up is reloaded (to replace the
inconsistent configuration caused by the missing trailer
label).
Solution:
add this label to the end of file and run the rcmd command
again.
ERR 104: Can not get complete set-up (rcmd command aborted).
Command:
Cause:
setup_get
a network problem has occurred or the rcmd command has
been killed or aborted.
________________________________________________________________
TCP/IP AXEL Platine Terminal
93
Remote Administration
Consequence: the Set-Up obtained by the command is invalid (the trailer
label is missing).
Solution:
run the rcmd command again.
ERR 105: invalid rcmd command.
Command:
Cause:
Consequence:
Solution:
setup_send, setup_get or ax_reboot
the rcmd keyword is unknown.
no effect.
use setup_send, setup_get or ax_reboot.
ERR 106: cmos busy.
Command:
Cause:
setup_send
another rcmd command (setup_get or setup_send) is
running, or another user has entered Set-Up, on the target
AX3000.
Consequence: no effect.
Solution:
Either wait for a few seconds and repeat the command, or
arrange to exit Set-Up on the target AX3000.
10.4.2 - Warning Error Messages
Warning error messagess do not stop the rcmd command but indicate a
problem (Such as a syntax error, for example). The following warnings may
occur:
ERR 201: xxx: unknown parameter name.
Command:
Cause:
setup_send
this Set-Up parameter (xxx) is unknown.
(eg: s1_screencolumn instead of s1_screen_column).
Consequence: the Set-Up parameter is ignored. The current value of this
parameter is retained.
Solution:
check the syntax of the Set-Up parameter (section 10.5).
ERR 202: xxx: invalid value.
Command:
Cause:
setup_send
the value given to this Set-Up parameter (xxx) is not valid
(example: multi_nbpage=10).
________________________________________________________________
94
TCP/IP AXEL Platine Terminal
Remote Administration
Consequence: the Set-Up parameter is ignored. The current value of this
parameter is retained.
Solution:
check the possible values of this parameter (section 10.5).
ERR 203: xxx: no place to store udk value.
Command:
Cause:
setup_send
not enough memory to store the udk_xxx parameter (udk
stands for User-Defined Key; a function key for example).
Consequence: the default value of this udk parameter is reloaded.
ERR 204: line(s) after the trailer label ignored.
Command:
setup_send
Cause:
END_AX_SETUP is not the last line of the file.
Consequence: the lines after the trailer label are ignored. The AX3000 SetUp is updated.
Solution:
delete these lines.
ERR 211: service name/number error. Service(s) may be reset.
Command:
Cause:
setup_send
Other services, such as print or tty, use the same identifier
(TCP port or name).
Consequence: to get a consistent configuration, some services have been
removed.
Solution:
check service identifier values.
ERR 212: host error. Host(s) may be reset.
Command:
Cause:
setup_send
host parameters are missing or two host names are
identical.
Consequence: to get a consistent configuration, some hosts have been
removed.
Solution:
check the host configuration.
ERR 213: too many sessions or pages. Page number set to 1.
Command:
setup_send
________________________________________________________________
TCP/IP AXEL Platine Terminal
95
Remote Administration
Cause:
eight screens are supported by the AX3000. This resource is
shared by sessions and pages (i.e. multi_nbsession multi_nbpage 8).
Consequence: to get a consistent configuration, the multi_nbpage
parameter is set to one.
Solution:
check the number of sessions and pages.
10.5 - CONFIGURATION FILE FORMAT
A configuration file can list some or all AX3000 Set-Up parameters.
The configuration file begins with the header label (BEGIN_AX_SETUP) and
ends with the trailer label (END_AX_SETUP).
Example:
BEGIN_AX_SETUP V1.1
# this is a comment
tcp_host1_name=vangogh
...
END_AX_SETUP
Note: lines beginning with '#' are treated as comments and ignored.
The Set-Up parameters are divided between the following parameter groups:
Ethernet:
Ethernet interface parameters,
TCP/IP:
network environment,
AUX1 Port:
port service and communication parameters,
AUX2 Port:
port service and communication parameters,
Parallel Port:
port service,
Multi-session:
session numbers, hot keys, etc.
Terminal:
global parameters (screen, keyboard, etc.),
Session 1:
session 1 parameters,
...
...
...
...
...
...
Session 8:
session 8 parameters.
________________________________________________________________
96
TCP/IP AXEL Platine Terminal
Remote Administration
Several formats are available for Set-Up parameter values:
List:
the possible values are listed (the character '|' is
used as a separator).
Examples: (yes | no).
(none | xon-xoff | xpc |dtr)
Number:
maximum and minimum values are given.
Character string:
maximum length is given.
Note: an ASCII character can be represented by its
hexadecimal ASCII code, preceded with a
backslash character (eg.: \1B represents Escape
and \\ represents a backslash).
IP address format:
the IP address format is xxx.xxx.xxx.xxx.
8-colour format:
the 8 available colours are black, red, green,
brown, blue, magenta, cyan and white.
16-colour format:
the 8 additional available colours are grey,
lt-red,
lt-green,
yellow,
lt-blue,
lt-magenta, lt-cyan and hi-white.
In the following parameter lists, the possible values are bracketed after each
Set-Up parameter.
A configuration file can either be created using a text editor, or obtained from
an already configured TCP/IP AX3000 (by using rcmd setup_get).
When a configuration file is obtained from an AX3000, the inactive parameters
(undefined hosts, print server unused, colouring mode disabled, etc.) are
commented out.
The sample configuration file, shown In the following pages, is typical of a file
obtained from an already configured AX3000. Notes and headings are inserted
for clarification and would not appear in the file.
Header
BEGIN_AX_SETUP V1.1
#########################################################
#
TCP/IP AX3000 Platine Terminal
#
#
#
# Ethernet address: 00:A0:34:00:27:10
#
________________________________________________________________
TCP/IP AXEL Platine Terminal
97
Remote Administration
# Firmware: FK3.BV1.1a/TCP.UK.9701.a
#
#########################################################
#
# RESET_CMOS
Note: the RESET_CMOS command allows all the Set-Up parameters (except the
AX3000 IP address) to be reset. When the configuration file is obtained from an
AX3000, this RESET_CMOS command is displayed as a comment.
Ethernet Parameters
#ethernet_ipaddr=192.168.1.241 (address IP format)
ethernet_noise=low
(low | high)
Note: When a configuration file is obtained from an AX3000, the
ethernet_ipaddr parameter is commented out (in order to use this file for
configuring other AXEL Terminals).
TCP/IP Parameters
tcp_host1_name=vangogh
tcp_host1_ip=192.168.1.252
tcp_host1_telnetp=23
tcp_host2_name=picasso
tcp_host2_ip=192.168.1.248
tcp_host2_telnetp=23
tcp_host3_name=pablo
tcp_host3_ip=192.168.1.249
tcp_host3_telnetp=23
tcp_host4_name=vangogh
tcp_host4_ip=192.168.1.250
tcp_host4_telnetp=23
#tcp_host5_name=
#tcp_host5_ip=
#tcp_host5_telnetp=
#tcp_host6_name=
#tcp_host6_ip=
#tcp_host6_telnetp=
#tcp_host7_name=
#tcp_host7_ip=
(character string, 15
(address IP format)
(numeric)
(character string, 15
(address IP format)
(numeric)
(character string, 15
(address IP format)
(numeric)
(character string, 15
(address IP format)
(numeric)
(character string, 15
(address IP format)
(numeric)
(character string, 15
(address IP format)
(numeric)
(character string, 15
(address IP format)
char max.)
char max.)
char max.)
char max.)
char max.)
char max.)
char max.)
________________________________________________________________
98
TCP/IP AXEL Platine Terminal
Remote Administration
#tcp_host7_telnetp=
#tcp_host8_name=
#tcp_host8_ip=
#tcp_host8_telnetp=
tcp_router1_ip=192.168.1.252
tcp_router1_target=192.1.1.252
tcp_router1_mask=255.255.255.0
tcp_router2_ip=192.168.1.253
tcp_router2_target=192.18.1.2
tcp_router2_mask=255.255.255.0
tcp_router3_ip=0.0.0.0
tcp_router3_target=default
tcp_router3_mask=0.0.0.0
#tcp_router4_ip=
#tcp_router4_target=
#tcp_router4_mask=
#tcp_router5_ip=
#tcp_router5_target=
#tcp_router5_mask=
#tcp_router6_ip=
#tcp_router6_target=
#tcp_router6_mask=
#tcp_router7_ip=
#tcp_router7_target=
#tcp_router7_mask=
#tcp_router8_ip=
#tcp_router8_target=
#tcp_router8_mask=
tcp_mss=512
tcp_window=1000
tcp_ttl=255
tcp_setport=fixed
(numeric)
(character string, 15 char max.)
(address IP format)
(numeric)
(address IP format)
(address IP format / default)
(address IP format)
(address IP format)
(address IP format / default)
(address IP format)
(address IP format)
(address IP format / default)
(address IP format)
(address IP format)
(address IP format / default)
(address IP format)
(address IP format)
(address IP format / default)
(address IP format)
(address IP format)
(address IP format / default)
(address IP format)
(address IP format)
(address IP format / default)
(address IP format)
(address IP format)
(address IP format / default)
(address IP format)
(number, lower than 2049)
(number, lower than 2049)
(number, lower than 256)
(fixed | random)
Note: if a configuration file is obtained from an AX3000, undefined hosts and
routers are commented out.
Router explanation:
- The tcp_router%_ip parameter is the router IP address, the
tcp_router%_target parameter is the target host (or network) IP
________________________________________________________________
TCP/IP AXEL Platine Terminal
99
Remote Administration
address and the tcp_router%_mask parameter is an optional network
mask used to reach the target network.
- The default router is encoded by tcp_router%_ip set to 0.0.0.0,
cp_router%_target set to default and tcp_router%_mask set to
0.0.0.0.
AUX1 and AUX2 Parameters
In the following section of the file, for ease of reading the auxiliary port number
(1 or 2) has been represented by the '%' character. In a real configuration file,
the parameters for each auxiliary port would, of course, be listed.
aux%_service=none
(none | rtty | printd | lpd
rcmd | rtelnet | tty)
(character string, 8 char max.)
(number)
(yes | no)
(character string, 8 char max.)
(character string, 8 char max.)
(yes | no)
(yes | no)
(printer | bi-directional)
(300 | 600 | 1200 | 2400 | 4800
9600 | 19200 | 38400 | 57600
115200)
(7-1-none | 7-1-odd | 7-1-even
8-1-none | 8-1-odd | 8-1-even)
(none | xon-xoff | xpc | dtr)
(none | xon-xoff | xpc | dtr)
(none | cts)
aux%_service_name=aux1
aux%_service_num=2048
aux%_filter_nl=no
aux%_associate_host=vangogh
aux%_associate_term=ansi
aux%_associate_autoconn=yes
aux%_associate_reconn=yes
aux%_use=bi-directional
aux%_speed=38400
aux%_data
aux%_tx_hdsk=dtr
aux%_rx_hdsk=dtr
aux%_detect=none
Note: Depending on the associated service (aux%_service), some
parameters can be inactive. They are unmarked in the following table and
commented out in the configuration file:
aux%... parameter
service_name
service_num
none
printd
Available Services
rtty lpd rcmd rtelnet
tty
________________________________________________________________
100
TCP/IP AXEL Platine Terminal
Remote Administration
filter_nl
associate_host
associate_term
associate_autoconn
associate_reconn
Parallel Port Parameters
parallel_service=none
(none | rtty | printd /
lpd | rcmd)
parallel_service_name=parallel (character string, 8 char max.)
parallel_service_num=2050
(number)
parallel_filter_nl=no
(yes | no)
parallel_associate_reconn=no
(yes | no)
parallel_associate_host=dan
(character string, 8 char max.)
Note: Depending on the associated service (parallel_service), some
parameters can be inactive. They are unmarked in the following table and
commented out in the configuration file:
none
parallel_service_name
parallel_service_num
parallel_filter_nl
parallel_associate_host
parallel_associate_reconn
Available Services
printd rtty lpd rcmd
tty
Multi-session Parameters
multi_nbsession=4
multi_nbpage=2
multi_statusline=yes
multi_intro=alt
multi_s1=112
multi_s2=112
(number in range 1 to 8)
(number in range 1 to 8)
(yes | no)
(alt | shift | ctrl - alt-shift
ctrl-shift | ctrl-alt
ctrl-alt-shift)
(number in range 2 to 123)
(number in range 2 to 123)
________________________________________________________________
TCP/IP AXEL Platine Terminal
101
Remote Administration
multi_s3=112
multi_s4=112
multi_s5=112
multi_s6=112
multi_s7=112
multi_s8=112
(number
(number
(number
(number
(number
(number
in
in
in
in
in
in
range
range
range
range
range
range
2
2
2
2
2
2
to
to
to
to
to
to
123)
123)
123)
123)
123)
123)
Terminal Parameters
term_screen=color
term_screen_enhanced=no
term_keyboard=english
term_screensaver=yes
term_screensaver_delay=2
term_numlock=on
term_capslock=on
term_beep=long
term_keydelay=mediun
term_keyspeed=low
term_language=english
term_defaultport=aux1
(black-white | color
grey-levels | paper-white)
(no | underline | doublesize)
(french | german | italian
spanish | belgian | english
american | portuguese | dutch
swiss-german | swiss-french |
turk-q | turk-f | iceland)
(no | yes | yes-kbd-only)
(number lower than 31)
(on | off)
(on | off)
(no | long | short)
(low | medium | high)
(low | medium | high)
(french | english)
(none | aux1 | aux2 | parallel)
Note: When a configuration file is obtained from an AX3000, if
term_screensaver is set to no, term_screensaver_delay is commented
out.
'Session' Parameters
In the following section of the file, for ease of reading the session number (1 to
8) has been represented by the '%' character. In a real configuration file, the
parameters for each session would, of course, be listed.
s%_associate_host=vangogh
s%_associate_term=ansi
s%_associate_label=view 1
(character string, 15 char max.)
(character string, 15 char max.)
(character string, 15 char max.)
________________________________________________________________
102
TCP/IP AXEL Platine Terminal
Remote Administration
s%_associate_autoconn=yes
s%_associate_reconn=yes
s%_predefined_setup=ansi
s%_screen_enhanced=no
s%_screen_crlf=yes
s%_screen_line=25
s%_screen_column=80
s%_screen_codepage=437
s%_screen_scroll=yes
s%_screen_wrap=yes
s%_screen_cursor=block
s%_screen_overscan=09
s%_fctn_monitor=no
s%_fctn_termprg=no
s%_fctn_fctnbold=bold
s%_fctn_endprn=\1B[4i
s%_kbd_code=scancode
s%_kbd_capsmode=caps-lock
s%_kbd_localcompose=no
s%_color_mode=yes
s%_normal_foregrnd=lt-green
s%_normal_backgrnd=black
s%_reverse_foregrnd=lt-red
s%_reverse_backgrnd=white
s%_underscore_foregrnd=yellow
s%_underscore_backgrnd=black
s%_graphics_foregrnd=hi-white
s%_graphics_backgrnd=magenta
s%_tab=
X
X
X
(yes | no)
(yes | no)
(ansi | ansi dos | UNIX sco 3.2.2
UNIX sco 3.2.4 | sco openserver
xenix sco | UNIX svr4 | ansi mos
ansi interactive | ansi rs 6000
ansi data general | vt220
vt as400 | sm9400 | sm9412
ato300 | hft)
(no | yes)
(yes | no)
(25 | 24+1)
(80 | 132)
(437 | 850 | 860| 8859 | 8859-sg
dec-multi | iso-7 | sm9400
ato300 | greek | 861 | 857 )
(yes | no)
(yes | no)
(line | half-block | block)
(no | number in range 0 to 63)
(no | symbol-mode | hexa-mode)
(yes | no)
(bold | doublesize)
(character string, 6 char max.)
(ascii | scancode)
(caps-lock | shift-lock)
(no | remote | local)
(yes | no)
(16-coulor format)
(8-coulor format)
(16-coulor format)
(8-coulor format)
(16-coulor format)
(8-coulor format)
(16-coulor format)
(8-coulor format)
X
X
X
X
(char string, 132 max., X=tabu.)
________________________________________________________________
TCP/IP AXEL Platine Terminal
103
Remote Administration
s%_udk_f1=
s%_udk_f2=
s%_udk_f3=
s%_udk_f4=
s%_udk_f5=
s%_udk_f6=
s%_udk_f7=
s%_udk_f8=
s%_udk_f9=
s%_udk_f10=
s%_udk_f11=
s%_udk_f12=
s%_udk_f13=
s%_udk_f14=
s%_udk_f15=
s%_udk_f16=
s%_udk_f17=
s%_udk_f18=
s%_udk_f19=
s%_udk_f20=
s%_udk_f21=
s%_udk_f22=
s%_udk_f23=
s%_udk_f24=
s%_udk_f25=
s%_udk_f26=
s%_udk_f27=
s%_udk_f28=
s%_udk_f29=
s%_udk_f30=
s%_udk_f31=
s%_udk_f32=
s%_udk_f33=
s%_udk_f34=
s%_udk_f35=
s%_udk_f36=
s%_udk_f37=
s%_udk_f38=
s%_udk_f39=
(character
(character
(character
(character
(character
(character
(character
(character
(character
(character
(character
(character
(character
(character
(character
(character
(character
(character
(character
(character
(character
(character
(character
(character
(character
(character
(character
(character
(character
(character
(character
(character
(character
(character
(character
(character
(character
(character
(character
string,
string,
string,
string,
string,
string,
string,
string,
string,
string,
string,
string,
string,
string,
string,
string,
string,
string,
string,
string,
string,
string,
string,
string,
string,
string,
string,
string,
string,
string,
string,
string,
string,
string,
string,
string,
string,
string,
string,
32
32
32
32
32
32
32
32
32
32
32
32
32
32
32
32
32
32
32
32
32
32
32
32
32
32
32
32
32
32
32
32
32
32
32
32
32
32
32
char
char
char
char
char
char
char
char
char
char
char
char
char
char
char
char
char
char
char
char
char
char
char
char
char
char
char
char
char
char
char
char
char
char
char
char
char
char
char
max.)
max.)
max.)
max.)
max.)
max.)
max.)
max.)
max.)
max.)
max.)
max.)
max.)
max.)
max.)
max.)
max.)
max.)
max.)
max.)
max.)
max.)
max.)
max.)
max.)
max.)
max.)
max.)
max.)
max.)
max.)
max.)
max.)
max.)
max.)
max.)
max.)
max.)
max.)
________________________________________________________________
104
TCP/IP AXEL Platine Terminal
Remote Administration
s%_udk_f40=
s%_udk_f41=
s%_udk_f42=
s%_udk_f43=
s%_udk_f44=
s%_udk_f45=
s%_udk_f46=
s%_udk_f47=
s%_udk_f48=
s%_udk_ins=
s%_udk_end=
s%_udk_dn=
s%_udk_pgdn=
s%_udk_left=
s%_udk_five=
s%_udk_right=
s%_udk_home=
s%_udk_up=
s%_udk_pgup=
s%_udk_minus=
s%_udk_plus=
s%_udk_del=
s%_udk_esc=
s%_udk_dot=
s%_udk_backspace=
(character
(character
(character
(character
(character
(character
(character
(character
(character
(character
(character
(character
(character
(character
(character
(character
(character
(character
(character
(character
(character
(character
(character
(. | ,)
(\08 | \7F
string,
string,
string,
string,
string,
string,
string,
string,
string,
string,
string,
string,
string,
string,
string,
string,
string,
string,
string,
string,
string,
string,
string,
32
32
32
32
32
32
32
32
32
32
32
32
32
32
32
32
32
32
32
32
32
32
32
char
char
char
char
char
char
char
char
char
char
char
char
char
char
char
char
char
char
char
char
char
char
char
max.)
max.)
max.)
max.)
max.)
max.)
max.)
max.)
max.)
max.)
max.)
max.)
max.)
max.)
max.)
max.)
max.)
max.)
max.)
max.)
max.)
max.)
max.)
| ansi | sm9400)
Notes:
- The s%_predefined_setup parameter automatically sets all the session
parameters with proper values.
- When the configuration file is obtained from an already configured
AX3000:
- parameters referring to non-valid sessions (eg. multi_nbsession
parameter) are commented out.
- the colouring mode parameters are commented out if the
s%_color_mode parameter is set to no.
- user-defined keys that are set to their default values (eg. in
s%_predefined_setup) are commented out.
________________________________________________________________
TCP/IP AXEL Platine Terminal
105
Remote Administration
End of File
The configuration file must be ended with the following trailer label:
END_AX_SETUP
If this trailer label is missing, from the configuration file used to set-up an
AX3000, the fatal error message ERR 103 will be issued in response to the
rcmd command and the default factory set-up will be reloaded.
________________________________________________________________
106
TCP/IP AXEL Platine Terminal
Downloading Firmware
- 11 DOWNLOADING FIRMWARE
________________________________________________________________
TCP/IP AXEL Platine Terminal
107
Downloading Firmware
This feature may be used to upgrade TCP/IP AX3000 firmware over a network.
Firmware can be downloaded, for example to add or improve AX3000 features
or to add terminal emulations.
IMPORTANT: firmware can only be downloaded to an AX3000 equipped with
flash memory. On AX3000s not equipped with flash memory, the download
options are not available within AX3000 Set-Up.
Firmware can be downloaded in either of two ways:
- tftp protocol: the operator must enter the location of the firmware file.
- bootp and tftp protocol: this is an automatic procedure. The necessary
parameters will already be available from the UNIX configuration.
Whichever method is used, the firmware file is downloaded from a host (called
tftp host). Following this operation the AX3000 is automatically reset and the
new firmware is enabled.
These two methods can be run either:
- by the rcmd command, entered from any network host (remote
administration) or
- through the Set-Up (for the AX3000 to be upgraded).
Note concerning SCO UNIX: the SCO default configuration doesn't launch the
tftp and bootp daemons. To launch these daemons, modify the file
/etc/inetd.conf by removing the '#' comment character, from the
beginning of the line(s) associated with tftp and/or bootps, and reboot the
UNIX host.
________________________________________________________________
108
TCP/IP AXEL Platine Terminal
Downloading Firmware
11.1 - RCMD OVERVIEW
The rcmd command allows remote access to a network node (the rcmd
command is called rsh on some UNIX systems). The general syntax is:
$ rcmd name keyword <CR>
- name: peripheral name (listed in /etc/hosts). Some versions of UNIX
also accept the IP address of the peripheral.
- keyword: the operation to be performed.
Note: to access an AX3000 via the rcmd command, its IP address must
already be set. An AX3000 IP address can be set either:
- through the AX3000 TCP/IP Set-Up or,
- automatically using the RARP protocol (see section 2.2.2).
11.2 - DOWNLOADING BY TFTP PROTOCOL
To download firmware through the tftp protocol, the firmware file location
(filename and tftp host IP address) must be given.
11.2.1 - Remote Administration
The rcmd command syntax is as follows:
# rcmd axname ax_download file tftpIP routeIP <CR>
- axname: AX3000 name listed in /etc/hosts,
- ax_download: keyword for firmware downloading,
- file: path and name of the firmware file,
- tftpIP: name or IP address of the tftp host (if the name is used, this
host name must be listed in the target AX3000 Set-Up),
- routeIP (optional): name or IP address of a router to reach the tftp host
(if the name is used, this router name must be listed in the target AX3000
Set-Up).
________________________________________________________________
TCP/IP AXEL Platine Terminal
109
Downloading Firmware
Example 1:
# rcmd ax3001 ax_download /usr/firm 192.168.1.249 <CR>
Example 2: a router is used
# rcmd ax3002 ax_download /usr/firm vangogh 192.168.1.249 <CR>
Possible errors (displayed on the operator’s console):
- ERR 105: invalid rcmd command: incorrect keyword (check the
syntax).
- ERR 108: invalid number of parameters: bad parameter
number (2 or 3 parameters are required after the keyword).
- ERR 109: invalid file length: the filename is too long (more
than 31 characters).
- ERR 110: invalid server: the tftp host name is unknown (not listed
in the AX3000 Set-Up).
- ERR 111: invalid router: the router name is unknown (not listed in
the AX3000 Set-Up).
Note: other errors messages can also be displayed (connection time-out for
example). Refer to UNIX manuals.
The message 'Downloading in progress...' is displayed on the
operator’s console if the download can be performed (AX3000 and tftp host
reachable, firmware file found, etc.). A few seconds later, the target AX3000 is
automatically reset and the new firmware is enabled.
Note: during the downloading operation, various messages are displayed on
the target AX3000 (see Section 11.2.2).
To check the downloading operation has been correctly completed, use the
'rcmd ax_version' command:
# rcmd ax3001 ax_version <CR>
The version of the newly installed firmware is displayed on the operator
console. For example:
FK3.BV1.1a/TCP.UK.9701.a
________________________________________________________________
110
TCP/IP AXEL Platine Terminal
Downloading Firmware
11.2.2 - Downloading Through Set-Up
Enter TCP/IP Set-Up (<Ctrl><Alt><>) and select the 'Flash' menu.
Within this menu, select the 'Download (tftp)' item.
The following information must be entered in the four fields:
- Filename: path and name of the firmware file,
- AX3000 IP: this is an IP address only used during the downloading
operation. It can differ from the current IP address,
- tftp Host IP: name or IP address of the tftp host (if the name is used,
this host name must be listed in Set-Up),
- tftp Router IP (optional): name or IP address of a router via which
the tftp host can be reached (If the name is used, this router name must
be listed in the target AX3000 Set-Up).
When <CR> is pressed within the last field, the download operation is run and
the following message is displayed on the AX3000 monitor:
AX TFTP V1.3
Flash Key 3
If the download can be performed (AX3000 and tftp host reachable, firmware
file found, etc.), the current firmware is erased and the following message is
displayed on the AX3000 monitor:
Erasing code ...
Then, the selected firmware file is downloaded (each dot represents 256 bytes):
Loading code
................................................................
................................................................
................................................................
................................................................
.........................................
code loaded
The AX3000 is automatically reset and the new firmware is enabled.
________________________________________________________________
TCP/IP AXEL Platine Terminal
111
Downloading Firmware
IMPORTANT: The AX3000 IP layer, used for the tftp protocol, does not handle
the fragmentation/defragmentation process. Therefore, if a router fragments
frames (mtu lower than 600 bytes), the AX3000 will not be able to perform the
download.
If any problems occur, refer to Section 11.4.
11.3 - DOWNLOADING BY BOOTP AND TFTP PROTOCOLS
This procedure is divided into 2 steps:
- bootp: asking for firmware file information,
- tftp: downloading firmware file.
The bootp protocol is used get the location (IP address of the tftp host and
filename) of the firmware file. This information is obtained by means of a
broadcast.
Information concerning this firmware file must have been configured within
UNIX. The host selected for this function is known as the bootp host.
Note: the bootp host and the tftp host can be different machines.
Prerequisites for bootp:
- the bootpd process must be run on the bootp host.
- the bootpd configuration file (/etc/bootptab) must list an entry for
every AX3000 which can download firmware.
- the bootp host must be directly accessed by the AX3000 (not via a
router). Otherwise a bootp relay host must be set up.
The main capabilities of the bootpd configuration file are as follows:
- tc: network description
- ht: network type
- sa: IP address of tftp host
- sm: network mask
- gw: optional router
- vm: magic number (use only for a router)
________________________________________________________________
112
TCP/IP AXEL Platine Terminal
Downloading Firmware
- ha: Ethernet address of the AX3000
- ip: IP address of the AX3000 (the address is only used during the
downloading operation)
- bf: firmware file name
Examples of bootp configuration files:
a) The AX3000 accesses the tftp host via a router
.default:\
:hn:\
:df=/etc/bootpd.dump:\
:ht=ethernet:\
:sa=192.1.1.243
:to=auto:
.net1:\
:tc=.default:\
:sm=255.255.255.000:\
:gw=192.168.1.252:\
axel1:\
:tc=.net1:\
:vm=rfc1048:\
:ha=00.A0.34.00.00.01:\
:ip=192.168.1.242:\
:bf=/usr/axel/firm9645:
________________________________________________________________
TCP/IP AXEL Platine Terminal
113
Downloading Firmware
b) The AX3000 and the tftp host belong to the same network
.default:\
:hn:\
:df=/etc/bootpd.dump:\
:ht=ethernet:\
:sa=192.168.1.252
:to=auto:
axel1:\
:tc=.default:\
:ha=00.A0.34.00.00.01:\
:ip=192.168.1.242:\
:bf=/tmp/axel:
IMPORTANT: if a problem occurred during a previous download operation
(whatever method was used), the firmware of the target AX3000 may have
been erased. To restore valid firmware, the bootp+tftp protocol will
automatically be run when this target AX3000 is turned on.
11.3.1 - Remote Administration
The rcmd command syntax is as follows:
# rcmd axname ax_download file tftpIP routeIP <CR>
- axname: AX3000 name listed in /etc/hosts,
- ax_download: keyword for firmware downloading,
Example:
# rcmd ax3001 ax_download <CR>
The following error message can be displayed (on the operator’s console):
- ERR 105: invalid rcmd command: incorrect keyword (check the
syntax).
Note: other error messages can also be displayed (connection time-out for
example). For explanations refer to UNIX manuals.
________________________________________________________________
114
TCP/IP AXEL Platine Terminal
Downloading Firmware
The message 'Downloading in progress...' will be displayed on the
operator console if downloading can be performed (AX3000 and tftp host
reachable, firmware file found, etc.). A few seconds later, the target AX3000
will be automatically reset and the new firmware will be enabled.
Note: during the downloading operation, additional messages will be displayed
on the target AX3000 (see Section 11.3.2).
Check for correct completion of the downloading operation with the command:
'rcmd ax_version'.
# rcmd ax3001 ax_version <CR>
The firmware version is displayed on the operator’s console. For example:
FK3.BV1.1a/TCP.UK.9701.a
11.3.2 - Downloading Through Set-Up
Enter TCP/IP Set-Up (<Ctrl><Alt><>) and select the 'Flash' menu.
Within this menu, select the 'Download (bootp+tftp)' item.
Answer 'y' (yes) to the 'Download?' question to start the download operation.
The following message will be displayed on the AX3000 monitor:
AX BOOTP V1.1a
Flash Key 3
If a response is received to the bootp broadcast request, information about the
firmware file location will be displayed:
AX3000 IP: 192.168.1.242
bootp server name: vangogh
bootp relay IP: 0.0.0.0
tftp server IP: 192.1.1.254
file name: /axel/firm9645
tftp router IP: 192.168.1.252
________________________________________________________________
TCP/IP AXEL Platine Terminal
115
Downloading Firmware
An automatic connection to the tftp host will then be established in order to
download the firmware file (see previous chapter).
If any problems occur, refer to the next chapter.
11.4 - IN CASE OF PROBLEMS
This chapter discusses possible problems. The error list is not exhaustive ; if an
unlisted error occurs, please contact your AXEL distributor.
After an error, the AX3000 should be power-cycled.
11.4.1 - Bootp Stage
If an error occurs, the following message is displayed on the AX3000 monitor:
Bootp errno: xxx
- xxx is the error number.
Possible errors:
0: Ethernet board not responding.
1: no response to the bootp broadcast request (the bootp host is
unreachable or not correctly set-up).
Note: a bootp error does not erase the AX3000 firmware.
11.4.2 - Tftp Stage
A tftp error message can originate from either the tftp host or the AX3000.
Depending on the error, the AX3000 firmware may be erased. If this happens
the firmware downloading will be automatically run (bootp+tftp protocol) the
next time the AX3000 is power-cycled.
Tftp Host Errors:
tftp errno: xxx label
________________________________________________________________
116
TCP/IP AXEL Platine Terminal
Downloading Firmware
- xxx is the error number,
- label is the error message. This label is sent by the tftp host and is
generated by UNIX running on the tftp host.
Possible errors:
1: File not found
2: Access violation
3: Disk full or allocation exceeded
4: Illegal TFTP operation
5: Unknown Transaction Identifier
6: File already exists
7: Illegal TFTP operation
0: User-defined error
For more information, refer to UNIX manuals.
Tftp AX3000 Errors:
tftp errno: xxx
- xxx is the error number.
Possible errors:
10: Ethernet board not responding.
11: no response to the tftp broadcast request (the tftp host is unreachable
or not correctly set-up).
12: Network error.
13: the firmware file does not correspond to AX3000 firmware or is not
compatible with the AX3000 model.
14: the firmware file size is less than 256 bytes. This indicates that the file
is not an AX3000 firmware file.
15: checksum error on the firmware file.
________________________________________________________________
TCP/IP AXEL Platine Terminal
117
Zone d'activité d'Orsay-Courtabœuf
16 Avenue du Québec - BP 728
91962 LES ULIS Cedex - France
Tel.: 33 1 69 28 27 27
Fax: 33 1 69 28 82 04