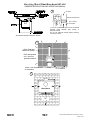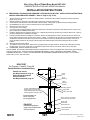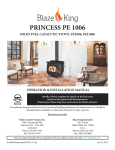
1
Blaze King, Royal Guardian, Model RGT-3001
OWNER'S INSTALLATION AND OPERATION MANUAL
Blaze King
Royal
Guardian
Owner's Installation
and
Operation Manual
Manufactured By
Valley Comfort Systems Inc.
1290 Commercial Way
Penticton, BC V2A 3H5
CANADA
Phone: (250) 493-7444
Fax: (250) 493-5833
Blaze King Industries
146 A Street
Walla Walla, WA 99362
U.S.A.
Phone: (509) 522-2730
Fax: (509) 522-9803
Pour la version française de nos manuels S.V.P. vous référez à notre site web : www.blazeking.com
OM-RGT.PUB
Page 1
Date Printed: Wednesday, November 07, 2012
Version 1.03
Blaze King, Royal Guardian, Model RGT-3001
OWNER'S INSTALLATION AND OPERATION MANUAL
SAFETY NOTICE
IF THE BLAZE KING, ROYAL GUARDIAN, MODEL RGT-3001, STOVE IS NOT
PROPERLY INSTALLED, A HOUSE FIRE MAY RESULT. FOR YOUR SAFETY,
FOLLOW THE INSTALLATION DIRECTIONS. CONTACT LOCAL BUILDING OR
FIRE OFFICIALS ABOUT RESTRICTIONS AND INSTALLATION INSPECTION
REQUIREMENTS IN YOUR AREA.
THIS STOVE MUST BE CONNECTED TO A LISTED (UL103 OR ULC S629) HIGH
TEMPERATURE RESIDENTIAL TYPE AND BUILDING HEATING APPLIANCE TYPE
HT CHIMNEY OR AN APPROVED MASONRY CHIMNEY WITH FLUE LINER.
IMPROPER ASSEMBLY, INSTALLATION, MAINTENANCE OR OPERATION OR
THIS APPLIANCE CAN CAUSE DAMAGE TO PROPERTY, SERIOUS INJURY OR
DEATH. READ THESE INSTRUCTIONS.
This unit certified by the United States Environmental
Protection Agency, certificate number 168. Certified to comply
with July, 1990 particulate emission standards.
SAVE THESE INSTRUCTIONS
CAUTION!
STOVE IS HOT WHILE IN OPERATION. KEEP CHILDREN,
CLOTHING AND FURNITURE AWAY. CONTACT MAY CAUSE
SKIN BURNS.
DO NOT USE CHEMICALS OR FLUIDS TO START THE FIRE.
DO NOT BURN GARBAGE OR FLAMMABLE FLUIDS.
DO NOT CONNECT TO ANY AIR DISTRIBUTION DUCT OR
SYSTEM.
OM-RGT.PUB
Page 2
Date Printed: Wednesday, November 07, 2012
Version 1.03
Blaze King, Royal Guardian, Model RGT-3001
OWNER'S INSTALLATION AND OPERATION MANUAL
Dear Customer:
Thank you for purchasing the Blaze King, Royal Guardian, Model RGT-3001, Wood burning Stove (hereafter referred
to as "stove"). The Royal Guardian's contemporary elegance, complementary trim and decorator colors make it the
first choice for improving your life style and enhancing the decor of your home.
This owner's manual explains the steps required to safely assemble, install operate, and maintain your new stove.
Be a responsible stove owner; carefully read these requirements for safe installation and proper operation BEFORE
installing and using your stove
if local laws require, obtain permits from the Building Inspector or Fire Department. Check local building and fire
code before installing your stove. When you have completed the installation, have it checked by your local inspector.
Disregarding inspection and code requirements may jeopardize your home owner's insurance. Since some insurance
carriers require notification of a stove installation, contact your insurance agent. We want your Royal Guardian to
give you a lifetime of trouble-free operation.
While we have made every effort to make these instructions as complete as possible, some installation or operating
conditions may not be covered. If you have any questions that are not answered here, contact you BLAZE KING
dealer, Local Building Inspector, Fire Department, or call our customer service department at B.K.I. Inc.in the U.S.A.
at (509) 522-2730 or in Canada call Valley Comfort at (250) 493-7444.
The Management and Employees of Blaze King.
KEEP THIS MANUAL FOR FUTURE REFERENCE.
IF YOU HAVE NOT ALREADY DONE SO, PLEASE TAKE A FEW MINUTES TO COMPLETE THE
WARRANTY CARD FOUND IN THE FIREBOX AND MAIL IT TODAY.
PRODUCT INSPECTION BLAZE KING
Blaze King stoves are known for their quality materials and construction, however, mistakes occasionally occur.
Inspect all parts for damage due to shipping and to be sure that all needed parts are enclosed. If you discover a part
is missing or damaged, contact your dealer immediately for replacement or repair. Refer to the part number listed
below and the model and serial numbers of your stove (see the tag on the back of the stove).
Standard Contents
Quantity:
Item:
1
1
1
1
1
Firebox, with brick
Owners Manual
Warranty Card
Thermostat Handle
Door Assembly, with handle
OPTIONAL ACCESSORIES
DESCRIPTION
Side Shield Kit With Fan Assembly
Back Shield Kit (must be installed with Side Shield Kit #Z8301A)
Outside Air Kit
OM-RGT.PUB
Page 3
PART #:
PAGE #:
Z8301A
Z8310A
Z8300AA
25
25
26
Date Printed: Wednesday, November 07, 2012
Version 1.03
Blaze King, Royal Guardian, Model RGT-3001
OWNER'S INSTALLATION AND OPERATION MANUAL
Warranty
BLAZE KING WOOD LIMITED WARRANTY
Blaze King and its respective brands extend the following warranty for wood fired appliances purchased from an
authorized Blaze King dealer and installed in the United States of America or Canada. Warranty starts with date
of purchase by the original owner (End User) except as noted for replacement parts.
Components
Covered
Warranty Period
Parts
Labor
Wood
1 Year
X
All parts, materials and surface finishes
(flaking and peeling) Subject to Conditions,
Exclusion, and Limitations listed
2 Years
X
Fan assemblies and motors, thermal sensors, catalytic thermometer , bi-metallic
thermostat assembly
X
Firebox & Heat Exchanger, Bypass Door
Steel Components
6 Years
X
Catalyst Combustor ( see Conditions, Exclusions, and Limitations)
1 Year
X
Other Replacement Parts
5 Years
2 Year
See Conditions, Exclusions, and Limitations.
OM-RGT.PUB
Page 4
Date Printed: Wednesday, November 07, 2012
Version 1.03
Blaze King, Royal Guardian, Model RGT-3001
OWNER'S INSTALLATION AND OPERATION MANUAL
Blaze King Wood Limited 5 Year Warranty
Blaze King is the manufacturer of the Blaze King line of heating products. At Blaze King, our commitment
to the highest level of quality and customer service is the most important thing we do. Each Blaze King
stove is built on a tradition of using only the finest materials and is backed by our limited warranty to the
original purchaser. With Blaze King, you’re not just buying a stove; you’re buying a company with years
of unequalled performance and quality.
Limited Six (6) Year Warranty:
The CATALYTIC COMBUSTOR is under warranty by Blaze King for six (6) years from the date of original
retail purchase. The purchaser shall pay the following share of the then current retail price for the
combustor: The first three (3) years no charge, 4th year 60%; 5th year 70%, 6th year 80%. The
Combustor must be returned to your dealer along with a completed COMBUSTOR FAILURE REPORT and
original proof of purchase document.
Limited (5) Year Warranty:
Under this warranty, Blaze King covers the stove body and accessories against defects in materials and
workmanship, for part repair or replacement for the first five (5) years *** to the original purchaser.
This Warranty covers: All Steel firebox components against defects in material and workmanship. Please
see the exclusions and limitation section below as certain restrictions and exclusions apply to this
warranty.
Limited Two (2) Year Warranty:
Under this warranty, Blaze King covers, fan assemblies and modular thermostat against defects in
materials and workmanship, for part repair or replacement and limited labor for the first two (2) years to
the original purchaser. Please see the exclusions and limitation section below as certain restrictions and
exclusions apply to this warranty.
Limited One (1) Year Warranty:
Under this warranty, Blaze King covers all parts and materials against defects in materials and
workmanship including exterior paint finishes, for part repair or replacement and limited labor for the
first year to the original purchaser. Please see the exclusions and limitation section below as certain
restrictions and exclusions apply to this warranty.
How the Warranty Works
1. All warranties by the manufacturer are set herein and no claim shall be made against the
manufacturer on any oral warranty or representation. All claims under this Limited Warranty must be
made in writing by your dealer.
2. Any stove or part thereof that is repaired or replaced during the Limited Warranty period will be
warranted under the terms of the Limited Warranty for a period not exceeding the remaining term of the
original Limited Warranty or six (6) months, whichever is longer.
3. For any part or parts of this stove, which in our judgment show evidence of defects, Blaze King
reserves the option to repair or to replace the defective part(s) through an accredited distributor or
agent, provided the defective part is returned to the distributor or agent, transportation prepaid, if
requested.
4. If you discover a problem that you think may be covered by the Limited Warranty, you MUST REPORT
it to your Blaze King dealer WITHIN 30 DAYS from the date the problem was first detected, giving them
proof of purchase and the date of purchase. The dealer will investigate the problem and work with Blaze
King to determine whether the problem:
a) Is covered by the Limited Warranty or
b) Can be fixed in your home or does the product need to be returned to Blaze King for repair.
5. If Blaze King determines that the stove needs to be returned to Blaze King for repair, the customer
has the responsibility and the expense of removing it from their home and shipping it to Blaze King. If
the problem is covered by the Warranty, Blaze King will repair or replace the item at their discretion and
the customer will be responsible for return shipping and re-installation in their home.
OM-RGT.PUB
Page 5
Date Printed: Wednesday, November 07, 2012
Version 1.03
Blaze King, Royal Guardian, Model RGT-3001
OWNER'S INSTALLATION AND OPERATION MANUAL
6. If the problem is not covered by the Limited Warranty, the customer will be responsible for all repair
costs, as well as all storage, shipping and the cost of removing and re-installing the stove.
If you are not satisfied with the service provided by the Blaze King dealer, write to Blaze King at the address
listed on the last page of the Owner’s Manual. Include a copy of the original purchase invoice and a
description of the problem.
Exclusions and Limitations:
1. This Warranty does not cover tarnish, discoloration or wear on the plated surfaces Painted finishes will
change colour after initial firing and will continue to change through the lifetime of the stove. This is normal
occurrence for all high temperature coatings.
2. This Warranty does not cover gasket material or firebrick.
3. Blaze King strongly recommends installation by a certified installer. Failure to comply may adversely affect
coverage under the terms of this warranty. This Limited Warranty covers defects in materials and
workmanship only if the product has been installed in accordance with local building and fire codes; in their
absence refer to the owner’s manual. If the product is damaged or broken as a result of any alteration, wilful
abuse, mishandling, accident, neglect, or misuse of the product, the Limited Warranty does not apply.
4. The stove must be operated and maintained at all times in accordance with the instructions in the Owner’s
Manual. If the unit shows signs of neglect or misuse, it is not covered under the terms of this Warranty
policy. Performance problems due to operator error will not be covered by the Limited Warranty policy.
5. Some minor expansion, contraction, or movement of certain parts and resulting noise, is normal and not a
defect and, therefore, is not covered under this Limited Warranty.
6. Misuse includes over-firing. Over-firing can be identified later by warped plates and paint pigment being
burnt off. Over-firing this appliance can cause serious damage and will nullify the Limited Warranty.
7. The Limited Warranty will cover glass thermal breakage only and will not cover misuse of the stove glass,
including but not limited to:
a) Glass that is struck, has surface contaminates or has had harsh or abrasive cleaners used on it.
b) If the door is slammed or is closed while wood in the firebox is protruding out the stove opening thus
striking the glass.
8. This warranty does not cover products made or provided by other manufacturers and used in conjunction
with the operation of this stove without prior authorization from Blaze King The use of such products may
nullify the Limited Warranty on this stove. If unsure as to the extent of this Limited Warranty, contact your
authorized Blaze King dealer before installation.
9. Blaze King will not be responsible for inadequate performance caused by environmental conditions.
10. The Limited Warranty does not cover installation and operational related problems such as use of
downdrafts or spillage caused by environmental conditions. Environmental conditions include but are not
limited to nearby trees, buildings, roof tops, wind, hills, mountains, inadequate venting or ventilation,
excessive offsets, negative air pressures or other influences caused by mechanical systems such as furnaces,
fans, clothes dryers etc.
11. The Limited Warranty does not cover damage caused by burning salt-saturated wood, corrosive
driftwood, chemically treated wood or any fuel not recommended in the Owner’s Manual (use cord wood
only).
The Limited Warranty is void if:
a) The stove has been operated in atmospheres contaminated by chlorine, fluorine or other damaging
chemicals.
b) The stove is subject to submersion in water or prolonged periods of dampness or condensation.
c) Any damage to the unit, combustion chamber or other components due to water, or weather damage
which is the result of, but not limited to, improper chimney/venting installation.
d) Salt air in coastal areas or high humidity can be corrosive to the finish; these environmental conditions
can cause rusting. Damage caused by salt air or high humidity is not covered by the Limited Warranty.
12. Exclusions to the Limited Warranty include: injury, loss of use, damage, failure to function due to
accident, negligence, misuse, improper installation, alteration or adjustment of the manufacturer’s settings
of components, lack of proper and regular maintenance, alteration, or act of God.
13. The Limited Warranty does not cover damage caused to the stove while in transit. If this occurs, do not
operate the stove and contact your courier and/or dealer.
14. The Limited Warranty does not extend to or include paint, door or glass gaskets or firebricks damage
caused by normal wear and tear, such as paint discoloration or chipping, worn or torn gaskets, chipped or
cracked firebrick, etc.
15. The Limited Warranty does not include damage to the unit caused by abuse, improper installation, or
modification of the unit.
OM-RGT.PUB
Page 6
Date Printed: Wednesday, November 07, 2012
Version 1.03
Blaze King, Royal Guardian, Model RGT-3001
OWNER'S INSTALLATION AND OPERATION MANUAL
16. Damage to plated surfaces caused by fingerprints, scratches, melted items, or other external scores and
residues left on the plated surfaces from the use of abrasive cleaners or polishes is not covered in this
warranty.
17. Blaze King is free of liability for any damages caused by the stove, as well as inconvenience expenses
and materials. The Limited Warranty does not cover incidental or consequential damages.
18. The Limited Warranty does not cover any loss or damage incurred by the use or removal of any
component or apparatus to or from the Blaze King stove without the express written permission of Blaze King
and bearing a Blaze King label of approval.
19. Any statement or representation of Blaze King Products and their performance contained in Blaze King
advertising, packaging literature, or printed material is not part of the Limited Warranty.
20. The Limited Warranty is automatically voided if the stove’s serial number has been removed or altered in
any way. If the stove is used for commercial purposes, it is excluded from the Limited Warranty.
21. No dealer, distributor, or similar person has the authority to represent or warrant Blaze King Products
beyond the terms contained within the Limited Warranty. Blaze King assumes no liability for such warranties
or representations.
22. Blaze King will not cover the cost of the removal or re-installation of the stove, hearth, facing, mantels,
venting or other components.
23. Labor to replace or repair items under this Limited Warranty will be covered per our warranty service fee
reimbursement and labor rates are set per component schedule. Labor rates vary from location to location
and as such total labor costs may not be covered. Please consult with your dealer or service technician for
any additional charges such as travel time or additional labor charges that may apply.
24. For parts of the Blaze King woodstove or fireplace insert warranted beyond the first year, the five year
limited warranty will have the same obligations as described in this document, provided, however that the
purchaser shall pay the following percentage of the then current retail cost of the repair or the replacement,
according to the year after purchase in the which the defect is brought to the attention of Blaze King.***
During the 2nd year----purchaser pays 20%.
3rd year ----purchaser pays 40%. 4th year -----purchaser pays 60%. 5th year---- purchaser pays 80%. 25. If a defect or problem is determined by Blaze King to be non warrantable, Blaze King is not liable for
travel costs for service work. In the event of in-home repair work, the customer will pay any in-home travel
fees or service charges required by the Authorized Dealer.
26. At no time will Blaze King be liable for any consequential damages which exceed the purchase price of
the unit. Blaze King has no obligation to enhance or modify any stove once manufactured (example: as a
stove model evolves, field modifications or upgrades will not be performed).
27. This Limited Warranty is applicable only to the original purchaser and it is non-transferable.
28. This warranty only covers Blaze King Products that are purchased through an authorized Blaze King
dealer.
29. If for any reason any section of the Limited Warranty is declared invalid, the balance of the warranty
remains in effect and all other clauses shall remain in effect.
30. The Limited Warranty is the only warranty supplied by Blaze King, the manufacturer of the stove. All
other warranties, whether express or implied, are hereby expressly disclaimed and the purchaser’s recourse
is expressly limited to the Limited Warranty.
31. Blaze King and its employees or representatives will not assume any liability for damages, either directly
or indirectly, caused by improper usage, operation, installation, servicing or maintenance of this stove.
32. Blaze King reserves the right to make changes without notice. Please complete and mail the warranty
registration card and have the installer fill in the installation data sheet in the back of the manual for
warranty and future reference.
33. Blaze King is responsible for stocking parts for a maximum of seven (7) years after discontinuing the
manufacture or incorporation of the item into its products. An exception to this would be if an OEM supplier
is not able to supply a part.
OM-RGT.PUB
Page 7
Date Printed: Wednesday, November 07, 2012
Version 1.03
Blaze King, Royal Guardian, Model RGT-3001
OWNER'S INSTALLATION AND OPERATION MANUAL
DEFINITIONS
CHIMNEY
One or more passageways, vertical or nearly so, for sending glue gases (smoke) to the outside atmosphere.
1. Listed Residential Type (UL103 OR ULC S629) and Building Heating Appliance Chimney which complies with the
requirements as described on page 27: PREFABRICATED 6 inch listed high temperature (tested at 2100 degrees
F) residential type and building heating appliance chimney. Components required by manufacturers for
installation such as the chimney support base, firestop (as appropriate), attic insulation shield, insulated tee, etc.,
are necessary to assure a safe chimney installation. Use only components manufactured for the chimney.
2. Masonry Chimney: A field-constructed of solid masonry units, bricks, stones, listed masonry chimney units or
reinforced Portland cement concrete, with at least 5/8" fire clay lining joined with refractory cement or other listed
lining system suitable for use with wood stoves.
AVOID FIRE
Maintain the designated clearance distance to combustibles. Insulation must not touch the chimney. There must be
the designated air space clearance around the chimney. This air space around a chimney is necessary to allow
natural heat removal from the area. Insulation in this space will cause a heat buildup which may ignite wood framing.
CHIMNEY CONNECTOR
Also known as stove pipe, connects a fuel-burning appliance to a chimney. A chimney connector shall not pass
through an attic or roof space, closet or similar concealed space, or a floor, ceiling, wall or partition of combustible
construction. The chimney connector should be 6" in diameter, of 24/26 MSG black/blue steel.
COMBUSTIBLE MATERIAL
Material made of or surfaced with wood, compressed paper, plant fibers, plastics, or other materials that will ignite and
burn. This includes materials flame proof or not or materials plastered or not.
COMBUSTION AIR INTAKE
Located on the back of the stove, on the centerline. Combustion air is drawn into this opening, through the control
and into the firebox.
FANS (Optional)
Two variable speed axial fans (105 CFM each). The fans circulate room air around the firebox and back into the home.
FANS SPEED CONTROL
Located on the Fan Assembly, controls the fan speed.
FIREBOX
Steel, 1/4” and 3/16”, lined with firebrick. The recommended log length that should be used in this firebox is up to
16".
FLOOR PROTECTOR
Non combustible surfacing applied to the floor area underneath and extending in front, to the sides and to the rear of a
heat producing appliance.
FLOOR PROTECTION MATERIAL
For the RGT-3001, any non-combustible material or a Listed floor protector.
FLUE
The general term for a passage through which flue gasses pass from the combustion chamber to the outside air.
HEARTH
The floor area within the fire chamber of a fireplace or fireplace stove. The bottom of the firebox. Build the fire
directly on the Hearth.
MOBILE HOME
A residence mounted on wheels, or capable of having wheels installed for moving to another location. Typically, a
residence with a steel frame supporting the structure and providing as axle(s) for the installation of wheels to move it
into the location and out again. Frequently referred to as "Manufactured Homes" to differentiate between travel
trailers and more permanent residences.
THIMBLE
A manufactured or site-constructed (brick) device installed in combustible walls. It is intended to keep walls from
igniting.
OM-RGT.PUB
Page 8
Date Printed: Wednesday, November 07, 2012
Version 1.03
Blaze King, Royal Guardian, Model RGT-3001
OWNER'S INSTALLATION AND OPERATION MANUAL
SAFETY
CHIMNEY FIRE
In the event of a fire in the chimney:
a. Adjust the thermostat to its lowest setting.
b. Check the Loading Door to be sure it is tightly closed.
c. Get everyone out of the house.
d. Call the Fire Department immediately. After the fire is out, have your chimney inspected by a Building Inspector
or certified chimney sweep. Any damaged chimney components should be replaced before the stove is used
again. A masonry chimney that is damaged should be repaired or rebuilt.
Contact you Fire Department for further advice. Your family should have a prearranged plan so that each person
will know what to do and will act immediately if such an emergency arises.
SMOKE DETECTORS
Install at least one smoke detector on each floor of your home to ensure your safety. It should be located away
from the wood stove and close to the sleeping areas. Locating a smoke detector too close to a wood stove can
cause the smoke detector alarm to sound if a puff of smoke is emitted while the wood stove door is open during
reloading. Follow the smoke detector manufacturers placement, installation, and maintenance instructions Your
local fire Department may provide assistance in selecting smoke detectors.
FIRE EXTINGUISHERS
Every home should have at least one approved "Class A-B-C" fire extinguisher. It should be mounted on the wall,
near an exit and close to the stove but not so close that accessibility to the extinguisher could be blocked by a fire.
Your local fire department can advise you concerning the most appropriate location.
BUILDING AND FIRE CODES, PERMITS, AND INSPECTIONS
The installation of this wood stove must comply with you local building and fire codes. Always contact you local
Building Inspector and /or Fire Department before beginning the installation process. If required, obtain a permit
before installation and have the completed installation inspected. Remember that noncompliance with building and/
or fire codes may jeopardize your homeowner's insurance.
CHILDREN
Do not allow children to play near the stove or with the operating knobs. Severe burns may be inflicted by touching
some of the parts of the stove and by opening the loading door. Train children to stay away from the stove and
never leave children unattended in the room when the stove is in operation.
CLEARANCES TO COMBUSTIBLE MATERIALS
For a safe installation, proper clearances to combustible materials must be observed (see pages 19 & 20). Failure
to follow these guidelines voids the certification and warranty, is illegal, and can result in a fire causing property
damage, injury, or death. Keep combustible (burnable) materials at least as far away form the wood stove as the
table on page 19 indicates. Combustible materials include items such as plasterboard or wood-paneled walls,
furniture, wooden mantles, bookshelves, carpets and drapes. Firewood should not be stored within the specified
clearances.
AVOID FIRE
Maintain the designated clearance distance to combustibles. Insulation must not touch the chimney. There must
be the designated air space clearance around the chimney. This air space around a chimney is necessary to allow
natural heat removal from area. Insulation is this space will cause a heat buildup which may ignite wood framing.
FUEL
THIS WOOD STOVE IS FOR USE WITH SOLID WOOD FUEL ONLY.
NEVER USE GASOLINE, GASOLINE-TYPE LANTERN FUEL, KEROSENE, CHARCOAL LIGHTER FLUID TO
START OR 'FRESHEN UP' A FIRE IN THIS HEATER. KEEP ALL SUCH LIQUIDS WELL AWAY FROM THE
HEATER WHILE IT IS IN USE.
Do not burn materials soaked in flammable liquids, trash, garbage, plastics, gift wrappings, coal, charcoal, naptha,
engine oil, chemical cleaners, chemical fire starters, treated or painted wood, saltwater drift wood, railroad ties,
plywood, particle board. Do not burn sawdust wood shavings or chips in this wood stove.
OM-RGT.PUB
Page 9
Date Printed: Wednesday, November 07, 2012
Version 1.03
Blaze King, Royal Guardian, Model RGT-3001
OWNER'S INSTALLATION AND OPERATION MANUAL
When selecting wood for the Model RGT-3001, it is preferable that you use seasoned wood. Dry, seasoned wood
will burn cleaner and produce less creosote. Dry or small pieces of fuel will provide a hotter fire. Larger pieces can
be used to provide a longer burn time.
CAUTION: Do not place wood fuel within the space heater installation clearances or within the space required for
wood loading and ash removal.
DISPOSAL OF ASHES
Ashes should be placed in a sealed non combustible container until they are thoroughly cooled. The closed
container of ashes should be placed on a non-combustible material pending final disposal. Once they are cooled
they can be disposed of by burial in soil or other suitable methods. Do not store other waste in the ash container.
Ashes should never be placed in wooden or plastic containers, or in paper or plastic bags, no matter how long the
fire has been out. Coals have been known to stay hot for several days when embedded in ashes.
WARNING REMOVE ASHES ONLY WHEN THEY ARE COOL. NEVER STORE HOT ASHES IN A GARAGE OR
BASEMENT. HOT ASHES WILL GENERATE CARBON MONOXIDE AND/OR FLAMMABLE GASES. THESE
GASES MAY CAUSE SUFFOCATION.
CHIMNEYS (See "Definitions" on page 8)
The use of make-shift chimney installation is not allowed. Before connecting a wood-burning unit to an existing
chimney, inspect the chimney to be sure it is in good condition. There should be no cracks or holes. Often it is
impossible to see these from the outside. A certified chimney sweep should inspect your chimney and give you an
accurate assessment of its condition. The cross-sectional area must not be less than that of the 6" diameter flue
collar (28.27 square inches). Relining or rebuilding may be necessary to make a Masonry Chimney safe. A proper
chimney is most important for safe, satisfactory operation of any wood heating system. Inspect the Chimney and
Chimney Connector (if installed) at least twice each month during the heating season. Any leak must be repaired or
it may admit more air and cause exhaust gasses to condense and form creosote. Patches of creosote in your
chimney indicates that such Leaks are present. If a significant amount of creosote has accumulated, it should be
removed to reduce the risk of a chimney fire. (See "Creosote and Soot Formation and Need for Removal", below)
"Never intentionally start a chimney fire to clean the flue."
CREOSOTE and SOOT FORMATION AND NEED FOR REMOVAL
When wood is burned slowly, it produces tar and other organic vapors which combine with expelled moisture to
form creosote. The creosote vapors condense in the relatively cool chimney flue of a slow-burning fire. As a result,
creosote residue accumulates on the flue lining. When ignited, this creosote makes an extremely hot fire. The
Chimney and Chimney Connector should be inspected at least twice each month during the heating season to
determine if a creosote or soot build-up has occurred. If creosote has accumulated it should be removed to reduce
the risk of a chimney fire. To control creosote build-up, It is preferable to build a small intense fire, rather than to
have a large smoldering one.
LOADING DOOR
Do not operate you stove with the loading door open. This stove is not designated or intended to be
operated with the loading door open. Do not leave your stove unattended when the loading door is not tightly
closed even when starting a fire. Leaving the loading door open AFTER the fire is well established can cause
overheating of the stove. Such overheating can cause the stove to warp.
Check the loading door gasket for deterioration at least twice each heating season. Inspect the gasket for physical
deterioration, missing sections or obvious leakage. To check the gasket further, insert a piece of paper into the
door opening and close and latch the door. Obvious resistance should be felt when pulling the paper out. Repeat
this check several times around the perimeter of the door.
OM-RGT.PUB
Page 10
Date Printed: Wednesday, November 07, 2012
Version 1.03
Blaze King, Royal Guardian, Model RGT-3001
OWNER'S INSTALLATION AND OPERATION MANUAL
SPECIFICATIONS
FOR MODEL RGT-3001
Heat Output
39,000 Btu/hr.
Wood Capacity (Approximate)
White Oak .................................................................................... 30 Lbs.
Fir................................................................................................. 20 Lbs.
Recommended Wood Length ........................................................... 16 In./40.6cm
Total Weight with Firebrick (approximate)......................................... 300 Lbs.
Width................................................................................................. 25 In./63.5cm
Depth ................................................................................................ 24.5 In./62.2cm
Height ............................................................................................... 32 In./81.3cm
Door Opening Width ......................................................................... 14 In./35.6cm
Door Opening Height ........................................................................ 8.5 In./21.6cm
Flue Size (Diameter) ......................................................................... 6 In./15.2cm
Fans, Two Variable Speed................................................................ 105 CFM
Door Glass ........................................................................................ High Temperature Ceramic
3/16” X 9 1/8 in. X 15 in.
3/16” X 23.2cm X 38.1cm
Minimum chimney Cross-Sectional Area .......................................... 28.27 (Square inches)
Tested and listed to U.L. 1482 / ULC S627 by:
INTERTEK TESTING SERVICES
OM-RGT.PUB
Page 11
Date Printed: Wednesday, November 07, 2012
Version 1.03
Blaze King, Royal Guardian, Model RGT-3001
OWNER'S INSTALLATION AND OPERATION MANUAL
PREPARATION AND ASSEMBLY
WARNING IMPROPER ASSEMBLY AND/OR INSTALLATION OF YOUR BLAZE KING WOOD STOVE OR FAILURE
TO OPERATE IT ACCORDING TO THE GUIDELINES DETAILED IN THESE INSTRUCTIONS, WILL VOID THE
STOVE WARRANTY, CAN CAUSE A HOUSE OR CHIMNEY FIRE, AND MAY ENDANGER YOU FAMILY. FOR
YOUR SAFETY, FOLLOW THE ASSEMBLY AND INSTALLATION INSTRUCTIONS CAREFULLY. CONTACT LOCAL
BUILDING OR FIRE OFFICIALS ABOUT RESTRICTIONS AND INSTALLATION INSPECTIONS IN YOUR AREA.
PLEASE READ THIS ENTIRE MANUAL BEFORE YOU INSTALL AND USE YOUR NEW STOVE
This Blaze King Model RGT-3001 Wood stove is Listed by INTERTEK TESTING SERVICES, ONLY if: it is connected
to a suitable masonry chimney, or a 6 Listed Residential Type and Building Heating Appliance Type Chimney System
(hereafter referred to as Chimney) and minimum clearances to combustible (burnable) materials are observed. See
CHIMNEY and CHIMNEY CONNECTOR, and Table 1, Page 19 for minimum clearances.
DO NOT CONNECT THIS UNIT TO A CHIMNEY FLUE SERVING ANOTHER APPLIANCE.
TOOLS NEEDED FOR INSTALLATION
If you are planning to install this stove yourself, you will need the tools listed below. Consult the chimney and chimney
connector manufacturer's installation instructions for tools needed for installation.
a. 1/4 Wrench, Nut driver, or Socket with Handle
b. Medium Flat Blade Screwdriver and Square Screwdriver.
c. Tape measure.
d. Carpenters Level.
e. See Mobile Home section for tools needed for Mobile Home stove installations.
PLANNING FOR YOUR STOVE PLACEMENT
As you plan your installation, consider the following:
a. Stove should be placed in the most central location in the home. Consider safety, convenience, traffic flow, and the
fact that the stove will need a chimney and chimney connector
b. MINIMUM CLEARANCES SHOWN IN FIGURES 21-26, PAGE 20 ARE TO PREVENT WALLS AND CEILINGS
FROM CATCHING ON FIRE.
c. The dimensions and position of the Floor Protector. See pages 19 & 20
d. The type of chimney system to be used. See page 19.
Electrical Power. (Optional) The stove can be equipped with a fan assembly and a seven foot electrical cord. Do not
route the cord in front of the stove.
REDUCED WALL CLEARANCES
The stove and chimney connector may be placed closer to the wall than shown in Figures 21-26, Page 20 if the wall is
properly protected. The two wall protection systems described on pg. 11 & 12, allow a reduced clearance from the wall
to the stove.
CHECK YOUR CHIMNEY
Before connecting any wood-burning unit to an existing chimney, inspect the chimney to be sure that it is in good
condition. There must be no cracks or holes. The cross-sectional area must not be less than that of the flue collar (6"
diameter 28.27 square inches). A proper chimney is crucial for safe, satisfactory operation of any wood heating
system. Relining or rebuilding may be necessary to make the chimney safe, efficient, and in conformity with local
codes.
Masonry chimneys that have a very large cross-section (100 square inches or more) may experience poor draft and
may require relining to reduce the cross-section and provide a proper draft.
This is also an ideal time to clean the existing chimney. For peak efficiency, a clean chimney flue is essential. A
qualified professional chimney sweep can perform both inspection and cleaning. If you choose to clean your own
chimney, use the proper tools. Homemade cleaners, such as chains, may damage your chimney.
Be sure the Ash Clean-Out door for the masonry chimney is closed tightly. This door may be in the wall in the room
below the chimney or outside near the ground level of the chimney. This is frequently overlooked, and can cause
severe drafting problems in masonry chimney installations.
The chimney MUST extend above the roof at least three feet & two feet above any area of the roof within ten feet of the
termination of the chimney.
If the chimney is a prefabricated metal chimney system be sure chimney pipe is attached, together and, to the woodburning unit with a minimum of three (3) screws securing each connection.
DO NOT CONNECT THIS UNIT TO A CHIMNEY FLUE SERVING ANOTHER APPLIANCE.
OM-RGT.PUB
Page 12
Date Printed: Wednesday, November 07, 2012
Version 1.03
Blaze King, Royal Guardian, Model RGT-3001
OWNER'S INSTALLATION AND OPERATION MANUAL
CHIMNEY HEIGHT AFFECTS DRAFT
Tall chimneys usually provide a strong, dependable draft. The chimney should be kept warm to enhance the draft.
This will also reduce creosote accumulation caused by smoke and condensation of water vapor. A buildup of
creosote can reduce the draft and will become a potential fire hazard. Chimney tops should NEVER be near trees or
other tall objects that might cause down drafts. In new or weatherized homes that are very air-tight, operating
exhaust fans, such as those installed in kitchens and bathrooms, can create a negative pressure in the room and can
result in a down draft in a chimney. Smoke may be drawn into the room, particularly when the loading door is opened
for loading. If this problem arises, open a window while the exhaust fan is being used or turn off exhaust fan while
reloading the stove. If make-up air is NOT supplied, the negative pressure may also draw gasses from a gas
furnace. An outside air connection directly to the stove is the preferred system. Outside air kits are an option
available from your dealer.
If you have a forced-air heating system, you can use the existing ducts and furnace fan to circulate air through the
house. DO NOT connect any ducting between the stove and the heating system ducts or any other air-distribution
ducts.
STOVE ASSEMBLY
Remove all items placed within the firebox for shipping.
IF YOU HAVE NOT ALREADY DONE SO, PLEASE TAKE A FEW MINUTES TO COMPLETE THE
WARRANTY CARD FOUND IN THE FIREBOX AND MAIL IT TODAY.
REDUCED WALL CLEARANCES
REDUCED WALL CLEARANCES
NOTE: Before planning on or using reduced wall clearances, consult local building authorities. Local codes may
vary.
The stove and chimney connector may be placed closer to the wall than shown in Figures 21-26 if the wall is properly
protected. The two wall protection systems described below allow a 12 inch clearance from the wall to the stove.
The National Fire Protection Association Standard 211 recognizes 8 different wall protection systems. Two of these
clearance reduction systems are galvanized steel sheet metal with a minimum thickness of 24 gauge, or 4-inch
nominal thickness brick (FIGURE 23-25). Either of these materials must be spaced out 1 inch from the wall surface.
Non-combustible spacers, with sheet metal screws, are used to maintain the 1-inch air space providing free air
circulation. It is also required that there are openings around the entire system, including the bottom, so that cooling
air can circulate in the 1-inch air space.
(This clearance reduction system is independent of clearance kits described on Page 14, and minimum clearances
detailed on Page 31. Both clearance reduction systems maybe combined, with local code approval .)
The clearance reduction system should extend 38 inches beyond each side of the heater measured diagonally from
the back stove corner (figure 6), 38 inches above the stove top in ceiling exit installations (measured diagonally from
the back of the stove top), and it must extend as high as the thimble penetration of the wall to the chimney wall
behind the vertical run of the chimney connector.
A variety of prefabricated clearance reduction systems may be available through your stove dealer. Always look for
a safety listing label on the product when selecting a prefabricated clearance reduction system and make sure it
designed for use with a wood stove. Follow exactly the installation instructions provided with the system.
OM-RGT.PUB
Page 13
Date Printed: Wednesday, November 07, 2012
Version 1.03
Blaze King, Royal Guardian, Model RGT-3001
OWNER'S INSTALLATION AND OPERATION MANUAL
Fig.
4
Air Space
Combustible
Wall
Fig.
3
Nail or screw anchor
Min. 24 Gauge
Sheet Metal
1 inch non-combustible spacer such as stacked
washers, small diameter pipe, tubing, or
electrical conduit.
Do not use fasteners directly behind chimney
connector or stove.
Sheet Metal Clearance Reduction System
Fig.
5
Brick Clearance
Reduction System
Brick wall spaced
out 1 inch from
protected surface.
Floor
Leave 1 inch clearance for
air circulation
Air Circulation
Fig.
7
4"
4"
Wood Stove
18”
16"
OM-RGT.PUB
Page 14
Date Printed: Wednesday, November 07, 2012
Version 1.03
Blaze King, Royal Guardian, Model RGT-3001
OWNER'S INSTALLATION AND OPERATION MANUAL
GENERAL INSTRUCTION
FLOOR PROTECTOR
The stove must be placed on a floor protector if the floor is made of wood or other combustible flooring.
Floor protection material: Any non-combustible material or Listed floor protector.
To provide the proper clearances, the floor protector must extend beyond the front and sides, see Figure 7.
The floor protector must extend to the wall under a wall exit installation and must extend 2" beyond each side of the
horizontal section of chimney connector.
WARNING FAILURE TO ALLOW THE REQUIRED CLEARANCES TO COMBUSTIBLE MATERIALS
OR TO PROVIDE ADEQUATE FLOOR PROTECTION CAN CAUSE A HOUSE FIRE. SUCH A FIRE
CAN RESULT IN DAMAGE TO PROPERTY AND SERIOUS INJURY OR DEATH.
VENTING SYSTEMS
For further information on chimney that meets the approval specifications for this unit, please see page 27 of this
manual or check the approval label on the rear of the stove. Many of the illustrations in this manual are courtesy of
the Consumer Products Safety commission. The venting system consists of a chimney connector and a chimney.
These get extremely hot during use. In the event of a creosote fire temperatures inside the chimney may exceed
2000 degrees. To protect against the possibility of a house fire the chimney connector and chimney must be
properly installed and maintained. A thimble must be used when a connection is made through a combustible wall
to a chimney. A chimney support package must be used when a connection is made through the ceiling to a
prefabricated chimney. These accessories are absolutely necessary to provide safe clearances to combustible wall
and ceiling material.
This stove may be connected to a lined masonry chimney or a listed high temperature prefabricated residential type
chimney. Do not connect it to a chimney serving another appliance. To do so will affect the safe operation of both
appliances, and will void the stove warranty.
Fig.
5
Toward
Stove Top
Flue Gas
Direction
CHIMNEY CONNECTOR
The chimney connector must be 6 inch diameter 24/26 MSG Black/Blue steel. Do not use aluminum or galvanized
steel. They cannot properly withstand the extreme temperatures of a wood fire. Do not use chimney connector pipe
as a chimney. You must connect your stove to a chimney comparable to those illustrated in this manual.
Chimney connector sections must be attached to the stove and to each other with the crimped end toward the stove
(FIGURE 5). This allows creosote to run into the stove and not onto the outside of the pipe. All joints should be
secured with three metal screws
For proper operation the chimney connector should be as short as possible. Horizontal lengths of chimney should
have an upward slope from the stove of 1/4 inch per foot.
Maintain 18 inches clearance between the chimney connector and the wall and ceiling unless a wall protection
system is installed, or a listed double wall connector pipe system is used to connect to the chimney.
OM-RGT.PUB
Page 15
Date Printed: Wednesday, November 07, 2012
Version 1.03
Blaze King, Royal Guardian, Model RGT-3001
OWNER'S INSTALLATION AND OPERATION MANUAL
CONNECTION TO A MASONRY CHIMNEY
If the stove is being connected to a masonry chimney, the chimney should be examined for cracks,
loose mortar and signs of deterioration or blockages. The stove should not be installed until it is
determined that the chimney is safe for use. Since an oversized flue contributes to the accumulation of
creosote, the size of the flue should be checked to determine that it is not too large for the stove. For
this stove, it is recommended that the flue size should not exceed the overall area of a 6" flue (28.27
square inches). The chimney should also be checked to assure it meets the minimum standards of the
National Fire Protection Association (NFPA) Standard 211 or CAN-CSA B365. Following is a list of the
more critical minimum requirements for a properly constructed chimney.
1. The masonry wall of the chimney, if brick or modular block, must be a minimum of 4 inches. A
mountain or rubble stone wall must be at least 12 inches thick.
2. The chimney must have a fire clay flue liner (or equivalent) with a minimum thickness of 5/8 inch and
must be installed with refractory mortar. There must be at least 1/2 inch air space between the flue
liner and the chimney wall (FIGURE 9). An equivalent liner must be a listed chimney liner system or
other approved material.
3. A chimney inside the house must have at least 2 inches of clearance to the combustible structure.
4. A chimney outside the house must have at least one inch clearance to the combustible structure. A
fire stops must be installed at the spaces where the chimney passes through floors and/or ceiling
(FIGURE 10).
Remember that insulation must not contact the chimney. There must be air space around the chimney.
Insulation must be 2 inches or more from the chimney (FIGURE 11).
A chimney must be the required height above the roof or other obstruction for safety and for proper draft
operation. The requirement is that the chimney must be at least 3 feet higher than the highest point
where it passes through the roof and at least 2 feet higher than the highest part of the roof or structure
that is within 10 feet of the chimney, measured horizontally (FIGURE 12).
Fig.
9
Non-Combustible
Fire-Stopping
Material
5/8" Fireclay
Flue Liner
Flue
Fig.
10
Chimney Wall
4" (Nominal)
1/2" Air Space
Floor
Foundation
Ceiling
Floor
(Second Story)
Minimum 1" clearance for
exterior chimney to sheathing.
Fig.
12
Fig.
11
Ceiling
Minimum 2" clearance
from combustible
material and insulation.
Non-Combustible
Fire-Stopping
Material
Chimnery Height
Requirements
OM-RGT.PUB
Page 16
Date Printed: Wednesday, November 07, 2012
Version 1.03
Blaze King, Royal Guardian, Model RGT-3001
OWNER'S INSTALLATION AND OPERATION MANUAL
THIMBLE
A thimble must be used when the connection from the stove is made through a combustible wall to a masonry chimney. There are
several methods to use for connection through a combustible wall, two of which are illustrated in this manual. Local building authorities
may be consulted or NFPA 211 and/or CAN-CSA B365 may be used for additional methods of chimney connection.
Listed prefabricated metal thimbles may also be used with wood stoves. The manufacturer's installation instructions for the thimbles
must be strictly followed to assure the safety of the system. Be sure to maintain the designated clearance to combustible materials.
1.
Brick Chimney Thimble Assembly:
Construction of the brick thimble assembly requires 12 inches of brick around a fire clay liner. Be sure the point of penetration
allows an 18 inch clearance from the connector to the ceiling. An appropriate opening for a 6 inch chimney connector must be
cut in the wall to maintain the required 12 inches of brick separation from combustibles. It will be necessary to cut wall studs
and install a header and sill frame to maintain proper dimensions and to hold the weight of the brick (FIGURE 13).
NOTE:
Whenever cutting through a wall, check first with local building authorities to be sure building integrity
is secured.
If it is necessary to cut a hole in the chimney liner, use extreme care to keep it from shattering. Refractory mortar must be used at the
junction to the chimney liner (FIGURE 14). After the assembly is complete, insert the chimney connector in the fire clay liner. Do not
push it beyond the inside edge of the chimney liner because this will affect the draw of the chimney.
2. 6 inch solid pack chimney with metal supports as a thimble.
For the method of installation to a masonry chimney shown in FIGURES 15 and 16, it will be necessary to purchase a 6 inch inside
diameter 12 inch long section of prefabricated listed solid pack chimney to use as a thimble. Purchase a wall spacer, trim collar and
wall band that are manufactured to fit the chimney section you purchase.
The safety features of this system are; the 2 inch air space between the chimney section and the combustible wall, and the 1 inch air
space around the chimney connector as it passes through the chimney section to the chimney.
The location of the opening through the wall to the chimney must leave a minimum 18 inch vertical clearance between the connector
pipe and the ceiling to prevent the ceiling from catching fire.
For instructions on installation of the thimble, refer to chimney manufacturer's instructions.
Flue Liner
Header
Wood stud 2”
clearance from
chimney wall
Fig.
14
Chimney Wall
Fireclay liner 5/8”
minimum or
equivalent
12”
Thimble Assembly: 12” of
brick separation from clay
liner to combustables
12
”
Fig.
13
Sill Support
Fig.
16
Trim Collar
Chimney section with 2"
clearance to combustibles.
Fig.
15
Fire Clay Flue Liner
Minimum Chimney
Clearance To Wall
Spacer And
Combustibles Of 2"
Chimney Flue Liner
Minimum Clearance 2"
1" Air Space To
Chimney Section
Masonry Chimney
Fireclay Liner
Or Equivalent
Chimney Connector
Chimney Section
Chimney Connector
Wall band to secure
chimney section
OM-RGT.PUB
Trim Collar
Wood studs used for framing
spaced 2 inches clearance
from masonry chimney
Wall Spacer
Page 17
Wall Band
Date Printed: Wednesday, November 07, 2012
Version 1.03
Blaze King, Royal Guardian, Model RGT-3001
OWNER'S INSTALLATION AND OPERATION MANUAL
CONNECTION TO A METAL PREFABRICATED CHIMNEY
CHIMNEY
One of the following listed chimney connectors (with compatible listed chimney system) can be used with this stove. In the
U.S.A.: Duravent Dura Plus HT, AmeriTec HS, Metalbestos HT or Security 103 HT. In Canada; you must use high
temperature chimney meeting S629M requirements.
When a metal prefabricated chimney is used, the manufacturer's installation instructions must be followed precisely. You must
also purchase and install the ceiling support package or wall pass through and "T" section package, firestops (where needed),
insulation shield, roof flashing chimney cap, etc. (from the same manufacturer) Maintain the proper clearance to the structure
as recommended by the manufacturer. This clearance is usually a minimum of 2 inches, although it may vary by manufacturer
or for certain components.
There are basically two methods of metal chimney installation. One method is to install the chimney inside the residence
through the ceiling and the roof (FIGURES 17 and 18). The other method is to install an exterior chimney that runs up the
outside of the residence (FIGURES 19 and 20). The components illustrated may not look exactly like the system you purchase,
but they demonstrate the basic components you will need for a proper and safe installation. Make sure chimney pipe is
attached together and to the wood-burning unit with a minimum of three (3) screws to secure each connection.
The chimney must be the required height above the roof or other obstruction for safety and for proper draft operation. The
requirement is that the chimney must be at least 3 feet higher than the highest point where it passes through the roof and at
least 2 feet higher than the highest part of the roof or structure that is within 10 feet of the chimney, measured horizontally
(FIGURE 12 on page 16).
THIMBLE
When a wall exit installation is used, a thimble must be installed. Either a manufactured or a site-constructed (brick) thimble
may be used.
In a roof exit installation, the ceiling support box supplied with the manufactured chimney acts as a thimble.
Fig.
18
Fig.
20
Fig.
19
Fig.
17
This method of installation requires at
a minimum a wall pass through
device, a wall support package and
insulated “T” section and roof flashing
This method of installation
requires at a minimum a ceiling
support package, an insulation
shield and roof flashing.
OM-RGT.PUB
Page 18
Date Printed: Wednesday, November 07, 2012
Version 1.03
Blaze King, Royal Guardian, Model RGT-3001
OWNER'S INSTALLATION AND OPERATION MANUAL
REMEMBER: Follow the manufacturer's installation instructions and maintain the manufacturer's
specified clearance distances.Install an attic insulation shield to maintain the specified clearance to
insulation. Insulation in this air space will cause a heat buildup which may ignite the ceiling joists. This
method of installation requires at a minimum a wall pass through device, a wall support package and
insulated "T" section and roof flashing.
INSTALLATION OPTIONS
Residential
1.
2.
3.
4.
5.
6.
7.
Standard Clearance, parallel with wall, using ceiling exit.
Standard Clearance, corner installation, using ceiling exit,
Standard Clearance, parallel with wall, using wall exit.
Standard Clearance, corner installation, using wall exit.
Reduced Clearance, wall exit.
Reduced Clearance, ceiling exit.
Alcove Installation.
See Page 21
See Page 24
See Page 22
See Page 23
See Page 22
See Page 21
See Page 24
Mobile Home (all ceiling exit)
1. Parallel Installation.
2. Corner Installation.
3. Alcove Installation.
See Page 24
See Page 24
See Page 24
* These numbers correspond with the table below.
CLEARANCES TO COMBUSTIBLE SURFACES
..............................................................................................................................................................................................................................................................
WARNING
FAILURE TO ALLOW THE REQUIRED CLEARANCES TO COMBUSTIBLE MATERIALS OR TO
PROVIDE ADEQUATE FLOOR PROTECTION CAN CAUSE A HOUSE FIRE. SUCH A FIRE CAN
RESULT IN DAMAGE TO PROPERTY AND SERIOUS INJURY OR DEATH.
..............................................................................................................................................................................................................................................................
1. TABLE #1
MINIMUM CLEARANCES TO COMBUSTIBLE SURFACES
(All Dimensions are in Inches)
CLEARANCE ILLUSTRATIONS
Fig.
CLEARANCES
*See Ref # A
B
C
Above
D
INST
Pg
RESIDENTIAL INSTALLATIONS
Parallel
23
1
16”
10”
25.5”
16”
19
Corner
21
1
12”
--
21.5”
--
19
Reduced Side Clearance
23
2
13”
10”
22.5”
16”
19
Reduced Corner Clearance
21
2
8”
--
17.5”
--
19
Reduced Back Clearance
23
3
16”
6”
25.5”
12”
22
Alcove
22
3
16”
6”
25.5”
12”
22
Wall Exit, Parallel
24 & 25
4
14”
10”
23.5”
16”
20,21
Wall Exit, Corner
24 & 26
4
8”
--
17.5”
--
20,21
For wall exit, minimum clearance from horizontal pipe to ceiling is 18".
MOBILE HOME INSTALLATIONS
Parallel
23
5
16”
6”
25.5”
12”
22
Corner
21
5
8”
--
17.5”
--
22
Alcove
22
5
18”
8”
27.5”
14”
22
ALCOVE REQUIREMENTS
OM-RGT.PUB
Minimum Height
64"
Minimum Width
57"
Maximum Depth
30"
Page 19
Date Printed: Wednesday, November 07, 2012
Version 1.03
Blaze King, Royal Guardian, Model RGT-3001
OWNER'S INSTALLATION AND OPERATION MANUAL
*REQUIRED TO ATTAIN ABOVE CLEARANCES
1.
2.
3.
4.
5.
6" dia. 24/26 MSG Black/Blue steel chimney connector with Listed Residential Type and Building Heating
Appliance type chimney.
Side Shield with Fan Kit (P/N Z8301A), and 6" dia. 24/26 MSG Black/Blue steel chimney connector with Listed
Residential Type and Building Heating Appliance type chimney.
Residential Alcove/Reduced Back Clearance Kit (Z8310A), and an approved chimney system with Close
Clearance Connector (See Page 18 or approval label on the rear of the stove for approved chimney systems).
Side Shield with Fan Kit (P/N Z8301A) and 6" dia. 24/26 MSG Black/Blue steel chimney connector with Listed
Residential Type and Building Heating Appliance chimney with listed wall pass through, or masonry residential
type chimney with listed wall pass through. And additional floor protection which must extend to wall under
chimney connector and must extend 2" beyond each side of chimney connector.
For Mobile Homes and Mobile Home Alcove Kit (P/N Z8340A), and an approved chimney system with Close
Clearance Connector (See Page 18 or approval label on the rear of the stove for approved chimney systems).
**CHIMNEY TYPE
1. Prefabricated Chimney,
2. Masonry Chimney,
Pg. 16
Pg. 14
18”
Combustible Wall
Combustible Wall
Combustible Wall
CLEARANCE ILLUSTRATIONS
18”
FIG. #22
ROOF EXIT CORNER ALCOVE
MOBILE HOME/RESIDENCE
FIG. #21
ROOF EXIT CORNER
MOBILE HOME/RESIDENCE
18”
FIG. #23
ROOF EXIT/PARALLEL
MOBILE HOME/RESIDENCE
FIG. #24
WALL EXIT/SIDE VIEW
OF FIGS. 25 & 26
OM-RGT.PUB
18”
FIG. #25
WALL EXIT/PARALLEL
RESIDENCE ONLY
Page 20
Combustible Wall
Combustible Wall
Combustible Wall
Combustible
Ceiling
18”
FIG. #26
WALL EXIT/CORNER
RESIDENCE ONLY
Date Printed: Wednesday, November 07, 2012
Version 1.03
Blaze King, Royal Guardian, Model RGT-3001
OWNER'S INSTALLATION AND OPERATION MANUAL
INSTALLATION INSTRUCTIONS
A. RESIDENTIAL STANDARD AND REDUCED CLEARANCE CEILING EXIT INSTALLATION INSTRUCTIONS
USING A PREFABRICATED CHIMNEY. Refer to Page 20, Fig. 21-23.
1.
Set floor protector and stove in location for marking holes in accordance with the label and figures of these instructions
(page 20, Fig. 21-23).
2.
Mark the position for the hole in the ceiling and roof by using a string and plumb-bob.
3.
Check that the intended location will not interfere with floor joists, ceiling joists, or rafters before proceeding further.
4.
(IF REQUIRED), be sure you have marked the hole for the Outside Air Kit.
5.
Move the stove out of the way.
6.
Cut a pilot hole in the ceiling.
7.
Cut a hole for the ceiling penetration components and frame in the sides of this hole in both ceiling and roof. Refer to the
pipe manufacturers installation instructions.
8.
Install the Support Box and Chimney through roof. Install the slip section for the Chimney Connector at this time. Refer to
the pipe manufacturer's installation instructions.
9.
Following the Manufacturers Installation Instructions, slip the roof flashing down over the chimney and secure to the roof,
being careful to keep the pipe centered in the opening. NOTE: To meet the code, the chimney must extend above the roof
at least three feet and two feet above any area of the roof within ten feet of the termination of the chimney. Be sure all
pieces (including outside air cap, flange, collar and pipe) are installed at this point before putting the stove in its final
position.
10. Slide the stove back into position.
11. To install the Chimney Connector, slip the lower (crimped) edge of the pipe inside the smoke collar. Install the remaining
lengths of pipe, one on top of the other, to the finished height of the Chimney Connector, and secure to each other.
12. IF REQUIRED, install the Outside Air Flex Pipe.
If the OPTIONAL Fan and Side Heat Shield Assembly is installed the fan motors are equipped with a three-prong (grounded) plug
to prevent shock hazard. THIS PLUG SHOULD BE INSERTED DIRECTLY INTO A PROPERLY GROUNDED, THREEPRONGED RECEPTACLE. DO NOT CUT OR REMOVE THE GROUNDING PRONG FROM THIS PLUG. Do not route the
power cord in front or under this heater.
ROOF EXIT
For Figures 21 and 23, Page 20
Residential Stove Installation Only
Parallel and Corner:
See Requirement #1, Page 19
Reduced Side & Reduced
Corner Clearance:
See Requirement #2, Page 19.
2’ min
10’
3’ min
Storm
Collar
Roof
Flashing
Listed
Chimney
System
6” Diam. 24/26 MSG. Black/Blue
Steel Chimney Connector with
listed residential type and building
heating appliance chimney system.
Firestop Assembly not
shown, required for
two story applications
Support Box
Ceiling Trim Plate
Attach chimney connector to
collar with screws provided
Shown With
Side Shield:
Requirement #2
FIGURE 27
Residential Installation
using Listed Prefabricated
Chimney System
OM-RGT.PUB
Ceiling Support
Combustable Wall
Floor Protector
Page 21
Date Printed: Wednesday, November 07, 2012
Version 1.03
Blaze King, Royal Guardian, Model RGT-3001
OWNER'S INSTALLATION AND OPERATION MANUAL
B.
RESIDENTIAL STANDARD AND REDUCED CLEARANCE WALL EXIT WITH PREFABRICATED CHIMNEY
Refer to Page 20, Figures 24-25-26.
1.
Set floor protector and stove in location for marking holes in accordance with the label and figures of these instructions (Page
20, Fig. 24-25-26).
2. Mark the position for the hole in the wall.
3. IF REQUIRED, be sure to mark the hole for Outside Air Kit.
4. Move the stove out of the way.
5. Cut pilot hole in the wall.
6. Cut the hole for the wall penetration components and frame in the sides of this hole. Install Listed Wall Pass-Through. Refer
to the pipe manufacturer's installation instructions.
7. Follow the Manufacturer's Installation Instructions to install Prefabricated Chimney system. NOTE: To meet the code, the
chimney must extend above the roof at least three feet and two feet above any area of the roof within ten feet of the
termination of the chimney. The RGT-3001's flue collar accepts only 6" chimney connector. The small end of the connector
fits into the collar to enable any water vapor which may form in the chimney to drain back into the stove. Close clearance
chimney connector is not normally required for residential standard clearance installations. Check with your local building or
fire inspector for local requirements. Chimney connectors can also be used horizontally as a connection between the stove
and a masonry chimney provided that the horizontal length does not exceed three feet AND THE CONNECTOR SLOPES
UPWARD TOWARD THE CHIMNEY AT THE RATE OF 1/4" PER FOOT. This slope in the horizontal connection is required
to encourage the water vapor to drain back into the stove. Use a carpenter's level and a ruler or tape measure to check the
slope. You should also use a level to check the chimney connector exiting the stove to be sure it is vertical. Under no
condition should the chimney connector have more than one 90 degree bend or two 45 degree bends. The distance
between the chimney connector and the ceiling must not be less than 18". The chimney connector sections should be
secured together with no less than three sheet metal screws per joint. The chimney connector should be attached to the
stove' flue collar with screws provided. Be sure all options, including outside air cap, flange, collar and pipe are installed at
this point before putting the stove in its final position.
8. Slide the stove back into position.
9. To install the Chimney Connector, slip the lower (crimped) edge of the pipe inside the smoke collar. Install the remaining
lengths of pipe, one on top of the other, to the finished height of the Chimney Connector, and secure to each other.
10. IF REQUIRED, install the Outside Air Flex Pipe.
11. If the OPTIONAL Fan and Side Heat Shield Assembly is installed, the fan motors are equipped with a three-prong
(grounded) plug to prevent shock hazard. THIS PLUG SHOULD BE INSERTED DIRECTLY INTO A PROPERLY
GROUNDED, THREE-PRONGED RECEPTACLE. DO NOT CUT OR REMOVE THIS GROUNDING PRONG FROM THIS
PLUG. Do not route the power cord in front of or under this heater.
WALL EXIT
For Figures 24, 25, and 26. Page 20
2’ min
Residential Stove Installation Only
10’
Reduced Parallel & Reduced
Corner Clearance,
See Requirement #4, Page 19
3’ min
Storm
Collar
Roof
Flashing
Support
Band
6” Diam. 24/26 MSG. Black/Blue
Steel Chimney Connector with
listed residential type and building
heating appliance chimney system.
“TEE”
with Cap
Support
Attach chimney connector to
collar with screws provided
FIGURE 28
Residential Installation
using Listed Prefabricated
Chimney System
OM-RGT.PUB
Page 22
Shown With
Side Shield:
Requirement #2
Combustable Wall
Floor Protector
Date Printed: Wednesday, November 07, 2012
Version 1.03
Blaze King, Royal Guardian, Model RGT-3001
OWNER'S INSTALLATION AND OPERATION MANUAL
C.
RESIDENTIAL STANDARD AND REDUCED CLEARANCE WALL EXIT WITH EXTERIOR MASONRY
CHIMNEY
Refer to Page 20, Fig. 24-25-26.
1.
Set floor protector and stove in location for marking holes in accordance with the label and figures of these instructions (Page 20,
Fig. 24-25-26).
2. Mark position for the hole in the wall or masonry chimney.
3. IF REQUIRED, be sure to mark the hole for Outside Air Kit.
4. Move the stove out of the way.
5. Cut the pilot hole in the wall and/or masonry chimney.
6. Cut the hole for the wall penetration components and frame in the sides of this hole. Install Listed Wall Pass-Through. Refer to
the pipe manufacturer's installation instructions.
7. Follow the manufacturer's installation instructions to install Prefabricated Chimney system. NOTE: to meet the code, the
chimney must extend above the roof at least three feet and two feet above any area of the roof within ten feet of the termination
of the chimney. The RGT-3000's flue collar accepts only 6" chimney connector. The small end of the connector fits into the
collar to enable any water vapor which may form in the chimney to drain back into the stove. Close clearance chimney
connector is not normally required for residential standard clearance installations. Check with your local building or fire inspector
for local requirements. Chimney connectors can also be used horizontally as a connection between the stove and a masonry
chimney, provided that the horizontal length does not exceed three feet AND THE CONNECTOR SLOPES UPWARD TOWARD
THE CHIMNEY AT THE RATE OF 1/4" PER FOOT. This slope in the horizontal connection is required to encourage the water
vapor to drain back into the stove. Use a carpenter's level and a ruler or tape measure to check the slope. You should also use
a level to check the chimney connector exiting the stove to be sure it is vertical. Under no condition should the chimney
connector have more than one 90 degree bend or two 45 degree bends. The distance between the chimney connector and the
ceiling must not be less than 18". The chimney connector sections should be attached to the stove's flue collar with screws per
joint. The chimney connector should be attached to the stove's flue collar with screws provided. Be sure all options including
outside air cap, flange, collar and pipe are installed at this point before putting the stove in its final position.
8. Slide the stove back into position.
9. To install the Chimney Connector, slip the lower (crimped) edge of the pipe inside the smoke collar. Install the remaining lengths
of pipe, one on top of the other, to the finished height of the Chimney Connector, and secure to each other.
10. IF REQUIRED, install the Outside Air Flex Pipe.
11. If the OPTIONAL Fan Assembly is installed, the fan motors are equipped with a three-prong (grounded) plug to prevent shock
hazard. THIS PLUG SHOULD BE INSERTED DIRECTLY INTO A PROPERLY GROUNDED, THREE-PRONGED
RECEPTACLE. DO NOT CUT OR REMOVE THE GROUNDING PRONG FROM THIS PLUG. Do not route the power cord in
front of this heater.
WALL EXIT
2’ min
For Figures 24, 25, and 26. Page 18
Residential Stove Installation Only
3’ min
10’
Reduced Parallel & Reduced
Corner Clearance,
See Requirement #4, Page 17
6” Diam. 24/26 MSG. Black/Blue
Steel Chimney Connector with
listed residential type and building
heating appliance chimney system.
18”
Combustable Wall
Attach chimney connector to
collar with screws provided
Shown With
Side Shield:
Requirement #2
FIGURE 29
Residential Installation
OM-RGT.PUB
Floor Protector
Page 23
Date Printed: Wednesday, November 07, 2012
Version 1.03
Blaze King, Royal Guardian, Model RGT-3001
OWNER'S INSTALLATION AND OPERATION MANUAL
D. MOBILE HOME (FIG. 23,30), MOBILE HOME ALCOVE (FIG. 22), MOBILE HOME CORNER (FIG. 21), AND
RESIDENTIAL ALCOVE (FIG. 22), INSTALLATIONS USING PREFABRICATED CHIMNEY. Refer to Page
20, Fig. 21, 22, 23, and Fig. 30 below.
NOTES:
1.
2.
For MOBILE HOME installations, use these instructions with Mobile Home Kit #8340AA and Insulated Pipe components.
The use of components, other than those specified, is not allowed.
For MINIMUM CLEARANCE residential alcove installations, use these instructions. Alcove Kit #8339AA and Insulated Pipe
components. The Outside Air Kit is not required for residential alcove installations.
WARNING - DO NOT INSTALL IN SLEEPING ROOM
CAUTION - THE STRUCTURAL INTEGRITY OF THE MOBILE HOME FLOOR, WALL AND CEILING/ROOF
MUST BE MAINTAINED.
1.
2.
3.
4.
5.
Set floor protector and stove in location for marking holes in accordance with the label and figures of these instructions.
Mark the position for the hole in the ceiling and roof using a string and plumb-bob.
Check that the intended location will not interfere with floor joists, ceiling joists, or rafters before proceeding further.
Mark the positions for the tie down and the hole for the outside air pipe.
Move the stove and using a saber saw, cut a 6 1/2" hole for the outside air pipe and install as per instructions, Page 20. Drill
a pilot hole for the tie down.
6. Cut a pilot hole in the ceiling.
7. Cut a hole for the ceiling penetration components and frame in the sides of this hole in both the ceiling and roof. Refer to
pipe manufacturers installation instructions. Install the support box. Be sure all options including outside air cap, flange,
collar and pipe are installed at this point before putting the stove in its final position.
8. Slide the stove back into position.
9. Install the tie down through the stove base.
10. To install Close Clearance Connector to the stove, slip the lower end marked by arrow inside the Smoke Collar. Fasten
chimney connector to stove with screws provided. Slide connector up and snap into ceiling support. (Make sure it "snaps"
in place). Refer to the pipe manufacturer's Installation Instructions.
11. Following the Pipe Manufacturer's Installation Instructions, install chimney system into support box, slip the roof flashing
down over the chimney and secure to the roof, being careful to keep the pipe centered in the opening. NOTE: To meet the
code, the chimney must extend above the roof at least three feet and two feet above any area of the roof within ten feet of
the chimney termination.
12. Install the Outside Air Pipe 4" flex tube.
ROOF EXIT
For Figures 21 and 23, Page 20
Residential Reduced Back Clearance & Alcove
2’ min
10’
See Requirement #3, Page 19
Mobile Home Parallel, Corner & Alcove:
See Requirement #5, Page 19.
Chimney
System
3’ min
Storm
Collar
Roof
Flashing
Insulation Shield
6” Diam. 24/26 MSG. Black/Blue
Steel Chimney Connector with
listed residential type and building
heating appliance chimney system.
Shown with Mobile
Home & Mobile
Home Alcove Kit
FIGURE 30
Mobile Home & Residential Installation using an approved
Chimney System and close clearance connector.
(for information on approved chimney systems please see page
27 of this manual of your approved label on the rear of the stove)
OM-RGT.PUB
Page 24
Starter Section
Support Box
Attach chimney connector to
collar with screws provided
Back Shield
Shown With
Side Shield:
Requirement #2
Combustable Wall
Mobile Home Outside Air
Floor Protector
Date Printed: Wednesday, November 07, 2012
Version 1.03
Blaze King, Royal Guardian, Model RGT-3001
OWNER'S INSTALLATION AND OPERATION MANUAL
SIDE - SHIELD & FAN KIT
P/N Z8301A
Standard RGT Fan Assembly - Uppco, Model 50-T with insulated spade type connectors.
Alternate RGT Fan Assembly - T30max Model 904-4999 with "push-in" connectors on the motor coil.
REQUIRED FOR:
MOBILE HOME INSTALLATIONS
RESIDENTIAL WALL EXIT CHIMNEY SYSTEMS
RESIDENTIAL REDUCED CLEARANCE
CHECK LIST:
ITEM
QTY
2
3
5
1
1
4
DESCRIPTION
Side Shield, Left With Fan
Side Shield, Right With Fan
#10 x 1/2" Screws
INSTALLATION:
1.
Place the right side shield behind the stove in the center, with enough slack in the Interconnect cord to install the left side
shield.
Align the notch in the shield with the top mount on the stove and then slide the shield on until it comes into contact with the
side of the stove. Make sure you push gently on the wooden handle (do not bend the shaft) there should be just enough
room to slide the shield onto the stove.
Put in the top screw and then the bottom screw on the left side shield.
Place the right side shield onto the side shield mounts and slide it until it comes in contact with the side of the stove.
Put in the top screw and the bottom screw on the right side shield.
Plug in the power cord and test fan operation.
2.
3.
4.
5.
6.
NOTE: The illustrations and instructions for the side shields with fan kit are included with the kit.
ELECTRICAL CONNECTION:
Your Royal Guardian fan kit is equipped with a three-prong (grounded) plug to decrease shock hazard. THIS PLUG SHOULD
BE INSERTED DIRECTLY INTO A PROPERLY -GROUNDED, THREE-HOLE RECEPTACLE. DO NOT CUT OR REMOVE
THE GROUNDING PRONG FROM THIS PLUG. Do not route the power cord in front or under the stove.
REAR SHIELD KIT
P/N Z8310A
REQUIRED FOR:
MOBILE HOME
MOBILE HOME CORNER
MOBILE HOME ALCOVE
RESIDENTIAL ALCOVE
NOTE: The rear shield kit #Z8310A cannot be installed without the Side Shield Kit #Z8301A installed. The
rear shield kit is mounted to the Side Shield Kit.
CHECK LIST:
ITEM
1
2
3
4
QTY
2
1
1
2
PART #
DESCRIPTION
0297
5773
0123
0041A
#10 x 1 S/M tapping hex washer
Back Shield
Thermostat Control Indicator
Nut 1/2” square
TOOLS NEEDED FOR INSTALLATION:
1.
Robertson (square drive) screwdriver.
1.
2.
Pull the thermostat control rod as far toward the outside of the stove as it will go (lowest setting).
Install the Rear Heat Shield with the two #10 x 1-14” Sheet Metal Screws
INSTALLATION:
OM-RGT.PUB
Page 25
Date Printed: Wednesday, November 07, 2012
Version 1.03
Blaze King, Royal Guardian, Model RGT-3001
OWNER'S INSTALLATION AND OPERATION MANUAL
Rear Shield
INSTALL SCREW
Wooden
Handle
INSTALL SCREW
NOTCH
Control Assembly
Firebox
Mounting Holes
For Rear Shield
Side Shield
Fan Assembly
with two 105 CFM
Axial Motors
Inte
INSTALL SCREW
INSTALL SCREW
e
nn
rco
rd
Co
ct
Pedestal
Power Cord
(Comes attached to Side Shield)
COMPONENT LOCATIONS
FIGURE 31
Location of Major Components,
RGT-3001
Combustion Air Control Decal
FIG. 36
OUTSIDE AIR KIT 4”
P/N Z8304
REQUIRED FOR:
OPTIONAL:
ALL MOBILE HOME INSTALLATIONS
ALL RESIDENTIAL INSTALLATIONS
FIG. 35
PRODUCT INSPECTION:
First, remove all packaged parts from the box and inspect them. Examine the pieces to see that there is no damage caused by
shipping. Should any part be missing or damaged, contact your dealer. See CONTENTS LIST below.
ITEM
1
2
3
4
5
6
7
8
QTY
4
2
2
2
1
1
1
1
PART#
0070A
0295A
0145
0513A
Z8317
FHOSE4
FLPLATE4
0624
CONTENTS LIST
DESCRIPTION
Screw 10 x 1 1/4 wood
Screw 10 x 1 1/2 Black
Washer 1/4 flat plated
Lag screw
Outside Air Cap 4” with collar
Flex hose 4” x 30” c/w clamp
Outside air floor flange 4”
6”x24” 30Ga Snap lock
TOOLS NEEDED FOR INSTALLATION:
1.
3.
5.
1/4" or 3/8" drill motor.
Saber Saw wood & metal blades
7/16" Wrench
2. Saber Saw
4. 5/6" Nut Driver or Wrench
6. Small tube of Hi-Heat Silicone
OUTSIDE AIR SUPPLY
The outside Air Inlet Hose is a flexible tube used to bring outside air, for combustion, into the stove from outside the residence,
through the wall or up through the floor. The Flexible tube will allow some adjustment over or around floor joists or plumbing. DO
NOT CHANGE THE STRUCTURAL INTEGRITY OF THE FLOOR. This air hose must be kept open at all times to provide outside air
for combustion.
INSTALLATION:
1.
Set floor protector and stove in location for marking holes in accordance with the dimensions listed on the label and figures of
these instructions.
2. Check that the intended location will not interfere with floor joists, ceiling wiring or plumbing.
3. Mark the positions for the tie down and the hole for the outside air pipe (Item 7).**
4. Move the stove and using a saber saw , cut a 6 1/2" hole for the outside air pipe. Drill a pilot hole for the tie down.**
5. Install the Outside Air Cap on the bottom of the Main Tube with three #10 x 3/8" screws (Item 1).
6. Install the Outside Air Pipe to the Outside air Flange and Collar (Items 7 & 8) with three #10 x 3/8" Sheet Metal Screws.
7. Install the Outside Air Pipe through the floor. Drill pilot holes and attach the Outside Air Flange to the floor with four 1/4" x 3/4"
screws.
8. Position the stove in its intended location. Secure to floor with one 1/4" x 3" Lag screw (Bottom center of base).**
9. Attach the Outside Air Hose to the Outside Air Cap with the Outside Air Hose Clamp. Push the other end of the Outside Air
Hose into the outside Air Flange and seal with high temperature silicone.
**(Not required for residential installations)
OM-RGT.PUB
Page 26
Date Printed: Wednesday, November 07, 2012
Version 1.03
Blaze King, Royal Guardian, Model RGT-3001
OWNER'S INSTALLATION AND OPERATION MANUAL
OPERATION
Your stove's performance (including its efficiency, pollutant emission level and service lifetime) depends largely on how it is
operated. You are the most important factor affecting your stoves performance. Read these operation instructions carefully.
.............................................................................................................................
BEFORE PROCEEDING FURTHER, be sure to read the following
SAFETY INFORMATION: Section 4, pages 9-10
INSTALLATION CLEARANCE INFORMATION: Section 6, pages 19 & 20.
FLOOR PROTECTION INFORMATION: Section 8, pages 19 & 20.
.............................................................................................................................
WARNING - PROVIDE ADEQUATE AIR CIRCULATION. It is essential that a source of fresh air for combustion be
provided at all times when this wood stove is in operation. In extremely tight houses, partially open a window near the wood
stove or install an Outside Air Kit.
FUEL
THIS WOOD STOVE IS FOR USE WITH SOLID WOOD FUEL ONLY. NEVER USE GASOLINE, GASOLINE-TYPE
LANTERN FUEL, KEROSENE, CHARCOAL LIGHTER FLUID OR SIMILAR LIQUIDS TO START OR "FRESHEN UP" A FIRE
IN THIS HEATER. KEEP ALL SUCH LIQUIDS WELL AWAY FROM THE HEATER WHILE IT IS IN USE.
Do not burn materials soaked in flammable liquids, trash, garbage, artificial or paper logs, plastics, gift wrappings, coal,
charcoal, naphtha, engine oil, chemical cleaners, chemical fire starters, treated or painted wood, saltwater driftwood, railroad
ties, plywood, particle board. Do not burn sawdust, wood shavings or chips in this wood stove.
When selecting wood for the Model RGT-3001, it is preferable that you use seasoned wood. Dry, seasoned wood will burn
cleaner and produce less creosote. Dry or small pieces of fuel will provide a hotter fire. Larger pieces can be used to provide
a longer burn time.
The wood for the Model RGT-3001 should be cut to lengths that are not more then 18" long; while 18" lengths will fit, 16"
lengths are preferred.
CAUTION: DO not place wood fuel within the space heater installation clearances or within the space required for
fueling and ash removal.
CAUTION: Do not overfire. If heater or chimney connector glows, you are overfiring.
STARTING A FIRE IN YOUR
ROYAL GUARDIAN MODEL 3001
NEVER USE A GRATE IN THIS WOOD STOVE. Never use a grate or other methods of supporting the
firewood in this wood stove. Build the fire directly on the firebox hearth bricks.
1.Initial start-up. Use only dry, well seasoned fuel, which has been cut, split and stacked for a minimum of six months.
2.SET THE COMBUSTION AIR CONTROL LEVER.Move the lever in the direction of the warmest setting, HIGH. See Fig. 36.
3.Open the Loading Door by lifting the loading door handle up to release the door latch.
CAUTION: Do not operate this stove if the door glass is cracked or broken. To replace broken glass, see
page 31.
4.
Starting the fire:
Place several balls of newspaper near the FRONT of the firebox and put a fairly large quantity of dry kindling on top of the
paper. Next, lay two or three pieces of wood on top of the kindling. Load the wood in a side-to-side orientation with the ends of
the logs toward the sides of the stove. Light the paper, partially close the Loading Door so that the latch touches the stove, but
do not latch it. Allow the kindling and most of the larger logs to get started, then latch the loading door. If you close the loading
door too soon, a new fire may go out. NEVER LEAVE ANY WOOD STOVE UNATTENDED WHEN THE DOORS ARE NOT
TIGHTLY CLOSED! The first fire should be long and MEDIUM-HOT to cure as much of the firebox paint as possible.
5.
Loading the firebox:
When the larger wood pieces are burning well, open the Loading Door and completely load the firebox. Close and latch the
Loading Door. Do not abuse the glass door by slamming it or striking it. Do not force the door closed if there is wood in the
firebox that is obstructing it. Let the fire burn on MEDIUM to HIGH for 20-30 minutes, or until the fire is well established. Then
you may adjust the combustion air to achieve the desired room temperature. See Combustion Air Control Adjustments.
OM-RGT.PUB
Page 27
Date Printed: Wednesday, November 07, 2012
Version 1.03
Blaze King, Royal Guardian, Model RGT-3001
OWNER'S INSTALLATION AND OPERATION MANUAL
COMBUSTION AIR CONTROL
OPTIMUM SETTING AFTER LOADING OR RELOADING
1.Position: Leave the combustion air-control in the Medium to High position for at least fifteen minutes before making
further adjustments.
2.Temperature Adjustments: Adjustments to achieve the desired room temperature should be made in small increments
for the most effective clean burning operation. Even a small change may increase emissions slightly for 10-15 minutes.
Changes should be made as few times each day as possible.
3.Tampering: The combustion air control is adjusted at the factory and should not be tampered with.
FAN OPERATION (Optional)
If you have the Optional Fan Assembly installed, wait 30 minutes before you turn the fans on to begin circulating the warm air
into the room. Use LOW speed setting when the stove is set for a low burn and a higher speed setting with hotter fires.
RELOADING THE FIREBOX
1. Maintaining an efficient fire. A bed of hot coals is the most important requirement for keeping an efficient fire. A bed of
hot coals will help the stove maintain a more even temperature as well as getting the new load of wood started easily. Let
each full load burn down to a coal bed before reloading. Many new wood stove users hesitate to load enough wood to sustain
a fire, fearing that a full wood stove automatically means a hotter fire. The combustion air control, set at the lowest air control
setting, permits a low fire even with the firebox full. Maintaining a clean burning low fire is easier with a partial load of wood.
For medium and high burn rates, a full load of wood may be used. Four 6" diameter logs may burn up to 8 hours. Burn times
may vary considerably due to the quality of wood and how well it is seasoned. How well your house is insulated and what you
set your air control at will also affect burn times.
2. Set the Combustion Air Control Knob to the warmest setting.
3. Open the Loading Door.
.............................................................................................................................
WARNING
ALWAYS OPEN THE DOOR LATCH AND ALLOW THE FIRE TO BUILD UP SLIGHTLY BEFORE FULLY
OPENING THE LOADING DOOR. IF THE LOADING DOOR IS OPENED TOO FAST, THE SUDDEN
INTRODUCTION OF AIR CAN CAUSE THE FIRE TO FLARE AND DISCHARGE SMOKE AND FLAME INTO
THE ROOM. SUCH A DISCHARGE CAN BURN PERSONS WHO ARE NEAR THE WOOD STOVE.
.............................................................................................................................
4. Load The Firebox. Rake the bed of hot coals to the FRONT of the firebox BEFORE putting the new fuel load in the stove.
To allow combustion air to flow under and around the fuel, make a trench in in the exact center the coal bed, from front to
back. The bottom of the coal bed trench must be lower than the air jet hole just inside the bottom of the firebox door. If
anything blocks the air jet, poor ignition and improper burning will result. FULLY LOAD THE FIREBOX. Put the wood in the
firebox in a side-to-side orientation with the ends of the logs toward the sides of the stove. The firebox will easily accept logs
up to 16".
5. Close the Loading Door and latch it. Do not abuse the glass door by slamming it or striking it. Do not force the door closed
if there is wood in the firebox that is obstructing it.
6. Combustion Air Control Adjustment. Leave the air control in the fully open position (the warmest setting or 15 minutes, or
until the fire is well established) before making further adjustments. Turning down the thermostat too soon may cause
creosote formation in the chimney. Once the fire is well established, adjustments may be made for low, medium or high fire,
depending on heat needs of the home.
For a low fire, (11,000 to 15,000 btu/hr) getting the fire well established is particularly critical. If the wood being used is not well
seasoned, it may be necessary to leave the air control setting in the fully open position for much longer than 15 minutes to
assure a clean, low burn. When the fire is burning well on high, reset the air control in steps to medium, then lower, over a 510 minute period. Watch the flames in the top of the firebox. Try to keep a good flame pattern just under the secondary air
diffuser at all times. When there is no flame pattern in the top of the firebox, the stove is less efficient (produces less heat from
a load of wood) and burns less clean (makes and deposits more creosote in the chimney system). When starting a low fire, do
not turn the fans on for the first 30 minutes. After 30 minutes, the fans may be turned on. For a medium burn (16,000 to
22,000 btu/hr) leave the air control set at high for 15 minutes, or until the fire is well established. Then move the air control to
the medium setting. Watch for a flame pattern in the top of the stove. When that flame is out the stove is less efficient and
burns dirtier. When starting a medium fire turn the fans on low to medium, depending on the heat needs of the home.
For a high fire (23,000 to 35,000 btu/hr) the air control setting may be left on high at all times. The fans may be turned on
medium to high at any time during the burn cycle.
OM-RGT.PUB
Page 28
Date Printed: Wednesday, November 07, 2012
Version 1.03
Blaze King, Royal Guardian, Model RGT-3001
OWNER'S INSTALLATION AND OPERATION MANUAL
DISPOSAL OF ASHES
WARNING
NEVER STORE HOT ASHES IN A GARAGE OR BASEMENT. HOT ASHES WILL GENERATE CARBON
MONOXIDE AND/OR FLAMMABLE GASES. THESE GASES MAY CAUSE SUFFOCATION.
Disposal of ashes: Ashes should be placed in a sealed non combustible container until they are thoroughly
cooled. The closed container of ashes should be placed on a non-combustible material pending final disposal.
Once they are cooled they can be disposed of by burial in soil or other suitable methods.
ASH REMOVAL
The ashes should be removed any time they come within one inch of the door's lower sill. A thick bed of ashes will
significantly limit the amount of wood you can get in the firebox. Wood burns best in a bed of ashes 1/2 inch to one inch thick.
It is not necessary or advisable to completely remove all of the ashes when cleaning this wood stove.
ASH PAN REMOVAL (OPTIONAL)
If your Royal Guardian RGT3001 is fitted with an optional ash pan follow these instructions for ash removal. The ash
pan is factory installed option and can not be added to stoves which were originally manufactured without the optional ash pan.
WARNING: REMOVE ASHES ONLY WHEN THEY ARE COOL. NEVER STORE HOT ASHES IN A
GARAGE OR BASEMENT. HOT ASHES WILL GENERATE CARBON MONOXIDE AND / OR FLAMABLE
GASES. THESE GASES MAY CAUSE SUFFOCATION BE SURE YOU OBSERVE THE SAFETY
INSTUCTIONS REGARDING
“DISPOSAL OF ASHES” DESCRIBED ABOVE.
1.
2.
3.
4.
5.
6.
7.
8.
After the ash bed has cooled down, remove the ash plug, located at the bottom centre of the firebox, by slipping a poker or
similar tool through the small handle loop on the top of the plug
Scrape the ashes down through the open ash dump hole and into the ash pan fitted into the stove pedestal. Do not be
concerned about “cleaning” the fire box completely as the next fire will burn better on a small bed of ash (up to ½” deep).
When the necessary ashes have been dumped down the ash dump into the ash pan, clean out the area around the dump
to ensure that the plug fits properly back into the ash dump.
REPLACE THE ASH DUMP PLUG; NEVER OPERATE THE STOVE WITH THE PLUG REMOVED. TO OPERATE THE
STOVE WITH THE PLUG REMOVED OR NOT PROPERLY IN PLACE IS DANGEROUS.
After you have replaced the ash dump plug spread the remaining ashes across the firebox and cover the ash dump plug
with a layer of ashes.
Remove the ash pan from the stove pedestal and flip up the two side lids to cover the open ash pan. (See Fig. 37,)
CAUTION: ENSURE THE PAN HAS COOLED DOWN BEFORE REMOVAL.
Dispose of the ashes in a safe manner as described above: “DISPOSAL OF ASHES”.
Before you replace the ash pan back into the stove pedestal ensure the pedestal is cleaned to allow proper seating of the
ash pan back into the pedestal. Replace the ash pan into the pedestal ensuring that the ash pan lids are OPEN. It is
important that the ash pan be fully inserted and seated against the pedestal front.
! IMPORTANT !
Close Lids Before Moving
Ash Pan Away From Stove!
FIGURE 37
OM-RGT.PUB
Page 29
Date Printed: Wednesday, November 07, 2012
Version 1.03
Blaze King, Royal Guardian, Model RGT-3001
OWNER'S INSTALLATION AND OPERATION MANUAL
MAINTENANCE
AUTHORIZED SERVICE REPRESENTATIVE
Your local BLAZE KING dealer is your authorized service representative. Contact him as soon as possible if you have
any problems with operating or maintaining your BLAZE KING Model 3001. The dealer will help you solve operating
problems, provide replacement parts, and/or arrange warranty service repairs as required. Dealers will need information
such as model, serial number, date of purchase, and a summary of the problem.
CREOSOTE AND SOOT FORMATION
When wood is burned slowly, it produces tar and other organic vapors which combine with expelled moisture to form
creosote. The creosote vapors condense in the relatively cool chimney flue of a slow-burning fire. As a result, creosote
residue accumulates on the flue lining. When ignited, this creosote makes an extremely hot fire. The chimney connector
and chimney should be inspected at least twice each month during the heating season to determine if a creosote buildup
has occurred. If creosote has accumulated it should be removed to reduce the risk of a chimney fire.
The design of the Model 3001 should reduce the accumulation of creosote to a low level if it is operated properly (see
Operation Instructions, Section 9, page 27). Even so, some creosote will eventually accumulate and must be dealt with.
The frequency of start-up operations and the temperatures at which the stove is usually operated will affect the rate of
accumulation. If significant creosote buildup occurs, re-examine your fire-building and burning procedures. Consult the
trouble-shooting guide at the end of these instructions.
CREOSOTE REMOVAL
The chimney connector and chimney should be inspected at least twice each month during the heating season to
determine if a creosote or soot buildup has occurred. If creosote has accumulated, it should be removed to reduce the
risk of a chimney fire. Hire a chimney sweep, or clean the chimney yourself with a tight-fitting chimney brush. Makeshift
equipment; hoses, tire chains, etc. - can damage the flue and/or do an unsatisfactory cleaning job. The stove should
also be inspected at this time and cleaned if needed. To inspect and clean the chamber inside the stove, allow the fire to
go out and the stove to cool down. Remove the first section of pipe above the stove and inspect the area immediately
below the flue exit. Clean with a vacuum cleaner. Remove as much creosote and fly ash as possible from the area
around the 2" x 4" Air Intake Transfer Tube. Heavy accumulations of creosote and ash in this chamber, if not removed,
may ignite and cause a very intense fire which could structurally damage the stove. Re-install the first section of pipe to
the stove. Refer to the Installation Instructions.
LOADING DOOR GASKET MAINTENANCE
Safe and efficient operation of any airtight wood stove depends greatly on the integrity of the gaskets. Check the loading
door gasket at the beginning of the heating season and at least twice during the heating season. When the gasket is
frayed or no longer seals, it must be replaced. Inspect the gasket for physical deterioration, missing sections or obvious
leakage. To check the gasket further, insert a piece of paper into the door opening and close and latch the door.
Obvious resistance should be felt when pulling the paper out. Repeat this check several times around the perimeter of
this door.
REPLACING THE DOOR GASKET
If the door gasket is to be replaced, be sure you have a replacement part ready to reinstall. See your Blaze King dealer.
Be sure the fire is out, and the stove has cooled down. The door does not have to be removed from the stove.
With a pair of pliers, pull the old door gasket out of the channel and dispose of it. Clean out the channel so the new
gasket can fit smoothly. Run a small bead of high temperature silicone adhesive (such as G.E. Silicone Sealer, or the
equivalent) along the center of the channel. Start the new gasket in the lower right corner. Do not stretch or cut the
gasket. Distribute the gasket evenly around the frame. Close the Loading Door and allow the adhesive to dry. Check the
fit of the door gasket. Insert a piece of paper into the door opening and close and latch the door. Obvious resistance
should be felt when pulling the paper out. Repeat this check several times around the perimeter of the door.
CLEANING THE GLASS
The glass may become coated during a low (overnight) burn. Adjusting the thermostat to the warmest setting after
reloading each morning will usually keep the glass clean. Heavier deposits may require hand cleaning. Manual glass
cleaning should be done when the stove and glass are cool. DO NOT CLEAN THE GLASS WHILE IT IS HOT. Use a
soft cloth and a suitable glass Cleaner, available from most hearth dealers. After using any cleaner, thoroughly rinse the
glass with water to remove any deposits left by the cleaner. Failure to remove all traces of glass cleaner will result in the
glass cleaner residue baking on. This residue will be very difficult to remove.
OM-RGT.PUB
Page 30
Date Printed: Wednesday, November 07, 2012
Version 1.03
Blaze King, Royal Guardian, Model RGT-3001
OWNER'S INSTALLATION AND OPERATION MANUAL
LOADING DOOR GLASS REPLACEMENT
Your BLAZE KING Model 3001 is equipped with a strong, heat-resistant ceramic glass intended to withstand
extremely high temperatures and tested for continuous use above 1200 degrees Fahrenheit. However, this glass
can be broken through improper use. If glass replacement becomes necessary contact your dealer for
replacement Blaze King parts only. DO NOT SUBSTITUTE ANY OTHER MATERIAL FOR THIS PURPOSE.
..........................................................................................................................................................................................
WARNING
BROKEN DOOR GLASS IS SHARP. ALWAYS WEAR EYE PROTECTION AND PROTECTIVE GLOVES WHEN
HANDLING GLASS. DISCARD THE GLASS IN A CLOSED CONTAINER INACCESSIBLE TO CHILDREN.
...........................................................................................................................................................................................
1.
2.
3.
4.
5.
Allow the fire to completely burn out and the stove to cool down.
Open the door and remove the twelve #10 x 3/8" screws holding the six retainers to the inside of the cast door.
Be sure to put aside all parts for re-installation.
Remove the damaged glass and the old glass gasket.
The replacement glass has the gasket installed on it's outer perimeter. Place the glass in the door frame. Be
sure the words "Blaze King" etched in the glass reads correctly when the door is closed.
6. Install the retainers with the 10 x 3/8" round head screws.
CHIMNEY DRAFTS
If you suspect a draft problem in an existing chimney, determine the draft by using a water manometer (draft
gauge). The draft should be measured with the stove at medium burn. After the measurement is completed, fill
any holes that were made to take the reading by using a sheet metal screw of proper size. The draft should
measure between. 02" and .10" of water. If the draft is outside these limits, the stove may not be operating
properly. Drafts below .02" will cause excessive smoke spillage, incomplete combustion and fire start-up
problems. A draft over .10 may cause overheating and short burn times. A draft near the upper limit will contribute
to the door glass staying clean.
OPTIONAL FAN ASSEMBLY
Routine maintenance of the OPTIONAL Fan Assembly on the back of the stove is not required. Should it become
necessary to replace the Fan Assembly, order Part # Z8310A from your local dealer.
RHEOSTAT REPLACEMENT
1. Unplug the fan power cord from the wall.
2. Remove the four screws on the fan cage containing the rheostat switch.
3. Remove the bower from the cage. DO NOT DISCONNECT THE WIRES; Locate the two wires coming from
the rheostat switch.
4. Unplug the two wires from the rheostat switch.
5. Pull the knob straight off the switch.
6. Unscrew the nut holding the switch to the cage.
7. Replace the switch with the proper replacement part from your Blaze King dealer.
8. To reinstall the switch, reverse the above steps being sure to tuck the wires back into the assembly so they do
not come in contact with the fan blade.
REPLACING THE SECONDARY AIR DIFFUSER
If it is necessary to replace the Secondary Air Diffuser, proceed as follows:
1. Obtain a replacement Secondary Air Diffuser from your Blaze King dealer.
2. Allow the fire to go out and the stove to cool down.
3. Remove all of the brick from the firebox and clean out the ashes. Back off the set nut on the bolt between
diffuser and front of stove.
4. From inside the stove, pull the Secondary Air diffuser straight toward the front of the stove (about 1") until the
front clip allows it to drop free. WARNING: There are four bricks ON TOP OF the diffuser. When released
from the front clip, the diffuser is unexpectedly heavy.
5. Lower the Air Diffuser into the firebox and remove the bricks.
6. Pivot the Secondary Air Diffuser until it can be removed from the firebox.
7. Install the new Secondary Air Diffuser. Replace the four firebricks on top of the diffuser and lift it into position.
Position the back of the diffuser so the two tabs on the back of the diffuser fit into the rectangular hole in the
top back of the stove, push the front up, and slip the front clip into position.
8. Tighten the set nut between the diffuser and the stove front.
9. Re-install the firebrick in the firebox.
OM-RGT.PUB
Page 31
Date Printed: Wednesday, November 07, 2012
Version 1.03
Blaze King, Royal Guardian, Model RGT-3001
OWNER'S INSTALLATION AND OPERATION MANUAL
TROUBLESHOOTING
Your Blaze King, Model RGT-3001 is designed to allow a wide selection of heat output levels. If you begin to lose
control of the amount of heat the stove is emitting, determine the problem early so that major problems can be
avoided.
The most important elements for a well-controlled fire are:
1.
2.
3.
4.
Knowledgeable operator.
Adequate air supply.
Properly sized, good quality firewood
Clean chimney, properly sized and installed.
A knowledgeable operator is the most important factor for the safe and efficient operation of any wood stove. The
remaining three factors above are also very important. A deficiency in any one will effect all of the others. If you
encounter a problem, determine the source and then follow-up by checking the factors above for a possible solution.
Please study the operation instructions carefully (Section 9, beginning page 27). If you have any questions not
answered in this manual, consult your BLAZE KING dealer or call the Customer Service Department: in the U.S.A.at
B.K.I., Inc. (509 522-2730) or in Canada at Valley Comfort Systems (250-493-7444),
PROBLEM: Chimney Fire
CAUSE:
SOLUTION:
Creosote build up, high draft.
Act immediately regardless of cause.
Adjust Combustion Air Control to lowest setting, check
loading door to be sure it is tightly closed. Call Fire
Department.
After the fire is out, have your chimney and flue connector inspected by a certified chimney sweep. A damaged
masonry chimney should be repaired or rebuilt. A damaged prefabricated chimney (factory built) should be
replaced. Any damage to the flue connector should be corrected before the system is used again.
Possible causes for a chimney fire, and remedies for those causes, can be found on page 31: "Excessive Creosote
Formation", and "Spots of Creosote Accumulation in Chimney or Flue Connector".
PROBLEM: Not enough heat
CAUSE:
SOLUTION:
Green or wet wood
Use seasoned wood.
Obstruction in chimney or cap screen
Remove obstruction
Heat exchange chamber filled with ash
Clean heat exchanger chamber
Thermostat not operating properly
Consult your Blaze King dealer
Poor draft caused by an oversize flue
Measure draft with Manometer
SEE DRAFTS, Pg. 31
SEE CHECK YOUR CHIMNEY, Pg. 12
Consult your Blaze King Dealer or a chimney sweep.
Strong, gusting winds causing down draft in chimney
Install wind-resistant chimney cap
Tightly sealed house, Inadequate air supply
Open a window, slightly, near the stove.
Reloading too much wood on top of too few coals
Allow a larger bed of coals to build up.
SEE Pg. 28
OM-RGT.PUB
Page 32
Date Printed: Wednesday, November 07, 2012
Version 1.03
Blaze King, Royal Guardian, Model RGT-3001
OWNER'S INSTALLATION AND OPERATION MANUAL
PROBLEM: Too much heat
CAUSE:
SOLUTION:
Thermostat not operating properly
Loading door gasket leaking, admitting
excess air into firebox
Excessive draft in the chimney
Consult your Blaze King Dealer
Replace door gasket and/or adjust door
SEE Pg. 30
Measure draft with a Manometer SEE DRAFTS, Pg. 31
Consult your Blaze King Dealer or a chimney sweep
Install a cap.
Wood is too dry
Wood in too small pieces
Replace wood or mix with not-so-dry pieces.
Use larger diameter pieces
PROBLEM: Fan will not run, or there is no adjustment for fan speed
CAUSE:
SOLUTION:
Not plugged in or lack of power
Fan speed control
Faulty Fan
Check to be sure fans are plugged in.
Consult your Blaze King Dealer
For replacement: SEE RHEOSTAT REPLACEMENTSee Pg 31
PROBLEM: Excessive creosote formation
CAUSE:
SOLUTION:
Improper operation
Wood too green or wet
Poor draft caused by an oversize flue, etc.
Check Combustion Air Control setting operating procedures SEE Pg. 28.
Use seasoned wood.
Measure draft with Manometer
SEE DRAFTS, Pg. 31
SEE CHECK YOUR CHIMNEY, Pg. 12
Chimney too cold or poorly insulated
Upgrade chimney system. Consult your Blaze King Dealer or a Chimney sweep.
PROBLEM: Spots of Creosote accumulation in chimney or flue
CAUSE:
SOLUTION:
Air leaks in chimney or flue connector
Inspect chimney and/or flue connector Repair or replace as necessary Check to
be sure that the flue connector is installed correctly. CAUTION: A leaking flue
Poor draft caused by an oversize flue, etc.
Measure draft with Manometer
SEE DRAFTS, Section 10, Pg. 31
SEE CHECK YOUR CHIMNEY, Pg. 12
PROBLEM: Door glass quickly becomes coated with creosote
CAUSE:
SOLUTION:
Low thermostat setting
Turn the thermostat to the warmest setting during the first 20-30 minutes or
Lowering the thermostat setting
Turn the thermostat to the warmest setting too far, too quickly during the first
Poor draft caused by an oversize flue, etc.
Measure draft with Manometer SEE DRAFTS, Pg 31 SEE CHECK YOUR
Obstruction in chimney or cap screen Heat
Remove obstruction. Clean heat exchanger chamber. SEE Section 10, page
31 Measure draft with Manometer SEE DRAFTS, Pg. 31 Some chimneys may
need to be relined. Consult your Blaze King Dealer or a chimney sweep.
Install wind-resistant chimney cap.
exchange chamber filled with ash
Strong, gusting winds causing down draft in
Tightly sealed house, inadequate air supply
Open a window, slightly, near the stove. Use seasoned wood with low pitch
Burning poorly seasoned wet wood,or wood with content
OM-RGT.PUB
Page 33
Date Printed: Wednesday, November 07, 2012
Version 1.03
Blaze King, Royal Guardian, Model RGT-3001
OWNER'S INSTALLATION AND OPERATION MANUAL
REPLACEMENT PARTS
Listed below are some of the more commonly needed replacement parts.
ITEM:
PART#:
Damper Handle
0131A
Door Handle
0121AA
Spray Paint
Contact your Blaze King dealer .
Door Gasket
Gasket 6’x 7/8”
Rheostat Knob
O137
Door Glass
Replacement Asmb.
Contact your Blaze King dealer
Outside Air Kit
Z8300AA
Back Shield Kit
Z8310A
Side Shields with Fan Kit
Z8301A
OM-RGT.PUB
NOTES:
Page 34
(Specify Color)
Sizes Vary
Date Printed: Wednesday, November 07, 2012
Version 1.03
LISTED
SOLID FUEL ROOM
P/N 0194BB
Blaze King, Royal
Guardian,
ModelHEATER
RGT-3001
Also suitable
forOPERATION
use in MOBILE
HOME
OWNER'S INSTALLATION
AND
MANUAL
MODEL: RGT 3001
Tested to: UL 1482/ULC S627
Report NO: 632-000500 (1/90)
WH-
PREVENT HOUSE FIRES. Install and use only in accordance with
manufacturer’s installation and operating instructions. Contact local building or
fire officials about restrictions and installation inspection in your area.
Use 6”/152mm minimum 24 GA. black or blued steel chimney connector with a
listed factory-built chimney suitable for use with solid woods, or an approved, lined
masonry chimney. Refer to local building codes and manufacturer’s instructions for
precautions required when passing a chimney or connector through a combustible
wall or ceiling. DO NOT CONNECT THIS UNIT TO A CHIMNEY SERVING
ANOTHER APPLIANCE.
MINIMUM CLEARANCES TO COMBUSTIBLE CONSTRUCTION (in./mm)
CONVENTIONALREDUCED CLEARANCE
USING SINGLE
USING DOUBLE
WALL CONNECTOR
WALL CONNECTOR
A. Connector to Backwall
B. Connector to Sidewall
C. Connector to Adjacent Wall
D. Unit to Backwall
E. Unit to Sidewall
F. Corner to Adjacent Wall
16”/406mm
25.5”/648mm
21.5”/546mm
10”/254mm
16”/406mm
12”/305mm
SIDE WALL
A
FLOOR PROTECTOR
ADJACENT WALL
ADJACENT WALL
BACK WALL
12”/305mm
21.5”/546mm
17.5”/445mm
6”/152mm
12”/305mm
8”/204mm
D
B
STOVE
E
F
C
4”
4”
STOVE
F
18”
For additional clearances, please refer to owner’s manual.
FRONT
COMBUSTIBLE FLOOR REQUIRES use of a minimum 3/8”/9.5mm non-combustible floor
protector extending a minimum of 18”/406mm to the front and 8”/203mm to each side of the fuel
loading and/or ash drawer, and 2”/51mm to either side of the chimney connector.
ALCOVE INSTALLATIONS: Minimum ceiling height 64”/1626mm, minimum width 59”/1499mm,
maximum depth 30”/762mm. Listed double wall chimney connector required. Requires use of Side
Heat Shield Part No. 8301AA and Rear Heat Shield No. 8302AA.
MOBILE HOME INSTALLATIONS: Roof exit required. DO NOT INSTALL IN A SLEEPING
ROOM. The structural integrity of the mobile home must be maintained.
COMPONENTS REQUIRED FOR MOBILE HOME INSTALLATION
Outside Air Kit No. Z8300AA - Side Heat Shield No. Z8301AA - Rear Heat Shield No. Z8310AA
One of the following listed chimney connectors (with compatible listed chimney system)
In the U.S.A : Duravent Dura Plus HT/Ameri-Tec HS/Metalbestos HT/Security 103 HT
In Canada: Canadian stoves require high temperature pipe meeting S629M requirements and
listed double wall pipe.
Replace glass only with ceramic glass available from your Blaze King Dealer.
Operate with doors closed only.
Electrical rating: 115 V, 0.58 Amps, 60 Hz. Route power cord away from appliance.
Risk of electrical shock. Disconnect power before servicing.
For use with solid wood fuel only. Do not use grate or elevate fire. Build fire directly on hearth.
Manufactured by:
Blaze King Industries
400 W. Whitman Dr.
College Place, WA.
99362 USA
Valley Comfort Systems
1290 Commercial Way
Penticton, B.C.
V2A 3H5
Design and specifications subject to change without notice. Covered by one or more of the
following U.S. Patents
D249890, D250541, D263993, D270087, 4261324. In Canada, patents 45026 and 45247.
Other U.S. and Canadian patents pending.
DO NOT REMOVE OR COVER THIS LABEL
U.S. ENVIRONMENTAL PROTECTION AGENCY
Certified to comply with July 1990 particulate emission standard
DATE OF MANUFACTURE
OM-RGT.PUB
1999
2000
2001
2002
APR
MAY
JUN
JUL
2003
2004
JAN
AUG
SEPT
OCT
Page 35
FEB
MAR
NOV
DEC
Date Printed: Wednesday, November 07, 2012
Version 1.03
Blaze King, Royal Guardian, Model RGT-3001
OWNER'S INSTALLATION AND OPERATION MANUAL
INDEX OF TOPICS,
TABLES & ILLUSTRATIONS
Page:
3
3
4-7
8
9
11
12
13
14
19
21
22
23
24
25
25
25
26
27
29
30
32
34
35
Table:
Topic:
Introductory Letter
Clearance Kits and Optional Accessories
Warranty
Definitions
Safety
Specifications
Installation Preparation
Reduced Wall Clearances
General Installation Instructions
Minimum Clearances to Combustible Surfaces
Residential Standard/Reduced Roof Exit Installation
Residential Reduced Clearance Wall Exit Inst.
Residential Reduced Clearance Wall Exit Masonry Chimney Installation
Mobile Home and Alcove Installation
Side Shield and Fan Kit
Trim on Side Shield
Back Shield Kit
Outside Air Kit
Operation Instructions
Disposal Of Ashes
Maintenance Instructions
Troubleshooting
Replacement Parts
Label
Page:
Description:
19
24
Minimum Clearances to Combustible Surfaces
Pipe for Mobile Home Installations
Figure:
Page:
Illustrations:
21-26
27
28
29
20
21
22
23
30
24
31
35
36
37
26
26
26
29
Clearance Diagrams
Residential Installation with Prefabricated Chimney Systems
Residential Installation with Prefabricated Chimney Systems
Residential Installation with Prefabricated Chimney Systems
with Exterior Masonry Chimney
Mobile Home and Residential Installation using Dura-Plus
Chimney and Close Clearance Connector
Location of Major Components
Outside Air Kit
Combustion Air Control Label
Ash Pan
1
2
OM-RGT.PUB
Page 36
Date Printed: Wednesday, November 07, 2012
Version 1.03