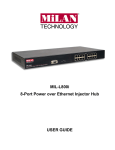
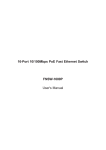
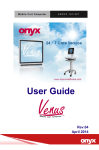
1
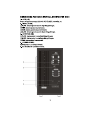
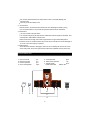
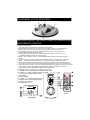
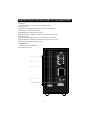
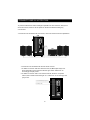
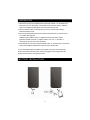
l
5.1 CH SURROUND SPEAKER
AUX 1
AUX 2
MODEL: HT 001UA-5505U
MODEL NO.: HT001UA-5505U
INSTRUCTION MANUAL
CONTENTS
SAFETY INSTRUCTIONS...........................................................................................1
IMPORTANT SAFEGUARDS.......................................................................................1
IMPORTANT SAFETY INSTRUCTIONS.......................................................................2
PACKING LIST............................................................................................................3
PLACEMENT OF THE SPEAKERS............................................................................. 4
DESCRIPTION OF THE FRONT PANEL OF SUBWOOFER& REMOTE CONTROL......4
DESCRIPTION OF THE REAL PANEL OF THE SUBWOOFER.................................... 5
CONNECTIONS ILLUSTRATION................................................................................ 6
OPERATION................................................................................................................7
BATTERY INSTALLATION......................................................................................... 7
IMPORTANT NOTES...................................................................................................8
SPECIFICATIONS.......................................................................................................8
SAFETY INSTRUCTIONS
IMPORTANT SAFEGUARDS
1- READ INSTRUCTIONS --- All the safety and operating instructions should be
read before the appliance is operated.
2- RETAIN INSTRUCTIONS---The operating instructions should be retained for
future reference.
3- HEED WARNING---All warnings on the appliance and in the operating
instructions should be adhered to.
4- FOLLOW INSTRUCTIONS---All operating and use instructions should be
followed.
5- WATER AND MOISTURE---The appliance should not be used near water-for
example, near a bathtub, washbowl, kitchen sink, laundry tub, in a wet basement,
or near a swimming pool, etc.
6- OUTDOOR USE ---Warning: To reduce the risk of fire or electric shock, do not
expose this appliance to rain or moisture.
7- LOCATION: The appliance should be installed in a stable location.
8- VENTILATION --- The appliance should be situated so that its location or position
does not interfere with its proper ventilation. For example, the appliance should not
be situated on a bed ,sofa, rug, or similar surface that may block the ventilation
openings; or placed in a built-in installation, such as a closed bookcase or cabinet
that may impede the flow of air through the ventilation openings.
9- HEAT--- The appliance should be situated away from heat sources such as
radiators, hear registers, stoves, or other appliances(including amplifiers) that
produce heat.
10- POWER SOURCES--- The appliance should be connected to a power supply
only of the type described in the operating instructions or as marked on the
appliance.
-1-
11- POWER CORD PROTECTION --- Power-supply cords should be routed so that
they are not likely to be walked on or pinched by items placed upon or against them.
Pay particular attention to cords at plugs, convenience receptacles, and the point
where they exit from the appliance.
12- Overloading- Do not overload wall outlets, extension cords, or integral
convenience receptacles as this can result in a risk of fire or electric shock.
13- GROUNDING OR POLARI ZATION ---The precautions that should be taken so
that the grounding or polarization means of an appliance is not defeated.
14- CLEANING --- The appliance should be cleaned only with a polishing cloth or a
soft dry cloth. Never clean with furniture wax, benzene, insecticides or other
volatile liquids since they may corrode the cabinet.
15- NON-USE PERIODS ---The power cord of the appliance should be unplugged
from the outlet when left unused for a long period of time.
16- LIGHTNING STORMS--- Unplug the appliance during lightning storms.
17-OBJECT AND LIQUID ENTRY ---Care should be taken so that objects do not fall
and liquids are not spilled into the enclosure through openings.
18- ACCESSORIES---Only use attachments/ accessories specified by the
manufacturer.
19- DAMAGE REQUIRING SERVICE---The appliance should be serviced by
qualified service personnel when:
The power-supply cord or the plug has been damaged.
Objects have fallen, or liquid has been spilled into the appliance.
The appliance has been exposed to rain.
The appliance does not appear to operate normally or exhibits a marked change
in performance.
The appliance has been dropped or the enclosure damaged.
20- SERVICING ---The user should not attempt to service the appliance. Servicing
should be referred to qualified service personnel or returned to the dealer or call
the dealer service line for assistance.
21- SAFETY CHECK ---Upon completion of any service or repairs to this product,
ask the service technician to perform safety checks to determine that the product
is in proper operation condition.
IMPORTANT SAFETY INSTRUCTIONS
1- Save the user’s manual
The user ’s manual should be saved and kept on hand as a convenient reference.
2- Cleaning the unit
Disconnect the mains plug from the outlet before attempting to clean the unit.
-2-
Do not use harsh abrasives or chemicals to clean it, as it will damage the
surface finish.
Use only a soft and damp cloth.
3- Accessories
Please use the accessories enclosed in the unit. Damage caused by using
non-recommended or non-provide accessories would not be warranted.
4- Placement:
Do not use this unit near water.
Do not allow anything to drop into the subwoofer case through its ventilator, as it
could result in fatal electric shock or file.
Place the unit far enough from other equipments from good heat dissipation.
Place the unit on a stable surface and out of reach of children to avoid damage to
the unit or the risk of injury to people.
5- Maintenance
To avoid shock hazard or damage to the unit, do not attempt to remove the cover
or the rear panel. All servicing should be referred to qualified service personnel.
PACKINGLIST
1- User ’s manual
2- Remote Control
3- Center Speaker
4- Surround Speaker
1pc
1pc
1pc
2pcs
5- Front Speaker
2pcs
6- Subwoofer Speaker
1pc
7- Singal Cable
3pcs
FR/FL/CEN:2M
SR/SL:4M
AU X 1
AU X 2
M O DEL : HT 0 0 1 UA -5 5 05 U
7
1
2
6
5
3
4
-3-
PLACEMENT OF THE SPEAKERS
DESCRIPTION OF THE FRONT PANEL OF SUBWOOFER
AND REMOTE CONTROL
1- Digital Volume Display:
To indicate power on/off of and the volume level of the system
2- INPUT set(On remote control): To choose the input modes 5.1CH or 2.1 CH or USB/Card.
IR(Infra-red on subwoofer): To receive the control signal from the remote control.
3-PLAY/PAUSE:when input signal is in USB/CARD status, this key is to used to control
the PLAY /PAUSE/of the input music device.
4/6- PREV/NEXT: when input signal is in USB/CARD status, this key is to used to control
the PREVIOUS/NEXT playback of the input device.
5- Master + (VOL +)/Master -(VOL-): To increase/decrease the master volume of the speaker
system.
7- ST.BY: Press ST.BY to get whole system in STANDBY status, of no audio output, and display
will be --, all other keys will not have function. Press ST.BY again to resume the system.
8- MUTE: this is for MUTE of whole system. Press MUTE key, the system will be in MUTE status,
of no audio output, and current volume will be display and flashed. Press any keys to MUTE OFF.
9- CARD, USB, AUX1,AUX2, 5.1 key: These keys are for selection of signal input. Press any of these
keys to select the relevant input signal. And the display will be in relevant input indication.
Display will be shifted to MASTER VOLUME status automatically.
10- PROLOGIC key: Press this key, 2.1 output and 5.1 output.
11-“MODE” switch fromSD/ MMC CARD to other USB
7
12-“PREV/ V-”shortly pressing tums to the last
1
music, continuously pressing reduce
the Volume.
13-PLAY/ PAUSE
14-“NEXT/ V+”shortly pressing turns to
the next music, continously pressing
increases the Volume.
AU X 1
AU X 2
US B
5 .1
CA RD
PROLOGIC
INP UT
8
2
PLAY/PAU SE
3
PR EV.
M AS TE R
NE XT
15- USB/SD/MMC socket.
4
5.1
AUX 1
HT001UA-5505U
AUX 2
6
10
15
HT001UA-5505U
12
13
14
9
5
Remote
11
Top panel
Front panel
-4-
DESCRIPTION OF THE REAL PANEL OF THE SUBWOOFER
1-AUX(L/R)
To receive the signal from PC, CD, MP3, Tape Player, etc.
2-INPUT(5.1CH)
(1)FL/FR:Front Left/Right channel input connectors of the system.
(2)CEN:Center channel input connector.
(3)SUB:Subwoofer channel input connector.
(4)SL/SR:Surround Left/Right channel input connectors of the system.
3-OUTPUT(5.1CH)
(1)FL/FR:Front Left/Right channel output connectors of the system
(2)SL/SR:Surround Left/Right channel output connectors of the system
(3)CEN:Center channel output connectors.
4-POWER ON/OFF
Switch for turn on/off the power
5-AC IN: AC power cord.
HT0 01UA-55 05U
L1
R1
L2
R2
1
2
FL
FR
SL
SR
CEN
SW
S-AUDIO
INPUT
3
FR-
FR+
FL-
FL+
CEN-
CEN +
SL-
SL +
SR-
SR +
ON
4
OFF
~ 220V 50Hz
5
HIGH TEMPERATURE
PLEASE KEEP AWAY
THE HEAT SINK
-5-
CONNECTIONS ILLUSTRATION:
To prevent malfunction and/or damage to speakers or other devices, always turn
down the volume, and turn off the power on all devices before making any
connections.
<Connections of the Subwoofer, the Center, the Front and the Surround Speakers>
SUB
HT00 1UA- 5505 U
L1
R1
L2
R2
FL
FR
SL
SR
CE N
SW
S -AUDI O
I NP UT
F R-
SL
FL
F R+
F L-
F L+
CE N-
CE N+
S L-
S L+
S R-
S R+
FR
SR
CEN
ON
OF F
~ 220V 50Hz
HI G H T EM P ERA T UR E
PL EA SE K EEP A WAY
T HE HEA T SIN K
<Connections of the Subwoofer and the audio source>
1.To make connection with 2CH device as PC,CD,MP3,Tape Player etc.
and press INPUT, then relevant indicator light "AUX" will be turn on
accordingly and play music.
2.To make connection with 5.1CH device as DVD, DTS etc. and press
INPUT, then relevant indicator light "5.1" will be turn on accordingly and
play music.
HT 00 1UA- 55 05U
1.To PC,CD,MP3,Tape Player, etc.
L1
R1
L2
R2
FL
2.To DVD(5.1CH)
FR
SL
SR
C EN
SW
S- AU DIO
IN PUT
FR-
FR+
FL-
FL +
CEN-
CEN+
SL-
SL +
SR -
SR +
ON
OFF
~ 220V 50Hz
HI GH TE MP ERATURE
P LE AS E KEE P AWAY
THE HEAT S I NK
-6-
OPERATION
1- Press down the tip of the POWER rocker switch with a white “I” on the back of the
subwoofer to turn on the system. The system is then turned on and the indicator
light on the Digital Volume Display of the front panel will turn red.
2- Press the MUTE button on the remote control once, and the system will be
switched to MUTE mode.
3- Press the following buttons on the front panel of the subwoofer or remote control
to a suitable listening level.
(1)MAST+(VOL+)/MAST-(VOL-): to adjust the volume level of the system
(2)Press the SUB + and VOL+ to adjust or SUB- and VOL- to increase or
decrease the volume level of the subwoofer.
4- Press MUTE key, the system will be in MUTE status, of no audio output, and current
volume will be display and flashed. Press any keys to MUTE OFF.
*It is recommended that the POWER rocker switch on the back of the subwoofer
be turned off and that the AC power cord be unplugged from the supply when the
system is left unused for a long period of time.
BATTERY INSTALLATION:
-7-
IMPORTANT NOTES
<AC POWER>
* Make sure that the power supply is correct and never handle the power cord or its
plug with wet hands when plugging into, or unplugging from, and outlet.
* Ensure that the main power switch is in the OFF position before connecting the AC
power cord to the power supply to avoid damage to the system.
* A damaged power cord can easily cause an electric shock or fire hazard. Never use
a power cord after it has been damaged.
SPECIFICATIONS
POWER INPUT......................... AC 220V/50Hz
TOTAL SYSTEM POWER........... 125Watts(45W+16Wx5)
FREQUENCY RESPONSE.........35 Hz-20 KHz
S/N RATIO................................>=70dB
DISTORTION............................0.1% @1W
DRIVER UNIT...........................SUB:5.25” 8Ohms; SAT:3” Full Range 4 Ohms
SEPARATION............................>=40dB(1KHz)
FUNCTION................................MUTE、2.1/5.1 Switch、VOL+/-、BASS+/-、
DIGITAL DISPLAY & REMOTE CONTROL
-8-
HT001UA-5505U
5.1 CH SURROUND SPEAKER