1
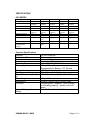
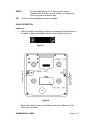
ACS Series Digital Counting Scales USER MANUAL SCALES usa © 2005 Page 1 of 16 SCALES usa © 2005 Page 2 of 16 INTRODUCTION The ACS series of counting scales provides an accurate, fast and versatile series of counting and check-weighing scales. The scales have selectable units of kilograms, grams, pounds, and ounces. There are 5 models, with capacities up to 60lb/30 kg. They all have stainless steel weighing platforms on an ABS base assembly. All the keypads are sealed, membrane switches and the displays are large easy to read liquid crystal type displays (LCD). The LCD’ s are supplied with a backlight. Features include automatic zero tracking, audible alarm for pre-set weights, automatic tare, pre-set tare and an accumulation facility that allows the count to be stored and recalled as an accumulated total. SCALES usa © 2005 Page 3 of 16 INTRODUCTION ............................................................................................ 3 SPECIFICATIONS .......................................................................................... 5 ACS SERIES......................................................................................................... 5 Common Specifications......................................................................................... 5 SETUP............................................................................................................ 6 GENERAL INSTALLATION ............................................................................... 6 INSTALLATION OF ACS A/C SERIES .............................................................. 6 KEYBOARD FUNCTIONS ................................................................................. 7 1). DISPLAY PANEL ....................................................................................... 7 Figure 1 ............................................................................................................. 7 2). KEYBOARD............................................................................................... 8 Figure 2 ............................................................................................................. 8 SCALE OPERATION ...................................................................................... 9 Power on: .............................................................................................................. 9 Figure 3 ............................................................................................................. 9 Figure 4 ............................................................................................................. 9 ZEROING THE DISPLAY ................................................................................. 10 TARING ............................................................................................................. 10 NORMAL TARE: ........................................................................................... 10 PRETARE:...................................................................................................... 11 PARTS COUNTING...................................................................................... 11 SETTING UNIT WEIGHT.................................................................................. 11 WEIGHING A SAMPLE TO DETERMINE THE UNIT WEIGHT .................... 11 ENTERING A KNOWN UNIT WEIGHT........................................................... 12 PRESET COUNTING ALARM .......................................................................... 12 ACCUMULATED TOTAL COUNT................................................................... 13 BATTERY OPERATION ............................................................................... 13 OPTION SETTINGS ..................................................................................... 14 SETUP TABLE 1 ............................................................................................ 14 SCALES USA Warranty Information ............................................................ 16 SCALES usa © 2005 Page 4 of 16 SPECIFICATIONS ACS SERIES Model # Maximum Capacity Readability ACS001AC 1.5kg/3lb 0.1g/ 0.0002lb External Resolution 1:15,000 Internal Resolution 1:128,000 Tare Range KG Mode Full Capacity Minimum Capacity .2g Repeatability (Std Dev) 0.2g Linearity ± 0.2 Units of Measure Recommended Calibrationtion Weight kg/g/lb/oz 1KG Common Specifications Interface Stabilization Time Calibration Display Operating Temperature Power supply Balance Housing Pan Size Overall Dimensions (W x D x H), Gross Weight Applications Functions Internal Rechargeable Battery SCALES usa © 2005 ACS003AC 3 kg /6 lb 0.2g/ 0.0005lb 1:15,000 1:128,000 Full Capacity .4g 0.4g 0.0008lb/ 0.4g kg/g/lb/oz 2KG or 3KG ACS006AC 6 kg /15 lb 0.5g/ 0.001lb 1:15,000 1:128,000 Full Capacity 1g 1g 1g ACS015AC 15kg/30lb 1.0g/ 0.002lb 1:15,000 1:128,000 Full Capacity 2g 2g 2 ACS030AC 30 kg /60lb 2.0g/ 0.005lb 1:15,000 1:128,000 Full Capacity 5g 4g 4g kg/g/lb/oz 5KG kg/g/lb/oz 10KG kg/g/lb/oz 20KG RS-232 Output NA 2 Seconds typical Automatic External 3 x 7 digits LCD digital display 0°C - 40°C 32°F - 104°F 12Vdc, 500ma AC adapter, Internal Rechargeable 6V Battery, 4 “ D”Drycells ABS Plastic, Stainless Steel platform 225 x 295mm 8.9 x 11.6” 310 x 330 x 114mm (12.2”x 13”x 4.5” ) 4.1kg / 9.1lb General Purpose Parts Counting Scale Kilogram/g/lb/oz weighing - parts counting accumulating memory - preset count with alarm 6V / 4Ah Sealed Lead Acid Battery Page 5 of 16 SETUP GENERAL INSTALLATION The scale should be sited in a location that will not degrade the accuracy. Avoid extremes of temperature. Do not place in direct sunlight or near air conditioning vents. Avoid unsuitable tables. The tables or floor must be rigid and not vibrate. Do not place near vibrating machinery. Avoid unstable power sources. Do not place near large users of electricity such as welding equipment or large motors. Avoid high humidity that might cause condensation. Avoid direct contact with water. Do not spray or immerse the scale in water. Avoid air movement such as from fans or opening doors. Do not place near open windows. Keep the scale clean. Do not stack material on the scale when not in use. INSTALLATION OF ACS A/C SERIES Level the scale using adjustable feet. Center the bubble in the spirit level located on the left of the scale control panel. If the scale rocks readjust the levelers. The ACS A/C Series comes with a stainless steel platform packed separately. Place the platform in the locating holes on the top of the scale. Do not press with excessive force as this could damage the load cell inside. There is a protective peel-off plastic coating on the platform and on the display that may be removed if desired. For AC operation or charging of internal battery, set the power source selection switch on the lower left side of the scale to the battery position and attach the power supply cable to the connector on the bottom of the scale. Be certain that it is firmly seated and that the shoulder of the plug fits into the hole in the scale case. Plug in the power supply module. The power switch is located on the bottom right side of the scale. See Figure 2. FOR Dry Cell operation, set the power source selection switch on the lower left side of the scale to Dry Cell. Insert 4 “ C SIZE”alkaline batteries. Do not store the scale with batteries installed if it will not be used for over 30 days to precent damage from battery corrosion. The battery charge light will illuminate whenever the scale is attached to power. SCALES usa © 2005 Page 6 of 16 KEYBOARD FUNCTIONS 1). DISPLAY PANEL Figure 1 kg g lb oz: The “ ”symbol appears to indicate the weight unit currently in use. There are are four units selectable. The default startup unit may be selected in setup. ZERO: The “ ”symbol appears when scale is displaying zero. CHRG: Not Used. The charge light on the front panel changes to red when battery is discharged to yellow while battery is charging, and Green when battery is charged. STABLE: The “▼”symbol appears when the reading is stable. LOS: The Lack of Sample symbol “▼”appears when the sample number on the platform is not enough for accurate counting operation. LPW: The Lack of Piece Weight symbol “▼”appears when the sample unit weight is not heavy enough for accurate counting operation. TARE: The “▼”symbol appears when tare function is in effect. WEIGHT: The top display line indicates the gross or net (with the tare function activated) weight on the platform. UNIT WEIGHT: The center display line indicates the average or set unit piece weight. TOTAL: The bottom display line indicates the accumulated total number of pieces on the platform. SCALES usa © 2005 Page 7 of 16 2). KEYBOARD Figure 2 0-9 and .: Numeric and decimal keys. UNITS: Used to toggle thru weight units. (Set default startup unit in scale setup) M+/ : Add the current weight/count to the accumulator memory. Up to 99 values or full capacity of the weight display can be added. While in scale setup mode, this key can be used as shift key. TOTAL: Recalls the total accumulated weight and count from the memory. UNIT WEIGHT /CANCEL: SAMPLE / BACK LIGHT: QUANTITY CHECK/<<: TARE/<: 1 the known unit weight. In the setup mode, Used to enter this key is used as a cancel and exit key. Used to input the sample size or weight. Turns backlight on in the weighing mode. (Configure backlight behavior in scale setup mode) Used to turn on the check weight mode and for setting alarm quantity. Used to subtract the weight of a container. Indicates that the current reading is the net weight. In setup mode, this key can be used as a shift key SCALES usa © 2005 Page 8 of 16 ZERO/>: CE: Set the weight display to “ 0”when a minor value is displayed on the scale (ex. from drifting). In setup mode, this key can be used as shift key. Used to clear the displayed numeric readings. SCALE OPERATION Power on: Place the scale horizontally by adjust four leveling feet at the bottom of the scale, to place the bubble at center of the level eye (Figure 3). Figure 3 Figure 4 Select the desired position of the Battery Selection to Battery or Dry Cell power as follows. SCALES usa © 2005 Page 9 of 16 For AC operation or charging of internal battery, set the power source selection switch on the lower left side of the scale to the battery position and attach the power supply cable to the connector on the bottom of the scale. Be certain that it is firmly seated and that the shoulder of the plug fits into the hole in the scale case. Plug in the power supply module. The power switch is located on the bottom right side of the scale. FOR Dry Cell operation, set the power source selection switch on the lower left side of the scale to Dry Cell. Insert 4 “ C SIZE”alkaline batteries. Do not store the scale with batteries installed if it will not be used for over 30 days to prevent damage from battery corrosion. Turn on the power switch at the bottom of the scale (See Figure 4). The display will show 0—9 sequentially and battery voltage value (over 5.5v) for several seconds. Then it will enter the weighing mode. The weight will display zero and the zero sign“”appears. ZEROING THE DISPLAY You can press the ZERO key at any time to set the zero point from which all other weighing and counting is measured, It is active within 4% of power up zero. This will usually only be necessary when the platform is empty. When the zero point is reached, the Weight display will show the indicator for zero. The scale has an automatic re-zeroing function to account for minor drifting or accumulation of material on the platform. However you may need to press ZERO to re-zero the scale if small amounts of weight are shown when the platform is empty. TARING The Tare function is used to remove the package weight, effectively setting the weight display to zero. If the item tarred is removed, a negative weight is displayed. This allows weighing or counting only the contents of the container. There are two methods to enter a tare value. Normal Tare uses the weight on the platform and Pretare uses a value input by the user. NORMAL TARE: Zero the scale by pressing the ZERO key if necessary. The zero indicator will be on. Place a container on the platform, a value for its weight will be displayed. Press the TARE key to tare the scale. The weight that was displayed is stored as the tare value and that value is subtracted from the display, leaving zero on the display. SCALES usa © 2005 Page 10 of 16 The "TARE" indicator will be on. As product is added only the weight of the product will be shown. The scale could be tarred a second time if another type of product was to be added to the first one. Again only the weight that is added after tarring will be displayed. When the container is removed, a negative value will be shown. If the scale was tarred just before removing the container this value is the gross weight of the container plus all product that was removed. The zero indicator will also be on because the platform is back to the same condition it was when the ZERO key was last pressed. Press the TARE key again to remove the tare weight. PRETARE: This method allows you to enter a known value for the container weight from the keypad. This is useful if all containers weigh the same, or if the container is already full but the net weight is required and the tare weight of the container is known. Remove all weight from the platform, and press the ZERO key to zero the display. Enter the value for the Pretare weight IN GRAMS! including decimal values (50.00). Using the keypad, press Tare to store the tare value. The weight will show a negative value equal to the tare. Note: If you have the scale set to operate in a unit other than grams, the weight will be converted to that unit in the top window, but the Pretare weight can only be entered in grams. Place the container on the platform. The display will then show the weight of the container minus the tare weight. Then when a full container is placed on the platform the tare value will be subtracted from the gross weight displaying only the net weight of the contents. PARTS COUNTING SETTING UNIT WEIGHT In order to count parts, it is necessary to know the average piece weight of the items to be counted. This can be done by placing a known number of the items on the weighing platform and letting the scale determine the average unit weight (Sampling), or by manually entering a known weight using the keypad. WEIGHING A SAMPLE TO DETERMINE THE UNIT WEIGHT To determine the average weight of the items to be counted it will be necessary to place a known quantity of the items on the scale and then key in the number of items being weighed. The scale will then divide SCALES usa © 2005 Page 11 of 16 the total weight by the number of items and display the average unit (piece) weight. The unit weight will be more accurate when the number of items placed on the scale is a large value. For example, A more accurate unit weight can be measured by placing 50 parts on the scale instead of 25. Zero the scale by pressing the ZERO key. If a container is to be used, place the container on the scale and press tare as discussed earlier. Place a known quantity of items on the scale. After the weight display is stable enter the quantity of items using the numeric keys followed by SAMPLE key. The number of items will be displayed on the "Count" display and the computed average piece weight will be shown on the "Unit Weight" display. As more items are added to the scale, the weight and the quantity will increase. ENTERING A KNOWN UNIT WEIGHT If the unit weight is already known then it is possible to enter that value using the keypad. When weighing in kilograms or grams the unit weight is entered in grams. When weighing in pounds the unit weight is entered in pounds. When weighing in ounces, the unit weight is entered in ounces. Enter the value of the unit weight using the numeric keys followed by pressing the UNIT WEIGHT key. The "Unit Weight" display will show the value as it was entered. Add items to the scale and the weight will be displayed as well as the quantity based upon the unit weight. PRESET COUNTING ALARM Preset Counting is a procedure that causes an beep to sound when the weight on the scale falls within a preset range. The weight range is set as follows. 1. Press the QUANTITY CHECK key while the scale is either loaded or unloaded. 2. Press the ZERO key to toggle the check weight function to ON. 3. Press the M+ key to save. 4. L XXX will show in the center window. Key in the low value and press M+ key. 5. H XXX will now show in the center window. Key in the high limit value and press the M+ key again. 6. The scale will now return to the weighing mode and the Quantity Alarm will be on. SCALES usa © 2005 Page 12 of 16 7. To disable the Alarm/ Beep function, Press QUANTITY CHECK / ZERO/ M+. ACCUMULATED TOTAL COUNT When counting large quantities, it is more accurate to count in smaller batches rather than one huge batch. Up to 99 batches can be counted and added to the internal scale memory. This allows the operator to keep a running total. The count can be added to the memory as follows 1. Press the M+ key. The "Weight" display will show the number of times that items have been added to the accumulation memory, and the “ Count”display will show the total number of items in memory. Press the CE key to return to counting. 2. Additional product can then be weighed or counted and the M+ key pressed again. This can continue for up to 99 entries, or until the weight capacity is reached. 3. To observe the total stored press the TOTAL key. 4. To clear the memory press TOTAL and then QUANTITY CHECK to clear all values from memory. BATTERY OPERATION The scales can be operated from the internal rechargeable battery if desired. The battery life is approximately 70 hours. When the battery needs charging the low battery symbol will be displayed, the battery should be recharged immediately. The scale will still operate for about 10 hours after which it will automatically switch off to protect the battery. To charge the battery, simply plug the AC Adapter into the scale and the AC power outlet. The charge LED on the front panel is red when battery is discharged and changes to yellow while the battery is charging, and to green when battery is charged. The scale does not need to be turned on. The battery should be charged for 12 hours for full capacity. When the battery life becomes unacceptable then obtain a sealed lead acid replacement battery of the same type and capacity. SCALES usa © 2005 Page 13 of 16 OPTION SETTINGS To set the optional scale technical parameters, it is necessary to enter a setup menu. This is done by entering a key combination while the scale is in the weighing mode. To enter the settings menus press and hold the CE key and then briefly press the QUANTITY CHECK key and release both keys. The parameter menu has 7 functions that can be toggled thru using the ZERO key The Weight Display will show the name of the functions and the Unit Weight Display will show the setting. To step through available settings within a parameter, press the ZERO key. At any time. Press the UNIT WEIGHT / CANCEL key to return to weighing. SETUP TABLE 1 Weight Description and Settings (Shown in Unit Weight Display) Display FILt ? ). SELECTION OF FILTER GRADE. There are two filter modes (mode 1 and mode 2) for the scale. Each mode has four grades (0-3). The higher the grade is, the higher the stability is but the slower the reaction is. For example, “ SEL 1 0”means the reaction of the scale is the quickest, but its stability is the lowest. “SEL2 3”means the reaction of the scale is the lowest, but its stability is the highest. In the FILt ? menu, press M+ to enter selection of filter grade mode. Then step thru the grade modes using the ZERO/> key until you reach the desired mode. Press M+ to save it. The display will show next menu. Or press the UNIT WEIGHT/CANCEL key to exit. StAb ? SELECTION OF STABILITY. There are five stable grades(0—4). In the “StAb ?”menu, press M+ to enter it. Then choose the grade by shift key ZERO/>. The original grade is 1. The higher the grade is, the higher the stability is. Press M+ to save it. The display will show next menu. Or press the UNIT WEIGHT/CANCEL key to exit. 2trC ? SELECTION OF ZERO TRACING GRADE. There are five zero tracing grade (0-4). In the “2trC ?”menu, press M+ to enter it. Then choose the grade by shift key ZERO/>. The original grade is 1. The higher the grade is, the larger the zero tracing is. . Press M+ to save it. The display will show next menu. Or press the UNIT WEIGHT/CANCEL key to exit. SCALES usa © 2005 Page 14 of 16 Option Settings (cont.) 2.dSP ? SELECTION OF ZERO DISPLAY RANGE. There are five zero display ranges (0—4). In the “2.dSP ?”menu, press M+ to enter it. Then choose the range by shift key ZERO/>. The original grade is 1. The higher the range is, the larger the zero display range is. Press M+ to save it. The display will show next menu. Or press the UNIT WEIGHT/CANCEL key to exit. UnIt ? SELECTION OF STARTUP UNITS. This function is used for setting the default unit. The unit selected will be kept in the scale when turn on the scale each times. There are four units ( kg, g, lb and oz ) to be selected. Press M+ in the “UnIt ?”menu to enter it, choose the desired unit by Shift key ZERO/>. Press M+ to save it. The display will show next menu. Or press the UNIT WEIGHT/CANCEL key to exit. BK lg ? SELECTION OF BACKLIGHT MODE There are three backlight modes (“OFF”,“ON”and “AUTO”) selectable. “ON”means backlight is always on, “OFF”means backlight is always off, and “AUTO”means the backlight is OFF with the scale at zero, and ON with a load on the platform. The default is in AUTO mode. Press M+ to save it. The display will show next menu. Or press the UNIT WEIGHT/CANCEL key to exit. ACAL SELECTION OF AUTO UPDATE FOR UNIT WEIGHT. This function is used for updating the unit weight automatically. Press M+ in the “ACAL?”menu to enter it, choose ON (or OFF) by ZERO/> key. Press M+ to save it. The display will show next menu. Or press the UNIT WEIGHT/CANCEL key to exit. SCALES usa © 2005 Page 15 of 16 SCALES USA Warranty Information Thank you for purchasing DigiWeighPro. The ACS A/C scale comes with a 1-year warranty. If you need service for your scale, please email your request to our customer service center at [email protected] or fax it to 206-600-1777. Also you can log on our website at www.scalesusa.com and contact us through our customer service page. This warranty will cover all defective scales within their warranty period. You must provide a copy of your receipt. This warranty will be void if the scale has been damaged due to misuse, physical abuse, accident, unauthorized service, or other cause not arising out of defects in materials or workmanship. During the one year warranty period, if your scale fails to work properly when used under normal conditions, Scales USA will repair, or at our option, replace it without charge. The Scales USA user has to pay the shipping charge to send the defective scale with the receipt of purchasing back to us and we will pay the cost of shipping to return the repaired or replaced scale to user. There are no other charges to the consumer for warranty coverage other than the shipping cost back to the manufacturer. Our USA service center address is: Scales USA 10306 E. Dunn Rd Chattaroy, WA 99003 USA Scales USA will provide the best quality scales and customer service for our entire satisfied customers and appreciate your business! Thank you for your business! The Scales USA customer service staff. SCALES usa © 2005 Page 16 of 16