
1
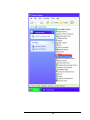
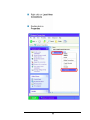
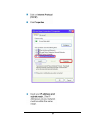
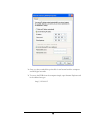
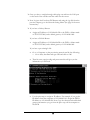
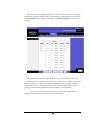
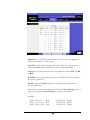
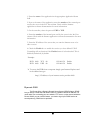
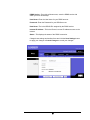
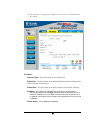
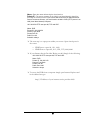
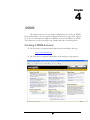
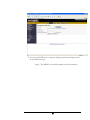
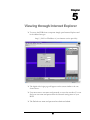
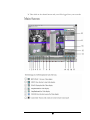
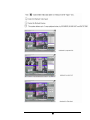
Volume 1 Instruction Manual Networking EVERFOCUS ELECTRONICS CORPORATION Networking Instruction Guide © 2004 Everfocus Electronics Corp 2445 Huntington Drive Phone 626.844.8888 • Fax 626.844.8838 All rights reserved. No part of the contents of this manual may be reproduced or transmitted in any form or by any means without written permission of the Everfocus Electronics Corporation. ] QuickTime is a registered trademark of the Apple Computer, Inc. Windows is a registered trademark of the Microsoft Corporation in the United States and other countries. Linksys is a registered trademark of the Linksys Corporation. D-Link is a registered trademark of the D-Link Corporation. DynDNS is a registered trademark of the DynDNS.org Corporation. Other product and company names mentioned herein may be the trademarks of their respective owners. Table of Contents Introduction CHAPTE R I 1 Networking Overview 1 Introduction to TCP/IP 1 Subnet Masks 1 Gateway Address 2 Virtual Ports 2 Pre-Installation 3 What type of Network Connection 4 Simple One to One Connection 5 Direct High Speed Modem Connection 11 Router or LAN Connection 13 CHAPTE R 2 Linksys Port Forwarding 16 Dynamic DNS 20 CHAPTE R 3 D-Link Port Forwarding 22 Dynamic DNS 25 CHAPTE R 4 DDNS 27 Creating a DDNS Account 27 CHAPTE R 5 Viewing through Internet Explorer 30 Chapter 1 Networking Overview This chapter will try to give you a detailed instruction on how to network the DVR. Before we begin the process of networking your digital recorder we should have a working knowledge of what a network is and how it works. This will be a helpful in completing the networking process. Introduction to TCP/IP TCP/IP is the suite of protocols used by the Internet and most LANs (Local Area Networks) throughout the world. In TCP/IP, every host (computer or other communications device) that is connected to the network has a unique IP address. By doing this you are giving your device a unique address similar to the address of your house. An IP address is composed of four octets (numbers in the range of 0 to 255) separated by decimal points. The IP address is used to uniquely identify a host or computer on the LAN. For example, a computer with the hostname Workstation could have an IP address of 192.168.1.127. You should avoid giving two or more computers the same IP address by using the range of IP addresses that are reserved for private, local area networks; this range of IP addresses usually begins with the octets 192.168. The first three octets of an IP address should be the same for all computers in the local area network. For example, if a total of 253 computers exist in a single LAN, the IP addresses could be assigned starting with 192.168.1.x, where x represents a number in the range of 2 to 254. Subnet Masks Each host in a LAN has a subnet mask. The subnet mask is an octet that uses the number 255 to represent the network address portion of the IP address and a zero to identify the host portion of the address. For example, the subnet mask 255.255.255.0 is used by each host to determine which LAN or class it belongs to. The zero at the end of the subnet mask represents a unique host within that network. Basically the subnet mask represents the city you live in for your home address, but in this case you are stating the network you belong too. 1 Gateway Address Each host in a LAN has a gateway. A gateway address is composed of four octets (numbers in the range of 0 to 255) separated by decimal points. The gateway address is used to uniquely identify a host or computer on the LAN which assigns the IP addresses to your network. For example, a Linksys router has an IP address of 192.168.1.1. If you were using this type of router within your LAN, then your gateway would be the IP address of the Linksys router. The reason this would be your gateway is because the Linksys is assigning the IP addresses for your network therefore the Linksys would be the gateway to your network. This is similar to the zip code of your address. Virtual Ports A port number represents an endpoint or "channel" for network communications. Port numbers allow different applications on the same computer to utilize network resources without interfering with each other. Port numbers most commonly appear in network programming, particularly socket programming. Sometimes, though, port numbers are made visible to the casual user. For example, some Web sites a person visits on the Internet use a URL like the following: http://www.everfocus.com:8100/ In this example, the number 8100 refers to the port number used by the Web browser to connect to the Web server. Normally, a Web site uses port number 80 and this number need not be included with the URL (although it can be). In IP networking, port numbers can theoretically range from 0 to 65535. Most popular network applications, though, use port numbers at the low end of the range (such as 80 for HTTP). This could be similar to the front door of your house. Without the door to the house being open you could not enter it. This is the same case with ports on a network. If the ports for a specific IP address are not open then you could not gain access to that IP address or what it is addressing. Please Note: The term port also refers to several other aspects of network technology. A port can refer to a physical connection point for peripheral devices such as serial, parallel, and USB ports. The term port also refers to certain Ethernet connection points, such as those on a hub, switch, or router. 2 Pre-Installation Before we begin with the installation we must ask ourselves a few questions in order to figure out where to begin with networking our DVR’s. Do you have Hi-speed Internet? ______________ There are many types of high speed Internet available. Three commonly used ones are T1, Cable, and DSL (in order of speed). Please Note: Everfocus suggests having a minimum upload speed of 256KBps. This can be addressed by the Internet Service Provider. Who is your Internet provider? ______________ Please confirm that your internet service provider that our upload speed is at least 256KBps. What type of modem/router do you have? ______________ Modem/router model name/ # The modem/router was either installed by your Internet service provider or purchased by you to establish a connection to the Internet. A router is installed to allow multiple computers to access the Internet through the same external IP address. It in turn assigns different internal IP addresses to local computers for this specific purpose. Do you have a static IP address? ______________ A Static IP address means you use the same IP address every time you log on to the Internet. With a static IP address, other Internet users always know the identity of your computer and can easily connect with it. That way, you can host a website, email server, or other type of server connection. Everfocus suggest using a static IP address. If your Internet provider does not offer a static IP address you have the option to use a dynamic IP address. This will be explained in more detail later on in the chapter. Do you have a dynamic IP address? ______________ A Dynamic IP address means your IP address changes each time you make a connection to the Internet. We recommend asking your Internet service provider for a Static IP address. If this is not a possibility, you may purchase a router (we suggest a Linksys or D-link router) which supports 3 DDNS. DDNS is a Dynamic Domain Name Server, a service that provides a central (public) database where DNS information can be stored and retrieved. It allows those using a dynamic IP address to be registered centrally so users can connect to it by name. What type of DVR are you installing? ______________ Everfocus EDR series: EDR 400, 1600 or 1680 Everfocus EDSR series: EDSR 110, 400H, 400M, 400, 900, or 1600 What Type of Network Connection do you have? Everfocus DVR’s can operate using three distinct types of networking connections. 1. Simple One to One Connection: A simple one to one connection is the most simple network connection. Basically it is a connection between a Computer and Another Computer or in this case a DVR using a crossover cable. (See page on how to install this type of connection) 2. Direct High Speed Modem Connection: A direct high speed modem connection is a network connection from the modem directly to a computer or in this case the DVR. (See page on how to install this type of connection) 3. Router or LAN Connection – A local area network connection either requires a router or a pre-existing LAN connection. Typically this type of connection is the most commonly used application. A router allows multiple computers and DVR’s to access each other as well as the Internet. It assigns different internal IP addresses to the computers. 4 Simple One to One Connection Cat 5 Cross-over-cable Crossover Ethernet Cable Pin outs: The Diagram below shows the pin configurations for a cross over cable. Diagram 31 Connection Procedure: ¾ The First step is to purchase or make a cross over cable. We recommend purchasing one if you have never made a cross over cable. Please remember you can not use a straight through network cable for this application ¾ Once you have a cross over cable plug one end into the LAN port on the back of the recorder and the other into the network card on the back of the computer. ¾ Now Log into the Everfocus DVR menu and using the jog dial from the previous chapter go to the Network Setting Menu. (See page 28 for more instructions) 5 ¾ Assign an IP address of 192.168.001.003 to the DVR, a Subnet mask of 255.255.255.000, and a default gateway of 192.168.001.001. ¾ The next step is to get the computer onto the same network to do this you will need administrator access to your windows machine. ¾ To assign a static IP address in windows 2000/XP. 6 7 8 9 ¾ Once you have reached this point click ok and restart both the computer and the digital recorder. ¾ To access the DVR from the computer simply open Internet Explorer and in the address bar type: http://192.168.1.3 10 Direct High Speed Modem Connection Hi-speed modem Internet Cat 5 Straight Through Cable DVR Straight Through Ethernet Cable Pin outs: The Diagram below shows the pin configurations for a straight cable. Diagram 32 Connection Procedure: ¾ The First step is to purchase or make a straight through cable. We recommend purchasing one if you have never made a straight through cable. Please remember you can not use a cross over network cable for this application ¾ Once you have a straight through cable plug one end into the LAN port on the back of the recorder and the other into the high speed modem. 11 ¾ Now Log into the Everfocus DVR menu and using the jog dial from the previous chapter go to the Network Setting Menu. (See page 28 for more instructions) ¾ Assign the Static IP address which you obtained from the internet service provider to the DVR, the Subnet mask from the internet service provider to the DVR, and the default gateway of the internet service provider. Please Note: If you have a dynamic IP address this type of connection will not work for you. You will need to purchase a router or ask your internet service provider for a static IP address. (Please refer to local area network connection checklist) ¾ Once you have reached this point click ok and restart both the computer and the digital recorder. ¾ To access the DVR from a computer simply open Internet Explorer and in the address bar type: http:// and the IP address of your internet service provider. 12 Router or LAN Connection Hi-speed modem Internet Cat 5 Straight Through Cable DVR Router Straight Through Ethernet Cable Pin outs: The Diagram below shows the pin configurations for a straight cable. Diagram 33 Connection Procedure: ¾ The First step is to purchase or make a straight through cable. We recommend purchasing one if you have never made a straight through cable. Please remember you can not use a cross over network cable for this application 13 ¾ Once you have a straight through cable plug one end into the LAN port on the back of the recorder and the other into the router. ¾ Now Log into the Everfocus DVR menu and using the jog dial from the previous chapter go to the Network Setting Menu. (See page 28 for more instructions) ¾ If you have a Linksys Router: Assign an IP address of 192.168.001.050 to the DVR, a Subnet mask of 255.255.255.000, and a default gateway of 192.168.001.001. If you have a D-Link Router: Assign an IP address of 192.168.000.050 to the DVR, a Subnet mask of 255.255.255.000, and a default gateway of 192.168.000.001. If you have a pre-existing LAN: Go to a Computer on the pre-existing network and do the following: o Go to Start, then Run and type cmd and click on OK. Then hit enter, type ipconfig and press enter this will give you the information you will need. Use the prior step to assign an IP address. For example, if you got the IP address from the computer of 192.168.002.101. Assign the DVR’s IP address as 192.168.002.050. Now Copy the subnet mask and default gateway information you got from the prior step off the computer to the DVR. 14 ¾ Please Note: Make sure the modem is in bridge mode. If your Internet Service Provider is BellSouth you will have a modem/router. BellSouth provides a Westell modem that includes a built-in router. You will need to disable the router functionality. ¾ The next step is to open ports within your router. Open virtual ports in the router (Log into the router using a PC) o EDR Ports to open: 80, 1111, 1600 o EDSR Ports to open: 80, 1111, 2222, 3333, 4444, 6666 Please Note: If your Internet service provider blocks port 80 you may use a different port to access the DVR through the routers UPNP forwarding (Linksys feature) or Virtual Server (D-Link feature). This will be addressed in the next two chapters. ¾ If you have a Dynamic IP address and have open the ports simply go to Chapter 9 to Configure DDNS. ¾ Once you have reached this point and you have restarted the digital recorder. ¾ To access the DVR from a computer simply open Internet Explorer and in the address bar type: http:// and the IP address of your internet service provider. Please Note: If your Internet service provider blocks port 80 you may use a different port to access the DVR through the routers UPNP forwarding (Linksys feature) or Virtual Server (D-Link feature). This will be addressed in the next two chapters. 15 Chapter 2 Linksys Port Forwarding This chapter will cover a few simple configurations for the Linksys router. Please understand we do not support this product and will not give tech support on it. If you need Technical support on this router you must call Linksys. This Chapter is to offer some help to the installer and end user nothing more. To access the Web-based Utility, launch Internet Explorer or Netscape Navigator, and enter the Router’s default IP address, 192.168.1.1, in the Address field. Then, press Enter. A password request page will appear. (Non-Windows XP users will see a similar screen.) Leave the User Name field blank. The first time you open the Web-based Utility, use the default password admin. (You can set a new password from the Administration tab’s Management screen.) Click the OK button to continue. 16 The first screen that appears displays the Setup tab. This allows you to change the Router's general settings. Change these settings as described here and click the Save Settings button to apply your changes or Cancel Changes to cancel your changes. The Applications and Gaming Tab allows you to set up public services on your network, such as web servers, ftp servers, e-mail servers, or other specialized Internet applications. (Specialized Internet applications are any applications that use Internet access to perform functions such as videoconferencing or online gaming. Some Internet applications may not require any forwarding.) To forward a port, enter the information on each line for the criteria required. Descriptions of each criteria are described here. 17 Application - In this field, enter the name you wish to give the application. Each name can be up to 12 characters. Start/End - This is the port range. Enter the number that starts the port range under Start and the number that ends the range under End. Protocol - Enter the protocol used for this application, either TCP or UDP, or Both. IP Address - For each application, enter the IP Address of the PC running the specific application. Enable - Click the Enable checkbox to enable port forwarding for the relevant application. Change these settings as described here and click the Save Settings button to apply your changes or Cancel Changes to cancel your changes. Example: DVR 80 to 80 Both DVR 1111 to 1111 Both DVR 2222 to 2222 Both 192.168.1.50 192.168.1.50 192.168.1.50 18 Enable Enable Enable DVR DVR DVR DVR 3333 to 3333 4444 to 4444 6666 to 6666 1600 to 1600 Both Both Both Both 192.168.1.50 192.168.1.50 192.168.1.50 192.168.1.50 Enable Enable Enable Enable ¾ The next step is to open ports within your router. Open virtual ports in the router. o EDR Ports to open: 80, 1111, 1600 o EDSR Ports to open: 80, 1111, 2222, 3333, 4444, 6666 ¾ If your Internet Service Provider Blocks port 80. Simply do the following: Clicking the UPnP Forwarding button on the Port Range Forwarding tab will display the UPnP Forwarding tab. The UPnP Forwarding tab displays preset application settings as well as options for customization of port services for other applications. To add a server using UPnP Forwarding: 19 1. Enter the name of the application in the appropriate Application Name field. 2. Next to the name of the application, enter the number of the external port used by the server in the Ext. Port column. Check with the Internet application software documentation for more information. 3. On the same line, select the protocol UDP or TCP. 4. Enter the number of the internal port used by the server in the Int. Port column. Check with the Internet application software documentation for more information. 5. Enter the IP address of the server that you want the Internet users to be able to access. 6. Check the Enable box to enable the services you have defined. UPnP Forwarding will not function if the Enable button is left unchecked. This is disabled (unchecked) by default. Example: DVR 8100 DVR 8100 TCP 80 UDP 80 192.168.1.50 192.168.1.50 Enable Enable ¾ To access the DVR from a computer simply open Internet Explorer and in the address bar type: http:// IP address of your internet service provider: 8100 Dynamic DNS The Router offers a Dynamic Domain Name System (DDNS) feature. DDNS lets you assign a fixed host and domain name to a dynamic Internet IP address. It is useful when you are hosting your own website, FTP server, or other server behind the Router. Before you can use this feature, you need to sign up for DDNS service at www.dyndns.org, DDNS service providers. 20 DDNS Service - From this pull-down menu, enter the DDNS service with which you have membership. User Name - Enter the User Name for your DDNS account. Password - Enter the Password for your DDNS account. Host Name - The is the DDNS URL assigned by the DDNS service. Internet IP Address - This is the Router’s current IP Address as seen on the Internet. Status - This displays the status of the DDNS connection. Change these settings as described here and click the Save Settings button to apply your changes or Cancel Changes to cancel your changes. 21 Chapter 3 D-Link Port Forwarding This chapter will cover a few simple configurations for the D-Link router. Please understand we do not support this product and will not give tech support on it. If you need Technical support on this router you must call D-Link. This Chapter is to offer some help to the installer and end user nothing more. 22 ¾ The next step is to open ports within your router. Go to Virtual Server in the router. Example1: Protocol Type - The protocol used for the virtual service. Public Port - The port number on the WAN (Wide Area Network) side that will be used to access the virtual service. Private Port - The port number of the service used by the Private IP computer. Schedule - The schedule of time when the virtual service will be enabled. The schedule may be set to Always, which will allow the particular service to always be enabled. If it is set to Time, select the time frame for the service to be enabled. If the system time is outside of the scheduled time, the service will be disabled. Virtual Server - Select Enabled or Disabled 23 Name - Enter the name referencing the virtual service Private IP - The server computer in the LAN (Local Area Network) that will be providing the virtual services. If you have a Web server that you wanted Internet users to access at all times, you would need to enable it. Web (HTTP) server is on LAN (Local Area Network) computer 192.168.0.50 HTTP uses port 80, TCP and UDP. Name: DVR Private IP: 192.168.0.50 Protocol Type: Both Private Port: 80 Public Port: 80 Schedule: always ¾ The next step is to open ports within your router. Open virtual ports in the router. o EDR Ports to open: 80, 1111, 1600 o EDSR Ports to open: 80, 1111, 2222, 3333, 4444, 6666 ¾ If your Internet Service Provider Blocks port 80. Simply do the following: 192.168.0.50 HTTP uses port 80, TCP and UDP. Name: DVR Private IP: 192.168.0.50 Protocol Type: Both Private Port: 80 Public Port: 8100 Schedule: always ¾ To access the DVR from a computer simply open Internet Explorer and in the address bar type: http:// IP address of your internet service provider: 8100 24 Dynamic DNS Dynamic Domain Name System is a method of keeping a domain name linked to a changing IP Address. This is a useful feature since many computers do not use a static IP address. ¾ To setup Dynamic DNS simple go to Tools and the Misc. At the bottom of the screen you will be able to enable DynDNS. ¾ Once you have enabled it enter the server address of DynDNS.org: members.dyndns.org ¾ Then enter the hostname you created with DynDNS.org Example: Everfocus.homeip.net ¾ Then enter the username and password you use to log into DynDNS.org 25 26 Chapter 4 DDNS This chapter will cover a few simple configurations for setting up DDNS. Please understand we do not support this product and will not give tech support on it. If you need Technical support on DDNS you must call Linksys or D-Link. This Chapter is to offer some help to the installer and end user nothing more. Creating a DDNS Account ¾ The first step is to open Internet Explorer and in the address bar type: http://www.dyndns.org ¾ The next step is to register with dyndns.org by clicking on sign up now. 27 ¾ This is where you file out the information DynDNS requires. You will then receive an email to confirm your account once you confirm you will login into DynDNS.org. ¾ After you have logged in click on click on the account tab and the click on Add Host link right next to Dynamic DNS. ¾ The next step is to add a host name with an extension. Example: Everfocus.homeip.net ¾ The IP address should already be entered for you. All you have to do is click add host and you are done registering DDNS. ¾ You may refer to the previous two chapters to set up DDNS within your router. 28 ¾ To access the DVR from a computer simply open Internet Explorer and in the address bar type: http:// The DDNS you created example everfocu.homeip.net 29 Chapter 5 Viewing through Internet Explorer ¾ To access the DVR from a computer simply open Internet Explorer and in the address bar type: http:// (LAN or IP address of your internet service provider) ¾ The digital video login page will appear on the screen similar to the one shown above. ¾ User must enter a user name and password to access the recorder. You can find your user name and password in the Network setting menu of your DVR. ¾ The Default user name and password are admin and admin. 30 ¾ Then click on the submit button and you will be logged into your recorder. 31 32 ¾ Please Note: If any icon is grayed, it means that particular function is not accessible. 33


![[cda - 7] tb/reg/pages 10/05/14](http://vs1.manualzilla.com/store/data/006447125_1-718c2f2e9a2138534c678f5182f4a6cc-150x150.png)

