1
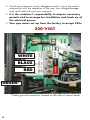
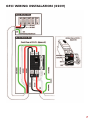
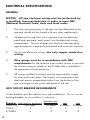
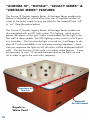
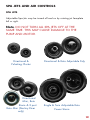
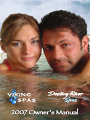
2007 Owner’s Manual
TABLE OF CONTENTS
• Important Safety Instructions
Personal Safety Precautions
Installation and Set-Up Instructions
Electrical Requirements (VS-500 & 501)
GFCI Wiring Installation (220v)
Electrical Specifications
2
4
5
5
7
8
• Operation Instructions
Topside Control Instructions
Topside Functions
Diagnostic Messages
Aurora III, Royale, Legacy & Heritage Features
Operation Instructions (Legacy & Heritage)
Topside Control Instructions (Legacy & Heritage)
Spa Jets and Air Controls
9
10
11
12
14
15
16
19
• Spa Startup Directions
Fill the Spa With Water
Apply Power
Activate Water Pump
Skimmer Side Filter
Add Start-Up Chemicals
21
21
21
22
22
22
• Maintenance
Spa Draining
Spa Surface Care
Long-Term Storage
Vika-Shield Cabinet
Filter Cleaning
23
23
23
23
24
24
• Ozonator
26
• Spa Situations & Solutions
27
• Trouble Shooting
28
1
IMPORTANT SAFETY INSTRUCTIONS
When installing and using this electrical equipment, basic safety precautions should always be followed, including the following:
READ AND FOLLOW
ALL INSTRUCTIONS
2
1.
WARNING: To reduce the risk of injury, do not permit
children to use this product unless they are closely supervised
at all times. Keep spa cover locked when not in use.
2.
A wire connector is provided on this unit to connect a minimum
No. 8 AWG (8.4mm2) solid copper conductor between this
unit and any metal equipment, metal water pipe or conduit
within 5 feet (1.5m) of the unit.
3.
DANGER: Risk of Injury. The suction fittings in this spa are
sized to match the specific water flow created by the pump.
Should the need arise to replace the suction fittings or the
pump, be sure that the flow rates are compatible. Never
operate the spa if the suction fittings are broken or missing.
Never replace a suction fitting with one rated less than the flow
rate marked on the original fitting.
4.
DANGER: Risk of Accidental Drowning. Extreme Caution
must be exercised to prevent unauthorized access by children.
To avoid accidents, insure that children cannot use this spa
unless they are supervised at all times.
5.
DANGER: Risk of Electric Shock. Install at least 5 feet (1.5m)
from all metal surfaces. As an alternative, a spa may be
installed within 5 feet of metal surfaces if each metal surface is
permanently connected by a minimum No. 8 AWG (8.4mm2)
solid copper conductor to the wire connector on the terminal
box that is provided for this purpose.
6.
DANGER: Risk of Electric Shock. Do not permit any
electrical appliance, such as a light, telephone, radio or
television within 5 feet (1.5m) of a spa.
7.
WARNING: To Reduce the Risk of Injury:
a) Before using your spa you should check the water
temperature with a thermometer that is known to be
accurate. The water temperature in a spa should never
exceed 104°F (40°C). A water temperature of 104°F is
considered safe for a healthy adult. Lower water
temperatures are recommended for young children and
when spa use exceeds 10 minutes.
b) Since excessive water temperatures have a high potential for
causing fetal injury during the early months of pregnancy,
pregnant or possibly pregnant women should limit spa water
temperature to 100°F (38°C).
c) The use of alcohol, drugs, or medication before or during
spa use may lead to unconsciousness with the possibility of
drowning.
d) Persons suffering from obesity or with a medical history of
heart disease, low or high blood pressure, circulatory
system problems or diabetes should consult a physician
before using a spa.
e) Persons using medication should consult a physician before
using a spa since some medication may induce drowsiness
while other medications may affect heart rate, blood
pressure and circulation.
8.
The causes, symptoms and affects of hyperthermia may be
described as follows:
Hyperthermia occurs when the internal temperature of the body
reaches a level several degrees above the normal temperature
of 98.6°F. The symptoms of hyperthermia include an increase
in the internal temperature of the body, dizziness, lethargy,
drowsiness and fainting.
The effects of hyperthermia include:
• Failure to feel heat
• Failure to recognize the need to exit the spa
3
•
•
•
•
Unawareness of impending hazards
Fetal injury in pregnant women
Physical inability to exit the spa or hot tub
Unconsciousness resulting in the potential of drowning
9.
WARNING: The use of alcohol, drugs or medication can
greatly increase the risk of fatal hyperthermia. If you suspect
hyperthermia, immediately get medical help, lay the victim on
their back with the head slightly elevated for easier breathing,
cover the body with a blanket and apply ice packs to the
head.
10.
Never touch or come in contact with any electrical accessory
when in your spa or when your body is wet.
11.
Prior to performing any service to the spa pack, turn off ALL
power to the system at the main power source breaker.
NOTE: A READILY ACCESSIBLE DISCONNECTING MEANS
SHALL BE PROVIDED DURING INSTALLATION.
SAVE THESE INSTRUCTIONS
PERSONAL SAFETY PRECAUTIONS
1.
2.
3.
4.
5.
4
Please use the spa when others are present.
Children should have spa access only with the permission and
supervision of an adult.
To reduce the risk of child drowning, keep the spa filter clean
and unclogged. Do not modify the suction or filtration
systems.
Exercise caution when entering or leaving the spa. When
moving or changing positions, be sure of your footing before
applying your full weight as water refraction can be
misleading.
Do not stay in the spa for extended periods of time. Set a
reasonable time limit after which you leave the spa, cool
down, take a shower, relax and then return for another stay in
the spa.
INSTALLATION AND SET-UP INSTRUCTIONS
SURFACE AND PAD REQUIREMENTS
• Your new portable spa must be placed on a uniformly firm,
flat and level surface. A concrete pad 4 inches thick is
best.
• In order to prevent flooding of the electrical equipment, the
pad must be such that water will drain away from the spa.
• If your spa is located near sprinklers, adjust or cap them so
as not to hit the siding of the spa.
BALCONIES AND DECK REQUIREMENTS
• Decking must be constructed to support 85 pounds per
square ft.
• Balconies must be constructed to meet current state and
local codes.
• Gates must be self-closing and self-latching.
ELECTRICAL REQUIREMENTS (VS-500 & 501)
• Your 220-volt spa pack will require a 40-amp dedicated G.F.C.I.
circuit breaker on all models except the “Legacy & Heritage spas”.
• Your 110-volt spa pack requires an isolated (no other appliances or
lights on this circuit at any time) 110-volt, 20-amp circuit breaker.
• Never tie ground and neutral together.
• The minimum conductor ampacity for 110-volt systems is 25-amps;
for 220-volt systems, it is 38-amps on all models except the
“Legacy & Heritage.” The maximum over current protection device
for 110-volt systems is 20-amps; for 220-volt systems, it is 40-amps
on all models except the “Legacy I & II & Heritage I & II”
• The minimum conductor ampacity for the 220-volt “Legacy & Heritage”
is 47-amps. The maximum over current protection device for the
“Legacy I” is 50-amps. The maximum over current protection device
for the “Legacy II & Heritages” are 60 amps.
• Your 110-volt or 220-volt spa pack is designed to be
“PERMANENTLY CONNECTED”.
5
• Use of any extension cord is dangerous and is not to be used in
conjunction with the operation of the spa. Low voltage damage
may result and will void your warranty.
• It is the customer’s responsibility to acquire necessary
permits and to arrange for installation and hook up of
the electrical power.
• Your spa comes set up from the factory to accept 220v.
220-VOLT
WHITE
BLACK
RED
GREEN*
*Green ground connection located on left side of control panel.
6
GFCI WIRING INSTALLATION (220V)
7
ELECTRICAL SPECIFICATIONS
GENERAL
NOTICE: All spa electrical wiring must be performed by
a qualified, licensed electrician in order to meet NEC
(National Electrical Code) state and local codes.
1.
The lines carrying power to the spa must be dedicated to the
spa and should not be shared with any other appliance(s).
2.
All electrical wiring lines must originate from the electrical
panel and terminate, hard wired, into the electrical wiring
compartment. The use of extension cords or improper plug
type termination is expressly prohibited and voids the warranty.
3.
Do not use aluminum wiring. Use only copper conductive
wiring.
4.
Wire gauge must be in accordance with NEC
requirements for the distance from current source to spa and
the current rating as stated on the ID label that is attached to
the equipment control enclosure.
5.
All wiring installed in conduit must be approved for usage
by state and local codes. The conduit must terminate at the
electrical access compartment either from the bottom of the
spa or through a hole in the side panel of the spa.
GFCI CIRCUIT BREAKER REQUIREMENTS
A new breaker must be used for new spa installations. Do not use an
existing breaker, as its condition is unknown.
Breaker
CAPACITY
POLES
# WIRES
8
220v (Legacy II & Heritages)
220v (Aurora III
Royale, Legacy I)
60 amps
2
4
50 amps
2
4
220v
40 amps
2
4
110v
20-amps
1
3
OPERATION INSTRUCTIONS
It is very important to make sure that the spa is filled up to the proper
level (note the water level mark on the skimmer face) before operating
spa.
WARNING: Do not run spa with gate valves closed or run pump with
no water circulating in spa for long periods. Damage could occur to
the spa equipment.
NOTE: The Viking I, Viking II, Aurora I and Eclipse models are
110v/220v systems. The Aurora II, Aurora III, Supreme, Royale,
Legacy I, Legacy II, Heritage I & Heritage II models are 220v only systems.
9
TOPSIDE CONTROL INSTRUCTIONS
(All Models Except Legacy & Heritage)
INITIAL START-UP
When your spa is first activated, it will go into Priming mode, indicated by “Pr”. The priming mode will last for less than 5 minutes. Then,
the spa will begin to heat and maintain the water temperature in the
Standard mode indicated by “St”.
TEMPERATURE (80°F - 104°F / 26°C - 40°C)
The start-up temperature is set at 100°F/37°C. The last temperature is
constantly displayed on the LCD.
Note: The last spa temperatur e displayed is current only
when the pump has been running for at least 2 minutes.
Displays Temperature and
Diagnostic Messages
Controls Low
Speed/High Speed Pump
Sets Water
Temperature
Heat On
Indicator Light
Turns Light
On/Off
Press the “Temp” button to display the temperature previously set. The
set temperature flashes on the display. Pressing the “Temp” button a
second time, while it is still flashing, will cause the set temperature to
increase or decrease depending on what direction was last chosen.
Each press to follow will change the set temperature in the same direction. If the opposite direction is desired, release the pad and let the
display revert to the actual water temperature. Press the button to display the set temperature, and press again to make the temperature
change in the desired direction. After three seconds, the LCD will
stop flashing and display the current spa temperature.
10
TOPSIDE FUNCTIONS
JETS
Press the “Jets” button once to activate the low speed of the pump and
again for the high speed. Press the “Jets” button again to turn off the
pump. If left running, the low speed of the pump will automatically
turn off after 4 hours, and the high speed will automatically turn off
after 15 minutes.
LIGHT
Press the “Light” button to turn the light on and off. If left on, the light
automatically turns off after 4 hours.
MODE
The mode is changed by pressing the “Temp” button, then pressing the
“Light” button.
Standard Mode is programmed to maintain the desired
temperature. Note that the last measured spa temperature displayed
is current only when the pump has been running for at least 2
minutes. “St” will be displayed momentarily when you switch into
Standard mode.
Economy Mode heats the spa to the set temperature only during
filter cycles. “Ec” will display solid when temperature is not current,
and will alternate with temperature when temperature is current.
Sleep Mode heats the spa to within 20°F/10°C of the set
temperature only during filter cycles. “SL” will display solid
when temperature is not current, and will alternate with temperature
when temperature is current.
Preset Filter Cycles. The first filter cycle begins 6 minutes after
the spa is energized. The second filter cycle begins 12 hours later.
Filter duration is programmable for 2, 4, 6, 8 or (12 hours
continuous filtration, indicated by “FC”). The default filter time is 2
hours. To program, press “Temp,” then “Jets.” Press “Temp” to
adjust. Press “Jets” to exit programming.
11
DIAGNOSTIC MESSAGES
Message Meaning
12
Action Required
__
Temperature Unknown
After the pump has been
running for 2 minutes, the
temperature will be displayed.
HH
“Overheat” – The spa
has shut down.
One of the sensors has
detected 118°F/48°C
at the heater.
DO NOT ENTER THE WATER.
Remove the cover and allow
water to cool. Reset by pushing
any button.
OH
“Overheat” – The spa
has shut down. One of
the sensors has detected
that the spa water is
110°F/43°C.
DO NOT ENTER THE WATER.
Remove the spa cover and
allow the water to cool. At
107°F/42°C the spa should
automatically reset. If it does not,
shut off the power to the spa and
call your dealer or service
organization.
IC
“Ice” – Potential freeze
condition detected.
No action required. The pump(s)
will automatically activate
regardless of spa status.
SA
The spa has shut down.
The sensor that is
plugged into the
Sensor “A” jack is not
working.
If the problem persists, contact
your dealer or service organization. (May appear temporarily in an overheat situation and
disappear when the heater cools.)
SB
The spa has shut down.
The sensor that is
plugged into the
Sensor “B” jack is not
working.
If the problem persists, contact
your dealer or service organization. (May appear temporarily in an overheat situation and
disappear when the heater cools.)
Sn
Sensors are out of
If the problem persists,
balance. If alternating contact your dealer or service
with spa temp, it may organization.
just be a temporary
condition. If flashing by
itself, spa is shut down.
HL
A significant difference Check water level in spa.
between temperature
Refill if necessary. If the water
sensors has been
level is okay, make sure the
detected. This could
pump(s) have been primed.
indicate a flow problem.
LF
Persistent low flow
Follow action required for “HL”
problems. (Displays
on the fifth occurrence of
HL message within 24 hrs.)
Heater is shut down, but
other spa functions continue
to run normally.
dr
Possible inadequate
water, poor flow or
air bubbles detected
in the heater. Spa
is shut down for 15
minutes.
Check water level in spa. If
water level is okay, make sure
pump(s) have been primed.
Press any button to reset or this
message will automatically reset
within 15 minutes.
dy
Inadequate water
detected in heater.
(Displays on third
occurrence of “dr”
message.) Spa is shut
down.
Follow action required for “dr”
message.
WARNING! / Shock Hazard! / No User Serviceable Parts.
Do not attempt service of this control. Contact your spa
retailer or service organization for assistance. Installation
and/or service must be performed by a licensed electrician
and all grounding connections must be properly installed.
13
“AURORA III”, “ROYALE”, “LEGACY SERIES” &
“HERITAGE SERIES” FEATURES
The Aurora III, Royale, Legacy Series, & Heritage Series models also
feature a Waterfall jet, which allows the user to regulate the flow of
water to the jet by simply turning the valve for the waterfall from “off”
to “on”. (See illustration below)
The Aurora III, Royale, Legacy Series, & Heritage Series models are
also equipped with an LED light system. This lighting, which encompasses the interior of the spa, is also incorporated into the light in the
foot well of these models. The LED Lighting system consists of a 9 position controller. The first time the light is turned on, it will begin to display all 9 colors available in an automatic rotating sequence. Each
time you sequence the light on/off, all colors will be displayed individually. The last function of the cycle is a unique strobe feature. It may
be necessary to wait 1-2 seconds between cycling the lights on and
off in order to get to the next color sequence.
Regulates Air
into Jets
Waterfall
On/Off Control
Royale in
White Pearl
14
OPERATION INSTRUCTIONS (Legacy &
Heritage Series)
Water Gate Valve
Drain Hose
Operation instructions are virtually the same for all of our models.
Please refer to Page 9 for these instructions.
15
TOPSIDE CONTROL INSTRUCTIONS
(Legacy & Heritage Series)
Displays Temperature and
Diagnostic Messages
Pump 2 Controls
Secondary Pump,
On and Off
Jets
Controls Low
Speed/High Speed Pump
Heat On
Indicator Light
Jets Temp Light
Sets Water
Temperature
Turns Light
On/Off
INITIAL START-UP
When your spa is first activated, it will go into a Priming mode, indicated by “Pr”. The Priming mode will last for less than 5 minutes.
Then, the spa will begin to heat and maintain the water temperature in
the Standard mode indicated by “St”.
TEMPERATURE (80°F – 104°F / 26°C – 40°C)
The start up temperature is set at 100°F/37°C. The last temperature is
constantly displayed on the LCD.
Note: The last spa temperature displayed is current only
when the pump has been running for at least 2 minutes.
Press the “Temp” button to display the temperature previously set. The
set temperature flashes on the display. Pressing the “Temp” button a
second time, while it is still flashing, will cause the set temperature to
increase or decrease depending on what direction was last chosen.
Each press to follow will change the set temperature in the same direction. If the opposite direction is desired, release the pad and let the
display revert to the actual water temperature. Press the button to display the set temperature, and press again to make the temperature
change in the desired direction. After three seconds, the LCD will
stop flashing and display the current spa temperature.
16
PUMP 1
Press the “Pump 1” button once to activate the low speed of the primary pump and again for the high speed. Press the “Pump 1” button
again to turn off the pump. If left running, the pump’s high speed will
automatically turn off after 15 minutes. The low speed of the pump
runs when the secondary pump is on. It may also activate for at least
2 minutes every 30 minutes to detect the spa temperature and then to
heat to the set temperature, if needed, depending upon mode. When
the low speed turns on automatically, it cannot be deactivated from the
panel, however, the high speed may be started.
PUMP 2
This button is used to turn the secondary pump on and off. If left on,
the pump automatically turns off after 15 minutes.
LIGHT
Press the “Light” button to turn the light on and off. If left on, the light
automatically turns off after 4 hours.
MODE
The mode is changed by pressing the “Temp” button, then pressing the
“Light” button.
Standard Mode is programmed to maintain the desired
temperature. Note that the last measured spa temperature displayed
is current only when the pump has been running for at least 2
minutes. “St” will be displayed momentarily when you switch into
Standard mode.
Economy Mode heats the spa to the set temperature only during
filter cycles. “Ec” will display solid when temperature is not current,
and will alternate with temperature when temperature is current.
Sleep Mode heats the spa to within 20°F/10°C of the set
temperature only during filter cycles. “SL” will display solid when
temperature is not current, and will alternate with temperature when
temperature is current.
17
Preset filter cycles The first filter cycle begins 6 minutes after the
spa is energized. The second filter cycle begins 12 hours later.
Filter duration is programmable at the topside control for 2, 4, 6,
8 hours, or 12 hours for continuous filtration, (indicated by “FC”).
The default filter time is 2 hours. To program, press “Temp”, then
“Jets”. Press “Temp” to adjust. Press “Jets” to exit programming.
Note: The Secondary Pump purges for 30 seconds at the beginning
of each filter cycle. The low speed of the primary pump runs during filtration and the ozonator (if installed) will be enabled.
FREEZE PROTECTION
Note: For all other diagnostic messages, please refer to
the SUV M-7 Control Reference Card that came with your
spa.
Warning! / Shock Hazard! / No User Serviceable Parts.
Do not attempt service of this control system. Contact your
dealer or service organization for assistance. Follow all
owner’s manual power connection instructions. Installation
must be performed by a licensed electrician and all
grounding connections must be properly installed.
18
SPA JETS AND AIR CONTROLS
SPA JETS
Adjustable Spa Jets may be turned off and on by rotating jet faceplate
left or right.
Note: DO NOT TURN ALL SPA JETS OFF AT THE
SAME TIME. THIS MAY CAUSE DAMAGE TO THE
PUMP AND MOTOR.
Directional &
Pulsating Cluster
Directional
Mini, Roto
Storm & 3 port
Roto Mini (Destiny River
only)
Directional & Roto Adjustable Poly
Single & Twin Adjustable Roto
Power Storm
19
TURBO (Whirlpool) JET / (VIKING II
ONLY) & Volcano Jet (Heritage II
only)
The Turbo jet is located on the filter cavity
wall is the Turbo jet. This jet is a combination valve and high capacity jet. To turn
the Turbo jet on, simply turn the face counterclockwise to the first stop position. To turn the
Turbo jet off, turn the face clockwise to bring the main jets back to full
power.*
The Volcano Jet operates on a valve
located in the middle of the lounger. Turn
the valve to activate the jet. Note: this valve
directs one of the pumps and will effect the flow
this pump used to power other jets in the spa.
* Due to the substantial amount of water pressure when the Turbo Jet
is operating, you must turn the pump to the off or low speed cycle
position before attempting to rotate the jet face.
AIR CONTROLS
Air controls are adjusted by rotating the topside dial. These controls
serve to regulate the amount of air mixed with water when the
whirlpool or hydrotherapy jets are operating in the high pump mode.
Viking I & II Only
20
All other models (See illustration on page 14)
SPA STARTUP DIRECTIONS
All Viking Spas require a solid, flat surface.* This is to ensure that the
spa cabinet is not exposed to a pressure stress condition that may
result in cabinet damage and shell cracking. A concrete pad is the
best example of a solid, flat surface, however, wood decking is suitable, provided it can withstand 85# per sq. ft. without deflection.
* FAILURE TO PROVIDE A PROPER, SOLID, FLAT SURFACE
MAY DAMAGE YOUR SPA AND VOID YOUR WARRANTY.
The following procedure should be followed on initial startup and
whenever the spa is drained for maintenance. Read each step in its
entirety before proceeding with that step.
FILL THE SPA WITH WATER
a. Clear all debris from your spa.
b. Using a garden hose, fill the spa with water.
c. DO NOT use softened water.
d. As water level rises, check inside equipment compartments for
water leaks. It may be necessary to tighten loose unions and/or
fittings.
e. Make sure T-Handled Gate VALVES at pump and heater are open.
(Fully extended up position).
Fill until approximately 6” from top of spa or to water level mark on
face of skimmer opening.
APPLY POWER
a. Apply power by turning on the spa-dedicated circuit breaker.
b. Test the GFCI: push the TEST button and power is cut off. Push
RESET and power is restored. If these do not seem to work,
STOP! Do not use your spa. There is no power, the
21
GFCI is defective or the equipment is malfunctioning. Only a
LICENSED ELECTRICIAN should do further inspection.
ACTIVATE WATER PUMP
Press the jet button on the control board. The high-speed pump will
come on.
Press the jet button again to turn the water to low speed.
Check for water leaks at unions and/or fittings on your equipment
while pump is running.
SKIMMER SIDE FILTER
All Viking spas have a skimmer side filter that does not require “air
bleeding” on initial startup. Simply fill spa to proper water level
(approximately half way up on skimmer throat opening) and follow
start-up procedure
Clean spa filters are critical for proper operation. Dirty filters cause
water restriction to the pump, which in turn may cause erratic heating
of the spa. A starving pump will degrade performance, result in dirty
or murky water and may cause the heater to malfunction.
ADD START-UP CHEMICALS
Ask your spa retailer to HELP you set up a chemical maintenance program.
The importance of chemical balance in your spa cannot be overemphasized.
SANITIZING: After filling spa, adjust the alkalinity and pH with the
pH increase and pH decrease per label instructions. Once this is completed, add 2 ounces of granular chlorine directly to the water while
your circulating pump is running. This should complete your start-up
procedure.
NOTE: If you live in an area where city water is not available, or
your spa water shows signs of calcium content, you will need to add a
“stain n scale” chemical on initial fill and then once a week, thereafter.
22
MAINTENANCE
SPA DRAINING
Every 3 to 4 months, depending upon water condition, you may
need to renew the spa water. To drain your spa, power must be
disconnected at the circuit breaker. Locate the drain faucet within
the equipment access compartment. Attach a garden hose to the
faucet and then open it. Water will start draining. The drain spigot
will not remove all of the water in the spa. You may have to remove
a small amount of water by hand.
SPA SURFACE CARE
Do not use abrasive solvents or cleaners to clean spa surfaces.
Consult your Viking Spa Retailer for the proper cleaners and detergents.
LONG-TERM STORAGE (90 days or more)
If you are not going to use your spa for an extended period of time, drain
it as described above. You will also have to drain the pump. Water left in
the spa during long-term storage may cause freeze damage.*
To drain the pump, you need to disconnect the 2 hoses attached to the
pump. These hoses are attached using unions that are hand tightened.
Be sure to reattach the hoses after you are done. Also, the front plug
on the pump must be gently loosened to drain the pump and then
gently re-tightened.
Additional water removal is required to prevent freeze damage to the
spa plumbing assembly. Use of a wet/dry vac is required.
Disconnect the plumbing hoses at the unions; place the shop vac hose
to the suction and discharge hose connections. Put the shop vac on
“blower” setting to force any water in the plumbing lines out the jet
openings. This will eliminate the entrapment of water in the plumbing
lines that could freeze and cause damage.
23
NOTE: We also recommend vacuuming each jet opening to ensure
that all of the water is out of the plumbing lines.
*FREEZE DAMAGE TO THE SPA PLUMBING IS NOT COVERED
UNDER THE WARRANTY.
VIKA-SHIELD CABINET
All Viking spas have a standard synthetic wood cabinet. This “VikaShield” material is virtually maintenance free and does not require any
type of sealant or treatment.
FILTER CLEANING
(Viking I, Viking II & Aurora I)
Your filter should be replaced once a year. When filters are removed
from the spa, make sure that no objects fall into the filter cavity. They
can cause obstruction to water movement. Remove filter cartridges as
shown in figure below.
The filter must be cleaned every month, more often with heavy use, to
get rid of objects and particles that are lodged in the filter pleats.
Using a garden hose with a pressurized nozzle, push water from the
inside to the outside of the filter pleats forcing all trapped particles out.
If the filter is too dirty to be cleaned as described above, obtain filter
cleaner material from your Viking Spa Retailer. Soak the filter
overnight; then hose it down.
A.
24
C.
Locate skimmer.
Remove basket.
B.
Pull weir door open.
D. Remove the two separate filters
and follow cleaning instructions above.
FILTER CLEANING
(All Other Spas)
Remove filter face cover by pulling straight up on front plate/face
cover. (As shown below.) Remove access basket and unscrew filter cartridge(s) from housing. Refer to filter cleaning procedure for Viking I,
Viking II & Aurora I on previous Page #24. Note: Spas with this filter
utilize 50 sq. ft. cartridge filters.
A.
Locate skimmer.
B.
Remove front
plate.
C.
Remove basket
& filters.
D.
Clean per
instructions.
25
OZONATOR
If your spa is equipped with an ozonator, it is factory set to filter during the filter cycles only. This should provide adequate ozonation, provided there is proper chemical balance in the spa.
NOTE: Please Do Not attempt to disassemble ozonator if it becomes
inoperable. Ozonators contain no user serviceable parts. Please contact your spa retailer or service organization.
120V
Ozonator
26
SPA SITUATIONS & SOLUTIONS
Situation
Cause or Result
Product to use
Solution
Calcium deposits
on surfaces of
heater, fittings
or plumbing
Hard water
Stain n Scale
Add 1oz. of Stain n Scale
pH/total alkalinity
out of adjustment
pH Up
pH Down
Test water - adjust with
pH Up or pH Down. For
preventative maintenance
add Stain n Scale weekly.
(1oz. up to 300 gals.)
Cloudy or murky
water
pH/total alkalinity
out of balance
pH Up
pH Down
Test water - add pH Up or
pH Down as needed
Plugged filter
Spa Cartridge Filter
Cleaner
Use Spa Cartridge Filter
Cleaner (min. once/month)
No sanitizer residual
Chlorinating Granules Add Chlorinating or
Brominating Granules (no
more than 2oz. per treatment).
Oils, soap, foreign
matter & other
contaminants
Spa See Clear
Eye & skin
irritation, rashes
allergies
Excessive foam
Too many conflicting
chemicals
Drain & refill if water is
older than 60 days
Water balance needs pH Up
to be corrected (pH/ pH Down
total alkalinity)
Total “A”
Test water, add pH Up, pH
Down or Total “A” as needed
Excessive chlorine or
bromine
Add fresh water and/or wait
a day & re-test sanitizer level
Build up of body oils, Spa Foam Away
cosmetics and
Spa See Clear
contaminants
Add Spa Foam Away to
foamy area, then add 1oz.
Spa See Clear
pH/Total Alkalinity
not in balance or
calcium level too low
Add Spa See Clear or Spa
Stain n Scale to help remove
oils and contaminants
Spa See Clear
Spa Stain n Scale
Soft water
Blue water
Treat water with Spa See
Clear twice a week (1oz.
up to 300 gals.)
Drain and refill.
Copper metals in
spa being eroded
Cop-Out
pH Up
pH Down
Total “A”
Use Cop-Out as per
instructions. Test and restore
alkalinity and pH to proper
levels.
NOTE: Most water chemistry problems can be resolved by the recommended solutions above. Extreme chemical conditions may warrant draining and refilling the spa.
Stains or calcium deposits on the spa may require attention prior to refilling. Please
contact your dealer if you have further questions.
27
TROUBLE SHOOTING
Caution: Viking Spas have slide type water shut off valves referred to
as Gate Valves. The spa should never be operated with the Gate
Valves in the closed position, as this will cause severe damage to the
pump and/or heater.
Spa Will Not Heat
Check For Air Lock
• Is this a new installation with trapped air?
Solution; Open drain hose and cycle pump to high speed for approximately 30 seconds or open bleed plug on face of pump for same
amount of time.
• If not, has the spa been drained and refilled?
Solution; Make sure water level is at mark on skimmer.
• Is there proper water flow?
Solution: Make sure both Gate Valves are open and filter is clean.
Pump Will Not Prime or Function
Solution: Gate Valves Closed
Improper wiring to spa
Water level in spa too low
Contact Your Authorized Spa Retailer for Service.
28
“Warning: Children should not use spas or hot tubs without adult supervision” and “Avertissement: Ne pas laisser les enfants utiliser une cuve de relaxation sans surveillance”
“Warning: Do not use spas or hot tubs unless all suction guards are installed
to prevent body and hair entrapment” and “Avertissement: Pour eviter que
les cheveux ou une partie du corps puissent etre aspires, ne pas utiliser une
cuve de relaxation siles grilles de prise d’aspiration ne sont pas toutes en
place”
“Warning: People using medication and/or having an adverse medical history should consult a physician before using a spa or hot tub” and
“Avertissement: Les personnes qui prennent des medicament ou ont des problemes de sante devraient consulter un medecin avant d’utiliser une cuve de
relaxation”
“Warning: People with infectious diseases should not use a spa or hot tub”
and “Avertissement: Les personnes atteintes de maladies infectieuses ne
devraient pas utiliser une cuve de relaxation”
“Warning: To avoid injury exercise care when entering or exiting the spa or
hot tub” and “Avertissement: Pour eviter des blessures, user de prudence en
entrant dans une cuve de relaxation et en sortant”
“Warning: Do not use drugs or alcohol before or during the use of a spa or
hot tub to avoid unconsciousness and possible drowning” and “Avertissement:
Pour eviter l’evanouissement et la noyade eventuelle, ne prendre ni drogue ni
alcool avant d’utiliser une cuve de relaxation ni quand on s’y trouve”
“Warning: Pregnant or possibly pregnant women should consult a physician
before using a spa or hot tub” and “Avertissement: Les femmes enceintes, que
leur grossesse soit confirmee ou non, devraient consulter un medecin avant
d’utiliser une cuve de relaxation”
“Warning: Water temperature in excess of 38°c may be injurious to your
health” and “Il peut etre dangereux pour la sante de se plonger sans de l’eau
a plus de 38°c”
“Warning: Before entering the spa or hot tub measure the water temperature
with an accurate thermometer” and “Avertissement: Avant d’utiliser une cuve de
relaxation mesurer la temperature de l’eau a l’aide d’un thermometre precis”
“Warning: Do not use a spa or hot tub immediately following strenuous exercise” and “Avertissement: Ne pas utiliser une cuve de relaxation immediatement apres un exercice fatigant”
29
NOTES:
30
2725 Prairie St. SW • Wyoming MI 49519
www.vikingspas.com • Email: [email protected]
© 2007 Viking Spas, Inc