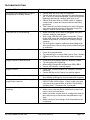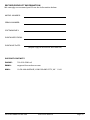
1
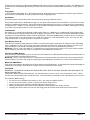
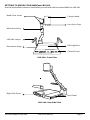
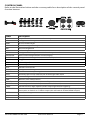
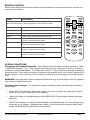
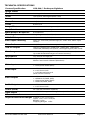
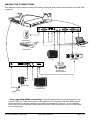
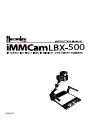
500
ENGLISH
Thank you for choosing a Recordex iMMCam LB camera for your presentation needs. Our iMM line of
products are developed specifically to enhance the interactive multimedia experience of any presentation.
Copyright
© 2013 by Recordex USA, Inc. All rights reserved. Reproduction or adaptation without prior written
permission is prohibited, except as allowed under copyright laws.
Disclaimer
The information contained in this document may change without notice.
The product warranty is defined on page 16. No part of this document should be construed as constituting an additional warranty. Recordex shall not be liable for any errors or inaccuracies contained in
the document. Under no circumstances is Recordex USA liable for direct or indirect damages arising
out of the use of this product or documentation.
Trademarks
Recordex is a registered trademark of Recordex USA, Inc. iMMCam is a trademark of Recordex USA,
Inc. Macintosh is a registered trademark of Apple Computer, Inc. Microsoft, and the Windows Operating System are trademarks of Microsoft Corporation. All other trademarks, product names or companies mentioned in this document are used for reference and clarification only and may be the
registered marks or property of their respective owners.
FCC Notice (Class A)
This device complies with Subpart J of Part 15 of the FCC Rules. Operation is subject to the following
two conditions: (1) this device may not cause harmful interference, and (2) this device must accept
any interference received, including interference that may cause undesirable operation.
Warning - This is a class A Product. In a domestic environment this product may cause radio interference in which case the user may be required to take adequate measures.
CE Class A (EMC) Notice
This product is intended for use in a commercial, industrial or educational setting and environment. It
is not intended for residential home use.
Warning - This is a Class A product. In a domestic environment this product may cause radio interference in which case the user may be required to take adequate measures to correct the interference.
RECYCLE PROPERLY
This device should not be disposed of with other household waste. It should be discarded through an
authorized recycling center able to accept electrical and electronic waste.
CAUTION
WARNING - TO REDUCE THE RISK OF FIRE OR ELECTRIC SHOCK, DO NOT EXPOSE THIS APPLIANCE TO
RAIN OR MOISTURE.
CAUTION - RISK OF ELECTRIC SHOCK - Do not attempt to service unit. Do not remove cover. There
are no user-serviceable parts inside the unit. Unit should be returned to the manufacturer for service.
Precautions When Using
Ÿ Do not use on unstable tray, table, or cart. Use only on stable surface.
Ÿ Do not use near water, steam, or excessive direct heat source.
Ÿ Only use the power adapter provided by the manufacturer.
Ÿ Always unplug the document camera before cleaning any part of the camera.
Ÿ Unplug the device when not in use for long periods of time and during electrical storms.
Recordex iMMCam LBX-500
Instruction Manual
Page 2
Table of Contents
PACKAGE CONTENTS.............................................................................................................4
GETTING TO KNOW YOUR iMMCam LBX-500......................................................................5
THE INPUT/OUTPUT PANELS.................................................................................................6
CONTROL PANEL.....................................................................................................................7
REMOTE CONTROL.................................................................................................................8
SPECIAL FUNCTIONS..............................................................................................................8
TECHNICAL SPECIFICATIONS.................................................................................................9
DEVICE DRIVER INSTALLATION...........................................................................................10
SAVING IMAGES TO INTERNAL MEMORY...........................................................................11
GETTING STARTED TIPS.......................................................................................................12
CALIBRATE CAMERA AUTO FOCUS SYSTEM......................................................................12
MAKING THE CONNECTIONS...............................................................................................13
TROUBLESHOOTING.............................................................................................................14
RECORD PRODUCT INFORMATION.....................................................................................15
WARRANTY STATEMENT......................................................................................................16
Recordex iMMCam LBX-500
Instruction Manual
Page 3
PACKAGE CONTENTS
Take a moment to confirm that you received all the items listed below:
QuickStart Guide
Recordex iMMCam LBX-500
RCA Cable
Power Adapter & Cord
VGA D-Sub Cable
RS232 Cable
Anti-Glare Sheet
Remote
Lens Cover
USB Cable
HDMI - DVI Cable
HDMI - HDMI Cable
Recordex iMMCam LBX-500
Instruction Manual
Page 4
GETTING TO KNOW YOUR iMMCam LBX-500
Use the illustrations below to familiarize yourself with the Recordex iMMCam LBX-500.
Head Pivot Joints
Camera Head
Lens (Lens Cap)
Mechanical Arm
LED Side Lamps
LED Light Box
Document Stage
Control Panel
LBX-500: Front View
Right Side Panel
Rear Panel
LBX-500: Rear Side View
Recordex iMMCam LBX-500
Instruction Manual
Page 5
THE INPUT/OUTPUT PANELS
Use the illustrations below to familiarize yourself with the various ports found on the rear
and side panel of the camera.
Rear I/O Panel
VGA-OUT1
1
#
1
2
3
4
5
6
7
8
9
10
2
Label
DC12V:2A
RS-232
Audio (In)
Video (In)
V-OUT
IN
OUT
VGA 1- IN
VGA-OUT1
USB
3
4
5
6
7
8
9
10
Description
Power Supply Port (DC 12V)
RS-232 Serial Communication Port
Composite Audio Port (INPUT)
Composite Video Port (INPUT)
Composite Video Port (OUTPUT)
3.5 mm Stereo Audio Jack (INPUT)
3.5 mm Stereo Audio Jack (OUTPUT)
D-Sub RGB Port (VGA INPUT)
D-Sub RGB Port (VGA OUTPUT)
USB 2.0 Port (OUTPUT to Computer)
Right Side I/O Panel
A
HDMI
11
# Label
11 MIC
12 VOL
13 VGA-2
14 A
15 HDMI
12
13
14
15
Description
3.5mm Microphone Jack (INPUT)
Microphone Volume Dial (On/Off, Volume Level Adjust)
D-Sub RGB Port (VGA INPUT)
3.5 mm Stereo Audio Jack (INPUT)
HDMI Output (connect HDMI display or use adapter for DVI-D)
Recordex iMMCam LBX-500
Instruction Manual
Page 6
CONTROL PANEL
Refer to the illustration below and the summary table for a description of the control panel
function buttons.
Label
Description
SAVE
Capture current view to internal memory
UP
Navigate saved images
VIEW
Access saved images
NEGA
Switch to negative image mode
BRI+
Increase brightness
BRI-
Reduce brightness
LEFT/VOL-
Navigate saved images/Lower Volume Output Level
ENTER/DEL
Select saved images/Delete saved image(s)
RIGHT/VOL+
Navigate saved images/Increase Volume Ouput Level
B.W/C
Toggle between black and white and color mode
NEAR
Micro Adjust Focus
FAR
Micro Adjust Focus
TEXT
Switch to text mode
DOWN
Navigate saved images
FREEZE
Freeze active view/press again to resume
SPLIT
Vertically split screen with left side frozen/right side active
RESET
Reset settings to default/Hold for 3 seconds to switch between SXGA/XGA Mode
AWB
Resume auto white balance
POWER
Power the unit on/Place unit in standby mode
SOURCE
Source input select switch (Presenter/VGA1/VGA2/AV)
LAMP
Switch between light options (Side Lamps/Light Box/No Lighting)
PRESENTER
Press once to Switch back to presenter mode from VGA1, VGA2, or AV Input Source
Press twice to Switch to C-Video output (this will switch off VGA/HDMI output)
AUTO
Auto focus image
WIDE
Zoom Out
TELE
Zoom In
Recordex iMMCam LBX-500
Instruction Manual
Page 7
REMOTE CONTROL
Refer to the illustration below and the summary table for a description of the remote control function buttons.
Label
Description
NOTE: most buttons are defined in the table on page 8. This table defines function buttons that only appear on the remote control.
B.W/C
Switch between black and white or color viewing.
MIRROR
Displays mirror image of current presenter view.
NEAR
Small nudge adjustment to AutoFocus
FAR
Small nudge adjustment to AutoFocus
BLUE+
Increase blue color level (manual white balance,
remote control function only)
BLUE-
Decrease blue color level (manual white balance,
remote control function only)
RED+
Increase red color level (manual white balance,
remote control function only)
RED-
Decrease red color level (manual white balance,
remote control function only)
SPECIAL FUNCTIONS
Changing VGA Output Resolution. The default output resolution of the camera is SXGA
(1280x1024 @60Hz). The VGA output resolution can be changed to XGA (1024x768
@60Hz) or 1920x1080@60Hz. To do this press the F17 button (Reset) and hold it down for
three seconds. The newly set output resolution will appear in the On Screen Display OSD)
of the camera. Press and hold F17 for three seconds to cycle through each output resolution.
WARNING: Changing the output resolution will delete any stored images that are saved to
the camera’s internal memory.
Deleting Saved Images. To delete the images stored to the internal memory follow
these steps:
Ÿ Press View (F3) and then select the image you wish to delete by using the Up (F2),
Down (F14), Left (F7) and Right (F9) buttons.
Ÿ
After the image is highlighted press the ENTER/DEL (F8) and hold it down for three
seconds.
Ÿ NOTE: The images can only be deleted while in thumbnail view. Do not enlarge/view
and then try to delete. Highlight the image in the thumbnail view and then hold
down the ENTER/DEL button for three seconds
Recordex iMMCam LBX-500
Instruction Manual
Page 8
TECHNICAL SPECIFICATIONS
Feature/Specification
Image Sensor
Pixels
Zoom
Lens
Frame Rate
Focus
Image Effect
Head Rotation
White Balance & Exposure
Shooting Area
VGA/RGB Output
Video Input Switching
LBX-500 // Desktop w/Lightbox
1/3” CMOS
5.0 Mega Pixel
10x Optical, 20x Digital (200x Total)
Glass
25 fps (max)
Auto Focus
Mirror/Freeze/B&W/Negative/Split
270 d. Rotation/ 180 d. pivot
Auto/Manual
SinglePage+ 10.6”x 14” (max)
HD (1920x1080), SXGA (1280x1024), XGA (1024x768)
VGA, PC, and DVD passthrough (w/ audio and video input
switch)
Video Scaler
USB 2.0 Output
Yes (All signals able to be output through VGA output)
Save Images
Unlimited capture by USB 2.0 (Video and still capture)
Up to 80 SXGA/XGA Images to internal memory
Microphone
Yes, built in microphone.
Software
XSight HD Viewer Software (Windows/Mac)
RS232 CamControl Software (Windows)
Video Input
2 x VGA Passthrough
1 x Composite Video (RCA)
Audio Input
1 x RCA
2 x 1/8” Stereo Jack
1 x 1/8” Microphone Jack
(with volume control)
Video Output
1 x VGA Out (SXGA, XGA)
1 x HDMI Out (SXGA, XGA)
1 x Composite Video (RCA)
1 x USB 2.0 (SXGA, XGA)
Audio Output
1 x RCA
1 x 1/8” Stereo Jack
Power (brick)
Light Source
Remote Control
Physical Dimensions/Weight
DC 12V/2A (100-240v 50/60 Hz)
Recordex iMMCam LBX-500
USB 2.0 (2560x1920, 2048x1536, 1600x1200, 1280x1024,
1024x768, 640x480) 10x Optical, 16x Xsight Digital (160x Total)
2 x LED Side Lamp, 1 x LED Light Base (7.75”H x 10”W)
1 x InfraRed Remote, 1 x Serial RS232 Connection
Folded: 17.5 x 13.7 x 6 (in)
Open: 17.5 x 15.7 x 21.5 (in)
Weight: 7.5 lbs
Shipping Weight: 15 lbs
Instruction Manual
Page 9
DEVICE DRIVER INSTALLATION
Your iMMCam LBX-440 document camera can be used as a visualizer without installing any
device drivers or additional software. However, if you wish to capture video or image stills
from your iMMCam then you will need to install USB capture software.
Go to www.recordexusa.com/myLBX.html to download our camera software for your
computer running Microsoft Windows or Mac OSX.
Recordex iMMCam LBX-500
Instruction Manual
Page 10
SAVING IMAGES TO INTERNAL MEMORY
You can save up to 80 images to the internal memory of your LBX-500 camera. If you
have the resolution set to 1920x1080 output then you will be limited to 28 images.
WARNING: If you change the output resolution of the camera (by pressing the
RESET/F17 button for 3 seconds) then all the images stored on the camera’s internal
memory will be deleted.
Ÿ Press SAVE (F1) on the camera or remote to save an image to internal memory.
Each time you press save an image is stored in the next available slot in the camera’s
memory.
Ÿ To view the saved images press VIEW (F3) which will bring up the camera’s photo
album.
Ÿ Use the UP(F2), DOWN (F14), LEFT (F7), RIGHT (F9) buttons to highlight the image
you wish to recall to the main screen then press ENTER (F8) to select the image. The
image will now be shown in full screen mode.
Ÿ From here you can flip through other saved images by pressing the LEFT/RIGHT buttons (for previous and next image) or by pressing the UP/DOWN buttons (to skip
ahead or back 4 images).
To go back to the thumbnail album view press ENTER (F8)
To exit back to normal viewing mode press VIEW (F3)
Recordex iMMCam LBX-500
Instruction Manual
Page 11
GETTING STARTED TIPS
Ÿ If after first turning on the camera the image appears dark, washed out, or otherwise
distorted press the AUTO button to reset and re-calibrate the camera. This should
correct any image quality issues.
Ÿ Sometimes when zooming the image can get darker. To correct this press the AWB
or AUTO button to cause the camera to automatically readjust the image.
Ÿ When using the camera through USB we recommend using 1280x1024 for demonstrating under the camera and 1600x1200 or higher for maximum image quality
when taking snapshots or using the digital zoom within the XSight camera software.
CALIBRATE CAMERA AUTO FOCUS SYSTEM
NOTE: Do not perform these steps if the camera is already focusing without any problems. ONLY perform these steps when the camera is having trouble focusing sharply.
To calibrate the auto focus system follow these steps:
NOTE: You must be connected to VGA, HDMI, or DVI display to perform these steps.
1.
Zoom the camera out to 1X by pressing the WIDE button.
2.
Place an 8.5x11 black and white text document under the camera.
3.
Press the AUTO button to refocus the camera.
4.
Use the NEAR(F11)/FAR(F12) buttons to correct the focus.
5.
Hold the NEGAtive (F4) button for about 3 seconds until CHECK OK message appears on the screen. The CHECK OK message will stay on the screen for 3 to 10 seconds.
6.
After the CHECK OK message has disappeared press the TELE button and zoom in to
approximately 10x then release the TELE button and allow the camera to auto focus.
7.
At this point the camera should be properly calibrated. If not then repeat the process again. If problems persist then contact [email protected].
Recordex iMMCam LBX-500
Instruction Manual
Page 12
MAKING THE CONNECTIONS
The diagram below demonstrates the many AV input and output connections the LBX-500
supports.
110V
Grounded
Laptop
DVD/VCR
TV
Projector
HDMI
Classroom
Amplification
Computer
MIC
LCD/Plasma
* Note regarding HDMI connectivity: Not all display devices are designed to support PC Devices. The LBX camera is designed as a PC Device and the HDMI signal
will only work on display devices equipped to handle PC Devices. If your display
device will not accept the HDMI signal from the LBX then please use the VGA cable
for connectivity.
Recordex iMMCam LBX-500
Instruction Manual
Page 13
TROUBLESHOOTING
Problem/Observation
No image is displayed or image is
totally black or totally white.
USB capture is not working
Image is out of focus
Image is dark or washed out
Image is stuck
VGA passthrough is not working
Video projector is unable to project
image from camera.
The microphone port is not working
properly
Recordex iMMCam LBX-500
Solution
Ÿ Check that the lens cap is removed.
Ÿ Check that the unit is plugged in and powered
on. Press the lamp button to cycle through the
lighting options to confirm the unit is on.
Ÿ Check that the VGA or HDMI cable is tightly
connected to the document camera and the
projector.
Ÿ The camera is zoomed too far in and is displaying only a blank portion of the document or
object. Zoom out or move object.
Ÿ Make sure the USB cable is plugged into the
camera and the computer.
Ÿ Use a rear USB Port on your computer. Some
front USB ports do not have adequate bandwidth and power to allow for quality image
capture.
Ÿ Try using the capture software provided with
the camera to rule out any issues with third party software.
Ÿ Press the AutoFocus button.
Ÿ Press the reset button
Ÿ Try zooming in or out a little (press Tele / Wide)
Ÿ Follow Auto Focus calibration steps on page
12
Ÿ Press the Auto White Balance button (AWB)
Ÿ Try changing the lighting
Ÿ Manually change the brightness (BRI+/BRI-)
Ÿ Power off camera and try again.
Ÿ Press the Freeze button to resume normal
viewing
Ÿ Power off the unit. Power on and try again.
Ÿ If using a laptop/notebook make sure to switch
the display settings to use an external monitor.
Ÿ Some projectors may not be able to handle a
SXGA 1280x1024 image. If this is the case you
can lower the resolution to XGA 1024x768 by
holding the F17 button for 3 seconds.
Ÿ Make sure a mic is connected.
Ÿ Make sure volume dial is switched on and volume is not on level zero.
Ÿ Make sure the connection is made from the audio out port to a classroom amplification system.
Ÿ Make sure you are using a low-impedence microphone.
Instruction Manual
Page 14
RECORD PRODUCT INFORMATION
We strongly recommend you fill out the information below:
MODEL NUMBER:
SERIAL NUMBER:
SOFTWARE KEY:
PURCHASED FROM:
PURCHASE DATE:
(staple copy of invoice to this manual)
SUPPORT CONTACTS
PHONE:
718-392-5380 x2
EMAIL:
[email protected]
MAIL:
10-50 46th AVENUE, LONG ISLAND CITY, NY 11101
Recordex iMMCam LBX-500
Instruction Manual
Page 15
WARRANTY STATEMENT
Recordex warrants to the original purchaser only that the Product will be
free from defects in material and workmanship under normal use for a period of five (5) years
from the date of original purchase.
Five (5) years from the date of the original purchase.
You are responsible for shipping the Product to our Warranty
Service Depot. Recordex will pay for return shipment of the repaired Product under warranty.
Return shipment will be by ground service to the 48 contiguous US states. You are responsible
for shipping to Alaska, Hawaii and any address outside of the United States. If the Product is
repaired out of warranty then you are responsible for shipping both ways. Recordex is not responsible for any shipping damage that may occur in transit to the service depot.
Yes, Product used in a classroom or education setting is eligible for our Replacement Warranty
Service. Make sure our customer service representative knows that the Product is in and educational setting and we will replace the product should a defect arise. Product will be replaced
with new or refurbished product at Recordex’s discretion. This process eliminates the wait
time associated with sending in the Product for repair. This warranty is often referred to as a
'hot swap' warranty.
To obtain warranty service please contact Recordex's Customer Service Center at 1-718-392-5380 x2 or contact your authorized Recordex Dealer for assistance in filing a warranty claim. You will receive instructions on how to properly
return your product for authorized warranty repair. In order to receive warranty service you
must be able to provide an original receipt or invoice for the purchase of your Product.
Recordex's warranty shall not apply: (i) to any Product subjected to
accident, misuse, neglect, alteration, acts of God, improper handling, improper transport, improper storage, improper use or application, improper installation, industrial or commercial use,
improper testing or unauthorized repair; or (ii) to cosmetic problems or defects that result from
normal wear and tear under ordinary use, and do not affect the performance or use of the product. If the Product develops a covered defect within the warranty period, Recordex will, at its
option, either repair or replace the Product at no charge, provided that the Product is returned
during the warranty period and this is your exclusive remedy and the entire liability of Recordex
under this warranty. No warranty is made or implied as to the effectiveness or suitability of this
product for your purposes.
THE ABOVE STATED WARRANTY IS EXCLUSIVE AND REPLACES ALL OTHER WARRANTIES EXPRESSED OR IMPLIED INCLUDING THOSE OF MERCHANTABILITY AND FITNESS FOR A PARTICULAR PURPOSE. RECORDEX WILL NOT BE HELD LIABLE FOR ANY OTHER DAMAGES OR LOSS
INCLUDING INCIDENTAL OR CONSEQUENTIAL DAMAGES AND LOSS OF PROFITS OR REVENUES
FROM WHATEVER CAUSE, INCLUDING BREACH OF WARRANTY OR NEGLIGENCE.
// www.recordexusa.com // 718-392-5380 // 10-50 46th Avenue, L.I.C., NY 11101 //