1
Britax
This product fulfills the requirements
of U.S. Federal Motor Vehicle
Safety Standards and is certified for use in motor vehicles and
aircraft. It is only intended for use as a child restraint for children
from 5 to 30 Ibs when used rearward
facing and from 20 to 40
Ibs when used forward
facing. It is not to be used in the home,
in boats or other non-certified
applications.
~~UNDAB~~T
Convertible
Child Restraint
5 to 30 Ibs rearward
20 to 40 Ibs forward
For children
For children
Please make sure you read and understand this information
booklet
before using your Roundabout.
Please store the booklet in the
Roundabout’s
pocket for further use and consult it often to make
sure you are using the restraint correctly.
facing.
facing.
FAILURE TO FOLLOW
EACH OF THE INSTRUCTIONS
IN THIS
BOOKLET
CAN RESULT IN YOUR
CHILD
STRIKING
THE
VEHICLE’S INTERIOR
DURING
A SUDDEN STOP OR CRASH.
SECURE THIS CHILD RESTRAINT WITH A VEHICLE BELT AS
SPECIFIED
IN THIS INSTRUCTION
BOOKLET
AND YOUR
VEHICLE’S OWNER’S
MANUAL.
The National
Highway
Traffic Safety Administration
recommendr,
according
to accident
statisttcs,
that parents select the the rear seat ar
the safest location
for a child seat. However,
the actual dimensions
of
the seat and the details of the belts used to anchor the child seat differ
from vehicle to vehicle.
Please study the section on Compatible Seat Belts
If in doubt, consult
your vehicle owner’s
manual and your Britax dealer.
The primary
protection
for occupants
of a motor vehicle
in a collision
is the structure
of the vehicle itself, and a child restraint
will not protect
a child when the vehicle sustains very serious damage. However, correctly
installed
restraints
will substantially
improve
the chances
for survival
in most accidents.
Make sure that you understand
the correct
way to
use this restraint
in your vehicle.
4
Introduction
4
Get To Know
Your Roundabout
Adjusting
The Roundabout
Compatible
Seat Belts
incompatible
Seating
5
To Fit Your
Positions
14
The Roundabout
Forward-Facing
Securing
The Roundabout
Rearward-Facing
Using
7
12
Securing
Buckle
Child
PosItton
In Your Vehicle
In Your Vehicle
15
Reclining
Your
lnstalltng
Your Roundabout
parts of your
IMPORTANT!
DO NOT place any child seat on front seat with air bag unless
air bag is turned off - DEATH or SERIOUS INJURY can occur.
The back seat is the safest place for children 12 and under.
Secure this child restraint even when it is not occupied. In a crash,
an unsecured child restraint may injure other occupants.
19
Versa-TetherTM
Roundabout
23
27
in Aircraft
28
Important
Notes
29
Care And
Cleaning
30
Recall
the different
22
Your Roundabout
Warranty
These pages will help you recognize
Roundabout.
33
Information
36
Recline
Hand16
Owners of vehicles with front passenger side airbags
to their vehicle owner’s manual for child restraint
Instructions.
should refer
in,tallatlon
5
Britax
Roundabout
Convertible
Chtld Restraint
page
1 of 9
These pages will help you recognize
Roundabout.
the different
parts of your
Changing
The
Height
Of The
Shoulder
Straps
IMPORTANT!
DO NOT place any child seat on front seat with air bag unless
air bag is turned off - DEATH or SERIOUS INJURY can occur.
The back seat is the safest place for children 12 and under.
Secure this child restraint even when it is not occupied. In a crash,
an unsecured
child restraint may injure other occupants.
Owners of vehicles with front passenger side airbags
to their vehicle owner’s
manual for child restraint
instructions.
should refer
installation
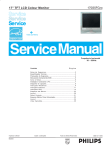
I. Loosen
the harness
by
pushing the release button in
as you pull the shoulder straps
out as much as possible.
2. Lift the metal oke out from
behind the seat-gelt guard and
unhook one shoulder strap. Pull
the strap through to the front
of vour Roundabout.
Do not
remove the chest clip.
3. Re-thread the shoulder strap
back through
vour chosen
shoulder slotYin the cover and
shell. Make
sure it is not
twisted.
4. Hook the shoulder
on to the yoke.
Repeat
8
6
Checking
The Height
Of The Shoulder
Straps.
Securely place your Roundabout
on the floor, Sit your child in
the seat and observe where the shoulder straps are positioned
on your child.
Using
The
Compound
Buckle
The shoulder straps must come out of the slots in the cover and
shell nearest the to of your child’s shoulders. If in doubt always
use the next slot a I! ove the shoulder rather than below It.
Are the shoulder
ti
straps In the correct
x - NO! Read How To Change
Straps
Id
positton?
OK! Then read How To Adjust
OK
Shoulder
XNO
straps too high.
1
The Harness
The Height
IdOK
Shoulder
x
No
straps too low.
7
Britax
Roundabout
Convertible
Child
in order to prevent
partial
latching, the two halves of the
buckle must be together before
insertion.
of The Shoulder
I
IMPORTANT
If the buckle’s tongues of your
Roundabout
cannot
be
inserted, fully press down the
release button
of the buckle
and reinsert.
Note: Periodrcally
clean the
buckle by soaking it in warm
water (if necessary, with dash
washing liquid).
See section
“Care and Cleaning”
on pages
30-32
9
Restraint
page
2 of 9
for other
strap back
strap.
Adjusting
1
The
Harness
I
I
I
2. To open
the chest clip,
squeeze the middle tabs. Note
that the chest clip appearance
may vary. (Some chest cli s
have only one middle tab.) T I!e
correct hei ht for the clip is the
middle oft a e chest, at the level
of the armpit.
Always make
sure that the harness is snug at
each
use
or
after
any
adjustments.
I. Loosen
the harness
by
pushing the release button in
as you pull the shoulder stra s
forward
as much as possib Pe.
Unfasten
the chest clip.
First note that some vehicles have no seating
ositions which
are compatible
with the Roundabout
(or any c 1.rld seat). Read
this section carefully. If in doubt, return to your vehicle or Britax
dealer for help.
There are several types of vehicle belts that will not work with
the Roundabout:
l Front
seat belts with anchorages
(top or bottom) in the door.
l Motor
driven automatic
belts of any kind.
l Non-locking
(ELR) two-point
seat-belts.
l Seat
belts specified by your vehicle manufacturer
as incompatible with child seats.
The handbook
for your vehicle will have information
on the types
of seat belts in your vehicle. If you have belts of the above-listed
types, select another seating position. Roundabout
will work with
rear seat three-point
seat-belts
with a sliding latch
late, and
with rear seat three-point
seat-belts that are specifica Ply marked
as appropriate
for child seats. The middle rear seat of most vehicles has a lap belt which most often will work with the Roundabout However,
make sure that the buckle is not too high (see
Buckle Position, page 22).
Your Roundabout
can be securely fitted in many vehicles using
their existing seat-belts,
However,
some types of vehicle design
prevent you from making a ood installation
due to the position of the seat-belt lower ant a orage points (an anchorage
point
is the point where your seat belt and buckle are attached to the
vehicle).
3. Unfasten
pressing the
(a) and place
seat. Fit the
our child
Karness (b).
the harness by
red button down
our child in the
K arness around
and fasten
the
Use this simple guide to check your seat-belts
choose the best position for your Roundabout.
10
and help you
12
Iehicle seat belt anchorages
may be too far forward
o securely hold the Roundabout.
Using the bar uide
rrinted on the sides of this page, check that the $ower
nchorage
point and buckle are within the shaded area
.s shown below. If rt is in the red area, then you should
tse another position (see Securing the Roundabout
in
‘our vehicle: page 15.)
Correct
4. With the chest clip low and
unfastened.
pull the harness up
to tighten
the lap sections
which are designed to fit low
down on your child’s body.
5. With the chest clip low and
unfastened,
pull the adjuster
stra forward making sure that
the Rarness is a comfortable
but
SNUG fit around your child.
r/
Lower
anchorage
point
Incorrect
4
Lower
anchorage
or buckle
6. Fasten the chest cli and slrde
up to child’s armpit [eight.
F
point -,
hrs end toward
seat
back
11
Britax
Fiorrndabout
i.;onvnrtibll?
Child Restrarnt
paqe
3 of 9
WARNING!
Use the Roundabout
in vehicle
seats which are forward
facing
only!
Do not use on rearward-facing
or side facing vehicle
seats.
You must use forward-facing
vehicle seats with this restraint.
Side-facing
or rear-facing
vehicle
seats in vans, station wagonsor
trucks CANNOT
be used with
this restraint.
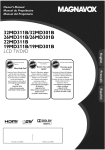
7b. ...and then pull the shoulder
sectlon of the seat-belt
tight here
7a. Carefully
kneel
on your
Roundabout
to push It into the
seat. Pull the seat-belt
here to
tighten
the lap sectron
7c. . ..~uIl hard on the shoulder
sectio;
then push the red lock-off
in to grip the seat-belt.
16
14
Lap
and
IThisI, is a lap and
Shoulder
shoulder
seat
Delr.
A. Shoulder
section.
6. Lap section.
2. Pass the seat
both side slots.
the seat
&tax
beit
Roundabout
belt
p&se;
through
below
Convertible
Belt
Installation
Lap
1. Place .r your
Roundabol
ut
torward
tacm
on the vehrcle
seat and pull t I?e harness
snug.
3. Fasten
the
seat
make sure that the
both lap belt guides.
15
Child
Restrarnt
page
belt.
lao
section
’
4 of 9
This is a lap
Belt
Only
belt.
2. Pass the lap
both side slots.
4. Before
oing
below bot f lap
Installation
1. Place
your
Roundabout
forward
facing
on the seat and
pull the harness
snug.
belt
througl
any further
belt guides
h
make
3. Fasten
sure
that
the
the
lap
lap
belt.
belt
passes
6. Your Roundabout
should
now be secure - see “Buckle
Position”
on page 22. To
remove
your
Roundabout,
simply unfasten
the belt and
reverse the above.
5. Carefully
kneel on your
Roundabout
to push it into the
seat and pull the lap belt tight.
6. Pull the shoulder
section,
close
the clamping
arm,
move the tab over until the
arm is locked
closed. Your
Roundabout
should now be
secure.
5. Pull the shoulder
section
here while
ushing down on
crabout to ensure a
~~;f~;un
Note: Use the lock-off
is adequate.
on the side closest
If the vehicle seat belt buckle
the other side.
Note that the lock-off
interferes
appearance
to you. One lock-off
with the lock-off,
use
may vary from above illustration.
If you have problems stabilizing
your Roundabout,
use a rolled
towel to level the Roundabout’s
base in your vehicle seat. The
bottom surface of the Roundabout’s
base should be horizontal.
Caution: Do not raise the base beyond
the protection
to your child.
horizontal;
this could reduce
Securing the Roundabout
using the Versa-TetherTM
will also help
stabilize the child seat. The rearward
facing installation
is always
im roved by the use of the Versa-TetherTM.
(see pages 25 and
26 P
20
18
Lap
and
Shoulder
Belt
Lap
Installation
2. Pass the seat belt through
both rearward-facing
slots.
Make sure lock-off
closest to
you is open.
seat and pull the harness snug.
Belt
Only
Installation
2. Pass the lap belt through
both rearward-facing
slots.
Make sure lock-off
closest to
you is open.
seat and pull the harness snug.
3. Fasten the lap belt.
3. Fasten the seat belt.
CAUTION:
Never bend the plastic lock-off
arm up or down...
tt WIII break
Off!
belts are passed
buckle strap.
behind
the
CAUTION:
Never bend the plastic
off arm up or down...it
break off!
lockwill
DUCKI?
strap.
21
19
Brltax
Roundabout
Convertible
Child
Restramt
page
5 of 9
Forward
5. Pull the lap belt
~~~~hi~~o,d~~ns~~fi
Close
tight
while
fir;our
6. Attach the Versa-Tethe?
as described
on page 25. The proper
seat angle IS 45 degrees. To remove
your Roundabout,
simply unfasten
the belt and reverse the above.
the lock-off.
The position
of the vehicle
seat be/t buckle can affect
your Roundabout.
In an acodent
an /mproper/y
positioned
come loose and your child would be unprotected..
the stability
of
buck/e could
When the vehicle belt is proper1
tightened,
if the buckle lies near the
position
marked
as wrong ( X r then try fitting your Roundabout
rn
another
seating
position
in your car.
If it is not possible
to achieve
then another
seating
position
the correct
position
MUST be used.
Facing
Mode
3. After {ou attach
the tether
to the ve tcle, tighten
by pullrng
the st$~i;~ura~;~eTetherTM
as
Your
Roundabout
should
be secure.
To release
the Versa-Tethe+
simply
lift the tether
adjuster
silver metal
tab and pull.
( ti ) for the buckle
,
REMEMBER
Check that
your
Roundabout
is secure
before
each
journey.
22
Forward
1. Place
selected
position.
“Securing
Forward
Vehicle”
Facine
24
Rearward
Mode
the
restraint
in the
vehicle
seating
Follow
the section
the
Roundabout
Facing
in
Your
(see pages
15-I 8).
2. Using the Versa-TetherTM
will
always
improve
the
Roundabout’s
performance
and
stability.
This is particularly
important
in lap belt
only
installations.
the
restraint
vehicle
Follow
the
Mode
in the
seating
section
The proper
degrees.
seat
angle
is 45
3 Locate an acceptable
location
for the tether
to be anchored.
Make sure you hook
your Versa-TetherTM
to a secure
location.
Use a orb, whrchever
provides
a more stable and secure mounting.
Check your vehicle
owner’s
manual
or contact
your vehicle’s
manufacturer
for proper
tether
attachment
anchorages
2 Locate
an acceptable
locatron
for the tether
to be anchored.
Make sure you hook your Versa-TetherTM
to a secure
location.
Use a, b, or c, whrchever
provides
a more
stable
and secure
mountmg.
Check
your vehrcle
owner’s
manual
or contact
your
vehrcle’s
manufacturer
for proper
tether
attachment
anchorages
DO NOT
DO NOT
Hook
the Versa-TetherTM
seat adjuster!
to the
bottom
of a vehicle
Roundabout
Convertible
Child
Hook
seat
the Versa-TetherrM
adjuster1
to the
25
23
Britax
I. Place
selected
position.
Facing
Restraint
page
6 of 9
bottom
of a vehicle
Rearward
Facing
Your Roundabout
is certified
for use on aircraft
(see label on seat).
Most airlines
in the U.S. and Canada
will allow
you to use a child
seat if it carried
such a label and fits properly
on the plane. Contact
your airline
about their polrcy.
Mode
Use your
Roundabout
Roundabout
only on forward
next to a window
will avoid
facing
aircraft
seats. The
blocking
the aisle.
Roundabout
Install
your
rearward-facing
in an aircraft
according
to section
“Securing
the
Roundabout
Rearward.
Facing
In Your Vehicle”.
(See
pages 21 and 22 for “Lap Belt
Only Installation”)
Roundabout
Install
forward-f!rr%g
in an aircraft
according
to section
“Securing
the Roundabout
forward-Facing
In Your Vehicle”.
(See pages 17
and
18 for “Lap
Belt
Only
Installation”)
3. After
you locate
the tether
tighten
by pulling
the strap in
your Versa-Tethe?
as shown
above.
Your
Roundabout
should
be secure.
To release
the Versa-TetherTM
simply
lift the tether
adjuster
silver metal
tab and pull.
Illurtrahons
show Roundabout
correctly ,nrtalled ,n wmdow seat of an aIrcraft
Adjust
the Roundabout
according
to sections
roundabout
To Fit Your Child”
(see pages 7 through
Your Roundabout”.
(See page 27)
If the aircraft
extender.”
lap belt is too short,
ask the flight
DO - Make
sure that you snugly
clothes
your child is wearing
will be too loose for a child
Recline
Positions
The Roundabout
has a choice
of two positions
for your child’s
comfort
It can be used in either
position.
Both are tested
and
ap roved.
The recline
adjustment
must be made with the vehicle
bet P loosened.
for a “belt
adjust
the harness
to fit the
- a fitting
for winter
clothes
wearing
summer
clothes.
DO - Cover your
can become
child seat if your car is left standing
hot to touch
in sunny
weather.
DO - Store
used.
child seat in a safe place when
placing
heavy
objects
on top
your
Avoid
DO - Secure the Roundabout
occupied.
In a crash,
other
occupants.
in your
an unsecured
vehicle
child
in sun.
it is not
of it.
Parts
being
even when it is not
restraint
may injure
DO NOT
-Use your
child
seat in the home.
designed
for home
use and should
your vehicle.
It has not been
only be used in
DO NOT
-Attempt
to dismantle
or modify
any part of your
seat, the harness
or your vehicle
seat-belts.
DO NOT
-Leave
back
have
keep
DO NOT
-Leave
folding
passenger
seats unlatched.
to stop your vehicle
suddenly
a loose
prevent
the child seat from protecting
well as It shoultl
DO NOT
-Leave
trme.
children
‘ilone
DO NOT
-Allow
children
10 play
IMPORTANT
Before
driving,
make sure that
the Roundabout
is secure
and
that the seat belt is tight. If there
IS any slack in the seat belt or
harness
then retighten
it before
starting
your journey.
Loosen
the vehicle
seat belt
slightly.
Squeeze
the recline
handle. Then slide the base tnto
the required
positron.
Let go of
the recline
handle
and make
sure that your Roundabout
has
locked Into place
attendant
28
26
A
“Adjusting
The
11) and “Reclining
Britax and the U.S. Department
of Transportation
warns
that
children
12 and under
must
ride in rear seats
away
from
child
loose objects,
such as books or luggage,
in the
of your vehicle
Always
keep them secure.
If you
to stop your vehicle
suddenly,
loose objects
will
moving.
They can then cause serious
injuries.
In your
with
vehicle,
your
If you have
seat back wtll
your child as
even
child
for a short
seat.
25)
27
Britax
Roundabout
Convertible
Chrld
Restraint
page
7 of 9
Cover
Removal
REPLACEMENT
OF CHILD SEAT
REPLACING
1. Your Roundabout
has an
easy to clean cover and buckle.
Loosen the harness by pushin
the release button in as you pu ‘i I
the shoulder straps out as much
as possible.
THE COVER
The cover
of your
Brita)
Roundabout
has been carefull)
designed,
manufactured
ant
tested to high standards.
It is recommended
not to use
child restraints older than 6 years
or restraints that have been in
a severe crash (i.e. main vehicle
body structure distorted).
This
ensures that no hidden dama e
or deterioration
has occurre 2
Replacement
covers
are
available from your Britax dealer.
2. Pull the metal yoke out from
behind the seat-belt
guard.
Unhook
the shoulder
straps
from
the
oke. Pull them
through tot K e front of the seat
and out of the chest clip.
To remove
the cover and belly
Grasp the metal plate under the
Roundabout,
by which the
buckle is secured to the seat
shell, push it upwards,
on its
side, throu
h the slot in the
shell. Centa
Rush the metal
plate throug
t e belly pad slot.
3. So as not to damage
the
ener y absorbin
foam, gently
pull t% e cover o # from the top
of the seat, then ease the chest
clip and harness straps through
their slots.
To refit the cover simply reverse
the above instructions.
Make
sure that the shoulder straps are
threaded
through
the chest
clips and that there are no twists
in the harness.
30
CLEANING
THE
HARNESS
AND SEAT
D~J NOT -Take apart or attempt
to take apart any of the harness
when cleaning
the harness
and
seat.
It IS unnecessary
and
dangerous
to do so.
DIJ NOT -Use solvents, detergents
or cleaning
fluid as these may
weaken the harness and the seat.
~0 . Only
use mild soap and
warm water.
CLEANING
THE COVER
The cover is machine-washable.
~0 NOT use chlorine
bleach.
Machme Wash - Warm, Medium
Cycle
Hand Wash
Warm
Line Dry
DO NOT machine
dry.
CLEANING
THE
the crotch
This Child Restraint was manufactured
Inc. (Britax Model 161).
grasp the meta Pplate under the
Britax Child Safety, Inc. (“Britax”)
original retail purchaser as follows:
necessary,
with dlshwashing
liouid) for about an hour. Rmse
aid dir dry thoroughly.
Reflttlng
the crotch
strap.
Hold the metal plate on the
crotch strap sldeways
and push
it with the narrow
side facing
upwards, throu$
the slot in the
fabric cover an Into the plastic
shell. The metal plate must be
Inserted through
the slot in the
plastic
shell and not merely
through
the fabric cover. Please
check this by pulling
up on the
crotch strap several times. If the
fabric cover significantly
lifts off
the seat shell, the metal plate
BUCKLE
strap.
reclme the seat. Pull the fabric
cover off of the seat to expose
the crotch stra
You can now
seat, by which
the strap
is
secured
to the seat shell, and
push it u wards, on its side,
through
tE e slot in the shell.
Most problems
relating
to your
child’s seat buckle are caused by
accumulattons
of dirt, food or
drinks. These are easily washed out.
These problems
include,
l
The tongues
fail to lock with an
audible cltck.
* The tongues
are only slowly
elected
after the button
has
been pressed.
* The tongues
are difficult
to
Insert (you feel resistance).
l The tongues
WIII no longer lock
(are ejected
agaln)
To clean the buckle.
follow these
5leps
1 Remove
32
IS not fltted correctly.
IMPORTANT:
l
l
l
l
Fully
Make sure
twlsted.
The buckle
plastic part5
outslde
the
Check your
harness to
Make sure
off;;d~;~&JJ;~
parbcles
the straps
dropped
Britax
Roundabout
Convertible
Child
To make
Britax
a claim
retailer
under
or Britax,
this Warranty,
Customer
page
Service
you
must contact
Department.
PLEASE COMPLETE
AND MAIL THE PRE-ADDRESSED
REGISTRATION
CARD
WITHIN
THIRTY
(30)
PURCHASE
TO EXPEDITE
WARRANTY
CLAIMS
EVIDENCE
THE ORIGINAL
DATE OF PURCHASE.
WARRANTY
LIMITATIONS.
dama
es which
arise from
actor f ante with this product
to the
your
460-R
call Britax
at 1
OWNER
DAYS
OF
AND
TO
This Warranty
does not include
negligence,
misuse
or use not in
instruction.
are not
on the straps.
8 of 9
Safety,
this product
Creenway
Industrial
Drive, Fort Mill SC 29715,
(888) 427-4829.
Proof of purchase required.
33
Restraint
warrants
Child
LIMITED ONE YEAR WARRANTY.
This product
is warranted
against defective
materials or workmanship
for one year from
the date of original purchase. Proof of purchase is required. Your
exclusive remedy for this Warranty
is that Britax will, at its option,
provide repair or replacement
corn onents for this product or
refund the ori inal purchase price o P the product. Britax reserves
the right to cf IscontInue
or change fabrics, parts, models or
products, or to make substitutions.
or other metal or
must be posItIoned
side slots
entlre Roundabout
remove any twist.
the straps are clear
;be;;
31
by Britax
LIMITATION
OF DAMAGES.
The Warranty
and remedies as set
forth are exclusive and in lieu of all others, oral or written, express
or implied. In no event will Britax or the dealer selling this product
be liable to you for any damages,
including
incidental
or
consequential
damages, arising out of the use or inability to use
this product.
LIMITATION
OF WARRANTIES
AND OTHER WARRANTY
TERMS
AND STATE LAW RIGHTS.
ANY IMPLIED
WARRANTIES,
INCLUDING
IMPLIED
WARRANTIES
OF MERCHANTABILITY
AND FITNESS FOR A PARTICULAR
PURPOSE, SHALL BE LIMITED
TO THE DURATION
AND TERMS OF THE EXPRESS WRITTEN
WARRANTY.
SOME STATES DO NOTALLOW
LIMITATIONS
ON
HOW
LONG
AN IMPLIED
WARRANTY
LASTS OR THE
EXCLUSION
OF
LIMITATION
OF
INCIDENTAL
OR
CONSEQUENTIAL
DAMAGES,
SO THE ABOVE LIMITATIONS
MAY NOT APPLY TO YOU. THIS WARRANTY
GIVES YOU
SPECIFIC LEGAL RIGHTS. AND YOU MAY HAVE OTHER RIGHTS
WHICH VARY FROM
STATE TO STATE. Neither Britax nor the
dealer selling this product authorizes
any person to create for it
any other warranty,
obligation,
or liability in connection
with this
product.
34
Child restraints could be recalled for safety reasons. You must
register this restraint to be reached in a recall. Send your name,
address, and the restraint’s
model number and manufacturing
date to:
Britax Child Safety, Inc.
460-R Greenway
Industrial
Fort Mill, SC 29715
Drive
or call
(888)
4 BRITAX
For recall information,
call
the U.S. Government’s
Auto Safety Hotline
at 1 (800) 424-9393
In the DC area call 1 (202) 366-0123
Fill out the registration
mail it in today!
Britax
card attached
to your child restraint
BRITAX Child Safety, Inc.
460-R Greenway
Industrial
Fort Mill, SC 29715
and
Drive
Britax
Roundabout
Convertible
Child
Restraint
page
9 of 9
Britax
ELITE
Convertible
.I
.
This product fulfills the requirements
of U.S. Federal Motor Vehicle
Safety Standards and is certified for use in motor vehicles and aircraft.
It is only intended for use as a child restraint for children 15 to 32
Ibs when used rearward facing and 20 to 40 Ibs when used forward
facing, It IS not to be used in the home, in boats or other non-certified
applications.
Please make sure you read and understand
this information
booklet
before using your Elite. Please store the booklet in the Elite’s pocket
for further use and consult it often to make sure you are using the
restraint correctly.
Child Restraint
For children 15 - 32 Ibs rearward Facing
For children 20 - 40 Ibs forward facing
FAILURE TO FOLLOW
EACH OF THE INSTRUCTIONS
IN THIS
BOOKLET CAN RESULT IN YOUR CHILD STRIKING THE VEHICLE’S
INTERIOR DURING A SUDDEN STOP OR CRASH. SECURE THIS
CHILD RESTRAINT WITH A VEHICLE BELT AS SPECIFIED IN THIS
INSTRUCTION
BOOKLET
AND YOUR VEHICLE’S
OWNER’S
MANUAL.
The National Highway
Traffic Safety Administration
recommends
that parents select the rear seat as the safest location for a child seat.
However, the actual dimensions
of the seat and the details of the
belts used to anchor the child seat differ from vehicle to vehicle.
Please study the section on Compatible Seat Belts. If in doubt, consult
your
vehicle
owner’s
manual
and your
Britax
dealer.
The primary protection for occupants of a motor vehicle in a collision
is the structure
of the vehicle itself, and a child restraint will not
protect a child when the vehicle sustains very serious damage.
However, correctly installed restraints will substantially
improve the
chances for survival in most accidents. Make sure that you understand
the correct
way to use this restraint
in your
vehicle.
3
Introduction
Get To Know Your Elite
Adjusting
The Elite To Fit Your Child
Compatible
Seat Belts
Securing The Elite Rearward
Facing In Your Vehicle
Securing The Elite Forward
Facing In Your Vehicle
Important
Notes
Care And Cleaning
Warranty
Recall Information
3
4
6
10
11
15
19
20
26
26
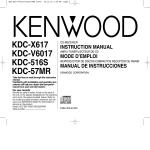
This page will help you recognize
Elite.
the different
parts of your
IMPORTANT!
DO NOT place an child seat on front seat with air bag unless
air bag is off. DEA f H or SERIOUS INJURY can occur.
The back seat is the safest place for children 12 and under.
Vehicle Belt
Forward-Facing
fgyg
\
Shoulder
, uvr
Buckle
\
T-iv
Chest
Clip
RearFacina
Harness /
AdJuster
strap
’
PosItIon
Base
Restraint
page
4
2
Britax
Elite Convertible
Child
1 of 7
.
,
0
.
This page will help you recognize
Elite.
the different
parts of your
Changing
The
Height
Of The
Shoulder
Straps
IMPORTANT!
DO NOT place an child seat on front seat with air bag unless
air bag is off. DEA 7 H or SERIOUS INJURY can occur.
The back seat is the safest place for children 12 and under.
Cover,
1. Unzip the cover at the back.
Unhook one shoulder stra and
pull it through
to the ! ront.
2. Re-thread
the shoulder strap
throu h your chosen shoulder
slot. dake sure it is not twisted.
b.Shoulder
Slots
1. Hook the shoulder strao back
onto the yoke. Make s&e the
adjuster
strap is not twisted.
’
Repeat steps l-3 with the other
strap.
5
7
Checking
The
Height
Of The
Shoulder
Straps.
Securely place our Elite on the floor. Sit your child in the seat
and observe w x ere the shoulder straps are positioned
on your
child.
The shoulder straps must come out of the slots in the cover and
shell nearest the top of your child’s shoulders. If in doubt always
use the next slot above the shoulder
rather than below It.
Are the shoulder
fl-
straps in the correct
position?
OK! Then read How To Adjust
x - NO! Read How
Straps
To Change
J OK x No
Shoulder
The Harness
The Height
of The Shoulder
VOK
straps too hiqh.
Shoulder
X
1. Loosen
the harness
by
pushing the adjuster button in
as you pull the shoulder straps
out as much
as possible.
IMPORTANT
If the buckle’s tongues of your
Elite cannot be inserted,
fully
oress the release button of the
buckle and reinsert.
NO
straps too low.
Fasten
G
Britax
Elite Convertible
Child
Restraint
the
chest
clip.
4. Pull the adjuster strap maklng
sure the harness is a comfort;lblc
but snug fit around your ctrlld.
8
page
2. Unfasten
the buckle
by
pressing the red button. Place
vnur
child in the seat. Fit harness
J --.
around your child and fasten
the buckle. In order to prevent
partial latching, the two halves
of the buckle must be together
before insertion.
2 of 7
Use your Elite rearward-facin
out of the infant carrier until
As long as the child and you
use the seat that wav. It can
hid reaches 32 Ibs.*
I\-
u
/I
5. Slide the chest clip up to the
middle of the chest.
I
I
6. To open the chest clip,
squeeze
the middle
tabs.
(Some chest clips have only
one tab.) The correct height
for the cli is the middle of the
chest, at t Re level of the armpit.
Always
make sure that the
harness is snug at each use or
after
any
adjustments.
&Lap
from the time your baby grows
ti e baby is at least one year of age.
are happy with rearward-facing,
be used rearward-facing
until the
Belt
1
This
.._is._ a- lao
._r and
- shoulder belt.
Most vehrcles have them in the
outboard
rear seat.
1. Adjust the angle of the Elite
with the swinging
base. For
infant recline in most vehicles.
flip the base beneath the shell.
I
I
2. Let the foot end of the Elite
rest about 12” (30cm) above
the seat surface. Make sure the
top end rests on the front seat
back.
“3. Run the seat belts over the
far side of the Elite, down
through the belt slot, under the
shell, up through the outer slot,
and buckle.
I
11
9
First note that some vehicles have no seating positions which are
compatible
with the Elite (or any child seat). Read this section
carefully.
If in doubt, return to your vehicle or Britax dealer for
help.
There
Elite:
l
l
l
l
are several
types
of vehicle
belts that will not work
with
Front seat belts with anchorages
(top or bottom)
in the door.
Motor driven automatic
belts of any kind.
Non-locking
(ELR) two-point
seat-belts.
Seat belts specified
by your vehicle
manufacturer
as
incompatible
with child seats.
The handbook
for your vehicle will have information
on the types
of seat belts in your vehicle. If you have belts of the above-listed
types, select another
seating position.
Elite will work with rear
seat three-point
seat-belts with a sliding latch plate, and with rear
seat three-point
seat-belts that are specifically marked as appropriate
for child seats. The middle rear seat of most vehicles has a lap belt
which most often will work with the Elite.
Your Elite can be securely fitted in many vehicles using
seat-belts.
However,
some types of vehicle desrgn
from making a good installation
due to the positron
belt lower anchorage
points (an anchorage
point
where your seat belt and buckle are attached
to
I
I
I\\
5. Move the front seat back so
that the Elite is squeezed
between
the front and back
seats. Recheck the seat belt and
re-tension
if necessary.
An
optional
tether strap, “VersaTetherTM “, may be obtained
from
your
Britax
dealer.
4. Put your knee into the Elite.
Pull the shoulder
strap (the
uppermost
webbing)
until the
lap section is tight. Then tighten
the shoulder strap.
their existing
prevent you
of the seatis the point
the vehicle).
12
10
Britax
Elite Convertible
Child
Restraint
page
3 of 7
This is a lap belt. Most vehicles
have a lap belt in the center of
the rear seat.
1. Check the angle of the base.
For recline fold the base under
This is a lap and shoulder
belt.
1. Place your child seat forwardfacing on the vehicle seat. Then
loosen the harness by oushinq
the release button in as you pull
the shoulder
straps
out.
_ - chdl
_ _.
the
.
.
I
I
2. Let the foot end of the Elite
rest about 12” (30cml above
the seat surface. fvlake sure the
top end rests on the front seat
back.
3. Run the seat belts under the
far side of the Elite, up throuqh
the belt slot, over the shell,
down through
the other slot,
and buckle.
!. Pull the seat belt out and hold
the lap and shoulder
sections
together. Keep them together
as you pass the seat belt through
the first seat belt routing slot,
indicated in red on your Elite.
through’the
second seat belt
routing slot to the front of your
child seat.
15
13
4. Tiqhten
the wcbbinq
by
pushing the Elite down into the
vehrcle seat, and pullrng the seat
belt
5. If hard to trghten, thread the
seat belt over the side, down,
across the underside of the shell.
up through
the other slot, and
down to the buckle.
4. Pull all the slack from the seat
belt to the front of your child
seat and then fasten the seat
belt.
5a. Carefully kneel on your Elite
to push it into the vehicle seat.
Pull the seat belt here to tighten
the lap section...
6. Trghten
the webbrng
by
pushrng the Elate down Into the
vchrcle scat and pullrng the seat
belt.
7. Move
the front
seats
rearward
to squeeze the Elite In
place between
the front and
back seats. The front seats do
not need to be symmetrical.
Recheck tensron on seat belt
5b. . ..and then oull the shoulder
section of the’seat
belt tight
here.
6. Your Elate should now be
secure
To remove
your Elrtc
srmply unfasten
the scat belt
and unthread
It.
14
Britax
Elate Convertrble
Child
Restraint
16
page
4 of 7
DO - Set a good example
by always wearing
your seat belt.
Make sure it is a firm rule that the car doesn’t move until
everyone
is buckled up. Make no exceptions
for adults
or children.
DO - Always check the Elite for hot parts before placing a child
into the seat. Parts can become hot to touch in sunny
weather.
This is a lap belt.
1. Place your child seat forward
facing oh the passenger
seat.
Then loosen the harness
by
pushing the release button in
as you pull the shoulder straps
out.
DO - Keep the Elite securely belted to the vehicle, even when
it is not occupied. In a crash or sudden stop, any unsecured
child restraint and other loose objects will keep moving
and can cause serious injuries.
DO NOT - Leave children
time.
DO NOT
- Attempt
Elite.
DO NOT - Use
Elite
and
your
Pass the lap belt through the
rst seat belt routing
slot,
dicated in red on your Elite.
alone in your vehicle,
to disassemble
or modify
even for a short
any part of the
anything,
such as a cushion or coat to raise the
off the passenger seat. In an accident the Elite
vehicle’s seat belts would not be able to protect
child as well as they should.
3. Then pass the lap belt back
through
the second seat belt
routing slot to the front of your
Elite.
19
5. Carefully
kneel on your Elite
to push it-into the passenger
seat Then tighten the lap belt
4. Pull all the slack from the lap
belt to the front of your child
seat and then fasten the lap belt.
The
U.S.
Department
of
Transportation
warns
that
children 12 and under must ride
in rear seats away from front
airbags. The only exception
is if
the alrbag is off.
6. Your
secure.
El&e should
now
be
To remove your Elite from your
vehlclc simply unfasten the lap
belt and unthread
It.
18
Britax
Elite Convertible
Child
Reshaint
page
5 of 7
IMPORTANT:
l
l
I
1
I
\
Make sure the straps are not
twisted.
Check your entire Elite harness
to remove any twist.
,
5. When the buckle does lock REPLACEMENT
OF CHILD SEAT
with an audible click leave it to It is recommended
not to use
dry.
child restraints older than 6 years
or restraints that have been in
DO NOT lubricate any part of a severe crash (i.e. main vehicle
the buckle.
body structure
distorted).
This
ensures that no hidden damage
To refit the buckle to your Elite, or deterioration
has occurred.
hold the end bracket sideways
and insert it into the seat slot.
Make sure the red buckle button
faces away from your Elite and
then rethread
the adjuster strap
back through
the end bracket
of the crotch strap (as shown in
figure 1).
If the buckle still does not return
to its original
working
order,
contact your Britax dealer for
assistance.
23
Cleaning
The
Buckle
This Child Restraint was manufactured
Inc. (Britax Model 151).
Britax Child Safety, Inc. (“Britax”)
original retail purchaser as follows:
x
1. Look underneath
your Elite
and you will see the adjuster
strap is threaded
through
the
end bracket of the crotch strap.
Unthread the adjuster strap from
the end bracket,
2. With one hand pulling on the
buckle and the other hand under
the seat, twist and slip the end
bracket
sidewavs
up throuqh
the slot.
-
by Britax
warrants
Child Safety,
this product
to the
LIMITED
ONE YEAR WARRANTY.
This product
is warranted
against defective
materials or workmanship
for one year from
the date of original purchase.
Your exclusive remedy
for this
Warranty
is that Britax will, at its option,
provide
repair or
replacement
components
for this product or refund the original
purchase
price of the product.
Britax reserves the right to
discontinue
or change fabrics, parts, models or products, or to
make substitutions.
To make a claim under this Warranty,
you
Britax retailer or Britax Child Safety, Inc.,
Department,
460-R Greenway
Industrial
29715,
call Britax at 1 (888) 427-4829.
required.
must contact your
Customer
Service
Drive, Fort Mill SC
Proof of purchase
PLEASE COMPLETE
AND MAIL THE PRE-ADDRESSED
OWNER
REGISTRATION
CARD
WITHIN
THIRTY
(30) DAYS OF
PURCHASE
TO EXPEDITE WARRANTY
CLAIMS
AND TO
EVIDENCE
THE ORIGINAL
DATE
OF
PURCHASE.
1
3. Clean buckle with mild hand
soap and water only! Then rinse
thoroughly
with warm water.
4. Latch
and unlatch
the
tongues into the buckle several
times until a strong audible clrck
is heard. If you still cannot hear
a strong
audible
click after
latching the buckle several times
run the buckle
under warm
water again.
22
Brrtax
Elite Convertible
Child
Restraint
WARRANTY
LIMITATIONS.
This Warranty
does not include
damages whrch arise from negligence.
misuse or use not in
accordance
with this product tnstructron.
26
page 6 of 7
LIMITATION
OF WARRANTIES
AND OTHER WARRANTY
TERMS AND STATE LAW RIGHTS. ANY IMPLIED WARRANTIES,
INCLUDING
IMPLIED WARRANTIES
OF MERCHANTABILITY
AND FITNESS FOR A PARTICULAR
PURPOSE,
SHALL BE
LIMITED TO THE DURATION
AND TERMS OF THE EXPRESS
WRITTEN
WARRANTY.
SOME
STATES DO NOT ALLOW
LIMITATIONS
ON HOW LONG AN IMPLIED
WARRANTY
LASTS OR THE EXCLUSION
OR LIMITATION
OF INCIDENTAL
OR CONSEQUENTIAL
DAMAGES,
SO THE ABOVE
LIMITATIONS
MAY NOT APPLY TO YOU. THIS WARRANTY
GIVES YOU SPECIFIC LEGAL RIGHTS, AND YOU MAY HAVE
OTHER RIGHTS WHICH VARY FROM STATE TO STATE. Neither
Britax nor the dealer selling this product authorizes
any person
to create for it any other warranty,
obligation,
or liability in
connection
with this product.
27
Child restraints could be recalled for safety reasons. You must
register this restraint to be reached in a recall. Send your name,
address, and the restraint’s
model number
and manufacturing
date to the address below.
For recall information,
call
the U.S. Government’s
Auto Safety Hotline
at 1 (800) 424-9393
In the DC area call 1 (202) 366-0123
Fill out the registration
today!
Britax
to your
Elite and mail it in
BRITAX Child Safety, Inc.
460
-1
card attached
R Greenway
&~~~~j
~c&~f~~
Industrial
Drive
PN 000-036
hI”P 1 08/‘)8
Britax
Elite Convertible
Child
Restraint
page 7 of 7
Britax
This product
fulfills the requirements
of the U.S.
Safety Standards
and is certified
for use in motor
it is only intended
for use as a forward
facing
weighing
between
20-40
Ibs., and is not to be
boats, or other non-certified
applications.
FREEWAY
Reclining
For children
Please make sure you read and understand
this information
booklet
before using your Freeway.
Please store the booklet
in the Freeway’s
pocket for further
use and consult
it often to make sure you are using
the restraint
correctly.
Child Safety Seat
between
Federal Motor Vehicle
vehicles
and aircraft.
car seat for children
used in the home, in
20 - 40 Ibs
IA WARNING! A
.J
FAILURE
TO FOLLOW
EACH
OF
THE
FOLLOWING
INSTRUCTIONS
CAN RESULT IN YOUR CHILD STRIKING
THE
VEHICLE’S
INTERIOR
DURING
A SUDDEN
STOP OR CRASH.
SECURE
THE CHILD
RESTRAINT
WITH
A VEHICLE
BELT AS
SPECIFIED
IN THIS INSTRUCTION
BOOKLET.
The National
Highway
Traffic Safety Administration
recommends,
according
to accident
statistics,
that parents select the rear seat as
the safest location
for a child car seat. However,
the actual
dimensions
of the seat and the details of the safety belts used to
anchor the child seat differ from vehicle to vehicle.
Please study
the section
on Compatible
Seat Belts. If in doubt,
consult
your
motor vehicle
handbook
and your Britax dealer.
The primary
protection
for occupants
of a motor vehicle
in a
collision
is the body of the vehicle
itself, and a child restraint
will
not protect
a child when the vehicle
body sustains
very serious
damage.
However,
correctly
installed
restraints
will substantially
improve
the chances
for survival
in all accidents.
Make sure that
you understand
the correct way to use this restraint
in your vehicle.
3
3
4
6
Introduction
Get to know your Freeway
Compatible
Seat Belts
How to fit your Freeway
using a Lap & Diagonal
How to fit your Freeway
using a Lap Belt
Checking
the Height of the Shoulder
Straps
Changing
the Height of the Shoulder
Straps
How to Adjust the Harness
Reclrning
your Freeway
Installing
your Freeway
in Aircraft
Caring for your Freeway
Cleaning
your Freeway
Important
Notes
Warranty
Recall Information
Seat Belt
8
IO
12
12
14
15
16
17
18
19
23
24
These pages wrll help you to recognize
the drfferent
parts of your Freeway
IMPORTANT!
DO NOT place any chrld seat on front seat wrth arr bag unless air bag
is turned off - DEATH or SERIOUS
INJURY can occur. The back seat IS
the safest place for children
12 and under.
Secure thus child restraint
unsecured
chrld restraint
even when it IS not occupred.
may Injure other occupants.
Cover,
In a crash
an
Head
Support
Straps
Shoulder
Slots
Red
Curde
Yoke
(Behrnd
Seat-belt
Guard)
Seat-belt
Britax
Freeway
Reclining
Child
SafetySeat
page
1 of 6
These pages will help you to recognize
the different
parts of your Freeway.
IMPORTANT!
DO NOT place any child seat on front seat with air bag unless air bag
is turned off - DEATH or SERIOUS
INJURY can occur. The back seat is
the safest place for children
12 and under.
x
Secure this child restraint
unsecured
child restraint
Lower
anchorage
even when it is not occupied.
may injure other occupants,
In a crash
-
Head
an
point
Pad
2. If either of the lower anchorage
then you should use another
using the lap belt.
points
position,
are in the red area, as shown
for example,
the middle
REMEMBER
Although
your seat-belt
anchorage
points fall within
rnrtallation
may be achieved
by reclming your Freeway.
Red
Seat-belt
above,
of the rear seat
the grey area,
a better
:;i’
Use the Freeway
in vehicle
seats which are forward
facing
only!
L
B
r
Do not use on rearward-facing
or side facing vehicle
seats.
i-l
You must use forward-facing
vehicle
seats with this restraint.
Side-facing
or
rear-facing
vehicle
seats in vans, station
wagons
or trucks CANNOT
be
used with this restraint.
5
First note that some vehicles
have no seating
oritions
which are
:om atible with the Freeway (or any car seat P Read this section
care Pully. If in doubt, return to the dealer for help.
There are several types of safety belts that will not work with Freeway
[or other toddler seats):
* Front seat belts with anchorages
(top or bottom)
in the door.
l Motor
driven automatic
belts of any kind.
l Three-point
belts that have retractors
for the shoulder
section and
the lap section. Such belts have latch plates (tongues) sewn both to
the shoulder
and lap sections.
0 Non-locking
(ELR) two-point
seat-belts.
The handbook
for your vehicle will have information
on the
seat belts in your vehicle. If you have belts of the above-lirte
select another seatmg position. Freewa will work with rear seat t
ooint seat-belts
with a sliding latch pate,
r
and with rear seat threepoint seat-belts
that are specifically
marked as a propriate
for child
seats. The middle rear seat of most vehicles has a Pap belt which most
often will work with the Freeway. However,
make sure that the buckle
does not catch on the vehicle seat frame (see Buckle Position section).
Your Freewa
can be securely
fitted in
existing seat- ‘6 elts. However,
some types
ou from making a good installation
due
belt lower anchora
e points (an anchorage
your seat belt and %uckle are attached
to
Use thrr simple guide to check your
Lhe best posrtion for your Freeway.
seat-belts
and help you choose
2. Pass the seat-belt
;lots.
6
Freeway
Reclining
Child Safety
1. Place your Freeway forward factng
onthe vehrcle seat and pull the harness
bght
seat-belt.
many vehicles
using their
of vehicle design prevent
to the position
of the seatpoint is the point where
the vehicle).
Put the gurde prrnted on the srde of thus page on your vehrcle seat
; the osrtion shown above, with the grey area towards the seat back
low 1 etermme If both of the lower anchorage
pornts are m lme wrth
‘le grey or red area of the uide. If they are rn the grey area, as shown
hove, then you can use t % IS posmon for your Freeway
Britax
This is a lap-and-dragonal
A. Dragonal sectron.
8. Lapsectton.
Seat page 2 of 6
through
I Fasten the seat-belt
both srde
4. Before
o,np, any lurthzr make sure that tl,<, lap ~c,,on
below bot ?l lap belt guides
8
of the %x-belt
Pasrer
5. Press the red lock open.
6. Pull the diagonal
the red lock.
section
through
6. Your Freeway should now be secure see “Buckle Position” below. To remove
your Freewa , simply unfasten the belt
and reverse t 6e above.
5. Carefully kneel on your Freeway to
push it into the vehicle seat and pull
the lap belt tight.
llle posftm
an accrdent
11 should.
of the /a be/t buckle cm affect the stabdlty
this coul B stop your Freeway from protecbrtg
of your freeway. In
your chdd as well as
If. when the lap belt is properly ttghtened, the buckle lies in the position
as wrong (X ) then try fitbng your Freeway in another seating position
vehicle.
7a. Carefully kneel on our Freeway to
push it into the vehice Y seat. Pull the
seat-belt
here to tighten
the lap
7b. ...and then pull the diagonal
section of the seat-belt tight here...
Skeleton
7~. ...keep ulkng the diagonal section
as you pus I: the red lock in to grip the
seat-belt.
If It is not possible to achieve the correct
another seating position MUST be used.
position
marked
in your
f r/ ) for the buckle
the
”
View
8. Your Freeway should now be secure see “Buckle Position” on the next
To remove your Freeway, sim
the belt and reverse
REMEMBER
Chock that your Freeway IS secure before
9
each journey.
11
Are the shoulder
position?
Stand your Freeway on the floor. Place
your child in the seat and buckle up
the harness.
The shoulder straps MUST be threaded
through the slots in the cover and shell
our child’s
nearest
the top of
shoulders.
If in any dou ITt always use
the slot above the shoulder rather than
straps in the correct
(/-
OK! Then read How To Adjust
The Harness
X-
NO! Read How To Change The
Height of The Shoulder Straps
Thus IS a lap belt.
hght
,/OK
j(
Shoulder
pass the lap-belt
de slots
through
F&ten
bot
NO
Id
I
straps too hrgh.
Shoulder
straps too low
2 Ltft the yoke out from bctvnd the
seat-bolt
guard and unhook
0°C
shoulder ,trap Pull the strap through
to the front of your Freeway Do not
removr the chest clip
REMEMBER
make sure that the lap belt parrcr
10
x
the lap belt
1 Loosen the harness by pushlo
the
adluster
button
I” a> you pul e the
shoulder
straps forward ar much ar
porrrble
4. Before gofog any further
belt guldcs
NO
OK
below
both 18
When usfog the top slots, adLustmrnt
IScas~cr If you rcmovc the head support
flr,t
Britax
Freeway
12
ReclinLng
Child
Safety-Seat
page
3 of 6
3. Rethread
the shoulder
strap back
through your chosen shoulder
slot in
the cover and seat. Make sure it is not
Wasted.
5. Pull the strap forward
to remove
any slack. Make sure the harness is
threaded
through the buckle tongues
Recline Positions
The Freeway has a choice of two reclining positions for your child’s comfort. It
can be used in either awake or sleeping posltion. Both are tested and approved.
wtth the other strap.
back behind
the seat-
Britax recommends
that all child
restraints
be installed
in the rear
seat for vehicles
equipped
with
front passenger
slde air bags.
4 Hook the shoulder
the yoke.
A
Squeeze the reclme bar and release
handle together.
Then slide the base
Into the required
posttion. Let go of
the release handle and make sure that
your Freeway has locked into place.
strap back on to
A
I
lMPORTANT
If the buckle’s tongues of your Freeway
cannot be inserted,
ress the release
button of the buck Pe and re-insert.
IMPORTANT
It is recommended
not to use child restraints older than 6 years or restraints
that have been in a severe crash (i.e.
main vehicle
body structure
distorted). This ensures that no hidden
damage or deterioration
has occured.
IMPORTANT
Each time you adjust your Freeway,
check that it is still secure and that
the seat-belt
is tight. If there is any
slack in the seat-belt then m-tighten
it before starting your journey.
13
15
Your Freeway
is certified
for use on aircraft
(see label on seat). Most
airlines
in the U.S. and Canada
will allow you to use a child seat if it
carried such a label and fits properly
on the plane. Contact
your airline
about their policy.
Use your
next
Freeway
to a window
only
on forward
will avoid
facing
blocking
aircraft
seats.
Install your Freeway in an aircraft according
to section
Freeway
Using a Lap Belt”. (See pages 10 and 1 I)
our child and fasten
the buckle
(bl
If the aircraft
extender.”
lap
belt
is too
short,
ask the flight
“How
attendant
Adjust the Freeway according
to sections
“How to Adjust
and “Reclining
Your Freeway”.
(see pages 14 and 15)
Fmally,
fdslrn
the
chest
chp
14
Bntax
Freeway
Reclining
Child
Freeway
to Fit Your
for a “belt
the Harness”
4 Pull the ad uster strap forward
maklng
sure t b at the harness 15 1
comfortable
but FIRM fit around
WI
r II
child. Note, make sure the chest clp
open before adjusting the straps tlghl
3. Pull the harness up to tlghten the
lao sections which are desIgned to fit
I&
down
on “our
child’s
hod! f.
5
The
the aisle.
Safety
Open the chest ckp by rqucer~ng the
middle tabs rhe correct height forthe
cl,p ,s the m,ddle of the chrst. at the
level of the armplt Always make WC
that the harness IS tight at each useor
after any adjustments
Seat
page
4 Of 6
lllustratlon
shows
Freeway
correctly
lnrtalled
16
I” wIndow
seat of an alrcraft
1. Your Freeway has an easy to clean
cover and buckle. To rem0ve the c0ver
unfasten
the clasps on the head
support straps and pull them through
the top slots in the seat and cover.
2. Pull the yoke out from behind the
seat-belt guard. Unhook the shoulder
from the yoke. Pull them throu
to
““R t e front of the seat and out oft Re
chest clip
possible.
To remove the belly pad, you must
remove the buckle. Fully recline the
seat. Grasp the metal plate under seat,
by which the crotch strap is secured
to the seat shell, push it upwards, on
its side, throu h the slot in the shell.
Gently push tt e metal plate through
the belly pad slot.
3. So as not to damage the energy
absorbing foam, gent1 pull the cover
off from the top of t I e seat, easing
The cover of your
Britax Freeway
has
been carefully desi ned. manufactured
and tested to hig 6 safety standards.
the buckle. chest clip and harness straps
Replacement
covers are available
your Britax dealer.
through their slots.
from
To refit the cover sim ly reverse
the
Ma I: e sure that the
above instructions.
shoulder straps are threaded through
the chest clips and that there are no
twists in the harness.
DO - Follow
these
fitting
instructions
in the order shown
and get to know your Freeway
before installing
it in your vehicle.
DO - Keep them safe for future
reference.
DO - Secure the Freeway
in your
vehicle
even
when
it is not
occupied.
In a crash an unsecured
child restraint
may injure
other
occupants.
DO -Make sure that the Freeway
does not become
trapped
by a
folding vehicle seat or in the door
of your vehicle.
DO - Make sure that you adjust
the harness to fit the clothes your
child is wearing
- a fitting
for
winter clothes will be too slack for
a child wearing
summer clothes.
DO - Cover your Freeway if your
vehicle is left standing
in direct
sunshine. Metal fittings can become
hot to the touch in sunny weather.
DO - Put the lightest
passenger
in the seat behind
your Freeway
if seat-belts
are not available
on
the back seats. In an accident
a
heavy passenger
could
cause
more injuries to your child than a
light one.
DO - Store your Freeway in a safe
place when it is not being used.
Avoid placing
heavy objects
on
top of it.
17
CLEANING
HARNESS
19
To clean the buckle.
THE
AND SEAT
CLEANING
THE
The Freeway
washable.
cover
2
soap and
COVER
Temp
Temp
(lOO”F/4O”C)
Drymg
dry.
Line Dry
CLEANING
Cleaning
the
buckle
unit
Soak the buckle in warm water (11
necessary. with dish washing liquid)
for about an hour. Rinse and dry
thoroughly.
the
crotch
strap
3 Refittong
Hold the metal plate on the crotch
strap sideways and push it with the
narrow
side faclna
upwards.
through the slot m the fabric cover
and mto the plastic shell The metal
plate must be Inserted through the
slot m the plastic shell and not
merely through
the fabric cover
Please check this by pulling up on
the crotch strap several times If the
fdbrlc cover sigmflcantly
hfts off the
seat shell, the metal plate IS not
fltted correctly.
is machme-
DO NOT use chlorine
bleach.
Machine
Wash
- Warm
(lOO”F/4O”C).
Medium
Wash
Hand
Wash
Warm
these steps:
and push it upwards, on its side,
through the slot in the shell.
detergents
or cleaning fluid as these may weaken
the harness and the seat.
DO _ Only use bathroom
warm water.
follow
the
crotch
strap.
1. Remove
Fullv recline the seat. Pull the fabric
co&t off of the seat to expose the
crotch strap. You can now grasp the
metal plate under the seat, by which
the strap is secured to the seat shell,
DO NOT _ Take apart or attempt to
take apart any of the harness when
cleaning
the harness and seat. It is
unnecessary
and dangerous to do SO.
DO NOT - Use solvents,
DO NOT - Use your Freeway
in
the
home.
It has not
been
designed
for home use and should
only be used in your vehicle.
DO NOT - Use anything,
i.e. a
cushion
or coat, to raise your
Freeway off the vehicle seat. In an
accident
your
Freeway
and
vehicle
seat-belts
would
not be
able to protect
your child as well
as they should.
DO NOT-Attempt
to disassemble
any part of your Freeway or change
the way its harness or your vehicle
seat-belts
are made or used.
DO NOT - Leave loose objects,
i.e. books, bags, etc., in the back
of your vehicle.
If you have to
stop your vehicle suddenly
loose
objects
will keep moving.
They
can then cause serious
injuries.
Large and heavy loose objects are
a particular
risk.
DO NOT - Leave folding
vehicle
seats unlatched.
If you have to
stop your vehicle suddenly
a loose
seat back could
prevent
your
Freeway
from protecting
your
child as well as it should.
DO NOT - Leave children
alone in
your vehicle, even for a short time.
DO NOT - Allow children
to play
with the Freeway.
DO NOT machme
THE BUCKLE
Most problems relatmg to your child’s
seat
buckle
are
caused
by
accumulations
of dust and dirt. These
are easily washed out
IMPORTANT:
. Make sure the straps are not twlsted
l
The buckle or othrr metal or plartlr
parts must be positioned
outslde the
ride slots
. Check your ent,re Freeway harneii
to lemO”e a twist
. Make sure the straps are clear of food
partlclcr
w,pe clean w!th a damp
cloth any food parbcles dropped 00
the straps
These problems
mclude
m The tongues fall to lock home with
an audible
click.
. The tongues are only slowly ejected
after the release button
has been
pressed
. The tongues
are dlfflcult
to Insert
(you feel resistance).
l The tongues
~111 no longer lock home
(are el’cted
agaIn)
Britax Child Safety, Inc. (“Britax”)
retail purchaser
as follows:
warrants
this product
to the original
LIMITED ONE YEAR WARRANTY.
When purchased
from an authorized
Britax dealer, this product
is warranted
against
defective
materials
or
workmanship
for one year from the date of original
purchase.
Pyoof of
purchase
is required.
Your exclusive
remedy
for this Warranty
IS that
Bntax will, at its option,
provide
replacement
parts, repair or replace
thts product
or refund the original
purchase
price of the product.
Britax
reserves the ri ht to discontinue
or change parts, models or products,
or to make substitutions.
To make a claim under this Warranty,
you must contact the authorized
dealer from whom the product
was purchased
or, if you cannot locate
the authorized
dealer, contact
Britax, Customer
Service Department
at 1 (888) 427-4829.
or write to 460-R Creenway
Industrial
Drive, Fort
Mill SC 29715.
Proof of purchase
is required
PLEASE COMPLETE
REGISTRATION
CARD
EXPEDITE WARRANTY
AND MAIL
THE PRE-ADDRESSED
OWNER
WITHIN THIRTY (30) DAYS OF PURCHASE
TO
CLAIMS.
WARRANTY
LIMITATIONS.
This Warranty
does not include damages
which arise from negligence,
misuse or use not in accordance
with the
product
Instruction
guide
This Warranty
is not transferable
and
therefore
does not apply to secondhand
products.
LIMITATION
OF DAMAGES.
The Warranty
and remedies
set forth
above are exclusive
and in lieu of all others,
oral or wntten,
express or
ImplIed.
In no event will Bntax be liable to you for any damages,
including
Incidental
or consequential
damages,
ansing out of the use
or mablhty to use thts product.
LIMITATION
OF WARRANTIES
AND OTHER WARRANTY
TERMS AND
STATE LAW RIGHTS.
Any Implied
Warranties,
lncludlng
implied
Warranties
of merchantabIlIty
and fitness for a particular
purpose,
shall
be lImIted to the duration
and terms of the express wrltten
Warranty.
Some states do not allow llmltatlons
on how long an @led
Warranty
lasts or the exclusion
or llmttatlon
of IncIdental
or consequential
damages, so the above llmltatlons
may not apply to you This Warranty
PIVCS you
speclflc
legal
rights,
and you
may
have
other
rights
which
vary
f&n state to state. Eritax does not authorize
any person to create for It
any other warranty,
obligation.
or liability m connection
with this product.
23
18
&tax
Freeway
Reclining
Child
Safety
Seat
page
5 of 6
Child restraints could be recalled for safety reasons. You must
re ister this restraint to be reached in a recall. Send your name,
a cf:dress, and the restraint’s model number and manufacturing
date to:
Britax Child Safety, Inc.
460-R Greenway
Industrial
Fort Mill, SC 29715
Drive
or call
(888)
4 BRITAX
For recall information,
call the U.S. Government’s
at I-800-424-9393.
In the DC area call l(202)
Fill out the registration
it in today!
Britax
Entax
Freeway
Auto
Safety
Hotline
366-0123
card attached
to your
BRITAX Child Safety, Inc.,
460 R Greenway lndustnal
Reclining
Child
Safety
Seat page
Freeway
Drive
6 of 6
and mail
Britax
This product
fulfills the requirements
of the Federal Motor
Vehicle
Safety Standards
and is certified
for use in motor vehicles.
This
for use
restraint
is not certified
for aircraft
use. It is onl intended
IY
as a forward
facin
child seat for children
weig mg between
3060 Ibs., and is not f o be used in the home, in boats, or other noncertified
applications.
CRUISER
Booster Seat for Lap/Shoulder
For children
between
Belts
30 - 60 Ibs
SECURE THE CHILD
THIS INSTRUCTION
SEAT WITH
BOOKLET.
A VEHICLE
BELT AS SPECIFIED
IN
USE ONLY THE VEHICLE’S
LAP AND SHOULDER
BELT SYSTEM
WHEN RESTRAINING
THE CHILD IN THIS BOOSTER SEAT. Under
no circumstances
should
ou use the Cruiser with two
olnt seat
belt only).
Your chi Pd will be
belts (lap belt only or s K oulder
seriously
injured
in the event of a crash1
The National
Highway
TrafficSafety
Administration
according
to accident
statistics,
that parents
select
as the safest location
for a child car seat. However,
dimensions
of the seat and the details
of the seat
attach the child seat differ from vehicle
to vehicle.
the section
on Compatible
Seat Belts. If in doubt,
motor vehicle
handbook
and your Britax dealer.
recommends,
the rear seat
the actual
belts used to
Please study
consult
your
The primary
protection
for occupants
of a motor
collision
is the structure
of the vehicle
itself, and
will not protect
a child when the vehicle
sustains
damage.
However,
a child in a child seat correctly
substantial1
improve
the chances
for survival
in
Make sure tK at you understand
the correct way to
seat in your vehicle.
vehicle
in a
a child seat
very serious
Installed
will
all accidents.
use this child
4
Introduction
Get to Know
How
your
to Fit your
Incompatible
Cruiser
Cruiser
Seating
Using
a Lap & Shoulder
Seat Belt
This page will help
5
Warning!
DO NOT place any child seat on front seat with air bag unless air bag
is turned off - DEATH or SERIOUS
INJURY can occur. The back seat is
the safest place for children
12 and under.
6
Positions
a
Cruiser
9
How to Care for your
Important
Notes
12
Warranty
Recall
4
13
Information
16
you to recognize
USE ONLY THE VEHICLE’S
RESTRAINING
THE CHILD
Secure this child restraint
unsecured
child restraint
Sliding
the different
parts
of your
Cruiser.
LAP AND SHOULDER
BELT SYSTEM WHEN
IN THIS BOOSTER SEAT.
even when it is not occupied.
may injure other occupants.
In a crash
an
Head Support
Seat belt Guide
Never
unless
use this Cruiser
in a vehicle
the airbag
is off1
l
Never
use this
Cruiser
with
a lap belt
l
Never
use this
Cruiser
with
a shoulder
l
Use only
l
with
a lap/shoulder
front
seat with
an airbag
only!
belt
only!
belt!
The Cruiser
has been
Replacement
Crurser
carefully
covers
desrgned,
are avadable
manufactured,
from your
and
Britax
tested
dealer.
5
Britax
Cruiser
Booster
Seat
for Lap/Shoulder-Belts
page
1 of 4
To protect your child in a crash. you must use the Cruiser together wth seat belts
that are compatible.
Different vehicles have ddferent types of seat belts. The Cruiser
must be uxd only with a lap 6 shoulder seat belt. Under no circumstances should
you ilse the Crwser wth two pomt seat belts (lap belt only or shoulder belt onl )
your child wall be seriously injured in the event of a crash1 There are lap & shoul d er
seat belts that will not work with the Cruiser. If your car has seat belts which are
attached to the door at the top or at the bottom, such belts will not work with !he
Cruiser. Cruiser is onl intended for UK in vehicle seats that are forward facing. This
restraint is not inten cl ed for use in seats that are rearward facing or side facing. Do
not use it in such seats.
This restraint is not certified for aircraft use. Aircraft seats have only lap belts.
If ou have any questions
ve K,~cle’s lnstructlon
about what
WARNING!
Use the Cruiser in vehicle
which are forward
facing
Do not use on rearward-facing
or side facing vehicle
seats.
You must use forward-facing
vehicle seats with this restraint.
Side-facing
or
rear-facing
vehicle
seats in vans, station
wagons
or trucks CANNOT
be
used with this restraint.
kind of belts you have, please refer to you
ou purchased the Cruiser.
if the be Ytr are compatible wth the
book or return to the store where
The store will be happy
use of the Cruiser.
to help you determine
This is a lap & shoulder
A. Shoulder iedion.
B. lap section.
seats
only!
1, Place the Cruiser in our car, making
sure It is pushed firm ry back into the
passenger
seat. Sit your child on the
truiser.-
seat belt.
I
3. Fasten the lap L shoulder belt across
the Cruiser. The lap section of the belt
should sit as far forward as possible over
the hips. Make sure the belt is not twisted.
2. Move the head support up or down
so that the slot m the seat belt guide is
level
with your
child’s
shoulder.
8
6
The cover of the Cruiser IS held in place by a apper
panel with velcro behind the child. Open the ripper
carefully
remove the cover.
CLEANING THE COVER
Read the label on the cover for washing
washable.
DO NOT machine
dry the cover
instructions.
on the back side and a
and the panel and
The cover
is machme
- drip dry only
CLEANING THE HARNESS AND SEAT
only use hand soap and warm water.
4 Thread the shoulder secbon of the belt
through the belt guide as shown.
DO NOT take the head support apart when removmg the covet or cleanmg
the Cwser
It IS unnecessary
and WIII damage the Cruiser
5. Pull the shoulder belt here to tighten
the lap Sect,o”. NOTE Children
will
rometlmes try to put the shoulder belt
under thetr arm. Correct thus immediately
an mcorrectly
worn belt V/III cause
DO NOT use solvents.
belts or seat structure.
detergents
or cleaning
I
6. With our other hand pull the shoulder
belt tlg 6 t through the seat-belt guide
Again, make sure the seat-belt is not
twlrted
Do not leave your Crwrer loose
not being used by your child
REMEMBER
- NO
In the event of an
for quick release
After an accldelt,
look undamaged.
Britax
Cruiser
I
SEAT
now be
IS ESCAPE
PROOF!
rest b~ltr are dwgned to meet the rxojin,red
standard
emergent
Children I K ould be educated to not play with the seat belt buckle
the Cxlie:
and seat belts should be replaced Although they may
there can be hldden damage or weakness
Booster
Seat
for Lap/Shoulder
the
I
I
I
7. Your child and Cruiser should
secure
Releasing Your Child
To release your child from the Cru~scr
rlmolv unbuckle the belt
Always fasten the belt across the Cru~rer when tt 15
CHILD
I
fluad as these may weaken
Belts
page
2 of 4
Taking Off The Cover - Step 1
Lay the Cruiser on a clean, flat surface and undo the hook and eye
found underneath
the head support
LOVCl
Taking Off The Cover - Step 2
Unhook
the elastic loops from the
seat belt guides and gently pull off
the head support cover
..
* .
.
DO NOT - Use the Cruiser in
a residence.
It has not been
designed
for home use and
DO - Follow these instructiorls
in the order shown
before
installing
the Cruiser in your
vehicle.
DO - Keep the instructions
for future reference.
Taking
Gently
Taking
Off The Cover - Step 3
lift up the cover flap and pull
it out from behind
Sit
the
the
the
the head support.
Off
The Cover
- Step
4
the Cruiser up. Unzip the cover at
top and pull it down unbl you see
two elastic ties near the bottom of
head support gudes.
should
safe
DO - Cover the Cruiser if it is
exposed
to direct sunshine.
Metal fittings can become hot
to touch in sunny weather and
the cover
fabric
may also
become faded.
in your
DO NOT - Leave loose objects,
such as books or lug age, in the
back of your vehlc 9 e. Always
keep them secure. If you stop
suddenly loose objects will keep
moving. They can then cause
DO - Store Cruiser in a safe
place when it is not being
used. Avoid
placing
heavy
objects on it.
Taking Off The Cover - Step 6
The Cruiser should now look like this.
be used
DO
NOT
- Attempt
to
disassemble or modify any part
of the Cruiser or your vehicle
seat belts.
if seat-belts are not available on
the back seats. In an accident
a heavy passenger could cause
more injuries to your child than
a light one.
Taking Off The Cover - Step 5
Turn the Cruiser onto its front and undo
both elastic ties. Pull the ties through to
the front and slip the cover off.
only
vehicle.
DO NOT - Use anything,
such
as a cushion
or coat to raise the
Cruiser off the assenger seat.
ln an accident Phe Cruiser and
vehicle seat belts would not be
able to protect your child as well
as they should.
serious
injuries.
DO NOT - Leave foldable
passenger
seats unlatched.
If
ou stop suddenly a loose seat
Ii ack could prevent the Cruiser
from Protecting
Your child.
DO NOT - Leave children
alone in your vehicle, even for
a short time.
DO - Secure this child restraint
even when it is not occupied.
In a crash an unsecured
child
restraint
may
injure
other
occupants.
12
10
Britax Child Safety, Inc. (“Britax”)
retail purchaser
as follows:
warrants
this product
to the original
LIMITED ONE YEAR WARRANTY.
When purchased
from an authorized
Britax dealer, this product
is warranted
against defective
materials
or
workmanship
for one year from the date of original
purchase.
Proof of
purchase is required.
Your exclusive
remedy for this Warranty
is that Britax
will, at its option, provide replacement
parts, repair or replace this product
or refund tne original
purchase
rice of the product.
Britax reserves the
right to discontinue
or change
abncs, parts, models or products,
or to
make substitutions.
F
Putting
On The Cover
- Ste
1
Pull the cover over the bottom o P the
Crumr.
Stop before
you cover the
small holes
for the elastic
tries.
Putting
On The Cover _ Step 2
Take hook end of one of the elartlc
ties attached to the inside of the cover
and ush tt through the hole. You ma
nee 8 to use d straw or pencil
it through.
to pus i
To make a claim under this Warranty,
you must contact
the authorized
dealer from whom the product
was purchased
or, if you cannot locate
the authorized
dealer, contact Britax, Customer
Service Department,
460R Greenway
Industrial
Drive, Fort Mill SC 29715, or call l-888-4
8RlTAX
(l-888-427-4829).
Proof of purchase
is required
PLEASE COMPLETE
REGISTRATION
CARD
EXPEDITE WARRANTY
AND
MAIL
THE PRE-ADDRESSED
OWNER
WITHIN
THIRTY (30) DAYS OF PURCHASE
TO
CLAIMS.
WARRANTY
LIMITATIONS.
This Warranty
does not include
damages
which arise from consumer
negli ence, misuse, normal sun fading or use
not I” accordance
with the pro f uct Instruction
guide. This Warranty
is
not transferable
and therefore
does not apply to secondhand
products.
Putting
On The Cover - Step 3
Feed the other part of the tie throu h
the bottom of the head support gut if!e.
Attach it to the hook end of the tie.
Repeat steps 2 & 3 for the other side.
Putting
On The Cover - Step 4
Pull the cover over the Cruiser. Push
the cover flap back behind the head
support and fasten it to the Velcro@
straps. Fasten the ZIP at the top of the
Putting
On The Cover - step 5
Put the head support cover back onto
the head su port, fastening the elastic
loops overt I: e seat belt gudes. Finally.
pass the elarttc hook and be through
the holes I” the head support
and
fasten them together.
LIMITATION
OF DAMAGES.
The Warranty
and remedies set forth above
are exclusive and in lieu of all others, oral or written, ex ress or im lied. In
no event will Bntax be liable to you for any damages, inc P.udlng 1nc1
-8 ental or
consequential
damages, arising out of the use or inability to use this product.
LIMITATION
OF WARRANTIES
AND OTHER WARRANTY
TERMS AND
STATE LAW RIGHTS.
Any Implied
Warranties,
includlna
Implied
Warranties
of merchantabllity
and fitness for a particular
purpose,‘shall
be limited
to the duration
and terms of the exoress wrltten
Warrantv
Some states do not allow llmltatlons
on how lo&an
implied
Warranty
lasts or the exclusion
or IimitatIon
of Incidental
or consequentIal
damages,
so the above IimitatIons
may not apply to you. This Warranty
gives you
speclflc legal rights. and you may have other rights which vary from state
to state. Bntax does not authorize
any oerson to create for It any other
warranty,
obligation,
or liability
in connection
with this product.
13
Britax
Cruiser
Booster
Seat
for Lap/Shoulder
Belts
page
3 of 4
Child restraints could be recalled for safety reasons. You must
register this restraint to be reached in a recall. Return the attached
registration
card or send your name, address, and the restraint’s
model number and manufacturing
date to:
Britax Child Safety, Inc.
460-R Greenway
Industrial
Fort Mill, SC 29715
Drive
or call
(888)
4BRITAX
For recall information,
call
the U.S. Government’s
Auto Safety Hotline
at 1 (800) 424-9393
In the DC area call 1 (202) 366-0123
Fill out the registration
in today!
Britax
card attached
BRITAX Child Safety,
to your
Drive
Tel: (888’) 48RlTAX
ISSUE
Britax
and mail it
Inc.
460 R Creenway
Industrial
Fort Mill SC 29715
m
Cruiser
Cruiser
3
5198
Booster
Seat for Lap/Shoulder
Belts
page
4 of 4
STARRISER
COMFY
Backrest
Booster Seat
For children
between
4
Introduction
Compatible
Seat Belts
incompatible
Seat Belts
Adjusting
& Installing Your Starriser
Using The Comfy Backrest
Important
Notes
Care and Maintenance
Warranty
Recall Information
30 - 80 Ibs (13.6
5
6
7
10
12
13
14
16
- 36 kg)
l
Never use the Starriser/Comfy
with
an airbag
unless
in a vehicle
is off!
the airbag
front
l
Never
use the Starriser/Comfy
with
a lap
l
Never
use the Starriser/Comfy
with
a shoulder
l
Use
only
with
a lap/shoulder
belt
seat
only!
belt
only!
belt!
3
This product fulfills
the requirements
of the Federal Motor Vehicle
Safety Standards
and Is certified
for use in motor vehicles.
it Is
only intended
for use as a forward
facing
car seat for children
weighing
between
30-80 Ibs.. (13.6-36
Kg) and is not to be used
in the home,
in an aircraft.
in boats,
or other
non-certified
Thank you for purchasing the Britax Starriser booster seat/Corn
backrest. With
roper use and care the Starriser and Comfy WI!yI
make your chll4 s travelling experiences
more enjoyable for years
to come.
applications.
WARNING!
Make sure your read and understand
this information
booklet
before using your Starriser or Comfy. Please store the booklet in
the Starriser’s side pocket for future use.
FAILURE
TO FOLLOW
EACH
OF THE
FOLLOWING
INSTRUCTIONS
CAN RESULT IN YOUR CHILD
STRIKING
THE
VEHICLE’S
INTERIOR
DURING
A SUDDEN
STOP OR CRASH.
Starriser is a belt-positioning
booster
point seat-belts
and children who
pounds (13.6-36
Kg).
SECURE
THE CHILD
RESTRAINT
SPECIFIED
IN THIS INSTRUCTION
The Comfy
Starriser.
WITH A VEHICLE
BOOKLET.
BELT AS
WARNING!
USE ONLY THE VEHICLE’S
LAP AND SHOULDER
BELT SYSTEM WHEN RESTRAINING
THE CHILD IN THIS BOOSTER
SEAT. Under no circumstances
should you use the Starriser/Comfy
with two point seat belts (lap belt only or shoulder
belt only).
Your child will be seriously
injured
in the event of a crash!
can only
be used when
Use onl the vehicle’s lap and shoulder
the chi Yd in this booster seat.
seat, for use only with threeweigh between
30 and 80
correctly
attached
to the
belt system when restraining
Secure this child restraint even when it is not occupied.
an unsecured
restraint may injure other occupants.
In a crash,
The National
Highway
Traffic Safety Administration
recommends,
according
to accident
statistics,
that parents
select the rear seat
as the safest location
for a child car seat. However,
the actual
dimensions
of the seat and the details
of the safety belts used
to anchor the child seat differ from vehicle to vehicle.
Please study
the section
on Compatible
Seat Belts. if in doubt.
consult
your
motor vehicle
handbook
and your Britax dealer.
The primary
protection for occupants of a motor vehicle in a
collision
is the body of the vehicle
itself,
and a child restraint
will not protect a child when the vehicle body sustains
very serious
damage.
However,
correctly
installed
restraints
will substantially
improve
the chances for survival
in all accidents.
Make sure that
you understand
the correct way to use this restraint
in your vehicle.
4
Britax
Starriser
Booster
Seat Comfy
Backrest
page
1 of 4
To rotect your child in a crash, you must use the Starriser to ether
wtt4 seat belts that are compatible. Different vehicles have dr4 erent
es of seat belts. The Starriser can only be used with three point
#oulder
& lap) safety belts.
The
the
the
use
pur ose of the Starriser belt-adjustin
booster seat is to adapt
adu Pt webbing of the vehicle’s seat fYelts to the body size of
child, so it is important
to adjust the width correctly and to
the height adjuster.
There are three point belts that will not work with the Starriser.
You cannot use the kind of seat belts where one or both of the
attachment
points are motorized
or installed in the vehicle door.
Use another seating position. As a rule, the rear seat is the preferred
seating position.
Make sure ou check the vehicle
the seat bets.
Y
handbook
for information
on
WARNING!
Never use the StarriserKomfy
with two point belts (lap belt or
shoulder belt onl ) of any kind! The child could be seriously injured
in case of a eras i This Restraint is not Certified for Aircraft use.
Aircraft seats have only two point seat belts.
Do Not place any child seat on front seat with airbag unless airba
is turned off-DEATH
or SERIOUS INJURY can occur. The bat &
seat is the safest place for children.
Adjusting
Starriser.
See illustration
1. The two armrests of the Starriser are
to be snug against the hips of the child,
so as to bring the lap belt close to the
body.
Illustration
If you have any questions about what kind of belts you have in
your car, please return to the store where you purchased
the
StarriserKomfy,
and the store will be happy to hel you determine
if the belts are compatible
with the use of the Ptarnser.
To adjust the width
of the
Starriser, see illustration 2. Loosen
the knob and pull the sides of the
booster apart. Make sure that the
cover holders are adjusted to the
new position.
StarriserKomfy
is only intended for use in vehicle seats that are
forward facin
This restraint is not intended for use in seats that
are rearward
f acrng or side facing. Do not use it in such seats.
As your child grows, you will have
to re-adjust
the width of the
Starriser.
Illustration
5
WARNING!
Use the Starriser/Comfy
in
vehicle seats which are forward
facing only!
Do not use on rearward-facing
or side facing vehicle seats.
You must use forward-facing
vehicle seats with this restraint.
Side-facing
or rear-facing
vehicle seats in vans, station
wagons or trucks CANNOT
be
used with this restraint.
Place the Starriser in the vehicle,
in a seating position with one
of the allowed
three-point
safety belts. See illustration
3.
Make sure the shoulder
belt
runs under the armrest nearest
the buckle and that the lap belt
runs under both armrests.
Find the shoulder belt adjuster
strap and attach it to the adult
shoulder belt. Simply thread the
adult webbing
into the belt
guide clip. See illustration
4.
If the belt adjuster strap is too
long or too short, adjust the
length so that it fits snu ly
against the shoulder
of t% e
chrld.
Britax
Starriser
Booster
Seat Comfy
Backrest
page 2 of 4
1
2
If ou move
the Starriser
to another
a cljust the belt adjuster
strap.
vehicle,
you
may
have
to
WARNING!
Children
sometimes
put the shoulder
belt under their arm. Please
correct
this immediately,
and explain
to the child that the belt
might cause internal
injuries
in a crash.
When
not in use keep
to keep it from striking
your Starriser
passengers
attached
in a crash.
to the
seat-belts
While
pushing
down
on
the Comfy
insert
the
wedges
into
the slots
behind
the connectors.
Push
down
until
the
wed es lock into place.
Re-c R eck your Comf
to
ensure that it is insta Yled
correctly
as shown.
Wedge
@
WARNING!
Leave
the
wedges
attached
to the
Comfy.
If not attached,
the wedges
could
be lost or pose
Wedge
Inserted
Position
f2ib
a choking
hazard
In
for children.
The belt guide
clip attached
to
the strap of the booster
stows
on the retaining
form (3) of the
backrest.
Bring
the
backrest
forward
and clip on the guide.
Adjusting
the height
of the
Comfy Unzip the back cover of
the backrest.
Push the “Press”
button
(4) and
ull the Comfy
upwards,
out o P the slots. Refit
to the desired
height
(so that the
shoulder
belt guides
are just
slight1
above
the
child’s
shoul dyer). Slide down
until the “Press”
button
clicks into place.
Close the zipper.
Adjust
the backrest
to fit the vehicle
seat by
plvoting
the Comfy
so that it rests flat against
the seat back of
the vehicle.
If necessary,
adjust
the vehicle’s
headrest
to allow
the Comfy
to lie flat.
9
11
Please make sure you understand
how to use the Starriser.
The
Comfy
can only be used when correct1
installed
on the Starriser.
K
The same rules apply
for the use of t e StarriserKomfy
as for
the Starriser.
DO
- Set a good
example
by always
wearing
your seat belt,
Make sure it is a firm rule that the car doesn’t
move until
everyone
is buckled
up. Make
no exceptions
for adults
or children.
Attaching
DO
- Always
check the Starriser/Comfy
a child into the seat. Plastic parts
in sunny
weather.
DO
- Put the lightest
passenger
on the seat behind
the Starriseri
Comfy.
In an accident,
a heavy
passenger
could
cause
more injuries
to your child than a light one.
DO
- Secure
this child
restraint
In a crash,
an unsecured
occupants.
DO
- Make
sure that the Starriser/Comfy
does
not become
trapped
by a folding
car seat or in the door or trunk
lid of
your car.
DO
- Replace
any worn
seat belts
Starriser/Comfy
and
Inspect
periodically
for signs of wear,
the Comfy
Carefully
open
at the rear end
the slot covers
of the Starriser.
Insert
the connectors
(I) into
the recesses
(2) and lock. The
connectors
will snap into place.
Always
make
sure that
the
connectors
are fully engaged
in
the recesses
and not just fed
through
the slots in the fabric
cover.
NOTE: If you have trouble
attaching
your Comfy,
adjust the width
of the Starriser
until you see the slots to locate
the Comfy.
There
IS a red gurde
block located
(2) inside
the slots inside
the shell.
This block
can be moved
from side to side using a screwdnver
Slide the
ulde block
Into
osition
until the slots line up. Attach
the Corn By by pushing
it 8 own until it snaps into place.
DO
NOT
DO
NOT
DO
NOT
- Leave
time.
children
for heat before
placin
can become
hot to tout f
even when
child restraint
alone
immediately.
Remove
the
vehicle
seat
fraying
or damage.
in your
-Attempt
to disassemble
Starriser/Comfy
or your
it is not occupied
may injure
other
car, even
or modify
vehicle’s
for
the
belt
a short
any part
seat belts.
of the
- Use anything,
such as a cushion
or coat to raise the
Starriser/Comfy
off the passenger
seat.
In an
accident
the Starriser/Comfy
and vehicle’s
seat belts
would
not be able to protect
your child as well ar
they should.
10
12
Britax
Starriser
Booster
Seat
Comfy
Backrest
page
3 of 4
The cover of the Starriser is held in place by buttons visible when
you turn the product upside down. Be very careful when removing
the cover to avoid tearing. Unbutton
the cover and follow the
care instructions
below.
To remove the cover from the Comfy for cleaning, unzi the back
of the cover and slide it free of the Comfy’s main she1 P and over
the headrest.
Cleaning
the Cover
The StarriserKomfy
cover
is machine
washable.
Do Not use chlorine bleach.
Machine Wash-Warm
Temp
(1OO”F/4O”C),
Medium
Wash
Hand Wash-Warm
Temp (1OO”F/4O”C)
Drying-Line
Dry-Do
Not machine dry.
LIMITATION
OR WARRANTIED
AND OTHER WARRANTY
TFRMS AND STATE LAW RIGHTS. ANY IMPLIED WARRANTIES.
INCLUDING
IMPLIED
WARRANTIES
OF MERCHANTABILIT?
AND FITNESS FOR A PARTICULAR
PURPOSE,
SHALL BE
LIMITED TO THE DURATION
AND TERMS OF THE EXPRESS
WRITTEN
WARRANTY.
SOME
STATES DO NOT ALLOW
LIMITATIONS
ON HOW
LONG AN IMPLIED
WARRANTY
LASTS OR THE EXCLUSION
OR LIMITATION
OF INCIDENTIAL
OR
CONSEQUENTIAL
DAMAGES,
SO
THE
ABOVE
LIMITATIONS
MAY NOT APPLY TO YOU. THIS WARRANTY
GIVES YOU SPECIFIC LEGAL RIGHTS, AND YOU MAY HAVE
OTHER RIGHTS WHICH VARY FROM STATE TO STATE. Neither
Britax nor the dealer selling this product authorizes
any person
to create for it any other warranty,
obligation,
or liability in
connection
with this product.
If the main shell becomes dirty, it can be washed off with water.
Do not wash with household
detergents
or with solvents - these
can weaken the seat shell.
If Starriser or Starriser + Comfy is used in a vehicle that incurs
serious body damage in a collision, the product must be replaced.
Most vehicle liability insurance policies will cover the replacement
of child restraints.
It is not possible to ade uately inspect the
Starriser to determine
if it has been damage 3. , simply return the
product to the place of purchase for disposal.
It is recommended
not to use child restraints older than 6 years
or restraints that have been in a severe crash (i.e. main vehicle
body structure distorted).
This ensures that no hidden damage
or deterioration
has occurred.
13
15
The Starriser booster seat and Corn
backrest was manufactured
by Britax Child Safety, Inc. Fort MI ‘y I, SC. (Britax Model 171).
Britax Child Safety, Inc. (“Britax”)
warrants
original retail purchaser as follows:
this product
to the
LIMITED
ONE YEAR WARRANTY.
When purchased
from an
authorized
Britax dealer, this product is warranted
a ainst defective
materials or workmanship
for one year from the 8 ate of original
purchase. Proof of purchase is required. Your exclusive remedy
for this Warranty
is that Britax will, at its option,
provide
replacement
parts, repair or replace this product or refund the
original purchase price of the product.
Britax reserves the right
to discontinue
or change fabrics, parts, models or products, or
to make substitutions.
To make a claim under this Warranty,
you must contact the
authorized
dealer from whom the product was purchased or, if
you cannot locate the authorized
dealer, contact Britax, Customer
Service Department
at (888) 427-4829
or write to 460-R
Creenway
Industrial Drive, Fort Mill, SC 29715. Proof of purchase
required.
Child restraints could be recalled for safety reasons. You must
re ister this restraint to be reached in a rechll. Send your name,
aif dress, and the restraint’s model number and manufacturing
date to:
Britax Child Safety, Inc.
460-R Creenway
Industrial
Fort Mill, SC 29715
Drive
or call
(888)
4BRITAX
For recall information,
call
the U.S. Government’s
Auto Safety Hotline
at 1 (800) 424-9393
In the DC area call 1 (202) 366-0123
Fill out the registration
and mail it in today!
card attached
to your
StarriserKomfy
PLEASE COMPLETE
AND MAIL THE PRE-ADDRESSED
OWNER
REGISTRATION
CARD
WITHIN
THIRTY
(30) DAYS OF
PURCHASE TO EXPEDITE WARRANTY
CLAIMS.
WARRANTY
LIMITATIONS.
This Warranty
(does not) include
defects
which arise from negligence,
misuse or use not in
accordance
with the product instruction
guide. This warranty
IS
not transferable
and therefore
does not apply to second hand
products.
LIMITATION
OF DAMAGES.
The Warranty
and remedies as set
forth are exclusive and in lieu of all others, oral or written, express
or implied. In no event will Britax or the dealer selling this product
be liable to ou for any damages,
including
mcldental
or
consequentia
Ydamages, arising out of the use or inability to use
this product.
14
Britax
Starnser
Booster
Seat Comfy
Britax
ISSUE 4
Backrest
page 4 of 4
BRITAX Child Safety, Inc.
460-R
Greenway
Industrial
Fort Mill, SC 29715
Tel: (888) 4 ERITAX
Drive
Mercedes-Benz
Child Booster
with Backrest
For Children
Britax
Model
from 40-100
This product fulfills
Safety
Standard
the requirements
of the U.S. Federal Motor Vehicle
213 and is certified
for use in motor
vehicles.
This Booster
Seat is a belt-positioning
booster
seat, for use ONLY
WITH THREE
POINT
(LAP-SHOULDER)
SEAT BELTS and only
intended
for children
weighing
from 40 to 100 Ibs. This Booster
Seat
MUST NOT be used with a lap belt only. FAILURE
TO USE A LAPSHOULDER
SEAT BELT CAN RESULT
IN SEVERE
TO FATAL
INJURIES
TO YOUR CHILD. WARNING!
THIS BOOSTER SEAT MUST
ONLY BE USED WITH VEHICLE’S
SEAT IN THE REARWARD
MOST
POSITION.
FAILURETO
DO SO COULD
RESULT IN AN INCREASED
LIKELIHOOD
OF YOUR CHILD
CONTACTING
THE VEHICLE’S
INTERIOR
SURFACE
IN AN ACCIDENT.
Seat
Ibs
34 l-03
The backrest
for the Booster
Seat can only be used when correctly
attached
to the Booster
Seat. Make sure you read and understand
this information
booklet
before using your Booster
Seat and backrest.
Please store the booklet
in the pocket
underneath
the Booster
Seat
for further
use and consult
it often to make sure you are using the
restraint
correctly.
FAILURE TO FOLLOW
EACH OF THE FOLLOWING
INSTRUCTIONS
CAN RESULT IN YOUR CHILD STRIKING
THE VEHICLE’S
INTERIOR
DURING
A SUDDEN
STOP OR CRASH.
SECURE
THIS CHILD
RESTRAINT
WITH
A VEHICLE
BELT AS SPECIFIED
IN THIS
INSTRUCTION
BOOKLET
AND
YOUR
VEHICLE’S
OWNERS
MANUAL.
Baby-SmartrU
The primary
protection
for occupants
of a motor vehicle
in a collision
is the body of the vehicle
itself, and a child restraint
will not protect
a child when the vehicle
sustains
very serious
damage.
However,
correctly
installed
restraints
will substantially
improve
the chances
for survival
in all accidents.
Make sure that you understand
the correct
way to use this restraint
in your vehicle.
Compatible*
3
Introduction
Compatible
3
Seat
Belts
Compatible
Seating
Positions
5
Adjusting
the Booster
Seat
6
Adjusting
the Backrest
7
Installation
Installation
Important
Care
9
Without
Backrest
10
Notes
USE ONLY THE VEHICLES
LAP AND SHOULDER
BELT SYSTEM
WHEN
RESTRAINING
THE CHILD
IN THIS BOOSTER
SEAT. USE
OF A LAP BELT ONLY COULD
RESULT
IN A SERIOUS
OR FATAL
INJURY.
11
and Maintenance
12
Warranty
Recall
To protect
your child in a crash, the Booster
Seat must only be used
with certain
three point (lapshoulder)
seat belts. A lap belt only may
NOT be used as it could result in serious or fatal injury in an accident.
4
13
Information
WARNING!
THIS BOOSTER SEAT MUST ONLY BE USED WITH THE
VEHICLE’S
SEAT IN THE REARWARD-MOST
POSITION.
FAILURE
TO DO SO COULD
RESULT
IN AN INCREASED
LIKELIHOOD
OF
YOUR CHILD CONTACTING
THE VEHICLES
INTERIOR
SURFACE
IN AN ACCIDENT.
16
This Booster
Seat contains
a special device that will automatically
turn off the front passenger
airbag ONLY in BabySmartrM
equipped
vehicles.
Unless this Booster
Seat is used in a vehicle
equipped
with a BabySmartrM
airbag
deactivation
system
and the front
passenger
airbag is off, this Booster
Seat must not be placed in
the front seat of a vehicle that has a passenger
airbag. A passenger
airbag will inflate with great force in the event of an accident
and
can cause serious
to fatal injuries
to your child.
BabySmartrM
is a trademark
of Siemens
Automotive
Co.
Unacceptable
Seat Belts
There are several
types of three point (lap-shoulder)
seat belts that
will NOT work
with the Booster
Seat and must not be used.
l
Front seat belts with anchorages
(top or bottom)
on the vehicle
door.
l
Motor driven automatic
shoulder
belts of any kind.
WARNING!
(lap belt
seriously
aircraft.
Never
use the Booster
Seat with
a two point
belt
or shoulder
belt only) of any kind! The child could be
injured
in a crash, This restraint
IS not certified
for use lfl
Aircraft
seats
have
only
two
point
seat
belts.
If you have any questions
about what
with the use of the Booster
Seat, please
manual
or contact
your Mercedes-Benz
kind of belts are compatrhle
consult
your vehicle owner’s
dealer.
4
2
Mercedes-Benz
Child
Booster
Seat
With
Backrest
page
1 of 4
Rear Seating
Positions
are Safest
According
to accident
statistics,
in a vehicle
with rear designated
seating
positions,
children
are safer when properly
restrained
in
rear seating
positions
than in front seating
positions.
Use only rear
seating
positions
equipped
with three
point
lap-shoulder
belts.
As a rule, if a lap-shoulder
seat belt is available,
use the rear middle
position.
Otherwise,
the second choice is the rear outboard
position,
on the curb side. If the vehicle
has only lap belts in the rear, do not
use this restraint
on the rear seat.
DANGER:
UNLESS
THIS BOOSTER
SEAT IS USED IN A VEHICLE
EQUIPPED
WITH
A BABYSMARTT””
AIRBAG
DEACTIVATION
SYSTEM
AND THE FRONT
PASSENGER
AIRBAG
IS OFF, BE
AWARE
OF THE FOLLOWING:
This restraint
contains
a special
device
that will automatically
turn
off the passenger
side front airbag ONLY in BabySmart”
equipped
vehicles.
It MUST NOT be used in the front
seat of vehicles
without
the BabySmartnl
System.
Failure to do so may result in
injury or death to your child. Owners of vehicles
with front passenger
air-bags should refer to their vehicle owner’s
manual for child restraint
installation
instructions.
Seat Orientation
The Booster
Seat is not intended
side facing. Do not use it in such
for use in vehicle
seats.
seats
that
are
Attaching
the Backrest
To The Booster
Seat
1. Open the cloth slots at
the rear of the Booster Seat.
Insert the connectors
into
the slots and push down to
lock
into
place.
Pull
upwards on the Backrest
to
assure
that
it is fully
connected.
2. After
checking
the
Backrest
installation
insert
the wedges
into the slots
behind
the connectors.
Push down until the wedges
lock into place.
Recheck
your Backrest
to ensure
that it is installed
correctly
as shown.
Wedge
WARNING!
Leave
the
wedges
attached
to the
Backrest.
If not attached,
the wedges could be lost or
pose a choking
hazard for children.
width
of the
Booster
Seat
is to adapt the adult
seat belts to the
the width correctly.
before
installation
in
1. Lift the flap located
on
the bottom
of the Booster
Seat and pull the sides of
the booster
seat
apart.
Removing
the Backrest
from the Booster
Seat
Remove the wedges by pulling upwards.
Press the lower part of both
connectors
at the point marked “Press” and pull the Backrest
upwards.
2. While
your
child
is
standing,
position
the arm
rests of the Booster
Seat to
be snug against
the hips of
the child, so as to bring the
lap portion
of the three
point
lap-shoulder
belt
close to the body.
Arm Rests
3. When the width has been correctly
on the bottom
of the Booster
Seat.
grows,
adjusted,
you WIII have
close
to re-adjust
the flap located
the width
of the
6
Mercedes-Benz
Child
Booster
Adjusting
Seat
With
Backrest
page
2 of 4
the
Height
of
Unzip the back cover of the
Backrest.
Push the “Press”
button and pull the Backrest
upwards,
out of the slots.
Refit to the desired
height
(so that the shoulder
belt
guides
are just
slightly
above the child’s shoulder).
Slide
Fla P
4. As your child
Booster
Seat.
II
7
The purpose
of the belt-adjusting
Booster
Seat
webbing
of the vehicles
three point lap-shoulder
body of the child,
so it is important
to adjust
the
Wedge
Inserted
Position
3. Bring the Backrest
forward
and stow the shoulder
belt adjuster
clip onto the back base of the Backrest
by sliding it into place on the
storage plate. Do not pull the strap tight.
5
Adjusting
the vehicle.
.
fib
_
down
until
the “Press”
button
clicks
into place.
Close the zipper.
Adjusting
the Backrest
to fit the Vehicle’s
Seat.
Pivot the Backrest
so that it rests flat against
the seat back of the
vehicle.
If necessary,
adjust
the vehicle’s
headrest
to allow the
Backrest
to lie flat.
1. Place
in the
compatible
position
lapshoulder
sections
belts
positions.)
the Booster
Seat
vehicle,
onto
a
seating
with a three-point
belt only. (See
on compatible
and
seating
DO-
‘DO - Always check
into the seat.
weather.
2. If necessary,
adjust the
vehicle’s head rest to allow
the Backrest
to lie flat
against
the seat of the
vehicle.
3. Have
the child
sit down
Set a good example
by always wearing
your seat belt. Make
sure it is a firm rule that the car doesn’t
move until everyone
is buckled
up. Make no exceptions
for adults
or children.
\/\
---y/
Guide
Seat.
before placing
a child
hot to touch in sunny
DO - Put the lightest
passenger
on the seat behind
the Booster
Seat.
In an accident,
a heavy passenger
could cause more injuries
to your child than a light one.
DO-
in the Booster
the Booster
Seat for heat
Plastic parts can become
Keep the Booster
Seat securely
belted
to the vehicle,
even
when it is not occupied.
In a crash or sudden stop, any unsecured
child restraint
and other loose objects
will keep moving
and
can cause serious
injuries.
4. Fasten the seat belt. Make sure that the shoulder
belt runs under
the Booster
Seat armrest
nearest
the buckle
and that the lap belt
runs under both Booster
Seat armrests.
DO - Make sure that the Booster
Seat does not become
trapped
a folding
car seat or in the door or trunk
lid of your
5. Thread
belt guide.
DO - Replace
any worn seat belts
Seat and inspect
the vehicle
wear, fraying or damage.
the upper
portion
of the shoulder
belt
into
the
shoulder
WARNING!
Children
sometimes
pull the shoulder
belt under their arms instead
of over their shoulder.
Please correct
this immediately,
and explain
to the child that when under
the child’s
arm, the belt can cause
serious to fatal injuries
in a crash.
DO NOT - Leave
children
immediately.
Remove
seat belt periodically
alone
in your
DO NOT - Attempt to disassemble
Seat or your vehicle’s
DO NOT
Use anything,
Booster
Seat
Booster
Seat
to protect
car, even
or modify
seat belts.
by
car.
the Booster
for signs of
for a short
time.
any part of the Booster
such as a cushion
or coat to raise the
off the passenger
seat. In an accident
the
and vehicle’s
seat belts would not be able
your
child
as well
as they
should.
11
9
It is recommended
that the Booster
Seat always
be used with the
Backrest
so that the shoulder
belt guide is available.
Once your child’s
shoulders
are higher than the backrest’s
belt guides, you can remove
the Backrest
(see page 7) and use the adjuster
strap and clasp to
position
the shoulder
belt as described
below.
1. Place the Booster
Seat
in the vehicle,
onto
a
compatible
seating position
with
a three
point
lapshoulder
seat belt only.
(See
sections
on
compatible
belts
and
seating
positions.)
Radio transmitters,
such as a portable
telephone
or a citizens
band
unit should
only be used inside the passenger
compartment
if they
are connected
to a Mercedes-Benz
approved
antenna
that is installed
on the outside
of the vehicle.
2. Move the shoulder
belt
adjuster
strap
aside
and
have the child sit down in the booster
The cover of the Booster
Seat is held in place by buttons
you turn the product
upside
down. Unbutton
the cover
the care instructions
on the inside of the cover.
seat.
3. Fasten the seat belt. Make sure the shoulder
Booster
Seat armrest
nearest
the buckle
and
under both Booster
Seat armrests.
belt runs under the
that the lap belt runs
4. Thread the shoulder
belt into the adjuster
clasp. Adjust the length
of the adjuster
strap so that it fits snugly against
the shoulder
of the
child.
5. Adjust
the
vehicle
head
rest
to
support
WARNING!
Children
sometimes
put the shoulder
arm instead
of over their shoulder.
Please correct
and explain
to the child that when under the child’s
cause severe to fatal rnjurres
in a crash.
the
child’s
visible when
and follow
To remove
the cover from the Backrest
for cleaning,
unzip the back
of the cover and slide it free of the Backrest’s
main shell and over
the headrest.
Follow
the washing
instructions
on the back of the
cover.
If the main shell becomes
not wash with household
weaken
the seat shell.
dirty, it can be washed
off with water. Do
detergents
or with solvents
- these can
head.
belt under their
this immediately,
arm, the belt can
12
10
Mercedes-Benz
Child
Booster
Seat
With
Backrest
page
3 of 4
This Booster Seat with Backrest
was manufactured
in the Federal
Republic of Germany
by Britax RGmer GmbH and imported
by Britax
Child Safety, Inc. Fort Mill, SC. (Britax Model
341-03)
for MercedesBenz of North America,
Inc.
Britax Child Safety, Inc. (‘Britax”)
inc. (“Mercedes-Benz”)
warrant
purchaser
as follows:
and Mercedes-Benz
North America,
this product
to the original
retail
Child restraints
could be recalled
for safety reasons.
You must register
this restraint
to be reached
in a recall. Send your name, address,
and
the restraint’s
model
number
and manufacturing
date
to:
Britax Child Safety, Inc.
460-R Greenway
Industrial
Fort Mill, SC 29715
Drive
or call
LIMITED ONE YEAR WARRANTY.
This product
is warranted
against
defective
materials
or workmanship
for one year from the date of
original purchase.
Your exclusive
remedy
under this Warranty
is that
Britax will, at its option,
repair or replace
this product
or refund the
original purchase
price of the product.
Britax reserves
the right to
discontinue
or change
parts,
models
or products,
or to make
substitutions.
To make a claim under this Warranty,
you must either contact
Britax,
Customer Service Department,
46C-R Greenway
Industrial
Drive, Fort
Mill SC 29715,
call Britax
at 1 (888)
427-4829,
or contact
your
authorized
Mercedes-Benz
dealer.
PLEASE COMPLETE
REGISTRATION
CARD
EXPEDITE WARRANTY
DATE OF PURCHASE.
WARRANTY
which arise
the product
1 (EBB) 4 BRITAX
For recall information,
call
the U.S. Government’s
Auto Safety
at 1 (800) 424-9393
In the DC area call 1 (202) 366-0123
Fill out the registration
card attached
Backrest
and mail it in today!
to your Child
Booster Seat with
AND MAIL THE PRE-ADDRESSED
OWNER
WITHIN THIRTY (30) DAYS OF PURCHASE
TO
CLAIMS
AND TO EVIDENCE
THE ORIGINAL
LIMITATIONS.
This Warranty
does not include
damages
from negligence,
misuse
or use not in accordance
with
instruction
guide.
Britax
ISSUE 3
13
LIMITATION
OF DAMAGES.
The Warranty
and remedies
as set forth
are exclusive
and in lieu of all others,
oral or written,
express
or
implied.
In no event will Britax, Mercedes-Benz,
or the dealer selling
this product
be liable to you for any damages,
including
incidental
or consequential
damages,
arising
out of the use or inability
to use
this product.
LIMITATION
OF WARRANTIES
AND OTHER WARRANTY
TERMS AND
STATE LAW RIGHTS. ANY IMPLIED WARRANTIES,
INCLUDING
IMPLIED
WARRANTIES
OF MERCHANTABILITY
AND
FITNESS
FOR A
PARTICULAR
PURPOSE,
SHALL BE LIMITED TO THE DURATION
AND
TERMS OF THE EXPRESS
WRITTEN WARRANTY.
SOME STATES DO
NOT ALLOW LIMITATIONS
ON HOW LONG AN IMPLIED
WARRANTY
LASTS OR THE EXCLUSION
OR LIMITATION
OF INCIDENTAL
OR
CONSEQUENTIAL
DAMAGES,
SO THE ABOVE LIMITATIONS
MAY NOT
APPLY TO YOU. THIS WARRANTY
GIVES YOU SPECIFIC LEGAL RIGHTS,
AND YOU MAY HAVE OTHER RIGHTS WHICH VARY FROM STATE TO
STATE. Neither
Britax nor Mercedes-Benz
nor the dealer
selling this
product
authorizes
any person
to create
for it any other warranty,
obligation,
or liability
in connection
with
this
product
14
Mercedes-Benz
Hotline
Child
Booster
Seat
With
Backrest
page
4 of 4
BRITAX Child Safety, Inc.
460-R Creenway
Industrial
Fort Mill, SC 29715
Drive
This product
fulfills
the requirements
of the U.S. Federal
Motor
Vehicle
Safety
Standard
213 and is certified
for use in motor
vehicles.
It is certified
for use in aircraft.
It is only intended
for
use as a rear facing child restraint
for children
who weigh between
5 and 20 Ibs.
Mercedes-Benz
Infant
Restraint
Rear Facing
Infant Restraint
Please
make sure you read and understand
this information
booklet
before using your Infant Restraint.
Please store the booklet
in the Infant Restraint’s
pocket
for further
use and consult
it often
to make
sure
you
are using
the
restraint
correctly.
& Carrier
For Children from 5-20 Ibs
Britax
Model
301-03
FAILURE
TO FOLLOW
EACH
OF THE
FOLLOWING
INSTRUCTIONS
CAN RESULT
IN YOUR CHILD STRIKING
THE
VEHICLE’S
INTERIOR
DURING
A SUDDEN
STOP OR CRASH.
SECURE
THIS CHILD
RESTRAINT
WITH A VEHICLE
BELT AS
SPECIFIED
IN THIS INSTRUCTION
BOOKLET
AND YOUR
VEHICLE’S
OWNERS
MANUAL.
The primary
protection
for occupants
of a motor vehicle
in a
collision
is the body of the vehicle
itself, and a child restraint
will
not protect
a child when the vehicle sustains
very serious
damage.
However,
correctly
installed
restraints
will substantially
improve
the chances
for survival
in all accidents.
Make sure that you
understand
the correct
way to use this restraint
in your vehicle.
Premature
infants
or infants under five pounds
breathing
when in a sitting position.
Consult
using this or any child restraint
with an infant
Baby-Smart”
Compatible*
3
Introduction
Get To Know
Adjust
Your Infant
The Infant
Securing
Your
Compatible
Seat
Compatible
Seating
Securing
Using
Important
Care
must
Carrying
10
Restraint
11
In Your Vehicle
Outside
the different
parts
Infant
be rear-facing!
Handle
\
Chest
Clip
16
18
Cleaning
Directions
And
20
Troubleshooting
21
As Your Child
24
Grows
24
Information
This Infant Restraint
contains
a special device that will automatically
turn off airbags
ONLY in BabySmartrM
equipped
vehicles.
Unless
this Infant
Restraint
is used in a vehicle
equipped
with a
BabySmartTM
airbag deactivation
system and the front passenger
airbag
is off, this restraint
must not be placed
in the front seat
of a vehicle
that has a passenger
airbag. A passenger
airbag will
inflate with great force in the event of an accident
and can cause
serious
to fatal injuries
to the infant.
l
of your
14
Of Your Car
Warranty
Recall
you recognize
0
Positions
Restraint
will help
IMPORTANT!
Infant Restraint
7
Restraint
Notes
And
General
6
To Fit Your Baby
In The Infant
Belts
The Infant
The Infant
This page
Restraint.
4
Restraint
Restraint
Baby
may have difficulty
YOUI doctor
before
under five pounds.
BabySmartrM
is a trademark
of Siemens
Automotive
Handle
Release
Rllttnn
CO.
‘
Mercedes-Benz
Infant
Restraint
page
1 of 6
This page will help
Restraint.
you to recognize
the different
parts
of your
Infant
Belts And Suckle
simultaneously
Shoulder
I
-1l----l
Join both buckle
tongues
(5) together
and then firmly
insert
both
tongues
into the
buckle (6) so that they lock
with a click. If the tongues
cannot
be inserted,
press
the release
button
(7) and
reinsert.
Belt
SNUGLY ADJUST THE BELTS PROVIDED
RESTRAINT AROUND YOUR CHILD.
IMPORTANT:
(6) to make
Now pull on the shoulder
sure
they
are securely
straps
WITH THIS CHILD
where
they
buckle
fastened.
Chest Clip
Adjuster
/
Connect
the
belt
positioning
chest
clip.
Gently slide the clip up until
the shoulder
belts cannot
fall off the baby’s shoulders.
Make sure that the chest
clip is positioned
so that it
keeps the shoulder
straps
on the infant’s
shoulders.
If
the chest clip is too wide
for
a small
infant,
temporarily
remove
the chest clip until the infant
has grown and
reinstall
when the chest clip correctly
positions
the shoulder
straps
on the shoulders.
I
I
Trim Lane1
II’
Base
Foot
Stabilizer
7
Shoulder
Height
To ensure
that the baby is
properly
held in the lnfani
Restraint,
the height of the
shoulder
straps (1) can be
adjusted
to the size of the
child by making
use of the
appropriate
pair of belt slot5
(Za/2b).
To change
slots
open
the trim panel
b)
pulling
on the cover latch
Remove
chest
clip from
shoulder
straps by pulling out of slot in front of clip. Pull the shoulder
straps out and reinstall
through
the other pair of slots. Reclose
the
trim panel. Reinstall
chest clip.
Belt Tension
This Infant
Restraint
with a lap belt alone.
performs
better
Positioning
a
Restraint
page
2 of 6
belt
with
than
the
the door.
shoulder
(tongues]
Your vehicle
owner’s
manual
will have Information
on the types of
seat belts in your vehicle.
If you have belts of the above listed types,
select
another
seating
position.
When using the middle
rear seat lap
belt, make sure that the buckle does not catch on the Infant Restraint
frame.
Your baby’s back and bottom
must rest against
the Infant Restraint
without
spaces
or gaps. Very small babies
should
be supported
at
the sides with rolled-up
towels or blankets,
never
under the baby
Infant
a lap-shoulder
There are several
types
of safety belts that will not work
Infant Restraint
and must NOT be used:
l
Front
seat belts with anchorages
(top or bottom)
in
l
Motor-driven
automatic
belts of any kind.
l
Three-point
lap-shoulder
belts that have retractors
for the
section
and the lap section.
Such belts have latch plates
sewn both to the shoulder
and the lap sections.
l
Non-locking
(ELR) two-point
lap belts.
To adjust
harness
tension,
open the trim panel by pulling
on the
cover latch. To tighten,
pull the narrow
adjusting
strap (3) until the
shoulder
straps
fit the child’s
body snugly.
To loosen,
press the
button
(4) in the belt adjuster
and pull on the shoulder
straps.
Mercedes-Benz
with
8
a.
e -
-.
..
:-
;ome vehicle seat belts cannot be used due to the position
rf the lower anchorage points both where your seat belt
rnd where the buckle are attached to the vehicle. Use the
rar guide on the appropriate
side of this page to check
‘our seat belt anchorage points.
i either of the anchorage points falls outside of the black
irea, as shown, then you should use another position, for
sxample the middle of the rear seat using the lap belt.
Correct
aY
Lower
anchorage
..
; 1. You must adjust the
Infant Restraint to its stable
mode. To do this, lower the
front
and rear
base
stabilizer feet until they click
into place. Always double
check
that
the base
stabilizer feet are locked
into place. In certain cases
it is possible that the front
support will not rest evenly
on the vehicle seat. This can
be remedied
by placin
.
a towel
-
or blanket
-
underneath
2. For proper support of the child’s head, with the infant already
’ secured in the Infant Restraint, PLACE THIS INFANT RESTRAINT
IN A REAR-FACING
POSITION WHEN USING IT IN THE VEHICLE.
This means the child is looking toward the back of the vehicle. This
restraint may only be used in the rear facing position. If installed in
the front passenger seat of a vehicle with BabySmartru,
recheck
that the airbag is off. “Airbag Off” lamp on instrument
panel will
illuminate.
point
Incorrect
3. The carrying
hand11
should be in the “A” carryinj
position.
x
Lower
anchorage
.
point
11
9
Rear Seating Positions
Are Safest
According to accident statistics, in a vehicle with rear designated
seating positions, children are safer when properly restrained in
rear seating positions than in front seating positions. As a rule, if
a lap-shoulder
belt is available, use the rear middle position. The
second choice is the rear outboard
position, on the curb side.
Use this restraint only on forward facing vehicle seats. Do not use
in rear-facing
seats of station wagons or side facing seats. Read
this section carefully.
If in doubt, return to the dealer for help.
DANGER:
UNLESS THIS INFANT RESTRAINT
IS USED IN A
VEHICLE
EQUIPPED
WITH
A BABYSMART”
AIRBAG
DEACTIVATION
SYSTEM AND THE FRONT PASSENGER AIRBAG
IS OFF, BE AWARE OF THE FOLLOWING:
4. Pull out and buckle the
vehicle’s seat belt, without
attaching
it to the Infant
Restraint.
5. Place the lap portion of /
the belt in the belt guides
on both arm rests of the
Infant Restraint and tighten
by pulling on the shoulder
portion of the belt.
-
.\
Direction of travel
6. Open the cover panel on the back of the Infant Restraint. Pull the
shoulder belt out to its furthest length. Insert the shoulder belt into
the belt guide on the back of the seat shell. Make sure that the belt
is not twisted.
7. Holding the top of the Infant Restraint firmly in place with one
hand, pull the shoulder
belt tight with the other hand.
This restraint contains a special device that will automatically
turn
off the airbag ONLY in BabySmart’”
equipped vehicles. It MUST
NOT be used in the front
seat of vehicles
without
the
BabySmart”
System. Failure to do so may result in injury or death
to the infant. Owners of vehicles with front passenger airbags should
refer to their vehicle owner’s manual for child restraint installation
instructions.
Do not pull the shoulder
belt up so that the Infant Restraint
lifts off the seat of the vehicle. The Infant Restraint must remain
flush against the vehicle seat.
8. Firmly close the cover panel to clamp the shoulder belt in place.
The cloth restraint covering must not be caught between the cover
panel and the seat shell. By pressing on the cover latch check that
the trim panel is securely closed.
10
12
Mercedes-Benz
Infant
Restraint
page
3 of 6
The carrying
handle
locks
in two positions.
To change
the position
of the handle,
press
the two buttons
simultaneously.
Whenever
the position
of the carrying
handle
is changed,
make
sure that it snaps
into
position.
9. Confirm
that the lnfal
Restraint
is now secure
the vehicle,
with only a litt
movement
of the restrail
possible.
1
/
If
Direction
of ravel WARNING:
It is possible
to install the Infant Restraint
incorrectly
in your vehicle.
In the event of an accident,
this could have serious
consequences.
Please
read the instructions
carefully
and make
sure
that:
The shoulder
straps
of the Infant
Restraint
snug, and
l
The Infant Restraint
is secured
in the vehicle
accordance
with the instructions
provided.
l
are
with
always
seat
pulled
belts
in
15
13
.
-
.
--
.
0
0-a
The Infant Restraint
can be used as both a child
and as a carrier
outside
of a vehicle.
In either
straps
on the Infant Restraint
must be fastened.
The Infant Restraint
offer
a choice
of two modes:
a
a rocker for uses outside
c
motor vehicles...
-.
restraint
in a vehicle
case. the shoulder
DO - Set a good example
by always
wearing
your seat belt. Make
sure it is a firm rule that the car doesn’t
move until everyone
is buckled
up. Make no exceptions
for adults
or children.
DO - Always
check
the Infant
Restraint
a child into the seat. Plastic
parts
in sunny weather.
DO - Put the lightest
Restraint
if seat
In an accident,
a
to your child than
. ..or as a stable seat. In the
car, the Infant
Restrain1
MUST always be used in the
stable
mode.
Make
sure
that the base stabilizer
feel
are always
locked
(the)
snap into position)
in the
appropriate
position
a:
shown.
Infant
passenger
on the seat behind
the Infant
belts are not available
on the back seats.
heavy passenger
could cause more injuries
a light one.
DO - Keep the Infant
Restraint
securely
belted
to the vehicle,
even when it is not occupied.
In a crash
or sudden
stop,
any unsecured
child restraint
and other
loose objects
will
keep moving and can cause serious
injuries.
DO - Make sure that the Infant Restraint
does not become
trapped
by a folding
car seat or in the door or trunk lid of your car.
,
DO - Replace
any worn seat belts immediately.
Restraint
and inspect
the vehicle
seat
signs of wear, fraying
or damage.
14
Mercedes-Benz
for heat before
placing
can become
hot to touch
Restraint
page
16
4 of 6
Remove
the Infant
belt periodically
for
DO NOT - Feed an infant while riding in a child restraint.
Never
tend to a crying baby’s need while driving.
Never take
a baby out of a child restraint
for comforting
while
the car is moving.
2. Soak the buckle
in warm water (if necessary
with a dishwashing
liquid) for a prolonged
period (a minimum
of 30 minutes
or possibly
overnight).
Rinse out the buckle,
shake out excess water, and allow
to air dry thoroughly.
DO NOT - Leave
3. Proceed
in the reverse
order
metal plate is reinserted
through
not merely attached
to the seat
children
alone
in your
car, even
for a short
DO NOT - Attempt
to disassemble
or modify
any
Infant Restraint or your vehicle’s seat belts.
DO NOT - Use anything,
such
Infant Restraint
off
the Infant Restraint
be able to protect
part
time.
of the
(see step 1). Make sure that the
the slot in the plasth:
shell and is
cover.
IMPORTANT!
l
Make sure that the straps are not twisted.
l
The buckle or other metal or plastic
parts must
outside the side slots.
as a cushion
or coat to raise the
the passenger
seat. In an accident
and vehicle’s
seat belts would not
you child as well as they should.
not be positioned
Radio Transmitters
I Warning!
Neveropmteradlltran~wdrasaportabletdsphol#oradtbw
band unit, equipped
with a built-in
or inside antenna,
from Inside the
passengerccmpartrnantwhilethaenginair~nnkrg.
Doingsocouidbad
toamalfmctkaoftheBabySmartTYalrbagdeucUvat&nrystan,msulng
in a potentially
severe
or fatal personal
injury
to your child.
Radio transmitters,
such as a portable telephone
or a citizens band unit
should only be used inside the passenger
compartment
if they are
connected
to a MercedesBenz
approved
antenna that is installed on the
outside of the vehicle.
17
Cleaning
The Harness
DO NOT-Take
apart or
when cleaning
and dangerous
DO NOT - Use solvents,
may weaken
DO-Use
only mild soap
Cleaning
The Cover
DO NOT - Use chlorine
bleach.
Machine
Wash
- Warm
Temp (lOO”F/4O”C),
Hand Wash
Warm Temp (lOO”F/4O”C)
Drying
- Line Dry - DO NOT machine
dry, since
cover and it will no longer fit.
Cleaning
To clean
The Buckle
the buckle,
follow
l
Put the vehicle
seat’s
The vehicle
seat back,
placed,
should
be fully
And Seat
attempt
to take apart any of the harness
the harness
and seat. It is unnecessary
to do so.
detergents
or cleaning
fluid
as these
the harness
and the seat.
and water.
these
l
If the buckle
tongues
press
the
release
l
It is essential
seat is adequately
Medium
this will shrink
Wash
the
adjustable
head rest in its lowest position.
against
which
a child restraint
device
is
upright,
padded
and free of hard objects.
of the Infant Restraint
cannot
be inserted,
button
of the
buckle
and
reinsert.
to ensure
latched
that a moveable
and secure.
1. Remove
the belt. Push
the belt downwards
in the I
slot. This will enable you to
grasp the metal plate under
the seat by which the belt
is secured
to the seat shell
and push it end first
up
through
the slot in the seat
shell
of the vehicle
. The seat shell could suffer damage
in an accident
at a collision
speed
above 5 mph. In such cases, the Infant Restraint
must be
inspected
by the manufacturer
and replaced
if necessary.
Problems
With The Buckle
Most problems
relating
to your child’s
accumulation
of dust and dirt. These
Care And Cleaning
section).
steps:
backrest
These problems
l
The tongues
l
The tongues
been pressed.
l
The tongues
l
The tongues
include:
fail to lock home with
are only slowly ejected
seat buckle
are caused by
are easily washed
out (see
an audible
click.
after the release
button
has
are difficult
to insert (you feel resistance).
will no longer
lock home (are ejected
again).
J
18
20
Mercedes-Benz
Infant
Restraint
page
5 of 6
This Infant Restraint was manufactured
in the Federal Republic of
Germany by B&x RBmer GmbH and imported by Britax Child Safety,
Inc. Fort Mill, SC. (Britax Model 301-03) for Mercedes-Benz
of North
America, inc.
Which
l
l
Britax Child Safety, Inc. (‘Britax”) and Mercedes-Benz
North America,
Inc. warrant this product to the original retail purchaser as follows:
LIMITED ONE YEAR WARRANTY. This product is warranted
against
, defective materials or workmanship
for one year from the date of
original purchase. Your exclusive remedy for this Warranty is that
Eritax will, at its option, repair or replace this product or refund the
original purchase price of the product. Britax reserves the right to
discontinue
or change parts, models or products,
or to make
substitutions.
restraint
should
you
use next
Britax Child Safety, Inc.
460-R Greenway Industrial
Fort Mill, SC 29715
Drive
PLEASE COMPLETE AND MAIL THE PRE-ADDRESSED
OWNER
REGISTRATION CARD WITHIN THIRTY (30) DAYS OF PURCHASE TO
EXPEDITE WARRANTY CLAIMS AND TO EVIDENCE THE ORIGINAL
DATE OF PURCHASE.
For recall information,
call
the U.S. Government’s
Auto Safety Hotline
at 1 (BOO) 424-9393
In the DC area call 1 (202) 366-0123
WARVNTY LIMITATIONS. This Warranty does not include defects
which arise from negligence, misuse or use not in accordance with
the product instruction guide.
Fill out the registration
mail it in today!
1 (EBB) 4 BRITAX
Britax
ISSUE
LIMITATION OF WARRANTIES AND OTHER WARRANTY TERMS AND
STATE LAW RIGHTS. ANY IMPLIED WARRANTIES, INCLUDING IMPLIED
WARRANTIES
OF MERCHANTABILITY
AND FITNESS FOR A
PARTICULAR
PURPOSE,
SHALL
BE LIMITED
TO THE DURATION
AND
TERMS OF THE EXPRESS WRITTEN WARRANTY. SOME STATES DO
NOT ALLOW LIMITATIONS ON HOW LONG AN IMPLIED WARRANTY
LASTS OR THE EXCLUSION
OF LIMITATION OF INCIDENTAL OR
CONSEQUENTIAL
DAMAGES, SO THE ABOVE LIMITATIONS MAY NOT
APPLY TO YOU. THIS WARRANTY GIVES YOU SPECIFIC LEGAL RIGHTS,
AND YOU MAY HAVE OTHER RIGHTS WHICH VARY FROM STATE TO
STATE. Neither Britax nor Mercedes-Benz
nor the dealer selling this
product authorizes any person to create for it any other warranty,
obligation,
or liability
in connectlon
with this product.
22
Mercedes-Benz
Infant
Restraint
page
6 of 6
grows?
Child restraints could be recalled for safety reasons. You must register
this restraint to be reached in a recall. Send your name, address,
and the restraint’s
model number and manufacturing
date to:
or call
LIMITATION OF DAMAGES. The Warranty and remedies as set forth
are exclusive and in lieu of all others, oral or written, express or
implied. In no event will Britax, Mercedes-Benz,
or the dealer selling
this product be liable to you for any damages, including incidental
or consequential
damages, arising out of the use or inability to use
this product.
child
Mercedes-Benz
Toddler Restraint
20-40 Ibs.
Mercedes-Benz
Child Booster Seat
40-100 Ibs.
To make a claim under this Warranty, you must either contact Britax,
Customer Service Department,
460-R Greenway
Industrial Drive,
Fort Mill SC 29715, call Britax at 1 (888) 427-4829,
or contact your
authorized Mercedes-Benz
dealer.
21
as your
1
card attached
to your Infant Restraint
BRITAX Child Safety, inc.
460-R Creenway
Industrial
Fort Mill, SC 29715
Drive
and
Mercedes-Benz
Toddler
For Children
Restraint
from 20-40
Ibs
Britax Model 3 1 l-03
3
Introduction
Get To Know Your Toddler
4
Restraint
Compatible
Seat Belts
5
Compatible
Seating
5
Positions
6
Installation
Important
8
Notes
This product fulfills the
Vehicle Safety Standard
vehicles. This Restraint
only intended for use as
who weigh between 20
Please
booklet
booklet
consult
requirements
of the U.S. Federal Motor
213 and is certified
for use in motor
is not certified
for use in aircraft.
It is
a forward facing child restraint for children
and 40 Ibs.
make sure you read and understand
this information
before using your Toddler Restraint.
Please store the
in the Toddler Restraint’s
pocket for further
use and
it often to make sure you are using the restraint correctly.
Care And Maintenance
Warranty
As Your Child Grows
12
Recall Information
FAILURE
TO FOLLOW
EACH
OF THE FOLLOWING
INSTRUCTIONS
CAN RESULT IN YOUR CHILD STRIKING THE
VEHICLE’S
INTERIOR
DURING
A SUDDEN
STOP OR CRASH.
SECURE THIS CHILD RESTRAINT
WITH A VEHICLE
BELT AS
SPECIFIED
IN THIS INSTRUCTION
BOOKLET
AND YOUR
VEHICLE’S
OWNER’S
MANUAL
The primary
protection
for occupants
of a motor vehicle in a
collision is the body of the vehicle itself, and a child restraint will
not protect a child when the vehicle sustains very serious damage.
However,
correctly
installed restraints
will substantially
improve
the chances for survival
in all accidents.
Make sure that you
understand
the correct way to use this restraint
in your vehicle.
This Toddler Restraint
contains
a special
device that will
automatically
turn off the passenger airbag ONLY in BabySmartTM
airbag deactivation
system equipped vehicles. Unless this Toddler
Restraint is used in a vehicle equipped
with BabySmartTM
and
the front passenger airbag is off, this Restraint must not be placed
in the front seat of a vehicle that has a passenger
airbag. A
passenger airbag will inflate with great force in the event of an
accident
and can cause serious to fatal injuries to your child.
Baby-SmartTM
Compatible*
BabySmartr”
is a trademark
of Siemens
2
Automotive
Co.
This page will help you recognize
Restraint.
the different
parts of your Toddler
First note that some vehicles have no seating positions which are
compatible with this Toddler Restraint (see below). Read this section
carefully.
If in doubt,
return
to the dealer
for help.
Length of Seat Belt
Lap belts and lap-shoulder
belts will work with the Toddler Restraint,
if the belt length is long enough to fit into the slot on the Toddler
Restraint. If the seat belt is not long enough, NEVER use the Toddler
Restraint
without the Impact Shield. Use an alternative
vehicle
seating position.
Unacceptable
Seat Belts
There are several types of seat belts that will NOT work with the
Toddler Restraint and must not be used.
Front three point (lap and shoulder)
seat belts that attach (top
or bottom) to the vehicle door.
Motor driven automatic
belts of any kind.
l
l
Guide
Rear Seating Positions
are Safest
According
to accident statistics,
in a vehicle with rear designated
seating positions,
children are safer when properly
restrained
in
rear seating positions than in front seating positions.
As a rule, if
the appropriate
seat belt is available, use the rear middle position.
The second choice is the rear outboard
position, on the curb side.
This restraint
contains a special device that will automatically
turn
off the front passenger-side
airbag ONLY in BabySmartTM
equipped
vehicles.
It MUST NOT be used in the front seat of vehicles
without
the BabySmartm
System.
Failure to do so may result in
injury or death to the child. Owners of vehicles with front passenger
airbags should refer to their vehicle owner’s manual for child restraint
installation
instructions.
DANGER:
UNLESS THIS TODDLER
RESTRAINT
IS USED IN A
VEHICLE
EQUIPPED
WITH
A BABYSMART”.’
AIRBAG
DEACTIVATION
SYSTEM AND THE FRONT PASSENGER AIRBAG
IS OFF, BE AWARE OF THE FOLLOWING:
4
Seat Orientation
The Toddler Restraint is not intended for use in vehicle
are side facing. Do not use it in such seats.
5
seats that
1. Place the Toddler Restraint onto a compatible
seating position
with nothing between it and the seat. Adjust the vehicle seat back
so that the restraint lies flush against the seat. Adjust the vehicle
head rest into lowest position to further
support the child’s head.
2. Sit the child down in the restraint.
3. Place the impact shield on the armrests
of the restraint, in front
of the child’s abdomen. The slot for the vehicle’s
seat belt should
be on the front side, away from the child.
4. Pull the seat belt out partially,
but not completely.
5. Placement of seat
belt:
Lap Belt (Z-point)
Seat
Belt:
A. Insert the lap belt into
the belt guides on both
sides of the impact shield,
through
the slots of the
guide and fasten the seat
belt buckle.
B. Tighten
the seat belt
I
snugly.
Lap and Shoulder
(3-point)
Seat Belt:
A. Without inserting the seat belt into the belt guides of the restraint,
fasten the seat belt buckle.
B. Fit the lap belt section into the belt guides on both sides of the
impact shield, through
the slots of the guide, and pull snug.
C. Carefully guide the shoulder belt section along the lap belt section
and insert into the belt guide slots.
D. Make sure the belt is not twisted.
E. Without unbuckling the seat belt, pull the seat belt out completely
then feed back until the restraint
is snugly fitted.
Never install by using the lap belt in the guide and the shoulder
over the child.
belt
DO - Set a good example by always wearing your seat belt. Make
sure it is a firm rule that the car doesn’t move until everyone
is buckled
up. Make no exceptions
for adults or children.
The impact shield MUS
always be used and th
belt webbing should nc
be twisted. FAlLURET(
USE THE
IMPAC’
SHIELD CAN RESUL
IN SEVERE TO FATAI
INJURIES
TO YOUI
CHILD!
DO - Always check the Toddler Restraint
for heat before placing
a child into the seat. Plastic parts can become hot to touch
in sunny weather.
Removing the Seat Shell
Cover:
I. Untie the strings at the
bottom of the seat shell
cover.
DO - Put the lightest passenger
on the seat behind the Toddler
Restraint. In an accident, a heavy passenger could cause more
injuries to your child than a light one.
DO - Keep the Toddler Restraint
securely
belted to the vehicle,
even when it is not occupied.
In a crash or sudden stop,
any unsecured
child restraint
and other loose objects will
keep moving and can cause serious injuries.
2. Pull the cover off first
from the top portion of the
seat and then the bottom.
DO - Make sure that the Toddler
Restraint
does not become
trapped
by a folding car seat or in the door or trunk lid of
your car.
DO - Replace
any worn seat belts immediately.
Remove the
Toddler Restraint and inspect the vehicle seat belt periodically
for signs of wear, fraying or damage.
DO NOT - Leave children
DO NOT - Attempt
Toddler
alone in your car, even for a short time.
to disassemble
or modify
any part
Restraint
or your vehicle’s
seat
of the
belts.
DO NOT - Use anything,
such as a cushion or coat to raise the
Toddler Restraint off the passenger seat. In an accident
the Toddler Restraint
and vehicle’s
seat belts would
not be able to protect your child as well as they shoujd.
L
Washing the Seat She!! Cover:
Wash in a mild detergent
using a mild (permanent
Do not spin or tumble dry.
Impact Shield:
The cover is non-removable.
Wash impact shield with mild detergent
and lukewarm
water. Clean fabric parts with vehicle upholstery
cleaning foam.
Seat Shell:
If the main shell becomes dirty, it can be washed off with water. Do
not wash with household
detergents
or with solvents - these can
weaken the material of the seat shell.
Radio transmitters,
such as a portable telephone
or citizens band
unit should only be used inside the passenger
compartment
if they
are connected to a Mercedes-Benz
approved antenna that is installed
on the outside of the vehicle.
7
8
press) wash cycle.
9
L
(D
;;
d
x
F
2
?5+
B
5
nT
z
?
n,
3
m
:
P
P
P
This Toddler Restraint
was manufactured
in the Federal Republic
of Germany by Britax Rkner GmbH and imported by Britax Child
Safety, Inc. Fort Mill, SC. (Britax Model 31143) for Mercedes-Benz
of North America, Inc.
Britax Child Safety, Inc. (“Britax”)
Inc. (“Mercedes-Benz”)
warrant
purchaser as follows:
and MercedesBen
North America,
this product to the original retail
LIMITED ONE YEAR WARRANTY. This product is warranted
against
defective materials or workmanship
for one year from the date of
original purchase. Your exclusive remedy for this Warranty
is that
Britax will, at its option, repair or replace this product or refund
the original purchase price of the product. Britax reserves the right
to discontinue
or change parts, models or products,
or to make
substitutions.
LIMITATION OF WARRANTIES
AND OTHER WARRANTY TERMS AND
STATE LAW RIGHTS. ANY IMPLIED
WARRANTIES,
INCLUDING
IMPLIED WARRANTIES
OF MERCHANTABILITY
AND FITNESS FOR
A PARTICULAR PURPOSE, SHALL BE LIMITED TO THE DURATION
AND TERMS OF THE EXPRESS WRITTEN WARRANTY. SOME STATES
DO NOT ALLOW
LIMITATIONS
ON HOW LONG AN IMPLIED
WARRANTY
LASTS OR THE EXCLUSION
OF LIMITATION
OF
INCIDENTAL
OR CONSEQUENTIAL
DAMAGES,
SO THE ABOVE
LIMITATIONS
MAY NOT APPLY TO YOU. THIS WARRANTY GIVES
YOU SPECIFIC LEGAL RIGHTS, AND YOU MAY HAVE OTHER RIGHTS
WHICH VARY FROM STATE TO STATE. Neither Britax nor MercedesBenz nor the dealer selling this product authorizes
any person to
create for it any other warranty,
obligation, or liability in connection
with this product.
Which
l
restraint
Mercedes-Benz
40-100
should
you
Child Booster
Ibs.
next
as your
child
Seat
Drive
or call
1 (888) 4 BRITAX
PLEASE COMPLETE
AND MAIL THE PRE-ADDRESSED
OWNER
REGISTRATION
CARD WITHIN THIRTY (30) DAYS OF PURCHASE
TO EXPEDITE WARRANTY CLAIMS AND TO EVIDENCE THE ORIGINAL
D.TE OF PURCHA.SE.
For recall information,
call
the U.S. Government’s
Auto Safety Hotline
at 1 (800) 424-93‘93
In the DC area call 1 (202) 366-0123
WARRANTY LIMITATIONS.
This Warranty
does not include defects
which arise from negligence,
misuse or use not in accordance
with
the product instruction
guide.
Fill out the registration
mail it in today!
card attached
to your Toddler
Restraint
LIMITATION OF DAMAGES.
The Warranty
and remedies
set forth
above are exclusive and in lieu of all others, oral or written, express
or implied. In no event will Britax, Mercedes-Benz,
or the dealer
selling this product
be liable to you for any damages,
including
incidental
or consequential
damages,
arising out of the use or
inability to use this product.
Britax
10
grows?
Child restraints
could be recalled
for safety reasons. YOU must
register this restraint
to be reached in a recall. Send your name,
address, and the restraint’s
model number and manufacturing
date
to:
Britax Child Safety, Inc.
460-R Greenway
Industrial
Fort Mill, SC 29715
To make a claim under this Warranty,
you must contact Britax,
Customer Service Department,
460-R Greenway
industrial Drive,
Fort Mill SC 29715, or call Britax at 1 (888) 4 BRITAX. Or contact
your authorized
Mercedes-Benz
dealer.
use
11
ISSUE 2
BRITAX Child Qfety, Inc.
460-R Greenway Industrial Drive
Fort Mill, SC 29715
and
Porsche Prince
Instructions on installation and use
PORSCHE
Pleaseread through these instructionscarefully before using
the PorschePrince.The PorschePrinceis suitablefor children
weighingbetween approximately20 and 40 lb (9 and 18 kg).
The child is secured in the Prince via the lap shieldwhich is
securedusingthe vehiclebelts.
Warning
It is possible to secure the Porsche Prince or the child
incorrectly.
This could cause severe inju
or death if
there is an accident.
Therefore Dlease rea ‘IT through the
following
information
carefulli
and make sure that
- the Porsche Prince is secured with the seat belts as
described in the instructions.
- the disconnection
belt tongue
is inserted
in the
disconnection
belt buckle in front of the front passenger
seat to turn off the Porsche front passenger
airbag.
The Porsche Prince shouldbe used on the rear seat facing
forwardandfastenedwith a 2- or 3-pointseatbelt. If necessary
(e.g.: 2-seatvehicles)the PorschePrincemay alsobe usedon
the front passengerseat. For Porsche cars with air bags
Porsche testinghas
shown that the Prince may be u&d
on the front seat onlv if the vehicle seat is moved fullv
rearward. Porsche s6ongly recommends
that the air bag
belt
be turned off b inserting the air bag disconnection
tongue on the 6.rlnce into the disconnection
belt buckle
in front of the Porsche front passenger
seat. Thisadapter
devicemustbe installedby an authorized Porschedealerwhen
purchasin the Prince. If your car has a seat belt with an
automatic
3 ocking retractor (ALRIyou maywant to engageit to
helppreventunwantedmovementof the Prince duringnormal
driving.
Further information
on this can also be found in the
Porsche Owner’s Manual under “Child Restraint Systems
and Airbag Systems”.
Prince’”
Toddler Restraint
For Children from 20-40 Ibs
Britax Model 411-13
includes Airbag Disconnection Belt for Porsches
Securing the child in the Porsche Prince
on the rear seat
Placethe Prince on the seat and let your child get settled in.
Place the lap shield on the armrests in front of the child’s
stomachso that the slotfor the seatbelt pointsforward. The
closer the lap shield is to the child’s body, the greater the
protection. The PorschePrincecan be usedwith the 2- or 3-
Pointseatbelts (fig. I, II).
Theair bag disconnectionbelt hasno functionwhenthe Prince
ISinstalledin a rear seat. The additionalattached block (fig. I,
II, 5) must be removed when placing the child seat in the
rear seat for the ModelYear 1999 911 only. To remove the
block the laceson the undersidemustbe untied. Tie the laces
together to keepthemawayfrom the child.
Fastening the lap shield with a 2-point seat belt on the
rear seat
a) Insert the belt strap into the belt gtlide markedin red (fi
II, 2) on the lap shield,up to the slots of the beit gulT e
portion,andfastenthe belt tuckle. The belt straprnustnot
be twistedin the belt slotof the lap shield. The belt buckle
andother rigidmetalor plasticparts mustbe placedto the
side, out of the way of the belt guide portion.
b) Tightenthe seatbelt untilit fits snugly. Make surethe belt
is not twisted (fig. II).
Fastening the lap shield with a 3-point lap and shoulder
seat belt on the rear seat
a) Pullout the lap and shoulderbelt seat belt and insertin the
buckleuntilyou hearit engage(fig. III, 1).
b) Insertthe lapbelt portion(3) in the belt uideportionmarked
in red and tighten until it fits scugly kfig. III, IV). The belt
strap mustnot be twistedin the belt slot of the lap shield.
The belt buckleandother rigid metalor plasticparts mbst
be placed to the side out of the way of the belt guide
portion.
c) Guidethe shoulderbeltportion(4) alongthe lap belt portion
and also insert in the belt guide portion (2) (fig. IV, VI.
d) Tightenthe seat belt untilit fits snugly. Make surethe belt
is not twisted (fig. VI.
Securing the child in the Porsche Prince on the front
passenger seat
The PorschePrincemay alsobe usedon the front passenger
seat with the passengerseat moved to its rearmostpositlon.
Placethe childseaton the car seatandlet your childget settled
in. Placethe lap shieldon the armrestsin front of the child’s
stomachso that the slot for the seat belt pointsforward. The
closer the lap shield
the protection.
is to the child’s
body, the greatel
The additronalblock (fig. I, 5) on the child seat must be attached
for use in the front seat. For Porsche cars with air bags, Porsche
testing indicates that the Prince may be used on the front seat
onlv if the vehicle seat is moved fullv rearward. Porsche stronglv
recbmmends that the air bag be turned off by insertin the air
bag disconnection belt ton ue on the Porsche Prince kfig. I, 6)
into the disconnection belt %uckle in front of the Porsche front
passenger seat ffi . I, 7). This adapter device must be installed
by an authorized Borsche dealer when purchasing the Porsche
Prince.
Warning: Never use this Prince in the front seat of an
non-Porsche
vehicle
unless the airbag is of.1:
Care and maintenance
a) Child seat: Remove the cloth coverin and wash carefully
in a mild detergent and warm water f 30” C) and hang to
dry. Do not sprn or machine dry.
b) Lap shield: (Coverin cannot be removed). Wash lastic
impact plate with mif d detergent and warm water ( t 0” C).
Clean fabric cover with mild upholstery cleaning foam (check
for color fastness).
Warning
Further information on this can also be found in the
Porsche Owner’s Manual under “Child Restraint Systems
and Airbag Systems”.
This child seat provides effective protection only when
it is used and installed properly in accordance with
instructions in this booklet.
Fastening the lap shield with the lap and shoulder belt
seat belt on the front passenger seat
The Porsche Prince is designed, tested and approved
in accordance with the requirements
of US Federal
Motor Vehicle Safety Standards governing child safety
devices.
a) Pull out the lap and shoulder belt seat belt and insert in the
buckle (fig. III, 1).
b) Insert the lap belt portion (3) in the belt guide portion (2)
marked in red and tighten until it fits snugly (fig. (Ill, IV). The
belt strap must not be twisted in the belt slot of the lap
shield. The belt buckle and other rigid metal or plastic
parts must be p!aced to the side out of the way of the belt
guide portion.
c) Guide the shoulder belt portion (4) along lap belt portion and
also insert in the belt guide portion (2) (fig. IV, VI.
d) Tighten until the belt fits snugly. Make sure the belt is not
hyrsted (fig. VI.
e) Turn off the front passen er airbag by inserting the
disconnection belt tongue (f:rg. I, 6) on the Porsche Prince
into the disconnection adapter buckle in front of the front
passenger seat (fig. I, 7). The disconnection belt should
be left slack.
f) Ensure that the tongue for switching off the front passenger
airbag is correctly inserted as follows. Turn the ignition key
to the on position (position 2). The airbag warning light In
the instrument panel should flash for 10 seconds and then
go off, indicatingthat the front passenger airbag is switched
off. See your Owners Manual for further details.
If you cannot confirm that the air bag is turned off do not
use the Porsche Prince. Check with your Porsche dealer
for assistance.
Figures I and V show the correct belt path with the
disconnection
belt and buckle for turning off the front
passenger airbag.
The backrest of the vehicle seat must be properly
secured. There should be no heavy, sharp-edged ok
loose obiects in the car fez on the oarcel shelf) which
ma strike the child or otti& occupant in an accident
an d cause injury).
If problems arise during use, please contact
Porsche dealer.
your
No modifications may be made to the Porsche Prince.
The child seat may be dama ed after an accident with
an impact speed above 6 mp t (10 km/h). The Porsche
Prince must then be checked for damage and replaced
if necessary.
So that your child does not get burned by hot items,
the Porsche Prince should be covered by a towel or
blanket
and not be left in direct
sunlight.
Never leave your child alone or unattended in the child
seat or in the car.
If the Porsche Prince is carried in the car without a
child, it must be secured with the belt.
II I
What comes after the Porsche Prince?
Childrenover 4 years old or 40 lb (18 kg) can be restrainedin
a PorscheZoomboosterseat(availablewith Corn sleeprest).
Please check with your Porsche dealer 7or details.
3
2
1
6
I
IV, -
Vf
35-
Britax
ISSUE1
BRITAX Child Safety, Inc.
460-R Greenway Industrial
Fort Mill, SC 29715
Drive
Using the Porsche Baby-Safe
When used properly,
the Porsche Baby-Safe
is desi ned as a way
to safely transport
your infant both inside and outs! ,f e the car. The
safety harness of the Porsche Baby-Safe must be correctly fastened
around the infant (see “Securing
your infant in the Porsche BabySafe”).
PORSCHE
The Porsche Baby-Safe has two positions, a rigid position (fig. I) and
a rocking position (fig. II). In the vehicle, the Porsche Baby-Safe
must only be usedIn the rigid position. Ensure that the supports
(fig. I, 3a and 3b) are always locked in the extended
posrtion.
The carryin
handle attached to the Porsche Bab -Safe (fig. Ill, 1)
engages rn
3 t ree positions (A, B, C). Position A or f! should be used
in the car so that the carrying
handle does not interfere
with the
shoulder portion of the car belt. The two push buttons (fig. ill, 2)
must be pressed at the same time to adjust the carrying handle to
a different position. Ensure that the carrying handle engages positively
after each adjustment.
Warning: Be sure that your infant is buckled in and the carry handle
is “locked”
before
lifting or carrying
the child.
Securingyour infant in the PorscheBaby-Safe
Place the infant in the Porsche Baby-Safe
and fasten the safety
harness securely. Very small infants can be supported
with some
kind of padding
(cushion)
on each side, never underneath.
Adjusting the height of the safety harnessshoulderbelts
Baby-Safe”
To ensure the infant is held securely in the Porsche Baby-Safe, the
hei ht of the shoulder belts (fig. IV, 8) can be adjusted to the size
of t% e child by using the appropriate
set of seat belt slots (fig. IV,
9a or 9b). We recommend
selecting the lower set of slots (fig. IV,
9b) for small infants.
Rear Facing Infant Restraint & Carrier
For Children From 5 Ibs - 20 Ibs
Includes
Ajrbag
Britax Model
Disconnection
401-U
Bek For Porsches
Porsche Baby-Safe
Instructions
on installation
and use
Please read through these instructions
carefully before using the
Porsche Babv-Safe. The Porsche Babv-Safe is suitable for infants up
to approximate1
9 months of a e or weighing from 5 Ibs. up to
approximately
2 8 Ibs. (9 kg). Chil f ren larger than this should use the
appropriate
chrld or booster seat.
WARNING!
It is possible to secure the Porsche Baby-Safe in the car
incorrectly. This could cause severe injury or death if there
is an accident. Therefore please read through the following
information carefully and make sure that:
l
the safetv harnesses of the Porsche Babv-Safe always fit
snugly
l
the Porsche Baby-Safe is secured with the vehicle seat
belts as described in the instructions.
l
the disconnection belt ton ue is inserted in the disconnection
belt buckle in front of the % orsche front passenger seat to
turn off the front passenger airbag.
The Porsche Baby-Safe
must be used in the Porsche only on the
front passen er seat, with the passen er seat moved to its rearmost
position, an % fastened with the lap-s % oulder (3.point) vehicle seat
belt. Under no circumstances should the Porsche Baby-Safe
be fastened with only a lap (Epoint) belt. The Porsche BabySafe may be used on the front passenger seat in a Porsche
with an airbag (fi . X), only if the air bag disconnection belt
tongue on the If orsche Baby-Safe is inserted into the
disconnection buckle in front of the front passenger seat. Thus
adapter devrce must be installed by an authorized
Porsche dealer
when purchasrng
the Porsche Baby-Safe.
If our vehicle has a seat
belt wrth an automatic
lockrng retractor
( K LR) see your Owner’s
Manual to enga e It to help prevent unwanted movement
of the seat
during normal cfrrvrng.
Further information on this can be found in the car Owner’s
Manual under “Child Restraint Systems and Airbag Systems”.
Porsche
To change the set of slots, the cover (fig. IV, 4) must be opened by
pulling on the clas (fig. IV, 5). The shoulder belts together with the
tongues (fig. V, 1 8 1 can now be pulled out of the slots and guided
into the other set of slots. Make sure the belt webbing is not twisted.
Fastening the belt buckle
The belt buckle (fig. V, 11) is fastened by inserting the two tongues
(fig. V, 10) together
and then insertrng them In the belt buck!e (fig.
V, 10) until you hear them engage (“CLICK”).
If they won’t insert,
press the red pushbutton
all the way down, then Insert the two
tongues together.
Adjusting the length of the safety harness
Open
the cover
(fig.
IV, 4) by pullrng
on the clasp
(fig.
IV, 5).
To tighten:
Pull upwards on the narrow adjusting belt (fig. IV,
6) towards the top ed e of the seat back, untrl the
shoulder belts (frg. IV, i ) frt snugly across the child’s
body.
To loosen:
To loosen the shoulder belts (fi IV, 81, press the
button (fig. IV, 7) on the belt a %juster and pull on
the shoulder belts. Release the button once the
belts are loose.
Securingthe PorscheBaby-Safein the car
What to do:
a)
Make sure the vehicle seat is moved fully to the rear away
from the Instrument
panel. Put the Porsche Baby-Safe into
the rrgrd posrtron by folding down the front and rear supports
(fig. 1, 3a and 3b). Place the Porsche Baby-Safe on the car
seat facing the rear of the car. In certain cases the front
support (fig. I, 3b) of the Porsche Baby-Safe may not lie flat
on the surface of the car seat. Placing a rolled towel or
blanket underneath
one support may Improve the stabrlity
of the seat.
Baby-SafeTM
Rear
Facing
Infant
Restraint
and Carrier
page
1 of 3
Porsche
Baby-SafeTM
Rear
Facing
Infant
Restraint
13
m
and
Carrier
page
-I-
2 of 3
X
R
b)
cl
Switch off the front passenger airbag by insertin the
disconnection belt tongue (fi . N, 18) on the Porsche esabySafe into the disconnection 6 elt buckle in front of the front
passenger seat (fig. VIII, 18). The red disconnection belt
should be left slack.
Ensure that the tongue for switching off the front,passenger
airbag is correctly Inserted as follows. Turn the Ignition key
to the on position (position 2). The airbag warnrng Ii ht in
the instrument panel should flash for 10 seconds and then
go off, indicatin that the Porsche front passenger airbag
IS switched off. ! ee your Owner’s Manual for further details.
If you cannot confirm that the air ba is turned off do
not use the Porsche Baby-Safe. E heck with your
Porsche dealer for assistance.
dl
Pull out the car seat belt and insert in the buckle (see figure
VII.
e)
Place the lap belt portion (fig. VII, 14) of the car seat belt
over the armrests of the Porsche Baby-Safe and insert into
the belt uides (fig. VII, 15) on both sides of the Porsche
Baby-SaBe. Pull the belt snug over the Porsche Baby-Safe.
Open the cover (fig. WI, 4) usin the clasp (fig. VII, 5). Pull
the shoulder belt portron (fig. si I, 13) behind the Porsche
Bab -Safe seat back and insert it between the belt clip (fig.
VII r6) and seat back (fig. VII 17). Ensure that the car seat
beit fits snugly and is not twisted.
Close the cover (fig. VII, 4) and lock in position in order to
engage the shoulder belt portion (fig. VII, 13). The cloth seat
coverin must not be trapped between the cover (fig. VII,
4) and tfl e seat back. By pressing on the clasp (fig. VII, 5)
make sure that the cover (fig, VII, 4) is closed fully.
Warning:
l
This child seat provides effective protection only when it
is used and installed properly in accordance with instructions
in this booklet.
The Porsche Baby-Safe is designed, tested and ap roved
in accordance with the re uirements of US Federa PMotor
Vehicle Safety Standard %13 governing child restraints.
The backrest of the vehicle seat must be properly secured.
There should be no heavy, shar -edged or loose objects in
the car (e.g. on the parcel shetf Pwhich may strike the child
or other occupants in an accident and cause injury.
Zfeyi;lems
arise during use, please contact your Porsche
No modifications
may be made to the Porsche Baby-Safe.
The child seat may be damaged after an accident with an
impact speed above 6 mph (10 km/h). The Porsche Baby
Safe must then be checked for damage and replaced if
necessary.
So that your child does not contact hot items, the Porsche
Bab -Safe should be covered with a blanket or towel and
not z e left in direct sunlight.
Never leave your child alone or unattended
seat or in the car.
in the child
If the Porsche Baby-Safe is carried in the car without a
child, it must be secured with the belt.
Illustrations VIII and IX show the correct path for the seat belt,
with the cover closed and the front passenger airbag
disconnection belt and buckle inserted in the proper location.
6
4
Care and maintenance
What comes after the Porsche Baby-Safe?
Remove the cloth covering and wash it carefully in a mild detergent
and warm water (30°C) and hang to dry. Do not spin or machine dry.
Children over 20 lb (9 k ) should be restrained in a Porsche PrinCe
child seat or a Porsche 5 oom booster seat (with or without Comfy
sleep rest.) as their size indicates, Please check with your Porsche
dealer for details.
If the safety harness buckle malfunctions
If both tongues cannot be inserted, press the red pushbutton all the
way down, then insert the two tongues together. If the safety harness
buckle malfunctions, this may be due to contaminants which can be
washed out. Malfunctions
can usually be identified by:
- The tongues engage without a pronounced “Click”.
-The tongues are elected slowly after pressing the release button.
- Insertion of the tongues is difficult.
. The tongues will not engage (are ejected again).
What to do
Try the following corrective steps. If these do not fix the
problem, do not use the Porsche Baby-Safe until the malfunction
has been repaired.
1.
Remove the safety harness buckle
Push the buckle downwards in the belt slot. You can now
reach the metal plate under the seat area used to secure
the belt to the seat base and push it up through the slot in
the seat base, allowing the buckle to be removed from the
seat
2.
Cleaning the buckle
Soak the buckle portion (for at least 30 min. or possibly
overnight) in hot water (possrbly with detergent). Then rinse
out the buckle and dry it thoroughly.
3.
Refitting
Reinstall In reverse order of step 1. You must make sure
that the metal plate is pressed back through the slot of the
plastic seat base and is not just fastened beneath the
coverrng. If In doubt of correct rnstallahon contact your
Porsche dealer.
Britax
ISSUE
Porsche
Baby-Safe
BRITAX
Child
Safety,
Inc.
460-R
Greenway
Industrial
Fort Mill,
SC 29715
Drive
Facing
Carrier
1
TM Rear
Infant
Restraint
and
page
3 of 3
Securing the Porsche Comfy sleep rest
The belt holder clip (fig. I, 7) on the Porsche Zoom must be
attached to the retaining bracket (fig. II, 5) of the sleep rest. To
do this, fold the Porsche Comfy sleep rest forward and attach belt
clip (fig. Ill, 7) to the retainin bracket (fig. Ill, 5). Now pull the belt
that the Porsche Comfy
PORSCHE
Adjusting
the height of the Porsche
Comfy sleep rest
Undo the cover zipper, push in the “PRESS” button (fig. Ill, 31 and
lift the Porsche Comfy sleep rest lower bracket up and out of the
locking holes. Insert again at the required height (belt guide loop
at the height of the child’s shoulder (fig. IV)). Then push down
and slide the bracket until the lower bracket fingers engage the
sleep rest and the “PRESS” button (fig. fll,3) pops up and en ages
a hole in the lower bracket. Ensure that the lower brat f et IS
securely connected to the back rest before zipping up the cover.
Securing the child
Place the Zoom and Comfy combination on the seat. Guide the
shoulder belt through the belt uide loop (fig. IV, 6) and over the
child to make sure the shoul d er belt fits properly. Follow the
installation guidelines for the Porsche Zoom.
Removing the Porsche Comfy sleep rest
The snap wedges (Fig V, 9) must be removed first b ulling them
up and out. Then squeeze to ether the lower PREiit buttons of
the plug-in connecbon (fig. I,k 1) and at the same time lift the
Porsche Comfy sleep rest up and out.
Sleep Rest
For Use with the Porsche
for Children
from
Britax
Model
Zoom Booster
37-100
Ibs
Seat
421-13
2
Porsche Comfy
Care and maintenance
Children who have outgrown
Remove
child seats often miss their lateral
support, particularly
on tong journeys.
The Porsche Comfy sleep
rest provide this comfort
in conjunction
with the Porsche Zoom
child booster seat. It has been tested and approved
for use with
this system.
Instructions
on installation
and use
Please read through these instructions
carefully before using the
Porsche Comfy sleep rest. The Porsche Comfy sleep rest IS
sultable for children between the ages of 4 and 12 or weighing
between 37 and 100 lb (17 and 45 kg).
The Porsche Comfy sleep rest should always be used In the car
on the rear seat (when possible) and in conjunctIon with a lap and
shoulder belt. It may also be used on the front passenger
seat.
Please pay attention to the special notes when used In coqunchon
with a front passenger alrbag (see Porsche Zoom InstructIons and
your vehicle Owners Manual).
the cloth covering by unzipping and lifting upwards. Wash
carefully in a mild deter ent and warm water (30” C) and hang to
dry. Do not spin or machine dry.
WARNING!
The Porsche
Comfy
sleep rest only
protection
when it is used and installed
with the Porsche
Zoom booster
seat in
instructions
and those for the Porsche
l
The Porsche
Comfy sleep rest is designed,
a proved in accordance
with the requirements
213 governing
rir otor Vehicle Safety Standard
devices.
the Comfy
sleep
rest
on
the Zoom booster seat
tested and
of US Federal
child safety
l
If problems
dealer.
l
l
Installing
provides
effective
properly
in conjunction
accordance
with these
Zoom booster
seat.
arise
No modifications
rest.
during
may
use, please
be made
contact
your
to the Porsche
Porsche
Comfy
sleep
Fold open the fabric tabs over the holes on the rear end of the
Porsche Zoom (fig. I). Lower the Comfy sleep rest so that the
plug-in connectors
(fl
II, 1) engage In the Zoom booster seat
receptacles
(fig. II, 2 7 and lock in position.
“Locking
in” of the
Comfy sleep rest may be enhanced by inserttng the snap wedges
along the plug-in connectors
between the connectors
and the seat
receptacles
(fig. V, 9).
Britax
BRITAX
Child Safety, Inc.
460-R
Creenway
Industrial
Fort Mill, SC 29715
Drive
3
Porsche
Comfy
TM Sleep
Rest page
1 of 2
‘f-7
.
cl+
8
9
.
9
a!J
Porsche
ComfyTM
Sleep
Rest
page
2 of 2
Adjusting
the seat width
Adjusting the width of the seat is only possible when using the
Porsche Zoom on the front passenger seat. When using the
Porsche Zoom on the rear seat, always move the side arm rests
in fully.
Before the child uses the Porsche Zoom, the seat must be adjusted
to the width of the child’s pelvis as follows:
Unlock the seat lock on the underside by opening the retaining
flap (fig. Ill, l), allowing the arm rests (fig. V,2 ) of the Porsche
Zoom to move in and out. Now adjust the arm rests to the seat
width of your child as shown in Figure V and engage the seat Jock
b folding down the retaining flap, The arm rests should stt as
cYose to the child’s pelvis (the widest part of the chi!d’s hipsI,as
possible to ensure the lap belt runs properly, but wlthout bemg
too tight or restrictive for the child.
After you have engaged the lock, let the child t sitting on the
seat cushion and assure you have a comfortab 7 e but snug fit.
Should the adjustable arm rests become loose as time goes
dy, they can be re-adjusted. To do this, proceed as follows:
a) Open retaining flap and move the arm rests fully out.
b) Close retaining flap.
c) Carefully tighten the screws (fig. IV, 3) approx. 1 turn
clockwise. Do not over tighten the screws or you may
damage the plastic parts.
d) Now adjust the seat cushion to the width of the child’s pelvis
as described above.
Zoom”
Child
For Children
includes
Airbag
Booster
from
Seat
37-100
Ibs
Britax Model 431-13
Disconnection
Belt for Porsches
2
Porsche Zoom
Securing the child in the Porsche Zoom on the rear seat
Instructions on installation and use
Please read throu h these instructions carefully before using the
Porsche Zoom. B he Porsche Zoom is suitable for protecting
children between the a es of 4 and 12 years or weighing between
37 and 100 lb (17 an cf 45 kg).
b) Fasten the lap and shoulder belt, ensuring that the shoulder belt
portion passes over the child’s collarbone (fig. I, II).
WARNING!
It is possible
to secure the child or Porsche
Zoom in the
car incorrectly.
This could cause severe injury or death if
there is an accident.
Therefore
please read through
the
following
information
carefully
and make
sure that
- the Porsche
Zoom
is secured
with the seat belts as
described
in the instructions.
- the disconnection
belt tongue
is inserted
in the
disconnection
belt buckle
in front
of the Porsche
front
passenger
seat to turn off the front passenger
airbag.
The Porsche Zoom should always be used in the rear seat and in
conjuncfion with a lap and shoulder belt. The disconnechon belt
on the Porsche Zoom has no function there. Under no
circumstances
can the Zoom be fastened
with only a lap
2 pomt) belt. If necessary
(2-seat
cars) Porsche
test@
b-as shown
.
that the Zoom may be used In a Porsche
with
an airbag, if the seat is moved all the way rearward.
Porsche
strongly
recommends
that the air bag be turned
off by
insertmg
the air bag disconnection
belt ton ue on the
Porsche
Zoom into the disconnection
belt but 1 le In front
of the front
passenger
seat. This adapter device must be
a) Ensure that the arm rests are adjusted fully in. Place the Porsche
Zoom on the seat and have the child sit in the Porsche Zoom.
c) The lap belt portion must pass as low as possible over the child’s
pelvis and under the arm rests (fig. I, 4).
For smaller children, when the belt does not pass over the collarbone,
the shoulder belt should be correctly positioned by the belt holder
clip (fig. II, 5) of the back belt. This prevents the shoulder belt from
sitting too close to the neck.
ushed
fully
into the
Pull on the lap and shoulder belt until it fits the child snugly and does
not twist.
Securing the child in the Porsche Zoam on the front passenger
seat
Porsche testing has shown the Porsche Zoom may also be used on
the front passenger seat with the passenger seat moved to Its
rearmost position. Porsche strongly recommends
that the air
bag be turned
off by insertin
the air bag disconnection
belt
tongue on the Porsche
Zoom ‘i-fig. II, 9) into the disconnectlon
belt buckle
in front of the front passenger
seat (fi . II, 8).
installed by an authorized Porsche dealer when purchasing the
Porsche Zoom. If our vehicle has a seat belt with an automatlc
locking retractor (x LR) you may want to engage it to help prevent
unwanted movement of the child seat during normal drlvlng.
This adapter device must be Installed by an authorized f orsche
dealer when purchasing the Porsche Zoom.
Furthe,r
information
OIJ this can also
&s;JEslanual
under
Child Restraint
Warning:
Never
any non-Porsche
be found
Systems
in th! car
and Alrbag
use this Porsche
vehicle unless
Zoom in the front
the airbag is off!
seat of
Porsche ZoomTM Child Booster Seat page 1 of 3
V
2
Porsche
ZoomTM
Child
Booster
Seat page 2 of 3
Further information on this can also be found in the Owner’s
Manual under “Child Restraint Systems and Airbag Systems”.
a) Ensure the seat width is adjusted correctly to fit the child.
b) Fasten the lap and shoulder belt seat belt, ensuring that the
shoulder belt portion passes over the chrld’s collar bone (fig. I,
II).
c) The lap belt portion must pass as low as possible over the pelvis
and under the arm rests (fig. I, 4).
For smaller children, when the belt does not pass over the collarbone,
the shoulder belt should be correctly positioned b the belt holder
(fig. II, 5) of the back belt. This prevents the shouYder belt from
sitting too close to the neck.
lt is im ortant that the shoulder belt is pushed fully into the
ooen sPot of the belt holder clip and that the length of the bett
holder is adjusted so that the’shoulder harness-passes over
the child’s collar bone and does not rub on the child’s neck.
Pull the lap and shoulder belt seat belt until it fits snugly and does
not twist.
d) Turn off the front passen er airba by inserting the disconnection
belt tongue (fig. II, 9) on tfl e Porsc7l e Zoom into the disconnection
belt adapter buckle in front of the Porsche front passenger seat
(fig. II, 8). The red disconnection belt should be slack.
The backrest of the vehicle seat must be
There should be no heavy, sharp-ed
in the vehicle [e.g. on the rear she
the child or otheroccupants
in an accident and cause
injury.
lf e;lbFms arise during use, please contact your Porsche
a
.
No modifications
may be made to the Porsche Zoom.
The Zoom ma be damaged after an accident with an
impact spee J above 6 mph 10 km/h). The Porsche
Zoom must then be checked 1or damage and replaced
if necessary.
So that your child does not get burned by hot items, the
Porsche Zoom should be covered with a towel or blanket
and not be left in direct sunlight.
Please never leave your child alone unattended
child seat or in the car.
in the
lf the Porsche Zoom is carried in the car without a child,
it must be secured with the belt.
e) Ensure that the tongue for switching off the front passenger
airbag is correctly inserted as follows. Turn the ignition key to
the on position ( osition 2). The airbag warning kght in the
instrument pane Pshould flash for 10 seconds and then
indicating that the front passenger airba
your Owners Manual for further details.
that the air bag is turned off do not
with your Porsche dealer for assistance.
Figure II shows the correct belt ath and the disconnection
belt and buckle for turning off tit e Porsche front passenger
airbag.
The Porsche Zoom and Comfy backrest are very important because
they help the lap and shoulder belt, which were desrgned for adults,
sit correctly over the child’s pelvis and shoulder.
The correct position of the belt system is critical in an accident
as the lar e su port area of the booster seat cushion arm rests
reduce ta e c Iiante of the child slipping under the belt.
Care and Maintenance
Remove the cloth coverings as follows: Unbutton the seat covering
(fig. Ill 6) and pull the covering forward. Pull the belt holder
through the slot in the covering and pull the cover off the front.
The armrest coverin s are attached by elastic bands at the rear
(fig. V, 7) which must i e unhooked. The coverings can be replaced
if damaged.The coverin s may be washed in a mild detergent and
warm water (30°C) and% ung to dry.
Warning
This child seat provides effective protection only when
it is used and Installed properly in accordance with
instructions in this booklet.
l
The Porsche Zoom must never be used in conjunction
with a 2-point lap belt only!
l
l
The Porsche Zoom is designed, tested and approved in
accordance with the requirements of US Federal Motor
Vehicle Safety Standards governing child safety devices.
Britax
ISSUE
BRITAX Child Safety, Inc.
460-R Greenway
Industrial
Fort Mill, SC 29715
Drive
1
Porsche
ZoomTM
Child Booster
Seat page 3 of 3