1
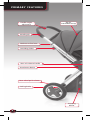
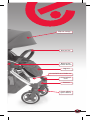
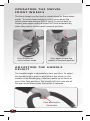
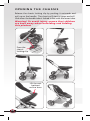
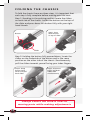
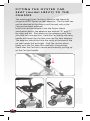
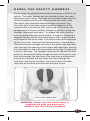
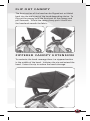
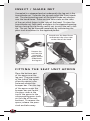
register your product at www.babystyledirect.co.uk
INSTRUCTION MANUAL
CONTENTS
Page
2
Important Safety Information
3
Primary features
4-5
Fitting and removing the front wheels
6
Fitting and removing the rear wheels
7
Operating the swivel front wheels
8
Adjusting the handle height
8-9
Using the parking brake
9
Opening the chassis
10
Fitting the seat unit
11
Removing the seat unit
11
Folding the chassis
12
Folding the chassis with the seat unit fitted
13
Adjusting the seat unit backrest
14
Fitting the carrycot to the chassis
14
Removing the carrycot from the chassis
14
Lowering the carrycot hood
15
Fitting and removing the bumper bar
15
Fitting the Oyster car seat to the chassis
16
Removing the Oyster car seat from the chassis
17
Carrycot/Car seat height adaptors
17
Car seat adaptors
18
Car seat options
18
Fitting removing alternative car seats to the Oyster chassis
19-20
Using the safety harness
20-21
Hood/Sun canopy
22
Removing/Fitting the hood
22
Flip out canopy
23
Zippered canopy extension
23
Insect/shade net
24
Fitting the seat unit apron
24
Fitting the footmuff
25
Fitting the stroller rain cover
25
Fitting the carrycot rain cover
25
Care and Maintenance
26
Warranty
27
I M P O R TA N T S A F E T Y I N F O R M AT I O N
Read these instructions carefully before use and keep
them for future reference. Your child’s safety may be
affected if you do not follow these instructions
1.
WARNING: A child’s safety is your responsibility
2.
WARNING It may be dangerous to leave your child unattended.
3.
WARNING Ensure that all locking devices are engaged before use.
4.
WARNING Do not use a mattress thicker than 35mm
5.
This vehicle is intended for children from birth to a maximum weight
of 15kg. Age and weight usage: Pram body/carrycot 0 to 9kg, Car
seat 0 to 13kg, Seat unit 6 months to 15kg
6.
It is important that any person intending to use this vehicle fully
understands the instructions.
7.
WARNING Use a harness as soon as your child can sit unaided.
8.
WARNING This seat unit is not suitable for children under 6 months.
9.
Never overload the vehicle; the weight limit for the shopping tray is
3 kg. Always place articles in the centre of the tray provided.
10. This vehicle has been designed for one child, do not attempt to
carry more than one child in this vehicle. A second child may travel on
the Oyster Ride on board up to a maximum weight of 20kg
11. WARNING: Incorrect assembly, folding or use of this vehicle may
cause damage and affect the safety of the vehicle.
12. Do not use accessories that are not approved by the manufacturer
13. WARNING Any load attached to the handle affects the stability of
the pram/pushchair.
14. WARNING Always use the crotch strap in combination with the
waist belt.
15. WARNING: Never leave the vehicle without first engaging the
parking device. Avoid uphill or downhill parking.
16. WARNING Check that the pram body or seat unit attachment
devices are correctly engaged before use.
17. Do not use the vehicle on steps, stairs or escalators as it may be
dangerous to your child/children.
18. WARNING This product is not suitable for running or skating
19. Check on a regular basis to make sure that all essential components
& locking devices are functioning correctly.
20. Do not use replacement parts other than those supplied by the
manufacturer or distributor.
21. WARNING! To avoid injury ensure that your child is kept away when
unfolding and folding this product.
22. WARNING! Do not let your child play with this product
23. All references to Left and Right are given from the perspective of a
person standing in the pushing position
3
P R I M A RY F E AT U R E S
Handle height
adjustment
Zip for
extendable canopy
Handle grip
Backrest recline lever
Unfolding sliders
Seat unit release handle
Attachment device
Rear wheel quick release
Parking brake
Shopping
basket
4
Flip out canopy
Bumper bar
Bumper bar
release button
Leg rest
Concealed insect/shade net
Swivel wheel
locks
Footrest
Front wheel
quick release
5
FITTING AND REMOVING THE
FRONT WHEELS
Push in the front wheel quick release button on the front
wheel housing and push the wheel unit onto the front
wheel axle stub until it stops. Release the quick release
button and check that the wheel is locked on. To remove
the wheel; push in the front wheel quick release button on
the front wheel housing and pull the wheel unit from the
axle stub. NOTE, the axle stubs can become greasy and may
leave marks on other surfaces they come into contact with.
To prevent marking clean the axle stubs with a cloth.
To keep the front wheels swivelling freely ensure they are
regularly lubricated. If steering becomes stiff, remove front
wheel units, clean, lubricate and refit.
Press and hold
wheel release Button
6
FITTING AND REMOVING THE
REAR WHEELS
Hold the rear wheel and insert the rear wheel axle stub into
the hole in the rear axle. Push in completely until you hear a
click. Pull the wheel to check it is locked on. To remove the
rear wheel, push in and hold the rear wheel quick release
lever (on the rear axle) and pull the rear wheel from the
axle. NOTE, the axle stubs can become greasy and may leave
marks on other surfaces they come into contact with. To
prevent marking, clean the axle stubs with a cloth.
Press and hold
wheel release Button
7
O P E R AT I N G T H E S W I V E L
FRONT WHEELS
The front wheels can be used in swivel-wheel or fixed-wheel
mode. To switch from locked to swivel; press down the
swivel wheel lock buttons (left & right), to switch back to
locked; press again and the wheels will lock automatically
when they return to the travel forwards position.
Press DOWN for
swivel-wheel mode
Press again to lock the
wheels in forwards position
ADJUSTING THE HANDLE
HEIGHT
The handle height is adjustable to four positions. To adjust
the handle height, press-in and hold in the button in the
middle of the handle grip, slide the handle up or down to
one of the four positions. The handle will click into one of
the pre-set positions when the button is released.
Press and hold in
the button
8
Pull handle to
adjust height
to one of four
positions
U S I N G T H E PA R K I N G B R A K E
To engage the brake, firmly press down with your foot the
brake lever found in the middle of the rear axle. Check that
the brake is fully engaged before letting go of the handle.
To release the brake, with your foot press forwards or lift up
the brake lever until the wheels move freely.
NEVER Leave the vehicle without first
engaging the brake.
lever UP Brake OFF
lever DOWN Brake ON
9
OPENING THE CHASSIS
Release the chassis locking clip by pushing it outwards and
pull up on the handle. The chassis will start to open and will
click when the handle tube is locked in line with the lower tube.
Warning! To avoid injury ensure that children
are kept away when unfolding and folding
this product
Press the
chassis
locking clip
Lift the seat
backrest
recline lever
10
F I T T I N G T H E S E AT U N I T
To fit the seat unit to the chassis: hold the seat unit by the
seat unit release handles and lower the seat unit into the
attachment devices left & right. Push down until the seat
clicks and locks into position. Ensure the seat is locked into
position by trying to pull the seat from the chassis. The seat
can be fitted facing forwards or facing backwards.
R E M O V I N G T H E S E AT U N I T
Hold the seat unit by the seat sides and the seat unit release
handles (left & right) and pull the handles up with your fingers.
The seat will be released from the attachment device.
NEVER attempt to fit or remove the seat unit
while the seat unit is occupied.
Pull UP on release
handles to
remove Seat Unit
11
FOLDING THE CHASSIS
To fold the chassis there are three steps, it is important that
each step is fully complete before moving onto the next:
Step 1: Standing in the pushing position locate the sliders
on each side of the chassis. Locate the button on the top of
the slider and press down this button fully with your right
hand thumb.
Step 1. Press
down button
on top of slider
Button
Slider
Step 2: Holding the button fully pressed down, locate the
sliders on the underside of the button and in the same
position on the other side of the chassis. Simultaneously
pull the sliders towards yourself using your index fingers.
Step 2. Keep
button held
down and pull
back slider
Step 2. Alternate
angle, pull both
sliders back
simultaneously
Always ensure the child is clear of
moving parts while making adjustments
12
Step 3. Lift the
handle and
push away from
yourself
Step 3: With the button held fully
down and the sliders fully pulled
back, lift the whole handle and
push away from yourself. If the
handle does not move easily it is
likely that the button is not fully
pressed down and/or the sliders
are not fully pulled back, if this
happens repeat steps 1 and 2
until the handle moves easily in
the direction shown by the arrow
in the image below.
CAUTION: It is important when folding the
chassis that the button is fully pressed down
and that the sliders are fully lifted before
lifting the handle is lifted, failure to ensure
this is could damage the folding device.
FOLDING THE CHASSIS WITH
T H E S E AT U N I T F I T T E D
The Oyster can be folded with the seat unit fitted facing
either forwards or backwards.
To fold the chassis with the seat unit facing forwards:
Remove the bumper bar. Pull the backrest seat recline
lever and fold the backrest forward so that it lies
completely flat on the seat base. If the seat back rest stops
before it is completely flat, lift the backrest seat recline
lever a little more, and lower the seat back rest. The
chassis can now be folded as described above in “FOLDING
THE CHASSIS”
To fold the chassis with the seat unit facing backwards:
Remove the bumper bar. Pull the backrest seat recline lever
and fold the backrest so that it lies completely flat on the
seat base. If the seat back rest stops before it is completely
flat, lift the backrest seat recline lever a little more, and
lower the seat back rest. The chassis can now be folded as
described in “FOLDING THE CHASSIS”
The most compact fold is achieved with the seat unit
removed.
13
A D J U S T I N G T H E S E AT U N I T
BACKREST
Lift the seat backrest
recline lever to adjust
backrest angle
To recline the seat unit:
With your fingers, hold the
lever at the top back of the
seat unit and lift the lever.
While holding the lever,
reposition the backrest
to the required position.
The seat backrest has
three positions; upright,
intermediate and reclined.
When the seat backrest is
in the required position,
release the lever and the
seat will lock into position.
F I T T I N G T H E C A R RY C O T T O
THE CHASSIS
The Carrycot can only be fitted to the chassis when the seat
unit or car seat has been removed. The carry cot can only
be fitted to the chassis facing the handle. Lower the carry
cot so that the fittings in the middle of the carrycot line up
with the attachment device. Push the carrycot down until
it clicks into position. Check that the carrycot is securely
attached by trying to lift the carrycot from the chassis.
R E M O V I N G T H E C A R RY C O T
FROM THE CHASSIS
Pull UP on
release handles
to remove
Carrycot
14
To remove the
carrycot from the
chassis: Hold the
Carrycot by the two
release handles, and
pull the handles up
with your fingers.
The carrycot will be
released from the
attachment device.
L O W E R I N G T H E C A R RY C O T
HOOD
The carrycot hood can be lowered (reclined backwards)
by pressing in the two buttons (left & right) at the outside
base of the hood opening. Push in the buttons and recline
the hood. To erect the hood; lift up the hood until it clicks
into position.
Push the
hood
recline
buttons
Children should be clear of moving
parts while making adjustments.
FITTING AND REMOVING THE
BUMPER BAR
Push the ends of the bumper bar into the corresponding
slots on the seat unit until the bumper bar locks into
position. To remove the bumper bar, press in the bumper
bar release button on the side of the seat; one on the right
side one on the left side. The position of the bumper bar
can be adjusted by pressing the buttons on the insides of
the bumper bar.
bumper
bar release
button
15
FITTING THE OYSTER CAR
S E AT ( m o d e l L B 3 2 1 ) T O T H E
CHASSIS
The matching Oyster Car Seat is fitted to the chassis by
using the LB321 Oyster car seat adaptors. The Car Seat can
not be attached to the chassis until the seat unit or the
Carrycot has been removed.
Insert the Car Seat adaptors into the Oyster chassis
attachment device, the adaptors are marked “R” and “L”
for right and left. Push down on the adaptors until they
click and lock into position. Hold the Car Seat by the carry
handle and lower the Car Seat onto the Car Seat adaptors.
The adaptors should slot into the cavity at the base of the
car seat handle left and right. Push the car seat down
firmly until the Car Seat clicks and locks into position.
Check that the Car Seat is secure and locked by pulling up
on the Car Seat handle.
16
REMOVING THE OYSTER CAR
S E AT ( m o d e l L B 3 2 1 ) F R O M
THE CHASSIS
To remove the Car Seat from the chassis; press down on
the two red buttons on the sides of the Car Seat (not the
handle adjustment buttons where the handle turns) and lift
the Car Seat away from the chassis.
To remove the adaptors on the Oyster chassis pull up on
the recessed handles and lift the adaptors away from the
attachment device.
C A R RY C O T / C A R S E AT H E I G H T
ADAPTORS (Optional)
The Oyster Carrycot and selected Car Seats (see table page
11) can be raised in height by use of the height adaptors.
To fit the height adaptors; insert the adaptors (marked L
for left and R for right) into the attachment device and
ensure they are locked into position. Lower the carrycot
or Car Seat onto the adaptors and press down. Check that
the Carrycot or car Seat is secure and locked by trying to
lift away from the chassis. To remove the Carrycot, hold
the Carrycot by the two release handles, and pull the
handles up with your fingers. The Carrycot will be released
from the height adaptors. To remove the Car Seat press
down on the two buttons on the sides of the Car Seat (not
the handle adjustment
buttons used to operate
the handle recline) and
lift the car seat away
from the height adaptors.
17
O Y S T E R C A R S E AT A D A P T O R S
OYSTER (LB321) Car Seat adaptor
Multi Car Seat adaptor
Recessed handles for removing car seat adaptors from chassis
C A R S E AT O P T I O N S
The Oyster chassis can be combined with car seats from other
leading brands. For details, see the table below. Always check
with your retailer that you have the correct car seat adaptors if
adaptors are required.
ADAPTOR TYPE
CAR
SEAT
OYSTER Car Seat
(LB321)
No
Adaptor
required
OYSTER
LB321
adaptor
required
Multi
Adaptors
required
Carrycot/
Car Seat
height
adaptors
required
I ntegral
adaptor
supplied
with car
seat
Optional
MAXI-COSI
CabrioFix
MAXI-COSI Pebble
Optional
BRITAX BABYSAFE plus SHR
Optional
BRITAX BABYSAFE plus SHR II
BRITAX BABYSAFE for Oyster
Optional
Cybex Aton
Optional
NOTE: The BRITAX BABY-SAFE plus SHR II requires the
OYSTER Carrycot/Car Seat Height Adaptors.
18
F I T T I N G A C A R S E AT T O T H E
OYSTER CHASSIS USING THE
M U LT I A D A P T O R S
The Car Seat can not be attached to the chassis until the seat
unit or the Carrycot has been removed.
Insert the Car Seat adaptors into the Oyster chassis attachment
device, the adaptors are marked “1” and “2”, 1 is right and 2 is
left. Push down on the adaptors until they click and lock into
position. Hold the Car Seat by the carry handle and lower the
Car Seat onto the car seat adaptors, the adaptors should slot
into the cavity at the base of the Car Seat handle left and right.
Push the car seat down firmly until the car seat clicks and locks
into position. Check that the Car Seat is secure and locked by
pulling up on the Car Seat handle.
R E M O V I N G A C A R S E AT F R O M
THE OYSTER CHASSIS WHEN
F I T T E D W I T H T H E M U LT I
ADAPTORS
To remove the Car Seat from the chassis: Press down on the
two buttons on the sides of the Car Seat (not the handle
adjustment buttons used to operate the handle recline) and lift
the Car Seat away from the chassis.
To remove the adaptors from the OYSTER chassis pull up on
the recessed handles and lift the adaptors away from the
attachment device.
F I T T I N G T h e B r i t a x B A B YSAFE plus SHR TO THE OYSTER
C H A S S I S ( n o a d a p t o r s re q u i re d )
The Car Seat can not be attached to the chassis until the seat
unit or the carrycot has been removed. The Britax Baby Safe
plus SHR does not require adaptors to fit onto the OYSTER
chassis. Hold the car seat by the carry handle and lower the
car seat onto the chassis so that the fittings below the car seat
handle slide into the attachment device on the OYSTER chassis.
Push the car seat down firmly until the car seat clicks and locks
into position. Check that the car seat is secure and locked by
pulling up on the car seat handle.
19
R E M O V I N G T H E B r i t a x B A B YS A F E S H R C A R S E AT F R O M T H E
OYSTER CHASSIS
Hold the carry handle of the Car Seat and press one of the
buttons on the top of the handle with your thumb. While
holding in the button press with your fingers on the larger
button and lift the Car Seat away from the chassis.
F I T T I N G T H E B r i t a x B A B Y- S A F E
f o r O Y S T E R C A R S E AT
The car seat cannot be attached to the chassis until the seat
unit or the carrycot has been removed. Insert the Britax car
seat adaptors into the car seat following the instructions
provided with the Britax car seat, these adaptors need to be
inserted one time and are then integral to the seat unit. Hold
the car seat by the carry handle and lower the car seat onto
the chassis until the adaptor fittings below the car seat handle
slot into the corresponding attachment device on the Oyster
chassis. Push the car seat down firmly until it clicks and locks
into position. Check that the car seat is secure and locked by
pulling up on the car seat handle.
R E M O V I N G T H E B r i t a x B A B YS A F E f o r O Y S T E R C A R S E AT
Hold the car seat by the recessed handles in the adaptors located
below the base of the car seat carry handle. Pull up on the two
adaptor handles and lift the car seat away from the chassis.
OYSTER HARNESS
Shoulder
strap and
buckle
Shoulder
strap and
buckle
Waist belt
& buckle
Waist belt
& buckle
Centre
harness
buckle
20
Crotch
strap
buckle
USING THE SAFETY HARNESS
Always apply the parking brake before placing your child in the
vehicle. The safety harness has two shoulder straps, two waist
belts and a crotch strap. Place the two shoulder straps over the
child’s shoulders and the waist belts around the child’s waist.
The crotch strap should be placed between the child’s legs.
The waist belts & shoulder straps should be clipped into the
centre buckle at the end of the crotch strap. The harness can
be adjusted to suit your child by sliding the adjusters along the
shoulder straps and waist belts. To release the safety harness,
push the buttons on the centre buckle. D-rings for attaching a
separate harness can be found attached to the integral harness
at the base of the waist straps. The crotch strap can be adjusted
to suit your child. There are two button holes in the seat base.
Thread the buckle through the hole in the plastic seat base and
then through the opening in seat covers and reposition, passing
back through first the seat cover and then through the opening
in plastic seat base. The shoulder straps can be adjusted to two
positions; thread the buckle through the hole in the plastic seat
back and through the opening in the seat cover and reposition
passing first through the seat cover and then through the
opening in the plastic seat back. Ensure that both shoulder
straps are at the same level and that both are secure.
with comfort pads fitted
WARNING Always use the crotch strap in
combination with the waist belt.
ALWAYS USE THE SAFETY HARNESS
21
HOOD/SUN CANOPY
The Oyster has a multi function hood that helps to protect
your child from the elements. The hood has four sections
and a viewing window. The hood can also be removed
altogether.
TO REMOVE/ FIT THE HOOD
Release the two press-studs at the back of the hood where
the hood attaches to the backrest. Release the Velcro
fastening just above the two press-studs. Fold the hood
back; hold the hood by the frame in the centre and pull the
hood up in line with the back rest, the hood will slide away
from the fittings on the side of the seat back rest. To fit the
hood. Line up the plastic components on the hood sides
(one left, one right) and slide them into the corresponding
plastic parts on the sides of the seat back rest. Push them
down until they click into position. Fasten the Velcro on
the hood to the seat back and secure the press-studs.
Line up
the hood’s
connecting
bars with the
connecting
slots
Slide the
components
together
Pull the
back of
the hood
over the
Seat Unit
Connect the press-studs
22
FLIP OUT CANOPY
The front section of the hood can be flipped out or folded
back into the main part of the hood depending choice. To
flip out the canopy hold the front part of the canopy and
pull forwards. To fold the canopy away push it back into
the hood and smooth the fabric.
ZIPPERED CANOPY EXTENSION
To maximise the hood coverage there is a zippered section
in the middle of the hood. Unfasten the zip and extend the
hood. Fasten the zip to reduce the hood coverage.
23
INSECT / SHADE NET
Concealed in a zippered pocket underneath the leg rest is the
Insect/shade net. Unfasten the zip and unfurl the Insect/shade
net. The elasticated top part of the Insect/shade net attaches
over the hood frame. There are two Velcro tabs on the sides
of the net which fasten to the sides of the hood. To stow the
Insect/shade net; fold neatly and place in the zippered opening
before closing the zip; being careful not to catch the net in the
zip. The net can be removed completely by unfastening the
press-stud attachment in the zippered pocket.
Stretch over the hood frame
and connect the velcro tabs
to the sides of the hood
Remove the
net from the
concealed
zipper pocket
underneath
the leg rest
F I T T I N G T H E S E AT U N I T A P R O N
Place the bottom part
of the apron over the
leg rest. The press-studs
at the side of the apron
allow the apron to be
fastened around the
bumper bar. Pass the top
of the apron under the
bumper bar and fasten
the press-studs at the
top of the apron to the
corresponding press-studs
on the side of the seat
backrest. To remove the
apron, release the pressstuds and take away.
24
FITTING THE FOOTMUFF
The footmuff top cover can be removed by unfastening the
zip. The base of the footmuff can be used as a seat liner
without the top part.
To attach the footmuff to the seat unit: Release the harness
clips from the centre buckle and release the shoulder straps
from the waist belts at the buckle connection. Pass the
shoulder straps and waist belts through the corresponding
openings in the footmuff. Pass the crotch strap through
the opening in the footmuff. Attach the two press-studs at
the rear top of the seat backrest to the two press-studs on
the top of the footmuff.
FITTING THE STROLLER RAIN
COVER
Place the rain cover over the stroller; the rain cover needs
the stroller hood to be fitted to support the rain cover.
Fasten the Velcro strips at the front of the rain cover
around the front legs of the stroller (when the seat unit is
facing forwards). When the seat unit is facing rearwards,
fasten the Velcro strips at the front of the rain cover around
the rear legs to secure. Fasten the strap at the back of the
seat unit by joining the press-studs.
F I T T I N G T H E C A R RY C O T R A I N
COVER
With the carrycot hood in the upright position place the
rain cover over the hood so that the flap on the rain cover
corresponds with the opening in the carry cot hood. Pull
the rain cover down to the rear of the hood so that the
elasticated edge covers the rear of the carrycot. Ease the
front part of the rain cover over the apron and down and
around the front and sides of the carrycot.
25
CARE AND MAINTENANCE
• Regularly check screws, rivets, bolts & fastenings to ensure
they are locked tight and secure. Replace any parts in an
inferior condition. Should you intend to use the pushchair
during the winter, by the sea or off-road; it is important to
clean thoroughly & dry the vehicle after use. Salt from the
ocean or from roads will corrode metal parts unless
removed. After use in these circumstances clean with fresh
water and thoroughly dry after use.
• Check on a regular basis that all chassis locking devices are
working correctly.
• If any part of the pushchair is damaged contact your local
Babystyle retailer immediately without using the pushchair.
• Do not expose your pushchair to excessive sunlight for
extensive periods of time, even normal exposure to sunlight
may cause the colour of the fabric to change.
• Take care not to tear the fabrics while transporting the
pushchair.
• Light oil or silicone spray is suitable to use as a lubricant for
moving parts. Petroleum jelly is a good lubricant to use on
the front axle stubs. Periodically remove the front swivel
wheel units clean and lubricate with petroleum jelly.
• Ensure that zips are either fully open or fully closed or they
may be damaged.
• Always use the rain cover in inclement weather.
• Do not place items on the hood/canopy, it may damage the
vehicle and/or render it unsafe.
• Rubber tyres can leave marks on some surfaces. The tyres
can react with some surfaces (vinyl floor coverings, carpets
etc.) and cause stains. Always stand the stroller on a
protective surface indoors.
• Routinely clean the metal parts with a damp cloth & then
dry immediately
• Fabrics should be cleaned following the guidance on the
care labels.
• Do not wash in the washing machine. Sponge clean or
hand wash with mild detergent and warm water (30°C)
26
WARRANTY
A stroller has many moving parts and requires regular
maintenance by the user. Simple cleaning and lubricating
will make the stroller look good & operate better for
longer. The stroller will be used in many different
environments, country walks, a trip to the coast; a winter’s
walk to school, all can increase wear; lead to rust and
corrosion and reduce the life of the product. Regular
cleaning; care and maintenance will reduce the effects of
the environment on the stroller. The warranty does not
protect the stroller against overloading, misuse, neglect or
lack of care and maintenance by the user.
Babystyle UK Ltd provides a warranty in support of the
retailer from whom you purchased this product. The
warranty is effective for 12 months from the date of
purchase for the original purchaser/owner. Proof of
purchase will (at the discretion of Babystyle UK Ltd) be
required in order for your retailer to claim on the
warranty. The warranty excludes any fault caused by
misuse, damage or neglect. It is the user’s responsibility to
undertake routine inspection and maintenance of the
vehicle in order to avoid damage to the vehicle and/or
injury to the child. The vehicle is returned to the retailer at
the owners’ expense in order to ascertain if a claim under
the warranty is justified. Please carefully read the
instructions on how to look after your stroller. This does
not affect your statutory rights.
27
www.oysterstroller.com
BabyStyle UK Limited
LE12 7RJ
UNITED KINGDOM
This instruction manual
BabyStyle UK Limited 2013
All rights reserved. OYSTER AJB1620/12062013