1
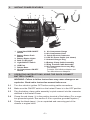
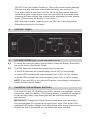
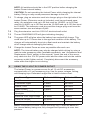
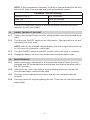
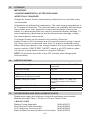
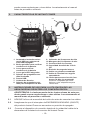
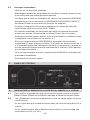
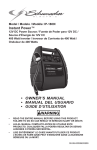
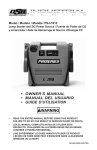
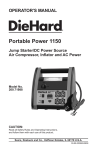
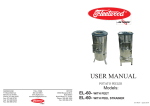
Model IP-180KE
INSTANT POWER™
Jump Starter, Air Compressor, Light & 12V DC
Power Source Plus 5V USB
Owner’s Manual
READ ENTIRE MANUAL BEFORE
USING THIS PRODUCT
00-99-000838/0808
Table of Contents
SECTION
Page
1. IMPORTANT SAFETY INSTRUCTIONS
1
2. product features
2
3. operating instructions (using battery clamps) 2
4. operating instructions (using ring terminals) 3
5. control panel
4
6. led indicators 4
7. charging the internal battery 4
8. using the 12v dc power outlet
5
9. using the usb port
6
10. using the air compressor
6
11. using the built in light
7
12. maintenance
7
13. storage
8
14. specifications
8
15. accessories and replacement parts
8
16. warranty
9
espaÑol
1. INSTRUCCIONES DE SEGURIDAD IMPORTANTES
12
2. CARACTERÍSTICAS DE INSTANT POWER
13
3. instrucciones de uso para la utilizacion DE
LAS ABRAZADERAS DE BATERÍA DE CONEXIÓN RÁPIDA 13
4. INSTRUCCIONES DE USO, PARA LA UTILIZACIÓN
DE LOS TERMINALES TIPO ANILLO DE CONEXIÓN RÁPIDA
14
5. Panel de control 15
6. INDICADORES LUMINOSOS 15
7. CARGA DE LA BATERÍA INTERNA 16
8. UTILIZACIÓN DE LA SALIDA DE 12 V CC
17
9. UTILIZACIÓN DEL PUERTO USB
18
10. UTILIZACIÓN DEL COMPRESOR DE AIRE
18
11. UTILIZACIÓN DE LA LUZ EMPOTRADA
19
12. MANTENIMIENTO
19
13. ALMACENAMIENTO
19
14. ESPECIFICACIONES
20
15. ACCESORIOS Y REPUESTOS
20
16. GARANTÍA
21
IMPORTANT: CHARGE IMMEDIATELY AFTER PURCHASE
IMPORTANT: read and save this safety and instruction manual.
1.
IMPORTANT SAFETY INSTRUCTIONS
Charge the Instant Power internal battery immediately upon purchase,
every 30 days and after every use.
1.1
Use in a well-ventilated area.
1.2
Keep clear of fan blades, belts, pulleys and other parts that may cause
injury.
1.3
To prevent sparking, NEVER allow clamps to touch together or contact the
same piece of metal.
1.4
Turn the vehicle’s ignition OFF before making cable connections.
1.5
Consider having someone close enough by to come to your aid when you
work near a lead-acid battery.
1.6
Have plenty of fresh water and soap nearby in case battery acid contacts
skin, clothing, or eyes. If acid enters the eye area, rinse with cold water for
at least 10 minutes and get medical help immediately.
1.7
Do not smoke, or use matches or cigarette lighter, or allow any spark or
flame near the battery or engine.
1.8
Never operate the jump starter if it has a damaged lead wire or clamps.
1.9
Wear complete eye and clothing protection when working with any battery.
1.10 Do not permit the internal battery of the Instant Power to freeze. A fully
charged battery will not freeze - refer to the storage section of the manual.
1.11 Never charge a frozen battery.
1.12 The Instant Power contains a sealed, non-spillable, lead-acid, internal battery that must be disposed of properly.
WARNING: Possible explosion hazard. Contact with battery acid may
cause severe burns and blindness. Keep out of reach of children.
WARNING: Pursuant to California Proposition 65, this product contains
chemicals known to the State of California to cause cancer and birth defects or other reproductive harm.
WARNING: Failure to follow instructions may cause damage or an explosion. Read entire manual before use.
•1•
2.
instant power features
14
1
5
6
3
2
15
13
8
9
4
12
11
7
10
1. Jump Start/USB ON/OFF
Switch
2. Battery Status Push
Button
3. Battery Status Lights
4. Built in LED Light
5. Light ON/OFF Switch
6. USB Port
7. Rubber Base
8. Air Compressor ON/OFF
Switch
3.
9. Air Compressor Gauge
10.Air Compressor Hose
11.Quick-Connect Connector
12.12V DC Power Outlet (not shown)
13.Internal Charger Plug
14.Battery Clamp Cable Assembly
15.Ring Terminal Cable Assembly
16.Air Compressor Accessory Bag
(not shown)
Contains: Ball Inflation Adapter and
Two Miscellaneous Adapters
OPERATING INSTRUCTIONS, USING THE QUICK-CONNECT
battery clamps
WARNING: Failure to follow instructions may cause damage or an
explosion. Read entire instruction manual before use.
3.1
Turn the vehicle’s ignition OFF before making cable connections.
3.2
Make sure the ON/OFF switch on the Instant Power is in the OFF position.
3.3
Plug the battery clamp cable assembly’s quick-connect into the connector
attached to the Instant Power.
3.4
Clamp the red clamp (+) to the positive terminal of the battery (For a negative grounded system. See section 3.9 for a positive grounded system.)
3.5
Clamp the black clamp (-) to an unpainted and unmoving part of the
chassis or engine block.
•2•
3.6
If you have connected the clamps of your Instant Power backwards, an
audio alarm will sound. DO NOT turn your Instant Power on. This could
cause serious damage. Reverse the connections, and the audio alarm will
stop.
3.7
If no audio alarm is sounded, turn ON the Jump Start switch and then
crank the engine. If the engine does not start within 5-8 seconds, stop
cranking and wait at least one minute before attempting to start vehicle
again. (This permits the battery to cool down.)
3.8
After the engine starts, make sure to turn OFF the Jump Start switch.
Then disconnect the black clamp (-) and then the red clamp (+) in that
order. Store the clamps on the ears located the back of the case.
3.9
NOTE: In the rare case of jump-starting a vehicle that has a positivegrounded vehicle electrical system, connect the NEGATIVE black clamp
(-) to the negative terminal (-) of the vehicle battery. Then connect the
POSITIVE red clamp (+) to an unpainted and unmoving part of the vehicle
chassis or engine block. If you are unsure of the nature of the vehicle’s
electrical grounding system, check the owner’s manual of the vehicle. To
disconnect clamps, reverse these steps.
4.
operating instructions, using the quick connector
ring terminals
WARNING: Failure to follow instructions may cause damage or an
explosion. Read entire instruction manual before use.
4.1
Mounting the Ring Terminal Cable Assembly to the Battery
• The ring terminals can be permanently mounted to the battery. If permanently mounted, make sure to securely mount the quick-connect connector. Confirm that the ring terminal cable assembly is not obstructing or
touching any live, hot or moving components in the vehicle. ALWAYS ensure ring terminals are properly mounted and tight prior to jump starting.
• Turn the vehicle’s ignition OFF before making ring terminal connections.
• Attach the red ring terminal (+) to the positive terminal of the battery.
• Attach the black ring terminal (-) to the negative terminal of the battery.
4.2
Jump Starting
• Use in a well-ventilated area.
• Keep clear of fan blades, belts, pulleys and other parts that may cause
injury.
• Make sure the vehicle ignition is OFF.
• Make sure the ON/OFF switch on the Instant Power is in the OFF position.
• Plug the ring terminal cable assembly’s quick-connect into the connector
attached to the IP-180KE.
• If the ring terminals were installed incorrectly, an audio alarm will sound.
•3•
DO NOT turn your Instant Power on. This could cause serious damage.
Remove the ring terminals and reinstall correctly, per section 4.1.
• If no audio alarm is sounded, turn ON the Jump Start switch and then
crank the engine. If the engine does not start within 5-8 seconds, stop
cranking and wait at least one minute before attempting to start vehicle
again. (This permits the battery to cool down.)
• After the engine starts, make sure to turn OFF the Jump Start switch.
• Disconnect the Quick Connector.
5.
control panel
6.
led indicators (red, yellow and green lights)
6.1
To check the internal battery charge status, press the Battery Status Button on the front of the Instant Power.
6.2
The LED lights will indicate the charge level as follows:
• A red LED indicates the internal battery has a 50% or less charge.
• A yellow LED indicates the internal battery has a 50% to 75% charge.
• A green LED indicates the internal battery has a 75% to 100% charge.
NOTE: If the red LED or the yellow LED glows, immediately recharge the
Instant Power internal battery.
7.
charging the internal battery
This Instant Power, IP-180KE comes with a sealed, non-spillable, maintenance-free, lead acid battery. This internal battery is specifically designed
to deliver high power jump-starting as well as repetitive deep-cycling
performance.
IMPORTANT: Charge the Instant Power immediately after removing it
from the package for a minimum of eight hours, even if the green FULL
(charged) LED glows. Charge the Instant Power after every use and every
30 days so that it is available for immediate use when needed.
•4•
NOTE: All switches should be in the OFF position before charging the
Instant Power internal battery.
CAUTION: Do not operating the Instant Power while charging the internal
battery. Doing so may cause permanent damage to the unit.
7.1
To charge, plug an extension cord into charger plug on the right side of the
Instant Power. (Extension cord not included; must be purchased separately.) An extension cord up to 25 feet must be 18 AWG; up to 50 feet,
must be 14 AWG; up to 100 feet must be 12 AWG and up to 150 feet must
be 10 AWG. The extension cord plug and the charger plug must have the
same number, size and shape of pins.
7.2
Plug the extension cord into 120V AC electrical wall outlet.
7.3
The red CHARGING LED will glow indicating charging.
7.4
The green LED will glow when the battery has reached full charge. This
could take up to 72 hours due to the age and condition of the battery. The
charger will automatically drop into a float mode and maintain the battery
at full charge without damaging the battery.
7.5
Charge the Instant Power as soon as possible after each use.
NOTE: The internal battery may also be charged while driving by using a
male-to-male accessory cable (available separately; see “Accessories and
Replacement Parts” section in the manual). Insert one end of the accessory cable into the 12V DC power outlet and the other end into the vehicle
accessory outlet (lighter socket). Completely disconnect the accessory
cable when the engine is not running.
8.
using the 12 volt dc power outlet
The Instant Power is a power source for all 12 volt DC accessories
equipped with a 12 volt accessory plug. Use for power outages, fishing,
and camping trips. Estimated usage time is listed in below chart:
Appliance Type
Estimated Wattage
Estimated Time
Cell Phones
4 Watts
54 Hours
Fluorescent Lights
4 Watts
54 Hours
Radios, Fans
9 Watts
24 Hours
Depth Finders
9 Watts
24 Hours
Camcorders, DVD Players,
Spotlights
15 Watts
15 Hours
Electrical Tools, Bilge Pumps
24 Watts
9 Hours
Electrical Coolers
48 Watts
5 Hours
Car Vacuum, Air Compressors
80 Watts
3 Hours
NOTE: Estimated run-times. Actual time may vary. Times are based on
the internal battery being new, fully charged and operating at room temperature.
•5•
8.1
Open the protective cover of the DC power outlet on the left side of the
Instant Power.
8.2
Make sure that the device to be powered is OFF before inserting the 12V
accessory plug into the 12V accessory outlet.
8.3
Plug the 12V DC device into the DC power outlet and turn it ON (if required).
8.4
If the 12V DC device draws more than 15A, the Instant Power internal
circuit breaker will stop powering the device. If this occurs, unplug the device and the circuit breaker will automatically reset after several seconds.
8.5
The DC power outlet is internally wired directly to the internal battery.
Extended operation of the 12V DC device may result in excessive battery
drain. Recharge the battery immediately after unplugging the device.
9.
using the usb port
The USB port provides up to 500 mA at 5V DC.
Note: The Jump Start + USB On/Off switch energizes both the jump starting clamps and the USB port. Do not allow the clamps to touch each other
or the same piece of metal when the switch is ON (turned to the right).
9.1
Confirm that both jump starting clamps are stored on the storage holders,
or even better, that the Quick Connector is disconnected.
9.2
Turn the Jump Start + USB switch to the ON position.
9.3
The USB plug is now live; plug in the accessory.
10. using the air compressor
CAUTION – Read instructions of the product being inflated before using
the compressor. Avoid over-inflation, do not exceed the manufacturers
recommended pressures. Do not leave the compressor unattended during
use.
The 12 volt compressor is rated for 150 PSI pressure. The hose is stored
on the back of your Instant Power.
The ON / OFF switch for the compressor is located on the back of the
Instant Power.
10.1 Attach the air compressor hose to the product or accessory to be inflated
by flipping down the lever.
10.2 Push the air compressor switch to the ON position and inflate product.
10.3 When the product is inflated to the proper air pressure, press the compressor switch to the OFF position and remove the hose.
10.4 Do not run compressor for more than 10 minutes maximum at a time. Allow the compressor to cool down for 10 minutes before using again.
•6•
NOTE: If the compressor overheats, the built-in thermal protection will turn
the unit off. Wait a few minutes and it will automatically restart.
Estimated Time for Inflating
Vehicle 13” to 16”
3 to 16 Minutes
Bike Tire
30 to 40 Seconds
Sports Balls
5 to 30 Seconds
Use an air compressor gauge to ensure the proper pressure has been
reached. Do not over-inflate.
11.
using the built in light
11.1 Position the Instant Power on a flat, stable surface near the intended work
area.
11.2 Turn the light ON/OFF switch to the ON position. The light will turn on and
illuminate your work area.
NOTE: With a fully charged internal battery, the built in light will provide up
to 215 hours of continuous, useful light.
11.3 Turn the ON/OFF switch to the OFF position when the work is complete.
11.4 Charge the battery as soon as possible after using the built-in light.
12. maintenance
12.1 Before performing maintenance, disconnect the Instant Power from any
batteries and DC powered devices and make sure that all switches are in
the OFF position.
12.2 After each use, use a dry cloth to wipe all battery corrosion, dirt and oil
from the terminals, cords and the case.
12.3 Through routine maintenance, ensure that all user-installed parts are
secured.
12.4 Servicing does not require opening the unit. There are no user-serviceable
parts inside.
•7•
13. storage
important:
• CHARGE IMMEDIATELY AFTER PURCHASE
• KEEP FULLY CHARGED
Charge the Instant Power internal battery before first use and after every
use thereafter.
All batteries are affected by temperature. The ideal storage temperature is
at 70 degrees Fahrenheit. The internal battery will gradually self-discharge
(lose power) over time, especially in warm environments. Leaving the
battery in a discharged state may result in permanent battery damage. To
ensure satisfactory performance and avoid permanent damage, charge
the internal battery every month.
The Instant Power can be stored in any position. When the
Instant Power is ON, the clamps are live and will produce arcing or sparking if they come in contact with each other. To prevent accidental arcing,
always keep the clamps on the storage holders, the quick-connect disconnected, and the JUMP START ON/OFF switch in the OFF position when
not using it to jump start a vehicle or using the USB port.
NOTE: All switches should be in the OFF position while charging the
internal battery.
14. specifications
Internal Battery Type
Sealed, Maintenance Free, AGM
Lead Acid
Nominal Voltage
12V DC
Capacity
18 Ah
DC Power Output
(Maximum Continuous Load)
15A
Battery Hook-up Cables
6-Gauge, AWG, 17” Long (34”
Long Connected to the Instant
Power)
Dimensions (H x W x D)
12” x 9.5” x 8”
Weight
19 lbs.
15. accessories and replacement parts
Replacement parts and customer technical assistance are available
Monday through Friday, 7:00 am to 4:30 pm Central Time:
1-800-621-5485
Battery Clamp Assembly:
38-99-002075
Ring Terminal Cable Assembly:
38-99-002080
Air Compressor Accessory Kit
00-99-000599
Make-to-Male Accessory Cable (not included) 38-99-000834
•8•
16. limited WARRANTY
SCHUMACHER ELECTRIC CORPORATION, 801 BUSINESS CENTER
DRIVE, MOUNT PROSPECT, IL 60056-2179, MAKES THIS LIMITED WARRANTY TO THE ORIGINAL RETAIL PURCHASER OF THIS PRODUCT.
THIS LIMITED WARRANTY IS NOT TRANSFERABLE OR ASSIGNABLE.
Schumacher Electric Corporation (the “Manufacturer”) warrants this Instant
Power for 90 days from the date of purchase at retail against defective material or workmanship that may occur under normal use and care. If your unit
is not free from defective material or workmanship, Manufacturer’s obligation
under this warranty is solely to repair or replace your product, at the option of
the Manufacturer. It is the obligation of the purchaser to forward the unit, together with the sales receipt and/or warranty card, along with mailing charges
prepaid to the Manufacturer or its authorized representatives in order for repair
or replacement to occur.
Manufacturer does not provide any warranty for any accessories used with
this product that are not manufactured by Schumacher Electric Corporation
and approved for use with this product. This Limited Warranty is void if the
product is misused, subjected to careless handling, repaired, or modified by
anyone other than Manufacturer or if this unit is resold through an unauthorized retailer.
Manufacturer makes no other warranties, including, but not limited to, express,
implied or statutory warranties, including without limitation, any implied warranty of merchantability or implied warranty of fitness for a particular purpose.
Further, Manufacturer shall not be liable for any incidental, special or consequential damage claims incurred by purchasers, users or others associated
with this product, including, but not limited to, lost profits, revenues, anticipated
sales, business opportunities, goodwill, business interruption and any other
injury or damage. Any and all such warranties, other than the limited warranty
included herein, are hereby expressly disclaimed and excluded. Some states
do not allow the exclusion or limitation of incidental or consequential damages
or length of implied warranty, so the above limitations or exclusions may not
apply to you. This warranty gives you specific legal rights and it is possible you
may have other rights which vary from this warranty.
THIS LIMITED WARRANTY IS THE ONLY EXPRESS LIMITED WARRANTY
AND THE MANUFACTURER NEITHER ASSUMES OR AUTHORIZES ANYONE TO ASSUME OR MAKE ANY OTHER OBLIGATION TOWARDS THE
PRODUCT OTHER THAN THIS WARRANTY.
Call Customer Service at: 800-621-5485 Monday - Friday, 7 a.m. to 5 p.m. CST
•9•
• 10 •
Modelo:
IP-180KE
INSTANT POWER™
Arranque Inmediato, Compresor de Aire y
Fuente de Potencia de 12 VOLT cc Mas 5
VOLT USB
MANUAL DE INSTRUCCIONES
• 11 •
IMPORTANTE: CARGUE ESTE PRODUCTO INMEDIATAMENTE LUEGO DE SU ADQUISICIÓN
IMPORTANTE: LEA Y CONSERVE ESTE MANUAL DE INSTRUCCIONES Y DE SEGURIDAD.
1.
INSTRUCCIONES DE SEGURIDAD IMPORTANTES
Cargue la batería interna del producto Instant Power inmediatamente luego de haber efectuado su compra, cada 30 días y después de cada uso.
1.1
Utilícelo en un área bien ventilada.
1.2
Manténgase alejado de las paletas del ventilador, correas, poleas y cualquier otra pieza que pueda provocar lesiones.
1.3
A fin de prevenir chispazos, NO permita que las abrazaderas se rocen
entre sí o entren en contacto con la misma pieza de metal.
1.4
APAGUE la llave de encendido del vehículo antes de conectar cualquiera
de los cables.
1.5
Procure contar con alguna persona en el área, que pudiera auxiliarlo
cuando trabaje cerca de una batería de ácido-plomo.
1.6
Asegúrese de tener a su alcance suficiente agua y jabón, para poder
utilizarlos en caso que el ácido de la batería entre en contacto con la piel,
vestimenta u ojos. Si el ácido penetra en el área de los ojos, enjuague con
abundante agua fría durante por lo menos 10 minutos y solicite asistencia
médica de inmediato.
1.7
No fume, ni utilice fósforos o encendedores, ni permita que se produzca
ninguna chispa o llama cerca de la batería o el motor.
1.8
Nunca opere el arrancador instantáneo si advierte la presencia de cables
conductores o abrazaderas dañados.
1.9
Utilice protectores que preserven íntegramente sus ojos y vestimenta de
seguridad mientras trabaja con cualquiera de las baterías.
1.10 No permita que la batería interna de su Instant Power se congele. Las
baterías cargadas no pueden congelarse; consulte la sección de almacenamiento del manual a estos efectos.
1.11 Nunca cargue una batería congelada.
1.12 Instant Power contiene una batería interna sellada, antiderrame, de ácidoplomo, que debe utilizarse y desecharse de manera adecuada.
ADVERTENCIA: Peligro de explosión. El contacto con el ácido de la
batería puede provocar graves quemaduras y ceguera. Mantenga lejos
del alcance de los niños.
ADVERTENCIA: De conformidad con la Proposición 65 de California,
este producto contiene químicos que el estado de California reconoce
como cancerígenos y causantes de defectos congénitos u otros trastornos
reproductivos.
ADVERTENCIA: La inobservancia de las instrucciones de este producto
• 12 •
puede causar explosiones u otros daños. Lea atentamente el manual
antes de proceder a utilizarlo.
2.
CARACTERÍSTICAS DE INSTANT POWER
14
1
5
6
3
2
15
13
9
8
4
12
11
7
10
1. Arrancador Instantáneo/memoria USB con selector de
encendido/apagado
2. Botón pulsador para verificar
condición de la batería.
3. Luces para verificar
condición de la batería
4. Luces guía LED integradas
5. Selector de apagado/encendido iluminado
6. Puerto USB
7. Cubierta de Gaucho
8. Selector de apagado/encendido para Compresor de Aire
3.
9. Indicador del Compresor de Aire
10.Manguera del Compresor de aire
11.Conector fácil de conectar
12.Capacidad de salida de 12V de
CD
13.Enchufe de cargador interno
14.Cable con pinzas ensamblado
15.Cable de Terminal con argolla
ensamblado
16. Bolsa para accesorios del Compresor de Aire (no mostrada)
Contiene: Adaptador par inflar
balones y dos adaptadores para
varios usos.
INSTRUCCIONES DE USO PARA LA UTILIZACIÓN DE LAS
ABRAZADERAS DE BATERÍA DE CONEXIÓN RÁPIDA
ADVERTENCIA: La inobservancia de las instrucciones de este producto puede causar explosiones u otros daños. Lea atentamente el
manual antes de proceder a utilizarlo.
3.1
APAGUE la llave de encendido del vehículo antes de conectar los cables.
3.2
Asegúrese de que el interruptor de ENCENDIDO/APAGADO (ON/OFF)
del producto Instant Power se encuentre en posición de apagado.
3.3
Conecte el dispositivo de conexión rápida de la unidad del cable de la
abrazadera de la batería al conector del Instant Power.
• 13 •
3.4
Para el sistema de conexión a tierra negativo, ajuste la abrazadera roja
(+) al terminal positivo de la batería. (Para el sistema positivo, vea la sección 3.9).
3.5
Ajuste la abrazadera negra (-) a una pieza no pintada e inmóvil del chasis
o el bloque del motor.
3.6
Si usted ha conectado las abrazaderas de su Instant Power al revés,
sonará una alarma. NO encienda su Instant Power. De lo contrario,
podrían provocarse graves daños. Invierta las conexiones, y el sonido de
la alarma se detendrá.
3.7
Si no escucha ninguna alarma, ENCIENDA el interruptor del arrancador
instantáneo y luego arranque el motor. Si el motor no arranca entre los 5
y 8 segundos siguientes, detenga la operación y espere por lo menos un
minuto antes de intentar arrancar nuevamente el vehículo. (Esto permitirá
que se enfríe la batería.)
3.8
Una vez que arranque el motor, asegúrese de APAGAR el arrancador
instantáneo. Luego, desconecte la abrazadera negra (-) y la roja (+), en
el orden enunciado. Guarde las abrazaderas en las orejas de sujeción,
ubicadas a cada lado de la caja.
3.9
NOTA: En el extraño caso que desee efectuar el arranque instantáneo de
un vehículo con un sistema eléctrico de conexión a tierra positivo, conecte
la abrazadera negra NEGATIVA (-) al terminal negativo (-) de la batería
del vehículo. Luego conecte la abrazadera roja POSITIVA (+) a una pieza
no pintada e inmóvil del chasis o el bloque del motor. Si tiene dudas
acerca de la naturaleza del sistema de conexión eléctrica del vehículo,
consulte el manual del usuario provisto con el vehículo. Para desconectar
las abrazaderas, siga los pasos descriptos en sentido inverso.
4.
INSTRUCCIONES DE USO, PARA LA UTILIZACIÓN DE LOS TERMINALES TIPO ANILLO DE CONEXIÓN RÁPIDA
ADVERTENCIA: La inobservancia de las instrucciones de este producto puede causar explosiones u otros daños. Lea atentamente el
manual antes de proceder a utilizarlo.
4.1
Montaje de la unidad del cable del terminal tipo anillo con la batería
• Los terminales tipo anillo pueden encontrarse montados a la batería de
manera permanente. En ese caso, verifique que el dispositivo de conexión rápida quede colocado correctamente. Revise que la unidad del cable
del terminal tipo anillo no entre en contacto ni represente obstrucciones
para ninguno de los componentes vivos, calientes o móviles del vehículo.
SIEMPRE verifique que los terminales estén debidamente ajustados
antes de proceder a cargar.
• APAGUE la llave de encendido del vehículo antes de efectuar cualquier
conexión de este tipo de terminales.
• Conecte el terminal tipo anillo rojo (+) al terminal positivo de la batería.
• Conecte el terminal tipo anillo negro (-) al terminal negativo de la batería.
• 14 •
4.2
Arranque instantáneo
• Utilícelo en un área bien ventilada.
• Manténgase alejado de las paletas del ventilador, correas, poleas y cualquier otra pieza que pueda provocar lesiones.
• Verifique que la llave de encendido del vehículo se encuentre APAGADA.
• Asegúrese de que el interruptor de ENCENDIDO/APAGADO (ON/OFF)
del Instant Power se encuentre en posición de apagado.
• Conecte el dispositivo de conexión rápida de la unidad del cable del
terminal tipo anillo al conector del IP-180KE.
• Si usted ha conectado los terminales tipo anillo de manera incorrecta,
sonará una alarma. NO encienda su Instant Power. De lo contrario,
podrían provocarse graves daños. Quite los terminales e instálelos como
corresponde, de acuerdo con la sección 4.1.
• Si no oye ninguna alarma, ENCIENDA el interruptor del arrancador
instantáneo y luego arranque el motor. Si el motor no arranca entre los 5
y 8 segundos siguientes, detenga la operación y espere por lo menos un
minuto antes de intentar arrancar nuevamente el vehículo. (Esto permite
que la batería se enfríe.)
• Una vez que arranque el motor, asegúrese de APAGAR el interruptor del
arrancador instantáneo.
• Desconecte el conector rápido.
5.
panel de control
6.
INDICADORES LUMINOSOS (Luces roja, amarilla y verde)
6.1
Para verificar el estado de carga de la batería interna, presione el botón
Battery Status (Estado de la batería) ubicado al frente del Instant Power.
6.2
Los indicadores luminosos le señalarán el nivel de carga según se indica
a continuación:
• La luz roja indica que la batería interna tiene un nivel de carga del 50% o
inferior.
• La luz amarilla indica que la batería interna tiene un nivel de carga que
oscila entre el 50% y el 75%.
• 15 •
• La luz verde indica que la batería interna tiene un nivel de carga que
oscila entre el 75% y el 100%.
NOTA: Cuando se enciendan la luz roja o amarilla, recargue inmediatamente la batería interna del producto Instant Power.
7.
CARGA DE LA BATERÍA INTERNA
El producto Instant Power, IP-180KE, viene con una batería sellada,
antiderrame, sin mantenimiento y de ácido-plomo. Esta batería interna se
encuentra específicamente diseñada para lograr un arranque instantáneo
de alta potencia, así como un rendimiento de ciclos completos repetidos.
IMPORTANTE: Cargue el Instant Power durante un mínimo de ocho
horas inmediatamente después de abrirlo, aún en caso que se encienda
el indicador luminoso verde de CARGA COMPLETA. Cargue el Instant
Power después de cada uso y luego de intervalos de 30 días, de modo
que siempre se encuentre disponible.
NOTA: Todos los interruptores deberían encontrarse en posición de APAGADO antes de cargar la batería interna del Instant Power.
PRECAUCIÓN: No opere el Instant Power mientras carga la batería
interna. De lo contrario, la unidad podría resultar dañada de modo permanente.
7.1
Para cargar, conecte un alargue con el cargador ubicado a la derecha
del Instant Power. (El alargue no está incluido; debe adquirirse de forma
separada.)
7.2
Conecte el alargue con una salida eléctrica de 120V CA.
7.3
El INDICADOR LUMINOSO de carga se encenderá señalando que se
está efectuando dicha operación.
7.4
El INDICADOR verde se encenderá una vez que la batería se haya cargado completamente. Ello podría llevar hasta 72 horas, de acuerdo con la
antigüedad y el estado de la batería. El cargador descenderá automáticamente a modo flotación y mantendrá la batería, sin dañarla, en su nivel de
carga completo.
7.5
Cargue el Instant Power tan pronto como pueda luego de cada utilización.
7.6
NOTA: También es posible cargar la batería interna también mientras se
conduce, utilizando un cable accesorio macho a macho (disponible por
separado; vea la sección “Accesorios y repuestos” del manual). Introduzca un extremo del cable accesorio en la salida de la fuente de 12V
CC y el otro extremo en la salida auxiliar del vehículo (toma del encendedor). Desconecte completamente el cable accesorio mientras el motor se
encuentra apagado.
8.
UTILIZACIÓN DE LA SALIDA DE 12 V CC
El Instant Power es una fuente de poder para todos los accesorios de 12
• 16 •
V CC equipado con un enchufe accesorio de 12 V. Puede utilizarse en
caso de cortes de suministro eléctrico, pesca y excursiones de campamento. La tabla incluida a continuación, indica la duración estimada del
producto en cada caso:
Tipo de artefacto
Vataje estimado
Duración estimada
Celulares
4 Vatios
54 horas
Luces fluorescentes
4 Vatios
54 horas
Radios, ventiladores
9 Vatios
24 horas
Detectores de profundidad
9 Vatios
24 horas
Cámaras de video, reproductores de DVD, reflectores
15 Vatios
15 horas
Herramientas eléctricas, bombas de carena
24 Vatios
9 horas
Refrigeradores eléctricos
48 Vatios
5 horas
Aspiradoras para automóviles, compresores de
aire
80 Vatios
3 horas
NOTA: Los tiempos de funcionamiento son estimados. Los tiempos reales
pueden diferir. Las duraciones se calculan sobre la base de una batería
nueva, totalmente cargada, que funcione a temperatura ambiente.
8.1
Abra la cubierta protectora de la salida CC ubicada a la izquierda del
Instant Power.
8.2
Verifique que el dispositivo al cual se transmitirá energía se encuentre
APAGADO antes de introducir el enchufe accesorio de 12V en la salida
accesoria de 12V.
8.3
Enchufe el dispositivo de 12V CC en la salida CC y colóquelo en posición
de ENCENDIDO (si fuera necesario).
8.4
Si el dispositivo de 12V CC consume más de 15A, el disyuntor interno del
Instant Power dejará de transmitir energía al artefacto en cuestión. En ese
caso, desenchufe el dispositivo y el interruptor se reiniciará automáticamente luego de varios segundos.
8.5
La salida CC tiene una conexión directa con la batería interna. El uso
prolongado del dispositivo de 12V CC puede tener como consecuencia
un consumo excesivo de la batería. Recárguela inmediatamente luego de
desconectar el dispositivo.
9.
UTILIZACIÓN DEL PUERTO USB
El puerto USB tiene una capacidad máxima de suministro de 500 mA a 5V
CC.
Nota: El interruptor Jump Start (fuente de poder) junto con USB Encendido/Apagado transmite energía a las abrazaderas de arranque instantáneo
y al puerto USB. No permita que las abrazaderas se toquen entre sí ni
rocen con la misma pieza de metal mientras el interruptor se encuentre en
• 17 •
posición de ENCENDIDO (es decir, hacia la derecha).
9.1
Verifique que ambas abrazaderas de arranque instantáneo estén almacenadas en sus fundas, o si fuera posible, que el Conector Rápido se
encuentre desconectado.
9.2
Lleve el interruptor Jump Start (fuente de poder)+ USB Encendido/Apagado a la posición de encendido.
9.3
El enchufe USB ya se encuentra activado; proceda a enchufar el accesorio.
10. UTILIZACIÓN DEL COMPRESOR DE AIRE
PRECAUCIÓN: Lea las instrucciones del producto a ser inflado antes de
utilizar el compresor. Evite inflar excesivamente, nunca supere las presiones recomendadas por los fabricantes. No deje de controlar el compresor durante su uso.
El compresor de 12 voltios tiene una calificación de presión admitida de
150 PSI. La manguera se encuentra guardada en el sector trasero de su
Instant Power.
El interruptor de ENCENDIDO/APAGADO del compresor también está
ubicado detrás del Instant Power.
10.1 Conecte la manguera del compresor de aire con el producto o accesorio
que desea inflar, haciendo descender la palanca.
10.2 Lleve el interruptor del compresor de aire a la posición de ENCENDIDO y
proceda a inflar el producto.
10.3 Una vez que el producto haya sido inflado a la presión deseada, lleve el
interruptor a la posición de APAGADO y quite la manguera.
10.4 No haga funcionar el compresor durante más de 10 minutos por vez. Deje
que se enfríe durante 10 minutos antes de volver a utilizarlo.
NOTA: Si el compresor se recalienta, la protección térmica interna
apagará la unidad. Espere unos minutos y ésta se reiniciará automáticamente.
Tiempo de inflado estimado
Vehículo de 13” a 16”
3 a 16 minutos
Llantas de bicicleta
30 a 40 segundos
Pelotas deportivas
5 a 30 segundos
Utilice un medidor para verificar que se ha alcanzado la presión deseada.
Nunca infle productos en exceso.
• 18 •
11.
UTILIZACIÓN DE LA LUZ EMPOTRADA
11.1 Coloque el producto Instant Power en una superficie lisa y estable, cerca
del área de trabajo.
11.2 Encienda el interruptor de la luz de ENCENDIDO/APAGADO. La luz se
encenderá e iluminará el área de trabajo.
NOTA: Con una batería interna completamente cargada, la luz empotrada
podrá suministrar hasta 215 horas de iluminación útil y continua.
11.3 Lleve el interruptor a la posición de APAGADO una vez finalizado el
trabajo.
11.4 Cargue la batería tan pronto como pueda luego de utilizar esta luz del
sistema.
12. MANTENIMIENTO
12.1 Antes de efectuar las tareas de mantenimiento, desconecte el Instant
Power de todas las baterías y dispositivos de CC y verifique que todos los
interruptores se encuentren en posición de APAGADO.
12.2 Luego de cada uso, limpie con un paño seco todo resto de corrosión de la
batería, suciedad y aceite de los terminales, los cables y la caja.
12.3 Durante el mantenimiento de rutina, verifique que todas las piezas instaladas por el usuario se encuentren debidamente colocadas.
12.4 No es necesario abrir la unidad durante el mantenimiento. En su interior,
no hay piezas que requieran este tipo de servicio del usuario.
13. ALMACENAMIENTO
IMPORTANTE:
• CARGUE EL PRODUCTO INMEDIATAMENTE LUEGO DE SU ADQUISICIÓN
• MANTENGA SIEMPRE LA CARGA COMPLETA
Cargue la batería interna del Instant Power antes de efectuar el primer
uso y luego de cada uso siguiente.
La temperatura afecta a todas las baterías. La temperatura de almacenamiento ideal es de 70 ºF. La batería interna se descargará progresivamente (perderá energía) con el transcurso del tiempo, especialmente en
ambientes cálidos. Dejar la batería descargada puede dañarla permanentemente. Para garantizar un rendimiento satisfactorio y evitar este tipo de
daños, cargue la batería interna todos los meses.
El producto Instant Power puede guardarse en cualquier posición. Cuando se encuentra ENCENDIDO, las abrazaderas están vivas y pueden
producir arcos eléctricos o chisporroteos si entran en contacto entre sí.
Para evitar arcos accidentales, mantenga siempre las abrazaderas en
sus fundas, el dispositivo de conexión rápida desconectado, y el interruptor de ENCENDIDO/APAGADO del arrancador instantáneo en posición
• 19 •
APAGADA mientras no se utilice para arrancar un vehículo, ni se utilice el
puerto USB.
NOTA: Todos los interruptores deberían encontrarse en posición de APAGADO mientras se carga la batería interna.
14. ESPECIFICACIONES
Tipo de batería interna
Sellada, sin mantenimiento, AGM,
Ácido- plomo
Voltaje Nominal
12V CC
Capacidad
18 Ah
Salida CC (Carga máxima continua)
15A
Cables de conexión de la batería
Calibre 6, sistema de medidas
AWG, 17” de longitud (34” de largo
conectado con el Instant Power)
Dimensiones
(Altura x Ancho x Diámetro)
12” x 9,5” x 8”
Peso
19 lbs.
15. ACCESORIOS Y REPUESTOS
Para adquirir repuestos o solicitar asistencia técnica al cliente, llame de
lunes a viernes, de 7:00 am a 4:30 pm. (Hora central):
1-800-621-5485
Unidad de abrazaderas de la batería:
Unidad del cable del terminal tipo anillo:
Juego de accesorios del compresor de aire:
Cable accesorio macho a macho: (no incluido)
• 20 •
38-99-002075
38-99-002080
00-99-000599
38-99-000834
16. GARANTÍA
SCHUMACHER ELECTRIC CORPORATION, 801 BUSINESS CENTER DRIVE,
MOUNT PROSPECT, IL 60056-2179, EXTIENDE ESTA GARANTIA AL COMPRADOR ORIGINAL DE ESTE PRODUCTO. ESTA GARANTIA LIMITADA NO ES
TRANSFERIBLE O IMPUTABLE
Schumacher Electric Corporation (el “Fabricante”) garantiza este Instant Power por
90 Días a partir de la fecha
en el momento de compra para los defectos en los materiales y la mano de obra
en condiciones de uso y servicio normal. Si su producto ha salido defectuoso, el
Fabricante, bajo esta garantía, se compromete a reparar o sustituir este producto
según juzgue el propio Fabricante. Es obligatorio, que el comprador envíe la
unidad, acompañada del recibo de compra y/o la tarjeta de garantía, y gastos de
envío al Fabricante o representante autorizado para reparar o remplazar según sea
el caso.
El Fabricante no legitima ninguna garantía por cualquier parte usada para alterar
el producto, al menos que sea fabricada por Schumacher Electric Corporation y
sea aprobada para el uso del mismo. Esta Garantía Limitada queda Anulada si
el producto es alterado, sufre modificaciones, es reparado, se le da mal trato por
alguien más que no sea el Fabricante o si es revendida a través de un vendedor
no autorizado.
El Fabricante no emite ni admite ninguna otra garantía, que esta pero, no limita a
implicar garantías legales, incluyendo las de sin limitación, que sean usadas para
adaptar a otra mercancía o un propósito particular.
Además, el Fabricante no es responsable por demandas a daños indirectos o en
especial daños consecuentes incurridos por los compradores, usuarios u otros
vinculados con este producto, incluyendo, sin omisión, a pérdida de ganancias,
ingresos, ventas anticipadas, oportunidades de empleo, donación, interrupción de
negocio, y cualquier otra lesión o daños.
Cualquiera o todas las otras garantías, aparte se esta Garantía Limitada, incluida
aquí, quedan expresamente, excluidas y anuladas. Algunos estados no permiten la
exclusión o limitación de daños consecuentes e incluso la duración de la garantía
implicada así que las limitaciones o las exclusiones antedichas pueden no aplicarse a usted. Esta garantía le da derechos legales específicos y es posible usted
pueda tener otros derechos diferentes a los de esta garantía.
ESTA GARANTIA LIMITADA ES LA UNICA GARANTIA EXPRESADA Y EL FABRICANTE NO ASUME O AUTORIZA A ALGUIEN MAS A ASUMIR OBLIGACION
ALGUNA EN EL PRODUCTO, SINO ESTA GARANTIA
Comuníquese con nuestro servicio de atención al cliente al número:
800-621-548, de lunes a viernes, de 7:00 am a 5:00 pm.
• 21 •
• 22 •