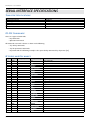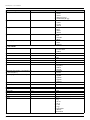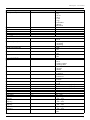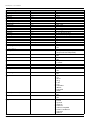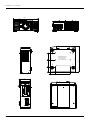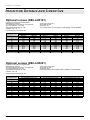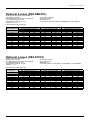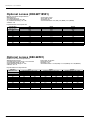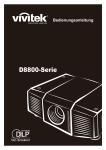
1
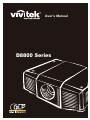
User’s Manual D8800 Series Contents COPYRIGHT INFORMATION 4 yCopyright y yDisclaimer y yAbout y this manual 4 4 4 yDisposal y of old electrical and electronic equipment yImportant y Recycle Instructions: 6 6 yAbout y This Manual yDescription, y Features and Benefits yParts y List 7 7 8 IMPORTANT SAFETY INSTRUCTIONS 5 INTRODUCTION7 CONTROLS AND FUNCTIONS 9 yD8800/D8900/D8010W y at a Glance 9 yI/O y Panel 10 yKEYPAD11 y yRemote y control 12 yTo y install batteries in the remote control 13 yRange y of effective remote control signal reception 13 Installation Considerations yAmbient y Light yThrow y Distance yModes y of installation yAllow y at least 50 cm clearance around the exhaust vent. Lens Shift yVertical y Lens Shift yHorizontal y Lens Shift Connecting the projector to other devices. yHDMI y Connection yTrigger y connection yIR y Input connection yS-VIDEO, y VIDEO connection yCOMPONENT y connection yRS-232 y Connection yLAN y Connection Start using the projector - Adjustments yConnecting y to AC Power yTurning y on the Power yChanging y the OSD Language yAdjusting y the Picture Orientation yLens y Adjustments 14 14 14 15 16 17 17 17 18 18 18 19 19 20 20 21 22 22 22 23 23 24 Start using the projector - Operation ySelecting y An Input Source ySelecting y an Aspect Ratio yUsing y the OSD Start using the projector - OSD Introduction yOSD y Menu Tree yOSD y Introduction - INPUT yOSD y Introduction - PICTURE yOSD y Introduction - LAMPS yOSD y Introduction - ALIGNMENT yOSD y Introduction - CONTROL yOSD y Introduction - SERVICE Change Lamp yTo y replace the projector lamp1 yTo y replace the projector lamp2 Change Lens 25 25 25 25 26 26 28 31 34 35 39 45 47 47 48 49 yTo y replace the projector Lens 49 yTo y replace the Filter on the left side of the projector yTo y replace the Filter on the right side of the projector yyChange the color wheel 51 52 53 Change Filter LED Status 51 54 yPower y LED yStatus y LED yLamp1/Lamp2 y LED yTemp y LED yShutter y LED 54 54 54 54 54 yTransfer y Specifications yRS-232 y Commands yIR y Codes and Key names yOperations y Commands 56 56 56 57 SPECIFICATIONS55 SERIAL INTERFACE SPECIFICATIONS 56 Dimensions64 Supported Timings 65 Projection Distance and Screen Size 66 yOptional y Lens DLP Projector - User’s Manual COPYRIGHT INFORMATION Copyright This publication, including all photographs, illustrations and software, is protected under international copyright laws, with all rights reserved. Neither this manual, nor any of the material contained herein, may be reproduced without written consent of the manufacturer. The Vivitek logo is a trademark of “Vivitek Corporation.” © Copyright 2012 Disclaimer The information in this document is subject to change without notice. The manufacturer makes no representations or warranties with respect to the contents hereof and specifically disclaims any implied warranties of merchantability or fitness for any particular purpose. The manufacturer reserves the right to revise this publication and to make changes from time to time in the content here without obligation of the manufacturer to notify any person of such revision or changes. About this manual This manual is intended for end users and describes how to install and operate the DLP projector. Wherever possible, relevant information such as an illustration and its description has been kept on one page. This printer-friendly format is both for your convenience and to help save paper, thereby protecting the environment. It is suggested that you only print sections that are relevant to your needs. 4 DLP Projector - User’s Manual IMPORTANT SAFETY INSTRUCTIONS Thank you for your purchase of this quality product! For best performance, please read this manual carefully as it is your guide through the menus and operation. 1. Read and Keep these instructions. 2. Heed all warnings. 3. Follow all instructions. 4. Do not use this apparatus near water. And not install near any heat sources such as radiators, heat registers, stoves, or other apparatus (including amplifiers) that produce heat. 5. Clean only with a dry cloth. 6. Do not block any of the ventilation openings. Install in accordance with the manufacturer’s instructions. 7. Do not defeat the safety purpose of the polarized or grounding type plug. A polarized plug has two blades with one wider than the other. A grounding type plug has two blades and a third grounding prong. The wide blade or the third prong is provided for your safety. When the provided plug does not fit into your outlet, consult an electrician for the replacement of the obsolete outlet. 8. Protect the power cord from being walked on or pinched particularly at plugs, convenience receptacles and the point where they exit from the apparatus. 9. Only use the attachments/accessories specified by the manufacturer. 10. Use only with a cart, stand, tripod, bracket or table specified by the manufacturer or sold with the apparatus. When a cart is used, use caution when moving the cart/apparatus to avoid injury from tip-over. 11. Unplug this apparatus during lightning storms or when unused for long periods of time. 12. Refer all servicing to qualified service personnel. Servicing is required when the apparatus has been damaged in any way, such as power supply cord or plug is damaged, liquid has been spilled or objects have fallen into the apparatus, the apparatus has been exposed to rain or moisture, does not operate normally, or has been dropped. 13. The +12V trigger only outputs 12V DC signal for triggering. Do not connect to any other power input or output. This could cause damage to this unit. 14. Keep the packing material in case the equipment should ever need to be shipped. 15. Never look into the lens when the projector is on. AVOID EYE CONTACT TO THE LIGHT 5 DLP Projector - User’s Manual Disposal of old electrical and electronic equipment (Applicable throughout the European Union and other European countries with separate collection programs) This symbol found on your product or on its packaging, indicates that this product should not be treated as household waste when you wish to dispose of it. Instead, it should be handed over to an applicable collection point for the recycling of electrical and electronic equipment. By ensuring this product is disposed of correctly, you will help prevent potential negative consequences to the environment and human health, which could otherwise be caused by inappropriate disposal of this product. The recycling of materials will help to conserve natural resources. This symbol is only valid in the European Union. If you wish to discard this product, please contact your local authorities or dealer and ask for the correct method of disposal. Important Recycle Instructions: Lamp(s) inside this product contain mercury. This product may contain other electronic waste that can be hazardous if not disposed of properly. Recycle or dispose in accordance with local, state, or federal Laws. For more information, contact the Electronic Industries Alliance at WWW. EIAE.ORG. For lamp specific disposal information check WWW.LAMPRECYCLE.ORG. 6 DLP Projector - User’s Manual INTRODUCTION About This Manual This User’s Manual describes how to install, set up and operate the D8800/D8900/D8010W. Throughout this manual, the Projector is referred to as the “D8800/D8900/D8010W.” Target Audience Vivitek has prepared this manual to help installers and end users get the most out of the D8800/ D8900/D8010W. Vivitek has made every effort to ensure that this manual is accurate as of the date it was printed. However, because of ongoing product improvements and customer feedback, it may require updating from time to time. You can always find the latest version of this and other Vivitek product manuals on-line, at www.vivitekcorp.com. Description, Features and Benefits The Vivitek D8800/D8900/D8010W provide state-of-the-art technology for full HD (1920 x 1200, WUXGA 16:10) native resolution for crystal clear, pristine images. The D8800/D8900/D8010W offer incredibly high definition images at today’s highest avail-able resolutions. Equipped with precision optics, the D8800/D8900/D8010W include zoom, focus and lens shift controls for a throw range of 1.85:1 to 2.40:1. For a smaller throw distance (1.56:1 to 1.86:1), the D8800/D8900/ D8010W can be fitted with a varying optics package (optional) to meet different requirements. Exceptional scaling and film-to-video (3:2 pull-down) conversion is easily achieved. Combined with Vivitek’s sophisticated parameters for white balancing, the D8800/D8900/D8010W’s proprietary de-interlacing technology provides the highest level of development for gray-scale and color balancing and artifact-free images. Completing this engineering marvel are discrete infrared (IR) and RS-232 control, power and source selection controls for seamless, flexible operation. Key Features and Benefits The D8800/D8900/D8010W offer these key features and benefits: yNative y Resolution: 1920 x 1080 (16:10 Native Aspect Ratio). yDLP y system using high-performance Digital Micromirror Device (DMD). yHDMI y 1.3 Input with High-bandwidth Digital Content Protection (HDCP). yHDTV y Compatible. yExcellent y Video Processing on progressive and interlaced video inputs. Green Product with: yLead y free solder used for soldering including circuit and component electronics. yLead y free glasses and coatings. yRecycled y paper used in the user manuals and packing cartons. yEnergy y Saving: High efficiency power switching and less than 0.5W power consumption in standby mode. 7 DLP Projector - User’s Manual Additional Features of the D8800/D8900/D8010W yHorizontal y and vertical lens shift. yKeystone y adjustment. Parts List Your D8800/D8900/D8010W is shipped with the following items, if any items are missing or damaged, please contact your dealer or Vivitek Customer Service. Accessory Box List D8800/D8900/D8010W Item Manual Assy Q’ty EU/ASIA/US/TWN China 1 CD-ROM 1 ● ● 2 WARRANTY CARD (US/EUR) 1 ● 3 WARRANTY CARD (CN) 1 ● 4 RoHS Card (CN) 1 ● 5 QC Pass Card (CN) 1 ● 6 Important Information (CN) 1 ● ● 7 POWER CORD 125Vac USA 1 ● 8 POWER CORD 250Vac EUR 1 ● 9 POWER CORD 250Vac CHINA 1 ● 10 VGA Signal cable 1 ● ● 11 SCREW M M4*0.7*70 PAN C SUS 1 ● ● 12 BATTERY 2 ● ● 13 REMOTE 1 ● ● 14 MODULE COLOR TYPE COLOR WHEEL 1 ● ● 8 DLP Projector - User’s Manual CONTROLS AND FUNCTIONS D8800/D8900/D8010W at a Glance yAir y outlet Warm air exits the projector through this vent. Ensure that it is not blocked. yAir y inlet Internal fans draw cool air into the projector through this vent. Rear Infre-red window (remote control) Air inlet Power inlet Adjustable feet*4 Power switch yAdjustable y feet Use these when the projector is installed in a tabletop configuration to level the image and/or adjust the projection angle. yPower y Inlet For input power from wall outlet to projector. yRear y Infre-red window For receive the remote controller’s message. Air outlet Air inlet Air outlet Air outlet 9 DLP Projector - User’s Manual I/O Panel HDMI DVI-D IN SDI B/Pb G/Y R/Pr V H WIRED REMOTE TRIGGER S-VIEDO VIEDO OUT LAN RGB RS-232 ySDI y Connect a BNC cable from a serial digital interface (SDI) device. yHDMI y Connect an HDMI source. yDVI y Connect a DVI source. yComponent y Connect a Component (YUV HS/VS-CS) source. yWIRED y REMOTE Wired input from a Niles- or Xantech-compatible, infrared (IR) repeater system. yTRIGGER y (3.5-mm, mini phone jack) Offers 12 (+/- 1.5) V of output for 350mA monitor relay with short circuit protection. yS-VIDEO y A standard S-Video input for connecting a DVD player, satellite receiver or Super VHS (S-VHS) VCR. yVIDEO y Standard composite video input for connecting a VCR, laser disc player or other composite video source. Also provides composite sync input for RGBS sources. yLAN y Connect an RJ45 ethernet cable. yRGB y Provides a standard, 15-pin VGA-style connection to either an RGB or component high-definition source, or to a personal computer. The D8800/D8900/D8010W automatically detect the input signal resolution. yRS-232 y 9-pin D-sub connector for interfacing with a PC or home theater automation/control system. 10 DLP Projector - User’s Manual KEYPAD POWER INPUT AUTO SYNC ASPECT OPEN CLOSE SHUTTER MENU EXIT LENS SHIFT FOCUS ZOOM yPOWER y Use the button to turn on/off the projector. yINPUT y Press to select a video source. HDMI, DVI, VGA, Component / BNC Composite, S-Video or 3D-SGI. Press this to re-acquire the current active source. yASPECT y Press this to change the aspect ratio of the current image. ySHUTTER y Use the buttons to turn on/off shutter. yMENU y Press this button to show or hide the OSD menu. yENTER, y , , , Use these buttons to select items or settings, adjust settings or switch display patterns. yEXIT y Press this to go one menu higher or exit the OSD menu. yLENS y SHIFT Button to shift control of the lens, up/down or left/right. yFOCUS y Button to focus the projected image. yZOOM y Button to zoom in/out the lens. 11 DLP Projector - User’s Manual Remote control ON FOCUS POWER OFF ZOOM TEST PATTERN LENS SHIFT ENTER MENU EXIT INPUT PICTURE NETWORK AUTO SYNC ASPECT PIP 1 2 3 OVERSCAN FREEZE LAMP MODE 4 5 6 3D MODE INFO. LIGHT 7 8 9 CLEAR SHUTTER ID SET 0 yyON Use this button to turn the projector on. yyOFF Use this button to turn the projector off. yyFOCUS Focuses the projected images. yyZOOM Zoom in/out the projected image. yyTEST PATTERN Use this to enter test pattern menu. yyLENS SHIFT Button to shift control of the lens, up/down or left/right. yyENTER, , , , Use these buttons to select items or settings, adjust settings or switch display patterns. ENTER: Press to select a highlighted menu item or confirm a changed setting. yyMENU Press this button to show or hide the OSD menu. yyEXIT Press this to go one menu higher or exit the OSD menu. yyINPUT Press to select a input source. yyPICTURE Starts the PICTURE function. yyNETWORK Press this to enter the Network (LAN) menu. yyAUTO SYNC Press this to re-acquire the current active source. yyASPECT Selection Button: Press this button repeatedly to select one of the following aspect ratios: 16 : 9: For viewing 16:9 DVDs or HDTV programs in their native aspect ratio. yyPIP Press this to display the picture-in-picture screen. yyOVERSCAN Press to select an overscan mode. yyFREEZE Freeze/unfreezes the on-screen picture. yyLAMP MODE Press this to select a higher or lower brightness setting. yy3D MODE This function is not available for this model. yyINFO. Starts the SERVICE function. yyLIGHT Press this to turn on remote control backlight. yyCLEAR Not available yySHUTTER Use the button to turn on/off shutter. yyID SET Not available Notes on Remote Control Operation yy In most situations, you can simply point the remote control at the screen which will reflect the IR signal from the re-mote back toward the IR receiver on the projector. In some cases, however, ambient conditions may prevent this. If so, point the remote control at the projector and try again. yy If the effective range of the remote control decreases, or it stops working, replace the batteries with new ones. yy The remote control may fail to operate if the infrared remote sensor is exposed to bright sunlight or fluorescent lighting. 12 DLP Projector - User’s Manual To install batteries in the remote control STEP 1 STEP 2 STEP 3 1. Slide the battery compartment cover in the direction of the arrow to remove it. 2. Install two AA batteries with the correct polarity. 3. Replace the cover. Notes on Batteries yyMake sure that the battery polarities are correct when installing the batteries. yyDo not mix an old battery with a new one or different types of batteries. yyIf you will not use the remote control for a long time, remove the batteries to avoid damage from battery leakage. Range of effective remote control signal reception 10m 30° IR Reception effective Angles: 30° IR Reception effective distance: 10m Note: Avoid placing the remote control at places of high temperature or humidity as it could cause the remote control to malfunction. 13 DLP Projector - User’s Manual Installation Considerations Proper installation of your projector will ensure the quality of your display. Whether you are installing a projector temporarily or permanently, you should take the following into account to ensure your projector performs optimally. Ambient Light In general, minimize or eliminate light sources directed at the screen. Contrast ratio in your images will be noticeably reduced if light directly strikes the screen, such as when a shaft of light from a window or floodlight falls on the image. Images may then appear washed out and less vibrant. Requires separate room Installation cost is usually higher. Throw Distance Throw distance is the distance measured from the front of the projector to the screen. This is an important calculation in any projector installation as it determines whether or not you have enough room to install your projector with a de-sired screen size and if your image will be the right size for your screen. You can quickly estimate the throw distance by taking the width of the screen and multiplying it by the lens throw ratio; see the image as following. The result of this calculation tells you roughly how far back the projector should be positioned from the screen in order to project a focused image large enough to fill the screen. Throw Distance (TD) = Screen Width (W) x Throw Ratio (TR) Scree n Width ow Thr nce ta Dis (W) ) (TD Two models of the D8800/D8900/D8010W are available, one with 1.56-1.86:1 lens and the other with 1.85-2.40:1 lens With optional zoom adaptors throw ratios of 1.24 – 3.0 can be achieved. The standard D8800/D8900/D8010W offer throw ratios between 1.85:1 and 2.40:1. With the optional, short-throw lens, the D8800/D8900/D8010W offer throw ratios between 1.56:1 and 1.86:1. 14 DLP Projector - User’s Manual Modes of installation Frontal projection - desktop installation Advantages: easy to install can be easily moved or adjusted easy to operate. Projec to Disadvantage: o ccupies floor space and limits seating capacity. r Rear projection - desktop installation Advantage: the projector is completely hidden from plain view the projector can be easily operated this setup usually offers better reduction of ambient noise. Disadvantage: r equires an additional room for installation relatively higher costs for installation. Projec to r Frontal projection - ceiling mode Advantage: d oes not occupy floor space does not draw attention to it. Eliminates the possibility that someone would accidentally move the projector. Disadvantage: s tricter installation requirements and conditions; care should be taken during the installation to ensure the projector has been securely mounted. Operation of the projector becomes inconvenient without the remote control. Projec to r Rear projection - ceiling mode Advantage: the projector is completely hidden from plain view this setup usually offers better reduction of ambient noise. Disadvantage: r equires an additional room for installation. Stricter installation requirements and conditions; care should be taken during the installation to ensure the projector has been securely mounted. Operation of the projector becomes inconvenient without the remote control. Projec to r 15 DLP Projector - User’s Manual Allow at least 50 cm clearance around the exhaust vent. The device need to have enough space to prevent issues as stated in this image. 50cm Or Greater Side Way 70cm Or Greater Back Side 30cm Or Greater Celling Mount 16 50cm Or Greater DLP Projector - User’s Manual Lens Shift Vertical Lens Shift The D8800/D8900/D8010W have a lens shift capability which allows the vertical movement of the image without moving the projector. Lens shift is generally expressed as a percentage of the screen height. For ceiling mounted projectors, the lens can be moved 50% (0.5V) downward, while the lens can be moved 50% (0.5V) up or down on a desktop mounted projector. Ceiling Front Projection Max. 0.5V Vertical Shift Height of projected image Max. 0.5V Max. 0.5V 1V Vertical Shift 1V Desktop Front Projection Note: This is a general example of lens shift. Lenses vary in their shift capabilities. No particular lens or projector is used in this example. Horizontal Lens Shift The D8800/D8900/D8010W have a lens shift capability which allows the horizontal movement of the image without moving the projector. The lens can be moved 10% (0.1H) to the right or left within the housing. Max. 0.5V 1V Normal Projection Position 0.1H Shift to Left 1H Width of projected image 0.1H Shift to Right Note:: This is a general example of lens shift. Lenses vary in their shift capabilities. No particular lens or projector is used in this example. 17 DLP Projector - User’s Manual Connecting the projector to other devices. Proceed as follows to connect the D8800/D8900/D8010W to your video sources, external controller(s) - if present - and AC power. When connecting your equipment: •Use the correct signal cables for each source. •Ensure that the cables are securely connected. Tighten the thumbscrews on connectors that have them. Connecting Source Components to the D8800/D8900/D8010W Connect your video sources to the D8800/D8900/D8010W as shown and described in the sections that follow. HDMI Connection HDMI DVI-D IN SDI B/Pb G/Y R/Pr V H WIRED REMOTE TRIGGER S-VIEDO VIEDO OUT LAN RGB RS-232 DVI Source(s) (BD/HD-DVD/DVD Player, HD SetTop Box, Game Console etc.) Trigger connection If your home theatre system includes a projector screen, screen cover or other 12V Trigger equipment, please connect such device/equipment to the projector’s 12V Trigger output as illustrated. After you have done so, your screen will lower automatically whenever you turn on your projector for your convenience. Retractable screen or other 12V device Scre r o t c e Proj 18 en Sleeve = Ground Tip = +12V B/Pb G/Y R/Pr V H WIRED REMOTE TRIGGER RS-232 S-VIEDO VIEDO DLP Projector - User’s Manual IR Input connection If infrared signals from the remote control cannot reach the projector due to excessive distance or obstructions such as walls or cabinet doors, you can connect an external IR repeater system to the IR INPUT on the D8800/D8900/D8010W to extend the range of the remote control. IR repeater Remote control IR sensor B/Pb G/Y R/Pr V H WIRED REMOTE TRIGGER S-VIEDO VIEDO RS-232 S-VIDEO, VIDEO connection If the image input device offers both S-Video and Video connection, it is recommended that you choose S-Video to obtain better image quality. If both the S-Video and Video inputs are connected to the projector, the projector will prioritize SVideo signal input and image from the Video input will not be played. HDMI DVI-D IN SDI B/Pb G/Y R/Pr V H WIRED REMOTE TRIGGER S-VIEDO VIEDO OUT LAN RGB RS-232 DVD player, VCR, satellite receiver, LD and so forth 19 DLP Projector - User’s Manual COMPONENT connection Take the 3/5 cabled RGB component video connectors from the source equipment to the projector’s COMPONENT jacks. Pr Y Pb HDMI DVI-D IN SDI B/Pb G/Y R/Pr V H WIRED REMOTE TRIGGER S-VIEDO VIEDO OUT LAN RGB RS-232 DTV set-top-box or other component (YPbPr) input source RS-232 Connection Connect a PC or home theater control/automation system (if present) to the RS-232 port on the D8800/D8900/D8010W. Use a standard, 9-pin serial cable, wired straight-through. HDMI DVI-D IN SDI OUT LAN RGB Desk Top or Notebook RS-232 Interface and Requirements The RS-232 Commands use only ASCII characters which can be entered using a typical terminal emulator like Windows HyperTerminal with the following setting: Bits per second: 38400 Data bits: 8 Parity: None 20 Stop bits: 1 Flow control: None DLP Projector - User’s Manual LAN Connection HDMI DVI-D IN SDI OUT LAN RGB Desk Top or Notebook Network Swtich 21 DLP Projector - User’s Manual Start using the projector - Adjustments Connecting to AC Power The D8800/D8900/D8010W ship with various types of AC power cords. Choose the one that is appropriate to your locale. Plug the female end of the power cord into the AC receptacle on the rear of the projector (AC 100V ~ 240V); Then, connect the other end to your AC power source. Turning on the Power Press POWER SWITCH on the projector. Press ON on remote control or POWER on the projector. The power LED indicator flashes green to indicate that it is warming up. When the projector is ready for use, the LED indicator turns off, and the projector lights. POWER ON FOCUS POWER INPUT AUTO SYNC ASPECT POWER OFF ZOOM TEST PATTERN LENS SHIFT or STATUS LAMP 1 MENU EXIT LAMP 2 TEMP. Press Power 22 SHUTTER POWER LED Flash Green clolor DLP Projector - User’s Manual Changing the OSD Language The D8800/D8900/D8010W can display the menus in English, French, Spanish, German, Portuguese, Simplify Chinese, Traditional Chinese, Japanese or Korean. Press MENU to display the OSD, press to select CONTROL item. Then press to select LANGUAGE and press a language that you wanted. Then press ENTER to confirm your selection. INPUT PICTURE LAMPS ALIGNMENT CONTROL SERVICE Language Eco Network Power < Eco English Auto Power Off < On > Français Auto Power On < Off > Español Projector Control < ----- > Deutsch Network Português Start Up Logo < On ㅔԧЁ᭛ Trigger < Auto > 㐕储Ё᭛ Auto Search < Off > ᮹ᴀ䁲 Dynamic Black < On > 穢剳檺 Language > Enter > Enter Adjusting the Picture Orientation If the D8800/D8900/D8010W is installed behind the screen, you must change the picture orientation to match the installation method. Refer to “Modes of installation” on page 15. To do this, press MENU on the remote control. Then select ALIGNMENT -> Projection Mode -> Rear. If the projector is ceiling-mounted, the D8800/D8900/D8010W will automatically inverts the image. If this automatic inversion is not desired, please select Ceiling Mode from the Menu -> ALIGNMENT -> Projection Mode -> Ceiling + Front or Ceiling + Rear. INPUT PICTURE LAMPS ALIGNMENT CONTROL SERVICE Projection Mode < Front > Fan Mode < Normal > Lens Control Lens Memory Center Lens Enter Enter Execute Warp Enter Blanking Enter Edge Blend Enter 23 DLP Projector - User’s Manual Lens Adjustments The D8800/D8900/D8010W gives you a great deal of control over the picture size, position and focus. Focus To focus the projected image, grasp the lens by the front ring and rotate it. Adjust foot Rotate the 4 feet on projector for image position. Note: Ceiling Mode can’t adjust this function. LENS SHIFT Shift adjustment Vertical Lens Shift To shift the projected image vertically, press on the keypad. Range: Up, 50%; Down, 0%. Horizontal Lens Shift To shift the projected image horizontally, press on the keypad. Range: Right, 10%; Left, 10%. FOCUS ZOOM Zoom To make the picture smaller (zoom out) or larger (zoom in). Press ZOOM on the keypad the appropriate direction. Focus To make the picture clear or Fuzzy. To focus the current image, press FOCUS on the keypad appropriate direction. 24 DLP Projector - User’s Manual Start using the projector - Operation Selecting An Input Source When you turn on the D8800/D8900/D8010W, it switches to the last selected input and looks for a valid signal. Press INPUT on the remote control to select an input source directly. INPUT Selecting an Aspect Ratio Press ASPECT to adjust the video aspect ratio. ASPECT 2 Using the OSD 1. Press the MENU button on the remote control or machine top cover’s keypad to display the OSD main menu. 2. Press or to select a sub-menu. 3. Press or to select a sub-menu item. 4. For each sub-menu item, the currently-selected value is highlighted. Press or to choose a setting for that item, and press ENTER on the remote controller or SELECT on the keypad to adjust the value of that item. 5. If want return to the previous menu, please press MENU. 6. In the Main Menu, press MENU to turn off the OSD menu. The D8800/D8900/D8010W OSD menus are arranged. 25 DLP Projector - User’s Manual Start using the projector - OSD Introduction OSD Menu Tree Input Selection PIP Test Pattern INPUT Color Space Input Lock Background Video Standard Auto Sync Adjust 26 HDMI DVI VGA Component / BNC Composite S-Video 3G-SDI PIP Option PIP Input PIP Swap Position Color Bar Crosshatch Burst Res Green Blue White Black Uncorrected Red Uncorrected Green Uncorrected Blue H Ramp Off Auto YCbCr YPbPr RGB-PC RGB-Video Auto 48Hz 50Hz 60Hz Logo Blue Black White Auto PAL SECAM NTSC Off Auto Always Display Mode Contrast Brightness Adaptive Contrast Saturation Hue Gamma Color Sharpness Noise Reduction PICTURE Aspect Ratio Overscan VGA Setup Auto Sync Mode Power LAMP High Bright Presentation Video 0~200 On Off 0~200 Film Graphics Video Color Temperature Trim 0~200 5:4 4:3 16:10 16:9 1.88 2.35 Letterbox Native Unscaled Off Crop Zoom H Total H Start H Phase V Start Execute Single Dual Eco Normal Custom Power Level On Off Custom Power Level 80.4%~100% Lamp 1 Status On Lamp 2 Status Off High Altitude DLP Projector - User’s Manual Projection Mode Fan Mode Lens Control Lens Memory Center Lens ALIGNMENT Warp Blanking Edge Blend Front Rear Ceiling + Front Ceiling + Rear Normal Up Down Zoom Focus Load Memory Save Memory Execute Keystone Rotation Pincushion / Barrel Top Left Corner Top Right Corner Bottom Left Corner Bottom Right Corner Custom Warp Reset Top Bottom Left Right Reset Edge Blend Blend Width Black Level Uplift Reset Eco Network Power Auto Power Off Auto Power On Projector Control Network Start Up Logo CONTROL Trigger Auto Search Dynamic Black Language Standard Eco On Off RS232 Network IP Address Subnet mask Gateway DHCP On Off 5:4 4:3 16:10 16:9 1.88 2.35 Letterbox Native Unscaled Auto On Off English Français Español Deutsch Português 简体中文 繁體中文 日本語 한국어 Model Serial Number Software Version Active/PIP Source Pixel Clock SERVICE Signal Format H/V Refresh Rate Lamp 1 Time Lamp 2 Time Power On Time Blue Only Factory Reset x HRS x HRS x HRS On Off 27 DLP Projector - User’s Manual OSD Introduction - INPUT PICTURE INPUT LAMPS Input Selection Enter PIP Enter Test Pattern Enter ALIGNMENT Color Space < RGB-PC > Input Lock < Auto > Background < Logo > Video Standard < ----- > Auto Sync Adjust < Always > CONTROL SERVICE yInput y Selection This function is same as the hotkey which on Remote controller. You can use remote controller or this function to select the correct input source. Refer to “Selecting An Input Source” on page 25. yyHDMI HDMI input from PC or media device. yyDVI DVI input from PC. yyVGA Analog RGB from PC. yyComponent / BNC Analog / serial digital interface from media device. yyComposite Traditional composite video from media device. yyS-Video Super video (Y/C seperated). yy3G-SDI Uncompressed digital video from a serial connection (coaxial). Color Sampling Bit Cable Length Timing SDI Link mode Signal Standards Encode Structure depth Tested NTSC SD SMPTE 259M-C 270Mbps SD YCbCr 4:2:2 10 128m PAL SD SMPTE 259M-C 270Mbps SD YCbCr 4:2:2 10 128m 1080i 59.94Hz HD-Single SMPTE 292M292M 1.5Gbps HD YCbCr 4:2:2 10 128m 1035i 60Hz 1080i 60Hz 1080P 30Hz 1080P 25Hz 1080P 50Hz 28 HD-Single HD-Single HD-Single HD-Single HD-Single SMPTE 292M292M 1.5Gbps HD SMPTE 292M292M 1.5Gbps HD SMPTE 292M292M 1.5Gbps HD SMPTE 292M292M 1.5Gbps HD SMPTE 292M292M 1.5Gbps HD YCbCr YCbCr YCbCr YCbCr YCbCr 4:2:2 4:2:2 4:2:2 4:2:2 4:2:2 10 10 10 10 10 128m 128m 128m 128m 128m DLP Projector - User’s Manual 1080P 24Hz HD-Single SMPTE 292M292M 1.5Gbps HD Color Encode YCbCr 720P 50Hz HD-Single SMPTE 292M292M 1.5Gbps HD YCbCr Timing 720P 60Hz 1080Sf 25Hz 1080Sf 30Hz 1080P 50Hz 1080P 59.94Hz 1080P 60Hz 1080P 50Hz 1080P 59.94Hz 1080P 60Hz SDI Link mode HD-Single HD-Single HD-Single 3G Level A 3G Level A 3G Level A 3G Level B 3G Level B 3G Level B Signal Standards SMPTE 292M292M 1.5Gbps HD YCbCr SMPTE 292M292M 1.5Gbps HD YCbCr SMPTE 292M292M 1.5Gbps HD 4:2:2 YCbCr SMPTE 424M 3Gbps 128m 4:2:2 YCbCr SMPTE 424M 3Gbps 10 4:2:2 YCbCr SMPTE 424M 3Gbps 4:2:2 4:2:2 4:2:2 YCbCr SMPTE 424M 3Gbps Cable Length Tested 128m 4:2:2 YCbCr SMPTE 424M 3Gbps Bit depth 10 4:2:2 YCbCr SMPTE 424M 3Gbps Sampling Structure 4:2:2 4:2:2 YCbCr 4:2:2 10 10 10 10 10 10 10 10 10 128m 128m 128m 128m 128m 128m 128m 128m 128m Note: Signals are not supplied for D8800/D8900/D8010W, if it is not in the table. yPIP y You can use this function to display multiple windows each containing an image. yyPIP Option Use this to turn the function On/Off. yyPIP Input Use this to select the input. yyPIP Swap Use this to exchange displayed images. yyPosition Use this to select the location of the PIP window (Top left, Top Right, Bottom Left, Bottom Right, or Split L-R). Top Left 2 Split L-R 1 Source HDMI DVI RGB BNC S-Video Video HDSDI HDMI X X O O O O X Location 1 1 Bottom Left 2 DVI X X O O O O X 2 RGB O O X X O O O Top Right 2 Bottom Right 1 1 BNC O O X X O O O S-Video O O O O X X O 2 Video O O O O X X O HDSDI X X O O O O X yTest y Pattern Select this to enter the display test function. 29 DLP Projector - User’s Manual yColor y Space This function allows you to change component, composite, and RGB sources. You can select different color space for different color performance. yyThe default setting, Auto, functions as follows: HDMI: If the Auxiliary Video Information (AVI) infoframe contains color space and/or range data, the D8800/D8900/D8010W use that information. Otherwise, for RGB sources, the D8800/D8900/D8010W use the RGB-Video color space. For component SDTV and EDTV resolutions, REC601 is used. For other component video resolutions, REC709 is used. RGB: If Hsync or Vsync signals are present, the D8800/D8900/D8010W use the RGB-PC color space. Otherwise, REC601 is used for SDTV and EDTV sources, and REC709 for all other sources. Component: For SDTV and EDTV resolutions, the D8800/D8900/D8010W use the REC601 color space. For all other resolutions REC709 is used. yyIn most cases, the Auto setting determines the correct color space to use. If it does not, you can force the D8800/D8900/D8010W to use a specific color space. Choose one of the following: YCbCr uses component color space and sets black at 0,0,0 and white at 255,255,255. YPbPr uses composite color space and sets black at 0,0,0 and white at 255,255,255. RGB-PC uses RGB color space and sets black at 0,0,0 RGB and white at 255,255,255 RGB, assuming an 8-bit image. RGB-Video uses RGB color space and sets black at 16,16,16 RGB and white at 235,235,235, assuming an 8-bit image, to correspond to the luminance values defined in digital component standards. yInput y Lock Use this function to lock a source to an internal sync signal (Auto, 48Hz, 50Hz, or 60Hz). Auto setting locks the sync signal to the current source. yBackground y Use this function to specify the content or color to be displayed on the blank screen when no input signal is available. You can choose from Logo, Blue, Black, White. The default value is Logo. yVideo y Standard Different countries may use different video signal formats. Please choose the video standard in your area. yyAuto The color systems are automatically identified and the format is set accordingly. yyPAL (Phase Alternation By Line) This is the standard used in Europe, Australia and many other parts of the world, typically with a 50Hz frame rate. yySECAM (Sequential Color With Memory) This is a standard format used mainly in France and Russia. Gamma: Select Gamma from the ADVANCED menu to choose a DLP de-gamma curve. Used correctly, the Gamma control can improve contrast while maintaining good details for blacks and whites. If excess ambient light washes out the image and it becomes difficult or impossible to see details in dark areas, lower the gamma setting to compensate. This improves contrast while maintaining good details for blacks. Conversely, if the image is washed out and unnatural, with excessive detail in black areas, increase the setting. yyNTSC (National Television Systems Committee) This is the standard format used mainly in the United States and Japan. Note: Generally speaking, the projector will be able to automatically detect the video standard used in your area. However, there are circumstance where the projector will fail to interpret the video standard used and the user will have to manually configure the video format. If you are unsure of the video standard used in your area, please contact a qualified personnel and inquire about the video standard used in your area. yAuto y Sync Adjust Use this function to set the automatic adjust setting for the incoming signal by adjusting the black level, gain, and reference (Off, Auto, Always). 30 DLP Projector - User’s Manual OSD Introduction - PICTURE INPUT PICTURE LAMPS ALIGNMENT Display Mode < Video > Contrast < 100 > Brightness < 50 > Adaptive Contrast < Off > Saturation < ----- > Hue < ----- > Gamma < Film > CONTROL SERVICE Enter Color Sharpness < 0 > Noise Reduction < 0 > Aspect Ratio < 16:10 > Overscan < Off > VGA Setup Enter Auto Sync Execute yDisplay y Mode Use to select the display mode. yContrast y Use to adjust the contrast of the projected image. Note: Brightness and Contrast controls are interactive. The screen change to one may require a subtle change to the other in order to achieve the optimum setting. yBrightness y Use to adjust the level of black in the image to increase or decrease image brightness. yAdaptive y Contrast Use to adjust the light and dark aspects of the contrast curve. ySaturation y Use to adjust the color saturation levels (higher the level the higher the saturation). yHue y Use to adjust the Hue level for true color reproduction (Video and S-Video for NTSC). Gamma Different Gamma settings will affect viewers’ perception of the image. For images that are darker, it is recommended that Gamma be set higher to yield better image quality in darker regions by sacrificing details in brighter areas. In contrast, when projecting brighter images, you can set the Gamma lower to give up details in the darker areas to make the brighter areas (i.e. clouds) more visible. yyFilm set the gamma to 2.2. yyGraphics should only be used for computer presentations that require increased brightness at the cost of grayscale accuracy. yyVideo is similar to Film gamma but differs in dark areas of the image to correspond to the function that video cameras use to create images. 31 DLP Projector - User’s Manual yColor y Use to adjust the color temperature of the projected image. ySharpness y The adjustment of sharpness primarily changes the value of high frequency detail. Use to adjust it. yNoise y Reduction Use to adjust the noise of the projected image. This function is suitable for the elimination of image noise from interleaving SD input. Generally speaking, reducing image noise will lower the value of high frequency detail and make the image appear more mellow. yAspect y Ratio This function allow user adjust the picture’s Aspect ratio. When Native input is 16:10, the images as following is the result of picture’s Aspect ratio for your reference. Native input 16:10 Output aspect ratio 5:4 Output aspect ratio 4:3 Output aspect ratio 16:9 Output aspect ratio 1.88 Output aspect ratio 2.35 Output aspect ratio Letterbox Output aspect ratio Native Output aspect ratio Unscaled When Native input is 4:3, the images as following is the result of picture’s Aspect ratio for your reference. Native input 4:3 32 Output aspect ratio 5:4 Output aspect ratio 4:3 Output aspect ratio 16:9 Output aspect ratio 1.88 Output aspect ratio 2.35 Output aspect ratio Letterbox Output aspect ratio Native Output aspect ratio Unscaled DLP Projector - User’s Manual yOverscan y Some consumers may use the image that input source is not 16:9, and some programs may not display the edges of the image. Use this function to hide the image edge by choosing one of the following three options: Crop Zoom 4:3 6:9 16:9 4:3 Narrow Native (720p) Sou Source image area Edg Edge Noise Scre Screen (16:9) yVGA y Setup Use this function to set up the VGA display. yAuto y Sync Use this function to set the automatic adjust setting for the incoming signal by adjusting the black level, gain, and reference (Off, Auto, Always). 33 DLP Projector - User’s Manual OSD Introduction - LAMPS INPUT PICTURE LAMPS ALIGNMENT CONTROL SERVICE Mode < Single > Power < Eco > High Altitude < Off > Custom Power Level < ----- > Lamp 1 Status : On Lamp 2 Status : Off yMode y Use function to select single or dual lamp mode. yPower y Use function to select Eco, normal, or custom power level. yHigh y Altitude Use this function to control the projector’s cooling fan. You can set it to Off or On. The default setting is Off. Under normal circumstances, the projector will operate normally with this function set to Off. By default, the projector will detect the temperature of the surrounding environment to regulate the speed of the cooling fan. When the ambient temperature rises, fan speed will increase (generates louder noise) to make sure the heat inside the projector gets discharged and keep the projector working normally. However, if you were to operate the projector in environment of excessive heat or in areas of high altitude, the projector may automatically shut down. When this happens, you can enable this function by setting it to On to force the cooling fan to work at a higher speed to regulate the temperature inside the projector. Note: High altitude region refers to area with elevation over 5000 feet. yCustom y Power Level Use function to select a custom power level (80.4% to 100%). yLamp y 1 Status Use function to set lamp status to On/Off. yLamp y 2 Status Use function to set lamp status to On/Off. 34 DLP Projector - User’s Manual OSD Introduction - ALIGNMENT INPUT PICTURE LAMPS ALIGNMENT CONTROL SERVICE Projection Mode < Front > Fan Mode < Normal > Lens Control Enter Lens Memory Enter Center Lens Execute Warp Enter Blanking Enter Edge Blend Enter yProjection y Mode Use function to select the projection mode (Front, Rear, Ceiling + Front, Ceiling + Rear). yFan y Mode Use function to set the fan mode (Normal, Up, Down). yLens y Control Use this function to set the lens control mode (Zoom/Focus). yLens y Memory Load Memory: Select this item to load the your own setting. Save setting: You can adjust the OSD’s items by yourself then use this function to save your setting. yCenter y Lens Use this to center the lens. yWarp y Use this to correct image distortion. yyKeystone Press to correct horizontal keystone due to projection angle. Press to correct Vertical keystone due to projection angle. yyRotation Press to correct incorrect image angle. Correct angle Press to adjust angle to correct. Press to adjust angle to correct. P P P 35 DLP Projector - User’s Manual yyPincushion / Barrel Press to correct pincushion/barrel distortion. P Press to correct pincushion distortion to correct image. P P Press to correct barrel distortion to correct image. P yyTop Left Corner Press to correct top left corner image distortion. P Press to correct top left corner image distortion to correct image. P yyTop Right Corner Press to correct the right corner image distortion. P Press to correct top right corner image distortion to correct image. P yyBottom Left Corner Press to correct the bottom left image distortion. P Press to correct bottom left corner image distortion to correct image. P yyBottom Right Corner Press to correct the bottom left image distortion. P Press to correct bottom right corner image distortion to correct image. yyCustom Warp Use this to create custom warp values. yyReset Set all values to factory defaults. 36 P DLP Projector - User’s Manual yBlanking y Use this function to adjust the edges of the image and hide unwanted sections of the screen. yTOP y Press on the remote control to adjust the top blanking area on the projected image. yBottom y Press on the remote control to adjust the bottom blanking area on the projected image. yLeft y Press on the remote control to adjust the left blanking area on the projected image. yRight y Press on the remote control to adjust the right blanking area on the projected image. yReset y It will reset all the blanking functions to the default settings that is without any blanking functions enabled. Use left blanking function to block the additional image on the screen. P P yEdge y Blend Edge blend function requires multiple projectors simultaneously displaying on the same screen. Use this to adjust the uniformity of the images. To use this function, Edge Blend must be enabled on both projectors. yyEdge Blend 1. Press Menu to activate menu. 2. Press to select Alignment and press Enter. 3. Press to select Edge Blend and press Enter. Note: Notice that red and green lines appear to indicate the edge of the screen. The green lines indicate the start/end of the blend zone. yyBlend Width The menu White Level allows for Top, Bottom, Left, and Right adjustment of a blending zone. 1. Press Menu to activate menu. 2. Press to select Alignment and press Enter. 3. Press to select Edge Blend and press Enter. 4. Press to select Blend Width and press Enter. 5. Select an adjustment zone and use to correct the blend zone. 37 DLP Projector - User’s Manual Top Bottom Left Right White Level 0 0 0 0 yyBlack Level Uplift Black Level Uplift is used to compensate for the lack of pure black output from projectors, due to light leaking to the projection screen. When projecting black , the hot area where the two images overlap project twice the projectors’ black output levels. The solution is to adjust the Black Level Uplift. First make sure that the units connected to the projectors are outputting black. Then increase the Black Level Uplift (Top, Bottom, Left, Right) until the non-overlap area’s brightness matches the overlap area. To adjust Black Level Uplift 1. Press Menu to activate menu 2. Press to select Alignment and press Enter. 3. Press to select Edge Blend and press Enter. 4. Press to select Black Level Uplift and press Enter. 5. Adjust the black level in zone A by setting the Selected Area (Top, Bottom, Left, Right) to match the black levels in zones B and C. You can also use Adjust (All, Red, Green, Blue) to set all primary colors. Note: yyFour corners, black level uplift adjustment function is not available. yyCorner blending, black level uplift adjustment function is not available. Black Level Uplift Select Area Top Bottom Left Right All Red Gerrn Blue Adjust 0 0 0 0 0 0 0 0 yyReset This function sets Edge Blend figures to the factory default settings. yyAlign Pattern Enable this function to use a test pattern to align and adjust multiple images. To use the Align Pattern: 1. Setup two projects on a horizontal position and display the test grid pattern image on each. 2. Create an overlap zone with the two test patterns by using the buttons on the remote control. Note: yyBlanking and Blend combinations are specific to each model. yyDo not adjust black levels in order to use the Edge blend / four corner combination function. yyDo not adjust black levels in order to use the blend along corners function. 38 DLP Projector - User’s Manual OSD Introduction - CONTROL INPUT PICTURE LAMPS ALIGNMENT CONTROL SERVICE Eco Network Power < Eco > Auto Power Off < On > Auto Power On < Off > Projector Control < ----- > Network Enter Start Up Logo < On > Trigger < Auto > Auto Search < Off > Dynamic Black < On > Language Enter yEco y Network Power Use function to set Standard or Eco network power. yAuto y Power Off The default value is OFF. If you set it to ON, the projector will automatically shut down after 20 minutes without input signal. yAuto y Power On The default value is Off. If you set it to ON, the projector will automatically start up when it is connected to AC power. If you plug the projector’s power cord into an AC socket with a switch, you can use this function to start up the projector using the socket’s switch instead of the remote. If you do not need this function, please set it to Off. yProjector y Control Use function to select RS232 or Network for the projector control. yNetwork y Use this function to setup the network configuration. 39 DLP Projector - User’s Manual To connect to a network (LAN), refer to the following steps: 1. Connect an RJ45 cable to LAN ports on the projector and a router or hub on the network. Projector (Ethernet) 2. On the control PC, open a web browser and enter the IP address of the projector. The Projector Web Server home page displays. In the example, the projector resides at IP address 192.168.0.100. 40 DLP Projector - User’s Manual 3. Make any desired changes to projector settings, then Click Save. To connect to a stand alone PC or notebook, refer to the following steps: 1. Connect an RJ45 cable to LAN ports on the projector and the PC (Laptop). HDMI DVI-D IN SDI OUT LAN RGB Desk Top or Notebook 2. On the PC (Laptop), select Start -> Control Panel -> Network Connections. 41 DLP Projector - User’s Manual 3. Right-click on Local Area Connection, and select Properties. 4. In the Properties window, select the General tab, and select Internet Protocol (TCP/IP). 5. Click Properties. 6. Click Use the following IP address. 7. Fill in the IP address and subnet mask. Make sure the IP address of the projector and PC are in the same network group. For example, 192.168.0.X. Whereas X must contain a different value. Then click OK. 42 DLP Projector - User’s Manual 8. On the control PC, open a web browser and enter the IP address of the projector. The Projector Web Server home page displays. In the example, the projector resides at IP address 192.168.0.100. 9. Make any desired changes to projector settings, then Click Save. 10. Access Tera Term tool. Use RS-232 command to control the Projector. 43 DLP Projector - User’s Manual yStart y Up Logo Use function to turn On/Off the start up logo. yTrigger y The projector comes with one set of Trigger output. You can configure one devices connected to the projector via the trigger port to be automatically turned on when the projector is on. There will be a 2-3 second delay prior to activation to prevent operation of this function when the user is choosing the desired aspect ratio. yy5:4: Outputs 12V of power on Trigger when chooses the 5:4 aspect ratio. yy4:3: Outputs 12V of power on Trigger when chooses the 4:3 aspect ratio. yy16:10: Outputs 12V of power on Trigger when chooses the 16:10 aspect ratio. yy16:9: Outputs 12V of power on Trigger when chooses the 16:9 aspect ratio. yy1.88: Outputs 12V of power on Trigger when chooses the 1.88 aspect ratio. yy2.35: Outputs 12V of power on Trigger when chooses the 2.35 aspect ratio. yyLetterbox: Outputs 12V of power on Trigger when chooses the Letterbox aspect ratio. yyNative: Outputs 12V of power on Trigger when chooses the Native aspect ratio. yyUnscaled: Outputs 12V of power on Trigger when chooses the Unscaled aspect ratio. yyAuto: Outputs 12V of power on Trigger automatically. yAuto y Search Use function to turn On/Off auto search. yDynamic y Black Use function to turn On/Off dynamic black . yLanguage y Choose the OSD display language that you familiar. English, French, Spanish, Dutch, Portuguese, Simplify Chinese, Traditional Chinese, Japanese or Korean. 44 DLP Projector - User’s Manual OSD Introduction - SERVICE INPUT PICTURE LAMPS ALIGNMENT CONTROL SERVICE Model : DP9675QDPxA Serial Number : C202XXXX00767 Software Version : MD05-GD02-Ub01- 9999-31-DPNE02-D02 Active/PIP Source : HDMI Pixel Clock : 83 .30 MHZ Signal Format : 1280x800@60Hz H/V Refresh Rate : H: 49.578 KHZ V: 60 HZ Lamp 1 Time : 7 HRS Lamp 2 Time : 7 HRS Power On Time : 7 HRS Blue Only < Factory Reset / Off Off > Enter The functions covered in this unit relate to the display of some basic information about the projector. Note: Memory of the custom timing files will be erased in the Factory Reset operation. yModel y The designated model number of the projector. ySerial y Number The designated serial number of the projector. ySoftware y Version The version of software installed on the projector. yActive/PIP y Source Displays the current Active/PIP sources. yPixel y Clock Displays the pixel clock of the current input signal. ySignal y Format Displays the format of the current input signal. yH/V y Refresh Rate Displays the horizontal and vertical refresh rates for the current image. yLamp y 1 Time Display the lamp 1 usage time. When you change the new lamp. The lamp hours will re-calculate the time. 45 DLP Projector - User’s Manual yLamp y 2 Time Display the lamp 2 usage time. When you change the new lamp. The lamp hours will re-calculate the time. yPower y On Time Display the total On time for projector. Display only. yBlue y Only Enabling this option will make the projector display only blue color to facilitate the process of image inspection for the service personnel. For detailed instructions on how to use this function, consult a qualified service personnel. yFactory y Reset Use this function to restore the configurations in the OSD Menu back to factory default. Note that this function will not apply to items including no signal, network, Projector control, startup Logo, language, High Altitude mode and lamp hours. Note: When Factory Reset is executed, all source memories created by the projector (i.e. timings files) will be erased. 46 DLP Projector - User’s Manual Change Lamp The lifecycle of ordinary projection lamp typically lasts for 1200 hours before requiring replacement (different lamp configurations will affect lamp life). From the OSD Menu, you can go to “OSD Introduction - SERVICE” on page 45 to check how long a lamp has been used. You should also replace the lamp when the projected image gets noticeably darker. Contact your local dealer to purchase new certified lamps for your projector. To replace the projector lamp1 1. Turn off the projector and unplug the power cord. Let the projector cool for approximately 60 minutes before removing the lamp module for replacement. Note: When you turn off the projector, the lamp inside the projector will still be very hot (approximately 200 ~ 300°C). If you attempt to replace the lamp without allowing the projector to cool, you could risk scalding yourself. This is why you should wait for no less than 60 minutes for the lamp to cool down in order to perform the replacement safely. 2. Loosen the fan. 3. Use a screw driver to loosen the screws as shown in the illustration and pull the lamp out. 4. Insert the new lamp in the direction shown in the illustration into the lamp assembly; tighten the three screws using a screw diver and make sure the lamp is firmly secured to prevent the lamp from shaking or poor contact. 5. Replace the fan and firmly secure the one screw on the fan. 47 DLP Projector - User’s Manual To replace the projector lamp2 1. Loosen the fan. 2. Use a screw driver to loosen the screws as shown in the illustration and pull the lamp out. 3. Insert the new lamp in the direction shown in the illustration into the lamp assembly; tighten the three screws using a screw diver and make sure the lamp is firmly secured to prevent the lamp from shaking or poor contact. 4. Replace the fan and firmly secure the one screw on the fan. 48 DLP Projector - User’s Manual Change Lens To replace the projector Lens 1. Remove the front cover. 2. Press and hold the lens lock button. Support the lens with one hand and turn clockwise loose the lens. 3. Pull the lens backward and slide the lens out of the lens holder. 4. Insert the lens that female jeck is in front of the male jack (upper left corner). Ensure the lens touches the lens holder. 5. Secure the lens in the lens holder by turning counterclockwise the lens to the “locked” position. 6. Check if the lens is really secured by trying to pull the lens out of the lens holder. ■ Six models of lens for D8800(WUXGA) Vivitek Part Number Lens D88-ST001 Standard Lens D88-WZ01 Wide Zoom D88-WF18501 D88-SMLZ01 D88-LOZ101 D88-LOZ201 Wide Fix F# Zoom Ratio 0.79 N/A 2.22 ~ 3.67 1.65 5.31 ~ 8.26 1.55 1.7 ~ 1.9 1.73 ~ 2.27 1.85 ~ 2.50 1.25 ~ 1.79 1.85 Semi Long Zoom 1 1.86 ~ 2.48 Long Zoom 2 1.85 ~ 2.48 Long Zoom 1 TR 1.85 ~ 2.41 3.58 ~ 5.38 1.3 1.41 1.5 49 DLP Projector - User’s Manual Six models of lens for D8900(XGA) Vivitek Part Number Lens D88-ST001 Standard Lens D88-WZ01 Wide Zoom D88-WF18501 D88-SMLZ01 D88-LOZ101 D88-LOZ201 Wide Fix F# Zoom Ratio 0.8 N/A 2.3 ~ 3.81 1.65 1.7 ~ 1.9 1.79 ~ 2.35 1.85 ~ 2.50 1.3 ~ 1.85 1.85 Semi Long Zoom 1.86 ~ 2.48 Long Zoom2 1.85 ~ 2.48 Long Zoom1 TR 1.3 1.41 1.85 ~ 2.41 3.67 ~ 5.64 1.5 5.5 ~ 8.56 1.55 F# TR Zoom Ratio 0.76 N/A Six models of lens for D8010W(WXGA) Vivitek Part Number D88-ST001 D88-WF18501 Lens Standard Lens Wide Fix D88-WZ01 Wide Zoom D88-LOZ101 Long Zoom1 D88-SMLZ01 D88-LOZ201 50 1.7 ~ 1.9 1.80 ~ 2.38 1.85 ~ 2.50 1.31 ~ 1.87 1.85 1.3 1.41 Semi Long Zoom 1.86 ~ 2.48 2.33 ~ 3.86 1.65 Long Zoom2 1.85 ~ 2.48 5.56 ~ 8.67 1.55 1.85 ~ 2.41 3.71 ~ 5.57 1.5 DLP Projector - User’s Manual Change Filter The filter should be changed every 3000 hours. To replace the Filter on the left side of the projector 1. Remove the cover on the left side of the projector. 2. Remove the filter from it. 3. Insert a new filter. 4. Install the cover on the left side of the projector. 51 DLP Projector - User’s Manual To replace the Filter on the right side of the projector 1. Loosen the fan cover on the right side of the projector. 2. Open the fan cover and remove the filter from it. 3. Insert a new filter and install the fan cover on the right side of the projector. 4. Secure the fan cover. Optional component Handle Foot Filter 52 Component D88-Acc-HDL-00 D88-Acc-Fot-00 D88-AF00 P/N DLP Projector - User’s Manual Change the Color Wheel The color wheel is on the top side. ² j Loosen the top cover Slide the cover and remove it. k Loosen the color wheel’s screw. Ç m Replace the color wheel that you wanted. Ç l Life up the color Wheel n Tighten the screws. ² o Slide the bracket to recover the machine then use the screw to fix the top bracket on the machine. 53 DLP Projector - User’s Manual LED Status Green Status LED Off Flashing LED Display Red (Cycles of 1) Red (Cycles of 4) Red On Lamp1/Lamp2 LED Off Flashing LED Display Green Red (Cycles of 6) Red On Green Temp LED Off Flashing LED Display Red Shutter LED Off Flashing 54 LED Display Green Projector status Power is off Prepare to turn on projector Projector cooling Standby mode POWER On STATUS Green Orange Red LAMP 1 LED Display LAMP 2 Off Flashing TEMP. SHUTTER Power LED Procedure Wait till projector start displaying Wait until cooling finish ( ~ 90 sec) Projector is on Projector status No Problem Cover Problem Fan Problem System Error Procedure Contact local Vivitek Server Center Contact local Vivitek Server Center Contact local Vivitek Server Center Projector status Lamp off Prepare to light lamp Lamp lit fail Lamp is end-of-life Procedure Projector status No Problem Temperature problem Procedure Lamp lit Projector status Shutter is open Shutter is closed Contact local Vivitek Server Center Procedure DLP Projector - User’s Manual SPECIFICATIONS Model D8800 D8900 D8010W Display Type DLP Brightness 8000 ANS Lumens 10,000 ANS Lumens 8000 ANS Lumens Native Resolution WUXGA (1920 x 1200) XGA (1024 x 768) WXGA (1280 x 800) Maximum Resolution WUXGA (1920 x 1200)@60Hz Contrast Ratio 3000:1 Lamp Life and Type 2000/2500 Hours (Std. / Eco Mode), 400W x 2 Throw Ratio (Standard Lens) 1.73 - 2.27:1 1.79-2.35:1 1.81-2.38:1 Image Size (Diagonal) 40”- 500” 40”- 500” 40”- 500” Projection Distance 1.83 – 14.9m (6 - 49ft) 1.79 – 14.54m (5.87 – 47.07ft) 1.93 – 15.64m (6.3 – 51.31ft) Projection Lens Zoom Ratio (Standard Lens) F = 1.7 - 1.9 f = 25.7 - 33.7mm 1.3X Aspect Ratio 16.10 Native, 4.3 and 16:9 Compatible Offset 0% ~ +50% Keystone Correction Vertical: +/-30° Horizontal:+/-35° Vertical: 48 - 120 Hz Horizontal: 15 - 108kHz Yes (built-in) Synchronization Edge Blending Lens Shift Range Projection Method Vertical: +/- 50% Horizontal: +/- 10% SDTV(480i/576i), EDTV (480p/576p), HDTV (720p, 1080i/p), NTSC/NTSC 4.43, PAL B/G/H/I/ M/N 60, SECAM HDMI v1.3, DVI-D, Component (YPbPr), VGA-In (x2), S-Video, Composite, 3G HDSDI-In, 3G HDSDI-Out, RJ45, 12V Trigger, RS-232C, Wired Remote Table Top, Ceiling Mount (Front or Rear) Dimensions (W x D x W) 508 x 552.6 x 229mm (20” x 21.8” x 9”) Weight (Without Lens) 24kg (52.9lbs) Noise Level 39 dB/39 dB (Single Lamp Eco./Std Mode) 39 dB/43 dB (Dual Lamp Eco./Std Mode) AC 100-240V, 50/60Hz Video Compatibility I/O Connection Ports Power Supply Power Consumption Standard Accessories Optional Accessories Lamp Style 220V 110V Dual Lamp 960W 995W Single Lamp 450W 440W Standby: 0.5W (Without RJ-45, RS-232 Enabled) AC Power Cord VGA Cable Remote Control Lens Cap Documentation Kit Replacement Lamp Remote Carry Handle Foot Socket Interchangeable Lens Options (x6) 55 DLP Projector - User’s Manual SERIAL INTERFACE SPECIFICATIONS Transfer Specifications Transmission Speed Data Length Parity Stop Bit Flow Control Item 38400 bps 8 bit None 1 None Specifications RS-232 Commands There are 2 types of commands: yKey y commands yOperation y commands All commands start with 2 letters as shown in the following: y“ky” y for key commands. y“op” y for operations commands. yKey y Commands The following example is the syntax for key commands: ky <keyname> [CR] IR Codes and Key names Key 1 2 3 4 5 6 0x90 0x91 0xB6 0xB7 0xB8 0xB9 7 0xBA 8 9 10 11 12 13 14 0xBB 0xC1 0xC3 0xC4 0xC5 0xC2 0x87 15 16 17 0xBC 0x83 0x98 RS232 Key name Key Wording ON OFF LENS SHIFT ENTER MENU Shift control of the lens. Keypad up arrow. Keypad left arrow. Keypad right arrow. Keypad enter. Keypad down arrow. Show or hide the OSD menu. ZOOM- Exit the OSD menu. PICTURE Open PICTURE menu. INPUT 20 0x9F ASPECT 0x8F AUTO SYNC PIP 22 0xBD OVERSCAN 24 0x8b LAMP MODE 23 25 26 0x8E 0xBE 0xBF Zoom out. EXIT NETWORK 21 Turn power off. Zoom in. Enter test pattern menu. 0x8C 0x86 Turn power on. Description FOCUS+ ZOOM+ TEST PATTERN FOCUS- 18 19 56 Code Switch the active source. Switch to the next aspect ratio. FREEZE 3D MODE INFO Not available. Open SERVICE menu. DLP Projector - User’s Manual Key Code 27 0x9E 29 0x9B 28 30 RS232 Key name Key Wording LIGHT CLEAR 0x9A SHUTTER ID SET 0x9C Description Not available. Turn on or off the shutter. Not available. Operations Commands The following example is the syntax for operations commands: op <operation> <command> [CR] No. Function Command Action on unit 1 Set =<value> Makes the unit take that value. 2 Get ? Asks what the current value is. 3 Increment + Adds 1 to the current value. 4 Decrement Subtracts 1 from the current value. 5 Execute (none) Performs an action. 1. INPUT Operation Command input.sel =? pip =? pip.sel =? pip.swap pip.pos (execute) =? pattern =? Values 0 = HDMI 1 = DVI 2 = VGA 3 = Component / BNC 4 = Composite 5 = S-Video 6 = 3G-SDI 7 = Option Board (Reserved) 0 = Off 1 = On 1 = HDMI 2 = DVI 3 = VGA 4 = Component / BNC 5 = Composite 6 = S-Video 7 = 3G-SDI 8 = Option Board (Reserved) Swap main and PIP source 0 = Top Left 1 = Top Right 2 = Bottom Left 3 = Bottom Right 4 = Split L-R 0 = Color Bar 1 = Cross Hatch 2 = Burst 3 = Red 4 = Green 5= Blue 6 = White 7 = Black 8 = Red (TI) 9 = Green (TI) 10 = Blue (TI) 11 = HRamp (TI) 12 = Off 57 DLP Projector - User’s Manual color.space Operation =? input.lock =? no.signal =? vid.std =? auto.imgadj =? 2. PICTURE pic.mode =? contrast =?+- dyna.cont =? bright saturat tint =?+=?+=?+- gamma =? Command Values 0 = Auto 1 = YCbCr 2 = YPbPr 3 = RGB-PC (0-255) 4 = RGB-Video (16-235) 0 = Auto 1 = 48 Hz 2 = 50 Hz 3 = 60 Hz 0 = Logo 1 = Blue 2 = Black 3 = White 0 = Auto 1 = PAL 2 = SECAM 3 = NTSC 0 = Off 1 = Auto 2 = Always 0 = High Bright 1 = Presentation 2 = Video 0 - 200 0 = Off 1 = On 0 - 200 0 - 200 0 - 200 red.offset =?+- 0 = Film 1 = Graphics 2 = Video 3 = Linear 0 = Default 1 = Native 0 = 5000K 1 = 6500K 2 = 7800K 3 = 9300K 4 = Native 0-200 blue.offset red.gain =?+=?+- 0-200 0-200 sharp nr aspect =?+=?+=? 0-200 0-200 (Noise Reduction) 0 = 5:4 1 = 4:3 2 = 16:10 3 = 16:9 4 = 1.88 5 = 2.35 6 = Letterbox 7 = Native 8 =Unscaled color.temp (pic.mode is “High Bright” = ? or “Presentation”) color.temp ( pic.mode is “Video”) =? green.offset green.gain blue.gain 58 =?+- =?+=?+- 0-200 0-200 0-200 DLP Projector - User’s Manual Operation zoom (Overscan) =? h.total =?+- h.pos h.phase v.pos auto.img (Auto Sync) =?+=?+=?+(execute) 0-200 0-200 0-200 lamps =? lamp.mode (Drive) =? lamp.pwr altitude (High Altitude) =? =? lamp1.stat ? lamp2.stat ? 0 = Single 1 = Dual 0 = Economy 1 = Standard 2 = Dimming 0-25 (80.4 % ~100.0 %) 0 = Off 1 = On 0 = Off 1 = On 0 = Off 1 = On 3. LAMP 4. ALIGNMENT proj.mode =? fan.pos =? zoomio +- focus +- vert.offset +- horiz.offset +- lens.load lens.save = = lens.center h.keystone v.keystone warp.rotat warp.pinbrl warp.tlc.x warp.tlc.y warp.trc.x warp.trc.y warp.blc.x warp.blc.y warp.brc.x warp.brc.y warp.cust (execute) =?+=?+=?+=?+=?+=?+=?+=?+=? Command 0 = 5:4 1 = 4:3 2 = 16:10 3 = 16:9 4 = 1.88 5 = 2.35 6 = Letterbox 7 = Native 8 =Unscaled 0-200 Values 0 = Front 1 = Rear 2 = Ceiling + Front 3 = Ceiling + Rear 0 = Normal 1 = Vertical 2 = Down + => Zoom out - => Zoom in + => Focus Near - => Focus Far + => Up - => Down + => Right - => Left 1~10 set of lens memory (Load) 1~10 set of lens memory (Save) Midposition shift -350~+350 -200~+200 -20 ~ +20 (in ¼ 1/4 unit) -100 ~ +100 ‘x: -192 ~ +192 ‘y: -120 ~ +120 ‘x: -192 ~ +192 ‘y: -120 ~ +120 ‘x: -192 ~ +192 ‘y: -120 ~ +120 ‘x: -192 ~ +192 ‘y: -120 ~ +120 0 = Off 1 = On 59 DLP Projector - User’s Manual Operation warp.reset blank.top blank.btm blank.left blank.right blank.rst eb.stat (Edge Blend) eb.wht.top eb.wht.btm eb.wht.left eb.wht.right eb.blk.top eb.blk.btm eb.blk.left eb.blk.right eb.all eb.red eb.green eb.blue eb.reset w2.recover eb.adl (Align Pattern) 5. CONTROL (execute) =?+=?+=?+=?+(execute) =? =?+=?+=?+=?+=?+=?+=?+=?+=?+=?+=?+=?+(execute) (execute) eco.net.pow =? auto.powoff =? auto.powon =? proj.ctrl =? net.ipaddr net.subnet net.gateway net.dhcp =? =? =? =? startup.logo =? trig.1 =? auto.src (Auto Search) =? dblack =? lang =? 60 Command Values 0 ~ 360 0 ~ 360 0 ~ 534 0 ~ 534 0, 200 ~ 500 0, 200 ~ 500 0, 200 ~ 800 0, 200 ~ 800 0, 8, 16, 24, 32 0, 8, 16, 24, 32 0, 4, 8, 12, 16, 20, 24, 28, 32 0, 4, 8, 12, 16, 20, 24, 28, 32 0 ~ 32 0 ~ 32 0 ~ 32 0 ~ 32 0 = Off 1 = On 0 = Off (ECO Standby Mode) 1 = On (Standard Standby Mode) 0 = Off 1 = On 0 = Off 1 = On 0 = rs232 1 = network <string> <string> <string> 0 = Off 1 = On 0 = Off 1 = On 0 = 5:4 1 = 4:3 2 = 16:10 3 = 16:9 4 = 1.88 5 = 2.35 6 = Letterbox 7 = Native 8 = Unscaled 9 = Auto 0 = Off 1 = On 0 = Off 1 = On 0 = English 1 = French 2 = Spanish 3 = German 4 = Portuese 5 = Chinese Simplified 6 = Chinese Traditional 7 = Japanese 8 = Korean DLP Projector - User’s Manual Operation 6. SERVICE Command model ser.no sw.ver act.src ? ? ? ? pip.src ? pixel.clock signal h.refresh v.refresh lamp1.hours lamp2.hours proj.runtime blue.only ? ? ? ? ? ? ? =? fact.reset (execute) Values <string> <string> <string> 0 = HDMI 1 = DVI 2 = VGA 3 = Component / BNC 4 = Composite 5 = S-Video 6 = 3G-SDI 7 = Option Board (Reserved) 0 = PIP OFF 1 = HDMI 2 = DVI 3 = VGA 4 = Component / BNC 5 = Composite 6 = S-Video 7 = 3G-SDI 8 = Option Board (Reserved) <string> <string> <string> <string> <string> <string> <string> 0 = Off 1 = On 61 DLP Projector - User’s Manual A. Others power.on (execute) power.off (execute) picture.mute =? 0 = Off 1 = On status ? 0 = standby 1 = warm up 2 = imaging 3 = cooling 4 = warning errcode ? 0=ErrMsgOverTempInlet 1=ErrMsgOverTempDMD 2=ErrMsgOverTempLamp1 3=ErrMsgOverTempLamp2 4=Reserved 5=Reserved 6=ErrMsgOverTempBallast1 7=ErrMsgOverTempBallast2 8=Reserved 9=Reserved 10=ErrMsgFanInitError 11=ErrMsgFan1RotateError 12=ErrMsgFan2RotateError 13=ErrMsgFan3RotateError 14=ErrMsgFan4RotateError 15=ErrMsgFan5RotateError 16=ErrMsgFan6RotateError 17=ErrMsgFan7RotateError 18=ErrMsgFan8RotateError 19=ErrMsgFan9RotateError 20=ErrMsgFan10RotateError 21=ErrMsgFan11RotateError 22=ErrMsgFan12RotateError 23=ErrMsgFan13RotateError 24=Reserved 25=Reserved 26=Reserved 27=ErrMsgDMDInitFail 28=ErrMsgLampInitFail 29=ErrMsgLampLitFail 30=ErrMsgBallastUart1Error 31=ErrMsgExGpioFail 32=ErrMsgInterLockOpen 33=ErrMsgGF9450NoResponse 34=ErrMsgSystemI2cFail 35=ErrMsgSoftwareI2cFail 36=ErrMsgEepromFail 37=ErrMsgEdidFail 38=ErrMsgEepVersionFail 39=ErrMsgRstGennum 40= ErrMsgLamp2LitFail 41= ErrMsgBallast2UartError 42=ErrMsgGtInletTp 43=ErrMsgGtDmdTp 44=ErrMsgInletTempSensorFail 45=ErrMsgDMDTempSensorFail 46=ErrMsgGeoSystemFail 47=ErrMsgLampDoor1Open 48=ErrMsgLampDoor2Open 49= ErrMsgLCUFail, 50= ErrMsgLCUVerFail 51= ErrMsgLowTempStart 52= ErrMsgDDP3021ASICError 53= ErrMsgDDP3021MainRLDRam 54= ErrMsgDDP3021SlaveRLDRam 55= ErrMsgColorWheelSpin 56= ErrMsgFETempSensorFail 57= ErrMsgOverTempFE 58=ErrMsgColorWheelCover 59=ErrMsgAllBallastUartError 60= ErrMsgHDMIDecoderFail 61= ErrMsgVideoDecoderFail 62= ErrMsgAD9984Fail remote.set =? 1 ~ 10 : Set Projector ID 255 : Clear Projector ID (No ID) 62 mot.ver ? Get firmware version of motor board hw.ver ? Get hardware version of main PCB DLP Projector - User’s Manual Dimensions 549.2mm 508.8mm 19 mm 664 mm 417mm 7 230.3mm 549.2mm 204.9mm 508.8mm 63 DLP Projector - User’s Manual 509.8 150 254.9 108.8 150 547.6 Use 6pcs M4 screws. Lenth max=15mm to fix this machine on the ceiling mount. 104.4 230.1 204.5 64 300 DLP Projector - User’s Manual Supported Timings Signal Type Frame rate 640x480 59.94 640x480 74.99 640x480 85 800x600 60.32 800x600 75 800x600 85.06 848x480 47.95 848x480 59.94 PC 1024x768 60 1280x1024 60.02 1280x1024 75.02 1280x1024 85.02 1600x1200 60 1680x1050 59.954 1920x1080 47.95 Apple Mac 640x480 66.59 RGBs 50 1440x480i 60 1440x576i 50 SDTV EDTV HDTV NTSC PAL SECAM Resolution 480i 576i 480p 576p 1035i 1080i 1080i (Aus) 1080i 1080i 720p 720p 59.94 50 59.94 50 60 50 50 59.94 60 50 59.94 720p 1080p 1080p 1080p 1080p 60 23.98 24 25 29.97 1080p 1080p 1080p 1080p NTSC (M 4.43) PAL (B,G,H,I) PAL (N) PAL (M) SECAM (M) 30 50 59.94 60 59.94 DVI Video X X X X X X X X X X X X X X X X SCART S-Video Y-Pb-Pr HD15-YUV HD15-RGB X X X X X X X X X X X X X X X X X X X X X X X X X X X X X X X X X X X X X X X X X X X X X X X X X X X X X X X X X X X X X X X X X X X X X X X X X X X X X X X X X X X 50 X X 50 59.94 50 X X X X X X X X X X X X X X X X X X 65 DLP Projector - User’s Manual Projection Distance and Screen Size Optional Lenses (D88-LOZ101) Long Zoom 1 Lens Features and Specifications •Motorized Zoom and Focus •Lens Shift Position: 0-50% Vertical; +/-10% Horizontal •Focus adjustable Range: 40” - 500” •Optical Performance Range: 50” - 300” •F-Number: 1.85 - 2.41 •Focal Length: 52.8-79.1mm •Screen Size: 50”-300” •Zoom Ratio: 1.5:1 •Throw Distance Ratio: 3.71-5.57:1(XGA); 3.76-5.64:1(WXGA); 3.58-5.38:1(WUXGA) Projection Distance V.S. Projection Size D88-LOZ101 Long Zoom 1 Lens Screen Size (inch) 40 50 60 80 100 120 150 180 200 300 400 500 XGA Projection Distance (m) +/-10% Minimum Maximum Wide Tele 2.94 4.49 3.71 5.65 4.48 6.80 6.02 9.12 7.56 11.43 9.10 13.74 11.41 17.21 13.72 20.68 15.26 22.99 22.95 34.56 30.65 46.12 38.34 57.69 WXGA Projection Distance (m) +/-10% Minimum Maximum Wide Tele 3.17 4.83 4.00 6.08 4.83 7.32 6.48 9.80 8.14 12.29 9.79 14.77 12.27 18.50 14.75 22.22 16.41 24.71 24.68 37.13 32.95 49.55 41.22 61.97 WUXGA Projection Distance (m) +/-10% Minimum Maximum Wide Tele 3.01 4.6 3.8 5.78 4.59 6.96 6.16 9.33 7.73 11.7 9.31 14.06 11.67 17.61 14.03 21.16 15.6 23.53 23.47 35.36 31.34 47.19 39.21 59.02 Optional Lenses (D88-LOZ201) Long zoom 2 Lens Features and Specifications •Motorized Zoom and Focus •Lens Shift Position: 0-50% Vertical; +/-10% Horizontal •Focus adjustable Range: 40” - 500” •Optical Performance Range: 50” - 300” •F-Number: 1.85 - 2.48 •Focal Length: 78.5-121.9mm •Screen Size: 50”-300” •Zoom Ratio: 1.55:1 •Throw Distance Ratio: 5.5-8.56:1(XGA); 5.56-8.67:1(WXGA); 5.31-8.26:1(WUXGA) Projection Distance V.S. Projection Size D88-LOZ201 Long Zoom 2 Lens Screen Size (inch) 40 50 60 80 100 120 150 180 200 300 400 500 66 XGA Projection Distance (m) +/-10% Minimum Maximum Wide Tele 4.31 6.89 5.46 8.68 6.61 10.48 8.91 14.07 11.22 17.66 13.52 21.25 16.97 26.64 20.42 32.03 22.73 35.62 34.24 53.57 45.75 71.53 57.26 89.48 WXGA Projection Distance (m) +/-10% Minimum Maximum Wide Tele 4.65 7.42 5.89 9.35 7.13 11.28 9.60 15.13 12.08 18.99 14.55 22.85 18.27 28.63 21.98 34.42 24.45 38.28 36.83 57.56 49.20 76.85 61.58 96.13 WUXGA Projection Distance (m) +/-10% Minimum Maximum Wide Tele 4.42 7.05 5.59 8.89 6.77 10.73 9.13 14.4 11.48 18.07 13.84 21.75 17.37 27.26 20.91 32.77 23.26 36.44 35.04 54.81 46.82 73.18 58.6 91.54 DLP Projector - User’s Manual Optional Lenses (D88-SMLZ01) Semi Long Zoom Lens Features and Specifications •Motorized Zoom and Focus •Lens Shift Position: 0-50% Vertical; +/-10% Horizontal •Focus adjustable Range: 40” - 500” •Optical Performance Range: 50” - 300” •F-Number: 1.86 - 2.48 •Focal Length: 32.9-54.2mm •Screen Size: 50”-300” •Zoom Ratio: 1.65:1 •Throw Distance Ratio: 2.3-3.81(XGA); 2.33-3.86:1(WXGA); 2.22-3.67: 1(WUXGA) Projection Distance V.S. Projection Size D88-SMLZ01 Semi Long Zoom Lens Screen Size (inch) 40 50 60 80 100 120 150 180 200 300 400 500 XGA Projection Distance (m) +/-10% Minimum Maximum Wide Tele 1.83 3.08 2.30 3.87 2.78 4.66 3.73 6.24 4.69 7.82 5.64 9.40 7.07 11.77 8.50 14.14 9.46 15.72 14.23 23.62 18.99 31.52 23.76 39.42 WXGA Projection Distance (m) +/-10% Minimum Maximum Wide Tele 1.97 3.31 2.48 4.16 3.00 5.01 4.02 6.71 5.05 8.41 6.07 10.10 7.61 12.65 9.15 15.19 10.17 16.89 15.30 25.38 20.42 33.86 25.55 42.35 WUXGA Projection Distance (m) +/-10% Minimum Maximum Wide Tele 1.87 3.15 2.36 3.96 2.85 4.77 3.82 6.39 4.80 8.00 5.78 9.62 7.24 12.04 8.70 14.47 9.68 16.08 14.56 24.16 19.44 32.25 24.32 40.33 Optional Lenses (D88-ST001) STD Lens Features and Specifications •Motorized Zoom and Focus •Lens Shift Position: 0-50% Vertical; +/-10% Horizontal •Focus adjustable Range: 40” - 500” •Optical Performance Range: 50” - 300” •F-Number: 1.7 - 1.9 •Focal Length: 26 - 34mm •Screen Size: 50”-300” •Zoom Ratio: 1.3:1 •Throw Distance Ratio: 1.79-2.35:1(XGA); 1.81-2.38:1(WXGA); 1.73-2.27:1(WUXGA) Projection Distance V.S. Projection Size D88-ST001 STD Lens Screen Size (inch) 40 50 60 80 100 120 150 180 200 300 400 500 XGA Projection Distance (m) +/-10% Minimum Maximum Wide Tele 1.42 1.88 1.79 2.37 2.16 2.86 2.90 3.83 3.65 4.80 4.39 5.78 5.50 7.24 6.62 8.70 7.36 9.67 11.07 14.54 14.79 19.41 18.50 24.28 WXGA Projection Distance (m) +/-10% Minimum Maximum Wide Tele 1.53 2.03 1.93 2.55 2.33 3.07 3.13 4.12 3.93 5.17 4.72 6.22 5.92 7.79 7.12 9.36 7.92 10.40 11.91 15.64 15.90 20.88 19.90 26.11 WUXGA Projection Distance (m) +/-10% Minimum Maximum Wide Tele 1.45 1.93 1.83 2.42 2.21 2.92 2.97 3.92 3.73 4.92 4.49 5.91 5.63 7.41 6.77 8.9 7.53 9.9 11.33 14.88 15.13 19.87 18.93 24.85 67 DLP Projector - User’s Manual Optional Lenses (D88-WF18501) Wide Fix Lens Features and Specifications •Motorized Focus •Lens Shift Position: 0% •Focus adjustable Range: 40” - 500” •Optical Performance Range: 50” - 300” •F-Number: 1.85 •Focal Length: 11.6mm •Screen Size: 50”-300” •Zoom Ratio: N/A •Throw Distance Ratio: 0.79:1(XGA); 0.8:1(WXGA); 0.76:1(WUXGA) Projection Distance V.S. Projection Size D88-WF18501 Wide Fix Lens Screen Size (inch) 40 50 60 80 100 120 150 180 200 300 400 500 XGA Projection Distance (m) +/-10% Wide 0.62 0.79 0.96 1.29 1.62 1.96 2.46 2.96 3.3 4.97 6.64 8.31 WXGA Projection Distance (m) +/-10% Wide 0.67 0.85 1.03 1.39 1.75 2.11 2.64 3.18 3.54 5.33 7.13 8.92 WUXGA Projection Distance (m) +/-10% Wide 0.64 0.81 0.98 1.32 1.66 2.01 2.52 3.03 3.37 5.08 6.79 8.5 Optional Lenses (D88-WZ01) Wide Zoom Lens Features and Specifications •Motorized Zoom and Focus •Lens Shift Position: 0-50% Vertical; +/-10% Horizontal •Focus adjustable Range: 40” - 500” •Optical Performance Range: 50” - 300” •F-Number: 1.85 - 2.5 •Focal Length: 18.7-26.5mm •Screen Size: 50”-300” •Zoom Ratio: 1.41:1 •Throw Distance Ratio: 1.3-1.85:1(XGA); 1.31-1.87:1(WXGA); 1.25-1.79:1(WUXGA) Projection Distance V.S. Projection Size D88-WZ01 Wide Zoom Lens Screen Size (inch) 40 50 60 80 100 120 150 180 200 300 400 500 68 XGA Projection Distance (m) +/-10% Minimum Maximum Wide Tele 1.03 1.49 1.30 1.87 1.57 2.25 2.11 3.02 2.65 3.79 3.18 4.56 3.99 5.71 4.80 6.86 5.34 7.63 8.04 11.47 10.74 15.31 13.44 19.14 WXGA Projection Distance (m) +/-10% Minimum Maximum Wide Tele 1.11 1.60 1.40 2.01 1.69 2.43 2.27 3.25 2.85 4.08 3.43 4.90 4.30 6.14 5.17 7.38 5.75 8.20 8.65 12.33 11.55 16.45 14.45 20.58 WUXGA Projection Distance (m) +/-10% Minimum Maximum Wide Tele 1.02 1.51 1.29 1.9 1.56 2.29 2.1 3.07 2.64 3.85 3.18 4.63 3.99 5.8 4.8 6.97 5.33 7.75 8.03 11.65 10.72 15.56 13.42 19.46 2012.08 ©2012 Vivitek Corporation. is a trademark of Vivitek Corporation. Other trademarks are the properties of their respective owners.