1
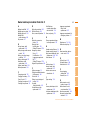
Contents
A-Z
Owner’s Manual for the vehicle.
With a quick reference guide
for your convenience.
Online Edition for Part-No. 01 41 9 791 187 - © 12/98 BMW AG
Online Edition for Part-No. 01 41 9 791 187 - © 12/98 BMW AG
740i
740iL
750iL
Online Edition for Part-No. 01 41 9 791 187 - © 12/98 BMW AG
Congratulations, and thank you for choosing a BMW.
Thorough familiarity with your vehicle will provide you with enhanced control and
security when you drive it. We therefore have this request:
Please take the time to read this Owner's Manual and familiarize yourself with the
information that we have compiled for you before starting off in your new car. It
contains important data and instructions intended to assist you in gaining maximum
use and satisfaction from the unique range of technical features on your BMW. The
manual also contains information on care and maintenance designed to enhance
operating safety and contribute to maintaining the value of your BMW throughout an
extended service life.
This Owner's Manual should be considered a permanent part of this vehicle. It
should stay with the vehicle when sold to provide the next owner with important
operating, safety and maintenance information.
This manual is supplemented by a Service and Warranty Information Booklet
(US models) or a Warranty and Service Guide Booklet (Canadian models). We
recommend that you read this publication thoroughly.
Your BMW is covered by the following warranties:
> New Vehicle Limited Warranty
> Limited Warranty Rust Perforation
> Federal Emissions System Defect Warranty
> Federal Emissions Performance Warranty
> California Emission Control System Limited Warranty
Detailed information about these warranties is listed in the Service and Warranty Information Booklet (US models) or in the Warranty and Service Guide Booklet (Canadian models).
We wish you an enjoyable driving experience.
BMW AG
Online Edition for Part-No. 01 41 9 791 187 - © 12/98 BMW AG
4n
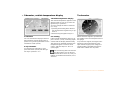
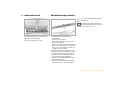
Notes on the Owner's Manual
Symbols used
The individual vehicle
We have made every effort to ensure
that you are able to find what you need
in this Owner's Manual as quickly as
possible. The fastest way to find certain
topics is by using the detailed index at
the end. If you desire an initial overview
of your vehicle, this can be found in the
first chapter. The detailed list of contents that directly follows the summary
of contents is intended to stimulate
your curiosity regarding your BMW and
to encourage you to read the manual.
These sections contain vital information – please read the accompanying text passages carefully, both
for your own safety and to prevent damage to your BMW.<
On buying your BMW, you have decided in favor of a model with individualized equipment and features. This
Owner's Manual describes all models
and equipment that BMW offers within
the same group.
These passages contain information on special and unique features of your vehicle.<
We hope you will understand that
equipment and features are included
which you might not have chosen for
your vehicle. Any differences can easily
be identified, since all optional accessories and special equipment are
marked with an asterisk *.
Should you wish to sell your BMW at
some time in the future, please remember to hand over the Owner's Manual to
the new owner; it is part of the vehicle.
If you have any additional questions, an
authorized BMW center will be glad to
advise you.
© 1998 BMW AG
Munich, Germany
Reprinting, including excerpts, only with the
written consent of BMW AG, Munich.
Order no. 01 41 9 791 187
US English VIII/98
Printed in Germany
Printed on environmentally friendly paper
(bleached without chlorine, suitable for recycling).
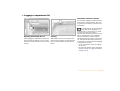
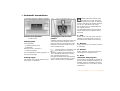
Indicates special information on
recycling.<
<Indicates the end of a note.
If your BMW features equipment which
* Indicates special equipment, country- is not described in this Owner's Manual
(car radio or telephone, for instance),
specific equipment and optional extras.
Supplementary Owner's Manuals are
enclosed. We ask you to read these
Indicates that you should consult
manuals as well.
the relevant section of this Owner's
Manual for information on a particular
part or assembly.
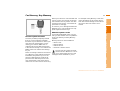
Alerts you to functions which can
be adjusted for individual drivers
by your authorized BMW center ("Car
Memory" or "Key Memory"). Refer to
page 53.<
Online Edition for Part-No. 01 41 9 791 187 - © 12/98 BMW AG
5n
Status at time of printing
BMW pursues a policy of continuous,
ongoing development that is conceived
to ensure that our vehicles continue to
embody the highest quality and safety
standards combined with advanced,
state-of-the-art technology. For this
reason, it is possible that the features
described in this Owner's Manual could
differ from those on your vehicle. Nor
can errors and omissions be entirely
ruled out. You are therefore asked to
appreciate that no legal claims can be
entertained on the basis of the data, illustrations or descriptions in this manual.
Online Edition for Part-No. 01 41 9 791 187 - © 12/98 BMW AG
6n
For your own safety
Important safety information!
For your own safety, use genuine
parts and accessories approved by
BMW.
Installation and operation of non-BMW
approved accessories such as alarms,
Use unleaded gasoline only. Fuels
radios, amplifiers, radar detectors,
containing up to 10% ethanol or
wheels, suspension components, brake
other oxygenates with up to 2.8% oxy- When you purchase accessories tested dust shields, telephones (including opgen by weight (i.e., 15% MTBE or
eration of any portable cellular phone
and approved by BMW and Original
3% methanol plus an equivalent
BMW Parts, you simultaneously acquire from within the vehicle without using an
amount of co-solvent) will not void the
the assurance that they have been thor- externally-mounted antenna) or transapplicable warranties with respect to
ceiver equipment (C.B., walkie-talkie,
oughly tested by BMW to ensure optidefects in materials or workmanship.
ham radio, for instance) may cause exmum performance when installed on
Field experience has indicated signifitensive damage to the vehicle, comproyour vehicle.
cant differences in fuel quality (i.e., volmise its safety, interfere with the vehiBMW warrants these parts to be free
atility, composition, additives, etc.)
cle's electrical system, or affect the
from defects in material and workmanamong gasolines offered for sale in the
validity of the BMW Limited Warranty.
ship.
United States and Canada. The use of
See your authorized BMW center for
BMW will not accept any liability for
poor-quality fuels may result in driveadditional information.<
damage resulting from installation of
ability, starting and stalling problems,
Maintenance, replacement, or reespecially under certain environmental parts and accessories not approved by
BMW.
pair of the emission control deconditions, such as high ambient temvices and systems may be performed
perature and high altitude.
BMW cannot test every product from
Should you encounter driveability prob- other manufacturers to verify if it can be by any automotive repair establishment
lems that you suspect could be related used on a BMW safely and without risk or individual using any certified automoto the fuel you are using, we recomto either the vehicle, its operation, or its tive part.<
mend that you respond by switching to occupants.
a recognized high-quality brand.
Original BMW Parts, BMW Accessories
Failure to comply with these recomand other products approved by BMW,
mendations may result in unscheduled
together with professional advice on
maintenance.
using these items, are available from all
Follow the relevant safety rules when
BMW centers.
you are handling gasoline.<
Online Edition for Part-No. 01 41 9 791 187 - © 12/98 BMW AG
7n
The following only applies to vehicles owned and operated in the US.
REPORTING SAFETY DEFECTS
If you believe that your vehicle has a defect which could cause a crash or could cause injury or death, you should
immediately inform the National Highway Traffic Safety Administration (NHTSA) in addition to notifying BMW of
North America, Inc., P.O. Box 1227, Westwood, New Jersey 07675-1227, Telephone (201) 307-4000.
If NHTSA receives similar complaints, it may open an investigation, and if it finds that a safety defect exists in
a group of vehicles, it may order a recall and remedy campaign. However, NHTSA cannot become involved in
individual problems between you, your dealer, or BMW of North America, Inc.
To contact NHTSA, you may either call the Auto Safety Hotline toll-free at 1-800-424-9393 (or 366-0123 in
Washington, D.C. area) or write to: NHTSA, U.S. Department of Transportation, Washington, D.C. 20590. You
can also obtain other information about motor vehicle safety from the Hotline.
Online Edition for Part-No. 01 41 9 791 187 - © 12/98 BMW AG
8n
Online Edition for Part-No. 01 41 9 791 187 - © 12/98 BMW AG
Operation, care
and maintenance
Controls
Controls and features
Car care
Overview
Overview
9n
Advanced technology
Technology Repairs
Owner service procedures
Data
Technical data
Index
Index
Online Edition for Part-No. 01 41 9 791 187 - © 12/98 BMW AG
Cockpit 16
Instrument cluster 18
Indicator and warning lamps 20
Multifunction steering wheel
(MFL) 23
Hazard warning flashers 24
Warning triangle 24
First-aid kit 24
Refueling 25
Fuel specifications 25
Tire inflation pressure 26
Controls and features
Overview
Contents
Locks and security systems:
Keys 30
Electronic vehicle
immobilizer 31
Central locking system 32
Door locks – outside 32
Radio remote control 33
Door locks – inside 36
Luggage compartment lid 37
Luggage compartment 39
Alarm system 40
Electric power windows 42
Security glass 43
Sliding/Tilt sunroof 44
Adjustments:
Seats 46
Steering wheel 49
Mirrors 50
Seat, mirror and steering wheel
memory 51
Car Memory, Key Memory 53
Passenger safety systems:
Safety belts 54
Airbags 55
Child restraints 57
Child restraint installation 58
Child-safety locks 58
Driving:
Steering/Ignition lock 59
Starting engine 59
Switching off engine 60
Parking brake 61
Automatic transmission 62
Automatic transmission with
Steptronic 65
Turn signal/Headlamp flasher 68
Washer/Wiper system/Rain
sensor 68
Rear window defroster 70
Cruise control 70
Everything under control:
Odometer, outside temperature
display 72
Tachometer 72
Energy control 73
Fuel gauge 73
Temperature gauge 74
Service Interval Display 74
Check Control 75
Multi-Information Display
(MID) 78
Digital clock 79
Onboard computer 84
Technology for safety and
convenience:
Park Distance Control PDC 90
Automatic Stability Control plus
Traction (ASC+T)/Dynamic Stability Control (DSC) 92
Electronic Damper Control
(EDC) 93
Tire Pressure Control (RDC) 94
Online Edition for Part-No. 01 41 9 791 187 - © 12/98 BMW AG
Lamps:
Parking lamps/Low beams 96
Instrument panel lighting 96
High beams/Parking lamps 97
Fog lamps 97
Interior lamps 97
Reading lamps 98
Controlling the climate
for pleasant driving:
Automatic climate control 100
Rear passenger-area air
conditioning 105
Seat heating 106
Steering wheel heating 106
Roller sun blind 107
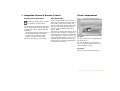
Independent ventilation
system 107
Cabin convenience:
Integrated Universal
Remote Control 108
Glove compartment 110
Center armrests 111
Additional storage areas 113
Cup holder 113
Cellular phone 113
Ashtray 114
Cigarette lighter 115
Rear footrests 115
Operation, care and maintenance
Controls and features
11n
Special operating instructions:
Break-in procedure 122
Driving notes 123
Catalytic converter 124
Antilock Brake System
(ABS) 125
Disc brakes 126
Brake system 128
Winter operation 128
Power steering 130
Level control system 130
Cellular phone 131
Radio reception 131
Wheels and tires:
Tire inflation pressure 132
Tire condition 132
Tire replacement 133
Tire rotation 133
Wheel and tire
combinations 134
Winter tires 135
Snow chains 135
Approved wheel and tire
specifications 136
Under the hood:
Hood 137
Engine compartment 138
Washer fluids 142
Washer nozzles 142
Engine oil 143
Coolant 146
Brake fluid 147
Oil for power steering/
Level control system 148
Vehicle Identification
Number 148
Care and maintenance:
The BMW Maintenance
System 149
Caring for your car 150
Airbags 156
Vehicle storage 156
Laws and regulations:
Technical modifications to the
vehicle 157
OBD connector 158
Loading and transporting cargo:
Ski bag 116
Cargo loading 118
Roof-mounted luggage rack 118
Online Edition for Part-No. 01 41 9 791 187 - © 12/98 BMW AG
In case of electrical
malfunction:
Fuel filler door 178
Sliding/Tilt sunroof 178
Assistance, giving and
receiving:
Jump-starting 179
Towing the vehicle 180
Airbags 184
Adaptive Transmission Control
(ATC) 184
Automatic Stability Control plus
Traction (ASC+T)/Dynamic Stability Control (DSC) 185
Radio reception 186
BMW Active Seat 186
Safety belt tensioner 187
DSP sound system 187
Interior rearview mirror with automatic dimming feature 188
Tire Pressure Control (RDC) 189
Xenon lamps 190
Water and dirt repelling
windshield 191
Technical data
Replacement procedures:
Onboard tool kit 162
Windshield wiper blades 162
Lamps and bulbs 163
Remote control 168
Changing tires 170
Battery 173
Fuses 176
Advanced technology
Owner service procedures
Contents
Engine specifications 194
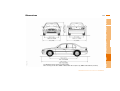
Dimensions 195
Weights 196
Capacities 197
Electrical system 198
Drive belts 198
Online Edition for Part-No. 01 41 9 791 187 - © 12/98 BMW AG
Index
13n
Everything from A to Z 202
Owner service procedures from
A to Z 207
Online Edition for Part-No. 01 41 9 791 187 - © 12/98 BMW AG
14n
Online Edition for Part-No. 01 41 9 791 187 - © 12/98 BMW AG
Operation, care
and maintenance
Controls
Controls and features
Car care
Overview
Advanced technology
Technology Repairs
Owner service procedures
Data
Technical data
Index
Index
Cockpit 16
Instrument cluster 18
Indicator and warning lamps 20
Multifunction steering wheel
(MFL) 23
Hazard warning flashers 24
Warning triangle 24
First-aid kit 24
Refueling 25
Fuel specifications 25
Tire inflation pressure 26
Overview
15n
Online Edition for Part-No. 01 41 9 791 187 - © 12/98 BMW AG
380de675
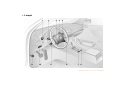
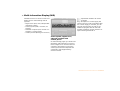
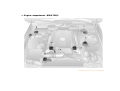
16nCockpit
Online Edition for Part-No. 01 41 9 791 187 - © 12/98 BMW AG
Cockpit
17n
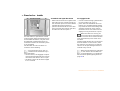
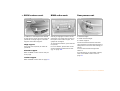
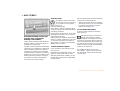
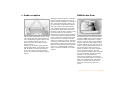
Overview
1 Parking lamps/Low beams 96
Controls
2 > Turn signal 68
> Parking lamp 97
> High beams 97
> Headlamp flasher 68
> Onboard computer 89
3 Horn: The entire surface
4 Fog lamps 97
5 Wiper/Washer lever 68
Car care
6 Central locking system 32
7 Hazard warning system 24
8 Rear window defroster 70
Technology Repairs
9 Electric steering wheel
adjustment 49
10 Parking brake release handle 61
Index
Data
11 Parking brake pedal 61
Online Edition for Part-No. 01 41 9 791 187 - © 12/98 BMW AG
cluster
380us625
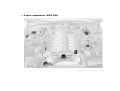
18nInstrument
Online Edition for Part-No. 01 41 9 791 187 - © 12/98 BMW AG
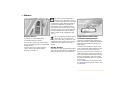
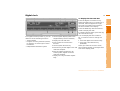
Instrument cluster
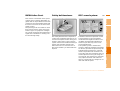
4 Indicator lamp for high beam
headlamps 22
13 Check Control display 75
5 Tachometer and
Energy Control 72, 73
14 Odometer 72
6 Coolant temperature gauge 74
16 Reset button for trip odometer 72
7 Indicator and warning lamps for
> Parking brake 21
> Hydraulic brake system/Dynamic
Brake Control (DBC)* 20, 21
> ABS 21
> Airbag 21
> Please fasten safety belts 21
> Cruise control 22
17 Indicator and warning lamps for
> Fog lamps 22
> Battery charge current 20
> Engine oil pressure 20
> Check Engine lamp 21
8 Check button 75
Overview
12 Trip odometer 72
Controls
3 Speedometer
15 Service Interval Display 74, 149
Car care
2 Turn signal indicators 22
11 Indicator lamp for Automatic
Stability Control plus Traction
(ASC+T)/Dynamic Stability
Control (DSC)* 21
Technology Repairs
1 Fuel gauge with lamp for fuel
reserve range 73
19n
You can display the outside temperature and distance driven in
different units of measurement.<
9 Program display for automatic
transmission 64, 67
Index
Data
10 Outside temperature display 72
Online Edition for Part-No. 01 41 9 791 187 - © 12/98 BMW AG
20nIndicator
and warning lamps
Technology that monitors itself
Red: Stop immediately
Many of the systems of your BMW monBattery charge current ●
The battery is no longer being
itor themselves automatically, both durcharged. There is a malfunction
ing engine starts and while you are drivof the alternator ribbed V-belt or in the
ing. Indicator and warning lamps that
charging circuit of the alternator. Please
are identified by "●" are tested for
proper functioning whenever the ignicontact the nearest BMW center.
tion key is turned. They each light up
once for different periods of time.
If the V-belt is defective, do not
continue driving. The engine could
If a fault should occur in one of these
be
damaged
due to overheating. If the
systems, the corresponding lamp does
not go out after the engine is started or ribbed V-belt is defective, increased
steering effort is also required.<
it lights up while the vehicle is moving.
You will see how to react to this below.
Brake hydraulic system ●
The brake fluid level is too low.
Before driving further, be sure to
read the notes on pages 128 and 147.
Also comes on with the message
"Check brake pads" in the Check Control.
Brake hydraulic system warning
lamp for Canadian models.
Engine oil pressure ●
Comes on while the engine is
running and the "Stop! ENGINE
OILPRESS" message appears in the
Check Control:
Stop vehicle and switch off engine immediately. Check level of oil in engine,
top up as required. If oil level is correct:
Please contact the nearest BMW center.
Do not continue driving. The engine could be damaged because
of inadequate lubrication.<
Online Edition for Part-No. 01 41 9 791 187 - © 12/98 BMW AG
Indicator and warning lamps
Parking brake warning lamp for
Canadian models.
ABS warning lamp for Canadian
models.
Data
Automatic Stability Control plus
Traction (ASC+T)/Dynamic
Stability Control (DSC)* ●
The ASC+T/DSC has been switched off
or has been deactivated because of a
malfunction. In the event of a malfunction, have the system checked by your
authorized BMW center. For additional
information: Refer to page 92.
Index
For additional information: Refer to
page 55.
Technology Repairs
Please fasten safety belts* ●
An acoustic signal and message
in the Check Control for 4 to
Antilock Brake System (ABS) ●
The ABS system has been de8 seconds. The acoustic signal ends afactivated because of a system
ter the safety belts are fastened.
fault. Conventional braking efficiency is
For additional information on safety
available without limitations. Please
belts: Refer to page 54.
have the system inspected by your auAirbags ●
thorized BMW center.
Please have the system
For additional information: Refer to
checked by your authorized
page 125.
BMW center as soon as possible.
Overview
Check Engine lamp ●
If the indicator lamp comes on
either continuously or intermitDynamic Brake Control (DBC)* ●
tently,
this
indicates a fault in the emisFault in the DBC System. Consions-related electronic systems. Alventional braking efficiency is
though the vehicle remains operational,
available without limitations.
you should have the systems checked
For additional information: Refer to
by your BMW center at the earliest pospage 127.
sible opportunity.
Warning lamp, Dynamic Brake
For additional information: Refer to
Control (DBC)* for Canadian
OBD connector on page 158.
models.
Yellow: Check as soon as
possible
Controls
Parking brake
Comes on when you engage the
parking brake.
For additional information: Refer to
page 61.
Car care
Red: An important reminder
21n
Online Edition for Part-No. 01 41 9 791 187 - © 12/98 BMW AG
22nIndicator
and warning lamps
Green: For your information
Blue: For your information
Turn signal
Flashes when the turn signals
are in operation. Rapid flashing
indicates a system malfunction.
For additional information: Refer to
page 68.
High beam
Lights up when the high beams
are on or the headlamp flasher
is actuated.
For additional information: Refer to
pages 68, 97.
Cruise control
Lights up when the cruise control is activated. Available for
operation via the multi-function steering
wheel.
For additional information: Refer to
page 70.
Fog lamps
Lights up whenever you switch
on the fog lamps.
For additional information: Refer to
page 97.
Online Edition for Part-No. 01 41 9 791 187 - © 12/98 BMW AG
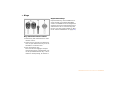
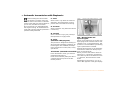
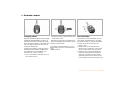
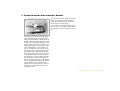
Multifunction steering wheel (MFL)
23n
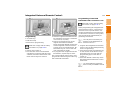
2 Radio/Telephone: Selection
3 Radio/Telephone: Search backward
or station keys or scroll in the phone
book.
Fast forward and reverse for CD and
cassette modes
Controls
8 Cruise control: Store and accelerate (+); decelerate and store (–)
9 Cruise control: Activate/Interrupt/
Deactivate
10 Recirculated-air mode and AUC or
steering wheel heating: Switch on
and off
Car care
7 Cruise control: Activate stored
setting (resume)
4 Radio/Telephone: Volume
5 Radio/Telephone: Search forward or
station keys or scroll in the phone
book.
Fast forward and reverse for CD and
cassette modes
Data
The illustration shows the maximum
possible number of controls, corresponding to a full range of optional
equipment. Refer to the individual accessory manuals for more detailed descriptions.
6 Horn: The entire surface
Technology Repairs
1 Cellular phone: Receive an incoming
call, initiate dialing and end a call.
Pressing and holding the key for a
longer period activates or deactivates
the voice input*
Index
In order to operate a system via
the MFL, the corresponding system controls must be switched on.<
390de110
> Some of the functions of the radio,
the CD and cassette modes
> The recirculated-air mode of the air
conditioner or
> The steering wheel heating
> The cruise control and
> Selected cellular phone functions.
Overview
The controls integrated in the multifunction steering wheel are provided so
that you can operate a number of accessories quickly and without being
distracted from traffic conditions. You
may operate:
Online Edition for Part-No. 01 41 9 791 187 - © 12/98 BMW AG
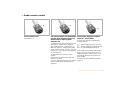
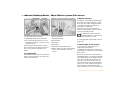
The push-button flashes rhythmically
when the hazard flashers are on.
To help you to locate the switch, the
button is also lighted whenever the car
lamps are on.
The hazard warning triangle is stored
underneath the luggage compartment
lid in the onboard tool holder where it is
quickly available.
Comply with legal requirements
which cover the availability of a
hazard warning triangle in the car.<
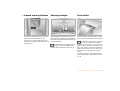
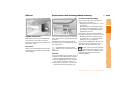
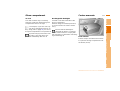
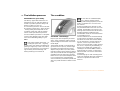
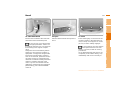
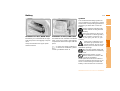
First-aid kit
380de086
Warning triangle*
394de053
warning flashers
380de039
24nHazard
Stored between the rear seats. Pull the
lever (arrow) and fold the cover forward.
Some of the articles in the first-aid
kit may be used within a limited
time only. For this reason, check the expiration dates of each of the items regularly, and replace any whose expiration
dates have passed. You can acquire replacements in any drugstore or pharmacy.
Comply with legal requirements which
cover availability of a first-aid kit in the
car.<
Online Edition for Part-No. 01 41 9 791 187 - © 12/98 BMW AG
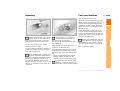
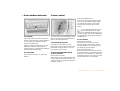
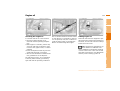
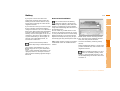
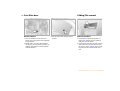
Before filling the tank, shut off the
engine. If you do not, fuel cannot
flow into the tank and the "Check Engine" warning lamp may come on.<
To open the fuel filler door, press
against its forward edge.
To unlock the fuel filler door if there is a
malfunction of the central locking system, refer to page 178.
380de633
384de011
Minimum octane requirement: 91 AKI.
Open the filler cap carefully to
prevent fuel from spraying out.
Fuel spray may cause injury.
Do not top off. Topping off may cause
fuel spillage.<
Keep the filler cap in the bracket attached to the fuel filler door.
BMW engines are equipped with knock
sensors and will adapt automatically
to different octane ratings, provided
that the minimum octane requirement
(87 AKI) is met.
Fuels with higher octane ratings will
provide enhanced performance and
lower fuel consumption, while the use
of fuels with lower octane ratings will
have the opposite effect.
Do not use leaded fuels. The use
of leaded fuels will cause permanent damage to the system's oxygen
sensor and the catalytic convertor.<
AKI = Anti Knock Index
When refueling, insert the filler nozzle
completely into the filler pipe. Pulling
the nozzle out of the pipe during refueling
Index
Data
When handling fuels, comply with
all of the applicable safety precau- > results in premature pump shutoff
tions and regulations pertaining to fuels. > and will reduce the effect of the
recovery vapor system on the pump.
Never carry spare fuel containers in
your vehicle. Whether empty or full,
Close the fuel cap carefully after
these containers can leak, cause an exrefueling. A loose or missing cap
plosion, or lead to fire in the event of a
will activate the "Check Engine“ lamp.<
collision.<
Controls
Use unleaded gasoline only.
Overview
25n
Car care
Fuel specifications
Technology Repairs
Refueling
Online Edition for Part-No. 01 41 9 791 187 - © 12/98 BMW AG
inflation pressure
460de163
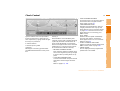
26nTire
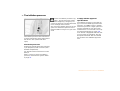
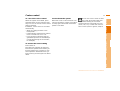
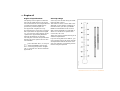
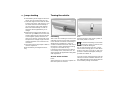
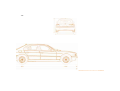
The inflation pressures are indicated on
a sticker attached to the B-pillar behind
the driver's door (visible with door
open).
Check tire inflation pressures regularly - at least every two weeks
and before beginning a longer trip. Incorrect tire pressure can otherwise lead
to tire damage and accidents.
Also check the inflation pressure of the
spare tire. Inflate the spare tire to the
highest inflation of any tire on your vehicle.<
Comply with tire approval
specifications
The inflation pressures in the table apply to tires from BMW-approved manufacturers. Your BMW center is familiar
with these pressures. Higher pressures
may be specified for tires from other
manufacturers. You will find a list of approved tires beginning on page 136.
Your vehicle is equipped with tires that
not only meet US standards, but also
European standards. We recommend
the exclusive use of BMW-approved
tires.
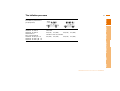
Check tire pressures
All pressure specifications are indicated
in psi (kilopascal) with cold tires (cold =
ambient temperature).
For vehicles with Tire Pressure Control
(RDC)*:
After a correction of the tire inflation
pressure, reactivate the system. Refer
to page 94.
Online Edition for Part-No. 01 41 9 791 187 - © 12/98 BMW AG
Tire inflation pressure
27n
Controls
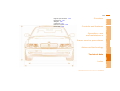
outside of the US/Canada:
29 (200) 33 (230)
33 (230)
41 (280)
Car care
41 (280)
Technology Repairs
33 (230)
Data
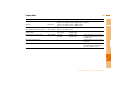
US/CDN:
33 (230) 41 (280)
Index
235/60 R 16 100 H M + S
235/60 R 16 100 W
245/55 R 16 100 W
235/50 ZR 18
Rear: 255/45 ZR 18
215/65 R 16 98 Q M + S
235/60 R 16 100 Q M + S
245/55 R 16 100 Q M + S
Overview
Tires
Tire inflation pressures in
psi (kilopascal)
Online Edition for Part-No. 01 41 9 791 187 - © 12/98 BMW AG
28n
Locks and security systems:
Keys 30
Electronic vehicle
immobilizer 31
Central locking system 32
Door locks – outside 32
Radio remote control 33
Door locks – inside 36
Luggage compartment lid 37
Luggage compartment 39
Alarm system 40
Electric power windows 42
Security glass 43
Sliding/Tilt sunroof 44
Adjustments:
Seats 46
Steering wheel 49
Mirrors 50
Seat, mirror and steering wheel
memory 51
Car Memory, Key Memory 53
Passenger safety systems:
Safety belts 54
Airbags 55
Child restraints 57
Child restraint installation 58
Child-safety locks 58
Driving:
Steering/Ignition lock 59
Starting engine 59
Switching off engine 60
Online Edition for Part-No. 01 41 9 791 187 - © 12/98 BMW AG
Cabin convenience:
Integrated Universal
Remote control 108
Glove compartment 110
Center armrests 111
Additional storage areas 113
Cup holder 113
Cellular phone 113
Ashtray 114
Cigarette lighter 115
Rear footrests 115
Operation, care
and maintenance
Controls
Car care
Controls and features
Owner service procedures
Advanced technology
Technology Repairs
Technology for safety and
convenience:
Park Distance Control (PDC) 90
Automatic Stability Control plus
Traction (ASC+T)/Dynamic Stability Control (DSC) 92
Electronic Damper Control
(EDC) 93
Tire Pressure Control (RDC) 94
Controlling the climate
for pleasant driving:
Automatic climate control 100
Rear passenger-area air
conditioning 105
Seat heating 106
Steering wheel heating 106
Rear window blind 107
Independent ventilation
system 107
Overview
Technical data
Data
Everything under control:
Odometer, outside temperature
display 72
Tachometer 72
Energy control 73
Fuel gauge 73
Temperature gauge 74
Service Interval Display 74
Check Control 75
Multi-Information Display
(MID) 78
Digital clock 79
Onboard computer 84
Lamps:
Parking lamps/Low beams 96
Instrument panel rheostat 96
High beams/Parking lamps 97
Fog lamps 97
Interior lamps 97
Reading lamps 98
Index
Loading and transporting cargo:
Ski bag 116
Cargo loading 118
Roof-mounted luggage rack 118
Index
Parking brake 61
Automatic transmission 62
Automatic transmission with
Steptronic 65
Indicator/Headlamp flasher 68
Washer/Wiper system/Rain
sensor 68
Rear window defroster 70
Cruise control 70
Overview
29n
Online Edition for Part-No. 01 41 9 791 187 - © 12/98 BMW AG
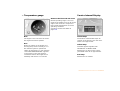
30nKeys
380us012
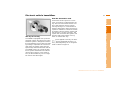
Replacement keys
Replacement keys are available exclusively through your authorized BMW
center. Your BMW center is obligated to
ensure that a person requesting a key is
authorized to do so since the keys belong to a security system (refer to "Electronic vehicle immobilizer" on page 31).
Key with radio remote control
1 Master key with transmitter for radio
remote control.
2 Spare key for storage in a safe place,
such as your wallet. This key is not intended for continuous use.
3 Door and ignition key
The locks for the luggage compartment lid and glove compartment cannot be operated with this key – this is
useful for valet parking, for instance.
Online Edition for Part-No. 01 41 9 791 187 - © 12/98 BMW AG
Electronic vehicle immobilizer
31n
The key to security
Overview
Controls
At the heart of this system is an electronic chip which is integrated into the
key. The lock mechanism itself is actually a dual-function device, simultaneously serving as a communications
interface designed to allow the security
system to maintain a continuous stream
of variable, vehicle-specific signals with
the electronic circuitry in the key. The
system will not release the ignition, fuel
injection and starter unless it recognizes an "authorized" key.
Car care
390de015
How the electronics work
Index
Data
Technology Repairs
Your BMW is equipped with a passive
Force applied to the key can damanti–theft system. This electronic immoage the integrated electronic cirbilization system is designed to reduce
the susceptibility of your vehicle to theft cuitry. A damaged key can no longer be
by making it impossible to start the en- used to start the engine.<
gine using any means other than the
special keys furnished with the vehicle.
Your BMW center can cancel the electronic system authorization for individual keys (for instance, in the event of
loss). A deactivated key can no longer
be used to start the engine.
Online Edition for Part-No. 01 41 9 791 187 - © 12/98 BMW AG
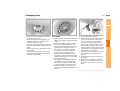
32nCentral
locking system
Door locks – outside
Convenience operating mode
The central locking system is ready for
operation as soon as you close the
driver's door. The system engages and
releases the locks on the
You can also use your remote control
transmitter to open and close the electric power windows and the sliding/tilt
sunroof.
> doors
> luggage compartment lid
> fuel filler door.
> To open: With the door closed, turn
the key to the "Unlock" position and
hold it.
> To close: With the door closed, turn
the key to the "Lock" position and
hold it.
The central locking system can be
operated
> from outside via the driver's door or
luggage compartment lock and with
the remote control
> from inside via the central locking
button.
The fuel filler door remains unlocked
when you activate the system from inside the vehicle.
380de015
The concept
To engage and release locks
One turn of the key in the driver's door
lock unlocks the driver's door only.
Turning the key a second time unlocks
all of the remaining doors, the luggage
compartment lid and the fuel filler door.
When a door is opened, the inteThe anti-theft system is automatically
rior lamps and the exterior door
armed whenever you activate the central locking system from outside the ve- handle illumination are switched on.
Switching off is automatic.<
hicle. The alarm system is also activated or deactivated.
Watch the closing process carefully and be sure that no one is
trapped by the closing motion. The
movement stops when you release the
key.<
Manual operation
(in the event of an electrical failure)
Turn the key all the way to the extreme
left or right to unlock/lock the door.
In the event of an accident, the central
locking system unlocks automatically
(only those doors which were not
locked separately with the safety lock
buttons). Refer to page 36. In addition,
the hazard warning flashers and interior
lamps come on.
Online Edition for Part-No. 01 41 9 791 187 - © 12/98 BMW AG
Radio remote control
33n
Since children might be able to
lock the doors from the inside,
take the vehicle's keys with you so that
the vehicle can be opened again from
the outside at any time.<
Every transmission is indicated by a
light signal. If the signal no longer lights
up when a button is pressed and locking with the remote control no longer
functions:
Change the battery. Refer to page 168.
Controls
Car care
380us645
Unlocking and convenience
opening mode
To release: Press button 1.
Press the button once to unlock the
driver's door only; press a second time
to unlock all remaining doors as well as
the luggage compartment and fuel filler
door.
Convenience opening mode: Press and
hold button 1. The electric power windows and the sliding/tilt sunroof are
opened.
If you desire, you can have this
feature set so that it is related to
specific keys.<
Technology Repairs
Keys with a transmitter for remote control are master keys. Refer to page 30.
Data
When the vehicle is unlocked, the interior lamps and the exterior door handle
illumination are switched on.
Master keys
Index
The anti-theft system is also deactivated/activated simultaneously with
the unlocking or locking of the vehicle,
and the alarm system is disarmed/
armed.
380us644
> Switching on the interior lamps and illuminating the exterior door handles.
With this function, you can also
"search for" your vehicle, when
parked in an underground garage, for
instance
> To open luggage compartment lid
The luggage compartment lid will
open slightly, regardless of whether
the lid was previously locked or unlocked
> Panic Mode
In case of danger, you can trigger an
alarm.
Overview
The remote control makes opening and
locking the doors of your vehicle very
convenient. Furthermore, it provides
three additional functions which can
only be executed by means of the remote control:
Online Edition for Part-No. 01 41 9 791 187 - © 12/98 BMW AG
To lock and secure
Press button 2.
The interior lamps and illuminated
exterior door handles switch on;
the tilt sensor alarm system
switches off
380us648
380us646
remote control
380us646
34nRadio
Opening the luggage compartment lid - Panic Mode
To open the luggage compartment:
Press button 3.
To switch on the interior lamps and illuminating the exterior door handles:
Before beginning a trip, be sure
After locking the car, press button 2.
that the luggage compartment lid
With this function – keeping the range
was not opened unintentionally.<
of the remote control in mind – you can
"search for" your car (in a large parking Panic Mode: By pressing and holding
lot, for instance).
button 3 for 2 to 5 seconds, you can
trigger the alarm system if there is an
To deactivate the tilt sensor alarm
impending danger if the system has
system:
been armed.
Press button 2 again briefly after the
system is locked.
This also deactivates the interior motion
sensor of the alarm system (refer to
page 41).
The alarm is deactivated by pressing
button 1.
Online Edition for Part-No. 01 41 9 791 187 - © 12/98 BMW AG
Radio remote control
For US owners only
Operation of the remote control system
may be affected by other units or equipment employing the same transmission
frequency in the immediate vicinity of
your car.
The transmitter and receiver units comply with part 15 of the FCC (Federal
Communications Commission) regulations. Operation is governed by the following:
FCC ID:
Controls
Same-frequency interference
Overview
35n
LX8EWS
LX8FZVS
LX8FZVE
Car care
Compliance statement:
This device complies with part 15 of the
FCC Rules. Operation is subject to the
following two conditions:
Technology Repairs
> This device may not cause harmful interference, and
> this device must accept any interference received, including interference
that may cause undesired operation.
Index
Data
Any unauthorized modifications to
these devices could void the
user's authority to operate the equipment.<
Online Edition for Part-No. 01 41 9 791 187 - © 12/98 BMW AG
36nDoor
locks – inside
380de016
To unlock and open the doors
Use this button to operate the central
locking system when the front doors are
closed. With this button, only the doors
and luggage compartment lid are unlocked or locked. The anti-theft system
is not activated.
The fuel filler door also remains unlocked to allow refueling.
If only the driver's door was unlocked from the outside and you
press the button
> all other doors, the luggage compartment lid and the fuel filler door will be
unlocked if the driver's door is open
> the driver's door will be locked again
if it is closed.<
To engage locks
> Either unlock the doors together with > Use the central locking system button
the button for the central locking systo locks all doors at once, or
tem and then pull each of the release > press down the individual door lock
handles above the armrests or
buttons. As an added design feature
> pull the release handle for each door
to prevent the driver from being inadtwice: The first pull unlocks the door,
vertently locked out of the vehicle,
and the second one opens it.
the driver's door lock button will not
engage as long as the door is open.
When the vehicle is moving, do
not lock the doors with safety lock
buttons since the doors would not then
open automatically in the event of an
accident.
Children might be able to lock the doors
from the inside. For this reason, take
the vehicle's keys with you so that the
vehicle can be opened again from the
outside at any time.<
When the low beams are switched
on, the interior door handles are
lighted. The brightness is controlled by
the instrument panel lighting. Refer to
page 96.<
Online Edition for Part-No. 01 41 9 791 187 - © 12/98 BMW AG
Luggage compartment lid
(in the event of electrical failure)
Secure separately
Only the master key (refer to page 30)
fits in the lock of the luggage compartment.
Turn the master key to the right past the
resistance point and then pull it out in
the horizontal position.
Car care
The lock
The luggage compartment is locked
again as soon as you close the lid.
Technology Repairs
380de650
Data
This locks the luggage compartment lid
and disconnects it from the central
locking system. This feature can be
used to prevent unauthorized access to
the luggage compartment when you
surrender the door and ignition key (refer to page 30) for valet parking, for instance.
Index
380de649
Turn the master key to the left in the
luggage compartment lock clear to the
stop – the luggage compartment lid will
open.
Controls
Manual operation
Overview
37n
Online Edition for Part-No. 01 41 9 791 187 - © 12/98 BMW AG
38nLuggage
compartment lid
Automatic Soft-Close feature
380de128
380de018
To close the luggage compartment lid,
merely press it down gently. The closing process will then be carried out automatically.
Opening from inside the car
Closing
If the luggage compartment lid has not
been locked separately, you can open it
with this button when the vehicle is stationary.
The handle recess in the interior trim
panel of the luggage compartment lid
(arrow) makes it easier to pull the lid
down.
To avoid injuries, be sure that the
travel path of the luggage compartment lid is clear when it is closed,
as with all closing procedures.
Operate the vehicle only when the luggage compartment lid is completely
closed. Otherwise, exhaust fumes
could penetrate the interior of the vehicle. Should it be absolutely necessary
to operate the vehicle with the luggage
compartment lid open:
> Close all windows. Shut the sliding/
tilt sunroof
> Increase the airflow of the automatic
climate control to a high level. Refer
to page 104.<
Online Edition for Part-No. 01 41 9 791 187 - © 12/98 BMW AG
Luggage compartment
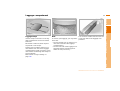
To secure your luggage, you may either
hook nets
You can store smaller articles in the net
on the rear wall of the luggage compartment.
Controls
Car care
Nets
Use the straps on the floor of the luggage compartment to secure smaller
suitcases.
Technology Repairs
Luggage straps
380de324
380de612
394de302
Overview
39n
> into the lashing eyes on the front corners and rear wall of the luggage
compartment or
>
into the rear wall of the luggage comLashing eyes located at the front corpartment and the mounting points
ners and the rear wall of the luggage
under the rear parcel tray.
compartment provide you with a convenient means of attaching draw straps to
secure luggage.
Movement is reduced, when objects
are placed on the straps.
Index
Data
Refer also to "Cargo Loading" on
page 118.
Online Edition for Part-No. 01 41 9 791 187 - © 12/98 BMW AG
system
The vehicle alarm system responds:
> When a door, the hood or the luggage compartment lid is opened
> To movement inside the vehicle (interior motion sensor)
> To variations in the vehicle tilt sensor
such as occur during attempts to
steal the wheels or tow the vehicle
> To interruption of battery voltage.
The system responds to unauthorized
vehicle entry and attempted theft by simultaneously activating the following:
> Sounding an acoustical alarm for
30 seconds
> The hazard warning flashers are activated for approx. five minutes
> The high beams flash on and off in
the same rhythm.
To arm and disarm the alarm
system
When the vehicle is locked or unlocked
by using a key or with the remote control, the alarm system is also simultaneously armed or disarmed.
The interior motion sensor is activated
approx. 30 seconds after you have finished locking the car.
The system indicates that it has been
correctly armed by switching on the
hazard flashers for a single cycle and by
emitting an acoustical signal.
When the system is active, you can still
gain access to the luggage compartment by pressing button 3 on the remote control transmitter. When the lid is
closed, it is armed once again.
380de020
40nAlarm
Indicator lamp displays
> The indicator lamp on the top of the
instrument panel flashes continuously: The system is armed
> The indicator lamp flashes during
arming: door(s), the hood or luggage
compartment lid are not completely
closed. Even if you do not close the
alerted area, the system begins to
monitor the remaining areas, and the
indicator lamp flashes continuously
after 10 seconds. However, the interior motion sensor is not activated
> If the indicator lamp goes out when
the system is disarmed: No unauthorized entries have been detected
in the period since the system was
armed
Online Edition for Part-No. 01 41 9 791 187 - © 12/98 BMW AG
Alarm system
Following triggering of an alarm, the indicator lamp will flash continuously.
1 Use the key to unlock the door (the
alarm sounds for 30 seconds when
opening the door)
2 Turn the key to ignition key position 1; the central locking system
unlocks the remaining doors.
Technology Repairs
The indicator lamp lights up briefly and
then flashes continuously. The tilt alarm
sensor and the interior motion sensor
are deactivated for as long as the system remains armed.
The transmitter and receiver of the interior motion sensor are located in a trim
panel in the vehicle's headliner.
The alarm system is now disarmed. Refer the problem to your BMW center.
In order for the interior motion sensor to
function properly, the windows and
sliding/tilt sunroof must be completely
closed.
Nevertheless, you should deactivate the
interior motion sensor whenever
> children or animals are left in the
vehicle
> the windows and/or sunroof are left
open.
Data
Lock the vehicle twice (= arm the system). In other words, press button 2 of
the remote control twice in succession
or lock the vehicle twice with the key.
Interior motion sensor
Index
The tilt alarm sensor and interior motion
sensor may be switched off at the same
time. By doing this, you can prevent
false alarms on garage ramps or when
the vehicle is transported by trailer or
train, for instance.
380de628
Tilt alarm sensor
If the car is locked and it is not possible
to disarm the system in the normal
manner, proceed as follows:
Controls
Emergency deactivation
procedure
Car care
> If the indicator lamp flashes for
10 seconds when the system is
disarmed: An attempted entry has
been detected in the period since the
system was armed.
Overview
41n
Online Edition for Part-No. 01 41 9 791 187 - © 12/98 BMW AG
42nElectric
power windows
After the ignition has been switched off:
380us651
> You can continue to operate the
power windows as long as one of the
front doors has not been opened. To
open a window, press the rocker
switch past the resistance point.
Remove the ignition key when you
leave the vehicle and close the
doors so that children can no longer
operate the power windows, possibly
injuring themselves, for instance.<
Open and close windows
In ignition key position 1 or 2:
> Depress the rocker switch until you
feel resistance:
The window continues moving for as
long as you maintain pressure on the
switch
> Press the rocker switch beyond the
resistance point:
The window moves automatically.
Press the switch a second time to
stop the window
For the convenience operating mode
via the door lock or the remote control,
refer to page 32 or page 33.
Safety feature
A contact strip is integrated into each of
the upper window frame sections. If
pressure is exerted against this contact
strip while a window is being raised, the
system will respond by stopping the
window and then retracting it a small
distance.
Despite this safety feature, be extremely careful that the closing
path of the window is not obstructed
whenever it is closed. Otherwise, an
object might not touch the contact strip
in some situations (with very thin objects, for instance). You can override
this safety feature by pressing the
switch beyond the resistance point and
holding it.
Because the power windows are sealed
at high pressure to prevent wind noise
when closed, a powerful motor is required for efficient closing. When closing the windows, always ensure that
they are not obstructed in any way. Unsupervised use of these systems can
result in serious personal injury. Remove the ignition key to deactivate the
electric power windows whenever you
leave the car. Never leave the keys in
the car with unsupervised children.
Never place anything that could obstruct the driver's vision on or next to
the windows.<
Online Edition for Part-No. 01 41 9 791 187 - © 12/98 BMW AG
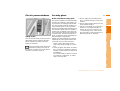
Security glass*
Press the safety switch whenever
children are riding in the rear of
the vehicle. Careless use of the power
windows can lead to injury.<
Controls
Technology Repairs
You can use the safety switch (arrow) to
deactivate the rear window switches
(when children are riding in the rear
seats, for instance).
1 The film is not scratch-resistant.
Avoid contact with sharp objects
which may break through or cut the
film
2 Clean the glass with water. If ineffective, you may use regular household
window cleaner; wipe the cleaner off
immediately.
Do not use window cleaners containing solvents or abrasives, as these
may scratch the film
Data
Safety switch
3 Do not apply any self-adhesive labels, or labels with tape to the inner
The glass installed on all side windows
surface
and the rear window is designed to of4
Do not apply window tint film to the
fer resistance to breakage and vandalinner window surface
ism. Each break-resistant window con5
If frost or ice builds up on the inner
tains several layers of clear synthetic
surface in cold, high-humidity cliplastic film sandwiched between the inmates, do not use a scraper or an
ner and outer glass panes. In addition,
"ice-removing spray." Start the enanother film is applied to the inner surgine and refer to the instructions on
face of the glass (facing the passenger
defrosting the door windows.
compartment). This film prevents the
glass, if shattered, from spreading into
the passenger compartment.
Please note the following precautions
regarding this inner glass surface film:
Index
380us055
Break-resistant security glass
Overview
43n
Car care
Electric power windows
Online Edition for Part-No. 01 41 9 791 187 - © 12/98 BMW AG
sunroof
To prevent injuries, exercise care
when closing the sliding/tilt sunroof and keep it in your field of vision
until it is shut.
Before leaving the car, switch off the
electric sunroof mechanism by taking
out the ignition key. Do not leave
children unattended in the vehicle with
access to vehicle keys. Use of the key
can result in starting of the engine and
operation of vehicle systems such as
power sunroof, etc. Unsupervised use
of these systems can result in serious
personal injury.<
To avoid pressure or drafts in the passenger compartment when the sunroof
is open or lifted, keep the air vents in
the dashboard open and increase
the air supply if necessary. Refer to
pages 100, 104.
For the convenience operating mode
via the door lock or the radio remote
control, refer to page 32 or page 33.
Safety feature
If the sliding/tilt sunroof encounters resistance at a point roughly past the
middle of its travel when it is closing,
the closing cycle is interrupted and the
sunroof will open again slightly.
Despite this safety feature, be extremely careful that the closing
path of the sunroof is not obstructed
whenever it is closed. Otherwise, triggering the closing-force limitation may
not be ensured in some situations (with
very thin objects, for instance). You can
override this safety feature by pressing
the switch beyond the resistance point
and holding it.<
380de615
44nSliding/Tilt
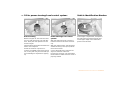
Lifting – opening – closing
From ignition key position 1 press the
switch or slide it to the desired direction
until you feel resistance.
When lifting, the headliner retracts several inches.
You can continue to operate the sunroof after the ignition has been
switched off as long as one of the front
doors has not been opened.
Online Edition for Part-No. 01 41 9 791 187 - © 12/98 BMW AG
Sliding/Tilt sunroof
Pressing the switch again briefly stops
the motion immediately.
In the event of an electrical system malfunction, the sliding/tilt sunroof can be
manually operated. Refer to page 178.
Controls
Overview
1 Raise the sliding/tilt sunroof all the
way
2 Continue to hold the switch for
approx. five seconds.
Car care
The headliner insert slides back somewhat when you raise the roof. When the
roof is opened, the headliner retracts
with it. The headliner will then automati- Power loss or malfunction
cally remain in its retracted position, but After interruptions in electrical supply
(when the battery is disconnected, for
can be repositioned as desired.
instance), the sunroof will only lift. To
reinitialize the mechanism:
Technology Repairs
> With the sunroof open, press the
switch briefly toward "Lift:"
The sunroof automatically extends to
its fully raised position
> With the sunroof lifted, press the
switch briefly toward "Open:" The
sunroof automatically opens all the
way.
The options and control procedures are
essentially the same as those previously described for the sliding/tilt sunroof. In order to open the raised roof,
press the control switch towards
"Open" until the roof has reached the
desired position.
Data
Other automatic operations are:
Sliding/Tilt sunroof with glass
moonroof*
Index
Press the switch past the resistance
point briefly: The sunroof travels to either the fully-closed or fully-open position.
380de616
Automatic* opening and closing
45n
Online Edition for Part-No. 01 41 9 791 187 - © 12/98 BMW AG
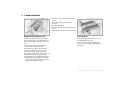
46nSeat
adjustment
Electric power seats
Correct sitting posture
Never try to adjust your seat while
operating the vehicle. The seat
could respond with unexpected movement, and the ensuing loss of vehicle
control could lead to an accident.
Wear the safety belt firmly against your
body at all times. In the event of a frontal impact, a loose lap belt could slide
over your hips, leading to abdominal injury. In addition, the safety belt's restraint effectiveness is reduced if the
belt is worn loosely.
Never ride with the backrest reclined to
an extreme horizontal angle (especially
important for front passengers to remember). Keep the backrest relatively
upright to minimize the risk of "sliding
under" the safety belt and sustaining injury in an accident.
Do not slide the seats to the rear when
the vehicle is at an extreme angle (on
garage ramps or steep slopes, for instance), to prevent the shoulder strap's
automatic height adjustment mechanism from disengaging.<
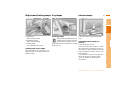
380de023
For maximum safety when adjusting the
seat position, please observe the following:
1 Tilt angle
2 Forward - backward adjustment
3 Cushion height
4 Backrest angle
5 Head restraint height
To reduce strain on the spinal column,
sit all the way back in the seat and rest
your back fully against the backrest.
Ideal sitting posture is achieved with
your head extending from your spine in
a straight line.
For long-distance driving, you may wish
to increase the backrest tilt-angle
slightly to reduce muscular tension.
Please remember that you should always remain able to grasp the entire
periphery of the steering wheel without
straightening your arms.
Lumbar support
Refer to the BMW comfort seat in the
following column.
Adjust the head restraint manually by
tilting it in the desired direction.
Head restraints reduce the risk of
spinal injury in the event of an accident.
Adjust the head restraint so that its center is approximately at the height of the
ear.
For maximum safety, read carefully and
comply with the adjustment instructions
presented here.<
Online Edition for Part-No. 01 41 9 791 187 - © 12/98 BMW AG
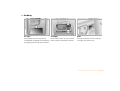
BMW comfort seat*
1 Lumbar support
2 Shoulder support
Lumbar support
You can adjust the backrest's contour
for additional support in the curvature
of your spine's lumbar region.
Press the rocker switch: The support
angle of the upper backrest section is
adjusted.
Make corrections in the forwardbackward adjustment of the seat
to ensure that the safety belt still fits
firmly against your body. If you do not
do this, the protection provided by the
safety belt may be reduced.<
When you are adjusting the seat, select
You can use the adjustable upper backa position in which you remain as far
rest for supplementary support in the
from the instrument panel as possible.
shoulder region. This provides a relaxed
driving position and helps relieve stress
on the shoulder muscles.
1 Adjust the upper backrest section
to its extreme rear position
2 Adjust to the optimal seat position as
described on page 46
3 Bring the upper backrest section forward until your shoulders enjoy firm
support.
Controls
Index
Increase/decrease curvature.
> Press the upper/lower end of the
switch:
Increase the upper/lower curvature.
Data
To obtain an optimal seating posture,
The upper hips and spinal column rewe recommend:
ceive supplementary support to help
you maintain a relaxed, upright posture. Driver's side and front passenger's
side:
> Press front/rear of switch:
Car care
Shoulder support
1 Adjust the upper backrest section to
its extreme rear position
2 Increase the seat cushion tilt
3 Tilt the backrest more
4 Bring the upper backrest section
forward.
Technology Repairs
This seat allows you to make additional
adjustments for
380de064
380de024
Front passenger's seat adjusted for relaxed traveling:
Overview
47n
Online Edition for Part-No. 01 41 9 791 187 - © 12/98 BMW AG
In addition to the adjustments offered
by the electric power seat, there are adjustments for thigh support, shoulder
support and lumbar support.
Actively changing the surface of the
seat helps to prevent muscle tension,
back pain in the lumbar region, and
symptoms of fatigue.
Thigh support
To activate this feature, press the button (arrow).
Press the switch (arrow) to make adjustments.
Shoulder support
Refer to BMW comfort seat on the previous page.
For more details, please refer to the
section headed "Advanced technology" on page 186.
Rear power seat*
380de025
BMW active seat*
380de627
contour seat*
380de066
48nBMW
1 Backrest angle
2 Head restraint height
3 Lumbar support
The head restraint extends automatically whenever a passenger fastens the
safety belt at one of the rear seating positions.
Correct head restraint height with
switch 2.
For information on the lumbar support,
refer to the BMW comfort seat on
page 47.
Lumbar support
Refer to BMW comfort seat on page 47.
Online Edition for Part-No. 01 41 9 791 187 - © 12/98 BMW AG
Adjusting the steering wheel
49n
Overview
Electric steering wheel
adjustment
Do not adjust the steering wheel
while the vehicle is moving. There
is a risk of accident from unexpected
movement.<
Controls
Car care
The steering wheel can be moved in
any of four directions. Adjust by moving
the control lever in the desired direction.
This automatic feature is controlled by
the position of the ignition key and by
the driver's door.
You can make the settings of your
vehicle in such a manner that,
when you unlock the car with your personalized remote control, your own personalized steering wheel adjustment is
initiated.<
Technology Repairs
380de028
In order to make it easier to get into and
out of the car, the steering wheel automatically moves into the top position
and returns to the driving (memory) position.
Index
Data
To store the steering wheel setting, refer to "Seat, mirror and steering wheel
memory" on page 51.
Online Edition for Part-No. 01 41 9 791 187 - © 12/98 BMW AG
Exterior mirrors
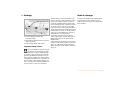
1 Switch for 4-way adjustment
2 Left/right selection switch.
You can also adjust the mirrors manually by pressing against the outer edges
of their lenses.
To store the mirror angles: Refer to
"Seat, mirror and steering wheel
memory" on page 51.
The mirror on the passenger's
side features a lens with a more
convex surface than the mirror installed
on the driver's side. When estimating
the distance between yourself and
other traffic, bear in mind that the objects reflected in the mirror are closer
than they appear. This means that estimations of the distance to following
traffic should not be regarded as precise.<
380us031
380us029
50nMirrors
You can make the settings of your
vehicle in such a manner that,
when you unlock the car with your personalized remote control, your own personalized mirror adjustment is initiated.<
Inside rearview mirror with
automatic dimming feature
Electric heaters
The mirror automatically reverts to its
clear, undimmed setting whenever you
move the selector lever to Reverse.
Depending on the outside temperature,
both mirrors are automatically defrosted
when the ignition key is in position 2.
This mirror automatically responds to
light (ambient light and headlamp glare)
by dimming through an infinitely variable range.
To ensure that the mirror continues to
operate properly, keep the two photocells clean and unobstructed. One photocell is integrated in the mirror glass,
the other somewhat offset on the back
of the mirror.
For an explanation of the electro-chromic technology used in this mirror, refer
to page 188.
Online Edition for Part-No. 01 41 9 791 187 - © 12/98 BMW AG
The mirror lamps operate in ignition key
positions 1 and 2.
Sun visors
These can be folded down toward the
windshield or swiveled out against the
side windows.
You can store and call up three different
seat, exterior mirror and steering wheel
positions.
The illustration shows the buttons on
the driver's door, for making these position adjustments.
The adjustment for the lumbar
support is not in the stored in the
memory.<
To store
With driver's door closed and ignition
key either removed or in position 0 or 2:
> Maintain pressure on desired memory button 1, 2 or 3 until the adjustment process is completed.
If you press the MEMORY button accidentally: Press the button a second
time, the indicator lamp goes out.
Do not call up a position from the
memory while the vehicle is moving. There is a risk of accident from unexpected movement of the seat or
steering wheel.<
1 Turn the ignition key to position 1 or 2
2 Adjust for the preferred seat, exterior
mirror and steering wheel positions
3 Press the MEMORY button: The indicator lamp in the button lights up
4 Press memory button 1, 2 or 3, as desired: The indicator lamp goes out.
Data
Fold down the sun visor and slide the
cover panel to the side as required.
> Briefly press memory button 1, 2 or 3,
as desired.
Movement stops immediately when
one of the seat-adjustment or memory buttons is activated during the
adjustment process.
Index
Lighted vanity mirror
380de032
380de670
Driver's door open after unlocking or
ignition key in position 1:
Controls
To select a stored setting
Overview
51n
Car care
Seat, mirror and steering wheel memory
Technology Repairs
Mirrors
Online Edition for Part-No. 01 41 9 791 187 - © 12/98 BMW AG
52nSeat,
mirror and steering wheel memory
When you make use of this feature, be sure that the footwell behind the driver's seat is not obstructed
before unlocking the car. Otherwise,
any objects which are behind the seat
might be damaged by any rearward
movement of the seat.<
380us610
You can make the settings of your
vehicle in such a manner that,
when you unlock the car with your personalized remote control, your own personalized settings for the seat position
and the mirror and steering wheel adjustments are initiated.<
Passenger side exterior mirror tilt
function
(automatic curb monitor)
1 Move the mirror selector switch (arrow) to the "driver's mirror" position
2 When the selector lever is placed in
"Reverse," the passenger-side mirror
tilts downward to help the driver
monitor the area directly adjacent to
the car during parking (curbs, etc.).
You can deactivate this automatic feature: Set the mirror selector switch to
the passenger's mirror position.
Online Edition for Part-No. 01 41 9 791 187 - © 12/98 BMW AG
Car Memory, Key Memory
There are settings related to the vehicle
("Car Memory") and settings related to
individuals ("Key Memory"). You can
have two different basic settings adjusted for two different persons. The
only requirement is that each person
uses his or her own remote control key.
Controls
Car care
What the system can do
Your authorized BMW center can provide you with details on the capabilities
of the Car Memory and Key Memory
systems.
Memory functions are available for
Technology Repairs
You have probably frequently wished
that you could configure individual
functions of your vehicles to reflect your
own personal requirements. In engineering your vehicle, BMW has included several user-defined functions
in the vehicle's design. Your authorized
BMW center can make these settings
for you.
In order for you to distinguish between
different keys, colored decals are supplied together with the keys.
> driver's seat
> steering wheel
> exterior mirrors
> automatic climate control.
You will see this symbol throughout the Owner's Manual. It is to remind you at appropriate places of the
settings that are available to you.<
Data
How the system functions
An example of Key Memory is the automatic adjustment of the power driver's
seat with stored settings for the individual person when the vehicle is unlocked.
Index
380de626
When your vehicle is unlocked with the
remote control, the vehicle recognizes
the individual user by means of a data
exchange with the key, and makes adjustments accordingly.
Overview
53n
Online Edition for Part-No. 01 41 9 791 187 - © 12/98 BMW AG
belts
380de033
54nSafety
Fasten your safety belt before starting
off.
To fasten: Make sure you hear the catch
engage in the belt buckle.
To release: Press the red button in the
buckle. Hold the belt and guide it back
into its reel.
The shoulder belt anchor automatically
adjusts to continue providing an optimum fit when you move the seat forward or back.
For your safety, comply with the
following instructions for wearing
safety belts. If you do not, the safety
belts may not be able to provide their
maximum protection. All passengers in
the vehicle should be aware of and
comply with this information:
Never allow more than one person to
wear a single safety belt. Never allow
infants or small children to ride in a passenger's lap.
Avoid twisting the belt while routing it
firmly across the hips and shoulder. Do
not allow the belt to rest against hard or
fragile objects in your pockets. Never
route the belt across your neck, do not
run it across sharp edges. Be sure that
the belt does not become caught or
jammed.
Wear the safety belt as firmly as possible against your body at all times. For
this reason, avoid wearing bulky clothing which will prevent proper belt fit.
Pull the safety belt across your shoulders frequently to re-tension it. In the
event of a frontal impact, a loose lap
belt could slide over your hips, leading
to abdominal injury. In addition, the
safety belt's restraint effectiveness is
reduced if the belt is worn loosely.
Expectant mothers should always wear
their safety belts, taking care to position
the lap belt against the lower hips,
where it will not exert pressure against
the abdominal area.<
For securing child restraints, refer to the
next page.
For care instructions, refer to page 154.
If the safety belt system has been
subjected to the stresses involved
in an accident or damaged in any other
way, have the belt system, including the
safety belt tensioner replaced by an authorized BMW center. Have the safety
belt anchorages checked also.<
Child restraint systems*
Never install a rear-facing child restraint device on the front passenger seat. Otherwise, injuries could occur when the airbag is triggered in the
event of an accident. Children should
always ride in the rear.
Do not attempt to modify child restraint
systems. If you do this, the protection
provided by these systems could be impaired.<
Online Edition for Part-No. 01 41 9 791 187 - © 12/98 BMW AG
Airbags
The indicator lamp indicates the
operational readiness of the airbag system from ignition key
positions 1 and 2.
Protective effect
The front airbags supplement the threepoint safety belts by helping to provide
additional protection for the front-seat
occupants in the event of a severe frontal collision in which the protection afforded by the belts alone may no longer
be sufficient. The head protection and
side airbags help provide protection in
the event of a severe collision from the
side. Each of the side airbags is designed to help support the upper body.
A system malfunction could prevent the
system from responding to an impact
occurring within its normal response
range.
Please have your authorized BMW center inspect and repair the system as
soon as possible.
Car care
> The indicator lamp fails to come on
> The indicator lamp comes on briefly
before going out and then lighting up
again.
Technology Repairs
3 Side airbags (front and rear side*)
System malfunction:
Data
2 Side impact head protection system
(front and rear*)
The illustration depicts schematically
the primary directions of vehicle impact
which initiate an airbag deployment.
> The indicator lamp comes on briefly
then goes out.
Index
1 Front airbags for driver and
front passenger
380de674
380de643
System operational:
Controls
Indicator lamp
Overview
55n
Online Edition for Part-No. 01 41 9 791 187 - © 12/98 BMW AG
56nAirbags
Do not apply tape or stickers or other
material over the padded steering
wheel hub, the instrument panel, the
side trim panels of the front or rear
doors and the roof pillars or the sides of
the headliner, or modify them in any
other way.
Do not install a rear-facing child-restraint device on the front passenger
seat.
If your vehicle is equipped with side airbags in the rear, be sure that child seats
are installed correctly and with the
This is the right way a child should sit in
greatest possible distance from the
a child restraint when rear side bags
door. Do not allow children to lean out
(arrow) are installed.
of the child's seat in the direction of the
door. Otherwise, serious injuries could
occur if the airbag is triggered.<
380de637
For your safety, comply with the
following instructions for the airbags. If you do not, the airbags may not
be able to provide their maximum protection. All passengers in the vehicle
should be aware of and comply with
this information:
The airbags are supplemental restraint
devices designed to provide extra protection; they are not a substitute for
safety belts. Wear your safety belt at all
times. The airbags will not be triggered
in the event of a minor accident, a vehicle roll-over, or collisions from the rear.
In these situations, the safety belts provide optimal protection.
Adjust your seat to a position that provides maximum distance between you
and the steering wheel, the instrument
panel and the door while still allowing
comfortable and safe access to all vehicle controls.
Hold the steering wheel at the rim
(hands at the "9 o'clock and 3 o'clock"
positions) in order to avoid injuries to
the hands or arms if the airbag is triggered.
Never allow any objects to obstruct the
area between the airbag and the driver/
passenger.
Do not use the cover panel above the
passenger-side airbag as a storage
area.
Even when all these guidelines are followed, there is still a small residual risk
of injuries to the face, hands and arms
occurring in isolated instances. The ignition and inflation noise may provoke a
mild temporary hearing loss in extremely
sensitive individuals.
Airbag warning information is also provided on the sun visors.
For additional information concerning the
airbag system, refer to pages 156, 184.
Online Edition for Part-No. 01 41 9 791 187 - © 12/98 BMW AG
Children should always sit in the rear
and, depending on age, use either a
child restraint system or the existing
safety belts. Accident statistics have
shown that children are safer when
properly restrained in the rear seats
than in the front seating positions.
Infants or toddlers should be secured
with a child restraint system appropriate for their size.
Before installing any child-restraint
device or child seat, please read
the following:
Never install a rear-facing child restraint
system in the front passenger seat of
this car.
Your car is equipped with an airbag
supplemental restraint system for the
front passenger. Because the backrest
on any rear-facing child restraint system (of the kind designed for infants under 1 year and 20 lbs.) would be within
the airbag's deployment range, you
should never mount such a device in
the front passenger seat, as the impact
of the airbag against the child restraint's
Online Edition for Part-No. 01 41 9 791 187 - © 12/98 BMW AG
Overview
Controls
Car care
If the child restraint of your choice requires the use of a tether strap, three
fastening points (arrows) have been
provided on the rear shelf for attachment. Ask your BMW center principal to
perform the necessary work.
Technology Repairs
Infants or small children should never
be held on the lap of a passenger.
Commercially-available child restraint
systems are designed to be secured
with a lap belt or with the lap belt portion of a combination lap/shoulder belt.
Improperly or inadequately installed restraint systems can increase the risk of
injury to children. Always read and follow the instructions that come with the
system.
Data
All occupants – especially children –
should be restrained whenever riding in
cars.
57n
Index
This is the right way a larger child
should sit wearing the safety belt when
rear side airbags (arrow) are installed.
Child restraints
380us123
380de638
Airbags
backrest could lead to serious or fatal
injuries.
If it is necessary for a child (not an infant) to ride in the front seat, certain
precautions should be taken. First,
move the passenger seat as far away
from the dashboard as possible. This
important precaution is intended to
maximize the distance between the airbag and the child. Older children should
be tightly secured with the safety belt.
Younger children should be secured in
an appropriate forward-facing child restraint system that has first been properly secured with a safety belt. Never
install a rear-facing child restraint system in the front passenger seat.
We strongly urge you to carefully read
and observe the instructions for installation and use provided by the child restraint's manufacturer whenever you
use such a device.
Be sure that all occupants (of all ages)
remain properly and securely restrained
at all times.<
All rear seating positions in your
vehicle meet the recommendations
of SAE J1819, an industry recommended practice for securing child
restraint systems in motor vehicles.
Child restraint installation Child-safety locks
To allow you to use the safety belts to
secure child-restraint systems, the belts
at all rear positions feature a special
locking mode.
380de019
restraints
365us146
58nChild
Insert the key into a rear door lock and
turn it outward:
The door can now be opened from the
outside only.
A label with operating instructions is attached to the belt next to the latch plate
(except the middle belt in the rear).
Lock the safety belt
Extract the entire length of the belt from
the inertia reel mechanism. Allow the
belt to retract somewhat and engage
the buckle. Then tighten the belt around
the child restraint. The belt is now
locked. Comply with the instructions
provided by the manufacturer of the
child restraint.
Unlock the safety belt
Release the safety belt, remove the
child's seat and retract the safety belt to
its end position on the belt retractor.
Online Edition for Part-No. 01 41 9 791 187 - © 12/98 BMW AG
To move the selector lever out of P, the
ignition key must be turned at least to
position 2.
This is the only position in which the ig- 1 Steering lock disengaged
nition key can be inserted and removed.
You will find that it is often easier to turn
An acoustic warning sounds when you the ignition key from position 0 to posifail to remove the ignition key before
tion 1 when you move the steering
opening the driver's door.
wheel slightly to help disengage the
lock.
After removing the key, turn the steering wheel slightly to the left or right until Individual electrical equipment and accessories are available for use.
you hear the lock engage.
2 Ignition on
All electrical equipment and accessories are available for use.
Starting engine
> Start the engine. Do not press the accelerator pedal.
Your BMW is equipped with the
convenience starting feature.
Simply turn the key to position 3 (starter)
and then release it immediately.
The starter continues to operate automatically until the engine starts.
3 Starting engine
Controls
Do not allow the engine to run in
enclosed spaces. The exhaust
gases contain carbon monoxide, an
odorless and colorless, but highly toxic
gas. Breathing the exhaust gases poses
an extreme health risk, and can lead to
unconsciousness and death.
Never leave the car unattended with the
engine running, as such a vehicle represents a potential safety hazard.<
Car care
0 Steering lock engaged
In addition, the selector lever is locked
in position P when the ignition key is in
position 0 or removed from the ignition
switch.
Index
380de010
Your vehicle is equipped with an interBefore starting
lock. For this reason, the ignition key
> Press the parking brake pedal
cannot be turned to position 0 and re> Place the selector lever of the automoved until the selector lever is in posimatic transmission in P or N.
tion P.
Overview
59n
Technology Repairs
Starting engine
Data
Steering/Ignition lock
Online Edition for Part-No. 01 41 9 791 187 - © 12/98 BMW AG
60nStarting
engine
If the battery's voltage is not adequate,
the automatic starting procedure is not
initiated, or it is interrupted. Should this
condition arise, it remains possible to
jump-start the engine (refer to page 179).
Do not allow the engine to warm up by
leaving it running while the vehicle remains stationary. Instead, begin driving
immediately at a moderate engine
speed.<
Switching off engine
Engine idle speed is controlled by the
engine computer system. Increased
speeds at start-up are normal and
should decrease as the engine warms
up. If engine speed does not decrease,
service is required.
To prevent the battery from discharging, always switch off any electrical devices not in use, as well as the ignition
when the vehicle is not being driven.
Turn the ignition key to position 1 or 0.
The vehicle must be stationary
and the selector lever in "Park"
before you can remove the ignition key.
Always remove the ignition key and engage the steering lock before leaving
the vehicle.<
Should the engine fail to start on the
first attempt (if it is very hot or cold, for
instance):
> Press the accelerator pedal halfway
down while engaging the starter.
BMW 740i/L:
Cold starts at extremely low temperatures, from approx. +57 (–156)
and at elevations above 3300 feet
(1000 meters):
> Press the accelerator pedal halfway
down while engaging the starter.
Online Edition for Part-No. 01 41 9 791 187 - © 12/98 BMW AG
Overview
Controls
Car care
Data
You can prevent corrosion from forming
To release the brake, pull the handle.
Please remember that the brakes disen- on the separate parking brake drums
with an occasional gentle application of
gage immediately.
the parking brake when stopping at
The parking brake is primarily designed
traffic lights.
to prevent the vehicle from rolling while
parked, and operates against the rear
wheels.
Technology Repairs
If, in exceptional circumstances, it
should be necessary to engage
the parking brake while the vehicle is in
motion, depress the pedal cautiously
and slowly while continuing to pull on
the release handle.
Excessive pressure on the pedal can
lead to overbraking and loss of traction
at the rear.
The brake lamps do not come on when
the parking brake is applied.<
Index
Depress the pedal. The "PARK BRAKE"
(in Canada "P") indicator lamp in the instrument cluster comes on when the ignition key is in position 2.
61n
380de042
380de043
Parking brake
Online Edition for Part-No. 01 41 9 791 187 - © 12/98 BMW AG
380us046
transmission
380us045
62nAutomatic
Before exiting the vehicle when
the engine is running, place the
selector lever in the "Park" or "Neutral"
position and apply the parking brake. If
you do not, the vehicle can move.
Do not leave the car unattended with
the engine running.
An unattended vehicle with a running
engine represents a potential safety
hazard.<
P - Park
Selector lever positions
PRND432
Shift programs
Lever positions:
> A (Adaptive/Economy)
> M (Manual)
Selector lever in position 4:
> S (Sport program)
For an explanation of the programs, refer to the next page.
Starting engine
The engine can only be started in positions "Park" or "Neutral."
Changing the selector lever
position
A detent prevents inadvertent shifts into
some selector lever positions. To release the shift-lock mechanism, press
the button on the front side of the selector handle (arrow).
While the vehicle is stationary and
before shifting out of "Park" or
"Neutral," depress the footbrake in order to disengage the selector lever's
lock mechanism (shift-lock).
Hold the footbrake down until starting
off. The vehicle will otherwise "creep"
when a drive position is engaged.<
Select "Park" only when the vehicle is
stationary. The transmission locks to
prevent the rear wheels from turning.
R - Reverse
Select "Reverse" only when the vehicle
is stationary.
N - Neutral
Select "Neutral" only if your journey is
interrupted for a longer period.
D - Drive
(automatic shift program)
This position is designed for driving under all normal operating conditions. All
forward gears are available; the Adaptive Transmission Control (ATC) is fully
operational.
Online Edition for Part-No. 01 41 9 791 187 - © 12/98 BMW AG
Automatic transmission
For details concerning ATC, please refer to the chapter titled "Advanced
Technology" on page 184.
Overview
Controls
This program is for driving in one gear
(4th gear when D has been selected).
The transmission then remains in the
selected gear both when underway and
3 and 2 - Shift limiter
when starting off. For instance, when
Because
of
this,
the
remaining
selector
Select this range when you wish to limit
you make a steep ascent with the segear changes (on steep uphill or down- lever positions for forward driving are
lector lever in position 2, the transmisonly
required
in
extreme
situations
such
hill slopes, for instance). The transmission upshifts only as far as the selected as those listed in the description of po- sion does not make undesired upshifts.
The same principle applies during opersition 2.
gear.
ation on ice-covered roads: By placing
the selector lever in position 3 you can
A - Adaptive program
"Kickdown"
This is the initial position that the trans- move off gradually, and the transmis(automatic downshift)
mission selects at every start. In the po- sion will also suppress subsequent
In the "Kickdown" mode, you achieve
shifts into higher gears.
sitions for forward driving, the ATC
maximum performance.
Press the accelerator pedal past the in- (Adaptive Transmission Control) automatically selects the optimal gear from Selector lever positions
creased resistance point at the fullPositions 4, 3 and 2 have the function of
different shift programs. To achieve
throttle position.
enhanced control over shifting – control
this, the system constantly adapts to
driver characteristics (such as a moder- which is desired and intentionally seShift programs
lected.
ate or performance-oriented driving
The automatic transmission of your
style), road condition factors (slick
The ATC also functions in these selecBMW is equipped with the Adaptive
roads or extreme slopes, for instance)
tor lever positions – of course with limiTransmission Control (ATC) as standard
as well as the current driving situation
tations for gear selection imposed by
equipment.
(winding roads or mountain travel, for
the lever position.
instance).
Car care
M – Manual program
Technology Repairs
When you select program A, the ATC
system automatically adapts to individual driving styles and road conditions to
provide optimal performance with the
selector lever at position D.
Index
This position is recommended if your
driving style is performance-oriented.
Data
4 - Sport program
63n
Online Edition for Part-No. 01 41 9 791 187 - © 12/98 BMW AG
64nAutomatic
transmission
Special functions
In program A, the Adaptive Transmission Control influences several special
functions in the selection of the drive
gear.
With the system active, some shifts that
would be made in other modes will be
suppressed. The system also reacts to
special situations by executing shifts
that would not occur with a conventional transmission.
Control of the winter program
A winter program is automatically selected when the vehicle is operated on
slippery road surfaces (snow and ice).
When this program is active, the transmission starts in 2nd gear and shifts
into the higher gears earlier. This program improves response under winter
driving conditions by providing enhanced traction and vehicle stability.
Electronic transmission control
module
If the message "TRANS. FAILSAFE
PROG" appears in the Check Control,
there is a fault in the gearshift electronic
system or in the transmission itself.
You can still place the selector lever in
all positions. However, it is possible
that not all gears are available for the
vehicle's forward drive.
If this happens, avoid extreme engine
loads and consult the nearest authorized BMW center.
Do not work in the engine compartment when a drive gear (forward or reverse) is engaged. If you do
this, the vehicle could move.<
For towing, tow-starting or jump-starting the vehicle, refer to pages 179, 180.
ATC leaves the winter program when it
registers a high-traction road surface,
when the Sport program is selected and
when ASC+T/DSC is deactivated.
Online Edition for Part-No. 01 41 9 791 187 - © 12/98 BMW AG
Automatic transmission with Steptronic*
65n
A detent prevents inadvertent shifts into
some selector lever positions. To release the shift-lock mechanism, press
Starting engine
The engine can only be started in selec- the button on the front side of the setor lever positions P ("Park") or N ("Neu- lector handle (arrow).
tral").
While the vehicle is stationary and
before shifting out of "Park" or
"Neutral," depress the footbrake in order to disengage the selector lever's
lock mechanism (shift-lock).
Hold the footbrake down until starting
off. The vehicle will otherwise "creep"
when a drive position is engaged.<
Controls
Car care
P R N D M/S + –
Technology Repairs
380de211
Range selection
Data
For details concerning ATC, please refer to the chapter describing "Advanced
technology" on page 184.
Selector lever positions
Index
The automatic transmission of your
BMW is equipped with an Adaptive
Transmission Control (ATC). This system reacts with precision to your individual driving style and the current driving conditions. Different shift programs
are utilized to achieve this.
380us667
When you move the selector lever to
the left from position "D" and into the
M/S shift level, the performance-oriented shift programs of the automatic
transmission are activate. As soon as
you move the selector lever in the "+" or
"–" direction, Steptronic changes the
gear and the manual mode is active. If
you wish to utilize automatic shifting
once again, move the selector lever to
the right and into the D position.
Overview
You may drive your vehicle as with a
typical automatic transmission, but you
may also shift manually.
Online Edition for Part-No. 01 41 9 791 187 - © 12/98 BMW AG
transmission with Steptronic*
Before exiting the vehicle when
the engine is running, place the
selector lever in the "Park" or "Neutral"
position and apply the parking brake. If
you do not, the vehicle can move.
Do not leave the car unattended with
the engine running. An unattended vehicle with a running engine represents a
potential safety hazard.<
P - Park
Select "Park" only when the vehicle is
stationary. The transmission locks to
prevent the rear wheels from turning.
R - Reverse
Select "Reverse" only when the vehicle
is stationary.
N - Neutral
Select "Neutral" only if your journey is
interrupted for a longer period.
D - Drive
(automatic shift program)
380de659
66nAutomatic
M/S - Manual mode and
Sport Program
When you change from "D" to M/S, the
Sport program is activated. This is indiThis position is designed for driving uncated by "D S" in the gear display. This
der all normal operating conditions. All
position is recommended if your driving
forward gears are available; the Adapstyle is performance-oriented.
tive Transmission Control (ATC) is fully
With the first brief touch, the automatic
operational.
transmission shifts from the Sport pro"Kickdown" (automatic downshift) gram to manual mode.
When you move the selector lever forIn the "Kickdown" mode, you achieve
ward in the "+" direction, the transmismaximum performance.
sion shifts up. When moved back in the
Press the accelerator pedal past the in"–" direction, the transmission shifts
creased resistance point at the fulldown.
throttle position.
Depending on the version, "1 to 5" or
"M1 to M5" appears in the gear display.
Online Edition for Part-No. 01 41 9 791 187 - © 12/98 BMW AG
Automatic transmission with Steptronic*
If this happens, avoid extreme engine
loads and consult the nearest authorized BMW center.
Do not work in the engine compartment when a drive gear (forward or reverse) is engaged. If you do
this, the vehicle could move.<
For towing, tow-starting and jumpstarting, refer to pages 179, 180.
Overview
Controls
You can still place the selector lever in
all positions. However, it is possible
that not all gears are available for the
vehicle's forward drive.
Car care
If the "TRANS. FAILSAFE PROG" message appears in the Check Control,
there is a malfunction in the transmission system.
Technology Repairs
You can only change from M/S to the
selector lever positions "P," "R" and "N"
via the "D" position.
> In order to prevent engine overspeeding, the transmission shifts automatically to the next higher gear
shortly before the RPM cutoff point
> At low speeds, the transmission shifts
down automatically - you do not have
to act
> In the kickdown mode, the transmission shifts down to the lowest gear
which is possible, depending on the
engine speed.
Electronic transmission control
module
Data
In the manual mode for rapid acceleration – when passing, for example – manually or a shifting down to
the kickdown point.<
In the following situations, the Steptronic "thinks" for you in the manual
mode:
Index
The ATC will execute upshifts or downshifts only at appropriate engine and
road speeds. For example, the transmission does not shift down when the
engine speed is too high. The selected
gear will appear briefly in the instrument
cluster, followed by the current gear.
67n
Online Edition for Part-No. 01 41 9 791 187 - © 12/98 BMW AG
68nIndicator/Headlamp
flasher Wiper/Washer system/Rain sensor
380us041
380de629
0 Wipers retracted
1 High beam (blue indicator)
0 Wipers retracted
2 Headlamp flasher (blue indicator)
1 Intermittent wipe
3 Turn signal (green indicator accompanied by a rhythmic clicking sound
from the relay).
2 Normal wipe
If the indicator lamp and the clicking
from the relay are both faster than normal, one of the turn indicators has
failed.
3 Fast wipe
The wipers are partially hidden behind
the hood. To bring the wipers up into
their vertical position (important when
changing the blades, or folding up
when frost is expected):
With the control lever in position 1,
switch off the ignition when the wipers
are in the parked position.
Fold the wipers down onto the
windshield before you turn the ignition key to position 1 or 2.<
For changing the wiper blades, refer to
page 162.
4 Brief wipe
1 Interval time or rain sensor*
5 Automatic windshield washer
You can set the wipe interval to 4
stages with rotary dial 6.
In addition, the wipe interval automatically adapts to variations in road speed.
6 Rotary dial for control of the interval
time or the sensitivity of the rain
sensor
To signal briefly
Rain sensor:
Press the lever up to but not beyond the
detent. It then returns to the center position when released.
When the rain sensor is activated, the
windshield wiper is controlled automatically, depending on the degree of wetness of the windshield (in both snow
and rain). You do not have to be concerned with switching the windshield
wiper on or off or adjusting the wipe interval between intermittent and full
wipe. Instead, you can concentrate fully
Online Edition for Part-No. 01 41 9 791 187 - © 12/98 BMW AG
Wiper/Washer system
To modify the sensitivity of the rain
sensor:
Turn rotary dial 7.
Turn the rain sensor off in automatic car washes.
If you do not, damage may occur if the
wipers switch on unintentionally.<
The system sprays washer fluid against
the windshield and activates the wipers
for a brief period.
Windshield washer jets
The windshield washer jets and the
windshield in the wiper sweep area are
defrosted automatically when the ignition key is in position 2.
If you only pull the lever briefly, the system sprays washer fluid onto the windshield without activating the wipers.
Overview
Controls
Car care
> turn rotary dial 7 briefly or
> use either the automatic windshield
washer 5 or the automatic intensive
washer 6.
5 Automatic windshield washer
Technology Repairs
You can leave the lever permanently in
position 1. It is then only necessary to
activate the rain sensor from ignition
key position 1 and up. To do this
Do not use the washers if there is
any danger that the fluid will
freeze on the windshield, otherwise vision could be obscured. For this reason, use an antifreeze agent. Refer to
page 142.
3 Fast wiper speed
Do not use the washers when the reserWhen the vehicle is stationary, the wipvoir is empty, since this could cause
ers operate at normal speed (not on vedamage to the washer pump.<
hicles with rain sensor).
When the vehicle is stationary, the wipers switch automatically to intermittent
wipe (not on vehicles with rain sensor).
Headlamp washers*
If they are on, the headlamps will also
be cleaned every fifth time you activate
the automatic windshield washer.
Data
To activate the rain sensor:
From ignition key position 1 and up,
move the lever to position 1. The wipers
travel once across the windshield, regardless of the weather.
2 Normal wiper speed
Index
on the traffic conditions. This is especially important under adverse weather
conditions.
69n
Online Edition for Part-No. 01 41 9 791 187 - © 12/98 BMW AG
70nRear
window defroster
Cruise control
To activate
Press the button: The rear window defroster continues high-output operation
for as long as the indicator lamp remains on (rapid thaw).
390de058
380de622
Press and hold button 1:
The vehicle accelerates without pressure on the accelerator pedal. When
you release the button, the system
records and maintains the current
speed.
You can store and automatically maintain any desired vehicle speed above
approx. 20 mph (30 km/h).
To activate the system
After the indicator lamp goes out, the
defroster continues operating at reduced power for a limited period before
deactivating automatically.
In ignition key positions 1 and 2:
Press button 4, the indicator lamp in the
instrument cluster comes on. You can
now use the cruise control.
To deactivate
To store and maintain speed
or to accelerate
If the indicator lamp is on, press the
button.
Press button 1 briefly:
The system records and maintains the
current vehicle speed. Every time you
tap the button, the speed increases by
0.6 mph (1 km/h).
If, on a downhill gradient, the engine braking effect is not sufficient, the controlled speed can be exceeded. Speed may not be maintained
on uphill grades if the engine output is
insufficient.<
To decelerate
Press button 2 briefly:
When the cruise control is active,
vehicle speed is reduced by approx.
0.6 mph (approx. 1 km/h) every time
you briefly press the button.
Press and hold button 2:
With the cruise control active, the system automatically reduces the throttle
opening to slow the vehicle. When you
release the button, the system records
and maintains the current speed.
Online Edition for Part-No. 01 41 9 791 187 - © 12/98 BMW AG
Cruise control
In addition, cruise control is canceled
automatically:
To deactivate the system
Do not use cruise control on twisting roads, when high traffic denWhen the cruise control has been canceled, press button 4 again. The indica- sity prevents driving at a constant
speed, when the road surface is slick
tor lamp goes off and the memorized
(snow, rain, ice), or when the road surspeed is canceled.
face is loose (rocks or gravel, sand).<
Overview
When the system is activated, press
and hold button 4. The indicator lamp
stays on. You can use the cruise control
again as desired.
Controls
To cancel the cruise control
71n
Technology Repairs
Car care
> When you apply pressure to the
brake pedal
> If the automatic transmission selector
lever is moved from "D" to "N"
> If you exceed or fall below the programmed speed for an extended period (by depressing the accelerator,
for example).
To resume the stored setting
Index
Data
Press button 3:
The vehicle accelerates to and maintains the last speed stored. When you
turn the ignition key to position 0, the
stored speed is deleted from the system's memory and the system is deactivated.
Online Edition for Part-No. 01 41 9 791 187 - © 12/98 BMW AG
72nOdometer,
outside temperature display
Tachometer
3 Outside temperature display
The outside temperature appears in the
display panel as soon as you turn the
ignition key to position 1.
1 pressing and holding down the button (arrow) with the ignition key in position 1
2 while turning the ignition key to 0.
1 Odometer
Ice warning
You can activate the displays shown in
the illustration with the ignition key in
position 0 by pressing the button in the
instrument cluster (arrow).
If the outside temperature drops to approx. +37.57 (+36), a warning signal
sounds and the display flashes briefly.
2 Trip odometer
To reset the trip odometer to zero,
press the button (arrow) with the ignition key in position 1 or 2.
The warning is repeated whenever the
temperature goes to at least +437
(+66), and then drops to +37.57
(+36) again.
380us004
380us652
You can change the units of measure
(6/7) by
Never allow the engine to operate with
the needle in the red overspeed zone of
the gauge.
To protect the engine, the engine-management system automatically interrupts the fuel supply in this range; the
resulting effect resembles that associated with a sudden loss of power.
The ice warning does not alter the
fact that surface ice can form at
temperatures above +37.57 (+36), on
bridges or shaded road surfaces, for instance.<
Online Edition for Part-No. 01 41 9 791 187 - © 12/98 BMW AG
Fuel gauge
73n
Controls
Car care
When you switch on the ignition, the indicator lamp comes on briefly to confirm that the system is operational.
If the indicator lamp stays on, there are
approx.
Technology Repairs
Indicates current fuel consumption in
mpg (in liters per 100 km on Canadian
vehicles). This instrument clearly
shows whether your current driving
style is conducive to economy and minimum exhaust emissions.
380us006
380us005
Please refuel early, since driving
to the last drop of fuel can result in
damage to the engine and/or catalytic
converter.<
Overview
Energy control
> BMW 740i/L 2.6 gallons (10 liters)
When the vehicle is stationary, the dis- > BMW 750iL 3.2 gallons (12 liters)
play goes to "Maximum" (zero on Canaremaining in the tank.
dian models).
Tank capacity: Refer to page 197.
Index
Data
Certain operating conditions (such as
those encountered in mountainous areas) may cause the needle to fluctuate
slightly.
Online Edition for Part-No. 01 41 9 791 187 - © 12/98 BMW AG
74nTemperature
gauge
Service Interval Display
Between the blue and red zones
Checking coolant level: Refer to
page 146.
380us008
380de007
Normal operating range. It is not unusual for the needle to rise as far as the
edge of the red zone in response to
high outside temperatures or severe
operating conditions.
Blue
Green lamps
The engine is still cold. Drive at moderate engine and vehicle speeds.
The number of illuminated lamps decreases as the time for your next maintenance visit approaches.
Red
When you switch on the ignition, the
warning lamp comes on briefly to confirm that the system is operational.
Yellow lamp
Lights up while driving, or the message
"COOLANT TEMPERATURE” appears
in the Check Control: the engine is
overheated. Switch the engine off immediately and allow it to cool down.
Maintenance is due. Please contact
your BMW center for an appointment.
This field appears together with
OILSERVICE or INSPECTION.
Red lamp
Maintenance is overdue.
Online Edition for Part-No. 01 41 9 791 187 - © 12/98 BMW AG
Check Control
2 Status report symbol
3 Display
Messages concerning system faults
are differentiated based on two priorities:
> RELEASE PARKING BRAKE
This message appears together with
an acoustic signal any time you begin
to drive and the parking brake is applied.
> COOLANT TEMPERATURE
Coolant overheated. Stop the vehicle
and switch off the engine immediately.
Refer to pages 74, 146.
Overview
Controls
Car care
These defects are immediately indicated by a gong and a flashing warning
symbol (2). Several simultaneous defects will be displayed consecutively.
These messages remain active until the
malfunction is corrected. They cannot
be cleared with CHECK button (1).
Technology Repairs
1 CHECK button
Priority 1
Data
System malfunctions are reported in
text form and alerts or warnings are
each reported by a gong when the ignition key is in position 2.
> STOP! ENGINE OILPRESS
Oil pressure too low. Stop the vehicle
and switch off the engine immediately. Refer to page 20.
> CHECK BRAKE FLUID
Indicates that brake fluid is down to
roughly minimum level. Top up the
brake fluid as soon as possible. Refer
to page 147. Have the cause of the
brake fluid loss corrected by your
BMW center.
> FLAT TIRE*
Reduce vehicle speed immediately
and stop the vehicle. Avoid hard
brake applications. Do not oversteer.
Refer to page 95.
> LEVEL CONTROL INACTIVE*
Please consult the nearest authorized
BMW center. Refer to page 130.
> SPEED LIMIT*
This is displayed if the programmed
speed limit is exceeded.
Index
380us111
75n
Online Edition for Part-No. 01 41 9 791 187 - © 12/98 BMW AG
76nCheck
Control
Priority 2
These alerts for problems are reported
for 20 seconds when the ignition key is
in position 2. The status reports remain
after the message disappears. You can
view the message again by pressing the
CHECK button.
> TRUNK LID OPEN
This message is given only when initially starting off.
> DOOR OPEN
This is displayed after a minimum
vehicle speed is exceeded.
> FASTEN SEAT BELTS*
In addition, the indicator lamp with
the safety belt symbol appears and
an acoustic signal is heard.
> WASHER FLUID LOW
The washer fluid is too low. Top up
the fluid at the earliest opportunity.
Refer to page 142.
> CHECK ENGINE OIL
Add engine oil as soon as possible.
Refer to page 143.
> OUTSIDE TEMPERATURE 247
(–5.06)
This display is only an example. The
current reading appears at an outside
temperature of 37.57 (+36) and
below. Refer also to page 72.
> TIRE PRESSURE SET*
The RDC has imported the current inflation pressure in the tires as the target values which the system will
monitor.
Refer to page 94.
> CHECK TIRE PRESSURE*
Check and correct the tire inflation
pressure to specifications at the earliest opportunity (next stop for fuel).
Refer to page 94.
> TIRE CHECK INACTIVE*
A temporary interference of the RDC
or a system fault. Refer to page 95
> BRAKE LAMP CIRCUIT
A bulb has failed or the circuit has a
malfunction. Refer to pages 163, 176
or consult an authorized BMW center.
> CHECK LOWBEAMS
CHECK SIDE LAMPS
CHECK REAR LAMPS
CHECK FRONT FOGLAMPS
CHECK LICPLATE LAMP
CHECK TRAILER LIGHTS
CHECK HIGHBEAMS
CHECK BACKUP LAMPS
Defective bulb or circuit. Refer to
pages 163, 176 or consult an authorized BMW center.
> TRANS. FAILSAFE PROG
Please consult the nearest authorized
BMW center. Refer to pages 64, 67.
> CHECK BRAKE LININGS
Have the brake pads inspected by
your BMW center. Refer to page 126.
> REMOTE KEY BATTERY
Change the battery. Refer to
page 168.
> CHECK COOLANT LEVEL
The coolant is too low. Top up at the
next opportunity. Refer to page 146.
> ENGINE FAILSAFE PROG
Fault in the Electronic Engine Power
Control EML. When braking, higher
brake application pressure may be
necessary and brake pedal travel may
be significantly longer.
Please have the system inspected by
your authorized BMW center.
Online Edition for Part-No. 01 41 9 791 187 - © 12/98 BMW AG
Check Control
Displays after completion of trip
To monitor the Check Control
All of the malfunctions registered during
the trip appear consecutively when the
ignition key is turned to position 0.
With the ignition key in position 2, press
CHECK button (1):
CHECK CONTROL OK appears in the
display.
Controls
One of the following displays may appear:
Overview
77n
Car care
In this case, there are no faults in the
> LIGHTS ON
systems which are monitored.
> KEY IN IGNITION LOCK
> CHECK ENGINE OIL LEV
Add engine oil at the next opportunity
(next stop for fuel). Refer to page 143.
Technology Repairs
This message appears when you open
the driver's door after parking the vehicle. A supplementary gong is also
heard.
Index
Data
Even if the ignition key has been removed and the display has gone off,
you can still retrieve these messages
with CHECK button (1) for approx. three
minutes after completion of your trip. If
there are multiple messages, continue
to press the CHECK button.
Online Edition for Part-No. 01 41 9 791 187 - © 12/98 BMW AG
78nMulti-Information
Display (MID)
> Digital clock (time, date, independent
ventilation system)
> Sound system (radio, cassette, CD
player*)
> Onboard computer (such as fuel consumption, cruising range)
> Cellular phone* (dialing, for instance)
380us171
The MID serves as a central control and
display unit for the following vehicle
systems:
Implausible numbers will not be
accepted.
Any interruption in current supply will
result in the loss of all stored data. After
the current supply is restored, you will
need to reset the time as well as any
additional program data for the independent ventilation system, distance or
speed warning threshold.<
Sound system, digital clock,
onboard computer and
cellular phone
On the following pages you will find explanations and information on how to
use the digital clock and the onboard
computer. Information on using the
sound system and the telephone are
contained in the Supplementary
Owner's Manual.
Online Edition for Part-No. 01 41 9 791 187 - © 12/98 BMW AG
Digital clock
380us173
Press the DATE key with the time activated to display the date.
To display the time again, press the digital clock function key.
From ignition switch position 1, you can
make use of the following functions:
1 Sound system display (refer to the
Supplementary Owner's Manual)
> Time and date
> Program an hourly reminder (memo),
for instance, to remind you of news
broadcasts
> Independent ventilation system.
2 Display for time and date
3 Tone symbol for active memo
function
4 Sound system function key
5 Function key for the digital clock and
onboard computer
You can display the time in either a
12- or 24-hour scale. To change setting:
1 Press the digital clock function key
2 Press the scale selection key
(12H/24H).
When you select the 12-hour mode,
AM or PM will appear on the right-hand
side of the display panel.
6 Entry and data-request keys for
sound system, digital clock and
onboard computer
Index
Data
7 Display for entry and data-request
keys.
Controls
When the ignition key is in position 0 or
removed, the time appears for eight
seconds; from ignition key position 1,
the time remains in the display.
Car care
Press the digital clock function key.
Technology Repairs
To display the time and date
Overview
79n
Online Edition for Part-No. 01 41 9 791 187 - © 12/98 BMW AG
Programming a reminder signal
To reset the time
1 Press the digital clock function key
1 Press the digital clock function key
2 Press MEMO ON/OFF to activate/de- 2 Press the SET key; the dots in the
activate the hourly signal.
display start to flash
3
Enter the correct time with the
When MEMO ON is active, a tone sym– HRS + and – MIN + input keys
bol appears in the display and an
acoustic signal is provided 15 seconds 4 Confirm your entry by pressing the
SET key.
before each full hour.
380us175
380us174
clock
380us177
80nDigital
To reset the date
1 Press the digital clock function key
2 Press the DATE key.
The dots in the display and the word
DATE start to flash.
Online Edition for Part-No. 01 41 9 791 187 - © 12/98 BMW AG
Digital clock
81n
You can preselect two different activation times for the independent ventilation system. The system switches off
automatically after 30 minutes.
Refer to page 107 for important information on using the independent ventilation system.
Technology Repairs
To enter activation times
Data
Leap years are programmed into the
system and therefore need not be taken
into account.
Independent ventilation system
Index
3 Enter the date with the – DAY+,
– MONTH + and – YEAR+ input keys
4 Confirm your entry by pressing the
SET key.
2 Enter the correct time with the
– HRS + and – MIN + input keys
3 Press the SET key. The clock starts
4 Enter the date with the – DAY+,
– MONTH + and – YEAR+ input keys
5 Press the SET key.
380us183
380us176
The dots in the display start to flash.
Car care
1 Press the digital clock function key
Controls
Overview
To enter the time and date after a
power loss
Online Edition for Part-No. 01 41 9 791 187 - © 12/98 BMW AG
82nDigital
clock
To enter the second activation
time
Activating/deactivating
switch-on times
The procedure is the same as that for
After pressing the digital-clock function
setting the first activation time, except
key, the entered activation times can be
you will press TIME 2 for your selection. activated and deactivated by pressing
the keys TIME 1 or TIME 2.
380us184
To correct the time
To enter the first activation time
Before you can enter data, the ignition
key must be at position 1 and the digital
clock must be visible in the display.
1 Press the keys as shown in the
illustration
2 Press the SET key.
To enter a different time, press the keys
in the sequence described for the first/
second activation times.
Calling up a preselected time
When active, the LED to the right of the
BC key comes on and an asterisk appears at the left next to the time.
The times remain stored until they are
replaced by subsequent entries.
> For the first activation time, press the
keys in the sequence shown in the illustration on the left
> For the second activation time, follow
the same key sequence and press
TIME 2 key for your selection.
TIME 1 flashes in the display.
3 Use the – HRS + and – MIN + keys to
enter the correct time
4 Confirm your entry by pressing the
SET key.
An asterisk appears next to the time
and the LED to the right of the BC key
comes on.
Online Edition for Part-No. 01 41 9 791 187 - © 12/98 BMW AG
Digital clock
83n
Overview
Ventilation mode
Car care
380us185
Direct control
Technology Repairs
Available only with ignition key at position 1.
Data
Press the keys (AIR ON/AIR OFF) in the
sequence shown in the illustration.
Index
When a preselected activation
time is set, the independent ventilation system is operational at outside
temperatures above 607 (166), or by
direct switch activation. It cannot be
switched on when the vehicle is moving.<
Controls
During ventilation, the LED to the right
of the BC key flashes and AIR OFF appears in the display. Pressing this key
switches off the ventilation mode and
the LED goes out.
Online Edition for Part-No. 01 41 9 791 187 - © 12/98 BMW AG
84nOnboard
computer
Standard displays (no previous
data entries required)
380us178
Page
You can use the key with the clock
symbol to
> display the time and date
> program an hourly reminder signal
(Memo), to remind you of the next
news broadcast, for instance
> operate the independent ventilation
system.
Refer to page 79 for information and
details on using the digital clock.
Two different average fuel consumption calculations
85
RANGE
Estimated cruising
range
85
Average speed
86
SPEED
The onboard computer operates at igni- 1 Sound system display (refer to the
tion key positions 1 and 2.
Supplementary Owner's Manual)
Information for safe and economical
driving can be called up for display.
1 CONSUM 2
2 Sound system function key
With previous data entries:
DISTANCEARR
The remaining
distance to the
destination with
the estimated time
of arrival
86
LIMIT
Speed warning
threshold
87
CODE
Code
88
3 Function key for digital clock and
onboard computer
4 Entry and data-request keys for
sound system, digital clock and
onboard computer
5 Display for entry and data-request
keys
In the interest of driving safety, you
should always enter data with the vehicle parked/stationary. The onboard
computer starts its calculations as soon
as the vehicle starts to move.
You can also use the remote control
unit to select information for display.
Refer to page 89.
Online Edition for Part-No. 01 41 9 791 187 - © 12/98 BMW AG
Onboard computer
Estimated cruising range
The computer can calculate average
fuel consumption rates for two different
distances at the same time (simultaneous data for an entire journey and for
a single segment of it, for instance).
Displays the estimated travel range
available with the remaining fuel. The
system calculates the cruising range
based on operating conditions and the
amount of fuel remaining in the tank.
The computer uses the average rate of
fuel consumption over the preceding
18 miles (30 kilometers) as a reference.
To start calculations for distance 2:
The procedure is the same as that for
the first distance, except you will press
CONSUM 2 for your selection.
The computer starts calculating fuel
consumption as soon as you start driving.
Data request:
Press the keys in the sequence shown
in the illustration.
A range of under 31 miles (50 kilometers) is displayed in the Check Control
in the instrument cluster.
Data
To start calculations for distance 1:
Press the keys in the sequence shown
in the diagram.
Technology Repairs
Average fuel consumption
Car care
380us180
380us189
When you refuel, the onboard computer
registers the additional fuel only when
more than 1.5 gallons (5 liters) are
added.
Controls
Please respond to this warning by refueling at once to avoid serious damage
to the engine and catalytic converter.
Overview
85n
Index
Data request:
Press the BC key and CONSUM 1 or 2.
Online Edition for Part-No. 01 41 9 791 187 - © 12/98 BMW AG
380us187
380us186
computer
380us179
86nOnboard
Average speed
Distance remaining to destination To enter the distance
To start calculations:
Press the keys in the sequence shown
in the illustration.
Data request:
Press BC and DIST.
Press the keys in the sequence shown
in the illustration on the left.
Displays the distance to the destination.
Available only if the total distance was
entered before the start of the journey.
The miles flash in the display.
Calculations begin after you start off.
Data request: Press BC and SPEED
key.
The display shows your average speed
since the last time the SET key was
pressed. Calculations are interrupted
whenever you shut down the engine.
Enter the distance with keys 0 – 9 and
confirm with the SET key.
Use the CLR key to make corrections.
Press once to delete the final digit.
Any additional mileage extending beyond the total defined in the initial entry
is indicated by a minus sign.
At speeds below 100 mph (100 km/h)
the display includes decimals.
Online Edition for Part-No. 01 41 9 791 187 - © 12/98 BMW AG
Onboard computer
To enter the speed warning
threshold
Press the keys in the sequence shown
in the illustration on the left.
Overview
87n
Use the CLR key to make corrections.
Press once to delete the final digit.
Estimated time of arrival
Speed warning threshold (Limit)
To deactivate the speed warning
Data request:
Press the keys in the sequence shown
in the illustration.
Entry of a speed warning threshold
(Limit) will be indicated by the word
LIMIT at the right in the display.
> Press BC and then press LIMIT twice.
Shows the estimated arrival time based
on current driving speed.
Alerts you when you exceed the maximum speed that you entered earlier (for
instance, posted speed limit). Triggers
an acoustic signal, LIMIT flashes on the
right-hand side of the display, and the
stored limit appears in the instrument
cluster Check Control display panel for
approximately 3 seconds.
To adopt the current speed
as the limit
Press BC, LIMIT and SET twice.
Controls
Data
Vehicle speed must drop back to at
least 3 mph (5 km/h) below the programmed speed warning threshold to
reset the system for repeat warnings.
Index
Functions only when you enter the trip
distance (DIST) before the start of the
journey.
The word LIMIT on the right side of the
display disappears, however the value
remains stored and can be reactivated
using the LIMIT key.
Car care
Enter the speed warning threshold with
the 0 – 9 keys and confirm with the SET
key.
Technology Repairs
380us181
380us188
The word MPH flashes in the display.
Online Edition for Part-No. 01 41 9 791 187 - © 12/98 BMW AG
88nOnboard
computer
To cancel with the ignition key at
position 1 or 2
Code
You can program a code into the onboard computer for supplementary protection against unauthorized attempts
to start the engine or tamper with the
vehicle. This feature provides you with
an extra measure of security extending
beyond that furnished by the vehicle immobilization system (refer to page 31).
The system prevents the engine from
starting.
380us688
380us687
A gong and the "CODE – – – –" display
prompt the code entry.
Turn the ignition key to position 1
to set
1 Use the 0 – 9 keys to enter the code
2 Press the SET key
3 Turn the ignition key to position 0 or
remove it.
1 Use the keys to enter the code
number
2 Press the SET key.
The system responds to attempts to
start the vehicle using an incorrect/no
code by preventing the engine from
starting.
The time automatically appears after
you enter the correct code and then
confirm it by pressing SET.
Three incorrect entries will cause the
alarm to sound for 30 seconds.
If you press a different key of the onboard computer before you turn the ignition key to the 0 position, or if you turn
the key to position 2, the code which
has been entered will be deleted.
A code number is used to arm the system. The code is then required for subsequent starting attempts. Therefore:
Always remember the code number.
Code numbers from "0000" to "9999"
can be entered.
With the ignition key in position 1, press
the keys in the sequence shown in the
illustration.
"CODE – – – –" will appear in the display.
You can make corrections of the entered numbers with the CLR key.
The code must be re-entered each time
the system is armed.
Online Edition for Part-No. 01 41 9 791 187 - © 12/98 BMW AG
Onboard computer
89n
Overview
If you wish to display all data:
Controls
Data request:
Briefly press the switch in the turn signal lever for each data request.
Car care
380de630
1 Press the control in the turn signal
lever until "Prog 1" appears in the
display
2 Press the SET key.
Remote control
Technology Repairs
You can display all information for the
onboard computer and digital clock
with the switch in the turn signal lever.
You can also display selected information in the Check Control in the instrument cluster following specific entries.
To enter:
Index
Data
1 Press the control in the turn signal
lever until "Prog 1" appears in the
display
2 Press the buttons on the MID in the
sequence in which you want the information to be displayed.
The program number is counted in
the display every time information is
stored
3 Press the SET key.
Online Edition for Part-No. 01 41 9 791 187 - © 12/98 BMW AG
Distance Control (PDC)*
380de619
90nPark
The PDC assists you when you are
parking. Acoustic signals warn you
of the distance to an obstacle. In addition, four ultrasonic sensors in each the
front and rear bumpers measure the
distance from the nearest object. The
monitoring range for the four front sensors and that of the two rear corner
sensors ends approx. 2 feet (60 cm)
beyond the respective bumper. The two
center sensors cover a distance of
approx. 5 feet (1.50 m).
The system starts to operate automatically about one second after you move
the selector lever to "R" when the ignition key is in position 2. It is similarly
deactivated when you move the selector lever position from the "R" position.
The indicator lamp in the button (arrow)
comes on to signal the active status.
Acoustical signals
The distance to an obstruction in the
front is indicated by a higher interval
tone, while the distance to an obstruction in the rear is indicated by a deeper
tone. As the distance between vehicle
and object decreases, the intervals between the tones become shorter. A
Manual activation/deactivation is possi- continuous tone indicates the presence
of an object less than 1 ft. (30 cm)
ble using the button in the center
away.
console (arrow) (indicator lamp comes
on/goes out). The system deactivates
The warning signal is canceled after aponce the vehicle travels approximately
prox. three seconds if the distance to
160 ft (50 m) or exceeds a speed of
the obstruction remains constant during
about 18 mph (30 km/h). It must then be this time (if you are moving parallel to a
switched on again as desired.
wall, for instance).
System malfunctions are indicated by a
short, continuous tone and a flashing
indicator lamp (indicator lamp only
when the system is activated by shifting
the transmission into "R").
Switch the system off and consult an
authorized BMW center to have the
problem corrected.
Online Edition for Part-No. 01 41 9 791 187 - © 12/98 BMW AG
Park Distance Control (PDC)*
Data
Technology Repairs
Car care
Controls
Overview
Keep the sensors clean and free
of ice or snow in order to ensure
that they continue to operate effectively.
Do not apply high-pressure spray to the
sensors for a prolonged period of time.
Maintain an adequate distance of more
than approx. 4 inches (10 cm).<
Index
The PDC does not remove the
driver's personal responsibility for
evaluating the distance between the vehicle and any obstacles. Even when
sensors are involved, there is a blind
spot in which objects cannot be detected. This applies especially in those
cases where the system approaches
the physical limits of ultrasonic measurement, as occurs with tow bars and
trailer couplings, and in the vicinity of
thin and painted objects.
Certain sources of sound, such as a
loud radio, could drown the PDC signal
tone.<
91n
Online Edition for Part-No. 01 41 9 791 187 - © 12/98 BMW AG
92nASC+T/DSC*
Indicator lamp
380de621
We recommend that you deactivate the
The indicator light in the instru- system for increased traction:
ment cluster goes out shortly af- > When rocking the vehicle or starting
ter you switch on the ignition.
off in deep snow or on loose surfaces
Refer to page 21.
> or when driving with snow chains.
Refer also to page 129.
Indicator lamp flashes:
Automatic Stability Control plus
Traction (ASC+T)/Dynamic
Stability Control (DSC)*
These systems help provide additional
dynamic stability, particularly when accelerating and cornering.
The DSC system enhances the benefits
of the ASC+T. In addition to optimizing
vehicle stability and traction when accelerating or starting from a standstill,
another benefit is realized in cornering
stability. Of course, this is subject to the
limits imposed by the laws of physics.
The system activates automatically
each time you start the engine.
The system is actively regulating drive
torque in response to monitored vehicle
operating conditions.
If the indicator lamp fails to go out after
the engine is started, or if it comes on
during normal driving:
If the system has not been deactivated,
there is a system malfunction. The vehicle remains operational, but without
ASC+T/DSC. Consult your authorized
BMW center for repair.
To deactivate the system
Press the button. The indicator lamp
will come on.
Depending on equipment options, the
button is marked with ASC or DSC.
To reactivate the system
Press the button again; the indicator
lamp goes out.
The laws of physics cannot be repealed, even with ASC+T/DSC.
Any consequences arising from traction
loss due to excessive vehicle speed remain the responsibility of the driver. For
this reason, do not take risks, using the
additional safety margin provided by the
system as an excuse.<
For additional details concerning
ASC+T/DSC, please refer to the chapter describing "Advanced technology"
on page 185.
With deactivated ASC+T/DSC you are
driving with conventional, unregulated
torque transfer.
Online Edition for Part-No. 01 41 9 791 187 - © 12/98 BMW AG
Electronic Damper Control (EDC)*
93n
Overview
Sport program
Controls
The Sport program should be invoked
when you wish to have strictly performance-oriented tuning of the running
gear under all operating conditions.
To switch to automatic adaptation:
Press the button again; the indicator
lamp goes out.
Car care
380de620
With the ignition key in position 2, press
the EDC button (arrow). The indicator
lamp next to the S comes on.
Technology Repairs
The system automatically ensures
damping of the running gear on demand and thus increases comfort and
driving safety.
Automatic adaptation
Index
Data
Automatic adaptation is activated after
every engine start. It can be maintained
throughout the entire vehicle speed
range and for all load conditions. If operating parameters (road-surface quality, driving conditions such as steering,
braking, others) change, the damping
system adapts automatically to the new
factors in fractions of a second.
Online Edition for Part-No. 01 41 9 791 187 - © 12/98 BMW AG
94nTire
Pressure Control (RDC)*
Loss of tire pressure
RDC monitors the tire pressures at all
four wheels, even when the vehicle is
moving. The system provides an alert
whenever the inflation pressure drops
significantly below the specified pressure in one or more tires.
If, after a certain period of time, the air
pressure has gone down significantly
(which is normal for any tire), the message "CHECK TIRE PRESSURE" appears in the Check Control.
380de658
The concept
In order for the RDC to "learn" the correct tire inflation pressure, check the inflation pressure in all tires. Refer to the
table of "Tire inflation pressures" on
page 26 and make corrections if necesActivate the system
sary. Then activate the system.
The Check Control will inform you if the 1 Turn the ignition key to position 2
(do not start the engine)
tire pressure is not correct.
2 Press and hold the button (arrow) until the message "SET TIRE PRESSURE" appears in the Check Control
3 After you have driven for a few minutes, the RDC will import the current
inflation pressure in the tires as the
target values which the system will
monitor.
This alerts you that you should have the
tires inflated to the specified pressures
as soon as possible.
If you are prompted to check the
tire pressure shortly after a correction has been made, this indicates
that the corrected values were not accurate. Please check the inflation pressure again and make corrections according to the inflation pressure table.<
You will only have to repeat this procedure if the tire inflation pressure must
be corrected. Otherwise, the RDC functions automatically when the ignition
key is in position 2, and thus operates
whenever the vehicle is driven.
Online Edition for Part-No. 01 41 9 791 187 - © 12/98 BMW AG
Tire Pressure Control (RDC)*
During the period of the malfunction,
the message "TIRE CONTROL INACTIVE" appears in the Check Control.
You will also see the same message
> in the event of a system fault
> if a wheel is mounted without the
RDC electronics
> if, in addition to the spare tire, additional wheels with RDC electronics
are on board.
Please contact your authorized BMW
center for additional information.
Overview
Controls
Under certain local conditions, the RDC
may malfunction for brief periods because of interference from outside systems or electronic devices which have
the same radio frequency.
Car care
The spare tire which is available in
your vehicle as standard equipment is equipped with the electronics
required for RDC and, following activation of the system, is also monitored after it is mounted.<
Have the tires changed by your
authorized BMW center.
Your authorized BMW center has been
trained to work with the RDC system
and is equipped with the necessary
special tools to do so.<
System interference
Technology Repairs
If this occurs, reduce vehicle speed immediately and stop the vehicle. Avoid
hard brake applications. Do not oversteer. Replace the wheel and flat tire.
The RDC cannot alert you to severe and sudden tire damage
caused by external factors.<
Data
If there is a tire failure with a loss of air
pressure, the message "TIRE DEFECT"
appears in the Check Control. In addition, a gong sounds.
Index
Flat tire
95n
Online Edition for Part-No. 01 41 9 791 187 - © 12/98 BMW AG
96nParking
lamps/Low beams
Instrument panel lighting
You can adjust the "Follow-MeHome" function: The low beams
will then remain on for a brief period after you park the vehicle if you actuate
the headlamp flasher.<
Side lamps (side marker lamps)
With the switch in this position,
vehicle lighting is illuminated on
both sides. For lighting on one
side while parking, refer to page 97.
Low beams/Xenon lamps*
For additional details, refer to page 190.
"LIGHTS ON" warning
In ignition key position 0, a message
appears in the Check Control after the
driver's door is opened if the headlamps have not been switched off.
380us036
380de034
Xenon lamps*
Turn the rotary dial to adjust the illumination intensity.
Daytime-driving light switch*
The headlamps are automatically
switched on for daylight driving at ignition key position 2.
When you switch the ignition off
with the low beam headlamps
on, only the side lamps (side
marker lamps) will remain on.
When the low beams are switched on,
the interior door handles are lighted.
The brightness is controlled by the instrument panel lighting.
Online Edition for Part-No. 01 41 9 791 187 - © 12/98 BMW AG
Interior lamps
97n
Parking lamp, left or right*
With the ignition key in position 0, engage the lever in the appropriate turnsignal position.
Switching interior lamps on
and off
Press the button (arrow).
If you want the interior lamps to remain
off continuously, maintain pressure on
the button for approximately 3 seconds.
Press the button briefly to revert to normal operation.
The orientation lamps on the right and
left of the button for interior lamps
come on when the side lamps are
switched on.
Controls
Car care
380us640
If the high beam is switched on, the fog
lamps go out.
The interior lamps operate automatically.
Technology Repairs
3 Parking lamp
(not released at this time)
A green indicator light appears in
the instrument cluster to indicate
that the front fog lamps are on.
Data
2 Headlamp flasher
(blue indicator lamp)
Front fog lamps
Index
1 High beam
(blue indicator lamp)
380us037
380de629
Overview
High beams/Parking lamps Fog lamps
Online Edition for Part-No. 01 41 9 791 187 - © 12/98 BMW AG
98nInterior
lamps
Reading lamps
Footwell lamps
380us641
The footwell lamps operate in the same
way as the interior lamps.
The reading lamps are located in the
front near the interior lamp and in the
rear. They can be switched on and off
with the switch adjacent to each lamp.
In order to conserve the battery,
all of the lamps in the vehicle
are switched off automatically approx.
15 minutes after the ignition key is
turned to position 0.<
Online Edition for Part-No. 01 41 9 791 187 - © 12/98 BMW AG
Index
Data
Technology Repairs
Car care
Controls
Overview
99n
Online Edition for Part-No. 01 41 9 791 187 - © 12/98 BMW AG
climate control
380us632
100nAutomatic
Online Edition for Part-No. 01 41 9 791 187 - © 12/98 BMW AG
Automatic climate control
1 Air flow directed against windshield
and door windows
11 Automatic air distribution –
right-hand side 102
2 Air flow toward the upper body
The rotary dials allow infinitely-variable regulation of the air supply,
changes in the air-flow direction,
and temperature regulation.
(Change air-flow direction in the
rear passenger area with the levers
in the center of the vent). In the
closed position, air flows out at the
upper center of the instrument
panel only 104
12 Air supply – right-hand side 104
Controls
13 Recirculated-air mode/Automatic
recirculated-air control (AUC) 103
14 Air conditioner 103
15 Rear window defroster 70, 103
Car care
16 Defrosting the windows and remove
condensation 103
17 Air grill for interior temperature sensor - please keep clear and unobstructed
18 Air supply – left-hand side 104
Technology Repairs
3 Front footwell ventilation
There are corresponding air vents in
the rear footwell as well
Overview
101n
4 Automatic air distribution –
left-hand side 102
5 Individual air distribution –
left-hand side 102
6 Temperature control –
left-hand side 103
Data
7 Temperature and air flow display,
left- and right-hand
sides 103, 104
8 Temperature control –
right-hand side 103
9 Residual heat mode 104
Index
10 Individual air distribution –
right-hand side 102
Online Edition for Part-No. 01 41 9 791 187 - © 12/98 BMW AG
102nAutomatic
climate control
Tips for pleasant driving
Automatic air distribution
Use the automatic system, i.e., press
AUTO button 4. Select an interior temperature that is comfortable for you we recommend 707 (226) as a comfortable setting. When the outside temperature is above 427 (56), you can
also use the air conditioning system 14.
This will dry the air and prevent window
fogging, for example if people are wearing damp clothes in the vehicle. Set the
outlets 2 so that the air flows past you
and does not flow directly at you. Set
the rotary dial between the air outlets 2
for the upper body to a medium position, since air that is somewhat cooler
promotes driving without fatigue.
The AUTO program assumes the adjustment of
the air distribution and the air supply for
you and in addition adapts the temperature to external influences (summer,
winter) to meet preferences you can
specify. This program maintains a comfortable in-car climate regardless of the
season. Select an interior temperature
that is comfortable for you - we recommend 707 (226) as a comfortable
setting.
The temperature setting and the word
"AUTO" for the air flow appear in the
display 7 (refer to the overview on
page 100). Open the ventilation outlet
for the upper body area. Switch on the
air conditioner in warm weather. The
maximum cooling capacity is achieved
when you set the rotary dial 3 (refer to
page 104) to cold.
The following description will guide you
through additional individual settings.
You can make the settings of your
vehicle in such a manner that,
when you unlock the car with your personalized remote control, your own per- Individual air distribution
You can cancel the AUTO
sonalized setting of the automatic cliprogram by selecting spemate control is initiated.<
cific distribution patterns to
suit your own individual requirements. You can direct
air to flow onto the windows
, toward
the upper body
, and into the footwell
.
To defrost windshield and door
windows
This program quickly removes
ice and condensation from the
windshield and the side windows.
Air conditioner
The air is cooled and dehumidified and - depending on the temperature setting - warmed again when
the air conditioner system is switched
on.
Depending on the weather, the windshield may fog over briefly when the engine is started.
At outside temperatures below approx.
427 (56), switch off the air conditioner. This will help to prevent the windows from fogging up.
If the windows fog over immediately after the air conditioner is switched off,
switch it back on.
Condensation forms in the air conditioner system during operation,
which then exits under the vehicle.
Traces of condensed water of this kind
are thus normal.<
Online Edition for Part-No. 01 41 9 791 187 - © 12/98 BMW AG
Automatic climate control
If you have a multi-function steering
wheel with the AUC button (refer to
page 23), you can also switch between
"OFF" and AUC from there.
You can make individual
temperature settings on the
driver's side and the front passenger
side. Your settings will be shown in the
display 7. The displayed temperatures
are reference values for the interior
temperature. We recommend 707
(226) as a comfortable setting,
whether the air conditioner is operating
or not. When you start the vehicle, the
system ensures that the selected temperature is achieved as quickly as possible. It then maintains this temperature, regardless of the season.
When you press "–" during operation at
minimum blower speed all displays are
canceled: The fan, heating and air conditioner are switched off. The outside
air supply is closed. By pressing any
button of the automatic climate control
(except the "REST" button 9), you can
switch the system back on.
You can set uncontrolled heater
output at up to 907 (326). Full
cooling output is available from the air
conditioner down to 607 (166).<
Controls
Temperature
In the "AUTO" program, the
air flow is controlled automatically. AUTO will appear in the display, refer to the overview on page 100.
Use "+" and "–" to vary the air flow.
When your setting is displayed by bars,
the automatic air flow is switched off.
Automatic air distribution maintains its
setting. You can reactivate the automatic air flow by pressing the "AUTO"
button.
Car care
> Indicator lamps off: Fresh air flows
into the vehicle
> Left-hand indicator lamp on – AUC
mode: The system detects pollutants
in the outside air and responds by
deactivating the outside air flow when
required. The system then recirculates the air currently within the vehicle
> Right-hand indicator lamp on: The
flow of external air into the vehicle is
permanently blocked. The system
then recirculates the air currently
within the vehicle.
is activated, the indicator lamp
comes on. The rear window defroster
switches off automatically.
Data
You can respond to unpleasant
external odors by temporarily
stopping the flow of outside air. The
system then recirculates the air currently within the vehicle. Press the button repeatedly to run through the following control sequence:
Air supply
Technology Repairs
Automatic recirculated-air control Rear window defroster
(AUC)
When the rear window defroster
Overview
103n
Index
If the windows fog over in the recirculated-air mode, switch this
mode off and increase the air supply as
required.<
Online Edition for Part-No. 01 41 9 791 187 - © 12/98 BMW AG
104nAutomatic
climate control
Residual heat mode
Rotary dial 3 allows you to temper the
air flow from these outlets by adding
heat or cooling as desired:
The heat which is stored in
the engine is utilized for
heating of the interior when the engine
has been switched off (while waiting at
a railroad crossing, for instance).
This function may be activated
when the outside temperature is
below approx. 597 (156), the engine
is at operating temperature, and the
battery is adequately charged.<
380de051
In ignition key position 1, you can alter
the settings of the automatic climate
control. In ignition key position 0, the
system automatically directs heated air
to the windshield, side windows and
footwells.
> Turn toward blue – colder
> Turn toward red – warmer
Draft-free ventilation
You can adjust the vent outlets for the
upper body area for individual selection
of air-flow rates and directions:
To adjust the rear compartment vents:
Use the rotary dial on the left to close or
open the vent for any desired air flow.
You can adjust the temperature with the
right rotary dial in the same manner as
the adjustment for the front ventilation
outlets.
Use the levers at the centers of the vent
outlets to control the direction of the
emerging air.
You can open and close the ventilation
outlets with infinitely-variable adjustments and direct them up or down with
the rotary dials 1. In the closed position,
air exits only at the upper center of the
instrument panel. You can use rotary dials 2 to adjust the flow direction from
side to side.
Set the outlets so that the air flows past
you and is not directed straight at you.
Online Edition for Part-No. 01 41 9 791 187 - © 12/98 BMW AG
3 Air supply
Data
When you press "–" in the lowest
blower speed, all of the displays are
canceled: This setting deactivates the
blower and shuts off the air supply. You
can then switch the rear air conditioner
back on by pressing the button again.
The air flow in the rear will vary according to the settings selected at the front.
Index
3 Air supply/
Switching the system on
Overview
2 Temperature/
Switching the system on
Controls
1 Display for temperature and air
supply
The rear passengers can adjust the
temperature for the ventilation outlets
which are positioned above this as desired. The figures in the display provide
a general indication of interior temperature. We recommend 707 (226) as a
comfortable setting, whether the air
conditioner is operating or not. When
you start the vehicle, the system ensures that the selected temperature is
achieved as quickly as possible. It then
maintains this temperature, regardless
of the season.
380de636
The microfilter removes dust and pollen
from the incoming air. The activatedcharcoal filter provides additional protection by filtering gaseous pollutants
from the outside air. Your BMW center
replaces the filter assemblies as a standard part of your scheduled maintenance. A substantial reduction in air
flow indicates that the filter needs to be
replaced early.
2 Temperature
Car care
Microfilter, activated-charcoal
filter
105n
Technology Repairs
Automatic climate control Rear passenger-area air conditioning*
Online Edition for Part-No. 01 41 9 791 187 - © 12/98 BMW AG
106nSeat
heating*
Steering wheel heating*
Rear seat heating*
The seat cushion and backrest can be
heated with ignition key in position 2.
You can call up different heating modes
by repeatedly pressing the keys.
The highest heating mode is on when
the three indicator lamps are lit; one
lamp is lit for lowest heating. Temperature regulation in each mode is with a
thermostat.
You can also switch the higher heating
modes off directly:
Press the key and hold it slightly longer.
380de200
380de618
The switches are located at the rear of
the center console, beneath the air
vents.
To activate and cancel the steering
wheel heater, press button (arrow) with
the ignition key in position 2.
The lamp within the button lights up
when the steering wheel heater is in operation.
If you have a multi-function steering
wheel without steering wheel heating,
the button for the recirculated-air mode
is in this location (refer to page 23).
Online Edition for Part-No. 01 41 9 791 187 - © 12/98 BMW AG
Roller sun blind*
Independent ventilation system
107n
Use the strap to extract the blinds, then
suspend them in the attachment provided.
Overview
Controls
Car care
Technology Repairs
Roller sun blinds for the rear side
windows*
You can preselect the activation time
for a 30-minute ventilation cycle, or you
can switch the system on and off manually with the ignition key at position 1.
Since the system uses a substantial
amount of electrical current, you should
refrain from activating it twice in succession without allowing the battery to
be recharged in normal operation between use.
When a preselected activation time is
set, the independent ventilation system
is operational at outside temperatures
above 607 (166), or by direct switch
activation. It cannot be switched on
when the vehicle is moving.
The air emerges via the vent outlets for
the upper body. Therefore, the vents
must be open for the system to operate.
Data
To actuate, press the button briefly after
ignition key position 1.
The independent ventilation system is
operated via the Multi-Information Display (MID) or the onboard computer.
Refer to the separate Owner's Manual.
Index
380de624
This system uses the automatic climate
control system blower to ventilate the
passenger compartment and reduce interior temperatures while the vehicle is
parked.
Online Edition for Part-No. 01 41 9 791 187 - © 12/98 BMW AG
108nIntegrated
Universal Remote Control*
The concept
The Integrated Universal Remote Control replaces up to three hand-held
transmitters of different devices such as
garage-door openers, alarm systems,
or door locking systems. The Integrated
Universal Remote Control recognizes
and "learns" the transmitted signal of
each of the original hand-held transmitters.
The signal of an original hand-held
transmitter can be programmed on one
of the three channel keys. Following
that, each of the devices can be actuated with the appropriately-programmed channel key. Transmission of the
signal is signaled by the indicator lamp.
If the vehicle is sold, the memory of the
channel keys should be cleared as described on page 110.
During programming and before
every remote actuation of a programmed device by the Integrated Universal Remote Control, check to be
sure that there are no persons, animals
or objects within the actuation range of
the device in order to prevent possible
injuries or damage. Also, comply with
the safety precautions of the original
hand-held transmitter.<
To Canadian residents:
During programming, your handheld transmitter may automatically stop
transmitting after two seconds, which
may not be long enough to program the
BMW Universal Transmitter. If you are
programming from one of these handheld transmitters, the Universal Transmitter's light may begin to flash in a series of double-blinks. If this occurs,
continue to hold the button on the Universal Transmitter while you reactivate
your hand-held transmitter. You may
have to repeat this function several
times while programming.<
Before programming, read the
"User information" section on
page 110.<
Original hand-held transmitter
If this symbol is present on the
packaging or in the instructions
of the original hand-held transmitter, it may be assumed that this
hand-held transmitter is compatible
with the Integrated Universal Remote
Control.
Checking for the conversion code
To determine whether the original
hand-held transmitter is provided with a
conversion-code system, you may either read the instructions for the original
hand-held transmitter or program a
channel key as described on page 109
(left-hand column under "Programming").
Then press and hold the programmed
channel key of the Integrated Universal
Remote Control. If the indicator lamp of
the Integrated Universal Remote Control flashes for two seconds and then
comes on steadily, the original handheld transmitter is provided with a conversion-code system. With a conversion-code system, program the channel
keys as described on page 109 (righthand column under "Programming a
hand-held transmitter with conversion
code").
If you have additional questions,
please consult your BMW center
or call 1-800-355-3515.<
Online Edition for Part-No. 01 41 9 791 187 - © 12/98 BMW AG
1 Channel keys
2 Indicator lamp
3 Receiver for programming
Read and comply with the safety
precautions on page 108.<
1 Ignition key position 2
2 For initial use: Press and hold both
outside keys 1 until the indicator lamp
2 flashes, and then release them. The
three channel keys are cleared
3 Hold the original hand-held transmitter toward the receiver 3 a maximum
of 2 inches (5 cm) away
4 Press the transmission key of the
original hand-held transmitters
(arrow 2) and the desired channel key
of the Integrated Universal Remote
Control (arrow 1) simultaneously. Release both keys as soon as the indicator lamp flashes rapidly
5 To program other original hand-held
transmitters, repeat steps 3 and 4.
A second person facilitates programming of the Integrated Universal Remote Control.<
1 Program the Integrated Universal Remote Control as described previously
under "Programming"
2 Press and hold the programming key
on the receiver of the device for approximately two seconds until the
programming light on the device
The corresponding channel key is now
comes on
programmed with the signal of the orig3 Press the desired channel key of the
inal hand-held transmitter.
Integrated Universal Remote Control
three times.
If you have additional questions,
please consult your BMW center.<
Online Edition for Part-No. 01 41 9 791 187 - © 12/98 BMW AG
Controls
Car care
Programming
When programming the Integrated Universal Remote Control, consult the instructions for the specific device. For
using the Integrated Universal Remote
Control with a conversion-code system,
note the following supplemental programming instructions:
Technology Repairs
380us202
380de668
Read and comply with the safety
precautions on page 108.<
Data
Programming a hand-held
transmitter with conversion code
Overview
109n
Index
Integrated Universal Remote Control*
Universal Remote Control*
Clearing the channel keys
Read and comply with the safety
precautions on page 108.<
The memory of individual channel keys
cannot be deleted. However, the three
channel keys can be cleared together
as follows:
> Press and hold both outside keys of
the Integrated Universal Remote
Control until the indicator lamp
flashes, and then release them.
All of the channel keys are cleared.
Glove compartment
User information
Do not use this BMW Universal Transmitter with any garage door opener that
lacks safety "stop" and "reverse" features as required by federal safety standards (this includes any garage door
opener model manufactured before
April 1, 1982).
This device complies with Section 15 of
the FCC Rules. Operation is subject to
the following two conditions: As defined
in the regulations, this device must not
emit harmful interference, and must be
shielded against interference from external sources to prevent unauthorized
or inadvertent activation.
380de060
110nIntegrated
To open
Pull the handle down. The lighting will
be switched on.
It is also possible to swivel out the
glove compartment after opening for
improved driver access.
To close
Push the lid up after repositioning.
Online Edition for Part-No. 01 41 9 791 187 - © 12/98 BMW AG
Located on the left-hand side of the
glove compartment.
Rear armrest
Pull the strap to fold down the armrest.
Data
To open the storage compartment: Lift
the button (arrow).
Index
To prevent injury in the event of an
accident, close the glove compartment immediately after use.<
Be sure that the flashlight is
switched off when it is inserted
into its holder. Failure to comply with
this precaution could lead to overcharging and damage.<
380de065
For example, if you turn over only
your door and ignition keys for valet parking (refer to page 30), access to
the glove compartment is not possible.<
Features integral overload-protection,
so it can be left in its holder continuously.
Controls
Rechargeable flashlight
Lock with a master key or manually
press the small lever behind the glove
compartment latch to the right.
Car care
To lock
111n
Overview
Center armrests
Technology Repairs
Glove compartment
Online Edition for Part-No. 01 41 9 791 187 - © 12/98 BMW AG
112nCenter
armrests
2 Actuation of the power rear window
blind
3 Front passenger side shoulder
support
5 Power adjustment, front passenger's
seat
6 Seat memory for the front passenger
380de223
380de201
4 Tandem telephone
Multi-function armrest, rear*
Front armrest
In order to operate certain functions
from the rear seat, corresponding controls are integrated into the center armrest.
Press the button at the front for front/
rear adjustment (arrow 1).
Fold out the armrest and open the
cover. Refer to "Rear armrest."
Press the side-mounted buttons for
access to the storage compartments
(arrows 2).
The illustration shows the maximum
possible number of controls, corresponding to a full range of optional
equipment. Refer to the descriptions of
the individual accessories for additional details on the equipment options.
1 Multi-Information Display for operating the radio and onboard computer
(with limited function range)
Online Edition for Part-No. 01 41 9 791 187 - © 12/98 BMW AG
Cup holder
Cellular phones*
113n
To open, press against the upper recess, apply pressure and slide back to
close.
On vehicles with a telephone hookup*,
the handsfree speaker is positioned in
the headliner.
For further information on the cellular
phone, refer to the separate Owner's
Manual.
Car care
You will find additional storage compartments in all of the doors as well as
on the backrests of the front seats.
Handsfree system
Data
A rotating coin holder is located on the
right under the radio cover.
There are holders for two beverage
containers in a tray in the center console as well as in the face of the rear
seat bench near the center seat position.
Index
When a cellular phone is installed, a
small storage compartment is provided
on each side of the phone. Press side
button to open.
380de669
Storage compartment on center console between the front seats:
To open, reach into the recess at the
front and pull upward.
380de623
This storage area can be ordered with
an optional CD or cassette holder.
Controls
Overview
Front storage compartment on slanted
surface of center console:
To open, press the recess at the top,
press to close.
Technology Repairs
Additional storage areas
Online Edition for Part-No. 01 41 9 791 187 - © 12/98 BMW AG
380de063
380de062
380de061
114nAshtray
To open
To empty
Rear
Press gently on the recess (arrow).
Press button (arrow 1): You can now
pull the ashtray upward for removal.
To open: Press the recess at the top.
To extinguish a cigarette, tap off the ash
and gently press the tip into the funnel.
To empty: Pull out the unit.
Online Edition for Part-No. 01 41 9 791 187 - © 12/98 BMW AG
You can detach the footrests to place
them in any desired position within the
footwell.
Controls
Hold or touch the hot cigarette
lighter by the knob only. Holding
or touching it in other areas could result
in burns.
The cigarette lighter remains operational when the ignition key has been
removed. For this reason, children
should never be left in the car unattended.<
115n
Overview
Rear foot rests*
Car care
380de062
Cigarette lighter*
Push the lighter in (arrow 2). Remove as
soon as the lighter jumps back out.
Technology Repairs
Cigarette lighter for rear
passengers
At the rear of the center console.
Cigarette lighter socket
Index
Data
Suitable for attaching power supplies
to hand-held lamps, car vacuum cleaners, etc., up to a rating of approximately
200 watts at 12 volts. Avoid damaging
the socket due to inserting plugs of different shapes or sizes.
Online Edition for Part-No. 01 41 9 791 187 - © 12/98 BMW AG
116nSki
bag*
Loading
Fold the center armrest completely out.
Detach the Velcroâ strip holding the
center cover in position and place it on
the armrest.
Lower the center armrest
Gently raise the front of the armrest and
press the two levers inward (arrows):
The armrest drops down against the
surface of the seat.
380de068
The supplementary length provided by
the ski sacks in combination with the
space in the luggage compartment
makes it possible to transport skis of up
to 6.8 ft (2.10 m) in length. Because of
the tapered shape of the ski bag, it can
only accommodate two pairs of skis
with a length of 6.8 feet (2.10 m).
380de067
Designed for safe, convenient transport of 3 to 4 pairs of skis.
Press the release button (arrow 1) to
unlock the cover panel in the luggage
compartment.
Press the detent levers (arrows 2) inward and fold the cover to the front.
Extend the ski bag between the front
seats. The zipper provides convenient
access to the inside of the bag, and can
also be left open to promote drying.
Before loading the ski bag, the
center armrest must be completely lowered.<
Online Edition for Part-No. 01 41 9 791 187 - © 12/98 BMW AG
Ski bag*
Controls
Car care
Technology Repairs
To store the ski bag, perform the above
steps in reverse sequence. The center
armrest automatically returns to its original position when you fold it back.
An unsecured ski bag could lead
to loss of vehicle control and in
case of an accident to personal injury.<
Data
Please ensure that the skis are clean
before loading them into the bag. Take
care to avoid damage from sharp
edges.
Secure the bag's contents by tightening
down the strap at the buckle.
Index
From the inside of the luggage compartment, use the magnetic retainers to
attach the cover panel to the underside
of the rear parcel tray.
380de070
380de069
Overview
117n
Online Edition for Part-No. 01 41 9 791 187 - © 12/98 BMW AG
loading
380de613
118nCargo
Securing the load
> Secure smaller, light pieces with the
retaining straps or with a luggage
compartment net or elastic straps (refer to page 39)
> For large, heavy pieces, see your
BMW center for load-securing devices*. Lashing eyes are provided at
the corners of the luggage compartment for attaching these load-securing devices (refer to the illustration).
> Comply with the information enclosed with the load-securing devices.
Roof-mounted luggage rack*
Always position and secure the
load correctly, otherwise it can endanger the passengers in the event of
braking, swerving or in a crash.
Do not exceed the permissible gross
weight and the permissible axle loads
(refer to page 196). If you do so, the
operating safety of the vehicle is no
longer ensured, and you are in violation
of the law.
Do not stow heavy or hard objects in
the passenger compartment unless
they are properly secured. Improperly
secured objects would be thrown
around during braking and evasive maneuvers and endanger the occupants.<
A special luggage system is available as
an option for your BMW. Please comply
with the precautions included with the
installation instructions.
Because roof racks raise the center of
gravity of the car when loaded, they exercise a major effect on its handling and
steering response.
You should therefore always remember
not to exceed the approved roof weight,
the approved gross vehicle weight or
the axle weights when loading the rack.
You will find the specifications under
"Technical Data" on page 196.
Make sure that the load is not too
heavy, and attempt to distribute it
evenly. Always load the heaviest pieces
first (on the bottom). Make sure there is
sufficient space to raise the sliding/tilt
sunroof.
Online Edition for Part-No. 01 41 9 791 187 - © 12/98 BMW AG
Roof-mounted luggage rack*
119n
Overview
Secure the roof luggage correctly and
tightly to prevent it from shifting or being lost during driving (danger to following traffic).
Controls
Drive smoothly: Avoid sudden acceleration and braking maneuvers, corner
gently.
Index
Data
Technology Repairs
Car care
The roof load increases aerodynamic
resistance: Increased fuel consumption
and additional stresses on the vehicle's
body result from this.
Online Edition for Part-No. 01 41 9 791 187 - © 12/98 BMW AG
120n
Online Edition for Part-No. 01 41 9 791 187 - © 12/98 BMW AG
Laws and regulations:
Technical modifications to the
vehicle 157
OBD connector 158
Operation, care
and maintenance
Controls
Car care
Controls and features
Owner service procedures
Advanced technology
Technology Repairs
Care and maintenance:
The BMW Maintenance
System 149
Caring for your car 150
Airbags 156
Vehicle storage 156
Overview
Technical data
Data
Wheels and tires:
Tire inflation pressure 132
Tire condition 132
Tire replacement 133
Tire rotation 133
Wheel and tire
combinations 134
Winter tires 135
Snow chains 135
Approved wheel and tire
specifications 136
Under the hood:
Hood 137
Engine compartment 138
Washer fluids 142
Washer nozzles 142
Engine oil 143
Coolant 146
Brake fluid 147
Oil for power steering/
Level control system 148
Vehicle Identification
Number 148
Index
Index
Special operating instructions:
Break-in procedure 122
Driving notes 123
Catalytic converter 124
Antilock Brake System
(ABS) 125
Disc brakes 126
Brake system 128
Winter operation 128
Power steering 130
Level control system 130
Cellular phone 131
Radio reception 131
Overview
121n
Online Edition for Part-No. 01 41 9 791 187 - © 12/98 BMW AG
122nBreak-in
procedure
To ensure that your vehicle provides
maximum economy throughout a long
service life, we request that you comply
with the following:
Engine and differential
Up to 1,200 miles (2,000 km):
Drive at varying engine speeds and
road speeds, but do not exceed
4500 rpm and/or 105 mph (170 km/h)
during this initial period. Comply with
the legal speed limit at all times.
Refrain from using full throttle and avoid
pressing the accelerator beyond the
kickdown point.
Once 1,200 miles (2,000 km) have
elapsed, engine speeds and road
speeds can gradually be increased.
When the vehicle is operated on
wet or slushy roads, a wedge of
water may form between the tire and
the road surface. This phenomenon is
referred to as aquaplaning, or hydroplaning, and can lead to partial or complete loss of traction, vehicle control
and braking effectiveness. Reduce your
speed on wet roads.<
The brake lamps do not come on
when the parking brake is applied.
Vacuum for the brake system servo unit
on your BMW is available only when the
engine is running. When you move the
car with the engine shut off – when towing, for instance – substantially higher
levels of pedal force will be required to
brake the vehicle.<
Brake system
Approximately 300 miles (500 km) must
elapse before the brake pads and rotors
achieve the optimal pad-surface and
wear patterns required for trouble-free
operation and long service life later on.
To break-in the separate parking brake
drums, apply the parking brake lightly
when coasting to a standstill (at a traffic
You should also comply with these
signal, for instance), provided that trafbreak-in procedures if the engine or diffic conditions allow you to do so.
ferential is replaced later in the course
To avoid corrosion, repeat this proceof the vehicle service life.
dure from time to time.
Tires
Due to technical factors associated with
their manufacture, tires do not achieve
their full traction potential until an initial
break-in period has elapsed.
Thus drive with extra care during the
initial 200 miles (300 km).
Online Edition for Part-No. 01 41 9 791 187 - © 12/98 BMW AG
Driving notes
Data
Technology Repairs
Car care
Controls
Overview
Rear parcel tray:
Do not use the rear parcel tray to store
heavy or bulky objects. They could
pose a danger to the occupants during
braking maneuvers.
Clothes hooks:
Hang items of clothing from the hooks
so that they will not obstruct the driver's
vision. In order to avoid personal injuries during braking maneuvers, do not
hang heavy objects on the hooks.<
Index
Brakes:
Do not drive with your foot resting
on the brake pedal. Even light but consistent pedal pressure can lead to high
temperatures, brake wear and possibly
even brake failure.
Aquaplaning:
When driving on wet or slushy roads,
reduce road speed. If you do not, a
wedge of water can form between tires
and road surface. This phenomenon is
referred to as aquaplaning or hydroplaning. It is characterized by a partial
or complete loss of contact between
the tires and the road surface. The ultimate results are loss of steering and
braking control.
Driving through water:
Do not drive through water more than
1 foot (30 cm) deep. In water of this
depth, drive only at walking speed, otherwise damage to the engine, the electrical system and the transmission can
occur.
123n
Online Edition for Part-No. 01 41 9 791 187 - © 12/98 BMW AG
124nCatalytic
converter
The catalytic converter reduces harmful
exhaust emissions, and is designed for
use with unleaded fuel only.
Even minute quantities of lead would be
enough to permanently damage both
the catalytic converter and the system's
oxygen sensor.
To ensure efficient, trouble-free engine
operation and avoid potential damage:
> Be sure to comply with the scheduled
maintenance requirements
> Fill the fuel tank well before it is
empty
> If you have problems starting the engine, use jumper cables (you cannot
tow-start the vehicle with an automatic transmission)
> Avoid other situations in which the
fuel is not burned, or burns incompletely, such as engaging the starter
frequently or for extended periods, or
repeated start attempts in which the
engine does not start (stopping and
restarting an engine which is running
properly does not present a problem).
Never let the engine run with any of
the spark plug cables disconnected.
Be sure to comply with the instructions above to prevent unburned fuel from reaching the catalytic
converter. Otherwise there is danger of
overheating and damage to the catalytic converter.
Extreme temperatures occur at the
catalytic converter on this and every
catalyst-equipped vehicle. Heat shields
are installed adjacent to some sections
of the exhaust system. Never remove
these shields; do not apply undercoating to their surfaces. When driving,
standing at idle, and parking the vehicle, take care to avoid contact between
the exhaust system and flammable materials (grass, hay, leaves, etc.). Such
contact could lead to a fire, resulting in
personal injury and property damage.<
Online Edition for Part-No. 01 41 9 791 187 - © 12/98 BMW AG
Antilock Brake System (ABS)
Information for your safety
Not even ABS can suspend the laws of
physics. ABS alone cannot prevent accidents when the brakes are applied
without an adequate safety interval between vehicles, if the car is driven at an
excessive rate of speed in curves, or if
aquaplaning occurs. Responsibility for
these types of situations remains in the
hands (and at the feet) of the driver. You
should never allow the added safety of
ABS to lull you into a false sense of security, or mislead you into taking increased risks that could affect your own
safety and that of others.
Do not make any modifications to
the ABS system.
Service procedures on ABS are to be
performed by authorized technicians
only.<
Online Edition for Part-No. 01 41 9 791 187 - © 12/98 BMW AG
Overview
Controls
In driving conditions where there is a
loose upper surface together with a
subsurface which provides better traction (on gravel or snow, for instance), or
with snow chains, the braking distance
may also be longer than when the
wheels are locked. However, ABS continues to provide enhanced vehicle stability and steering response under
these conditions.
Car care
The system becomes operative once
the vehicle exceeds a speed of approx.
6 mph (10 km/h). The ABS is deactivated
whenever the vehicle's speed drops
back below approx. 4 mph (6 km/h). This
means that the wheels can lock in the final phase of a panic stop – a factor of no
significance in actual use.
If you are in a situation which requires
full braking, you will exploit the full beneThe system can achieve the shortest
braking distances possible under most fits of the ABS system if you apply maximum brake pressure ("panic stop").
conditions (on straights and in curves,
on asphalt, ice, wet road surfaces, etc.). Since the vehicle maintains steering responsiveness, you can avoid possible
ABS is designed to meet two essential
obstacles with a minimum of steering efrequirements during every brake applifort, despite the full brake application.
cation:
The ABS system closed-loop control cir> To help provide vehicle stability
cuit cycles in fractions of a second.
> To help maintain steering control and A pulsation at the brake pedal indicates
maneuverability – on all types of road to the driver that ABS is active, that is,
surfaces (asphalt, concrete, mud, wet that the vehicle is within its maximum
pavement, snow, ice).
braking range. In addition, a pulsation – a
result of the control function cycles – indicates to the driver that vehicle speed
should be reduced to adapt to road surface conditions when there is reduced
traction and grip between tires and road
surface (slippery road surface).
Always depress the brake pedal with
constant pressure. Keep the brake pedal
down. Do not pump the brakes.
Technology Repairs
Braking with ABS
Data
ABS enhances active safety by helping
to prevent the wheels from locking during brake applications. The reason:
Locked wheels are dangerous. When
the front wheels slide, the driver loses
steering control over the vehicle. Traction loss at the rear wheels can cause
the rear end to break into an uncontrolled skid.
Index
The concept
125n
126nAntilock
Brake System (ABS)
In the event of a fault
If the ABS warning lamp in the
instrument cluster comes on, refer to page 21. The brake system then reverts to conventional
operation as on vehicles without
ABS. However, have the brake
system checked by your BMW center
as soon as possible. To prevent undetected defects and cumulative faults
from adversely affecting the brake system, refer any problems to your authorized BMW center at the earliest opportunity.
Disc brakes
Disc brakes furnish optimum deceleration and braking control and greater
fade resistance under heavy use.
When the vehicle is driven only occasionally, during extended periods when
the vehicle is not used at all, and in operating conditions where brake applications are less frequent, there is an increased tendency for corrosion of the
rotors and accumulation of contamination on the brake pads. This occurs because the minimal pressure which must
be exerted by the pads to clean the rotors by brake applications is not
reached.
If the brake rotors are corroded, they
will tend to respond to braking with a
pulsating effect which even extended
application will fail to cure.
We recommend the use of original
BMW brake pads and components, otherwise driving safety can be
impaired.<
Online Edition for Part-No. 01 41 9 791 187 - © 12/98 BMW AG
Disc brakes
Extended or steep mountain descents
do not necessarily have to lead to reduced braking efficiency; downshift to a
gear in which only minimal periodic
brake applications are required - move
the selector lever to the appropriate
lower range.
You can continue to increase the braking effect of the engine by selecting a
lower gear - you can select transmission ranges as low as position 2 for extreme conditions.
Do not coast with the transmission
selector lever in neutral. Do not
drive with the engine shut off. The engine provides no braking effect when
the transmission is in neutral, and there
is no power-assist for braking or steering when the engine is shut off.
Never allow floor mats, carpets or any
other objects to protrude into the area
around the accelerator and brake pedals and obstruct their movement.<
Do not reduce the pressure on the
brake pedal for the duration of the
brake application. When the brake
pedal is released, the DBC is deactivated.
In the event of a malfunction, the
warning lamp comes on with a
yellow light. Conventional braking efficiency is available without limitations.
Have the system checked and
repaired at your BMW center as soon
as possible.
For "Information for your safety"
covering the ABS system, refer to
page 125. This information also generally applies for DBC.<
Overview
Controls
If you apply the brakes rapidly, this system automatically produces the maximum braking force boost and thus
helps to achieve the shortest possible
braking distance during "panic stops."
All of the benefits of the ABS system
are exploited under these circumstances.
Car care
Dynamic Brake Control (DBC)*
Technology Repairs
Maximum braking force is obtained
while the wheels continue to rotate,
peaking when the wheels remain on the
verge of locking without actually doing
so. ABS maintains this state automatically. If the ABS fails, you should revert
to the staggered braking technique described below (refer to page 129).
Should engine braking prove inadequate, you should still avoid extended,
continuous braking. Instead of maintaining low to moderate pressure over
an extended period of time, you should
decelerate the vehicle by applying more
substantial force on the pedal (watch
for following traffic!) and then pausing
before repeating the application. This
staggered braking technique allows the
brakes to cool in the intervals between
active braking phases, preventing overheating and ensuring that full braking
capacity remains available at all times.
Data
While driving in wet conditions and in
heavy rain, it is a good idea to apply
light pressure to the brake pedal every
few miles. Watch traffic conditions to
ensure that this maneuver does not endanger other road users. The heat generated in this braking process helps dry
the brake pads and rotors.
Index
Driving notes
127n
Online Edition for Part-No. 01 41 9 791 187 - © 12/98 BMW AG
128nBrake
system
Brake fluid level
The warning lamp for the brake
hydraulic system comes on or
the message "Check Brake
Fluid" appears in the Check
Control:
The brake fluid level is too low in the
reservoir. Refer to page 147.
If the brake fluid level is too low and
brake pedal travel has become noticeably longer, there may be a defect in
one of the brake system's hydraulic circuits.
The remaining circuit continues to provide adequate brake-system performance.
Proceed to the nearest authorized
BMW center. Higher brake application pressure may be necessary under these conditions, and brake pedal
travel may be significantly longer.
Please remember to adapt your driving
style accordingly.<
Winter operation
Brake pads
The onset of winter is often accompanied by rapid changes in weather. Adaptations in driving style should be accompanied by preparations on the
The brake pads have reached their minvehicle itself to ensure that your vehicle
imum pad thickness. Proceed to the
operation through the winter remains
nearest authorized BMW center as
safe and trouble-free.
soon as possible to have the pads replaced.
The message "Check Brake Pads" appears in the Check Control:
Coolant
We recommend the use of original
BMW brake pads and components, otherwise driving safety can be
impaired.<
Be sure that the coolant mixture is kept
at the year-round ratio of 50:50 (water
and antifreeze/corrosion protection).
This mixture provides protection
against freezing down to approx. –347
(–376). Replace the coolant every four
years.
Locks
BMW door lock deicer can be used to
free the locks if they are frozen. This
deicer also contains lubricant.
After using deicer, treatment with BMW
lock barrel grease is recommended.
The warning lamp also comes on with
the "Check Brake Pads" message in the
Check Control.
Online Edition for Part-No. 01 41 9 791 187 - © 12/98 BMW AG
Winter operation
Snow chains
BMW snow chains* can be fitted on
both summer and winter tires in response to severe winter road conditions. Mount them in pairs on the rear
wheels only, and be sure to comply with
the manufacturer's safety instructions.
Do not exceed a maximum speed of
30 mph (50 km/h). In this situation
(snow chains mounted), deactivate the
ASC+T or DSC*. Refer to page 92.
Starting off
Brakes
Winter road conditions substantially reduce the amount of traction available
between the tires and the road surface;
the resulting increases in braking distance are considerable and should be
continually borne in mind.
ABS is intended to prevent the wheels
from locking during brake applications,
thus helping to maintain vehicle stability
and steering response.
Do not shift down on slick road
surfaces. Doing so could cause
the rear wheels to lose traction and
skid, which could result in the loss of
vehicle control.<
Index
Data
When starting off in deep snow or when
rocking the car to free it, we recommend that you switch the ASC+T or
DSC* off. Refer to page 92.
Overview
Use smooth, gentle pressure to control
the accelerator pedal. Avoid excessive
engine speeds and shift to the next
higher gear at an early point. Adapt
your speed and driving style when apA full range of car care products is proaching grades. Maintain an adeavailable from your BMW center.< quate distance between yourself and
the car ahead.
If the ABS does not respond in a critical
braking situation and the wheels lock:
Reduce the pressure on the brake
pedal until the wheels just start to roll
again while still maintaining enough
force to continue braking.
Following that, increase pedal pressure
again. Reduce the pressure as the
wheels lock, then reapply pressure, etc.
This type of staggered braking will reduce the braking distance, and the vehicle still remains responsive to steering.
You can then attempt to steer around
hazards after you have reduced pressure on the brake pedal.
Controls
Driving on low-traction road
surfaces
Car care
In order to prevent the weather-stripping from freezing, apply rubber treatment or a silicone spray to the seals on
the doors, hood and luggage compartment lid.
Technology Repairs
Rubber seals and components
129n
Online Edition for Part-No. 01 41 9 791 187 - © 12/98 BMW AG
130nWinter
operation
Skid control
Release the accelerator pedal. Countersteer carefully and attempt to regain
control of the vehicle.
Parking
Place the selector lever in position P
(Park). Engage the parking brake when
parking on hills and inclined surfaces. In
order to prevent the parking brake linings from locking in the drum due to
frost or corrosion, dry them by gently
applying the parking brake as the vehicle is coming to a stop. Make sure that
following traffic is not endangered.
The brake lamps do not come on
when the parking brake is applied.<
Power steering
Level control system*
High steering effort:
Check the fluid level. Refer to
page 148.
If the message "LEVEL CONTROL INACTIVE" appears in the Check Control,
there is a malfunction in the level conHigh steering effort during sudden tran- trol system.
sitions:
Stop and inspect the vehicle. If it is
Consult your authorized BMW center
riding significantly lower in the rear
immediately for an inspection.
than in the front, or if it is sitting at an
incline (left rear compared to right rear),
consult the nearest authorized BMW
Servotronic special*
If steering becomes lighter as speed in- center. Drive with appropriate caution
in the meantime. The vehicle has recreases:
duced ground clearance or driving
Malfunction in the electronic control
system. Have your BMW center inspect comfort is noticeably reduced.
this system as soon as possible.
If the power steering fails, increased effort will be required to
steer the vehicle.<
Even if the attitude of the vehicle is normal, you should consult the nearest authorized BMW center if the warning
lamp indicates a system fault.
Online Edition for Part-No. 01 41 9 791 187 - © 12/98 BMW AG
Cellular phone
Radio reception
131n
The reception and sound quality obtained from mobile radios varies according to a variety of factors, including
the broadcast range of the transmitter
and the directional orientation of the
antenna. Interference factors such as
high-tension power lines, buildings and
natural obstructions can all lead to unavoidable reception interference, regardless of how well the vehicle sound
system is operating.
Climatic factors such as intense solar
To ensure that your BMW continues to radiation, fog, rain and snow can also
provide reliable and trouble-free opera- interfere with reception.
tion, refrain from using a cellular phone Cellular phones without official BMW
approval can also generate interferor other radio device with an antenna
located inside the passenger compart- ence. This phenomenon assumes the
ment. The antenna should always be
form of a low-pitched hum emanating
mounted on the outside of the vehicle.
from the speaker system.
Controls
Car care
Technology Repairs
Data
Please refer to the supplementary operating instructions provided with your
sound system for detailed information
on its use.
Index
Before loading the vehicle on a
car-carrier train or driving it
through a car-wash, remove the antenna.<
Overview
Mobile communications systems (cellular phone, radio, etc.) are permitted with
an output up to 10 watts only. Even
these systems may trigger malfunctions
in the operation of your vehicle if they
are not specifically designed for use
with the vehicle. BMW can neither test
nor assume responsibility for every individual product being offered on the
market. We recommend that you consult your BMW center before purchasing any device of this kind.
Online Edition for Part-No. 01 41 9 791 187 - © 12/98 BMW AG
132nTire
inflation pressure
Tire condition
Information for your safety
Do not drive on a deflated (flat)
tire. A flat tire greatly impairs
steering and braking response, and can
lead to complete loss of control over
the vehicle.
Avoid overloading the vehicle so that
It is not merely the tire's service life, but
the permitted load on the tires is not exalso driving comfort and - above all else
ceeded. Overloading can lead to over- driving safety which depend on the
heating and increases the rate at which
condition of the tires and the maintedamage develops inside the tires.
nance of the specified tire pressure.
The ultimate result can assume the form
Incorrect inflation pressure is a frequent
of a sudden air loss.
cause of tire damage. They also influUnusual vibrations encountered during
Tire tread – tire damage
ence the roadholding ability of your
normal vehicle operation can indicate
Inspect your tires frequently for tread
BMW.
tire failure or some other vehicle defect,
wear, signs of damage and for foreign
as can variations in normal vehicle reobjects lodged in the tread. Check the
Check tire inflation pressures – insponse, such as a pronounced tentread depth.
cluding the spare tire – regularly,
dency to pull to the left or right. Should
at least every two weeks and before be- Tread depth should not be allowed to
this occur, respond by immediately reginning a longer trip. If this is not done, go below 0.12 in (3 mm), even though
ducing your speed and carefully proincorrect tire pressures can cause driv- the legally specified minimum tread
ceeding to the nearest BMW center or
depth is only 0.063 in (1.6 mm). Wear
ing instability and tire damage, ultiprofessional tire center, or having the
indicators appear in the tread at 0.063 in vehicle towed in to have it and its tires
mately resulting in accidents.<
(1.6 mm) to indicate that the legally per- inspected.
missible wear limit has been reached.
Tire damage (up to and including blowBelow 0.12 in (3 mm) tread depth, there outs) can endanger the lives of both the
is an increased risk of aquaplaning,
vehicle occupants and other road
even at relatively moderate speeds and users.<
with only small amounts of water on the
road.
390de331
The factory-approved radial tires are
matched to the car and have been selected to provide optimum safety and
driving comfort on your car.
Online Edition for Part-No. 01 41 9 791 187 - © 12/98 BMW AG
To maintain good handling and vehicle
response, use only tires of a single
tread configuration from a single manufacturer. BMW tests and approves
wheel/tire combinations. Refer to
page 136.
Between the axles
Tire age
If different tire sizes are mounted
on the front and rear axles
(page 136), the tires may not be rotated
from one axle to the other.<
Car care
If a proposed interaxle rotation of tires
is based on economic considerations,
one should consider whether the costs
for the rotation are likely to be recaptured by any increase in the service life
of the tires which might be realized. Rotation should always be carried out at
short intervals, with a maximum of
3,000 miles (5,000 km). Consult your
authorized BMW center for more information.
Technology Repairs
Do not use retreaded tires, since
driving safety may be impaired by
their use. This is due to the possible
variations in casing structures and, in
some cases, to their extreme age,
which can lead to a decrease in their
durability.<
The tread wear patterns at the front end
differ from those at the rear - the actual
patterns will vary according to individual driving conditions. In the interests of
safety and maintaining optimal handling
characteristics, tire rotation is not recommended.
133n
Overview
Tire rotation
Controls
Tire replacement
Index
Data
The date on which the tire was manufactured is indicated by the code on the
sidewall:
DOT ... 178 means that the tires were
Should you decide to rotate the tires, it
manufactured in the 17th week of 1998.
is essential to comply with the followBMW recommends the replacement of ing:
all tires when the tires are no more than Rotate tires on the same side only,
6 years old, even if a tire life of 10 years since braking characteristics and road
is possible.
grip could otherwise be adversely afSpare tires over 6 years old should be
fected.
used only in case of emergency. Such a Following rotation, correct the tire inflatire should be replaced by a new tire
tion pressure.
immediately, and should not be
mounted together with new tires.
Online Edition for Part-No. 01 41 9 791 187 - © 12/98 BMW AG
134nWheel
and tire combinations
The right choice
Codes on tires and wheels
Winter tires:
Use only tires approved by BMW. Refer
to page 136.
Because of the high speeds this vehicle
can reach, the use of specific tire
brands, specifications and dimensions
is mandatory. Consult any BMW center
for details.
Comply with national, state, or provincial regulations.
The tire codes will aid you in selecting
the correct tire.
Q M+S = up to 100 mph (160 km/h)
T M+S = up to 118 mph (190 km/h)
H M+S = up to 130 mph (210 km/h)
The correct wheel-tire combination affects different systems such
as ABS, ATC, ASC+T/DSC. The function of these systems is impaired if improper wheel-tire combinations are
used.
For this reason, use only tires of the
same brand and tread pattern. In the
event of a flat tire if you have mounted
winter tires, for example, remount the
approved wheel-tire combination as
soon as possible.<
Codes on radial tires:
For example
235/60 R 16 100W
Nominal width
in mm
Aspect ratio in %
Radial tire code
Rim diameter in inches
Load rating
(not on ZR tires)
Speed rating
(before R on ZR tires)
The speed rating indicates the approved maximum speed for the tire.
Summer tires:
S
T
H
V
W
ZR
=
=
=
=
=
=
Codes stamped on light-alloy wheels:
For example
71/2 J x 16 H 2
Rim width
in inches
Code letter for
flange type
Symbol for full-drop
center rim
Rim diameter in inches
Hump on the 2 rim shoulders
Protect valve inserts against dirt using
screw-on valve stem caps. Dirt in the
valves frequently leads to slow leaks.
up to 112 mph (180 km/h)
up to 118 mph (190 km/h)
up to 130 mph (210 km/h)
up to 149 mph (240 km/h)
up to 167 mph (270 km/h)
over 149 mph (240 km/h)
Online Edition for Part-No. 01 41 9 791 187 - © 12/98 BMW AG
Mount only winter tires which have
been approved by BMW. Any BMW
center will be glad to provide you with
information on the best winter tires for
your particular driving conditions.
Overview
Controls
Never exceed the maximum
speed for which the tires are
rated.
Unprofessional attempts by laymen to
service tires can lead to damage and
accidents.
Have this work performed by skilled
professionals only. Any BMW center
has the required technical knowledge
and the proper equipment and will be
happy to assist you.<
Use narrow-link BMW snow chains on
summer or winter tires only in pairs and
only on the rear wheels. Comply with all
manufacturer's safety precautions when
mounting the chains.
Tire condition, tire pressure
Technology Repairs
In the interests of sure tracking and safe
steering response at all four wheels,
mount winter tires which are made by
the same manufacturer and which have
the same tread configuration.
Do not exceed specified
maximum speeds
Winter tires display a perceptible loss in
their ability to cope with winter driving
conditions once the tread wears to below 0.16 in (4 mm), and should thus be
replaced.
Comply with the specified tire inflation
pressures - and be sure to have the
wheel and tire assemblies balanced every time you change the tires.
Storage
Data
BMW recommends winter tires (M+S
radial tires) for driving in adverse winter
road conditions. While tires known as
all-season tires (M+S designation) provide better winter traction than summer
tires with load ratings H, V, W and ZR,
they generally do not achieve the performance of winter tires.
135n
Store tires in a cool, dry place, away
from light whenever possible. Protect
the tires against contact with oil, grease
and fuel.
Index
Choosing the right tire
Snow chains*
Car care
Winter tires
Online Edition for Part-No. 01 41 9 791 187 - © 12/98 BMW AG
136nApproved
wheel and tire specifications
Tire specifications
Light-alloy wheel
All season tires
235/60 R 16 100 H M+S
7.5Jx16
8Jx16
Summer tires
235/60 R 16 100 W
7.5Jx16
8Jx16
245/55 R 16 100 W
8Jx16
235/50 ZR 18
8Jx18
Rear: 255/45 ZR 18
The use of rims and wheel bolts
that do not meet the specifications
of the original factory-installed equipment will affect the safe operation of
your vehicle and may cause an accident
and personal injury.
Never mix tires of different design, such
as steel-belted radials with radial biasbelted or bias-ply tires, etc. Mixing tire
types will adversely affect roadholding
and can lead to loss of vehicle control.<
9Jx18
9.5Jx18
Winter tires (M+S)
215/65 R 16 98 Q
7.5J x 16
235/60 R 16 100 Q
7.5Jx16
8Jx16
245/55 R 16 100 Q
8Jx16
Note the tire and wheel data in the official documents of the car. If sizes not
approved by the manufacturer are
mounted, an entry in the vehicle's documents may be necessary. Comply with
local legislation.
Online Edition for Part-No. 01 41 9 791 187 - © 12/98 BMW AG
Hood
To open
To close
Pull the lever located at the lower lefthand side of the instrument panel.
Pull the release handle and open the
hood.
Press down lightly on the hood at the
locations shown in the illustration (arrows) or drop it from approx. 4 inches
(10 cm) so that it audibly engages.
Controls
Data
To avoid injuries, be sure that the
travel path of the hood is clear
when it is closed, as with all closing
procedures.
If it is determined that the hood is not
completely closed while driving, stop
immediately and close it securely.<
Index
Do not work on your vehicle without appropriate skills. Switch off
the engine and allow it to cool down before working in the engine compartment.
Always disconnect the battery before
working on any electrical systems or
equipment. Comply with all applicable
instructions and warnings. Failure to
work in an informed, professional manner when servicing components and
materials constitutes a safety hazard for
vehicle occupants and other road
users. If you are not familiar with the
guidelines, please have the operations
performed by your authorized BMW
center.<
Car care
To unlock the hood
Technology Repairs
380de634
380de635
380de071
Overview
137n
Online Edition for Part-No. 01 41 9 791 187 - © 12/98 BMW AG
compartment – BMW 740i/L
380us665
138nEngine
Online Edition for Part-No. 01 41 9 791 187 - © 12/98 BMW AG
Engine compartment – BMW 740i/L
139n
Overview
1 Brake fluid reservoir 147
2 Power steering fluid reservoir/
Level control system 148
Controls
3 Auxiliary terminal for jump
starting 179
4 Engine oil dipstick 143
5 Engine oil filler neck 143
6 Coolant expansion tank 146
Car care
7 Reservoir for headlamp
and windshield washer system 142
Index
Data
Technology Repairs
8 Fuse box 176
Online Edition for Part-No. 01 41 9 791 187 - © 12/98 BMW AG
compartment – BMW 750iL
380us666
140nEngine
Online Edition for Part-No. 01 41 9 791 187 - © 12/98 BMW AG
Engine compartment – BMW 750iL
141n
Overview
1 Brake fluid reservoir 147
2 Power steering fluid reservoir/
Level control system 148
3 Auxiliary terminal for jump
starting 179
Controls
4 Engine oil filler neck 143
5 Coolant expansion tank 146
6 Engine oil dipstick 143
Car care
7 Reservoir for headlamp
and windshield washer system 142
Index
Data
Technology Repairs
8 Fuse box 176
Online Edition for Part-No. 01 41 9 791 187 - © 12/98 BMW AG
fluids
380de082
142nWasher
Washer nozzles
Antifreeze agents or intensive
windshield cleaning agents for the
washer systems are highly flammable.
For this reason, keep them away from
sources of flame and store them only in
their original containers. Store them so
that they are inaccessible to children.
Comply with the instructions on the
containers.<
Windshield washer
The spray from the nozzles should be
directed so as to ensure effective
cleaning, even at high speeds.
Use a needle to adjust the nozzles as
required, or have them adjusted at your
authorized BMW center.
Headlamp washer system
Have the nozzles adjusted by your
BMW center as required.
Headlamp* and
windshield washer system
The filling capacity is approx. 4.7 US
quarts (4.5 liters) for the windshield
washer system or approx. 6.3 US
quarts (6.0 liters) together with the
headlamp washer system.
Fill with water and - when needed - with
a washer antifreeze (according to manufacturer's recommendations).
We recommend that you mix the
washer fluid before adding it to
the reservoir.<
Online Edition for Part-No. 01 41 9 791 187 - © 12/98 BMW AG
Engine oil
The oil volume between the two marks
on the dipstick corresponds to approx.
1.1 US quarts (1 liter). Do not fill to beyond the upper mark on the dipstick.
Excess oil will damage the engine.
Wait until the level has dropped to just
above the lower mark before adding oil.
However, do not wait until the oil drops
below the lower mark.
BMW engines are designed to operate without oil additives. The
use of additives could lead to damage
in some cases. This is also true for the
automatic transmission, the differential
and the power steering system.<
Index
Data
As with fuel economy, oil consumption
is directly influenced by your driving
style and vehicle operating conditions.
Controls
380de077
Adding engine oil
Car care
1 Park the vehicle on a level surface
2 Shut the engine off after it has
reached normal operating temperature
3 After approx. 5 minutes, pull the dipstick out and wipe it off with a clean
lint-free cloth, paper towel, or similar
material
4 Push the dipstick all the way into the
guide tube and pull it out again
5 The oil level should be in between the
two graduations on the dipstick.
Technology Repairs
Checking the engine oil
460de189
380de076
Overview
143n
Online Edition for Part-No. 01 41 9 791 187 - © 12/98 BMW AG
oil
Engine oil specifications
Viscosity ratings
The quality of the engine oil selected
has critical significance for the operation and service life of an engine. Based
on extensive testing, BMW has approved only certain engine oils.
Viscosity is the oil flow rating as established in SAE classes.
Use approved "longlife oils" only.
BMW recommends the use of oils in
SAE classes SAE 0W-X or SAE 5W-X,
where "X" stands for a specification
such as 30, 40 or 50.
If it should ever occur that it is impossible to purchase an approved "longlife
oil," you may use small volumes of the
"special oils" approved by BMW for
topping up between oil changes.
You may use oils with the specification
API SH only if the special oils are also
not available.
Call 1-800-831-1117, or ask your
authorized BMW center for details concerning the specific "longlife
oils" or "special oils" which have been
approved.<
The selection of the correct SAE class
depends on the climatic conditions in
the area where you drive your BMW.
These oils may be used for driving in all
ambient temperatures.
If you are using SAE class 10W-X, you
may continue to drive for short periods
at temperatures below this limit. However, the engine's cold-starting characteristics may be impaired.
460de162
144nEngine
Online Edition for Part-No. 01 41 9 791 187 - © 12/98 BMW AG
Engine oil
145n
Overview
Comply with the applicable environmental laws regulating the disposal of used oil.<
Controls
Recommendation: Have the oil
changed by your BMW center.
Index
Data
Technology Repairs
Car care
Continuous exposure to used oil
has caused cancer in laboratory
testing.
Any skin areas that come into contact
with oil should therefore be thoroughly
washed with soap and water.
Store oils, greases, and similar materials so that they are inaccessible to children. Comply with all warnings on the
containers.<
Online Edition for Part-No. 01 41 9 791 187 - © 12/98 BMW AG
146nCoolant
To add coolant
Wait until the engine cools before removing the cap from the expansion
tank. The needle of the coolant temperature gauge in the instrument cluster
must be located in the blue zone; otherwise, there is a danger of scalding.
380de081
Do not add coolant to the cooling
system when the engine is hot.
Escaping coolant can cause burns.
To avoid the possibility of damage later
on, never use anything other than factory-approved, nitrite and amino-free
extended-duty antifreeze with corrosion
protectant. Your authorized BMW center is familiar with the official specifications.
Antifreeze and anti-corrosion agents
are hazardous to health. Store antifreeze and anti-corrosion agents in their
original containers where they are inaccessible to children.
Extended-duty antifreeze with corrosion
inhibitor contains ethylene glycol - a
flammable substance. For this reason,
do not spill antifreeze with corrosion inhibitor on hot engine components. It
could catch fire and cause serious
burns.<
Correct coolant level when the engine
is cold (approx. 687/206):
Unscrew the cap from the expansion
tank.
The coolant level is correct when the
end of the red float is aligned with the
upper edge of the filler opening (refer to
the arrow in the illustration or the schematic diagram next to the cap).
1 Start by turning the cap counterclockwise. Pause to allow any accumulated pressure to escape, then remove the cap
2 If the coolant is low, slowly add coolant until the correct level is reached –
do not overfill.
Comply with the applicable environmental laws regulating the disposal of extended-duty antifreeze with
corrosion inhibitor.<
The coolant is a mixture of water and
extended-duty antifreeze with corrosion
inhibitor. Always maintain the prescribed all-season 50:50 mixture ratio
for year-round protection against internal corrosion. No other additives are required.
Replace the coolant every four years.
Online Edition for Part-No. 01 41 9 791 187 - © 12/98 BMW AG
Brake fluid
147n
Technology Repairs
Any BMW center can provide you with
information on factory-approved brake
fluids (DOT 4).
Car care
380de080
Controls
Overview
Brake fluid is hygroscopic, that is,
it absorbs moisture from the air
over time.
In order to ensure the operating safety
of the brake system, have the brake
fluid changed every two years by your
BMW center. Refer also to the Service
Warranty Information Booklet (US models) or to the Warranty and Service
Guide Booklet (Canadian models).
Brake fluid is toxic and damages the vehicle's paint. Always store brake fluid in
the original containers. Keep the conBrake fluid level
tainers tightly closed and out of reach
Brake hydraulic system warning
of children. Do not spill brake fluid. Do
lamp comes on, "Check brake
not fill beyond the "MAX" level in the
fluid" appears in the Check Conreservoir. The brake fluid could ignite
trol display: The brake fluid level
upon contact with hot engine parts and
is too low in the reservoir.
cause serious burns.<
Fill up to upper mark ("MAX" level visible through the transparent reservoir).
Comply with the applicable environmental laws regulating the disposal of brake fluid.<
Index
Data
Brake fluid loss results in extended
pedal travel. Refer to the information on
page 128.
Online Edition for Part-No. 01 41 9 791 187 - © 12/98 BMW AG
Power steering
With the engine off, unscrew the reservoir cap and remove the cap with dipstick. Then push the dipstick into the
reservoir again.
The fluid level should be in between the
marks on the dipstick.
Screw the reservoir cap back on.
Contact your BMW center if the fluid is
low, as only ATF may be used and special knowledge is required for topping
up.
Power steering/Level control
system*
With the engine shut off, loosen the
knurled nut and remove the reservoir
cap.
Vehicle Identification Number
380de074
380de079
for power steering/Level control system*
380de078
148nOil
In the engine compartment, stamped on
the right-hand strut dome (arrow) and
on the upper edge of the instrument
panel on the left side.
With the vehicle empty, the fluid level
should be barely 0.2 in (5 mm) above
the screen bottom.
Correct the fluid level if required. Always use Pentosin CHF 11S.
Position the reservoir cap and tighten
the knurled nut. Make sure the cover is
properly seated.
Online Edition for Part-No. 01 41 9 791 187 - © 12/98 BMW AG
Please keep in mind that regular maintenance is not only necessary for the
safety of your vehicle, but also plays a
significant role in maintaining the resale
value of the vehicle.
The BMW Maintenance System includes the Engine Oil Service and Inspections I and II.
Determining the maintenance intervals
according to the actual loads on the car
covers every kind of operating situation.
However, even those who drive only
short distances – significantly less than
6,200 miles (10,000 km) annually –
should have the engine oil changed at
least every 2 years since oil deteriorates
over time, regardless of use.
Depending upon operating conditions,
as a precaution against rust it may be a
good idea to have the body checked for
stone damage and chips at the same
time.
Have your BMW center do the
maintenance and repair.Your BMW
center is always informed on the latest
maintenance work and repair techniques and equipped with the required
special tools. In addition, checking
parts known from experience to be subject to wear is a permanent part of the
maintenance specifications. Be sure
that all maintenance work is confirmed
in the Service and Warranty Information
Booklet (US models) or in the Warranty
and Service Guide Booklet (Canadian
models). These entries will constitute
your proof that the vehicle has received
regular maintenance. They are also required in the event of a warranty claim.<
Online Edition for Part-No. 01 41 9 791 187 - © 12/98 BMW AG
Overview
Controls
Please refer to the Service and Warranty Information Booklet (US models)
or to the Warranty and Service Guide
Booklet (Canadian models) for additional information on maintenance intervals and procedures.
Car care
From the point of view of maintenance,
62,000 miles (100,000 km) accumulated
in short-distance urban driving are not
the equivalent of the same distance
covered at moderate speeds in longdistance highway travel. In response to
this fact, the BMW Maintenance System
monitors operating conditions as the
basis for determining the optimum service intervals for your individual vehicle.
Service and Warranty Information
Booklet (US models)/Warranty
and Service Guide Booklet
(Canadian models)
Technology Repairs
The BMW Maintenance System has
been designed as a reliable means of
providing maximum driving and operating safety – and as cost-effectively as
possible for you.
Advanced technology is employed to
calculate the optimal maintenance intervals, which are then indicated in the
Service Interval Display. While conventional systems rely on distance traveled
alone to determine when service is due,
the BMW Maintenance System has for
years considered the actual conditions
under which the vehicle operates.
Data
380us008
Service Interval Display
149n
Index
The BMW Maintenance System
150nCaring
for your car
Washing your car
You can have your new BMW washed
in an automatic car wash. Car wash
systems that do not employ brushes are
preferable.
Wipe away tough dirt and loosen and
remove dead insects before washing
the car.
To prevent spots, avoid washing when
the hood is still warm, or immediately
after and during exposure to strong
sunlight.
When using an automatic car wash, be
sure that:
> The car wash system is suited for the
dimensions of your vehicle
> No damage will occur on vehicles
with attached body accessories (such
as spoilers or antennas). If you are
uncertain, consult the manager of the
car wash
> The wheels and tires of your vehicle
cannot be damaged by the conveyance devices of the car wash system
> The vehicle is cleaned with minimum
brush pressure, and that ample water
is available for washing and rinsing.
Vehicles with rain sensor*:
Clean the windshield regularly. Wax
from automatic car washes or insects,
for example, can cause malfunctions in
the function of the rain sensor.
Turn the rain sensor off in automatic car washes. If you do not,
damage may occur if the wipers switch
on unintentionally.<
Parts of the car which are inaccessible
to the automatic washer - such as door
sills, door and hood edges, etc. should be cleaned by hand.
When cleaning the headlamps,
please observe the following:
> Do not clean by wiping with a dry
cloth (scratches). Never use abrasives or strong solvents to clean the
covers
> Remove dirt and contamination
(such as insects) by soaking with
BMW Car Shampoo and then rinsing
with plenty of water
> Always use a deicer spray to remove
accumulated ice and snow – never
use a scraper.<
After washing the car, apply the
brakes briefly to dry them. Braking
In the winter months, it is especially imefficiency
might otherwise be reduced
portant to ensure that the car is washed
by the moisture, and the brake rotors
on a regular basis. Large quantities of
dirt and road salt are difficult to remove, could also be corroded.<
and they also cause damage to the vehicle.
If spray wands or high-pressure
washers are used, be sure to
maintain an adequate distance between
the spray source and the vehicle's surface.
Inadequate distance and excessive
pressure can damage or weaken the
finish, making it more susceptible to
subsequent attack. In addition, moisture could penetrate to vehicle components, leading to long-term damage.<
Online Edition for Part-No. 01 41 9 791 187 - © 12/98 BMW AG
Caring for your car
Overview
Controls
In tropical zones, temperatures of over
1057 (406) in the shade prevail, in
addition to heavy ultraviolet radiation
and high humidity. Under those circumstances, light exterior finishes reach
temperatures of up to 1757 (806) and
dark finishes up to 2507 (1206).
Car care
Road dirt, tar spots, dead insects, animal droppings (strong alkali effect) and
tree excretions (resins and pollen) all
contain substances capable of causing
damage when allowed to remain on the
finish of your car for any period of time
(spots, etching, flaking, separation in
the top coat).
In coastal regions, high levels of atmospheric salt and humidity promote corrosion.
In industrial areas, deposits of flue dust,
lime, oily soot, precipitation containing
sulfur-dioxide (acid rain) and other environmental pollutants will damage the
car's finish unless adequate care is provided – even though this is generally
limited to the outside horizontal surfaces.
Technology Repairs
Increasing awareness of the effects of
harmful environmental factors on a vehicle's exterior finish have led paint and
vehicle manufacturers to initiate programs designed to further improve the
durability of their finishes. Despite this,
environmental factors that occur locally
or regionally can have negative effects
on the finish of your vehicle. These
should guide you in determining the frequency and extent of your efforts to
maintain the vehicle finish.
Depending upon material and type of
impact (perforation of paint layer), physical stresses from sand, road salt,
gravel, etc., can cause corrosion to
start extending beneath the finish, starting at the point of impact.
Data
To provide effective corrosion protection, multilayer paintwork is applied at
the factory. Cataphoretic immersion
priming techniques are supplemented
using special body-cavity protectants,
with the application of specially-developed and extensively tested materials.
A layer of flexible PVC is first applied to
the undercarriage. Following this, a
comprehensive undercoating treatment
with a wax-based protectant is applied.
Regular maintenance makes an important contribution to maintaining the
safety and value of your vehicle.
Index
Exterior finish
151n
Online Edition for Part-No. 01 41 9 791 187 - © 12/98 BMW AG
152nCaring
for your car
Caring for the vehicle finish
Waxing your car
Paint damage
Regular washing is a preventive measure against long-term effects from
substances that are harmful to the vehicle's finish, especially if you drive your
vehicle in areas with high levels of air
pollution or aggressive natural substances (tree resins, pollen).
Protect the finish using carnauba or
synthetic-based waxes only.
You can touch up small areas of damage with BMW spray paint or a BMW
touch-up stick.
Nevertheless, you should immediately
remove especially aggressive substances. Failure to do so can lead to
changes in the paint's chemical structure or to discoloration. Gasoline spilled
during refueling, oil, grease and brake
fluid should always be cleaned away
immediately, as should bird droppings.
All of these substances cause damage
to the finish.
Any contamination remaining on the
surface of the vehicle will be especially
conspicuous after washing. Use cleaning fluid or alcohol with a clean cloth or
cotton pad to remove. Remove tar
spots with tar remover. After cleaning,
the affected areas should be waxed to
ensure continued protection.
A full range of car-care products is
available from your BMW center.<
The best way to determine when the
finish needs to be waxed is by noting
when water stops beading on the surface.
You can use a glass cleaner to remove
any wax or silicone that may have been
left on the windows during waxing.
The color code of your vehicle is located on a tag near the vehicle's data
plate and on the first page of the Service and Warranty Information Booklet
(US models) or of the Warranty and Service Guide Booklet (Canadian models).
Damage caused by flying stones,
A full range of car-care products is scratches, etc., must be touched up
available from your BMW center.< without delay to prevent rust from forming.
If corrosion has started to form in an
area with paint damage, remove all rust
and clean the area. Then prime the area
with a BMW Primer Stick. Finally, apply
the finish coat. Wait a few days, then
polish the repaired area. Finish by applying a wax preservative.
More extensive paint damage should be
repaired professionally in accordance
with the manufacturer's instructions.
Your BMW center uses original BMW
finish materials in accordance with approved repair procedures.
Online Edition for Part-No. 01 41 9 791 187 - © 12/98 BMW AG
Caring for your car
The glass used for the side windows is
designed to provide resistance to
breakage and protection against vandalism. These break-resistant windows
contain several layers of a transparent
plastic film which is sandwiched between the inner and outer glass panes.
There is also one additional plastic film
on the inside of the glass pane (facing
the passenger compartment). This film
prevents shards of glass from spreading into the passenger compartment if
the window is shattered.
Data
Technology Repairs
Please observe the following precautions pertaining to this film
when caring for the interior glass surfaces:
> The film is not scratch-resistant. For
this reason, do not touch the glass
with sharp objects which could damage the film
> Clean the glass with clean water. If
necessary, you may also use regular
household window cleaners. Wipe
the cleaner off immediately.
Do not use window cleaners containing solvents or abrasives. These
cleaners can mar the film
Index
You can use window and glass cleaner
to clean interior window surfaces and
mirrors without streaking. Never use
polishing pastes or abrasive (quartz)
cleansers on mirror lenses.
> Do not apply any self-adhering decals, adhesive labels or other stickers
with tape to the inner window surface
> Do not apply colored films to the inside surfaces of the side windows
> If the windows are fogged or iced
over in cold or humid climates, do not
use an ice scraper or ice-removing
sprays to clean them. Start the engine and refer to the instructions for
defrosting the door windows.<
Controls
Break-resistant security glass
Water and dirt-repelling windshield (refer also to page 191).
The effectiveness of the coating is not
impaired by the wax used in car washes
or by windshield-washer additives.
Depending on the frequency of use of
the windshield wipers as well as on environmental factors, the coating of the
windshield is subject to natural wear.
As a result, the beneficial characteristics of the coating gradually diminish.
After approx. 12,400 to 15,500 miles
(approx. 20,000 to 25,000 km), the
windshield begins to resemble more
and more a standard windshield.
The coating can be renewed by your
BMW center.
Car care
Window care
Overview
153n
Online Edition for Part-No. 01 41 9 791 187 - © 12/98 BMW AG
154nCaring
for your car
Caring for other vehicle
components and materials
Clean the wiper blades with soapy water. The wiper blades should be replaced twice a year, before and after
Light-alloy wheels should be treated
with alloy wheel cleaner, especially dur- the cold season.
ing the winter months. However, do not
Use only wiper blades approved
use aggressive products containing acby BMW.<
ids, strong alkalis or abrasives. Do not
Leather care
use steam cleaners operating at temperatures above 1407 (606). Follow
the manufacturer's instructions.
Because this product is manufactured
using natural materials, you must make
allowance for its special characteristics
as well as for the peculiarities of its use
and care.
If your vehicle has chromed parts* such
as window moldings, door handles or
other parts, clean these parts especially
carefully with ample clean water, especially if they have an accumulation of
road salt. You may wish to add a car
shampoo supplement to the water. Use
a chrome polish for an additional treatment.
Plastic components, vinyl upholstery,
headliners, lamp lenses, the clear cover
of the instrument panel and components with a sprayed dull black surface
can be cleaned with water (add plastic
cleaner as required). Do not allow moisture to soak through the seats or headliner. Never use solvents such as lacquer thinner, heavy-duty grease
remover, fuels, etc.
The safety belts should be cleaned with
a mild soap and water solution without
being removed from the car. Never attempt chemical or dry cleaning, as
damage to the belt fabric could result.
After cleaning, never allow the inertia
reel to retract the belts until they are
completely dry. Dirty safety belts prevent the inertia reel mechanism from retracting the strap properly, and thus
constitute a safety hazard.
Heavily soiled floor carpets and mats*
can be cleaned with an interior cleaner.
The floor mats can be removed from the
vehicle for cleaning.
Please use only a damp cloth to clean
wooden fascia panels and components.
Follow up by drying with a soft cloth.
The leather upholstery used by BMW is
a natural product of the highest quality,
processed using state-of-the-art methods to ensure that it will maintain its
high quality for years to come, provided
that it is properly cared for.
Regular periodic cleaning and care are
essential, as dust and road dirt act as
abrasives in the pores and creases of
the material. This leads to wear spots
and premature brittleness on the surface of the leather. We therefore suggest that you clean the leather with a
vacuum cleaner or dust cloth at frequent intervals.
For cleaning, use BMW leather cleaning
foam.
A full range of car-care products is
available from your BMW center.<
Rubber components should be cleaned
with water only; a rubber treatment or
silicone spray may also be applied.
Online Edition for Part-No. 01 41 9 791 187 - © 12/98 BMW AG
Caring for your car
155n
Car care
Controls
Overview
Since dirt and grease gradually attack
Cleaning agents can contain subthe protective layer of the leather, the
stances that are dangerous or
cleaned surfaces should be treated with pose health risks. Therefore, always
BMW leather care agent. This also acts comply with the warnings and danger
as an antistatic agent.
notices on the package.
Open the doors or windows on your veFor protection against dampness or
moisture, treat the leather with a BMW hicle when cleaning the interior. Never
clean your vehicle with solvents or
impregnating agent.
other materials not specifically intended
We recommend that you perform this
for this application.<
procedure twice a year on leather exposed to normal use.
Technology Repairs
Spills should be wiped up immediately.
Remove grease and oil stains without
rubbing by carefully dabbing with a
cloth soaked in spot remover.
Index
Data
If the upholstery is to be exposed to intense sunlight or if the vehicle is to be
stored for an extended period, cover all
leather surfaces (or, better yet, the windows) to prevent fading.
Online Edition for Part-No. 01 41 9 791 187 - © 12/98 BMW AG
380de643
156nAirbags
1 Front airbags for driver and
front passenger
2 Side impact head protection system
(front and rear*)
3 Side airbags (front and rear*)
Important safety notices
Vehicle storage
Modifications may not be made on either the wiring or the individual components in the airbag system. These include the padded steering wheel hub,
the instrument panel, the side trim panels of the front or rear doors and the
roof pillars or the sides of the headliner.
Never apply adhesive materials to these
components or cover or modify them in
any way. Do not attempt to remove or
dismantle the steering wheel.
To ensure compliance with official
safety regulations, entrust disposal of
airbag generators to an authorized
BMW center.
Unprofessional attempts to service the
system could lead to failure in an emergency or undesired airbag activation,
either of which could result in personal
injury.<
Consult your BMW center regarding the
required special procedures if you intend to store the vehicle for longer than
three months.
Do not attempt to remove the gas
generators of the airbag restraint
system from the vehicle. Have testing
and service procedures performed by
specially-qualified technicians only. In
the event of a malfunction, deactivation,
or triggered actuation (as a response to
an accident) of the airbag restraint system, consult your authorized BMW center for repairs or service operations.
Online Edition for Part-No. 01 41 9 791 187 - © 12/98 BMW AG
Technical modifications to the vehicle
157n
Controls
Overview
Any authorized BMW center will be glad
Do not remove the protective lens
to inform you of the advisability, legal
and avoid staring directly at the
requirements and factory recommenda- unfiltered beam for extended periods
tions with regard to technical modifica- (several hours), as inflammation of the
tions on the car. For this purpose, the
iris could result.<
BMW center requires the Vehicle Identification Number and, in some cases,
also the engine number.
Light-Emitting Diodes (LEDs)
Index
Data
Technology Repairs
Car care
Light-emitting diodes installed behind
translucent lenses serve as the light
source for many of the controls and displays in your vehicle. The concept behind their operation is related to that
employed for lasers, and they are officially designated as Class 1 light-emitting diodes.
Online Edition for Part-No. 01 41 9 791 187 - © 12/98 BMW AG
158nOBD
connector
An Illuminated indicator informs
you of the need for service, not
of the need to stop the vehicle.
However, the systems should be
checked by your BMW center at the
earliest possible opportunity.
When the filler cap is not properly
tightened, the OBD system can
detect the vapor leak and the indicator
will light up. If the filler cap is subsequently tightened, the indicator should
extinguish within a few days.<
380de617
Under certain conditions, the indicator
will blink or flash. This indicates a rather
severe level of engine misfire. When
this occurs, you should reduce speed
and consult the nearest BMW center as
The interface socket for the onboard di- soon as possible. Severe engine misfire
over only a short period of time can seagnosis system is located beneath a
cover on the center console front panel riously damage emission control components, especially the catalytic con(arrow).
verter.
A sticker with the text "OBD" is attached to the cover.
The purpose of the OBD (Onboard
Diagnostic) system is to assure proper
emission control system operation for
the vehicle’s lifetime by monitoring
emission-related components and
systems for deterioration and malfunction.
Online Edition for Part-No. 01 41 9 791 187 - © 12/98 BMW AG
Index
Data
Technology Repairs
Car care
Controls
Overview
159n
Online Edition for Part-No. 01 41 9 791 187 - © 12/98 BMW AG
160n
Online Edition for Part-No. 01 41 9 791 187 - © 12/98 BMW AG
In case of electrical
malfunction:
Fuel filler door 178
Sliding/Tilt sunroof 178
Operation, care
and maintenance
Assistance, giving and
receiving:
Jump-starting 179
Towing the vehicle 180
Owner service procedures
Advanced technology
Controls
Controls and features
Car care
Overview
Technology Repairs
Replacement procedures:
Onboard tool kit 162
Windshield wiper blades 162
Lamps and bulbs 163
Remote control 168
Changing tires 170
Battery 173
Fuses 176
Overview
161n
Data
Technical data
Index
Index
Online Edition for Part-No. 01 41 9 791 187 - © 12/98 BMW AG
162nOnboard
tool kit
Windshield wiper blades
Use only wiper blades approved
by BMW.<
The onboard tool kit is located in the
luggage compartment lid.
Loosen the wingnut to open.
380de097
394de080
Fold the wipers back down onto
the windshield before you turn the
ignition to position 1 or 2.<
1 To fold the wiper away from
windshield:
Switch on the ignition.
Move the wiper lever to position 1
(intermittent wipe).
Switch the ignition off again when the
wipers are stationary in the intermittent cycle – they will then move to a
roughly vertical position
2 Fold the wiper arm completely out
3 Position the wiper blade at an angle
and pull the release spring (arrow)
4 Fold the wiper blade down and unhook it toward the windshield
5 Pull the wiper blade past the wiper
arm toward the top
6 Insert a new wiper blade and apply
pressure until you hear it engage.
Online Edition for Part-No. 01 41 9 791 187 - © 12/98 BMW AG
Lamps and bulbs
Press the tabs together (arrows).
2 Highbeams/side lamps and parking
lamps
Insert the screwdriver (from the onboard tool kit) and press in the direction
of the arrow.
Car care
Controls
Overview
1 Low beam headlamps
Technology Repairs
Release the lamp cover.
Data
A replacement bulb set is available from
your BMW center.
The illustration shows the left-hand side
of the engine compartment.
Index
Do not touch the glass portion of a
new bulb with your bare hands
since even small amounts of impurities
burn in to the surface, thus reducing the
service life of the bulb. Use a clean
cloth, paper napkin, or a similar material, or hold the bulb by its metallic
base.<
Whenever working on the electrical system, switch off the electrical accessory you are working on or
disconnect the cable from the negative
terminal of the battery. Failure to do this
could result in short circuits.
To prevent injuries and damage, comply
with any instructions provided by the
bulb manufacturer.<
380de656
The lamps and bulbs make essential
contributions to the safety of your vehicle. Observe the following instructions
during bulb replacement carefully. If
you are not familiar with any of the procedures, consult your authorized BMW
center.
163n
Online Edition for Part-No. 01 41 9 791 187 - © 12/98 BMW AG
164nLamps
and bulbs
1
2
3
4
5
Remove the cover
Pull off the connector at the bulb
Detach the wire clamp
Replace the bulb
Install in the opposite order of work.
380de099
3 Parking lamp
5 watt bulb
1 Pull the bulb holder out
2 Remove and replace the bulb.
When cleaning the headlamps,
please observe the following:
> Do not clean by wiping with a dry
cloth (scratches). Never use abrasives or strong solvents to clean the
1 Low beam headlamps
covers
H1 bulb, 55 watt
> Remove dirt and contamination
(such as insects) by soaking with
2 High beams
BMW Car Shampoo and then rinsing
with plenty of water
H7 bulb, 55 watt
> Always use a deicer spray to remove
accumulated ice and snow – never
The H7 bulb is pressurized. Thereuse a scraper.<
fore, wear safety glasses and protective gloves. Failure to observe this
precaution could lead to injury if the
bulb is accidentally damaged during replacement.<
For checking and adjusting headlamp aim, please contact your
BMW center.<
Xenon lamps*
The service life of these bulbs is very
long and the probability of a failure is
very low, provided that they are not
switched on and off an unusual number
of times. If one of these bulbs should
nevertheless fail, it is possible to continue driving with great caution using
the fog lamps, provided traffic laws in
your area do not prohibit this.
Because of the extremely high
voltages involved, any work on the
lighting system should be carried out by
technically-qualified personnel only.
Otherwise, there is a risk of fatal injury.<
Online Edition for Part-No. 01 41 9 791 187 - © 12/98 BMW AG
Lamps and bulbs
165n
Front fog lamps
Dual-filament bulb, 21 watt
1 Use a screwdriver to release the fog
lamp retainer (arrow)
2 Pull the fog lamp out toward the front
3 Release and remove the cover on the
rear of the lamp assembly
4 Remove the plug
5 Detach the wire clamp
6 Replace the bulb
7 After replacing the bulb, guide the
lamp assembly back into position.
Continue pressing until you hear the
detent snap into place.
Index
1 Remove the assembly cover
2 Insert a Philips-head screwdriver
(arrow) all the way in and loosen the
screw (about four turns)
3 Remove the light assembly toward
the front
4 Release and remove the bulb holder
5 Press gently on the bulb, turn it to the
left and remove
6 When you have replaced the bulb,
plug the light into the reliefs on the
headlamp with the tabs. Push the assembly into place and tighten the
screw
7 Secure the assembly cover.
H3 bulb, 55 watt
Car care
Turn signals/Parking lamps
(side marker lamps), front
Technology Repairs
380de101
380de100
1 Use a screwdriver to pry out the lamp
at the rear edge
2 Apply gentle pressure to the bulb
while turning it to the left to remove.
Data
5 watt bulb
Controls
Overview
Side turn signals
Online Edition for Part-No. 01 41 9 791 187 - © 12/98 BMW AG
Tail lamps
Tail lamp: 5 watt bulbs
Remaining bulbs: 21 watt
1 Turn signal
2 Backup lamp
3 Rear lamp assembly/
Side marker lamps
yellow
white
red
4 Reflector
red
5 Brake lamp
red
In the event of a failure of both
lamps of a rear lamp assembly,
the brake lamp assumes the function of
the tail lamps.<
1 Use the upper handle to fold down
the side panel in the luggage compartment
2 Once you have found the lamp holder
for the defective bulb, push it gently
to the rear while turning to the left to
remove
3 Use the same procedure to remove
the bulb.
380de105
380de103
and bulbs
380us102
166nLamps
License plate lamps
5 watt bulb
1 Apply a screwdriver to the narrow
side of the lamp to pry it out
2 Replace the bulb.
Center (high-mount) brake lamp
21 watt bulb
1 Open the luggage compartment lid
2 Remove the grommet from the lamp
holder below the rear parcel tray
3 Press the lamp holder gently while
turning to the left to remove
4 Use the same procedure to remove
the bulb.
Online Edition for Part-No. 01 41 9 791 187 - © 12/98 BMW AG
Lamps and bulbs
5 watt bulb
Interior lamp (10 watt bulb) with reading
lamps (10 watt bulbs)
1 Use a screwdriver to remove the lens
to the side
2 Replace the bulb.
1 Apply a screwdriver to the recess to
pry the lamp out
2 Remove the reflector
3 Replace the bulb.
1 Interior lamp: Use a screwdriver to
press out the lamp sideways and remove the lens. Pull the bulb out of the
contact studs
2 Reading lamp: Gently press against
the lamp while turning it to the left to
remove.
Rear:
Interior lamp (10 watt bulb) with reading
lamp (5 watt bulb)
1 Use a screwdriver at the top of the
recesses to press out the light
2 Interior lamp: Push the tab back on
the reflector and change the bulb
3 Reading lamp: Gently press against
the lamp while turning it to the left to
remove.
Door warning lamps
5 watt bulb
Luggage compartment lamps
1 Apply a screwdriver to the narrow
side of the lamp to pry it out
2 Turn the bulb holder to the left to
remove
3 Replace the bulb.
10 watt bulbs
Door handle lamps
Please contact your BMW center in the
case of a malfunction.
Lamps on the underside of the package
tray and in the luggage compartment
lid:
1 Apply a screwdriver to the recess to
pry the lamp out
2 Remove the reflector
3 Replace the bulb.
Indirect lighting (1 watt bulb)
Controls
Glove compartment lamp
5 watt bulb
Car care
Footwell lamps
Front:
Technology Repairs
Interior lamps
Overview
167n
Index
Data
1 Unclip the lamp holder
2 Replace the bulb.
Online Edition for Part-No. 01 41 9 791 187 - © 12/98 BMW AG
Changing battery
Replace the battery when the message
"REMOTE KEY BATTERY" appears in
the Check Control. The LED no longer
lights up when a button is pressed and
it is no longer possible to lock the car
using the remote key.
Install only a battery of the type that is
specified in the battery compartment
(CR 2016). Be sure the battery is installed in the correct position.
1 Use a screwdriver to lift the cover at
the recess (arrow)
2 Loosen the two screws (arrows) and
remove the cover.
The battery type and its installation position are stamped into the base of the
battery compartment.
Return used batteries to a recycling point or to your authorized
BMW center.<
380us014
365de018
control
365de017
168nRemote
New transmitter
If you place a new transmitter into service (either a replacement or an additional transmitter), it must be initialized:
1 Enter the vehicle and close the
driver's door
2 Briefly (max. 5 seconds) turn the
ignition key to position 1 in the steering lock, then return it to position 0
3 Remove key; press and hold down
button 1 (see illustration). Maintain
pressure on button 1 while rapidly
pressing button 2 three times in succession within a period of 10 seconds
Online Edition for Part-No. 01 41 9 791 187 - © 12/98 BMW AG
Remote control
Overview
To prevent unauthorized use of the
transmitter, surrender only the
door and ignition key or the spare key
(refer to page 30) for valet parking).<
Controls
4 Release button 1, LED 3 will flash
slowly for a maximum of 10 seconds
5 The central locking system activates
and releases all lock mechanisms in
rapid succession to indicate that the
initialization procedure has been
successfully completed.
169n
Car care
If the LED does not flash or the central
locking system fails to respond, you
must repeat the initialization procedure.
Technology Repairs
If you possess additional transmitters
for your vehicle (up to a maximum
of four units), you must now initialize
these as well. Be sure that no more
than 30 seconds is allowed to elapse
between the individual initialization procedures. Do not actuate the steering
lock during this time.
Index
Data
In the event of a system malfunction,
please contact your authorized BMW
center, who can also provide you with
replacement transmitters.
Online Edition for Part-No. 01 41 9 791 187 - © 12/98 BMW AG
tires
Safety measures in the event of a
flat tire or wheel change:
Stop the vehicle as far as possible from
passing traffic. Park on a firm, flat, surface.
Switch on the hazard flashers.
Turn the steering wheel to the straightahead position, remove the key and engage the steering lock. Make sure that
the selector lever is in Park, and engage
the parking brake.
All passengers should be outside the
car and well away from your immediate
working area (for instance, behind a
guardrail).
If a warning triangle or portable hazard
warning lamp is available, set it up on
the roadside at an appropriate distance
from the rear of the vehicle.
Comply with all safety guidelines and
regulations.
Change the wheel only on a level, firm
surface which is not slippery. Avoid
jacking the car on a soft or slippery support surface (snow, ice, loose gravel,
etc.), since it could slide sideways.
Position the jack on a firm support surface.
Do not place wooden blocks or similar
objects under the jack. If this is done,
the jack might not be able to reach its
full support capacity because of the
limited height. Do not lie under the vehicle or start the engine when the vehicle
is supported by the jack - risk of fatal
injury.<
380de639
170nChanging
What you will need
In order to avoid rattling noises later,
note the position of the tools when you
remove them and return them to their
original position when you are through
using them.
> Car jack
Fold the right-hand trim panel of the
luggage compartment down using
the handle at the top.
Loosen the wing nut (arrow 1).
When you have completed work,
screw the jack all the way back down.
Fold the handle back and insert it in
its holder.
> Wedge (wheel chock)
Next to the battery, under the jack.
Remove the jack and loosen the wing
nut (arrow 2).
Online Edition for Part-No. 01 41 9 791 187 - © 12/98 BMW AG
Changing tires
Online Edition for Part-No. 01 41 9 791 187 - © 12/98 BMW AG
Controls
Car care
390de350
5 Loosen lug bolts 1/2 turn
6 Position the jack at the jacking point
closest to the flat tire (refer to the
arrow on the sill trim) so that the
jack base is vertically below the
jacking point and the entire surface
of the head of the jack will move
into the square recess of the jacking
point (refer to the illustration detail)
when the jack is cranked
7 Jack the car up until the wheel you
are changing is raised from the
ground
8 Unscrew the lug bolts and remove
the wheel
9 Remove accumulations of mud or
dirt from the mounting surfaces of
the wheel and hub; clean the lug
bolts
Technology Repairs
1 Read carefully and comply with the
safety precautions on the preceding
page
2 Secure the vehicle against rolling:
Place the wedge against the rear
surface of the front tire on the side
opposite the side being raised. If
the vehicle is parked on a downward slope, place the wedge securely in front of the tire. If the
wheel must be changed on a surface with a more severe slope, take
additional precautions to secure the
vehicle from rolling
3 If equipped with adapters*: Place
the adapter on the lug bolt cover,
position the lug wrench and press
to the left (refer to the illustration)
4 Wheels with hub cover*: Pry the
hub cover off with the screwdriver in
the slot
Data
Procedure
Index
> Spare tire and adapter* for removal
of the lug bolt cover*
Both are stored in the luggage compartment below the floor mat. Fold
back the mat for access.
Remove the adapter (arrow), unscrew
the wing nut by hand and remove the
wheel
> Wheel lug wrench, alignment tool and
screwdriver
are in the onboard tool kit on the underside of the luggage compartment
lid (refer to page 162).
380de092
380de091
Overview
171n
172nChanging
tires
390de093
16 If equipped with lug bolt covers:
Align the arrow on the cover with
the line in the wheel and press the
cover into place
17 Check and correct the air pressure
as soon as possible.
10 Take the alignment tool from the
onboard tool kit and insert it together with the plastic insert into
one of the bolt sockets (arrow)
11 Position on the spare wheel. Secure
it by screwing at least two lug bolts
into opposite sockets. Remove the
alignment tool
12 Screw in the remaining lug bolts.
Tighten all the bolts securely
13 Lower the jack and remove it from
beneath the car
14 Tighten the lug bolts, alternating
between bolts positioned opposite
one another
15 Wheels with hub covers: Position
the hub cover and press on tightly
The vehicle jack is designed for
changing tires only. Do not attempt to raise another vehicle model
with it or to raise any load of any kind.
To do so could cause accidents and
personal injury.
Have the lug bolts checked for proper
tightness with a calibrated torque
wrench at the earliest possibility (torque
specification: 72 lb.ft./100 Nm).<
When storing the wheel, take care to
ensure that you do not damage the retaining pin in the spare tire recess.
When light-alloy wheels other than
Original BMW light-alloy wheels are fitted to the car, it may be necessary to
use different lug bolts.
Replace the defective tire as soon as
possible and have the new wheel/tire
balanced.
Online Edition for Part-No. 01 41 9 791 187 - © 12/98 BMW AG
Battery
Two batteries are installed in the BMW
750iL. They are located in the luggage
compartment behind the right side trim
panel.
Grasp the handle in the upper panel
and fold it down.
To check the charge condition or
for removal or installation, please
consult your BMW center.<
Battery acid is extremely corrosive. Wear eye protection and
protective gloves. Do not tip the
battery. Battery acid can leak from the
ventilation openings.
Be sure that children keep well
away from batteries and battery
acid.
Never allow sparks or open
flame, and do not smoke in the
vicinity of the battery.
Avoid sparks from electrical cables or
electrical equipment. Turn the key to position 0 in the steering lock when the
battery is disconnected or connected.
Controls
Car care
Installation location, BMW 750iL
The battery is located behind the rightside trim panel in the luggage compartment.
Wear eye protection. Do not allow particles containing battery
acid or lead to come into contact with your eyes, your skin, or your
clothing.
Technology Repairs
Installation location, BMW 740i/L
Please read the following information before working with the
battery.
Index
380de654
380de671
You will find the following symbols on
your car battery. To avoid injury, please
observe the corresponding precautions
whenever you work with or near the
battery.
Data
Symbols
Overview
173n
Online Edition for Part-No. 01 41 9 791 187 - © 12/98 BMW AG
174nBattery
Charging the battery
Do not short circuit the battery terminals. This creates a risk of personal injury from high-voltage sparks.
Charge the battery in the vehicle only
when the engine is off. Charge the battery using the supplementary positive
terminal and ground (terminal) in the engine compartment (refer to "Jump-starting" on page 179).
If you happen to get acid in
your eyes, rinse thoroughly for
15 minutes with clear water.
Consult a physician immediately. If you
get acid spray on your skin or clothing,
rinse with plenty of water. If electrolyte
is accidentally ingested, consult a physician immediately.
In order to protect the battery
case from ultraviolet radiation,
do not place it in direct sunlight.
A discharged battery can freeze. Store
the battery in areas where temperature
remains above freezing.
Car care
380de655
A highly-explosive gas is
generated when the battery is
charged.
Charge condition – BMW 740i/L
You can read the charge condition of
the battery with the "Magic Eye" (a hydrometer) (not released at this time):
> Green: Adequate charge
> Black: Not charged adequately. The
battery must be recharged. Please
contact your BMW center
> Yellow: Replace the battery.
On the BMW 750iL, there is an automatic switch between the two batteries
during charging.
Before performing any work on
the electrical system, disconnect
the cable from the negative terminal. If
you do not, short circuits can create the
risk of fire or personal injury.
If a jump start is necessary, connect the
cables only to the auxiliary terminal for
jump starting and a ground in the engine compartment in order to avoid
damage to the batteries (refer to
"Jump-starting" on page 179).<
The battery is completely maintenancefree, that is, the original electrolyte will
normally last for the service life of the
battery.
Online Edition for Part-No. 01 41 9 791 187 - © 12/98 BMW AG
Battery
Overview
Controls
Car care
Index
380de653
Do not disconnect the battery
when the engine is running. Disconnecting the battery cable when the
If you intend to store your car for longer engine is running will cause a voltage
surge that will damage the vehicle's onthan six weeks: Remove the battery,
charge it and store it in a cool (but frost- board electronics.
free) room. After a period not exceeding Do not make any modifications in the
wires to the positive terminal. If you do
6 months and before reinstalling the
battery, have it recharged. If it is not re- so, the protective function of the safety
battery terminal is no longer ensured.
charged, it will not be serviceable. EvRepairs and disposal may only be per- BMW 740i/L: When removing the batery time the battery is discharged, esformed by specially-trained personnel.< tery, disconnect the negative terminal
pecially over extended periods, its
first, then the positive terminal.
service life is reduced.
BMW 750iL: Please contact your authoUnscrew the battery retaining clamp
rized BMW center for additional inforAvoid environmental pollution
(arrow).
when disposing of old batteries.< mation.
When installing the battery, connect the
positive terminal first, then connect the
Return used batteries to a recynegative terminal.
cling point or to your authorized
BMW center. Maintain the battery in an
When installing a battery, be sure
upright position for transport and storthat it is mounted properly. If the
age. Secure the battery against tilting in
battery is not mounted properly, it will
transit.<
not be adequately secured in case of an
accident.<
Technology Repairs
Removal and installation
Data
If you plan to store the vehicle for
longer than 4 weeks, disconnect the
battery from the vehicle electrical system by disconnecting the cable at the
negative terminal.
175n
Online Edition for Part-No. 01 41 9 791 187 - © 12/98 BMW AG
176nFuses
380de085
A list of the fuses, their respective amDo not attempt to repair a burned
pere ratings and the equipment in their
fuse or replace it with a fuse havcircuits is provided next to the fuse box. ing a different color or amperage rating.
To do this could cause a fire in the vehiWhen you close the fuse box, be sure
cle resulting from a circuit overload.<
that the cover is seated securely.
If an electrical accessory should fail,
switch it off and check the fuse.
Additional fuses are provided in the
luggage compartment (refer to next
column).
If the fuse fails repeatedly, refer the
problem to your BMW center for repair.
The fuse for continuous positive current
is located in a separate fuse box above
the battery. If this fuse is defective, refer
the problem to your BMW center for repair.
In the engine compartment
1 Open the hood. Press the cover fasteners (arrows) forward and open the
cover
2 Use the plastic tweezers (located on
the inside of the cover) to remove the
fuse for the accessory or equipment
that has stopped working from its
socket
3 If the fuse is burned through (the
metal strip is melted and separated),
replace it with a new fuse of the same
ampere rating (color code).
Online Edition for Part-No. 01 41 9 791 187 - © 12/98 BMW AG
Fuses
Controls
Car care
3 Move the sound insulation material
slightly to the side.
Technology Repairs
A list of the fuses, their respective ampere ratings and the equipment in their
circuits is provided on the rear of the
side trim.
Data
1 Fold down the right-hand trim panel
with the upper handle
2 BMW 750iL: Unscrew the hexagon
nut (arrow), lift the battery support up
slightly and swing it inward together
with the battery
Index
In the luggage compartment
380de124
380de672
Overview
177n
Online Edition for Part-No. 01 41 9 791 187 - © 12/98 BMW AG
Manual release
1 Use the handle to lower the trim
panel on the right side of the luggage
compartment
2 BMW 750iL: Unscrew the hexagon
nut (arrow), lift the battery support up
slightly and swing it inward together
with the battery
3 Pull the knob with the fuel pump
symbol.
380de096
Sliding/Tilt sunroof
380de614
filler door
380de672
178nFuel
Manual operation
1 Remove the interior lamp (refer to
page 166). Reach into the opening
and push out the panel
2 Remove the plug (arrow) and use the
Allen wrench from the onboard tool
kit (refer to page 162) to turn the sliding/tilt sunroof in the desired direction.
Online Edition for Part-No. 01 41 9 791 187 - © 12/98 BMW AG
Jump-starting
179n
Follow the same sequence for
connecting the jumper cables if
you assist in jump-starting another vehicle. If you do not, there is a risk of injury caused by spark generation at the
battery.<
Online Edition for Part-No. 01 41 9 791 187 - © 12/98 BMW AG
Controls
Car care
Technology Repairs
Data
1 Ensure that the battery on the support vehicle is also rated at 12 volts,
and that the capacities of the two
batteries (Ah) are roughly comparable
(printed on casing)
2 Leave your battery connected to the
car electrical system
3 Make sure that there is no contact
between the bodywork of the two vehicles – short circuit risk.
4 Start by connecting the jumper cable 5 Then connect the negative terminals.
from the positive terminal of the supAttach the cable to either the support
port vehicle to the positive terminal
vehicle's negative battery terminal,
connector located in your BMW's enor to a suitable ground on its engine
gine compartment. The cover of the
or bodywork. Then connect the other
auxiliary terminal for jump starting is
end of the cable to ground on the vemarked with "Batt. +" (refer to the ilhicle's engine or bodywork which is
lustration). Remove by pulling tab.
to be started. Then connect the other
The illustration shows the auxiliary
end of the cable to a ground on your
terminal for jump starting the BMW
vehicle's engine or bodywork (for in740i/L as an example. For the BMW
stance, the nuts on the strut dome.
750iL: Refer to "Engine compartRefer to the arrows in the illustration
ment" on page 140
above)
Index
Carefully comply with the following instructions to avoid personal injury and
damage to one or both vehicles:
380de117
Do not touch high-voltage wiring
and cables on a running engine.
There is a risk of fatal injury if you do
this.<
380de089
If the battery is discharged, you can use
two jumper cables to start your car with
power from the battery of a second vehicle. Always use jumper cables with
fully insulated handles on the terminal
clamps.
Overview
Never use spray starter fluids to start
the engine.
Have the battery recharged if necessary.
Tow fitting
The screw-in tow fitting is stored in the
onboard tool kit; be sure that it remains
in the vehicle at all times. This fitting is
designed for installation in the tow
sockets located at the front and rear of
the vehicle, and is intended for towing
on proper road surfaces only.
It should not be used to pull a vehicle
out of deep snow, mud, sand, etc. Always observe all applicable towing laws
and regulations.
Access to tow sockets
Front:
Apply pressure to the arrow symbol on
the cover panel to remove.
380de088
6 If the battery of the support vehicle is
weak, start its engine and let it run
7 Start the engine on the vehicle needing the jump-start, and allow it to run
as usual. If the first start attempt is
not successful, wait a few minutes
before another attempt in order to
allow the discharged battery to recharge
8 Before disconnecting the jumper cables from your BMW, turn on the rear
window defroster and set the blower
to the highest speed; allow the engine to run approx. 10 seconds. This
will prevent a voltage surge from the
voltage regulator to the electrical accessories
9 Then disconnect the jumper cables in
reverse sequence.
Towing the vehicle
380de087
180nJump-starting
Rear:
Apply pressure to the arrow symbol on
the cover panel to remove.
Screw the tow fitting in until it bottoms firmly. If this is not done, the
threads could be damaged.
Do not tow the vehicle by any components of the running gear, or lash them
down in any way. If you do so, the components could be damaged, leading to
possible accidents.<
Use only a nylon towing strap to tow the
vehicle, since the inherent resilience of
this material helps protect both vehicles
from sudden jerking movements.
Online Edition for Part-No. 01 41 9 791 187 - © 12/98 BMW AG
Towing the vehicle
Overview
Data
Never allow passengers to ride in
a towed vehicle for any reason.<
Index
Make sure that the ignition key remains in position 1 even when the
electrical system has failed to prevent
the steering lock from engaging.
The steering and brakes are without
power assist when the engine is off.
This means that increased effort is required for steering and braking.<
Controls
380us124
1 Place selector lever in position N
2 Towing speed:
Max. 45 mph (70 km/h)
Tow-starting
3 Towing distance:
It is not possible to start the engine of
Max. 95 miles (150 km)
vehicles equipped with automatic trans- 4 Leave the ignition key at position 1 to
mission by towing or pushing.
ensure that the brake lamps, turn signals, horn and windshield wipers reFor instructions on jump starting, refer
main operative, and to prevent the
to page 179.
steering lock detent from engaging
Never attempt to use your vehicle to
5 Switch on the hazard-warning system Towing with a commercial tow
push another car, as damage to the
truck
(observe country-specific regulaenergy-absorbing bumpers could
tions).
> Do not tow with sling-type equipment
result.
Find some means of identifying the ve- > Use a wheel lift or flat bed equipment
> Please comply with applicable towing
hicle in tow, for instance, place a sign
laws.
or warning triangle in the rear window.
Car care
Towing a vehicle with automatic
transmission
Technology Repairs
The towed vehicle should always
be the lighter of the two vehicles.
If this is not the case, it is no longer
possible to control vehicle response.<
181n
Online Edition for Part-No. 01 41 9 791 187 - © 12/98 BMW AG
182n
Online Edition for Part-No. 01 41 9 791 187 - © 12/98 BMW AG
Operation, care
and maintenance
Controls
Controls and features
Car care
Overview
Advanced technology
Technology Repairs
Owner service procedures
Data
Technical data
Index
Index
Airbags 184
Adaptive Transmission Control
(ATC ) 184
Automatic Stability Control plus
Traction (ASC+T)/Dynamic Stability Control (DSC) 185
Radio reception 186
BMW Active Seat 186
Safety belt tensioner 187
DSP sound system 187
Rearview mirror with automatic
dimmer 188
Tire Pressure Control (RDC) 189
Xenon lamps 190
Water and dirt repelling
windshield 191
Overview
183n
Online Edition for Part-No. 01 41 9 791 187 - © 12/98 BMW AG
184nAirbags
ATC
The airbags located under the marked
covers inflate and unfold in a matter of a
few milliseconds. In this process they
tear through the rated breaking points
of the upholstered covers or press them
out.
ATC
In the event of a severe side impact, the
head protection and side airbags in the
front and/or rear* are triggered.
390de048
390de319
Because the inflation process must be
virtually instantaneous, it is necessarily
accompanied by a certain amount of ignition and inflation noise. The gas which
the system employs to inflate the airbag
is not dangerous, and the associated
Deceleration sensors continuously
On vehicles with automatic transmissmoke is quickly dissipated.
monitor the physical forces acting upon The entire process is completed within sion Adaptive Transmission Control
the vehicle. In a severe frontal collision, fractions of a second.
(ATC) uses a number of factors to calthe gas generators of the driver's airbag
culate the maximally efficient gear. In
and the front passenger airbag are igthis process it monitors your personal
nited. However, the passenger-side airdriving style, the situation in which you
bag is only triggered if an additional
are driving, the condition of the road
sensor has recognized that the passenand the traffic conditions.
ger seat is occupied.
ATC recognizes your personal driving
style from the positions and movements
of the gas pedal, declaration when
braking and lateral acceleration through
curves. Four shift characteristics – from
comfort-oriented to performance-oriented – are available for selection by
ATC.
Online Edition for Part-No. 01 41 9 791 187 - © 12/98 BMW AG
If differences in the wheel speeds occur, the system counteracts the danger
of wheelspin by reducing torque. If necessary, the system also responds with
additional applications of the brakes at
the rear wheels.
If the system detects an instability in the
vehicle's condition, the braking action
can also be directed to the front wheels
by the DSC in order to stabilize the vehicle.
You may need some time to become
accustomed to this system intervention.
However, it helps provide optimum propulsive force and driving stability.
The braking intervention may be accompanied by a certain degree of
noise.
Overview
Of course the selector lever can still be
used to select specific gear ratios. Performance-oriented driving is enabled by
shifting from drive position "D" to "S,"
"3" or "2." Positions "3" and "2" each
limit upshifts to the next gear. Position
"2" is best for driving on steep mountain
slopes with a heavy load.
Controls
Precision sensors monitor the number
of revolutions of the wheels. When
equipped with DSC, they also monitor
steering angle, lateral acceleration,
brake pressure and the movement of
the vehicle around its vertical axis.
Car care
By recognizing traffic conditions, ATC
can retain maximum driving comfort.
For instance, the system recognizes
stop-and-go traffic and then proceeds
only in second gear until it encounters
higher starting loads.
Data
With respect to road conditions, ATC
monitors the friction between the tires
and the road. The system responds to
slippery road surfaces (snow and ice)
by activating the winter program.
Second gear is used when moving
away from a standstill, upshifts occur
sooner, and on descents downshifting
does not occur in spite of the application of brakes. This enables you to
"feel" the road as you drive and produces greater dynamic stability. If the
friction between the tires and the road
is adequate, the normal system is again
activated. The system also leaves the
winter program when you shift from
drive position "D" to "S," "3" or "2," or if
the ASC+T/DSC* is deactivated.
185n
Index
In order to take driving conditions into
account, ATC registers corners and
both uphill and downhill gradients. For
example, if you maintain speed through
a curve, the transmission does not upshift.
On uphill gradients, it shifts only when
the engine speed increases in order to
make more efficient use of power reserves. On downhill gradients ATC
downshifts when the speed of the vehicles increases causing the driver to
step on the brakes.
ASC+T/DSC*
Technology Repairs
ATC
Online Edition for Part-No. 01 41 9 791 187 - © 12/98 BMW AG
186nRadio
reception
BMW Active Seat*
With radio stations which broadcast
over multiple frequencies, the "Radio
Data System" (RDS) ensures that the
frequency with the best reception quality will automatically be selected.
The Diversity Antenna system employs
several FM antennas integrated within
AM provides substantially longer recep- the rear window to provide three sepation ranges than FM. AM broadcast sig- rate sources for receiving broadcast
nals, propagated at ground level in the waves. An integral processor automatiform of surface waves, are also recally selects the antenna with the best
flected from the ionosphere as atmoFM reception quality at any given time.
spheric waves.
Because the ongoing antenna selection
Frequency-modulation (FM) provides
process is completed within millisecsubstantially better sound quality than
onds, it remains inaudible to the radio
AM. However, because FM transmislistener.
sions rely on line-of-sight broadcast
waves, their effective reception range is
limited.
380de676
360de062
Although numerous factors combine to
impose inherent limitations on the reception quality available from mobile radios, specially designed systems can
be employed to minimize their effects:
The Active Seat is an advanced development in BMW seats. These seats are
engineered with orthopedic considerations so that you will be less fatigued
during longer trips and sitting for long
periods without moving. The seat is no
longer a passive link between the road,
the running gear, and the driver. Instead, by means of an active modification to the seat's surface, the seat
causes weight transfers which are slight
and imperceptible. The basic seating
position is not changed by this.
In the seat's upholstery, beneath the
surface of the seat, there is a cushion of
fluid on the left and right. The fluid is
slowly circulated back and forth between the cushions by means of a
pump.
Online Edition for Part-No. 01 41 9 791 187 - © 12/98 BMW AG
187n
Car care
Technology Repairs
Data
The DSP Professional premium sound
system features a special amplifier
combined with Digital Sound Processing (DSP) and integrated speakers to
surround you with crisp, true-to-life
sound reproduction.
The speaker system's subwoofers,
woofers, midrange speakers and tweeters furnish you with an impressively fullbodied listening experience. The individual components are oriented so as
to produce the aural sensation that you
would experience facing the stage in a
concert hall. The system also automatically adjusts the bass and treble settings to compensate for changes in volume and vehicle speed.
Index
The safety belt tensioner responds to
collisions by tightening the belts to ensure that occupants remain firmly positioned in their seats. A gas-pressure
system retracts the buckle assembly to
tension the shoulder and lap belts
within fractions of a second. This reduces the tendency to slide under the
lap belt.
Controls
Overview
DSP sound system*
390de109
This causes a movement of the spinal
column which is barely detectable, together with an improvement in the flow
of blood to the intervertebral disks and
the muscle structure in the area of the
spinal column.
The passengers do not suffer as much
from muscle tension, back pain in the
lumbar region or symptoms of fatigue.
As a result, the Active Seat represents a
significant contribution to driving comfort and driving safety.
Safety belt tensioner
390de330
BMW Active Seat*
Online Edition for Part-No. 01 41 9 791 187 - © 12/98 BMW AG
188nRearview
mirror with automatic dimmer
390de113
The semisolid reacts chemically to this
electrical current, thus providing infinitely-variable dimming of the mirror
(electrochromic technology).
As a result, it is no longer necessary to
dim the mirror manually, and the driver
can maintain full concentration on traffic.
The interior rearview mirror with automatic dimming feature reduces glare
from following traffic by adapting the intensity of the reflected images to correspond to levels of light registered by the
unit's sensors. The mirror reverts to its
undimmed setting as soon as the light
source disappears. One of these sensors is mounted on the front of the mirror housing and is designed to monitor
light levels in the area immediately forward of the vehicle. The second sensor
is integrated within the mirror's glass.
The electronic control system operates
by comparing the respective levels of
luminous intensity in front of and behind
the car. The difference provides the basic parameter used to modulate an
electrical current and induce chemical
changes in a semisolid layer incorporated in the lens.
Online Edition for Part-No. 01 41 9 791 187 - © 12/98 BMW AG
Tire Pressure Control (RDC)*
189n
Overview
Controls
The RDC provides an important contribution to driving safety.
Car care
380de673
Near every wheel, there are antennas in
the body which receive the signals from
all four wheels. A central electronics
system evaluates the quadruple signals
which it receives and forwards any
changes.
Technology Repairs
The Tire Pressure Control system assumes the task of regular tire pressure
checks for you. Tire pressures are monitored at all four wheels, even when the
vehicle is moving.
Index
Data
Behind the valve stem in every wheel,
there is an electronic chip which is designed for severe-duty applications and
long service life. It contains a pressure
sensor, a transmitter and a battery. The
pressure is measured in extremely short
time intervals and then transmitted by a
radio signal. If an irregularity is detected, the transmission rate is increased.
Online Edition for Part-No. 01 41 9 791 187 - © 12/98 BMW AG
190nXenon
lamps*
390de134
Xenon lamps provide significantly-improved visibility, especially during adverse weather conditions and driving
situations (driving at night in heavy rain
or through road repair areas where
there are no lanemarkers, for instance).
The xenon lamps light up the side and
front areas of the vehicle with significantly more brightness and uniformity
than the traditional halogen lamp.
In a xenon lamp, an electric arc replaces the filament in order to generate
intense illumination. A gas mixture in a
quartz piston with metal vapor is ignited
by a high electric voltage. The arc that
is generated is then sustained by a
lower voltage. When the lamp is turned
on there is a brief period of high intensity. Maximum brightness is attained in
approx. 15 seconds.
Vehicles with xenon lamps are
equipped with automatic-dynamic
headlamp range control. As a result, the
highway is always optimally lighted, regardless of load conditions, and drivers
in oncoming traffic are not blinded.
Xenon lamps make a significant contribution to highway safety since other
highway users, bicyclists and motorcyclists in the right lane, and pedestrians
are more easily detected.
Online Edition for Part-No. 01 41 9 791 187 - © 12/98 BMW AG
Water and dirt repellent windshield*
191n
Overview
Additional benefits:
Car care
390de337
Controls
> Clear vision in adverse weather conditions, resulting in enhanced driving
safety
> Less glare when driving in the rain at
night.
Technology Repairs
With this windshield (not released at
this time), a specially-smoothed surface
causes water drops to bead up and run
off, thus carrying particles of dirt with
them.
Traditional windshields, even when they
are in new condition, have a microscopically "rough" surface (1). The surface of
the water and dirt repelling windshield
is smoothed with a clear transparent
fluid.
Index
Data
Depending on the cleanliness of the
windshield, the water beads up and
runs off at approx. 40 mph (60 km/h) as
a result of the air flow (2). The coating
has no negative effect on vision through
the windshield because it is completely
transparent.
Online Edition for Part-No. 01 41 9 791 187 - © 12/98 BMW AG
192n
Online Edition for Part-No. 01 41 9 791 187 - © 12/98 BMW AG
Operation, care
and maintenance
Controls
Controls and features
Car care
Overview
Advanced technology
Technology Repairs
Owner service procedures
Data
Technical data
Index
Index
Engine specifications 194
Dimensions 195
Weights 196
Capacities 197
Electrical system 198
Drive belts 198
Overview
193n
Online Edition for Part-No. 01 41 9 791 187 - © 12/98 BMW AG
194nEngine
specifications
3
BMW 740i/L
BMW 750iL
Displacement
Number of cylinders
cu in (cm )
268.4 (4398)
8
328.2 (5379)
12
Max. output
at engine speed
hp
rpm
282
5700
326
5000
Maximum torque
at engine speed
ft lb (Nm)
rpm
310 (420)
3900
361 (490)
3900
Compression ratio
e
10.0
10.0
Stroke/Bore
in (mm)
3.26/3.62 (82.7/92.0)
3.11/3.35 (79/85)
Fuel-injection system
Digital-electronic engine-management system
Online Edition for Part-No. 01 41 9 791 187 - © 12/98 BMW AG
Dimensions
All dimensions are given in inches (mm).
Min. turning circle dia.: BMW 740iL/750iL 40.0 ft (12.2 m), BMW 740i 38.1 ft (11.6 m)
Online Edition for Part-No. 01 41 9 791 187 - © 12/98 BMW AG
Index
380us663
Data
Technology Repairs
Car care
Controls
Overview
195n
196nWeights
BMW 740i
BMW 740iL
BMW 750iL
Curb weight (with driver, ready for operation, full tank of fuel, options not included)
lbs. (kg)
4255 (1930)
4289 (1945)
4549 (2065)
Approved gross vehicle weight
lbs. (kg)
5313 (2410)
5347 (2425)
5606 (2545)
Approved front axle weight
lbs. (kg)
2590 (1175)
2602 (1180)
2690 (1220)
Approved rear axle weight
lbs. (kg)
2910 (1320)
2933 (1330)
3040 (1380)
Maximum load capacity
lbs. (kg)
1058 (480)
1058 (480)
1058 (480)
Approved maximum roof load
lbs. (kg)
220 (100)
220 (100)
Permitted axle loads and permitted total vehicle weight may not be exceeded.
220 (100)
Luggage compartment capacity
17.7 (500)
cu ft (liters)
17.7 (500)
17.7 (500)
Online Edition for Part-No. 01 41 9 791 187 - © 12/98 BMW AG
Capacities
Reserve
gal. (liters)
Windshield washer
incl. headlamp-washing system
quarts (liters)
quarts (liters)
approx. 4.7 (approx. 4.5)
approx. 6.5 (approx. 6.0)
For details: Refer to page 128
Cooling system including
heater circuit
quarts (liters)
13.2 (12.5)
13.7 (13.0)
– BMW 740i/L
– BMW 750iL
For details: Refer to page 130
Engine oil and filter change
quarts (liters)
7.9 (7.5)
8.5 (8.0)
– BMW 740i/L
– BMW 750iL
Approved HD oil for gasoline
engines. Specifications: Refer
to page 144
Automatic transmission
–
–
Lifetime fluid, no fluid change
required
Differential
quarts (liters)
1.7 (1.6)
Approved hypoid gear oil
(specifications are available
from any BMW center)
Controls
22.5 (approx. 85) – BMW 740i/L Fuel specification: Refer to
25.1 (approx. 95) – BMW 750iL page 25
2.6 (approx. 10.0) – BMW 740i/L
3.2 (approx. 12.0) – BMW 750iL
Index
approx.
approx.
approx.
approx.
Car care
gal. (liters)
Data
Fuel tank
Technology Repairs
Notes
Overview
197n
Online Edition for Part-No. 01 41 9 791 187 - © 12/98 BMW AG
198nElectrical
system
Drive belts
Battery
BMW 740i/L
BMW 740i/L: 12 V, 110 Ah
BMW 750iL: 12 V, 55 Ah
12 V, 110 Ah
Water pump – AC generator power steering
V-belt 7 K x 1635
Spark plugs
A/C compressor
V-belt 5 K x 1004
NGK BKR 6 EQUP or
BMW 750iL
Bosch FGR 7 DQP
AC generator – power steering
V-belt 7 K x 1045
This spark ignition system meets all requirements of the Canadian Interference-Causing Equipment Regulations.
Coolant pump – air conditioner
compressor
V-belt 6 K x 1190
You can obtain Original BMW
Parts and Accessories, as well as
professional advice from your authorized BMW center.<
Online Edition for Part-No. 01 41 9 791 187 - © 12/98 BMW AG
Index
Data
Technology Repairs
Car care
Controls
Overview
199n
Online Edition for Part-No. 01 41 9 791 187 - © 12/98 BMW AG
200n
Online Edition for Part-No. 01 41 9 791 187 - © 12/98 BMW AG
Operation, care
and maintenance
Controls
Controls and features
Car care
Initial overview
Advanced technology
Technology Repairs
Owner service procedures
Data
Technical data
Index
Index
Everything from A to Z 202
Owner service procedures from
A to Z 207
Overview
201n
Online Edition for Part-No. 01 41 9 791 187 - © 12/98 BMW AG
Everything from A to Z
A
ABS 125
Accessories 6
Activated-charcoal filter 105
Active seat 48
Adaptive Transmission
Control (ATC) 63
Adding engine oil 143
Adding washer fluid 142
Adjust the backrest 46
Adjusting steering wheel 49
Air distribution 102
Air flow 103
Air jets 100
Air pressure 132
Airbags 55
Alarm system 40
Deactivating in an
emergency 41
Antenna diversity 186
Antifreeze 146
Antifreeze, radiator 128, 146
Antilock Brake System
(ABS) 125
Anti-theft alarm system
32, 40
Approved gross vehicle
weight 196
Aquaplaning 123, 132
Armrest 111
ASC+T (Automatic Stability
Control plus Traction) 92
Ashtray 114
AUC (Automatic recirculatedair control) 103
Audio System 78
Automatic car washes 150
Automatic climate
control 100
Automatic climate control,
removing window
condensation 102
Automatic recirculated-air
control (AUC) 103
Automatic Soft-Close
feature 38
Automatic Stability Control
plus Traction (ASC+T) 92
Automatic steering wheel
adjustment 49
Automatic transmission 62
Automatic transmission with
Steptronic 65
Automatic windshield
washer 69
Average fuel consumption 85
Average speed 86
Axle loads 196
B
Backup lamps, bulb
replacement 166
Battery 173, 198
Battery capacity 198
Battery change, radio remote
control 168
Battery charge current 20
Battery, discharged 179
Battery, removal and
installation 175
Belts 54
Beverage holders 113
Blower 103
Body-cavity protectant 151
Brake faults 128
Brake fluid 147
Brake hydraulic system 20
Brake lamps, bulb
replacement 166
Brakes 126
Break-in procedure 122
Break-resistant security
glass, care 153
Bulb replacement 163
C
Car jack 170
Car Memory 53
Car radio reception 131, 186
Car telephone 113
Car wash 150
Care, exterior 152
Care, interior 154
Caring for the vehicle
finish 152
Caring for your car 150
Catalytic converter 124
Cellular phone 131
Center (high-mount) brake
lamp 166
Central locking system 32
Central locking system,
button 36
Changing a wheel 170
Charge indicator lamp 20
Charging the battery 174
Check Control 75
CHECK key 75
Checking the engine oil 143
Checking tire pressure 26
Child restraints 57
Childproof door locks 58
Cigarette lighter 115
Clock,
refer to Digital clock 79
Code 88
Refer to the Radio Owner's
Manuel
Codes, tires 134
Coin tray 113
Cold start 60
Comfort seats 47
Connecting a car vacuum
cleaner 115
Consumption display 73
Contour seat 48
Online Edition for Part-No. 01 41 9 791 187 - © 12/98 BMW AG
Everything from A to Z
E
EDC (Electronic Damper
Control) 93
Electric power windows 42
Electric rear seat
adjustment 48
Electric steering wheel
adjustment 49
Electrical accessories,
failure 176
Electrical system 198
Electronic Damper Control
(EDC) 93
Electronic immobilizer 31
F
Failure messages 75
First-aid kit 24
Fittings for tow-starting
and towing 180
Flashlight 111
Flat tires 132
Fluid, power steering 148
Fog lamps 97
bulb replacement 165
switch 97
Footwell lamps 98
G
Gasoline 25
Glove compartment 110
Glove compartment lamp,
bulb replacement 167
Gross vehicle weight 196
H
Hand brake, refer to Parking
brake 61
Handsfree system 113
Hazard warning triangle 24
Online Edition for Part-No. 01 41 9 791 187 - © 12/98 BMW AG
Overview
Controls
Car care
Footwell lamps, bulb
replacement 167
For wheelslip control, refer
to ASC+T/DSC 92
Front armrest 112
Front seat adjustment 46
Fuel 25
Fuel consumption
indicator 73
Fuel filler door 25
Fuel filler door,
manual release after
electrical fault 178
Fuel gauge 73
Fuel specifications 25
Fuel tank capacity 197
Fuel, average fuel
consumption 85
Fuses 176
Technology Repairs
Daytime-driving light
switch 96
DBC (Dynamic Brake
Control) 127
Defrosting, windows 102
Digital clock 79
Digital sound processor 187
Dimensions 195
Dimming feature, interior
rearview mirror 50
Dipstick, engine oil 143
Disc brakes 126
Disconnect the battery 175
Displacement 194
Displays 18
Distance 86
Emergency deactivation of
the alarm system 41
Emergency release
doors 32
fuel filler door 178
luggage compartment
lid 37
sliding/tilt sunroof 178
Energy Control 73
Engine coolant 146
Engine data 194
Engine oil consumption 143
Engine oil pressure 20
Engine oil specifications 144
Estimated time of arrival 87
Exterior door handles,
lighted 33
Exterior finish, care 151, 152
Data
D
Distance warning 90
Door key 30
Door warning lamps, bulb
replacement 167
Doors, emergency release 32
Doors, radio remote
control 33
Drink holders 113
Drive belts 198
Driving notes 123
DSC (Dynamic Stability
Control) 92
Dynamic Brake Control
(DBC) 127
Dynamic Stability Control
(DSC) 92
Index
Convenience operating mode
for windows and sliding/tilt
roof 32
Convenience operating mode
for windows and sliding/tilt
sunroof 33
Convenience starting 59
Coolant 146
Coolant temperature
gauge 74
Coolant, antifreeze 128
Cooling system, capacity 197
Cruise control 70
Cruising range 85
203n
Everything from A to Z
Headlamp flasher 68
Headlamp washer
system 142
Headlamp washers 69
Heated seats 106
Heated steering wheel 106
Heating and ventilation 100
Heating during a stop 104
Height 195
HiFi system 187
High beam headlamps,
bulb replacement 164
High beams 68
Hood release 137
Horn 23
I
Ice warning 72
Ignition key 30
Ignition switch 59
Independent ventilation
system 107
Indicator lamps 20
Inflation pressures 26, 132
INSPECTION 74
Instrument cluster 18
Instrument lighting 96
Integrated Universal Remote
Control 108
Interior door handles,
lighted 36, 96
Interior lamps 32, 97
Load-securing devices 118
Locking and unlocking the
doors 32
Locks, care 128
Low beam headlamps, bulb
replacement 164
Low beams 96
Low-fuel warning lamp 73
Lug bolts 171
Luggage compartment 37, 39
J
Nets 39
Jump starting 179
Luggage compartment
lamps, bulb
K
replacement 167
Key Memory 53
Luggage compartment lid 37
Keys 30
Luggage compartment lid,
Kickdown 63, 66
Automatic Soft-Close 38
Luggage compartment lid,
L
manual operation 37
Lashing eyes 39, 118
Luggage compartment
Leather care 154
nets 39
Length 195
Luggage compartment,
Level control system 148
emergency release 37
License plate lamps, bulb
Luggage compartment,
replacement 166
locking separately 37
Light switch 96
Luggage compartment, radio
Lighted exterior door handles
remote control 34
32, 33
Luggage rack 118
Lighted interior door handles Luggage straps 39
36, 96
Lumbar support 47
LIGHTS ON warning 96
Limit 87
Loading 118
Interior lamps, bulb
replacement 167
Interior lamps,
radio remote control 34
Interior motion sensor 40
Interior rearview mirror,
automatic dimming 50
Intermittent wipe switch 68
M
Maintenance 74, 149
Malfunction displays 75
Manually controlled
recirculated-air 103
Master key 30
Memory 51, 53
MFL (Multi-function steering
wheel) 23
Microfilter 105
MID (Multi-Information
Display) 78
Mirror defrosting 50
Mirror memory 51
Mirrors 50
Modifications,
technical 6, 157
Multi-function armrest 112
Multi-function steering wheel
(MFL) 23
Multi-Information Display
(MID) 78
N
New transmitter, radio
remote control 168
Nozzles 100
O
OBD connector 158
Odometer 72
Oil additives 143
Online Edition for Part-No. 01 41 9 791 187 - © 12/98 BMW AG
Everything from A to Z
S
Safety belt tensioner 187
Safety belts 54
Safety lock buttons 36
Screw-on valve stem
caps 134
Seat adjustment 46
Seat heating 106
Seat memory 51
Seat, power 46
Online Edition for Part-No. 01 41 9 791 187 - © 12/98 BMW AG
Overview
Controls
Car care
Radio
Car radio
Refer to the separate
Owner's Manuel
Radio reception 131, 186
Radio remote control 33
Radio remote control,
battery change 168
Radio remote control,
new transmitter 168
Rain sensor 68, 150
RDC (Tire Pressure
Control) 94
Reading lamps 98
Rear passenger-area air
conditioning 105
Rear seat adjustment,
electric 48
Rear seat heating 106
Securing cargo 118
Selector lever, automatic
transmission 62, 65
Service and Warranty
Information Booklet 149
Service Interval Display
74, 149
Servotronic 130
Shoulder support 47
Shutting off the engine 60
Ski bag 116
Skid control 130
Sliding/Tilt sunroof 44
Sliding/Tilt sunroof with glass
moonroof 45
Sliding/Tilt sunroof, closing
after electrical fault 178
Sliding/Tilt sunroof,
convenience operating
mode 32
Sliding/Tilt sunroof, radio
remote control 33
Slippery roads 129
Snow chains 129, 135
Socket 115
Spare key 30
Spare tire 171
Spark plugs 198
Speaker 113
Special oils 144
Speed limit warning 87
Speedometer 19
Technology Repairs
Paint blemishes,
exterior dirt 152
Park Distance Control
(PDC) 90
Parking aid 90
Parking brake 61
Parking in winter 130
PDC (Park Distance
Control) 90
Playing cassettes
Refer to the
Radio Owner's Manuel
R
Rear window blind 107
Rear window defroster 70
Rear-seat control
Front passenger's seat 112
Onboard computer 112
Radio 112
Rear window blind 112
Telephone 112
Rearview mirrors 50
Refueling 25
Remote control for onboard
computer 89
Removing condensation,
windows 102
Replacement keys 30
Replacing tires 133
Residual heat 104
Roof luggage rack 118
Roof weight rating 196
Rubber seals and
components 154
Data
P
Playing CDs
Refer to the
Radio Owner's Manuel
Pocket light 111
Power seat adjustment 46
Power steering 130
Power steering fluid 148
Power windows 42
Pressure, tires 26, 132
Pushbutton for central
locking system 36
Index
Oil consumption 143
Oil level check 143
Oil pressure,
indicator lamp 20
Oil specifications 144
Oil, Engine oil
Capacities 197
OILSERVICE 74
Onboard computer 84
Onboard tool kit 162
Opening the luggage
compartment from the
inside 38
Outside mirrors 50
Outside temperature
display 72
205n
Everything from A to Z
Starting assistance 179
Starting the engine 59
Steering 130
Steering lock 59
Steering wheel adjustment,
automatic 49
Steering wheel lock 59
Steering wheel memory 51
Steering wheel, heated 106
Steptronic 65
Stopping the vehicle 60
Storage facilities 113
Sun visors 51
Symbols 4, 173
T
Tachometer 72
Tail lamps 166
Tail lamps,
bulb replacement 166
Tank capacity 197
Technical modifications
6, 157
Telephone
Refer to Car telephone 131
Telephone hookup 113
Temperature adjustment 103
Temperature display, engine
coolant 74
Temperature display,
outside temperature 72
Third brake lamp 166
Tilt alarm 41
Tire code 134
Tire damage 132
Tire failure 170
Tire inflation pressure 26, 132
Tire Pressure Control
(RDC) 94
Tire replacement 133
Tire tread 132
Tires, specifications 136
Tools 162
Topping up the windshield/
washer fluid reservoir 142
Torque 194
Towing eyes 180
Towing the vehicle 180
Tow-starting 180
Track circle 195
Transmission 62, 65
Tread depth, tires 132
Trip odometer 72
Trunk lid, refer to luggage
compartment lid 37
Turn signal 22, 68
Turn signals, bulb
replacement 165, 166
Turning circle 195
U
Universal Remote
Control 108
Used batteries 175
V
Vanity mirrors 51
Vehicle battery 173
Vehicle identification 148
Vehicle Identification
Number 148
Vehicle storage 156
Ventilation outlet,
ventilation 100
Ventilation, draft-free 104
Voice input 23
W
Warning lamp "Please fasten
safety belts" 21
Warning lamps 20
Warnings 75
Washer system 68
Washing your car 150
Water on the roads
Flooding 123
Waxing, finish 152
Weights 196
Wheel lug wrench 171
Wheel rims 134
Wheelbase 195
Wheels and tires 134, 136
Width 195
Windows, convenience
operating mode 32
Windows, radio remote
control 33
Windows,demisting 102
Windshield washer
Reservoir capacity 197
Windshield washer nozzle
adjustment 142
Windshield wiper blades,
replacing 162
Windshield wipers 68
Windshield, defrosting 69
Winter operation 128
Winter tires 135
Wiper blades, replacing 162
Wipers 68
Work in the engine
compartment 137
X
Xenon lamps 96, 164, 190
Online Edition for Part-No. 01 41 9 791 187 - © 12/98 BMW AG
Owner service procedures from A to Z
D
Adding brake fluid 147
Adding engine coolant 146
Adding engine oil 143
Adding fluid,
power steering 148
Air pressure 26
Defrosting, windows 102
Difficult steering 130
Doors, manual operation 32
Fuel filler door,
manual release after
electrical fault 178
Fuses, replacing 176
E
G
Electrical accessories,
failure 176
Electrical fault
fuel filler door 178
Sliding/Tilt sunroof 178
Emergency release
Doors 32
Fuel filler door 178
Luggage compartment
lid 37
Sliding/Tilt sunroof 178
Engine oil specifications 144
Glove compartment lamp,
bulb replacement 167
Changing a wheel 170
Charging the battery 174
Check Control 75
Checking the engine oil 143
Checking tire pressure 26
Failure messages 75
Filling the windshield washer
fluid reservoir 142
First-aid kit 24
Fittings, tow-starting and
towing 180
Fog lamp,
replace the bulb 165
Footwell lamps, bulb
replacement 167
Hazard warning flashers 24
Hazard warning triangle 24
High beam headlamps, bulb
replacement 164, 165
Hood release 137
I
Indicator lamps 20
Interior lamps, bulb
replacement 167
Interior motion sensor,
deactivation 41
N
New transmitter, radio remote control 168
O
Oil level check 143
Oil specifications 144
Onboard tool kit 162
P
Power steering,
adding fluid 148
Pressure, tires 26
Car care
H
Technology Repairs
C
F
Maintenance 74, 149
Malfunction displays 75
J
Jump starting 179
R
L
License plate lamps, bulb
replacement 166
Low beam headlamps, bulb
replacement 164
Radio remote control,
battery change 168
Radio remote control,
new transmitter 168
Rear lamp assembly 166
Removing condensation,
windows 102
Online Edition for Part-No. 01 41 9 791 187 - © 12/98 BMW AG
Data
Backup lamps, bulb
replacement 166
Battery change, radio remote
control 168
Battery, checking charge
condition 174
Battery, discharged 179
Brake lamps, bulb
replacement 166
Brakes, brake faults 128
Bulb replacement 163
M
Index
B
Luggage compartment
lamps, bulb
replacement 167
Luggage compartment lid,
emergency release 37
Controls
A
Overview
207n
Owner service procedures from A to Z
S
W
Security glass, care 153
Sliding/tilt sunroof, closing
after electrical fault 178
Sliding/tilt sunroof, power
supply interruption 45
Snow chains 135
Spare tire 171
Starting assistance 179
Starting problems
59, 124, 179, 180
Warning lamps 20
Warnings 75
Washer fluid reservoir,
filling 142
Wheel change 170
Windows, demisting 102
Windshield washer nozzle
adjustment 142
Wiper blades, replacing 162
Work in the engine
compartment 137
T
Tail lamps, bulb
replacement 166
Tilt sensor alarm system,
deactivation 41
Tire damage 132
Tire failure 170
Tire inflation pressure 26
Tools 162
Towing 180
Towing eyes 180
Tow-starting 180
Turn signal,
replace the bulb 165
U
Use of antifreeze,
radiator 146
Online Edition for Part-No. 01 41 9 791 187 - © 12/98 BMW AG
Refueling
So that you will have important specifi- Fuel
cations available when you stop to reFor a description, refer to page 25
fuel, we recommend that you supplement this table with data which apply to Designation
your vehicle.
AKI: Minimum
AKI: For rated performance
AKI: For enhanced
performance
Engine oil
For a description, refer to page 144
Quality
The space between the
two marks on the
dipstick corresponds to approx.
1.1 US quarts (1 liter).
Tire inflation pressures
For a description, refer to page 26
Summer
Front
Rear
Winter
Front
Rear
4 persons
5 persons or 4 plus luggage
Online Edition for Part-No. 01 41 9 791 187 - © 12/98 BMW AG
01 41 9 791 187 US En
We wish you an enjoyable
driving experience.
The Ultimate Driving Machine
Online Edition for Part-No. 01 41 9 791 187 - © 12/98 BMW AG