1
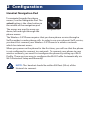
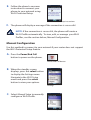
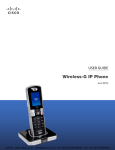
QUICK INSTALLATION GUIDE
Wireless-G IP
Phone
Model:
Package Contents
• Handset
• Phone Charger
• Power Adapter
• Li-ion Battery
• USB Cable
• Quick Installation Guide
• Read Me First Card
WIP310
1 Installation
A. Insert the battery into the
phone. It will only fit one way.
Do not force.
Battery Placement
B. Plug the power adapter into
the charger and then plug the
adapter into a wall outlet
Charger Power Adapter Plug
C. Charge the phone by placing
the handset into the charger.
The phone will display a
charging icon on the screen.
NOTE: The battery needs to charge for at least 8 hours
prior to using the phone. Do not power on the phone
until left to charge for at least 8 hours.
2 Configuration
Handset Navigation Pad
To navigate through the phone
menus, use the Navigation Pad. The
select button is the silver button in
the middle of the navigation pad.
The arrows are used to move up,
down, left and right through the
phone menus.
Navigation Pad
The Wireless-G IP Phone requires that you have phone service through a
VoIP provider to make phone calls. In order to use your phone’s VoIP service,
you must first connect your Wireless-G IP Phone to a wireless network
which has internet access.
When you power on the phone for the first time, you will see that the phone
is not configured to connect to a network. To connect your phone to your
wireless network, you must first configure the phone by setting up a Wi-Fi
Profile. There are two ways to configure the Wi-Fi Profile: Automatically via
Wi-Fi Protected Setup and Manually.
NOTE: The handset should be within 300 feet (90 m) of the
Network to connect.
Automatic Configuration via Wi-Fi Protected Setup
To automatically set up a secure wireless connection to your router, use
Wi-Fi Protected Setup. Your router must support this feature to use this
method.
NOTE: Look for the Wi-Fi Protected Setup
button on your router. If you are not sure
that your router supports this feature,
consult your User Guide.
Wi-Fi Protected Setup
button
A. Press the Power/End Call
button to power on the phone.
Power/End Call button
B. When the standby screen
displays, press the select button
to display the Settings menu.
Navigate to the Wireless Setup
menu and press the select
button to view your options. Settings
C. To automatically configure
your profile, highlight Use Wi-Fi
Protected Setup and press the
select button.
Wireless Setup
D. For the easiest way to connect
to your network, highlight
Connect easily by pushing a
button and press the select
button.*
Connect Automatically
E. Follow the phone’s onscreen
instructions to connect your
phone to your network using
Wi-Fi Protected Setup.
Wi-Fi Protected Setup Instructions
F. The phone will display a message if the connection is successful.
NOTE: If the connection is successful, the phone will create a
Wi-Fi Profile automatically. To view, edit, or manage your Wi-Fi
Profiles, see the section below, Manual Configuration.
Manual Configuration
Use this method to connect to your network if your router does not support
the Wi-Fi Protected Setup feature.
A. Press the Power/End Call
button to power on the phone.
Power/End Call button
B. When the standby screen
displays, press the select button
to display the Settings menu.
Navigate to the Wi-Fi Setup
menu and press the select
button to view your options. Settings
C. Select Manual Setup to manually
configure a Wi-Fi Profile.
Manual Setup D. You will see the Wi-Fi Profiles
screen list. The list will be empty
when configuring your phone
for the first time. To search for
the available networks, press
the left soft key Options, then
highlight Scan Networks. Press
the select button.
Wi-Fi Profiles
E. A list of available networks will
display. Highlight a network
and press the select button.
Available Networks
F. Follow the phone’s onscreen instructions to connect your phone to
your network.
G. The phone will display whether the connection is successful. The
network name will appear in the Wi-Fi Profile screen list.
NOTE: If your network is hidden, it will not appear in the list of available
networks. You can manually create a new Wi-Fi Profile by selecting New
Profile. You will be required to enter your network’s information:
Auto Connect (turn ON for the phone to use this profile)
Profile Name (the name you will call these network settings)
SSID (the network name that you want to connect to)
Wi-Fi Security (None, WEP, or WPA/WPA2 Personal)
* Another method of automatically connecting your phone to your nework is by
using the Wi-Fi Protected Setup PIN method. See your User Guide for more detailed
information regarding this procedure.
IMPORTANT SAFETY INSTRUCTIONS
BEFORE USING YOUR TELEPHONE EQUIPMENT, BASIC SAFETY PRECAUTIONS SHOULD
ALWAYS BE FOLLOWED TO REDUCE THE RISK OF FIRE, ELECTRIC SHOCK AND INJURY,
INCLUDING THE FOLLOWING.
•• This device for indoor use only!
•• Read and follow all warnings and instructions marked on the product.
•• Do not use this product near water, laundry tub, in a wet basement, or
near a swimming pool.
•• Do not place this product on an unstable table. The product may fall and
be damaged.
•• This product should never be placed near or over a radiator or heat
register.
•• This product should be operated only from the type of power source
indicated on the label.
•• Do not allow anything to rest on the power cord. Do not locate this
product where the cord will be abused by persons walking on it.
•• Avoid using a telephone during an electrical storm. There may be a
remote risk of electric shock from lightning.
•• Do not use this product to report a gas leak in the vicinity of the leak.
•• Do not use this product near intensive care medical equipment or by
persons with pacemakers.
BATTERIES
•• Use only the battery type listed in the instruction manual. Do not use
lithium batteries or non-rechargeable batteries that may damage the
handset and charger.
•• Do not dispose of the battery in a fire, as they can explode.
•• Do not open or mutilate the battery. Released electrolyte is corrosive and
can cause damage to the eyes or skin. It can be toxic if swallowed.
•• Avoid contact with metal objects when handling the battery. These
objects could short out the batteries or cause the conductor to overheat
resulting in burns.
•• Do not attempt to recharge the battery cell by heating it. Sudden release
of battery electrolyte can cause burns or irritation to the eyes or skin.
•• Observe the proper polarity, or direction, of any battery. Reverse insertion
of the battery cell can result in leakage or explosion.
•• Remove the battery cells if you do not plan to use the product for several
months at a time.
•• Discard any “dead” batteries because they are likely to leak into the
product.
•• Do not store this product or the battery in a high temperature area.
Battery stored in a freezer or refrigerator should be protected from
condensation during storage and defrosting. Battery should be stabilized
at room temperature before using.
•• Your battery is rechargeable and can be recycled once it outlives its
usefulness. Depending upon your local and state law, it might be illegal
to dispose of this battery into a municipal waste system. Check with your
local solid waste company for more information on your recycling options
for the battery cells.
SAVE THESE INSTRUCTIONS
Americas Headquarters
Cisco Systems, Inc.
170 West Tasman Drive
San Jose, CA 95134-1706
USA
For additional information or troubleshooting help, please contact your Service Provider or visit the WIP310 website at www.linksys.com/wip310.
CCDE, CCENT, Cisco Eos, Cisco Lumin, Cisco Nexus, Cisco StadiumVision, Cisco TelePresence, the Cisco logo, DCE, and
Welcome to the Human Network are trademarks; Changing the Way We Work, Live, Play, and Learn and Cisco Store are
service marks; and Access Registrar, Aironet, AsyncOS, Bringing the Meeting To You, Catalyst, CCDA, CCDP, CCIE, CCIP, CCNA,
CCNP, CCSP, CCVP, Cisco, the Cisco Certified Internetwork Expert logo, Cisco IOS, Cisco Press, Cisco Systems, Cisco Systems
Capital, the Cisco Systems logo, Cisco Unity, Collaboration Without Limitation, EtherFast, EtherSwitch, Event Center, Fast
Step, Follow Me Browsing, FormShare, GigaDrive, HomeLink, Internet Quotient, IOS, iPhone, iQ Expertise, the iQ logo, iQ Net
Readiness Scorecard, iQuick Study, IronPort, the IronPort logo, LightStream, Linksys, MediaTone, MeetingPlace, MeetingPlace
Chime Sound, MGX, Networkers, Networking Academy, Network Registrar, PCNow, PIX, PowerPanels, ProConnect,
ScriptShare, SenderBase, SMARTnet, Spectrum Expert, StackWise, The Fastest Way to Increase Your Internet Quotient,
TransPath, WebEx, and the WebEx logo are registered trademarks of Cisco Systems, Inc. and/or its affiliates in the United
States and certain other countries.
All other trademarks mentioned in this document or Website are the property of their respective owners. The use of the word
partner does not imply a partnership relationship between Cisco and any other company. (0807R)
8071020NC-KC