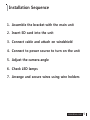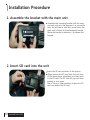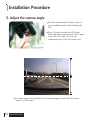
1
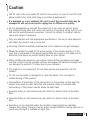
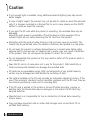
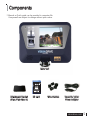
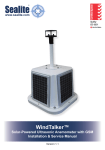
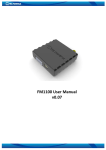
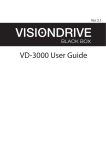
User Manual ® Ver. VD-9000FHD 1.0 E CAR BLACK BOX 00 12:00: 1 0 . 9 2012.0 INDEX 1. Before Use . . . . . . . . . . . . . . . . . . . . . . . . 2 2. Caution . . . . . . . . . . . . . . . . . . . . . . . . . . . 3 3. Components . . . . . . . . . . . . . . . . . . . . . . 5 4. Part Names . . . . . . . . . . . . . . . . . . . . . . . 6 5. Product Specification . . . . . . . . . . . . . 7 6. Installation Precautions . . . . . . . . . . . 8 7. Installation Sequence . . . . . . . . . . . . . 9 ............ 10 ...................... 15 10. PC Analysis Program Use . . . . . . . . . 19 1 1. Warranty . . . . . . . . . . . . . . . . . . . . . . . . . . 30 8. Installation Procedure 9. Product Use Before Use Thank you for choosing VisionDrive®. This section describes product cautions and the scope of the warranty service covered by us Please use the product with complete understanding below. Warranty Service and Responsibility We shall not be held responsible for damage caused by errors or data loss of this product, as well as any damage or loss derived from the device not operating normally. The product is designed to record, store, play and analyze videos caused by impacts and vehicle accidents or as recorded by user’s discretion. However, it is not assured that the product will record video in every instance. Furthermore, under circumstances where the impact is too weak, the vibration sensor may not be able to detect the impact, which induces that the system will be unable to automatically start recording the [Event] file. In such a situation, the urgent save button (SHOT) on the product should be pressed to start recording a video to the [Event] folder. The information in this manual may change without prior notice due to technical changes or upgrades. Check for updates periodically to ensure full knowledge of both the warranty service and responsibility scope. www.visiondrive.co.kr 2 visiondrive.co.kr Caution The SD card is the only usable SD card for this product. In case of a lost SD card, please contact your local retail shop to purchase a replacement. If a damaged or a non-authentic SD card is used, the recorded data may be damaged or will not record and/or replay due to difference in quality. Do not disassemble or remodel this product as it can cause an electric shock. Any malfunctioning after such action will result in the product being unfit for use and void all warranty/service provisions. Consult the retailer for product maintenance and repairs if necessary. Only use adaptors with the appropriate specifications. The use of other adaptors will defect the product and or cause fire. All wiring should be carefully implemented so the cables do not get damaged. Where the product is wired to the power supply of the vehicle directly or if the cigar jack is connected to the power supply while the engine is off, make sure to disconnect the device to prevent battery drain on your vehicle. When installing the device to your vehicle, follow all the procedures and make sure the mount is secure. Unclean surfaces will weaken the adhesive strength and can damage the product if it drops due to poor adhesion. This product is not waterproof. Do not allow liquids and impurities into the product. Do not use chemicals or detergents to clean the device. This can result in malfunctioning of the product. Accumulation of impurities on the camera lens or the window surface near the camera may result in video distortion and reduced clarity of recorded data. Surrounding of the product should always be kept clean. Excessive tinting on the window may also distort or reduce clarity of recorded data. Excessive tinting on the window may also distort or reduce clarity of recorded data. Recording can be distorted under the condition where brightness suddenly changes like passing through a tunnel, direct sunlight reflection during day time or where only low light is available at night time. visiondrive.co.kr 3 Caution If not enough light is available, using additional external lighting may help record better images. In case of slight impact, the product may not be able to create an event file automatically (it is however recorded as a Normal file). In such a case, please use the (SHOT) button to create an event file manually. If you eject the SD card while the product is operating, the recorded data may be damaged. Ensure the main power is completely off and the device is fully powered off (no indicator lights are on) before removing the SD card from the product. Interacting with the product while driving is risky and may cause an accident. This should only be performed when the vehicle is stationary and parked in a safe place. Do not keep the product in extreme temperatures or in humid areas. Being under extreme heat in summer days or freezing cold in winter days may result in defection of the product. Also, do not expose the product to direct fire or water. Do not disassemble the product as this may result in defect of the product which is not covered by us. Keep the SD card in its case when not in use for the product.. Static electricity or other environmental elements can damage the recorded data. SD cards are an expendable supply. After normal periods of use, partial memory sectors may be damaged and will disable the recording of data. The system installed on the SD card provides an automated checking function. If the use of the automatic checking function identifies problems with the SD card, then we recommend purchasing a new one for recording data. If the SD card is ejected or the system is turned off while recording, copying or deleting data, the stored data may be damaged or lost and/or the SD card may become defective. Manufacturer is not responsible for loss or destruction of stored data caused by actions above. Copy and keep important data on other data storages such as hard disk, CD or portable flash memory. 4 visiondrive.co.kr Components !! Manual or Quick guide can be provided in computer file. Components are subject to change without prior notice. 2012.09.01 12:00:00 Main Unit Attachment Bracket (Glass Plate Mount) SD card Wire Holders Cigarette lighter Power Adaptor visiondrive.co.kr 5 Part Names REC LED GPS LED MIC VIEW BUTTON PLAY BUTTON LCD SCREEN SHOT BUTTON GPS SENSOR CAMERA BRACKET INSTALLED ON MAIN UNIT POWER PORT TECH SUPPORT PORT SD CARD SLOT Product Specification Model VISIONDRIVE VD- 9000FHD Camera 1 Camera Full HD Color CMOS digital camera Resolution 1920 x 1080 (Full HD) Max. 30 fps Recording 24Hr Loop Recording / Manual & Emergency Recording Support Lighting Environment Min. 0.1 Lux Camera Angle Diagonal 120° Camera Rotation Vertical 65° Display 2.4" TFT Color LCD GPS Built-in GPS Module (Sirf IV) G- Sensor Built- in 3- Axis Sensor (x- y- z) Storage SD memory card (SDHC compatible 1G ~ 64G) Audio Recording Built- in MIC (One- touch recording) Voice Announcement Built- in Speaker Event Recording 10 sec. before impact ~ 15/30/45/60 sec. after impact Power Supply DC 12V ~ 24V Cigarette Power Supply Internal Battery EDLC for Emergency Backup Operation Temperature - 20 °C ~ 80 °C Car Battery Monitoring Low Voltage Detection / Control Dimensions 111mm * 75mm * 27mm PC OS Windows XP/ VISTA / Windows 7 File Protection Password Access Analyzer Program Dedicated Analyzer (AVI file transformation support) Automatic Parking Mode Function Additional Details Motion Detection Date/Time Display Video Quality Enhancement visiondrive.co.kr 7 Installation Precautions For safe installation and operation, carefully read all the information stated below. DO NOT disconnect the power supply while the system is booting up. Be aware of that engine ignition may disconnect the product for short periods of time. It is recommended using only authorized SD cards with the VisionDrive® products. Install the product after parking your vehicle in a bright and safe area. Install the system when ignition is off. Especially, after the power source has been turned off completely. Use the power cable provided with the product for the cigarette lighter power connection in the range of DC12V to DC24V. If power wiring is involved, we recommend a professional service for the installation. Prior to the installation, clean the area of the installation where the camera will be positioned. DO NOT eject the SD card while the product is in operation. DO NOT disconnect the product before its complete off. Do NOT attempt to modify, separate or repair the product yourself in any way. 8 visiondrive.co.kr Installation Sequence 1. Assemble the bracket with the main unit 2. Insert SD card into the unit 3. Connect cable and attach on windshield 4. Connect to power source to turn on the unit 5. Adjust the camera angle 6. Check LED lamps 7. Arrange and secure wires using wire holders visiondrive.co.kr 9 Installation Procedure 1. Assemble the bracket with the main unit 1 2 Assemble the mounting bracket with the main unit and push it to the direction 1 to secure the lock. You will hear a solid click sound when the main unit is locked to the attachment bracket. Move the bracket to direction 2 to release the bracket. 2. Insert SD card into the unit Insert the SD card as shown in the picture. When ejecting the SD card from the unit, turn off the main power completely, and then push in the SD card. The SD card will pop out when pushed in once more. Use of force or other methods to eject the SD card may defect the SD card. 10 visiondrive.co.kr Installation Procedure 3. Connect cable and attach on windshield Clean the area on the windshield where the unit will be placed. For the placement of the unit, it is better to place the unit closer to the center of the vehicle. If the unit is installed on the left or right side of the rear vision mirror, make sure there is room to detach and install the unit if needed. Also be aware of window tinting or other window coatings/shielding which may affect camera visibility. The adhesive on the bracket is very strong so partially remove the cover of the adhesive, Use the full adhesive surface area for final installation after correct installation is verified through LCD screen. Please proceed cigarette lighter connection after the main cable connection and attachment are finished. 4. Connect to power source to turn on the unit Insert the cigarette jack into an appropriate outlet. Turn on the engine or put the car key at ACC to hear voice notification while the product starts. (LCD screen will be turned on at this moment) Blinking of LED lamps after a moment means that the system startup was successful. DO NOT turn off the power source while the system boot is in progress. This may harm the product. visiondrive.co.kr 11 Installation Procedure 5. Adjust the camera angle Move the camera top to bottom to place it to a recordable position while checking the LCD. Press [V] button to make the LCD screen show where the camera records. Click it again to turn the LCD screen off. It records continuously even if the LCD screen is off. For better images and operation of the analysis program, ensure that the horizon meets ½ of the screen. 12 visiondrive.co.kr Installation Procedure Windshield Bracket Unit Vehicle Exterior Vehicle Interior (Driver’s Side) Camera When the unit is attached, set the camera to face the front direction of the vehicle. 65˚ Highest Position Lowest Position Camera is adjustable and can be rotated up to 65 degrees to cover desired recording areas. Give the camera a bit strong pressure to adjust the angle of the camera due to the camera is tightened to prevent movements caused by little vibration. visiondrive.co.kr 13 Installation Procedure 6. Check LED lamps The GPS lamp is red when the GPS signal is not received, and blue when it is received. The GPS connection may take a couple of seconds to several minutes, depending on the location of your vehicle. The REC lamp is blue when it is recording. It is blue when it is recording a NORMAL file and red when recording an EVENT file after an impact or if the SHOT button has been pressed. 7. Arrange wires Use the enclosed wire holders to arrange and secure the cables. 14 visiondrive.co.kr Product Use Start up - Turn off the engine and remove the key from ignition. Check if the SD card is inserted into the unit. Turn on the engine. When the engine is turned on, the system starts with the program installed in the SD card and voice notification will be announced. - The REC and GPS lamps will turn on. - The REC lamp will turn to blue while blinking. - The GPS lamp will turn on red before the signal, then turn to blue as receiving the GPS signal. - The GPS connection may take a couple of seconds to several minutes, depending on where the vehicle is. - 3 minutes after start up, LCD will be turned off automatically according to “Auto LCD OFF” mode in default Setting. (this is a configurable item) Normal Recording and Event Recording - While the power is on, the normal recording is active and the REC lamp will be blinking blue. - In normal recording mode, recordings are five minutes in duration and are stored in the NORMAL folder. If the memory is full while in NORMAL or EVENT recording mode, the program will erase the oldest recorded data in those folders to allow the saving of new files. The management is based on First-In First-Out. (FIFO) - In the case of an impact, the sensors will trigger the event mode. Users are notified by an alarm. The REC lamp will be red and the recorded data will be saved in the EVENT folder. - When an impact is registered, the program records 10 seconds prior to the impact and 15~60 seconds after the impact (adjustable in the configuration) as an EVENT file. - Memory size allocation between EVENT folder and the NORMAL folder can be adjusted in the configuration. Quality of recording, resolution and sensitivity as well. - SD memory card storage space divided into two folders, EVENT and NORMAL. When the capacity in each storage space is full, files are deleted in basis of First In First Out. - The product starts recording of new data when the EVENT folder is full of shock data. - The sensitivity you set in configuration affects on the frequency of occurrence of event files thus the capacity of keeping files not being overwritten can also be adjusted according to preference in the analyzer. Manual EVENT Recording - When the SHOT button is pressed, the alarm will sound and the recorded data will be saved in the EVENT folder just like recording on impact. - The SHOT button can also be used to record scenes of other accidents or great scenery you may want to save while driving. visiondrive.co.kr 15 Product Use Viewing Viewing recorded videos on LCD -VIEW button works as noted below. 1. Main camera image shows when system starts. 2. Pressing the [V] button will turn the display off and the recorder will continue to record. Press the [V] button again and the display will become active. 3. Another click on the [V] button starts the sequence from 1~2 again. !! Note : Operate the system while the car is securely stopped for your safety. Playback of the recorded videos on LCD - PLAY button starts the playback of the latest video file. - Which file you are working on is shown at the upper-right corner and percentage of completion can be found as bar chart on the bottom. - Date and time data are displayed on the bottom of LCD. - [SHOT] button makes the videos played according to time sequence. - Pressing the [PLAY] button for more than 3 seconds will make the system return to recording mode followed by an announcement of current audio recording status. Voice Recording - When the SHOT button is pressed and held for more than 3seconds, the voice notification will announce that the voice recording has been enabled. - Hold the button down once more to disabled the voice recording. The voice recording stops with an announcement that the voice recording is stopped. - The initial audio recording setting can be changed in the analysis program. 16 visiondrive.co.kr Product Use Parking Surveillance Mode - While there is no impact, the system records 4 frames/second to save the SD card space and returns to normal full frame recording mode making an EVENT file when it detects an impact to the car. - ”Auto switching to Parking mode” option is selected as a default setting and it automatically places the unit in the “Parking Mode” once the car does not move for longer than 10 minutes after the last driving mode recording. The unit will automatically turn back to “Driving Mode” once the unit registers movement. - If “Auto Parking” mode is selected in configuration, “Parking Mode” recording can be activated when you press and hold the [PLAY] button for more than 3 seconds if “Auto Parking” is relieved in configuration. When the system commences parking mode again, a voice notification will be announced that the parking mode has been initiated. - Once in Parking Mode, the system automatically rearranges its impact sensing sensitivity to the most sensitive in order to register even the slightest impact. After making an EVENT file, it returns to 4 frame recording mode again. - No audio is recorded while parking mode is on. - To use the parking mode, the product has to be connected to the power source directly. In regards to direct wiring to the vehicle’s power source, we recommend using professional help. - Extensive and continuous use of the vehicle’s power source may exhaust the performance of the product. The company is not liable for the damages from continuous use of the product more than 24 hours. We recommend the full power to be off after use of 2~3 days in order to maintain the product longer. Automatic System Check and Safe Rebooting Function - This product is programmed to automatically check and reboot the system, if the product is in a non-functional status. By rebooting the system, the product notifies the user that such action is taking place. - By safeguarding the system in this manner, the stability of the system is reinforced. If the system keeps rebooting repeatedly, the program installed in the SD card may have been damaged or altered. In this case, please stop the system and format the SD card in PC then download the latest Software to use the SD card like it is used for the first time. visiondrive.co.kr 17 Product Use SD Card Use - Users are recommended to use the SD card issued from the manufacturer. The SD cards contain programs necessary to operate the product. Also, the provided SD card is tested and certified by the manufacturer while other SD cards may not match the performance and specifications. - To eject the SD card from the product, the engine has to be turned off and the key should be removed from the ignition. A few seconds after the key has been removed, the product will turn off automatically and the LED lamps will be turned off as well. The built-in back up battery allows the last images to be stored into proper folders before the product is completely turned off. Wait until the LED lamps are turned off, then remove the SD card. - When the SD card is removed, it needs to be reinserted before you drive your car again. Without the SD card, the product will not function properly. - Use only SDHC supporting SD card readers to read the SD(HC) card. - If a voice notification repeatedly announces to insert a correct SD card, it means the SD card is defective or damaged. Purchase a replacement. - Purchase a replacement of the SD card when the voice notification keeps alerting even though the SD card is inserted normally. - SD card readers can be purchased at computer accessory stores. - Regular software upgrading on SD card helps to prevent or discover bad sector and malfunctions. Execute defrag or error checking for a stable and effective usage of the SD card. - Files recorded by the product are only allowed to have in the SD card. It may cause errors on program. 18 visiondrive.co.kr PC Analysis Program Use *** The skin used for the analysis program may differ by the version. *** Program Start Up - Open up the VDAnalyzer.exe file in the SD card after the SD card is connected to the PC. - Open the VDAnalyzer.exe program and a password window will be displayed. Type in the default password “12345678”. (You can either make your own password or have it on/off in configuration after all.) - Recorded videos may not be played smoothly depending on the PC environment. How to play the files - To play a certain file, select a file from the list located on the right-hand side and doubleclick on it. - The most recent data will be listed on the top. - The list of files can be lined up ascending / descending order in file/size/mode at the top. - The DATA folder will be the default folder to show up when you first open the program. - The EVENT folder has files related events and manual event recording by [SHOT] button. The NORMAL folder will have normal recording files and you may view them by clicking “open” on the analyzer. - In case of no SD card, the list is blank but saved videos in the selected folder can be played. - The names of the files are shown as below: Item Real Filename (Windows) File list in the analyzer GPS Registered number-date-time-type.vd (e.g) 124537834-20110802-120102-1.vd date-time-type.vd (e.g) 20110802-120102-1.vd No-GPS Registered number-date-time-type.vd NOGPS-number-type.vd (e.g) (e.g) 124537834-20110802-12345678-1.vd NOGPS-12345678-1.vd Ȅ'DWHDQGWLPHDUHGLVSOD\HGZLWKRXW*36VLJQDOZKLOH57&LVZRUNLQJ visiondrive.co.kr 19 PC Analysis Program Use Previewing - When a file is selected from the list, the screen shows the first frame of the file for your easier choice of reference. - A double click on the selected file makes the video play on the screen. Auto-play Function - After you double-click a file, the later recordings will automatically and continuously play one after another according to time sequence in the same folder. (Playing is not successive from a folder to another. Each folder has to be opened separately.) 20 visiondrive.co.kr PC Analysis Program Use Video Enlargement - Select a file and use the slider to enlarge the image. visiondrive.co.kr 21 PC Analysis Program Use Positioning on the map - With the saved GPS data, the map shows the location of the vehicle while playing the video. - The Google map is viewable only while your PC is connected to the Internet and only when the recorded video has GPS data associated with it. Shock Sensor Graph - The graph below shows impacts on the x-y-z axes of the vehicle. · X-axis : measures and records impacts from the front and back of the vehicle ( 0G ~ +/-3G is registered) · Y-axis: measures and records impacts from the left and right sides of the vehicle ( 0G ~ +/-3G is registered) · Z-axis: measures and records impacts from the top and lower part of the vehicle(up and down) ( 0G ~ +/-3G is registered) - The bottom left displays a progress bar showing the time line of the video. - Vertical line can be marked at the point of an impact. - The red line is before the impact, the blue line is the time after impact. SPEED METER - While the file is being played, the speed meter will show the vehicle’s speed that was collected by the GPS. 22 visiondrive.co.kr PC Analysis Program Use PREVIOUS FRAME / PAUSE / PLAY / LATTER FRAME - When the play button is pressed, it will replay the video file listed on the screen. After selecting a file from the list, double click it to play the file. - When you press the pause button, the viewing video will be paused. - When the previous frame or the later frame button is pressed, it will move backward or forward between frames within the file. BRIGHTNESS CONTROL - Brightness bar can give you better video analysis by changing the brightness during playback on PC. SHARPNESS CONTROL - Sharpness bar can give you better video analysis by changing the video sharpness during playback on PC. - This function may cause delayed video playback. INITIALIZING - This removes any applied brightness or sharpness controls. MAXIMIZING - Displays videos in full screen size. visiondrive.co.kr 23 PC Analysis Program Use AVI conversion - The data files in the SD card are product files and will only work within the Viewer Analyzer program. - To view the data on a regular PC without having the Viewer Analyzer program within the SD card, the recorded file has to be converted to an AVI file. - Pause the file where you want the conversion to take place on the previewing file display. - Press the AVI conversion button on the bottom right side, and then a window will pop up to have the file renamed. - When making an AVI conversion, you can select the options of Audio/GPS/Date & Time/Car Info to be included in the .avi file. - You may use any name you like for the converted file output and there is no need to put the extension of .avi on the end. - Press the play button again, and then the data being previewed will be converted from the point you specified or previously paused at. - Pressing the pause button while the conversion is in progress will stop the conversion at that point. - If the necessary codec is not available to convert the data into an AVI format file, it may not work on your PC or a notification will pop up saying you may need to download a specific codec to proceed. In such cases, use the supplied Xvid-1.2.1-0412008.exe(on the SD card) to install the needed codec, then restart the Viewer/Analyzer program to proceed again. If the codec is already installed on the PC, there may be some difficulties if the codec is installed twice. So unless there is a notification for installing a codec, do not install. Ȅ$9,FRQYHUVLRQRI+LJKFDSDFLW\YLGHRZRXOGWDNHPRUHWLPHWKDQXVXDOYLGHRFRQYHUVLRQ 24 visiondrive.co.kr PC Analysis Program Use Configuration ¢ ¤ £ ¥ ¦ § ¨ © ª ¬ £ ¤ ¥ ¦ § ¨ 9LGHR6HWWLQJ 6KRFN6HQVRU6HWWLQJ 5HFRUG6HWWLQJ 9HKLFOH,QIRUPDWLRQ 6SHHG$ODUP $XWR/&'212)) © ª « ¬ « /RZ%DWWHU\'HWHFWLRQ 7LPH=RQHVHWWLQJ 7\SH6HWWLQJ 3DUNLQJPRGH 3DVVZRUGVHWWLQJ visiondrive.co.kr 25 PC Analysis Program Use Configuration £Video Setting - The video resolution and quality settings can be modified. - If the resolution is high, the file size also becomes large and will spend more storage of the SD card. ¤Shock Sensor Setting - The sensor can be configured. If the number is higher on the sensor, the sensor becomes less sensitive. - A setting of 10 will disable the Shock Sensor for Event recording. ¥5HFRUG6HWWLQJ - You can set the recording time after an impact. (10 seconds prior to the impact are always recorded and stored.) - Impact files are stored in the EVENT folder and the size of the EVENT folder is defined here too. The remaining % of the SD card space is for the NORMAL folder. - Audio recording is selectable here but regardless of this setting, you can immediately change the audio recording status by pushing the SHOT button on the main unit as described earlier in this manual. - Impact sound volume can be modified. - Each of the Sound Options can be configured: Event (Alarm) / Start up (Greeting) / Parking Mode(Notice) to either enable or disable the sound. The volume of these announcements is also configurable. 26 visiondrive.co.kr PC Analysis Program Use Configuration ¦Vehicle Information - You can type in your car information, which will be shown on the video during playback and can be included with the exported AVI video. (Max. 20 letters can be available) §Speed Alarm - When set to a defined number, the system will alert you to over speeding when that speed is exceeded. ¨Auto LCD Off - If “Auto LCD Off” option is selected, the LCD of the unit turns off automatically 3 minutes after your unit has started. ©Low Battery Detection - You can select whether to use car battery drain monitoring function. 12.2V is recommended to set for sedan. ªTime Zone Setting - You can select your location and time zone. then, the GPS will register your local time in your video. visiondrive.co.kr 27 PC Analysis Program Use Configuration «Type Setting - You can select your local speed type as Km/h or Mile/h. - You can also select your vehicle type as Car, Truck or Bus and this assists in calibrating the 3 axes shock sensors for angled or vertical windscreen installation. ¬Parking Mode - If “Auto Parking” option is selected, the unit will automatically turn to “Parking Mode” recording where it records 4 frames/second ten minutes after last detected movement. This function cannot be relived with PLAY button in Auto Parking mode. - Optional “Motion Detection” is available only for the main camera in “Parking Mode”. Password Setting - Your own password can be modified here in order to secure the data. - It can be accessed without password according to your setting in configuration. Note: password length is limited to eight alphanumeric characters and is limited to eight if more than eight are entered. 28 visiondrive.co.kr Warranty The warranty is 1 year from date of purchase. If the product malfunctions under normal use within the warranty period, you can claim repair of product. To apply for warranty, register your product serial number with your local reseller. Only registered products will be accepted for repair or service. If the warranty period expires, repairs and services can be provided only if expenses are paid by the customer. In cases below, repairs may require expense payment by the customer. - If the product has been reassembled or disassembled or has been damaged by the customer. - Damages due to force majeure such as earthquakes, thunderstorms, etc. - Using power cables other than that which were provided by the manufacturer. - Dropping or damaging the product through any means – accidental or on purpose. - Product has been exposed to extremes in temperature, humidity or water. Warranty repairs are available only in the country where the product is purchased. Warranty Certificate Product Name VISIONDRIVE Model Name Purchase Date Serial Number Retail Shop Warranty Period VD-9000FHD If the product malfunctions after the 1 year warranty period expires, no service is provided under warranty. If the certificate does not have the date of purchase, the 1 year warranty is calculated by the serial number’s production date plus an additional 1 month to determine the 1 year warranty period. If no serial number, then no warranty is available. - The manufacturer will follow Consumer Protection Act (1006-36) to give warranty to all the products sold to consumers in the available regions. - After sales services are provided by either the manufacturer or the designated service center under an agreement with the manufacturer. - A decline of the warranty coverage will be notified to the customer within 14 working days of the application. If the application is accepted, the coverage will be in full effect within 30 days. visiondrive.co.kr 29 Warranty This device complies with part 15 of the FCC Rules. Operation is subject to the following two conditions: (1) This device may not cause harmful interference, and (2) this device must accept any interference received, including interference that may cause undesired operation ! Caution : Any changes or modifications in construction of this device which are not expressly approved by the party responsible for compliance could void the user's authority to operate the equipment. Note : This equipment has been tested and found to comply with the limits for a Class A digital device, pursuant to part 15 of the FCC Rules. These limits are designed to provide reasonable protection against harmful interference when the equipment is operated in a commercial environment. This equipment generates, uses, and can radiate radio frequency energy and, if not installed and used in accordance with the instruction manual, may cause harmful interference to radio communications. Operation of this equipment in a residential area is likely to cause harmful interference in which case the user will be required to correct the interference at their own expense. Guarantee of memory card This is a dedicated SDHC memory card compatible with any of products manufactured by VisionDrive. It can be treated with/without cost or exchange upon investigation when it meets a problem when only the problem is not caused by negligence of customers. The term of guarantee Up to 6 months since the date of purchase. All hardware, software, designs and logo of the product is copyrighted by the manufacturer of the product. Copy, disassembly, remake and distribution without the manufacturer’s written consent is strictly prohibited and will be enforced by all legal rights held by the manufacturer. 30 visiondrive.co.kr