1
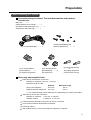
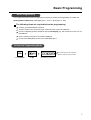
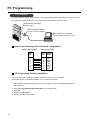
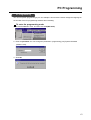
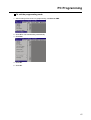
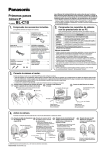
Digital Super Hybrid System
Getting Started
Model No.
KX-TD612
Thank you for purchasing a Panasonic Digital Super Hybrid System, Model KX-TD612.
Before connecting this product, please read this manual carefully and save this manual
for future use.
Version 3
Contents
Preparation
Page 3
Connections
Page 4
Basic
Programming
Page 7
PC Programming
Page 11
Information on
the CD-ROM
Page 16
2
Describes the included
accessories and required
tools for installation.
Shows you how to install
your system.
Describes the basic
programming to make/
receive calls.
Describes how to set the
system programming by
a personal computer
(PC).
Shows the contents of
the CD-ROM.
Preparation
Before installing your system
Check the package contents. The included materials and numbers
included are:
Main Unit ........... 1
Getting Started (This manual) ........... 1
CD-ROM (Including Manuals, etc.) ........... 1
Template (for wall mounting) ........... 1
AC Cord [PSWAT206E] ........... 1
10-pin Terminal Block
[PSJS10S07Z] ........... 1
(for external equipment)
Screws [PQHE5004Z] and
Washers [XWG35FY] ........... 3
Pin Plugs [PQJP1E1Z]
........... 2
(for paging equipment/
external music source)
8-pin Terminal Blocks
[PSJS08S08Z] ........... 3
(for extensions)
Necessary user-supplied tools:
Solid wire for the extension connection:
Diameter of conductor ø 0.4 mm - ø 0.6 mm
Maximum length of cable:
Diameter
Single Line Telephone
ø 0.5 mm
Digital Proprietary Telephone ø 0.5 mm
∗
Maximum length
620 m
240 m
The maximum length of the cable may vary depending on the type of the cables.
Solid wire for the CO line connection:
Diameter of conductor
ø 0.4 mm - ø 0.65 mm
Diameter coating
ø 0.66 mm - ø 1.05 mm
A Serial Interface (RS-232C) Connector for the PC connection.
Cross-head screwdriver and flathead screwdriver.
Electrician’s pliers.
Wall modular jacks to connect the telephone equipment, if required.
3
Connections
System Connection Diagram
3 ISDN (BRI) Lines
To ISDN (BRI) port 1 and 2 (initial)
To ISDN (BRI) port 3 (additional)
(Lightning Protectors)
1 Analogue CO Line (optional)
Car Batteries
External Music Source
Printer
or
Computer
External Relay
Amplifier
Second Ringer Relay
Speaker
12 Extension lines
Single Line Telephone
KX-T7436
KX-T7433
Door Openers
Cordless Phone
KX-T7431
KX-T7440
German type
Doorphone
Facsimile
Panasonic
VOICE PROCESSING SYSTEM KX-TVP50
POWER
Voice Processing System
Panasonic
Doorphones
KX-T30865
4
: needs optional card.
Connections
Extension Connection
Use 8-pin terminal blocks (included) to connect the extension lines. Extension jacks 1 to 4 are available
for eXtra Device Port (XDP) connection. Extension jacks 5 to 8 are only for digital proprietary telephones.
1. While pressing down on the hole at the top of the terminal block using a small flat type screwdriver,
insert the required telephone wire into the side hole as shown below.
5 mm - 6 mm
Pull out
to fix
Small flat type
screwdriver
Push to open
Push in the
Pealed Cable
2. Attach the terminal blocks to the extension connectors on the system.
To Extensions
(Jack 1 - 4(-1/-2), 5 - 8(-1) )
Jack no.1
L B A H . .
2
3
H: High
A: A-wire
B: B-wire
L: Low
Jack
X-2
Jack X-1
4
5 6 7 8
H: High
L: Low
L H . .
Jack X
View of Extension
Connector (Jack 5 – 8)
View of Extension
Connector (Jack 1 – 4)
• Before making the connection of the Extension Connector to the main unit,
extension lines should be checked carefully.
If the extension lines are connected to the main unit with those wires making a
short circuit between the H-L pins or A-B pins, it may cause a malfunction of
the system, or may damage the circuit of the system in the worst case.
5
Connections
CO Line Connection
1. Insert the modular plugs of the ISDN (BRI) CO line cords (8-conductor wiring) into the ISDN (BRI)
ports 1 and 2.
2. Connect the line cords to the terminal board or the modular jacks from the Central Office.
To Terminal Board or
Modular Jacks from
the Central Office
ISDN (BRI) ISDN (BRI) ISDN (BRI)
Port 1
Port 2
Port 3
TA RA RB TB
A. When your system is at the end of the connection
Terminal
Equipment 7
Network
Terminal
Termination
Equipment 1
To Central Office
B. When your system is not at the end of the connection
TR
Terminal
Equipment 7
Terminal
Equipment 1
Network
Termination
To Central Office
• When making a point-to-multipoint connection, we recommend you use
connection A above because your system has a terminal register (TR) included.
When making connection B, please consult your dealer to remove the TR in your
system.
6
Basic Programming
Before Programming
This chapter describes system programming necessary to enable receiving/making an outside call.
Setting Status of Extension: ISDN (BRI) port 1, Jack 1-1 (Extension no. 201)
The following items are required before the programming
Confirm your ISDN telephone number.
Confirm whether your connection type is point-to-point or point-to-multipoint.
Connect a digital proprietary telephone (DPT) with display (e.g. KX-T7436, KX-T7433, etc.) to
the Jack 1-1.
Put the overlay on the DPT connected to Jack 1-1.
Connect the ISDN (BRI) CO line to the ISDN (BRI) port 1.
To Enter the Programming Mode
#
PROGRAM
Press PROGRAM.
Dial
#.
1
2
3
4
You can change the user password.
(Default: 1234) Consult your dealer.
Dial 1234 (user password).
7
Basic Programming
Basic Programming
[001] System Speed Dialling and Intelligent Call Handling Number Set
1. Dial
0
0
1
2. Press NEXT.
.
SYS-PGM NO?→
SPD & CH Number
SE
NEXT
CLR
4. Enter your phone number.
500:Not Stored
→
SKP+
SE
NEXT
CLR
5. Press STORE
500:
→
SE
NEXT
SEL
3. Dial
.
0123456789
SE
NEXT
SEL
5
0
0
.
SPD&CH Cod?
SKP+
CLR
S
E
NEXT
6. Press NEXT.
500:
0123456789
SKP+
SEL
S
E
NEXT
END
7. Repeat steps 4 though 6
until you store all of
your phone number.
8. Press
.
[623] CLIP/COLP Number Assignment for Extension
1. Dial
6
2
SYS-PGM
1
3
NO?→
CLR
4. Dial
5
2. Press NEXT.
.
CLIP/COLP
NEXT
and press →.
#1-1:0:BI:
→
SEL
SKP+
3. Dial
NO.
CLR
NEXT
5. Keep pressing SEL+ until
AL is displayed.
#1-1:5:BI:
NEXT
→
7. Press
.
#1-1:5:AL:012345
→
8
SEL
S
E
NEXT
8. Press
Jack
SKP+
.
NO?
CLR
S
E
NEXT
6. Press → and then enter your
ISDN telephone number.
#1-1:5:AL:
SEL+
NEXT
END
STORE
1
.
→
SEL
NEXT
Basic Programming
[423] ISDN Layer 1 Active Mode
4
1. Dial
2
3
2. Press NEXT.
.
NO?→
SYS-PGM
CLR
L1
NEXT
Active
SKP+
<If Your Contract is
Point-to-Point>
3. Dial
CLR
Mode
1
.
NO? →
Port
NEXT
SKP+
CLR
NEXT
<If Your Contract is
Point-to-Multipoint>
END
STORE
4. Press
.
OR
4. Press SEL+ and then
STORE
press
#1
:Permanent
→
SEL+
#1
.
.
:Call
→
NEXT
5. Press
SEL+
NEXT
[424] ISDN Configuration
1. Dial
1
4
2
SYS-PGM
1
4
2. Press NEXT.
.
NO?→
CLR
Access
SE
NEXT
SKP+
<If Your Contract is
Point-to-Point>
4. Press
STORE
SEL+
1
.
Port
SE
NEXT
SKP+
NO? →
CLR
SE
NEXT
<If Your Contract is
Point-to-Multipoint>
.
:Point
→
Mode
CLR
OR
4. Press SEL+ and then
press
#1
3. Dial
#1
NEXT
STORE
END
5. Press
.
.
:Multipoint
→
SEL+
NEXT
9
Basic Programming
[425] ISDN Data Link Mode
4
1. Dial
2
5
2. Press NEXT.
.
NO?→
SYS-PGM
CLR
Data
NEXT
<If Your Contract is
Point-to-Point>
STORE
4. Press
Link
SKP+
SEL+
.
NO? →
Port
NEXT
SKP+
CLR
S
E
NEXT
<If Your Contract is
Point-to-Multipoint>
.
OR
:Permanent
→
Mode
CLR
END
4. Press SEL+ and then
press
#1
1
3. Dial
#1
STORE
.
.
:Call
→
NEXT
5. Press
SEL+
NEXT
[426] ISDN TEI Mode
1
4
1. Dial
2
SYS-PGM
1
6
2. Press NEXT.
.
NO?→
CLR
TEI
NEXT
SKP+
<If Your Contract is
Point-to-Point>
3. Dial
Assign
CLR
1
.
Port
NEXT
SKP+
NO? →
CLR
<If Your Contract is
Point-to-Multipoint>
END
SHIFT
4. Press
STORE
.
OR
4. Press
and then
press CLR, and then
press STORE
#1
:Fix
→
0
SEL
S
E
NEXT
#1
NEXT
→
5. Press
.
.
:Automatic
SEL
NEXT
System Restart
After setting the system programming, restart the system. You can restart the system by turning
the Power switch “OFF” and then “ON”.
10
PC Programming
System Requirements
Before installing the PC programming software, be sure to read the following information.
System Requirements:
- Microsoft® Windows® 95, Windows 98, Windows Me, Windows 2000 or Windows NT® 4.0 or later
- Installation of Internet Explorer 4.0 or later
- Minimum requirements
(for installing TD612 PC Programming software only)
CPU: Pentium® 133 MHz
RAM: 48 MB
HDD: 20 MB
- Recommendation of the ISDN cards for the remote maintenance
FRITZ!Card PCMCIA/AVM
FRITZ!Card PCI/AVM
FRITZ!Card classic/AVM
ELSA MicroLinkTM ISDN USB/ELSA
Xircom® CreditCardTM ISDN Adapter/Intel®
Trademarks:
- Microsoft, Windows and Windows NT are either registered trademarks or trademarks of Microsoft
Corporation in the United States and/or other countries.
- Intel, Xircom, CreditCard, and Pentium are trademarks or registered trademarks of Intel Corporation
or its subsidiaries in the United States and other countries.
- AVM and FRITZ! are either registered trademarks or trademarks of AVM Computersysteme
Vertriebs GmbH & Co. KG in the United States and/or other countries.
- ELSA and MicroLink are either registered trademarks or trademarks of ELSA AG in the United
States and/or other countries.
- All other trademarks identified herein are the property of their respective owners.
11
PC Programming
PC Installation
The PC is used for system programming. Connect the Serial Interface (RS-232C) connector of the PC
to the Serial Interface. (A printer can be connected to the system in the same way.)
Serial Interface (RS-232C)
(D-SUB, 9-pin)
Serial Interface (RS-232C)
Connector (user-supplied)
The cables must be shielded
and the maximum length is 2 m.
Refer to the following charts for the pin configuration.
Port on your system
9-pin port on a PC
Pin
No.
Pin
No.
Signal
Name
2
3
4
5
6
7
8
3
2
6
5
4
8
7
TXD
RXD
DSR
SG
DTR
CTS
RTS
PC Programming Software Installation
You can program the system by using the set up file supplied on the CD-ROM.
First install the PC programming software in your personal computer.
1. After exiting all Windows programmes on your computer, insert the CD-ROM (included) into
CD-ROM drive.
2. Click PC Programming Software Installer on the initial screen.
3. Click OK.
4. Double-click Setup.exe.
5. Follow the steps of the Wizard.
12
PC Programming
PC Programming
You can set system programming by PC. An example is shown below. Please change the language on
the window of the PC programming software when installing.
To enter the programming mode
1. Choose Connect in menu, and then click Local(RS-232C).
2. Enter the password. You can change the password in programming [107] System Password
(Default: 1234).
3. Click OK.
13
PC Programming
[001] System Speed Dialling and Intelligent Call Handling Number Set
1. Click Load from PBX.
2. Click OK to start uploading automatically.
3. System Program Menu screen is displayed. Double-click Speed Dial & Call Handling.
4. After entering telephone numbers and names, Click OK to store them.
14
PC Programming
To exit the programming mode
1. After finishing all the necessary programming, click Save to PBX.
2. Click OK to start downloading automatically.
3. Click Exit.
4. Click OK.
5. Click OK.
15
Information on the CD-ROM
<Product Documentation for the KX-TD612>
You can find electronic documentation for the KX-TD612 System, created in Portable
Document Format (PDF), on the attached CD-ROM.
Before you begin using the PDF documents, be sure to read the following information.
Once you insert the KX-TD612 CD-ROM into your CD-ROM drive, an html file will
start up automatically. Following the installation wizard, please select the PBX model
you have, the language you want, and the manual you need. Please use Microsoft
Internet Explorer version 4.0 or later. (It is not included in this CD-ROM.)
To view the PDF documents:
- Adobe® Acrobat® Reader version 4.0 or later is required.
If you do not have the appropriate software, you can use the Acrobat Reader Application included
in this CD-ROM.
System Requirements for Acrobat Reader:
-
i486TM, Pentium, or Pentium Pro Processor-based personal computer
Microsoft Windows 95, Windows 98 or Windows NT 4.0 service pack 3 or later
10 MB of available RAM on Windows 95 and Windows 98 (16 MB recommended)
16 MB of available RAM on Windows NT (24 MB recommended)
10 MB of available hard-disk space
Installation of Acrobat Reader:
Install Acrobat Reader in "Acrobat4.0installer" folder on this CD-ROM.
Includes:
- Adobe Acrobat Reader 4.0 for Microsoft Windows
- Documentation
The Getting Started Manual
The Features Guide
The User Manual
The Internet Driver Installation Manual
- Modem Driver File
Copyright:
- Digitised data for the documentation:
Kyushu Matsushita Electric Co., Ltd. (KME) owns the data for documentation included on
this CD-ROM.
Trademarks:
- Adobe and Acrobat are either registered trademarks or trademarks of Adobe Systems Incorporated
in the United States and/or other countries.
- i486 and Pentium are trademarks or registered trademarks of Intel Corporation or its subsidiaries in
the United States and other countries.
- All other trademarks identified herein are the property of their respective owners.
C
2000 Kyushu Matsushita Electric Co., Ltd. All Rights Reserved.
Printed in Japan
PSQX2435XA KK1200EP2022 (E)