1
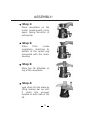
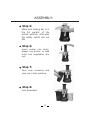
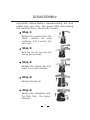
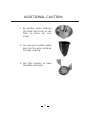
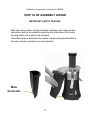
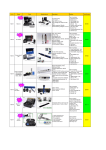
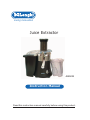
Living innovation
Juice Extractor
JE850M
Instruction Manual
Read this instruction manual carefully before using this product.
TABLE OF CONTENTS
1. Important Safeguards
1-2
2. Parts List
3
3. Special Helpful Hints for The
Best Performance
4
4. Assembly
5-6
5. Disassembly
7
6. Additional Caution
8
7. How to Cleaning
9
IMPORTANT SAFEGUARDS:
When using this electrical appliance, basic safety
precautions should always be followed including the
following:
a) Read all instructions before operating.
b) To protect against risk of electrical shock do not put
the motor housing in water or any other liquids.
c) Close supervision is necessary when the appliance is
used by or near children.
d) Unplug from outlet when not in use, before addition or
removal of any parts, and before cleaning.
e) Avoid contacting moving parts.
f) Do not operate any appliance with a damaged cord or
plug or after the appliance malfunctions, or is dropped
or damaged in any manner. Return appliance to the
nearest authorised De'Longhi Service Agent for
examination, repair or electrical or mechanical
adjustment.
g) The use of attachments is not recommended as they
can cause fire, electric shocks or injury.
h) Do not use outdoors
i) No not let cord hang over edge of table or counter.
j) Do not let cord contact hot surface, including the
stove.
K) SAVE THESE INSTRUCTIONS.
Do not use the appliance if the rotating sieve is damaged.
If the supply cord is damaged, it must be replaced by the
manufacturer, an authorised De'Longhi Service Agent or
similarly qualified persons in order to avoid a hazard.
1
SAFETY INSTRUCTIONS:
a) Always make sure juicer cover is clamped
securely in place before motor is turned on. Do
not unfasten clamps while juicer is in operation.
b) Be sure to turn switch to OFF position after each
use of your juicer. Make sure the motor stops
completely before disassembling.
c) Do not put your fingers or other objects into the
juicer opening while it is in operation. If food
becomes lodged in opening, use food pusher or
another piece of fruit or vegetable to push it
down. When this method is not possible turn the
motor off and disassemble juicer to remove the
remaining food.
d) Do not use the appliance if the rotating sieve is
damaged.
e) Unplug before cleaning and before assembling or
removing parts.
f) Turn OFF before cleaning and before assembling
or removing parts.
g) The cutting blade is extremely sharp so always
use food pusher.
2
PARTS LIST:
Pusher
Top Lid
Locking Bar
Receptacle
Juice Cup
Pulp Container
Switch
Motor Housing
3
SPECIAL HELPFUL HINTS
FOR THE BEST PERFORMANCE:
Do not put any fruit or vegetable in your juicer
until power is turned on.
Remove large seed from fruits such as peach,
mango, etc. as the seed will damage the blade of
the unit.
The juicer has two speeds. High speed is for the
hard fruits and vegetables like apples, carrots
etc...and low speed is for soft fruits and
vegetables such as watermelon, grapes and
strawberries.
Do not use bananas or avocados as they do not
contain juice and will clog juicer.
Allow the juicer run for a few minutes before
turning off to allow any excess juice to be
extracted from the pulp. Wait until motor stop
spinning before disassembling.
Do not immerse the whole machine into water or
liquid at any time.
4
ASSEMBLY:
Step 1:
Place receptacle on the
motor housing,with juicer
spout facing direction of
locking bar.
Step 2:
Place
filter
inside
receptacle, matching its
bottom to the center peg
connected with the motor
housing.
Step 3:
Place top lid attached on
top of the receptacle.
Step 4:
Lock chute lid into place by
lifting locking bar up until
it clicks into grooves
located on both side of the
lid.
5
ASSEMBLY:
Step 5:
Make sure locking bar is in
the full upright. of the
locked position otherwise
the safety switch will not
ON
Step 6:
Insert pusher into chute.
Always use pusher to feed
fruits and vegetables into
unit.
Step 7:
Place pulp container and
juice cup in their positions.
Step 8:
Fully assembled.
6
DISASSEMBLY:
Important Notice:Before disassembling the unit
make sure you turn the power OFF and unplug
the machine from the electric outlet.
Step 1:
Remove the pusher from the
chute, remove the plup
container and remove the
juice cup.
Step 2:
Hold the top lid and pull the
locking bar as shown.
Step 3:
Release the locking bar and
lower it to motor housing.
Step 4:
Remove the top lid
Step 5:
Remove the receptacle and
the filter from the motor
housing.
7
ADDITIONAL CAUTION:
1. Be careful, when cleaning
the blade and teeth on the
filter as these are very
sharp.
2. You may put a plastic waste
bag into the pulp container
for easy cleaning.
3. Use filter brusher to clean
the blade and teeth.
8
HOW TO CLEANING:
Turn off the power switch and wait until the motor
completely stops.
With dry hands, unplug the power cord from
electrical outlet.
Disassemble the juicer as disassembly as per
instructions on page #7
Clean all other parts except the motor housing, in
warm, soapy water. A mild detergent is
recommended. Rinse well and dry thoroughly. The
stainless steel receptacle and filter are dishwasher
safe. Never submerge the motor housing into water
or liquids. Plastic components are advised to be
placed in the top basket of your dishwasher or
hand washed.
The motor housing is not dishwasher safe.
While the unit is unplugged, wipe base with a soft
damp cloth or sponge. Do not submerge motor
base in water or liquids. Do not spray with water
or any other liquid.
To clean the filter and blade, hold them under clean
running water. Use a soft-bristled dish washing
brush gently to completely clean pulp from filter
and blade disc.
Rinse the filter from the outside under running
water.
Dry all parts thoroughly then assemble the juicer
and turn the power ON to spin out any excess
water in the filter and receptacle.
Make sure unit and parts are completely dry then
store in a cool, dry place.
9
Addendum to assembly instructions of JE850M
STEP 7A OF ASSEMBLY JE850M
IMPORTANT SAFETY FEATURE
Male connector at base of pulp collection container must make positive
connection with the microswitch inside the slot at the base of the motor
housing before unit is able to be activated.
This safety feature eliminates the chance of pulp being expelled without
the pulp collection container in correct position.
Male
Connector
-7-