1
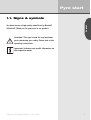
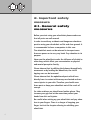
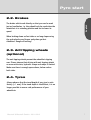
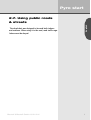
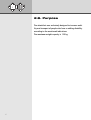
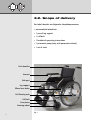
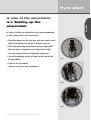
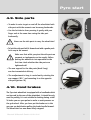
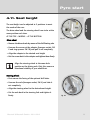
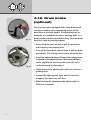
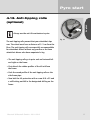
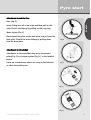
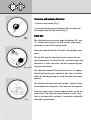
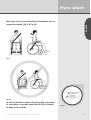
Bischoff & Bischoff
Instruction manual
Pyro start
Enjoy mobility.
Content
1| Introductory remark
4
1.1. Signs and symbols
2| Important safety measures
6
2.1. General safety measures
2.2. Brakes
2.3. Tyres
2.4. Obstacles
2.5. Ascending slopes and downward slopes
2.6. Safety in vehicles
2.7. Purpose
2.8. Indication
2.9. Indikationen
2.10. Contraindication
2.11. Responsibility
2.12. Conformity declaration
3| Product and delivery overview
13
3.1. Delivery check
3.2. Scope of delivery
4| Use of the wheelchair
15
4.1. Setting up of the wheelchair
4.2. Folding the wheelchair
4.3. Getting on and off the wheelchair from the side
4.4. Getting on and off the wheelchair
from the front side
4.5. How to surmount stairs and high steps
4.6. Foot plates
4.7. Leg supports
4.8. Tipping aid
2
4.9. Side parts
4.10. Handbrakes
4.11. Seat height
4.12. Drum brakes (optional)
4.13. Anti tipping rolls
4.14. Lap belt (optional)
5| Technical data
6| Transport
6.1. Transporting the wheelchair
6.2. Seat in disabled
7| Maintenance instructions for the user
7.1. Cleaning
7.2. Wheelchair check by the user
8| Repair instructions and maintenance instructions
9| Disposal
10| Passing on the wheelchair
11| Maintenance
12| Guarantee
13| Guarantee-Certificate
Bischoff & Bischoff GmbH • 03.01.2012
English
Pyro start
27
28
34
36
37
37
37
38
39
3
1. Introductory remark
Dear User,
You have chosen a high quality wheelchair by Bischoff &
Bischoff. We thank you for your trust in our product.
The wheelchair was designed in such a way to offer you
many advantages and to meet all your needs. Due to its
various adjustment features the Pyro start wheelchair can
be adjusted in seat height, seat angle and lower leg
length to your individual body seizes.
The Pyro start wheelchair can be used both indoors and
outdoors.
Before you start using your new wheelchair for the first
time, make sure you read the operating instructions
carefully. It is a very important and necessary part of your
wheelchair. Keep the operating instructions ready at hand
and when you pass on your wheelchair to someone else
please ensure to pass on the instructions.
Repairs and adjustments require a special technical knowledge and therefore can be carried out only by specialists
which are authorised by Bischoff & Bischoff.
4
Pyro start
1.1. Signs & symbols
English
You have chosen a high quality wheelchair by Bischoff
& Bischoff. Thank you for your trust in our product.
Attention! This sign is used for very important
parts concerning your safety. Please look at the
operating instructions.
Important! Indicates very useful information on
the respective matter.
Bischoff & Bischoff GmbH • 03.01.2012
5
2. Important safety
measure
2.1. General safety
measures
Before you start using your wheelchair please make sure
that all parts are well secured.
In order to avoid any accidents and dangerous situations
practice using your wheelchair on flat and clear ground. It
is recommended to have a companion in this case.
The wheelchair must not be misused to transport more
than one person or to carry any loads. Pay attention to its
purpose.
Never use the wheelchair under the influence of alcohol or
other drugs which affect your concentration or physical
and mental perceptive faculty.
Please observe that by shifting the balance through body
movements or by loading the wheelchair, the risk of
tipping over can be increased.
Please observe that the upholstered parts which have
directly been in contact with sunrays are heated and can
cause injuries to your skin. Therefore you should cover
these parts or keep your wheelchair out of the reach of
sunrays.
For rides outdoors you should wear leather gloves. They
increase your grip and at the same time protect your
hands from dirt and injuries.
Be careful when setting up your wheelchair and pay attention to your fingers. There is a danger of trapping your
finger. Look at the chapter referring to unfolding your
wheelchair.
6
Pyro start
2.2. Brakes
English
The brakes which work directly on the tyres can be used
just as handbrakes, i.e. they should only be used when the
wheelchair is in standing position and not to lower its
speed.
When braking down on fast rides or on long slopes using
the grab wheels your fingers and palms get hot.
Attention! Danger of burning!
2.3. Anti tipping wheels
(optional)
The anti tipping wheels prevent the wheelchair tipping
over. Please observe that driving with anti tipping wheels
on areas with stairs, hydraulic ramps and ramps is limited.
Make sure there is enough space above, below and on
both sides.
2.4. Tyres
Always observe that the tread depth of your tyre is satisfactory (> 1 mm). If the tread depth is insufficient, it is no
longer possible to assure safe performance of your
wheelchair.
Bischoff & Bischoff GmbH • 03.01.2012
7
2.5. Obstacles
To surmount obstacles (e.g. kerbstones, steps, etc.)
please always use loading ramps.
Avoid driving against obstacles without braking or bumping down from a higher level.
2.6. Ascending slopes &
downward slopes
Please do always consider that on extreme adjustments of
your drive wheel your wheelchair may tip over backwards
at just a slight slope. Use your wheelchair with extreme
adjustments only accompanied by another person. Also
use the anti tipping rolls to avoid tipping over backwardly.
8
Pyro start
English
2.7. Using public roads
& streets
The wheelchair was designed to be used both indoors
and outdoors. When using it in the road, road traffic regulations must be obeyed.
Bischoff & Bischoff GmbH •03.01.2012
9
2.8. Purpose
The wheelchair was exclusively designed to increase mobility and transport of people who have a walking disability
according to the mentioned indications.
The maximum weight capacity is 125 kg.
10
Pyro start
English
2.9. Indications
Walking disability or distinct walking impairment due to:
• paralysis
• extremity loss
• extremity defect/deformation
• joint stiffness/damage (not on both arms)
• Other diseases.
2.10. Contraindications
It is improper to use the wheelchair if there is
• a perception disorder/ perceptual disturbance
• a disturbance of balance
• extremity loss on both arms
• joint stiffness/damage on both arms
• Sitting incompetence
• Reduced or insufficient eyesight
Bischoff & Bischoff GmbH • 03.01.2012
11
2.11. Responsibility
We can only ensure safety if the product is used under the
given conditions and for the mentioned purposes.
Changes, enlargements, repairs and maintenance jobs can
be carried out only by authorised people. When using the
wheelchair you must obey all operating instructions.
2.12. Declaration of
conformity
The producer Bischoff & Bischoff certifies in its role as the
producer its sole responsibility that the wheelchair Pyro
start corresponds to the 93/42 EWG directive.
12
Pyro start
English
3. Product &
delivery overview
3.1. Delivery check
The wheelchair Pyro start is delivered in a cardboard packaging and is ready for use. After unpacking please retain
the cardboard packaging if possible. You may need it later
for storage or for the return of the wheelchair.
The delivery and the introduction to the wheelchair are
carried out by qualified and authorised medical companies.
When dispatching the wheelchair by train or carriage it
has to be checked immediately after arrival in the delivery
person’s presence in order to confirm the safe delivery of
the product. In the unlikely case that there has been some
damage immediately contact our customer service number:
(+ 49 (0)700/6000 7070).
Check the content for completeness and intactness. If
there are irregularities or damages do not hesitate to call
our customer service number. (+ 49 (0)700/6000 7070).
Bischoff & Bischoff GmbH • 03.01.2012
13
3.2. Scope of delivery
Der Inhalt besteht aus folgenden Hauptkomponenten:
• preassembled wheelchair
• 1 pair of leg support
• 1 calf belt
• 1 booklet of operating instructions
• 1 pneumatic pump (only with pneumatic wheels)
• 1 set of tools
Push handles
Armrest
Side part
Leg support
Elbow lever brake
Full-floating axle
Calf belt
Foot plates
Steering wheel
Fig. 1
14
Pyro start
English
4. Use of the wheelchair
4.1. Setting up the
wheelchair
In order to unfold your wheelchair after having unpacked
it, take a place next to the wheelchair.
• Seize the armrest or the seat pipe with one hand on one
side of the wheelchair and tilt it towards yourself.
• Push with your other hand the cross brace apart until
the seat pipe is completely set in the plastic holder.
• The seat cushion must be completely spread out.
• Use the handbrake on the left and on the right of the
driving wheels.
Fig. 2
• Hook in the leg support
• Now you can sit on your wheelchair.
Fig. 3
Fig. 4
Bischoff & Bischoff GmbH • 03.01.2012
15
4.2. Folding
the wheelchair
In order to fold your wheelchair, first elevate the footplates.
• Stand next to the wheelchair.
Fig. 5
• Take hold of the seat cushion at the front and back and
pull it up. In order to load the wheelchair into your car
you can remove the rear wheels gently over the full
floating axle.
Danger of trapping your finger!
Be careful not to grasp the seat pipe
Fig. 6
Fig. 7
16
Pyro start
English
4.3. Getting on & off the
wheelchair from the side
• Put the wheelchair as close as possible next to the
present or future seating surface.
• If you want to change seats from another wheelchair or
undercarriage first make sure to use the hand brakes
• Secure the Pyro Start wheelchair to avoid unwanted
moving by using the brake lever on the left and right
side of your wheelchair.
• Swing the padded armrest backwards.
• Fold the foot plates on the side or remove the leg
supports.
• Slip at the side to the other seat.
• Make sure you sit as far back in your seat As possible
• Finally place the leg support back in the initial position
Bischoff & Bischoff GmbH • 03.01.2012
17
4.4. Getting on & off the
wheelchair from the
frontside
• First swing the foot plates up or remove the leg support.
• Put the Pyro start wheelchair as close as possible to the
future sitting accommodation in frontal position.
• If you want to change seats from another wheelchair or
undercarriage, first make sure to use the hand brakes to
secure it.
• Now slip by turning your body on the seating surface.
• Finally you place the foot support back in its initial
position.
Never climb on the foot plates!
Danger of tipping over!
4.5. How to surmount
stairs & high steps
If the stairs are high and if there are stairs with
more than 3 steps, 2 people must carry the wheelchair.
Fig. 8
• The helpers must only take hold of firmly mounted
frame sections. (picture 8 and 9)
• While ascending stairs the helper behind the wheelchair
pulls the wheelchair over the step holding it on the
fastened grips.
Fig. 9
18
• The helper who is at the bottom/below takes hold of
the front frame pipes and stabilises the position. While
he is doing so he pushes the rear wheels of the
wheelchair against the steps.
Pyro start
English
• When descending the stairs the helper who is below,
brakes by pressing the wheelchair straight onto the
steps. The helper who is above takes hold of the
wheelchair at the push handles, secures it and holds it
in the right position. The wheelchair should roll step by
step down the stairs.
The holding points for transportation of the
wheelchair are exclusively the frames and the
push handles. The armrests mustn’t be used for
lifting the wheelchair under no circumstances.
4.6. Foot plates
• The length of the leg support can be directly adjusted
for 12 cm.
• To do this you have to undo the socket-head cap screw (SW
5)
• Adjust the leg support height according to your choice.
• To get on and off the wheelchair you have to tip up the
footplates on the side
Fig. 10
Attention!
The maximum extension length is marked.
Bischoff & Bischoff GmbH • 03.01.2012
19
4.7. Leg support
• To make it easy for you to get on and off the wheelchair
you can fold up the foot plates or swing the leg
supports outwardly or pivot them upwardly and take
them off.
Fig. 11
• To swing the leg supports outwardly open the
locking device. (picture 11)
• Being in the “outward position” the leg support
can be taken off completely. (picture 12)
• To assemble the leg supports proceed in reverse order.
• Swing the leg supports back to the front position
until they snap in clearly audible.
Fig. 12
4.8. Tipping aid
• Thanks to the tipping aid the accompanying person can
tip your wheelchair much easier to for example cross
over a step.
• To do it you have to press down a lever with your foot.
You keep your balance by holding the push handles.
• The tipping aid juts out on the left and right side of the
frame and is equipped with rubber profiles to grip well.
Fig. 13
20
• There is also the option to assemble anti tipping
rolls instead of the rubber profiles.
Pyro start
4.9. Side parts
English
• To make it easier to get on and off the wheelchair both
side parts with the armrests can be swung backwards.
• Use the lock device lever pressing it gently with your
finger and at the same time swing the side part
backwardly.
Fig. 14
Never use the side parts to carry the wheelchair!
• To lock the side part fold it forward and with a gentle push
let it snap in the armrest
Make sure that while you pivot the side parts no
garments or implements can be caught. Before
putting the wheelchair into operation for the
first time check whether the side parts are
tightened well.
Fig. 15
• The arm support for the side parts (desk/long)
are short mounted at delivery.
• The readjustment to long is carried out by rotating the
arm support 180 ° and mounting it on the opposite
side part.(picture 16)
4.10. Hand brakes
Fig. 16
The Pyro start wheelchair is equipped with a handbrake which
can be used by the user of the wheelchair. It should be only
used for parking. It is not suitable for braking during a ride!
To brake you use your palms to make a weak pressure on
the grab wheel. After you have put the brakes on in this
way you use both brakes pulling the brake handle forward.
The wheelchair has now been safely stopped.
Bischoff & Bischoff GmbH •03.01.2012
21
• The distance between the pivot bolt and the outer tyre
cover at maximum open brake mechanism/device has
to be x =15 mm at the narrowest part.
Fig. 17
• To adjust the distance you have to remove the two
hexagon socket screws at the brake mounting
(underside/bottom)Picture 18
• Then you pull the brake system along the mounting in
the correct position.
• The pivot bolt must be horizontal e.g. parallel to the
underground
• Finally you have to tighten up again both hexagon
socket screws.
Fig. 18
• Make sure that the brake snaps in when you use the
brake lever and that it does not snap back.
The brake adjustment should be carried out by
trained experts. However if you have enough
experience you can do the job yourself. But
consider that wrongly adjusted brakes can have
life-threatening consequences.
In order to ensure optimal brake functioning
pneumatic wheels should have a pressure of
300-400 k Pa (3-4 bars). If the air pressure in
the tyres is not according to the regulations then
there is a danger of brake function loss.
22
Pyro start
4.11. Seat height
English
The seat height can be adjusted to 3 positions to meet
the needs of the user.
The drive wheel and the steering wheel have to be at the
same position each time.
AT THE TOP – MIDDLE – AT THE BOTTOM
Drive wheel:
Fig. 19
• Remove the drive wheels by means of the full-floating axle.
• Unscrew the screws at the adapter (hexagon socket, SW
4 and ring spanner SW 10) and pull it out completely.
• Align the adapter to the desired seat height
• Put the screws back in the adapter and tighten them firmly.
Align the steering wheel to the same hole
position as the driving axle. Only this assures a
directional stability of your wheelchair.
Steering wheel:
• First remove the facing of the optional drill holes.
• Unscrew the axle (hexagon socket, SW 4) and take it
out completely.
• Align the steering wheel to the desired seat height.
• Put the axle back in the steering fork and tighten it
firmly.
Bischoff & Bischoff GmbH • 03.01.2012
Fig. 20
23
4.12. Drum brake
(optional)
Fig. 21
The Pyro start can be equipped with a drum brake which
can only be used by the accompanying person via the
brake lever on the push handle. The drum brake can be
used both as a handbrake as well as a driving brake. As a
driving brake it enables regulated braking. The hand brake
function is used for parking purposes.
• To use the brake you have just to pull the brake lever
and to push up the stopping lever.
• To let off the hand brake you just have to pull the brake
lever shortly. (The locking device loosens automatically.)
Fig. 22
• To achieve optimal braking efficiency the braking power
is adjusted at the adjusting screw. The braking efficiency
can be amplified by decreasing the screw bolt and it
can be decreased by increasing it.
• Please decrease the adjusting bolt until you can hear a
grinding noise.
• Increase the adjusting bolt again until all the noises
disappear. The wheel runs well then.
• After finishing the adjustments the adjusting bolt is
fixed by a counternut.
24
Pyro start
English
4.13. Anti-tipping rolls
(optional)
Always use the anti-tilt mechanism in pairs.
Fig. 23
The anti tipping rolls prevent that your wheelchair tips
over. The wheel must have a distance of 3- 5 cm from the
floor. The anti tipping rolls are especially recommendable
for wheelchair drivers without any practice or for those
wheelchair drivers who have amputated a leg.
• The anti tipping rolls go in pairs and are fastened left
and right on the frame.
• First detach the rubber profiles of the tilt aid from
the frame.
• Push the round profile of the anti tipping rolls on the
side frame pipe.
• Now bolt the tilt protection with a screw M 6 x 35 and
a self-locking nut M6 in the designated drilling on the
frame.
Bischoff & Bischoff GmbH • 03.01.2012
25
4.14. Lap belt
(optional)
A lap belt can be ordered optionally and secures users
who do not have enough support in the wheelchair.
• The Pyro start wheelchair can be equipped with
a safety belt at the back pipe.
Fig. 24
• The belt is opened and closed with a fastening clip.
• You can adjust the belt length with the moveable
belt clip on the belt.
26
Pyro start
5. Technical data
English
Measures/dimensions & weights
Maximum weight capacity (kg):125
Seat width (cm):
37/40/43/46/49/52
Seat depth (cm):
42
Frontal seat height (cm):
47/49/51
Seat angle (°):
3, 8
Total width:
seat width + 19 cm
Total length with/without
Leg support (cm):
99/77, 5
Total height (cm):
87/89/91
Backrest height (cm):
40
Lower leg length (cm):
30 up to 42 (without gradation)
Backrest angle (°):
5 (without adjustments)
Foot rest angle (°):
15 (without adjustments)
Knee angle (°):
115 (without adjustments)
Armrest height (cm):
22
Armrest length (cm):
34
Unloaded weight (kg):
from 16, 1
Frame weight (kg):
9, 0
Dimensions in folded state
(L/W/H) cm:
101/33/91
Wheels
Drive wheels (inch):
24 x 1 ” (breakdown secure)
Steering wheels (cm):
Ø 200 x 50 mm
(breakdown secure)
Bischoff & Bischoff GmbH • 03.01.2012
27
6. Transport
6.1 Transporting the
wheelchair
To make the wheelchair as convenient as possible to transport, all detachable parts (footrests, wheels, slot-in accessories) must be removed and the wheelchair folded.
6.2 Seat in disabled vehicle
You can check whether your wheelchair is licensed as a
seat in a disabled vehicle by the symbols on the frame (Fig.
A and Fig. B).
All wheelchairs authorised by B+B as seats for use in
vehicle are tested to ISO 7176-19: 2008.
• The securement points are marked with a symbol (Fig.
A). Other attachment points are not authorised by the
manufacturer.
Fig. A: Wheelchair suitable as seat in disabled
vehicles / anchor points
•Where possible, use a fixed fitted car seat and its seatbelt system. Stow the folded wheelchair in the boot.
•The person responsible for transportation should be
familiar with the current regulations on transportation
and use of the disabled vehicle and restraint system.
• 4-point restraint systems anchored to the vehicle must
be used to restrain the wheelchair.
Fig. B: Wheelchair not
suitable as seat in disabled vehicles
28
Pyro start
English
•Detachable parts and accessories on the wheelchair,
such as trays and bags, should, where possible, be
removed and safely stowed in the boot.
If attachments are not detachable they must be folded
away and secured by the user or adequately padded.
•When used as a seat in a disability vehicle, a 3-point
safety belt must always be worn. Other fixation systems
and straps may be used in addition.
•If your wheelchair has an adjustable backrest or seat,
these must be placed in as vertical a position as
possible and the locking mechanism checked.
•Products that have been involved in an accident must
be replaced and are no longer licensed to transport
people.
Bischoff & Bischoff GmbH • 03.01.2012
29
Positioning of wheelchair
• Position the wheelchair facing forwards (Fig. C).
Check whether the straps conform to the angles in Fig. D.
Rear attachment
point
Fig. C
Side view
Rear view
Position of static or
retracting belts
Front attachment
point
Front view
Side view
Position of static or
retracting belts
Fig. D
•Stipulated angles and positions of straps from wheelchair
to vehicle floor. Front straps should be arranged so that
the angle ensures optimum lateral stability
(D = 300mm).
•The hatched area indicates the range within which the
straps must be attached to the floor!
•Wheelchair must not be placed in front of an active
air-bag Deactivate air-bag or have it deactivated!
30
Pyro start
Attachment to vehicle floor
Rails (Fig. E)
English
Insert fitting into rail at an angle and then pull in sideways. Detach the fittings by pulling on the snap ring.
Mono System (Fig. F)
Place mono-fitting flat on the base plate and pull over the
base plate. Detach the mono-fittings by pulling down
from the base plate.
Fig. E
Attachment to wheelchair
Attachment to the wheelchair may be by securement
points(Fig. G) or tie-down system (Fig. H ) to the labelled
points.
Under no circumstances attach the strap to the footrests
or other detachable parts.
Fig. F
Fig. G
Fig. H
Bischoff & Bischoff GmbH • 03.01.2012
31
Tensioning and loosening the straps
•Tension using handle (Fig. I)
•Loosening using lever or alternatively by releasing the
belt tongue from the belt buckle (Fig. J).
Safety belt
Fig. I:
open
The safety belt must run at an angle of between 30° and
75° to the horizontal (Fig. K), with a larger angle being
preferable. It must fit low on the pelvis.
Make sure that the belt lies flat and is not twisted at any
point.
Fig. J: close
The lap belt must be attached on both sides to the rear
securement points. To close the lock, insert the tongue into
the buckle. It clicks into place. The lock is opened by pressing the large button.
The safety belt should fit firmly but not cut in. To tighten
the belt pull on the loose end of the belt. You can further
adjust the belt by pushing the clasp forwards in the open
position.
The shoulder belt hooks into the lap belt. It must fit close
to the body across the pelvis, chest and over the shoulder.
Fig. K
32
Place the clasp in front of the occupant's body, not on the
pelvic bone! The clasp must be positioned in such a way
that, in the event of an accident, it cannot be accidentally
released by attachments.
Pyro start
English
Belts must not run across wheelchair attachments such as
armrests or wheels! (Fig. L & Fig. M)
Fig. L
Fig. M
In order to be able to remove the belt quickly in the event
of an accident, a seat belt cutter like this (Fig. N) should
be kept in every vehicle.
Bischoff & Bischoff GmbH • 03.01.2012
Fig. N
33
7. Maintenance
instructions for the user
7.1. Cleaning
• The frames of the wheelchair can be cleaned with a
damp cloth. If there is more dirt you can use a mild
cleanser.
• The wheels can be cleaned with a damp brush made of
synthetic bristles (do not use wire brushes)
• The seat and back upholstery can be washed at 40 °C.
Use mild washing powder. For disinfection add a usual
disinfectant to the rinse cycle which will kill all bacteria
and germs at the washing temperature of 40 °C.
Do not use any pressure washers or steam
cleaners.
34
Pyro start
English
7.2. wheelchair check
by the user
Before you use your wheelchair to have a ride check
• the intactness of the wheels. You should regularly check
the profile depth of your wheels once a month. The
profile should be at least 1 cm. Faulty or worn out
wheels must be changed.
• the functional efficiency of the handbrake. When you
pull your brake the wheelchair should remain still. When
the brakes are released then you should be able to
move your wheelchair easily without any noise and
directional stability. If you notice any unusual braking
performance, inform at once your speciality retailer and
withdraw the wheelchair from circulation.
• the intactness and cleanliness of the seat and back
covering. If it is dirty you can clean it according to the
cleaning instructions. If it is damaged, get in touch with
your speciality retailer.
• the folding mechanism and all moveable parts on free
movement and silent functioning. Squeaking sounds are
a sign of partial damage and should be taken care of by
the speciality retailer.
• the intactness of all screw joints and rivet connections.
Bischoff & Bischoff GmbH • 03.01.2012
35
8. Repair & maintenance
instructions
It is recommended that the Pyro start wheelchair is
subjected to a performance test by the speciality retailer
at least once a year. If there are malfunctions or defects,
the wheelchair must be taken to the medical supply store
or the speciality retailer to be overhauled and repaired.
You can find a partner in your neighbourhood if you call
our customer service number: + 49 (0)700/6000 7070.
On request the speciality retailer will have the
necessary information and documents at his
disposal.
36
Pyro start
9. Disposal
English
If you decide not to use your Pyro start wheelchair any further and want it to be disposed,
get in touch with your speciality retailer. If you
want to deal with this matter on your own,
contact your local waste management organization
to find out the disposal rules of your place of
residence.
10. Passing on the
wheelchair
When passing on the wheelchair please do not
forget to hand over to the new user all the
necessary technical documents which are
important for safe usage. The wheelchair must
be checked and according to the maintenance
plan must be flawless.
11. Maintenance
A maintenance plan can be provided by our customer
service.
Bischoff & Bischoff GmbH • 03.01.2012
37
12. Guarantee
Guarantee items refer to all defects of the product which
can demonstrably be referred to material defect or manufacturing defect. If there are complaints you have to provide
a completed certificate of guarantee. For our wheelchair
Pyro start we offer a guarantee of 5 years for frame parts.
We offer a 2 year guarantee for all the other parts.
Non-observance of the operating instructions as
well as improper carried out maintenance jobs
and technical changes, adaptations without the
permission of the Bischoff & Bischoff company
lead to guarantee loss and product liability in
general.
If you have any questions our B & B customer service is
ready to answer them. The phone number is
+ 49 (0)700/6000 7070.
38
Pyro start
Warranty certificate
English
(Please note our general business terms and conditions)
Model: Pyro start
Model number:
Serial number:*
(must be inscribed by the retailer)
Dealer:
Date and Stamp
* Information signs can be found on the side frames.
Bischoff & Bischoff GmbH • 03.01.2012
39
Bischoff & Bischoff GmbH
Becker-Goering-Strasse 13 • D-76307 Karlsbad
Tel.: +49 700/6000 7070 • Fax: +49 700/6000 8080
www.bischoff-bischoff.com
[email protected]