1
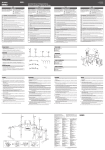
English Deutsch ELECTRONIC DRUM PAD Yamaha Electronic Drums web site: http://www.yamaha.co.jp/english/product/drums/ed/ Yamaha Manual Library http://www.yamaha.co.jp/manual/ U.R.G., Pro Audio & Digital Musical Instrument Division, Yamaha Corporation © 2009 Yamaha Corporation WS70070 910PO***.*-01A0 Printed in Japan Owner’s Manual Bedienungsanleitung Mode d’emploi Français XP100T XP100SD XP120T XP120SD EN DE FR 取扱説明書 ZH JA English PRECAUTIONS Please read carefully before proceeding. The purpose of the precautions detailed below is to ensure that this product is used safely without fear either of accidental injury to you or other people or of damage to property. As a means, furthermore, of indicating the severity and immediacy of any risk of injury or damage associated with incorrect operation, these precautions are classified as either WARNING or CAUTION. The instructions presented together with precautions are extremely important in terms of ensuring safety, and therefore, they should be fully observed. After reading this Owner’s Manual, ensure that it is kept in a safe, convenient location for future reference. CAUTION Always follow the basic precautions listed below to avoid the possibility of physical injury to you or others, or damage to the instrument or other property. These precautions include, but are not limited to, the following: • If this product is used with a Rack System or Cymbal Stand, do not place the rack or stand on a sloping, unstable surface, or on steps. The rack or stand may overturn or be damaged, resulting in injury. • If this product is used with a Rack System or Cymbal Stand, make sure all bolts are tightened firmly. Also, when adjusting the height or angle, do not suddenly loosen the bolts. Loose bolts may result in the rack overturning or parts dropping, causing injury. • Please be careful when children are close to or touching the product. Careless movement around the product may result in injury. • When setting the pads, please pay close attention to the handling and setting of cables. Carelessly placed cables may cause the user and others to trip and fall. • Do not alter the product. Doing so may result in injury or damage/deterioration to the product. NOTICE • Do not step on or place heavy objects on the product. It may result in damage. • Do not use or keep the product in places with extremely high temperature (places in direct sunlight, close to a heater, in a closed car, etc.) or high humidity (bathroom, outside on a rainy day, etc.). Doing so may result in deformation, discoloration, damage or deterioration. • When cleaning the product, do not use benzine, thinner or alcohol as it may result in discoloration or deformation. Please wipe with a soft cloth or a damp cloth that has been wrung out thoroughly. If the product is soiled or sticky, use a neutral detergent on a cloth then wipe with a damp cloth that has been wrung out thoroughly to remove any remaining detergent. Also pay close attention so as not to let the water and detergent come into contact with the cushions used in the product; doing so may result in deterioration. • Make sure you hold onto the plug, not the cable, when connecting or disconnecting the cable. Also, never place any heavy or sharp objects on the cable. Applying excessive force to the cable may result in damage to the cable, such as the wires being severed, etc. 2 Package Contents To customers who purchased a Pads Set, please refer to the attached “Assembly Manual” included with the Pads Set when confirming package contents. XP100T: XP100SD: XP120T: XP120SD: q XP100T main unit x 1, t Clamp bolt x 1, y Stereo phone cable x 1, u Owner’s Manual (this sheet) x 1 w XP100SD main unit x 1, t Clamp bolt x 1, y Stereo phone cable x 1, u Owner’s Manual (this sheet) x 1 e XP120T main unit x 1, t Clamp bolt x 1, y Stereo phone cable x 1, u Owner’s Manual (this sheet) x 1 r XP120SD main unit x 1, y Stereo phone cable x 1, u Owner’s Manual (this sheet) x 1 q–r t y B Rim Pad A Rim Specifications XP100T Tom Pad (10") Size: 290 x 80 (H) mm (Control knob and clamp bolt not included.) Weight: 2.3 kg Sensor System: Trigger sensor (piezo) x 1, rim switch (2 zones) x 1 Output jack: Standard stereo phone jack XP100SD Snare Pad (10") Size: 290 x 85 (H) mm (Control knob and clamp bolt not included.) Weight: 2.4 kg Sensor System: Trigger sensor (piezo) x 1, rim switch (2 zones) x 1 Output jack: Standard stereo phone jack XP120T Tom Pad (12") Size: 340 x 82 (H) mm (Control knob and clamp bolt not included.) Weight: 3.0 kg Sensor System: Trigger sensor (piezo) x 1, rim switch (2 zones) x 1 Output jack: Standard stereo phone jack XP120SD Snare Pad (12") Size: 340 x 85 (H) mm (Control knob and clamp bolt not included.) Weight: 3.1 kg Sensor System: Trigger sensor (piezo) x 1, rim switch (2 zones) x 1 Output jack: Standard stereo phone jack Specifications and descriptions in this Owner’s Manual are for information purposes only. Yamaha Corp. reserves the right to change or modify products or specifications at any time without prior notice. As specifications, hardware, and optional extras may not be the same in every region, please check with your Yamaha dealer. Information for Users on Collection and Disposal of Old Equipment This symbol on the products, packaging, and/or accompanying documents means that used electrical and electronic products should not be mixed with general household waste. For proper treatment, recovery and recycling of old products, please take them to applicable collection points, in accordance with your national legislation and the Directives 2002/96/EC. By disposing of these products correctly, you will help to save valuable resources and prevent any potential negative effects on human health and the environment which could otherwise arise from inappropriate waste handling. For more information about collection and recycling of old products, please contact your local municipality, your waste disposal service or the point of sale where you purchased the items. For business users in the European Union: If you wish to discard electrical and electronic equipment, please contact your dealer or supplier for further information. Information on disposal in other countries outside the European Union: This symbol is only valid in the European Union. If you wish to discard these items, please contact your local authorities or dealer and ask for the correct method of disposal. 3 Pad-to-Input Matching Chart The function of the XP series pads varies according to which trigger input jack on the Drum Trigger Module the pad is connected. The chart below describes its function in relation to trigger input jacks. DTX900 Trigger Input Jack 1-5 6-8, 12-15 9 10/11 Pad Rim – Pad Control Functions – – – : Compatible – : Not compatible • When using the XP series pad as a snare pad, set the pad type of the DTX900 to “XP120/100 (for snare).” When using the XP series pad as a tom pad, set the pad type of the DTX900 to “XP120/100 (for tom).” For details, refer to the Owner’s Manual that came with your drum trigger module. • When connecting the XP series pad to the drum trigger module, make sure a stereo phone cable is used. If a mono phone cable (plug has one black ring) is used, the voices assigned to the A/B rim switch will not be produced. Since the XP series pad does not incorporate a switch, use of a mono phone cable is allowed. • When connecting the XP series pad to the drum trigger module, always use the supplied stereo phone cable (parallel type). Voices assigned to the A/B rim switches or pad control functions cannot be used when using a mono phone cable. Also, using any stereo phone cable other than the supplied parallel type cable may result in improper function of the pad control functions. When connecting the XP series pad to other than the drum trigger module shown in this manual, refer to the following website. http://www.yamaha.co.jp/english/product/drums/ed/ 4 Setting Up XP100SD/120SD Before set up, please prepare a snare stand e (Yamaha SS652, etc.), and set the XP100SD/120SD onto the stand as you would an acoustic snare drum. XP100T/100SD/120T After setting up your rack system (Yamaha RS series, etc.) or a standard tom stand (Yamaha WS series, etc.), attach the pad as shown in the illustration. Insert the tom holder (hexagonal bar) q on your rack or tom stand into the pad, and firmly tighten the clamp bolt w to secure. CAUTION • Make sure that the pad is securely attached to the rack or stand. If the bolt is not tightened securely, the pad may slip or fall down, causing injury. Also, if the rack or stand is placed on an unstable surface, etc., the rack or stand may fall over, resulting in injury. Connections Use the supplied stereo phone cable to connect the output jack on the XP series pad to the input jack on the DTX Series drum Trigger Module. Insert the L-shaped connector into the output jack (OUTPUT) on the XP series pad. OUTPUT 5 Pad Control Functions The pad controller used with the drum trigger module is compatible with pad control functions. The pad controller lets you adjust a variety of parameters (snares setting and tightness, tuning, etc.) by rotating the pad controller knob q (Please refer to the Owner’s Manual that came with your drum trigger module for more information.) • Never hit the controller knob or apply excessive force to it, since this may result in damage or malfunction. Output Level Adjustment Controls the level of the trigger output from the XP series. Rotate the level adjustment knob q to the right (looking at the knob from above) to increase the output level, or to the left to decrease it. The pad’s output level should be adjusted depending on how hard you hit the pad, or to adjust the pad’s dynamic range, or to better match the pad to the type of DTX Series Drum Trigger Module you are using. • Do not put excessive pressure on the level adjustment knob; doing so may result in damage. • When the XP series pad is used with a DTX Series Drum Trigger Module, enter the module’s Trigger Setup Edit display and set the Gain (pad input level) parameter so that the display reads 90–95% when the pad is struck strongly. Refer to the Owner’s Manual that came with your module for more information. If the output level is too high, the pad’s dynamic range (the difference between loud and soft sounds) will be reduced and problems such as double triggering (multiple triggers being produced by a single stroke) may occur. Decreases the output level Increases the output level 6 Troubleshooting No Sound, Volume is Low Is the pad connected to the correct input number of the DTX Series Drum Trigger Module using the supplied stereo phone cable? (See “Pad-to-Input Matching Chart” above.) When a pad is connected with a mono phone cable, the voices assigned to the rim sections are not produced. Increase the output level using the level adjustment knob on the pad. (See “Output Level Adjustment” above.) Hitting the pad once produces multiple sounds (double triggering) Decrease the output level using the level adjustment knob on the pad. Too high of a level adjustment setting causes the drum module to produce multiple sounds, because the large signal produced by the high settings sustains for too long of a time. (See “Output Level Adjustment” above.) The pad control function does not work Is the pad connected to the correct input number on the drum trigger module using the supplied parallel type stereo phone cable? See “Pad-to-Input Matching Chart” in this manual. The Pad control function is not available when a mono phone cable is used. * Using any stereo phone cable other than the supplied parallel type stereo phone cable can result in improper function of the pad control function. Also, please refer to the Owner’s Manual that came with your DTX Series Drum Trigger Module for more information regarding the problems described above and any other problems that you may be experiencing. If a solution cannot be found to the problem after consulting the manuals, please contact the dealer from whom you purchased the product. 7 English Deutsch ELECTRONIC DRUM PAD Yamaha Electronic Drums web site: http://www.yamaha.co.jp/english/product/drums/ed/ Yamaha Manual Library http://www.yamaha.co.jp/manual/ U.R.G., Pro Audio & Digital Musical Instrument Division, Yamaha Corporation © 2009 Yamaha Corporation WS70070 910PO***.*-01A0 Printed in Japan Owner’s Manual Bedienungsanleitung Mode d’emploi Français XP100T XP100SD XP120T XP120SD EN DE FR 取扱説明書 ZH JA