1
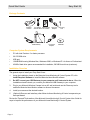
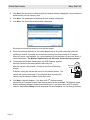
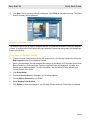
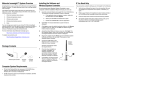
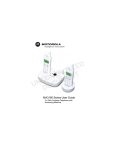
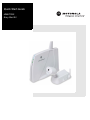
Quick Start Guide
HMEZ1000
Easy Start Kit
Quick Start Guide
Easy Start Kit
Regulatory Information
Wireless Camera FCC ID NUMBER OU4-XWC700
USB Controller FCC ID NUMBER OU4-XBX200
INSTRUCTION TO THE USERS (IF DEVICE DOES NOT CONTAIN A DIGITAL DEVICE)
The user is cautioned that changes or modifications not expressly approved by the party responsible for compliance could void the user's authority to operate this
equipment.
INSTRUCTION TO THE USER (IF DEVICE CONTAINS A DIGITAL DEVICE)
This device complies with part 15 of the FCC Rules. Operation is subject to the following two conditions: (1) This device may not cause harmful interference, and
(2) this device must accept any interference received, including interference that may cause undesired operation.
Note: This equipment has been tested and found to comply with the limits for a Class B digital device, pursuant to part 15 of the FCC Rules. These limits are
designed to provide reasonable protection against harmful interference in a residential installation. This equipment generates, uses and can radiate radio
frequency energy and, if not installed and used in accordance with the instructions, may cause harmful interference to radio communications. However, there is
no guarantee that interference will not occur in a particular installation. If this equipment does cause harmful interference to radio or television reception, which
can be determined by turning the equipment off and on, the user is encouraged to try to correct the interference by one or more of the following measures:
• Reorient or relocate the receiving antenna.
• Increase the separation between the equipment and receiver.
• Connect the equipment into an outlet on a circuit different from that to which the receiver is connected.
• Consult the dealer or an experienced radio/TV technician for help.
This device must be installed and used in strict accordance with the manufacturer’s instructions as described in the user documentation that comes with the
product.
The term "IC:" before the certification/registration number only signifies that the Industry Canada technical specifications were met.
Battery Life
For your Motorola Home Monitoring & Control System devices that require batteries, use high quality, non-corrosive batteries designed for use in electronic
equipment. Battery life is one year with normal usage. Do not use Rechargeable batteries in any Motorola Home Monitoring & Control System device.
Registration
Register your product by accessing this website:
http://broadbandregistration.motorola.com
Copyright © 2004 by Motorola, Inc.
All rights reserved. No part of this publication may be reproduced in any form or by any means or used to make any derivative work (such as translation,
transformation or adaptation) without written permission from Motorola, Inc.
Motorola reserves the right to revise this publication and to make changes in content from time to time without obligation on the part of Motorola to provide
notification of such revision or change. Motorola provides this guide without warranty of any kind, either implied or expressed, including, but not limited to, the
implied warranties of merchantability and fitness for a particular purpose. Motorola may make improvements or changes in the product(s) described in this
manual at any time.
MOTOROLA and the Stylized M Logo are registered in the US Patent & Trademark Office. All other product or service names are the property of their respective
owners. © Motorola, Inc. 2004.
Page i
Easy Start Kit
Quick Start Guide
Motorola Home Monitoring & Control System Overview
Congratulations on your purchase of the Motorola Easy Start Kit. This guide describes how to set up
and troubleshoot the components in your kit.
The Motorola Home Monitoring & Control System helps keep you informed day and night, rain or
shine. The complete product line offers many advanced monitoring devices, including:
•
Wired and Wireless video cameras
•
Temperature sensors
•
Water sensors
•
Door/Window sensors
You can manage your system on your home PC. With a broadband Internet connection, you can specify e-mail and cell phone for delivery of notifications based on device events.
For more information about Motorola Home Monitoring & Control products, go to:
http://www.motorola.com/homemonitoring/
To register your product, go to:
http://broadbandregistration.motorola.com
Easy Start Kit Overview
This kit includes:
•
Motorola Home Monitor software to manage cameras and sensors using your computer.
•
One USB Gateway to connect to your computer to locally manage your Motorola Home
Monitoring & Control System.
•
One wireless high-resolution color video camera with a built-in heat-activated motion detector
and microphone.
The Wireless Camera surveys an area of about 20 feet (6 m) at a viewing angle of about 80 degrees.
If you arm the Wireless Camera using the Motorola Home Monitor software, when the camera senses
motion, it automatically begins transmitting video wirelessly.
The video is recorded in an archive on your computer. You can watch the video while the event occurs
(in real time) or play the archive at a later time.
Power
Video
Status
Data
Page 1
Quick Start Guide
Easy Start Kit
Package Contents
Wireless
Camera
AC adapter Mounting Kit
camera cable for Camera
9V Power
Adapter
Discovery
Tool
Power
Video
Status
Data
USB Gateway
12V Power
Adapter
CD-ROM
Computer System Requirements
•
PC with Intel Pentium® 2 or faster processor
•
2X CD-ROM drive
•
USB port
•
128 MB RAM running Windows Me®, Windows® 2000, or Windows XP™ for Home or Professional.
•
45 MB of hard drive space recommended for installation; 500 MB for archives (maximum).
Installation Overview
The general steps to install your Easy Start Kit are:
1
Using the Installation wizard on the Motorola Home Monitoring & Control System CD, click
Install Required Software to install the Motorola Home Monitor software.
2
Do NOT connect your USB Gateway to your computer until instructed to do so. When the
Installation wizard instructs you, connect your Motorola USB Gateway to your computer.
3
Plug in your Motorola Wireless Camera into an AC wall outlet and use the Discovery tool to
enable the Motorola Home Monitor software to discover the camera.
4
Install your camera at the desired location.
5
(Optional) Discover and install any other Motorola Home Monitoring & Control components you
have purchased.
Review the Tips and Tricks section of the Motorola Home Monitoring & Control System User Guide for
ways to improve the performance of your Motorola Home Monitoring & Control System.
Page 2
Easy Start Kit
Quick Start Guide
Installing the Software and USB Gateway Hardware
Do not connect your USB Gateway to your computer until the Installation Wizard instructs you to do so.
1
Insert the Motorola Home Monitoring & Control System CD in the CD-ROM drive. The Motorola
Home Monitor Installation wizard is displayed.
a
If the application does not appear, right-click the Start button and select Explore.
b
Select your CD-Rom and click to open.
c
Double-click Launch.exe to start the application.
2
Click Next. The Choose Destination Location window is displayed.
3
Click Next to accept the default destination folder or click Browse to select a new one. After you
click Next, the Select Program Folder window is displayed.
4
Accept the default folder or choose a new one. Click Next. The file installation begins. After a few
moments, the Install Motorola Home Monitor Hardware and Driver window is displayed.
5
Remove the back cover from your USB Gateway.
Power
Video
Status
Data
6
Plug the AC adapter into the Power port on the USB Gateway and into an AC wall outlet. This
powers on your USB Gateway.
7
Connect the USB cable on the Gateway to the USB port on your computer. Windows automatically
installs the required drivers.
USB port on
PC (step 7)
AC adapter
(step 6)
8
If desired, replace the USB Gateway back cover as described in the Motorola Home Monitoring &
Control System User Guide.
9
Once the driver installation is complete, click Next. The Software installation was successful
window is displayed. Be sure the checkbox “Launch Motorola Home Monitor” is selected.
10
Click Finish. The Motorola Setup Wizard is displayed.
Page 3
Quick Start Guide
Easy Start Kit
11
Click Next. The Introduction to Detecting Wired Cameras window is displayed. If you purchased a
wired camera, you can connect it now.
12
Click Next. The Introduction to Detecting Devices window is displayed.
13
Click Next. The Device Discovery window is displayed:
Each device must be discovered to work with the system.
14
Plug in the wireless camera’s 9V AC power adapter into an AC power outlet that cannot be
switched on and off. If possible, we recommend powering the camera using its AC adapter.
When AC power is not available, you can use batteries to provide power for about two hours of
video transmission. The Wireless Camera must use AC power for the discovery process.
15
To associate the Wireless Camera with your USB Gateway, push the
discovery button on the camera with the discovery tool.
After the camera is discovered, it is listed on the Device Discovery
window.
Discovery
button
If desired, unplug the camera and move it to the desired location. The
camera will remain “discovered.” For information about mounting the
camera, see the Wireless Camera Quick Start Guide.
16
Page 4
Click Next. A window displays. If you have a Wi-Fi® wireless network,
choose the Wi-Fi network channel from the drop-down list and click Next. The Motorola Home
Monitor software intelligently works around this channel. If you do not have a Wi-Fi wireless
network, choose Don’t Know from the drop-down list and click Next. You can change this later.
Easy Start Kit
17
Quick Start Guide
Click Next. The Finish Setup window is displayed. Click Finish to complete the setup. The Home
Monitor Control Panel is displayed:
Remote Notification Setup
This section instructs you on how to configure and test your Remote Notification using your Wireless
Camera. It configures an Event Setup using your Wireless Camera and then guides you through notification configuration.
Event Setup for Wireless Camera
1
From the Control Panel window, access the properties for your Wireless Camera by clicking the
Edit Properties icon of your Wireless Camera.
2
Name your camera as you wish and alter the settings of the camera to 60 seconds Quiet Period
Before Rearming, 10 second Video Capture Length and leave the Brightness, Contrast, and
Quality at their default settings. For more information, see the Motorola Home Monitoring &
Control System User Guide.
3
Click Event Setup.
4
Choose a Sensor Device, in this case, your Wireless Camera.
5
Choose Motion Detected for your Event.
6
Select Send to Local Archive.
7
Click Update to save the changes to your Wireless Camera and your Event Setup is complete.
Page 5
Quick Start Guide
Easy Start Kit
Profile Setup Overview
To create a profile, you first have to set up the SMTP (Simple Mail Transfer Protocol) information necessary for transmitting the alerts. Then, you have to configure a profile using the information you
entered in SMTP setup.
Determining Your E-Mail (SMTP) Server Name
This section enables you to learn your Outgoing Mail (SMTP) server information if you are using Outlook Express 6.0. If using a different version, the steps may vary. You can also contact your ISP (Internet Service Provider) as they will have this information. The Motorola Home Monitoring & Control
System User Guide has a short listing of popular ISP SMTP server names as well.
1
Start Outlook Express.
2
Select Accounts... from the Tools menu. The Internet Accounts window is displayed.
3
Click the Mail tab.
4
Click your Mail Sever Account, for example, mail.comcast.net, from the list and click
Properties. The Properties window is displayed.
5
Click the Servers tab.
6
Write down your Outgoing mail server (SMTP), for example smtp.comcast.net. This server
name must be entered into the Motorola Home Monitor software by clicking on the Event Setup
button in the Motorola Home Monitor program.
7
Click Cancel and then Close.
SMTP Setup
1
Return to the Motorola Home Monitor program and click Event Setup from the main menu of the
MHM program.
2
Click Edit SMTP Info.
3
Enter the Outgoing Mail (SMTP) and your E-Mail Address necessary for your mail server. If
your server requires authentication, select the checkbox and enter the necessary information.
The Account Name and Password are for your Authentication Server, if using one.
4
Click OK when finished. You are now able to set up profiles to send event notifications.
Profile Setup
1
Click Event Setup from the main menu of the MHM program. If prompted for SMTP, see SMTP
Setup and then complete the instructions here.
2
Click Edit Profiles.
3
Select the Notification Type.
4
Enter an E-mail Address.
5
Click Add. The Profile configured displays in the Profiles List. You will now be able to select this
profile when setting up an event action.
6
Click Done to exit.
Page 6
Easy Start Kit
Quick Start Guide
Troubleshooting
Problem
Camera will not register
with the Gateway
No camera picture
Poor picture quality
Motion events are not
triggered
Audio problems
Solution
•
Ensure the camera is powered.
•
Ensure that the Gateway is powered and online.
•
Ensure you are pressing the Discovery button.
•
Reposition the camera closer to the Gateway.
•
Ensure the camera is powered.
•
Ensure that the Gateway is powered and online.
•
Ensure you have the proper camera selected.
•
Reposition the camera closer to the Gateway.
•
Reposition the antenna.
•
Ensure that you are using the proper power supply.
•
Make sure proper camera quality settings are configured when viewing.
•
Make sure your camera viewing area has proper lighting.
•
Try another location.
•
Adjust the camera antenna.
•
Select other operating channels on other 2.4 GHz devices
•
Ensure the camera is not positioned behind glass. The motion sensor is
triggered by changes in heat. Any material such as glass that "insulates”
keeps the camera from detecting heat changes (movement).
•
Ensure the camera head is positioned properly.
•
Make sure your volume is turned up when playing back the video clip.
•
Make sure the sound is within the microphone range (6-10 feet).
•
Does the computer have a sound card and are the speakers activated
and loud enough?
If You Need Help
If you encounter a problem setting up your Easy Start Kit, try the following:
•
Verify that you followed the steps in the order specified. Be sure you plugged in all components to
AC power. If necessary, try again.
•
Refer to your Motorola Home Monitoring & Control device User Guides (printed or on CD-ROM)
and the Control Panel online help.
•
Check the http://www.motorola.com/homemonitoring/ website.
•
To request support seven days a week, 24 hours a day, go to http://www.motorola.com/
homemonitoring/support/emailsupport.asp or call 1 (877) 466-8646.
Page 7
Quick Start Guide
Easy Start Kit
FAQ
The Gateway does not recognize the camera during discovery mode?
Make sure your Gateway indicates discovery mode and that the camera is using the proper power supply
(9 volt). Press the Discovery button found inside of the battery compartment. If this continues to fail, you will
need to try another location for the camera. You may also try a hard reset by holding down the Discovery button
while powering up the camera. After resetting the camera, please try to discover the camera again.
How far away can the camera see?
Depending on the lighting conditions and the size of the object(s), you can view objects up to 200 feet (60 m)
away with a viewing angle of 80 degrees. The motion sensor is capable of detecting objects up to 12 -14 ft.
(3.5 - 4 m) with a field of view of 80 degrees.
How sensitive is the camera's microphone?
The microphone picks up normal conversation 6 to 10 feet away.
Page 8
Visit our website at:
http://www.motorola.com/homemonitoring
516950-001
7/04
MGBI