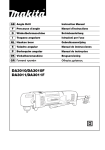
1
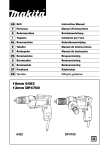
GB Angle Drill
Instruction Manual
F
Perceuse d'angle
Manuel d’instructions
D
Winkelbohrmaschine
Betriebsanleitung
I
Trapano angolare
Istruzioni per l’uso
NL Haakse boor
Gebruiksaanwijzing
E
Taladro angular
Manual de instrucciones
P
Berbequim angular
Manual de instruções
DK Vinkelboremaskine
Brugsanvisning
S
Vinkelborr
Bruksanvisning
N
Vinkelboremaskin
Bruksanvisning
SF Kulmaporakone
Käyttöohje
GR Γωνιακ τρυπάνι
Οδηγίες χρήσεως
DA3010/DA3010F
DA3011/DA3011F
6
6
4
5
3
1
1
2
A
B
2
7
3
4
10
8
9
11
5
2
6
Symbols
The followings show the symbols used for the tool. Be sure that you understand their meaning before use.
Symboles
Nous donnons ci-dessous les symboles utilisés pour l’outil. Assurez-vous que vous en avez bien compris la signification avant d’utiliser l’outil.
Symbole
Die folgenden Symbole werden für die Maschine verwendet. Machen Sie sich vor der Benutzung unbedingt mit ihrer
Bedeutung vertraut.
Simboli
Per questo utensile vengono usati i simboli seguenti. Bisogna capire il loro significato prima di usare l’utensile.
Symbolen
Voor dit gereedschap worden de volgende symbolen gebruikt. Zorg ervoor dat u de betekenis van deze symbolen
begrijpt alvorens het gereedschap te gebruiken.
Símbolos
A continuación se muestran los símbolos utilizados con esta herramienta. Asegúrese de que entiende su significado
antes de usarla.
Símbolos
O seguinte mostra os símbolos utilizados para a ferramenta. Certifique-se de que compreende o seu significado antes
da utilização.
Symboler
Nedenstående symboler er anvendt i forbindelse med denne maskine. Vær sikker på, at De har forstået symbolernes
betydning, før maskinen anvendes.
Symboler
Det följande visar de symboler som används för den här maskinen. Se noga till att du förstår deras innebörd innan
maskinen används.
Symbolene
Følgende viser de symblene som brukes for maskinen. Det er viktig å forstå betydningen av disse før maskinen tas i
bruk.
Symbolit
Alla on esitetty koneessa käytetyt symbolit. Opettele näiden merkitys, ennen kuin käytät konetta.
Σύµβολα
Τα ακλουθα δείχνουν τα σύµβολα που χρησιµοποιούνται για το µηχάνηµα. Βεβαιωθείτε τι
καταλαβαίνετε τη σηµασία τους πριν απ τη χρήση.
❏ Read instruction manual.
❏ Lire le mode d’emploi.
❏ Bitte Betriebsanleitung lesen.
❏ Leggete il manuale di istruzioni.
❏ Lees de gebruiksaanwijzing.
❏ Lea el manual de instrucciones.
❏ Leia o manual de instruções.
❏ Læs brugsanvisningen.
❏ Läs bruksanvisningen.
❏ Les bruksanvisingen.
❏ Katso käyttöohjeita.
❏ ∆ιαβάστε τις οδηγίες χρήσης.
❏ DOUBLE INSULATION
❏ DOUBLE ISOLATION
❏ DOPPELT SCHUTZISOLIERT
❏ DOPPIO ISOLAMENTO
❏ DUBBELE ISOLATIE
❏ DOBLE AISLAMIENTO
❏
❏
❏
❏
❏
❏
DUPLO ISOLAMENTO
DOBBELT ISOLATION
DUBBEL ISOLERING
DOBBEL ISOLERING
KAKSINKERTAINEN ERISTYS
∆ΙΠΛΗ ΜΟΝΩΣΗ
3
ENGLISH
Explanation of general view
1
2
3
4
Lamp
Speed control screw
Switch lever
Higher
5
6
7
8
Lower
Reversing switch lever
Chuck key
Sleeve
8.
SPECIFICATIONS
Model
DA3010/DA3010F
DA3011/DA3011F
Capacities
Steel .................................................................. 10 mm
Wood ................................................................. 25 mm
No load speed (min–1) .....................................0 — 2,400
Overall length ..................................................... 270 mm
Net weight ............................................................. 1.4 kg
Safety class ...........................................................
/II
• Due to our continuing programme of research and
development, the specifications herein are subject to
change without notice.
• Note: Specifications may differ from country to country.
Intended use
This tool is intended for drilling in wood, metal and plastic.
Power supply
The tool should be connected only to a power supply of
the same voltage as indicated on the nameplate, and can
only be operated on single-phase AC supply. They are
double-insulated in accordance with European Standard
and can, therefore, also be used from sockets without
earth wire.
Safety Hints
For your own safety, please refer to the enclosed safety
instructions.
GEB001-2
DO NOT let comfort or familiarity with product
(gained from repeated use) replace strict adherence
to drill safety rules. If you use this power tool
unsafely or incorrectly, you can suffer serious personal injury.
2.
3.
4.
5.
6.
7.
4
Some material contains chemicals which may be
toxic. Take caution to prevent dust inhalation
and skin contact. Follow material supplier safety
data.
SAVE THESE INSTRUCTIONS.
WARNING:
MISUSE or failure to follow the safety rules stated in
this instruction manual may cause serious personal
injury.
FUNCTIONAL DESCRIPTION
CAUTION:
• Always be sure that the tool is switched off and
unplugged before adjusting or checking function on the
tool.
Switch action (Fig. 1)
CAUTION:
• Before plugging in the tool, always check to see that
the switch lever actuates properly and returns to the
“OFF” position when released.
To start the tool, simply squeeze the switch lever. Tool
speed is increased by increasing pressure on the switch
lever. Release the switch lever to stop.
A speed control screw is provided so that maximum tool
speed can be limited (variable). Turn the speed control
screw clockwise for higher speed, and counterclockwise
for lower speed.
Reversing switch action (Fig. 2)
SPECIFIC SAFETY RULES
1.
9 Ring
10 Gripping part
11 Side grip (handle)
Use auxiliary handles supplied with the tool.
Loss of control can cause personal injury.
Hold tool by insulated gripping surfaces when
performing an operation where the cutting tools
may contact hidden wiring or its own cord.
Contact with a “live” wire will make exposed metal
parts of the tool “live” and shock the opeator.
Always be sure you have a firm footing.
Be sure no one is below when using the tool in
high locations.
Hold the tool firmly.
Keep hands away from rotating parts.
Do not leave the tool running. Operate the tool
only when hand-held.
Do not touch the drill bit or the workpiece immediately after operation; they may be extremely
hot and could burn your skin.
CAUTION:
• Always check the direction of rotation before operation.
• Use the reversing switch only after the tool comes to a
complete stop. Changing the direction of rotation
before the tool stops may damage the tool.
This tool has a reversing switch to change the direction of
rotation. Move the reversing switch lever to the F position (A side) for clockwise rotation or the R position (B
side) for counterclockwise rotation.
Lighting up the lamps (Fig. 1)
For DA3010F, DA3011F only
CAUTION:
• Do not look in the light or see the source of light
directly.
To turn on the lamp, start the tool. Then, the lamp lights
up the top of the bit. To turn it off, stop the tool.
NOTE:
• Use a dry cloth to wipe the dirt off the lens of lamp. Be
careful not to scratch the lens of lamp, or it may lower
the illumination.
ASSEMBLY
CAUTION:
• Always be sure that the tool is switched off and
unplugged before carrying out any work on the tool.
Installing side grip (handle) (Fig. 3)
CAUTION:
• Always be sure that the side grip is installed securely
before operation.
Screw the side grip on the tool securely. The side grip
can be installed on either side of the tool, whichever is
convenient.
Installing or removing drill bit
For DA3010, DA3010F (Fig. 4)
To install the bit, place it in the chuck as far as it will go.
Tighten the chuck by hand. Place the chuck key in each
of the three holes and tighten clockwise. Be sure to
tighten all three chuck holes evenly.
To remove the bit, turn the chuck key counterclockwise in
just one hole, then loosen the chuck by hand.
For DA3011, DA3011F (Fig. 5)
Hold the ring and turn the sleeve counterclockwise to
open the chuck jaws. Place the bit in the chuck as far as it
will go. Hold the ring firmly and turn the sleeve clockwise
to tighten the chuck.
To remove the bit, hold the ring and turn the sleeve counterclockwise.
• Avoid drilling in material that you suspect contains hidden nails or other things that may cause the bit to bind
or break.
MAINTENANCE
CAUTION:
• Always be sure that the tool is switched off and
unplugged before attempting to perform inspection or
maintenance.
To maintain product SAFETY and RELIABILITY, repairs,
carbon brush inspection and replacement, any other
maintenance or adjustment should be performed by Makita Authorized or Factory Service Centers, always using
Makita replacement parts.
ACCESSORIES
CAUTION:
• These accessories or attachments are recommended
for use with your Makita tool specified in this manual.
The use of any other accessories or attachments might
present a risk of injury to persons. Only use accessory
or attachment for its stated purpose.
If you need any assistance for more details regarding
these accessories, ask your local Makita service center.
• Drill bits
• Chuck key (For DA3010/DA3010F)
OPERATION
Holding the tool (Fig. 6)
Hold the tool firmly with one hand on the gripping part of
the tool and the other hand on the side grip when performing the tool.
Drilling operation
Drilling in wood
When drilling in wood, the best results are obtained with
wood drills equipped with a guide screw. The guide
screw makes drilling easier by pulling the bit into the
workpiece.
Drilling in metal
To prevent the bit from slipping when starting a hole,
make an indentation with a center-punch and hammer at
the point to be drilled. Place the point of the bit in the
indentation and start drilling.
Use a cutting lubricant when drilling metals. The exceptions are iron and brass which should be drilled dry.
CAUTION:
• Pressing excessively on the tool will not speed up the
drilling. In fact, this excessive pressure will only serve
to damage the tip of your bit, decrease the tool performance and shorten the service life of the tool.
• There is a tremendous twisting force exerted on the
tool/bit at the time of hole breakthrough. Hold the tool
firmly and exert care when the bit begins to break
through the workpiece.
• A stuck bit can be removed simply by setting the
reversing switch to reverse rotation in order to back out.
However, the tool may back out abruptly if you do not
hold it firmly.
• Always secure small workpieces in a vise or similar
hold-down device.
5
NEDERLANDS
Verklaring van algemene gegevens
1
2
3
4
Lampje
Snelheidsregelschroef
Aan/uit schakelaar
Hoger
5
6
7
8
Lager
Omkeerschakelaar
Boorkopsleutel
Bus
TECHNISCHE GEGEVENS
Model
DA3010/DA3010F
DA3011/DA3011F
Capaciteiten
Staal .................................................................. 10 mm
Hout ................................................................... 25 mm
Toerental onbelast (tpm) ................................. 0 — 2 400
Totale lengte ....................................................... 270 mm
Netto gewicht ......................................................... 1,4 kg
Veiligheidsklasse ...................................................
/II
• In verband met ons programma van ononderbroken
research en ontwikkeling, kunnen de bovenstaande
technische gegevens zonder voorafgaande kennisgeving worden gewijzigd.
• Opmerking: De technische gegevens kunnen van land
tot land verschillen.
Doeleinden van gebruik
Dit gereedschap is bedoeld voor het boren in hout,
metaal en kunststof.
Stroomvoorziening
Het gereedschap mag alleen worden aangesloten op
een stroombron van hetzelfde voltage als aangegeven op
de naamplaat, en kan alleen op enkel-fase wisselstroom
worden gebruikt. Het gereedschap is dubbel-geïsoleerd
volgens de Europese standaard en kan derhalve ook op
een niet-geaard stopkontakt worden aangesloten.
Veiligheidswenken
Voor uw veiligheid dient u de bijgevoegde Veiligheidsvoorschriften nauwkeurig op te volgen.
AANVULLENDE
VEILIGHEIDSVOORSCHRIFTEN
Volg de veiligheidsvoorschriften voor boren ALTIJD
strict op en laat u NIET misleiden door gemak of vertrouwdheid met het product (verworven na langdurig
gebruik). Als u dit elektrisch gereedschap op een
onveilige of onjuiste manier gebruikt, bestaat er
gevaar voor ernstige persoonlijke verwonding.
1. Gebruik de hulphandgrepen die bij het gereedschap werden geleverd. Als u de controle over het
gereedschap verliest, kan dit leiden tot ernstig persoonlijk letsel.
2. Houd het gereedschap bij de geïsoleerde handgrepen vast wanneer u boort op plaatsen waar
de boor met verborgen elektrische bedrading of
met het netsnoer van het gereedschap in contact
kan komen.
Door contact met een onder spanning staande
draad zullen de metalen delen van het gereedschap
onder spanning komen te staan zodat de gebruiker
een elektrische schok kan krijgen.
3. Zorg ervoor dat u altijd stevige steun voor de
voeten hebt. Controleer of er zich niemand beneden u bevindt wanneer u het gereedschap op
een hoge plaats gaat gebruiken.
4.
5.
6.
7.
8.
9 Ring
10 Grijpgedeelte
11 Zijhandgreep (handvat)
Houd het gereedschap stevig vast.
Houd uw handen uit de buurt van draaiende
onderdelen.
Laat het gereedschap niet achter terwijl het nog
in bedrijf is. Bedien het gereedschap alleen wanneer u het met beide handen vasthoudt.
Raak de boor of het werkstuk niet aan onmiddellijk na het gebruik. Deze kunnen erg heet zijn en
brandwonden veroorzaken.
Sommige materialen bevatten chemische stoffen
die giftig kunnen zijn. Neem de nodige voorzorgsmaatregelen tegen inademing van stof en
contact met de huid. Volg de veiligheidsinstructies van de leverancier van het materiaal op.
BEWAAR DEZE VOORSCHRIFTEN.
WAARSCHUWING:
VERKEERD GEBRUIK of het niet naleven van de
veiligheidsvoorschriften in deze gebruiksaanwijzing
kan leiden tot ernstige verwondingen.
GEBRUIK VAN HET GEREEDSCHAP
LET OP:
• Zorg altijd dat het gereedschap is uitgeschakeld en de
stekker ervan uit het stopcontact is verwijderd vooraleer u begint met afstelling of onderhoud van het
gereedschap.
Werking van de schakelaar (Fig. 1)
LET OP:
• Alvorens het netsnoer op een stopcontact aan te sluiten, dient u altijd te controleren of de aan/uit schakelaar
behoorlijk werkt en naar de “UIT” positie terugkeert
wanneer u hem loslaat.
Om het gereedschap te starten, drukt u de aan/uit schakelaar gewoon in. De draaisnelheid verhoogt naarmate u
de schakelaar harder indrukt. Laat de schakelaar los om
het gereedschap te stoppen.
Een snelheidsregelschroef is voorzien zodat de maximale draaisnelheid (variabel) kan worden beperkt. Draai
deze schroef naar rechts om de draaisnelheid te verhogen, of naar links om deze te verlagen.
Werking van de omkeerschakelaar (Fig. 2)
LET OP:
• Controleer altijd de draairichting alvorens het gereedschap te gebruiken.
• Verander de stand van de omkeerschakelaar alleen
nadat het gereedschap volledig tot stilstand is gekomen. Indien u de draairichting verandert terwijl de boor
nog draait, kan het gereedschap beschadigd raken.
Dit gereedschap heeft een omkeerschakelaar voor het
veranderen van de draairichting. Druk de omkeerschakelaar naar de F positie (A zijde) voor rechtse draairichting, of naar de R positie (B zijde) voor linkse
draairichting.
13
Gebruik van het lampje (Fig. 1)
Alleen voor DA3010F, DA3011F
LET OP:
• Kijk niet direct in het licht van het lampje.
Het lampje gaat aan wanneer het gereedschap wordt
gestart. Het lampje verlicht de punt van de boor. Stop het
gereedschap om het lampje uit te doen.
OPMERKING:
• Gebruik een droge doek om vuil op de lens van de
lamp eraf te vegen. Pas op dat u geen krassen maakt
op de lens, omdat de verlichtingssterkte daardoor kan
verminderen.
INEENZETTEN
LET OP:
• Zorg altijd dat het gereedschap is uitgeschakeld en de
stekker ervan uit het stopcontact is verwijderd alvorens
enig werk aan het gereedschap uit te voeren.
Installeren van de zijhandgreep (hulphandgreep)
(Fig. 3)
LET OP:
• Controleer altijd of de zijhandgreep goed vastgezet is
vooraleer met het werk te beginnen.
Schroef de zijhandgreep stevig vast op het gereedschap.
U kunt de zijhandgreep op een van beide zijden van het
gereedschap installeren. Kies de zijde die gemakkelijkst
is voor uw werk.
Aanbrengen of verwijderen van de boor
Voor DA3010, DA3010F (Fig. 4)
Om de boor te installeren, steekt u hem zo ver mogelijk
in de boorkop. Draai de boorkop met de hand vast. Steek
de boorkopsleutel in een van de drie gaten en draai vast
naar rechts. Zorg dat u alle drie de boorkopgaten gelijkmatig vastzet.
Om de boor te verwijderen, draait u met de boorkopsleutel een van de gaten naar links los. Draai daarna de
boorkop met de hand los.
Voor DA3011, DA3011F (Fig. 5)
Houd de ring vast en draai de bus naar links om de klauwen van de boorkop te openen. Steek de boor zo ver
mogelijk in de boorkop. Houd daarna de ring weer stevig
vast en draai de bus naar rechts om de boorkop vast te
zetten.
Om de boor te verwijderen, houdt u de ring vast en draait
u de bus naar links.
BEDIENING
Het gereedschap vasthouden (Fig. 6)
Houd het gereedschap tijdens het gebruik stevig vast
met de ene hand op het grijpgedeelte van het gereedschap en de andere hand op de zijhandgreep.
Boren
Boren in hout
Bij boren in hout krijgt u de beste resultaten met houtboren die voorzien zijn van een geleideschroef. Het boren
gaat dan gemakkelijker aangezien de geleideschroef de
boor in het hout trekt.
14
Boren in metaal
Om te voorkomen dat de boor slipt wanneer u een gat
begint te boren, moet u van te voren met een drevel en
hamer een deukje in het metaal slaan op de plaats waar
u wilt boren. Plaats vervolgens de boorpunt in het deukje
en begin te boren.
Gebruik altijd boorolie wanneer u in metaal boort. De
enige uitzonderingen zijn ijzer en koper die droog
geboord dienen te worden.
LET OP:
• Door overmatige druk op het gereedschap uit te oefenen verloopt het boren niet sneller. Integendeel, teveel
druk op het gereedschap zal alleen maar de boorpunt
beschadigen, de prestaties van het gereedschap verminderen en de gebruiksduur ervan verkorten.
• Wanneer de boor uit het boorgat te voorschijn komt,
wordt een enorme kracht uitgeoefend op de boor en
het gereedschap. Houd daarom het gereedschap stevig vast en wees op uw hoede wanneer de boor door
het werkstuk begint te dringen.
• Wanneer de boor klemraakt, keert u met de omkeerschakelaar de draairichting om, om de boor uit het gat
te krijgen. Pas echter op en houd het gereedschap stevig vast, aangezien het anders uit het gat weg kan
schieten.
• Zet kleine werkstukken altijd vast in een klemschroef of
iets dergelijks.
• Vermijd het boren in materiaal dat mogelijk spijkers of
andere obstakels bevat waardoor de boor zou kunnen
vastlopen of breken.
ONDERHOUD
LET OP:
• Zorg altijd dat het gereedschap is uitgeschakeld en de
stekker ervan uit het stopcontact is verwijderd vooraleer u met inspectie of onderhoud van het gereedschap
begint.
Om de VEILIGHEID en BETROUWBAARHEID van het
gereedschap te handhaven, dienen alle reparaties,
inspectie en vervanging van de koolborstels, en alle
andere onderhoudswerkzaamheden of afstellingen te
worden uitgevoerd bij een erkend Makita servicecentrum
of fabriekscentrum, en altijd met gebruik van originele
Makita vervangingsonderdelen.
ACCESSOIRES
LET OP:
• Deze accessoires of hulpstukken worden aanbevolen
voor gebruik met het Makita gereedschap dat in deze
gebruiksaanwijzing wordt beschreven. Het gebruik van
andere accessoires of hulpstukken kan gevaar voor
persoonlijke verwonding opleveren. Gebruik de accessoires of hulpstukken uitsluitend voor het gespecificeerde doel.
Wenst u meer informatie over deze accessoires, neem
dan contact op met het dichtstbijzijnde Makita servicecentrum.
• Boren
• Boorkopsleutel (Voor DA3010/DA3010F)