1
Lucent Technologies
Bell Labs Innovations
SPIRIT
Communications System
®
Model 2448
Administration Manual
999-500-235
105772644
Issue 5
June, 1989
LIMITED WARRANTY AND LIMITATION OF LIABILITY
AT&T Information Systems, Inc. ("AT&T") warrants to you that your SPIRIT® Communications System ("SPIRIT system")
will be free from defects in material and workmanship when title to your SPIRIT system passes to you. If you notify AT&T
that your SPIRIT system fails to operate as warranted within one year of the date title to your SPIRIT system passes to you,
AT&T will, at its option, repair or replace the component or components of your SPIRIT system that fail to operate as warranted.
Any repair or replacement components may be new or refurbished and will be provided on an exchange basis. If AT&T determines
that your SPIRIT system component cannot be repaired or replaced, AT&T will refund the purchase price to you.
If you purchased your SPIRIT system directly from AT&T, AT&T will perform warranty repair on your premises in accordance
with the terms and conditions of AT&T’s "Business Day" or "Around-the-Clock" warranty plans depending on which you have
selected. The details of AT&T’s warranty plans may be obtained by calling or writing to AT&T. If you purchased your SPIRIT system
from an Authorized AT&T Dealer, you will be covered by AT&T’s Authorized Dealer Warranty Plan during the warranty period.
Contact your Authorized Dealer for details of AT&T’s Authorized Dealer Warranty Plan. AT&T’S OBLIGATION TO REPAIR,
REPLACE OR REFUND IS AS SET FORTH ABOVE AND IS YOUR EXCLUSIVE REMEDY.
The limited warranties provided above do not cover damages, defects, malfunctions or product failures caused by:
–
–
–
–
–
Failure to follow AT&T’s installation, operation or maintenance instructions;
Failure to provide an appropriate electrical environment for the equipment;
Unauthorized modification or alteration of the SPIRIT system or its components;
Product abuse, misuse or the negligent acts of persons not under the reasonable control of AT&T, or;
Actions of third parties and acts of God other than power surges.
This limited warranty applies only to a SPIRIT system purchased directly from AT&T or purchased directly from an Authorized
AT&T Dealer. This limited warranty does not apply to SPIRIT systems purchased or operated outside the United States.
You may be required to provide AT&T with proof of purchase before AT&T will perform any warranty repair or provide any
warranty replacements.
EXCEPT AS SPECIFICALLY SET FORTH ABOVE, AT&T, ITS AFFILIATES, SUPPLIERS AND DEALERS MAKE NO
WARRANTIES, EXPRESS OR IMPLIED, AND SPECIFICALLY DISCLAIM ANY WARRANTY OF MERCHANTABILITY OR
FITNESS FOR A PARTICULAR PURPOSE.
EXCEPT FOR PERSONAL INJURY, THE LIABILITY OF AT&T, ITS AFFILIATES, SUPPLIERS AND DEALERS FOR ANY CLAIM,
LOSS, DAMAGE OR EXPENSE FROM ANY CAUSE WHATSOEVER, REGARDLESS OF THE FORM OF THE ACTION,
WHETHER IN CONTRACT, TORT OR OTHERWISE, SHALL NOT EXCEED THE LESSER OF DIRECT DAMAGES PROVEN
OR THE REPAIR OR REPLACEMENT COST OF THE SPIRIT SYSTEM OR THE SPIRIT SYSTEM’S PURCHASE PRICE. IN
NO EVENT SHALL AT&T, ITS AFFILIATES, SUPPLIERS AND DEALERS BE LIABLE FOR INCIDENTAL, RELIANCE, CONSEQUENTIAL OR ANY OTHER INDIRECT LOSS OR DAMAGE (INCLUDING LOST PROFITS OR REVENUES SUSTAINED
OR INCURRED IN CONNECTION WITH THE SPIRIT SYSTEM). THIS LIMITATION OF LIABILITY SHALL SURVIVE FAILURE
OF THE EXCLUSION REMEDY SET FORTH IN THE LIMITED WARRANTY ABOVE.
This limitation of liability shall apply to all users of SPIRIT systems and shall apply whether or not the above limited warranty applies.
INSTALLATION/MAINTENANCE INFORMATION
There are several types of installation and maintenance plans available from AT&T and/or your dealer. Please call your AT&T
sales representative or authorized dealer for details.
For warranty service, contact your authorized dealer or call the AT&T Hoteline listed below.
You may place your
AT&T Sales and Service
Label here
Prior to calling the Hotline refer to the Testing and Troubleshooting pages in the Customer Installation Instructions.
Record the following information:
AT&T Account Number
Number of outside/PBX lines
Number of telephones
Table of Contents
Parts of the System
Parts of the Telephone Used in Administration
Groups and Intercom Extensions
How to Use this Manual
2
3
3
4
SECTION 1 Customizing
Description of Features that May be Customized
How to Use the System Planner and the Customization Chart
System Planner
Customization Chart
How to Customize
Confirmation and Error Tones
Instructions for Customizing
Kinds of Customization
System Reset to Factory-Set Values - 0
System Customization - 1
Telephone Customization - 2
System SpeedCall - 3
SMDR Call Report - 4
Printing Customization Information - 5
5
5
7
8
10
12
12
13
SECTION 2 Additional Information
Ringing Options
System Changes
Using with a PBX Centrex System
L A Jacks (Dedicated Lines and Power Failures)
Optional Equipment
Additional Feature Information
Helpful Hints
30
30
30
30
31
31
32
34
System SpeedCall Directory
Intercom Extension and Group Directory
35
36
Index
37
14
15
18
23
25
27
NOTICE: While reasonable efforts were made to ensure that the information in this
document was complete and accurate at the time of printing, Lucent Technologies
assumes no responsibility for any errors. Changes or corrections to the information
contained in this document may be incorporated into future re-issues.
Intellectual property related to this product (including trademarks) and registered to
AT&T Corporation has been transferred to Lucent Technologies Incorporated.
Any references within this text to American Telephone and Telegraph Corporation
or AT&T should be interpreted as references to Lucent Technologies Incorporated.
The exception is cross references to books published prior to December 31, 1996,
which retain their original AT&T titles.
Lucent Technologies – formed as a result of AT&T’s planned restructuring –
designs, builds, and delivers a wide range of public and private networks,
communication systems and software, consumer and business telephone systems,
and microelectronic components. The world-renowned Bell Laboratories is the
research and development arm for the company.
Administration Manual 1
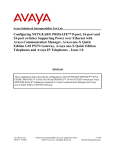
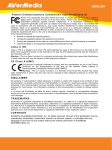
Parts of the System
The SPIRIT ® Communications System, Model 2448, consists of a CONTROLLER that controls
the system, TELEPHONES, and some optional equipment. Outside telephone lines from your
local telephone company or from a PBX, or switchboard, system are connected to the controller.
The controller is connected to all the telephones in the system.
CONTROLLER
Inside Cover:
MUSIC ON HOLD
MUSIC ON HOLD VOLUME CONTROL
SMDR JACK (Station Message
Detail Recording)
EXTERNAL ALERT
LA JACKS (Line Auxiliary)
Dedicated Lines for computer modems,
answer/record machines, and for
use during power failures.
TELEPHONES (STATIONS OR
INTERCOM EXTENSIONS)
(Both 6-button and 24-button
telephones or intercom extensions
may be used with the system.)
Telephones are installed in groups of up to
8 per group. Station 10, which is used for
customization must be a 24-button set.
NETWORK INTERFACE JACKS
(Incoming Telephone Lines)
LOUDSPEAKER PAGING SYSTEM
(optional)
2
Administration Manual
48-BUTTON ATTENDANT ADJUNCT
(optional)
Provides 48 intercom extension buttons for
one-button dialing of all the intercom
extensions in the system. Also provides feature
buttons for sending and canceling messages
and for turning night service on and off.
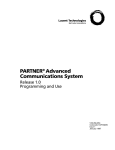
Parts of the Telephone Used in Administration
Administration Overlay
LINE NUMBERS
Line number the button represents during
Iine-by-line customization.
LINE BUTTONS and
INDICATOR LIGHTS
Used to customize Iine-by-line features.
ENTER ADMIN
Used to choose another kind of
customization.
INTERCOM BUTTONS and
INDICATOR LIGHTS
Used when beginning System
Administration.
COPY TO
Used to duplicate customization of one
telephone to another.
SPEAKER BUTTON and
INDICATOR LIGHT
Used to turn the speakerphone on
and off.
DROP
Used for removing PBX/Centrex Line
Access Codes.
FEATURE
Used to begin customization of
another feature.
DIAL
Used to enter numbers and symbols that
must be ‘dialed’ during System Administration.
STATION
Used to begin customization of
another telephone.
MEMORY BUTTON
Used to store SpeedCall numbers.
ADD
Used for adding PBX/Centrex Line
Access Codes.
Groups and Intercom Extensions
Each telephone in the system has a 2-digit intercom
extension number. The intercom extensions are grouped
according to the numbers on the right. Groups are used for
some features, such as group paging and picking up a call
within a group. Consider carefully how intercom extension
numbers are assigned to the people in the system so that
the group features are used most efficiently for your
company. The numbers do not have to be consecutive; for
instance, you may have intercom extensions 10 through
15, 18 through 22, and 28 through 33 in your system,
depending on the telephone capacity of your system.
Intercom Extension
Numbers
Group
Number
10-17
61
18-25
62
26-33
63
34-41
64
42-49
65
50-57
66
NOTE: When you assign intercom extension numbers to users, remember that all customization
of the system must be done at telephone set 10, and when users dial 0 (zero) using the intercom,
they reach intercom extension 10.
Administration Manual
3
How to Use this Manual
This manual is divided into two basic sections. Following is a description of the parts of the manual.
Customizing (Section 1)
The SPIRIT Communications System can be customized to fit the needs of your company.
This means that, as the administrator of the system, you will be able to change how some features
operate. The system can be used just as it is installed. You may, however, want to take
advantage of some of the customizing options. You can do as much or as little customizing as
you choose. Section 1 of the manual tells you how to customize the system.
Customization is easy to do and doesn’t have to be permanent. Your system is flexible and easy
to change. As you use the system you may think of other changes you want to make, so don’t be
concerned that you have to make all your customizing decisions right now.
Section 1 includes the six kinds of customization possible. These are:
■ System Reset - 0
The reset procedure describes how to return all customization to the installed, or factory-set
values, except SpeedCall numbers and Call Report date and time.
■ System Customization - 1
System customization describes how to make changes that are system-wide.
■ Telephone Customization - 2
Telephone customization describes how to make different telephones work in different ways.
■ System SpeedCall - 3
SpeedCall, a number memory, is an important timesaver for your users. There are two kinds of
SpeedCall numbers: Personal and System. Personal numbers are stored by the individual
telephone user and are available only at the telephone where they are stored. System numbers
are stored in the system memory by you and are available at all the telephones in the system.
System SpeedCall tells you how to store System SpeedCall numbers.
■ SMDR Call Report - 4
SMDR (Station Message Detail Recording) Call Report explains how to set the system to provide
a record of incoming and outgoing calls. If your system includes a printer, personal computer
with appropriate software, or specialized hardware you can take advantage of this feature.
■ Print Customization Information - 5
The call-reporting equipment can be used to print or receive customization information, including
the System SpeedCall directory.
Additional Information (Section 2)
This section includes additional information on features, optional equipment, and how to
make changes in your system.
4
Administration Manual
SECTION 1 Customizing
Following is a list and brief description of the features you can change. There are two kinds of
features, SYSTEM FEATURES and TELEPHONE FEATURES. When you customize a system
feature, you have made a change in the whole system that affects all the telephone extensions.
In this manual, information about system features is always printed with a grey background.
When you customize a telephone feature, the change is made for one telephone only. In this
manual, information about telephone features is always printed with a green background.
Description of Features that May be Customized
System Features (instructions for customizing begin on page 15)
■ AUTOMATIC PRIVACY — This feature prevents others from joining your call without your
permission. If Privacy is On, other people in the system can be added to a call only through
conferencing or a special release of Privacy. If Privacy is Off, another user can join a telephone
conversation by pressing the line button that the call is on or by dialing a dial code (see
User Manual). (Possible settings are On and Off. Installed setting is On.)
■ TOLL CALL CHECK — If you are in an area that requires a "1" before every toll call, leave this
at the preset value of 1 Required. If your local telephone service does not require a "1" before
dialing a toll call, change the setting to 1 Not Required. If you must dial an access digit in
order to make an outside call, you have PBX or Centrex lines. If you have PBX or Centrex
lines, the SPIRIT system, will not check for a toll call until after the code is dialed, if the
PBX/Centrex code and lines are correctly customized. Calls will be checked only for telephones
that have been customized as Toll Restricted. (Possible settings are 1 Required and 1 Not Required.
Installed setting is 1 Required.)
■ HELD CALL REMINDER — The system can remind a user that a call is on hold. You can set
the number of minutes it will wait before providing the reminder. (Possible settings are Zero
for no reminder, One, Two, Three, and Four Minutes. Installed setting is One Minute.)
■ LINE TYPE — All incoming lines are either PBX/Centrex Lines or direct Outside Lines. If your
system is not at incoming-line capacity you have Unavailable Lines. (For example, if you have 11
incoming lines on a system that has 12 incoming line jacks on the controller, line 12 is
Unavailable). Find out how many incoming lines you have, and customize Unavailable Lines as
such for proper operation of AUTOMATIC LINE SELECTION. (Possible settings are Unavailable
Line, Outside Line, and PBX/Centrex Line. Installed setting is Outside Line.)
■ PBX/CENTREX LINE ACCESS CODES — If you have PBX/Centrex lines, a code is necessary to
dial an outside call. By entering the code(s) required, you will allow the SPIRIT system to
check for toll calls and to automatically insert pauses in SpeedCall numbers on PBX/Centrex
lines. (Up to four one- or two-digit codes may be entered. One code, the digit 9, is already
installed for your convenience, but may be removed or changed.)
■ EXTERNAL ALERT — If an optional external alerter (buzzer) is part of your system, you can
set when it will turn on for each line. (Possible settings are No Alert, Night Only, Day Only,
and Always On. Installed setting is Night Only.) NOTE: Night Only and Day Only are
determined by whether Night Service is on or off (see User Manual).
■ DIAL TYPE — Set each line for the kind of service you have with your local telephone
company. (Possible settings are Touch Tone and Dial Pulse. Installed setting is Dial Pulse.)
Administration Manual 5
Telephone Features (instructions for customizing begin on page 18)
Telephone customization is used to make different telephones in the system work in different ways.
■ LINE BUTTON ASSIGNMENTS — The telephones in your system have six or twenty-four
buttons that can be line buttons assigned by you or multi-purpose buttons that the user programs
(see User Manual). When you have assigned a line to a button, that button cannot be used
for anything else unless you change the customization for that telephone.
You can assign any outside line to a button on any telephone. The system determines to what
button the line will be assigned (ascending order, starting with button 1 — see page 9). The
installed setting assigns the first 12 lines to the first 12 buttons on 24-button sets and the first
6 lines to the 6 buttons on a 6-button set. If you have fewer than 12 lines, for proper operation
"remove" the "lines" you don’t have (See page 20). Remember, the more line buttons you
assign to a telephone, the fewer SpeedCall and Intercom Extension buttons the telephone can
have. After a line is assigned to a button, the user can select the line by pressing the button. If a
line is not assigned to a button on a particular telephone, the user can select the line by dialing
a code (see User Manual).
■ LINE USE PERMISSION — You can assign to each line of each telephone one of the following
permissions. All lines may be customized for LINE USE PERMISSION, including those lines not
assigned to buttons on the telephone.
Permission. The telephone may not use that line at all except when a call on that line
is transferred to it.
● No
● Full
Permission. The user may place and answer calls on that line. (Installed setting)
● Answer
Only Permission. The user may answer calls or retrieve held calls on that line.
■ AUTOMATIC LINE SELECTION — This feature provides the dial tone when you pick up the
receiver, without having to first select a line by pressing a line button. The SPIRIT system has
been factory set to assign Line 2 as the first choice for outgoing calls. This cannot be changed.
Customizing all lines as Not Eligible will mean that the user must select a specific line every time
a call is made. A line that is assigned to a line button and has Full Permission can be set as
Eligible, which means it can be used by simply picking up the receiver, or Not Eligible, which
means the line button will have to be pressed first to use that line. If lines that are not assigned
to buttons on the telephone are set as Eligible for AUTOMATIC LINE SELECTION, the setting
is ignored. (Installed setting is Eligible.)
■ LINE RINGING OPTIONS — You can assign to any line (with Full or Answer Only Permission)
of any telephone one of the following ringing options for incoming calls.
● No
Ring. The line does not ring for incoming calls.
● Normal
Ring. The line rings normally. (Installed setting)
● Abbreviated
● Delayed
Ring. The line rings for 12 seconds only.
Ring. The line does not start ringing until 12 seconds after the call comes in.
■ NIGHT RINGING — You can assign to each telephone one of the following options. The options
you assign are in effect when Night Service (see User Manual) is on.
Ring at Night. When Night Service is on, the telephone will disregard customized
LINE RINGING OPTIONS and ring normally for all permitted lines.
● Normal
Ring at Night. The telephone will ring the same whether Night Service is on or off.
(Installed setting).
● Customized
6 Administration Manual
Telephone Features
■ OUTSIDE SERVICE — This feature determines the kinds of outside calls that may be made
from each telephone. The three choices are the following:
Restricted. No outside calls may be placed at that telephone except 911 and
unrestricted System SpeedCall numbers. (see page 23).
● Outward
● Unrestricted.
Calls may be placed at that telephone with no restriction. (Installed setting)
Restricted. No toll calls may be placed at that telephone except unrestricted System
SpeedCall numbers — see page 23.
● Toll
System SpeedCall Numbers (instructions for customizing begin on page 23)
The System SpeedCall memory allows you to store telephone numbers that can be dialed by
the users of the system with a two-digit code (30-99).
SMDR Call Report (instructions for customizing begin on page 25)
Call Report explains how to set the system to list outgoing, and, if you want, incoming calls.
If your system includes a printer, personal computer with appropriate software, or specialized
hardware you can take advantage of this feature. You must enter the day and time when this
equipment is installed at the SMDR jack.
■ DAY OF WEEK — This sets the day portion of a clock so the correct day can be printed.
■ TIME OF DAY — This sets a clock so the correct time can be printed.
■ REPORTED CALL DURATION — Decide what length call you want reported. Calls under thirty
seconds are probably not completed calls. (Installed setting is 30 seconds)
■ INCOMING CALL REPORT — Enable or Disable reporting of incoming calls (Installed setting
is Enabled)
Print Customization Information (instructions begin on page 27)
If you have a printer, personal computer with appropriate software, or specialized hardware
installed at the SMDR jack you can list all customizing information, including the System
SpeedCall directory.
How to Use the System Planner and the Customization Chart
A System Planner is provided on pages 8 and 9 to guide you in planning how you will customize
your system. The System Planner is not only a useful guide in the decision-making process of
setting up your system, but also provides a valuable record of the system. The planner should
be changed each time the system is changed.
Record your system-wide decisions on the first page or a copy of the first page of the planner.
You may want to use pencil so that you can make changes in the future. Make a copy of the
second page of the planner for each telephone in your system. Using one copy of the telephone
section of the planner for each telephone in your system, record your telephone customization
decisions.
When the System Planner is complete you can start customizing your system. After becoming
familiar with the confirmation and error tones (see page 12), the customization chart on pages
10 and 11 may be all you will need to complete the customization of your system. More
detailed instructions, however, begin on page 12.
If you use the customization chart on pages 10 and 11, remember to follow the dotted line path.
As on the System Planner, grey-shaded areas are the system features and green-shaded areas
are the telephone features.
Administration Manual
7
System Planner
INCOMING LINES
Use this page to plan the customization
for your system. Permission is granted to
make a copy of this page to record your
decisions for the whole system.
Telephone Number of Line
Line 01
Line 02
Line 03
Line 04
Line 05
AUTOMATIC PRIVACY
1 Privacy Off
2 Privacy On
†
TOLL CALL CHECK
1 1 Required
2 1 Not Required
HELD CALL REMINDER
0 0 minutes
1 1 minute
2 2 minutes
3 3 minutes
4 4 minutes
LINE TYPE
1 Unavailable
2 Outside†
3 PBX/Centrex
†
†
Line 24
Line 21
Line 22
Line 23
Line 20
Line 17
Line 18
Line 07
Line 13
Line 14
Line 15
Line 10
Line 11
Line 12
Line 07
Line 08
Line 09
Line 04
Line 05
Line 06
Line 09
Line 01
Line 02
Line 03
Line 10
PBX/CENTREX LINE ACCESS CODES
9
†
Line 11
Line 13
Line 14
Line 15
Line 16
EXTERNAL ALERT
1 No Alert
2 Night Only†
3 Day Only
4 Always On
Line 22
Line 19
Line 23
Line 20
Line 24
Line 16
Line 17
Line 18
Line 13
Line 10
Line 14
Line 15
Line 11
Line 12
Line 08
Line 05
Line 09
Line 02
Line 03
Line 17
Line 07
Line 18
Line 04
Line 01
Line 19
Line 20
Line 21
Line 22
Line 23
Line 24
8
Administration Manual
Line 21
Line 06
DIAL TYPE
1 Touch Tone
2 Dial Pulse†
Line 22
Line 23
Line 19
Line 20
Line 16
Line 17
Line 13
Line 14
Line 15
Line 10
Line 11
Line 12
Line 07
Line 08
Line 09
Line 04
Line 05
Line 06
Line 01
Line 02
Line 03
† Installed Setting
REPORTED CALL DURATION
(Enter digit 109)
(1 is ten seconds)
Installed setting: 3 (30 sec.)
INCOMING CALL REPORT
1 Disabled
2 Enabled
†
(Larger version on page 36)
Line 19
Line 16
Line 12
DAY OF WEEK
(Enter digit 1-7, 1 is Sunday)
Installed setting: ?
TIME OF DAY
Enter 4-digit time, 24-hour format)
Installed setting: 99:99
SYSTEM CONFIGURATION
Line 06
Line 08
CALL REPORT
SYSTEM CUSTOMIZATION
Line 24
Line 21
Line 18
STATION
10
11
12
13
14
15
16
17
18
19
20
21
22
23
24
25
26
27
28
29
30
31
32
33
34
35
36
37
38
39
40
41
42
43
44
45
46
47
48
49
50
51
52
53
54
55
56
57
LOCATION
GROUP
61
61
61
61
61
61
61
61
62
62
62
62
62
62
62
62
63
63
63
63
63
63
63
63
64
64
64
64
64
64
64
64
65
65
65
65
65
65
65
65
66
66
66
66
66
66
66
66
System Planner
TELEPHONE CUSTOMIZATION
GROUP(S)
LOCATION(S)
TELEPHONE(S)
Make a copy of this page for every different Telephone Customization. Complete one page for each
telephone or group of telephones that will be customized identically.
LINE BUTTON
ASSIGNMENTS
Check below the lines
assigned to buttons on
telephone(s). Installed
setting is lines 01-12
Assigned and lines
13-24 Not Assigned
LINE USE
PERMISSION
1 No Permission
2 Full Permission †
3 Answer Only
LINE RINGING
OPTIONS
AUTOMATIC LINE
SELECTION
1 Not Eligible
2 Eligible †
1
2
3
4
NIGHT RINGING
No Ringing
Normal Ringing †
Abbreviated Ringing
Delayed Ringing
Line 01
1 Normal Ring
2 Customized Ring †________
OUTSIDE SERVICE
1 Outward Restricted____
2 Unrestricted †
3 Toll Restricted
Line 02
Line 03
Line 04
Line 05
Line 06
Line 07
Line 08
Line 09
Line 10
Line 11
Line 12
Line 13
Line 14
Line 15
Line 16
Line 17
Line 18
Line 19
Line 20
Line 21
Line 22
Line 23
Line 24
† Installed Setting
The system assigns the lines
to buttons in numerical order,
starting with the lowest numbered
line on the lower left button and
proceeding left to right.
Using the Line Button Assignments
above, write on the button chart
at the right the lines you have
assigned to the telephone(s).
24button
set
6button
set
Line
Button 22
Line
Button 23
Line
Button 24
Line
Button 19
Line
Button 20
Line
Button 21
Line
Button 16
Line
Button 17
Line
Button 18
Line
Button 13
Line
Button 14
Line
Button 15
Line
Button 10
Line
Button 11
Line
Button 12
Line
Button 7
Line
Button 8
Line
Button 9
Line
Button 4
Line
Button 5
Line
Button 6
Line
Button 1
Line
Button 2
Line
Button 3
Administration Manual 9
Customization Chart
At Telephone Set 10
Press INTERCOM
Press SPEAKER
Dial * 9 2 4 4 8
Install Administration Overlay
Guide for use on page 11.
SYSTEM RESET
(to return to installed settings)
Dial 0
SYSTEM CUSTOMIZATION
Dial 1
AUTOMATIC PRIVACY
Dial 09009
(all telephones must be idle)
22
23
24
19
20
21
16
17
18
13
14
15
10
11
12
7
8
9
4
5
6
1
2
3
ENTER
ADMIN
FEATURE
COPY
TO
Privacy Off
Dial— 1
2 Privacy On †
STATION
Press FEATURE
Dial 2
Required †
Dial— 1 1
2 1 Not Required
LINE TYPE
Press FEATURE
Dial 4
Press line button(s)
1 Unavailable
Dial— 2 Outside †
3 PBX/Centrex
ADD
LINE BUTTON ASSIGNMENTS
Press FEATURE
Dial 1
Press line button(s)
Dial— 1 Remove Line
2 Assign Line
LINE USE PERMISSION
Press FEATURE
Dial 2
Press line button(s)
1 No Permission
Dial— 2 Full Permission †
3 Answer Only
HELD CALL REMINDER
Press FEATURE
Dial 3
0 No reminder
1 1 minute †
Dial— 2 2 minutes
3 3 minutes
4 4 minutes
DROP
Press STATION
Dial intercom extension number
Press FEATURE
Dial 1
TOLL CALL CHECK
Sample
Administration Overlay
TELEPHONE CUSTOMIZATION
Dial 2
PBX/CENTREX LINE
ACCESS CODES
Press FEATURE
Dial 5
To enter a code:
Dial code
Press ADD
To drop a code:
Dial code
Press DROP
To erase all codes:
Press DROP
Dial ✱
Press DROP
(Installed code is 9)
AUTOMATIC LINE SELECTION
Press FEATURE
Dial 3
Press line button(s)
1 Not Eligible
Dial— 2 Eligible †
LINE RINGING OPTIONS
Press FEATURE
Dial 4
Press line button(s)
1 No Ring
2 Normal Ring †
Dial— 3 Abbreviated Ring
4 Delayed Ring
NIGHT RINGING
Press FEATURE
Dial 5
1 Normal Ring
Dial— 2 Customized Ring †
OUTSIDE SERVICE
Press FEATURE
Dial 6
1 Outward Restricted
Dial— 2 Unrestricted †
3 Toll Restricted
EXTERNAL ALERT
Administration Overlay
Press FEATURE
Dial 6
Press line button(s)
1 No alert
2 Night Only †
Dial— Day Only
3
4 Always On
DIAL TYPE
Press FEATURE
Dial 7
Press line button(s)
1 Touch Tone
Dial— 2 Dial Pulse †
10
Administration Manual
COPY TO TELEPHONE
Press COPY TO
Dial intercom extension number
of telephone to be copied to
COPY TO GROUP
Press COPY TO
Dial group number
COPY TO ALL
Press COPY TO
Dial ✱
CALL REPORT
Dial 4
SYSTEM SpeedCall
Dial 3
ENTER A NUMBER:
Dial telephone number
● Press MEMORY
● Enter two-digit code
Repeat these three steps for each
telephone number to be stored.
PRINT CUSTOMIZATION
INFORMATION
Dial 5
●
DAY OF WEEK
Press FEATURE
Dial 1
Enter digit 1-7
(1 is Sunday)
CHANGE A NUMBER:
Dial telephone number
● Press MEMORY
●
Enter two-digit code of number
to be changed
● Listen for confirmation tone
Repeat these four steps for each
telephone number to be changed.
●
TIME OF DAY
Press FEATURE
Dial 2
Enter 4-digit time
REPORTED CALL DURATION
ERASE A NUMBER:
Press MEMORY
Enter two-digit code of number
●
you want erased
● Listen for confirmation tone
Repeat these three steps for each
telephone number to be erased.
●
Press FEATURE
Dial 3
Enter digit 1-9 (1 is 10 seconds)
Installed Setting: 3 (30 sec.)
INCOMING CALL REPORT
Press FEATURE
PRINT SYSTEM
CUSTOMIZATION
Press FEATURE
Dial 1
PRINT TELEPHONE
CUSTOMIZATION
Press FEATURE
Dial 2
PRINT SYSTEM
SpeedCall DIRECTORY
Press FEATURE
Dial 3
PRINT CALL REPORT
INFORMATION
Press FEATURE
Dial 4
Dial 4
1 Disabled
Dial— 2 Enabled †
CANCEL PRINTING
Press FEATURE
Dial #
Guide to Customization Chart
A more detailed set of instructions starts on page 13.
● To
get to a different column of features, at ● , press ENTER ADMIN.
● To
customize another feature in the same column, press FEATURE.
● To
customize another telephone, press STATION.
● To
copy the settings on that telephone to another telephone(s) press COPY TO.
● To
leave customization hang up and replace overlay in pocket.
● Light
patterns indicate current setting:
OFF is 1
ON is 2
Even Flash is 3
Wink (short on, long off) is 4
† Installed setting
Administration Manual 11
How to Customize
Getting Started
When you have finished your plans you are ready to customize the system. You must do all
customizing from telephone set 10, which must be a 24-button set. You cannot use an attendant
adjunct for customization. For telephone customization, including the COPY functions, the
telephone(s) being customized must not be in use. If you want to reset the system, all
telephones in the system (except set 10) must not be in use, so you will want to choose a time
when people are not using their telephones.
If you want, you can plan for future needs while you customize. If your system is not at
capacity (for instance, you have 18 lines and 30 telephones in your SPIRIT system now,
but plan to expand to 24 lines and 40 telephones in the future) you may customize the unequipped
lines and extensions now. For proper operation of AUTOMATIC LINE SELECTION, you
should customize LINE TYPE as Unavailable for the unequipped lines.
Confirmation and Error Tones
Throughout this manual you are told that you will receive a confirmation tone after correct
dialing and an error tone when you have made a mistake. It is important to become familiar
with the confirmation and error tones before you start customizing the system. The following
exercise provides examples of these tones.
● Press
INTERCOM.
● Lift
handset (or press SPEAKER).
To hear a confirmation tone,
● Dial # 2
To hear an error tone,
✱ 0. ● Press MEMORY. ● Dial 28.
● Dial
12 Administration Manual
Instructions for Customizing
Following are step-by-step instructions for customizing.
■ STEP 1 PRESS ONE OF THE INTERCOM BUTTONS ON TELEPHONE SET 10
An INTERCOM button press times out after five seconds. If more than five seconds elapse
before you proceed to STEP 2, press the INTERCOM button again.
■ STEP 2 PRESS SPEAKER (or lift the receiver)
You will hear a dial tone.
■ STEP 3 DIAL ✱ 9 2 4 4 8
You will hear a confirmation tone. If you do not hear the confirmation tone, hang up and
start over.
■ STEP 4 PLACE ADMINISTRATION OVERLAY
(This step is not necessary if you are going to reset features back to the installed setting or
enter SpeedCall numbers and do no other customization.)
Place the administration overlay on telephone set 10. The overlay is provided in the pocket on
the back cover of this manual. The ENTER ADMIN light will be on to show that the system is
ready for administration. No calls may come in to or go out from telephone set 10 during
customization.
■ STEP 5 CHOOSE KIND OF CUSTOMIZATION
The chart on pages 10 and 11 shows six customizing choices at the top. The chart also shows
what customizable features are reached through each choice. Using the chart as a guide, make
the appropriate choice.
● Dial
0 to reset the system. (All telephones except set 10 must be idle. If a telephone other
than set 10 is in use you will hear a busy tone and the system will not reset.)
● Dial
1 to do System Customization.
● Dial
2 to do Telephone Customization.
● Dial
3 to store or erase numbers in the System SpeedCall memory.
● Dial
4 to customize the SMDR Call Report feature.
● Dial
5 to print customization information.
■ STEP 6 COMPLETE CUSTOMIZATION CHOSEN IN STEP 5
Following the instructions on pages 14-27, complete the customization chosen in STEP 5.
■ STEP 7 BEGIN ANOTHER KIND OF CUSTOMIZATION
To continue with another kind of customization, press the ENTER ADMIN button and repeat
steps 5 and 6. For example, if you complete the desired customization under System Customization and want to continue with Telephone Customization, press the ENTER ADMIN button
and repeat steps 5 and 6.
■ STEP 8 EXIT CUSTOMIZATION
When you are finished or want to stop customizing, replace the receiver (or press SPEAKER).
Replace the Administration Overlay in the pocket on the back cover of this manual.
Administration Manual
13
System Reset to Factory-Set Values-0
CAUTION: Use of reset eliminates all customization.
If you dialed 0 in STEP 5 on page 13, and if all telephones except the one you are using are idle,
you can reset the system to the installed settings shown on the chart on pages 10-11. If all telephones
are not idle, you will hear the busy signal.
Enter the System Reset code 09009. If you make a mistake you will hear the error tone, and
you must exit and re-enter reset to try again (press ENTER ADMIN and dial 0). If you enter
the reset code successfully you will hear the confirmation tone and and all features except
System SpeedCall numbers and call report day and time will be returned to installed settings.
Lines 1 through 12 again will be assigned to buttons 1 through 12 on all telephones. If any
telephones were customized so that some of those buttons were multi-purpose, and those
buttons were programmed by the users, one-touch access to Personal SpeedCall numbers and all
other user programming for those buttons will be lost. User programming of buttons 13 through
24 will be unaffected.
The reset procedure requires up to five seconds. You will hear the confirmation tone after the
procedure is completed.
To exit you may replace the receiver or press SPEAKER, or, if you want to continue customizing
features, press the ENTER ADMIN button to reenter administration at STEP 5 on page 13.
14 Administration Manual
System Customization - 1
If you dialed 1 in STEP 5 on page 13 you began System Customization. The features on the
following pages may be programmed in any order, and you may exit customization at any time,
leaving unchanged features at previously-set values. You may also use System Customization
to check the setting of a feature. You do not have to make changes.
Features are customized by entering a digit, as shown on the following pages. If the digit you
enter is valid, you will hear a confirmation tone and the indicator light(s) will reflect the new
setting. If the digit you enter is not valid, you will hear the error tone and the system will
remain ready to customize that feature until a valid digit is entered or you exit the feature.
No change will be made in a feature until you hear a confirmation tone.
After customizing a feature, you may do any of the following:
● press
the FEATURE button to customize another feature
● press
the ENTER ADMIN button to go back to STEP 5
● hang
up the receiver or press SPEAKER to exit customization
Line 22
Line 23
Line 24
Line 19
Line 20
Line 21
Line 16
Line 17
Line 18
Line 13
Line 14
Line 15
During customization, all the buttons on your 24-button set
Line 10
Line 12
Line 11
at station 10 represent lines. Numbering starts at the lower
Line 07
Line 09
Line 08
left with line 1 (see illustration). When you are customizing
Line 04
Line 05
Line 06
a feature that is not changed on a line-by-line basis, the
Line 01
Line 02
Line 03
Line 1 indicator light will show the current status of the
Button Assignments
feature. When you are customizing a feature that is changed
During Customization
on a line-by-line basis (line selectable), the status of each line
(Telephone Set 10)
will be shown on the indicator light for that line.
When you are customizing features that require a setting for each incoming line in the system,
you do not have to press the FEATURE button for each line. Press all the line buttons for
which you want the same setting.
EXAMPLE: Your system has the capacity for 24 incoming lines. Lines 01 through 10 are
PBX/Centrex Lines. Lines 11 through 20 are Outside Lines. Lines 21 through 24 are not used
(Unavailable).
PROCEDURE: Press FEATURE, then dial 4. Press line buttons 01 through 10. Dial 3.
Press line buttons 21 through 24. Dial 1
(You do not have to customize lines 11 through 20 because the installed setting is Outside
Line.)
The indicator light of a selected line button will flash rapidly to let you know which line you
are currently customizing. If you have selected a line and then change your mind and do not want
to customize that line, simply press the line button again.
Administration Manual
15
System Customization
■ AUTOMATIC PRIVACY
Press FEATURE. Dial 1.
The indicator light for Line 1 will show the current system-wide privacy status. If the light is
ON, AUTOMATIC PRIVACY is On. If the light is OFF, AUTOMATIC PRIVACY is Off.
To change the privacy status, enter one of the following:
DIAL
1
2
INDICATOR LIGHT
OFF
ON
SETTING
Privacy Off
Privacy On (installed)
■ TOLL CALL CHECK
Press FEATURE. Dial 2.
All the line indicator lights will go OFF. If you are required to dial 1 before placing toll calls,
enter 1; otherwise, enter 2. Possible choices are 1, 1 Required (installed) and 2, 1 Not Required.
■ HELD CALL REMINDER
Press FEATURE. Dial 3.
All of the line indicator lights will go OFF. Enter the number of minutes for the HELD CALL
REMINDER. If you enter 0 the feature is turned off and no HELD CALL REMINDER will be
provided. You may also enter 1, 2, 3, or 4, so that the HELD CALL REMINDER will be provided
after One, Two, Three, and Four Minutes. The installed setting is One Minute.
■ LINE TYPE
Press FEATURE. Dial 4.
Each line indicator light will show the current status for that line. (Line assignments are
labeled on the Administration Overlay and shown in the table on page 15). If a light is ON the
line is set as an Outside Line. If a light is OFF the line is set as an Unavailable Line, that is not
part of your system. You should set as Unavailable, lines that are not part of your system. If the
light is flashing an even flash, the line is set as a PBX/Centrex Line. To change any individual
line(s), press the line button(s) and dial 1, 2 or 3 (see table, below). You may press more than one
line button to make the change on more than one line. If you dial the number without pressing
a line button first you will hear the error tone. (The system may require up to five seconds to
complete the procedure. You will hear the confirmation tone after the procedure is completed.)
DIAL
1
2
3
16 Administration Manual
INDICATOR LIGHT
OFF
ON
Even Flash
SETTING
Unavailable line
Outside Line (installed)
PBX/Centrex Line
System Customization
■ PBX/CENTREX LINE ACCESS CODE
Press FEATURE. Dial 5.
All of the line indicator lights will go off.
To ENTER a system-wide PBX/Centrex dial code.
Dial the desired dial code. Press ADD button. You will hear the confirmation tone when the
code is added. If there are already four other codes programmed you will hear the error tone.
The digit 9 is preset as the PBX/Centrex code, so there is room for three other codes. You may,
of course, erase the 9 code if you want.
To ERASE a system-wide PBX/Centrex dial code.
Dial the code you want to erase. Press DROP. You will hear the confirmation tone when the
code is erased. If the code is not there to be erased, you will hear the error tone.
To ERASE all codes.
Press DROP. Dial ✱ . Press DROP. You will hear the confirmation tone if you successfully
followed the DROP procedure.
You may continue to enter or erase codes or you may exit the feature.
■ EXTERNAL ALERT
Press FEATURE. Dial 6.
Each line indicator light will show the current EXTERNAL ALERT status for that line. (Line
assignments are labeled on the system administration overlay and shown in the table on page 15.)
To make changes, press the line button(s) for the line(s) on which you want to make a
particular change and dial one of the digits from the table below. You may press more than
one line button to make the change on more than one line. If you enter a digit without first
pressing a line button you will hear the error tone.
DIAL
1
2
3
4
INDICATOR LIGHT
OFF
ON
Even Flash
“Wink” (Short ON, Long OFF)
SETTING
No Alert
Night Only (installed)
Day Only
Always On
■ DIAL TYPE
Press FEATURE. Dial 7.
Each line indicator light will show the current DIAL TYPE for that line. (Line assignments are
labeled on the system administration overlay and shown in the table on page 15.) If the
light is OFF, that line is set for Touch Tone dialing. If the light is ON, the line is set for
Dial Pulse dialing. To change the DIAL TYPE for a line or lines, press the line button(s) and
dial the appropriate digit from the table below. You may press more than one line button to
make the change on more than one line. If you enter a digit without first pressing a line button
you will hear the error tone.
DIAL
1
2
INDICATOR LIGHT
OFF
ON
SETTING
Touch Tone
Dial Pulse (installed)
Administration Manual 17
Telephone Customization - 2
If you dialed 2 in STEP 5 on page 13, you began Telephone Customization. The features on the
following pages may be programmed in any order, and you may exit customization at any time,
leaving unchanged features at previously-set values. You may also use Telephone Customization
to check the setting of a feature. You do not have to make changes.
Features are customized by entering a digit, as shown on the following pages, If the digit you
enter is valid, you will hear a confirmation tone, and the indicator light(s) will reflect the new
setting. If the digit you enter is not valid, you will hear the error tone and the system will
remain ready to customize that feature until a valid digit is entered or you exit the feature.
No change will be made until you hear the confirmation tone.
All telephone features are customized on a set-by-set basis, so you must enter the telephone
number before customizing. The changes you make on set 12, for example, will not be made on
set 14, or any other, unless you specifically copy a customizing set-up from one telephone to
another. Making changes via Telephone Customization is not always necessary for all telephones.
You may, for example, want to leave all the telephones except one at the installed setting for
a feature.
EXAMPLE: All of the telephones except set 16 are used by employees who should not be
restricted from placing long distance calls. Set 16, however, is in the lobby, and is used by
company visitors. You might want to set OUTSIDE SERVICE on the lobby telephone
to Toll Restricted, leaving the other telephones Unrestricted.
After customizing a feature, you may do any of the following:
● press
the FEATURE button to customize another feature
● press
the STATION button to customize another telephone
● press
the ENTER ADMIN button to go back to STEP 5 on page 13
● press
the COPY TO button to copy the customization of this telephone to another telephone
● hang
up the receiver (or press SPEAKER) to finish customization
During customization, all the buttons on your 24-button set represent line buttons. Numbering
starts at the lower left with line 1 (see illustration, page 15). When you are customizing a
feature that is not changed on a line-by-line basis, the Line 1 indicator light will show the
current status of the feature on that telephone. When you are customizing a feature that is
changed on a line-by-line basis (line selectable), the status of each line of that telephone will show
on the indicator light for that line.
When you are customizing features that require a setting for each incoming line in the system,
you do not have to press the FEATURE button for each line. Press all the line buttons for
which you want the same setting.
EXAMPLE: You are customizing LINE USE PERMISSION and you want to make lines
4, 5, and 6 No Permission and lines 7 and 8 Answer Only.
PROCEDURE: Press FEATURE, dial 2, press line buttons 4, 5, and 6, and dial 1. Press line
buttons 7 and 8 and dial 3.
The indicator light of a selected line button will flash rapidly to let you know which line you
are currently customizing. If you have selected a line and then change your mind and do not
want to customize that line, simply press the line button again.
18 Administration Manual
Telephone Customization
COPY TO is a useful procedure if you plan identical customizing for more than one set. If you
want to copy the telephone customization you have completed for one telephone to another
telephone, use the COPY TO TELEPHONE feature (see page 22). If you want to copy the telephone
customization to all the other telephones in a group, use the COPY TO GROUP feature
(see page 22). If you want to copy the telephone customization to all the other telephones in the
system, use the COPY TO ALL feature (see page 22).
EXAMPLE: You have a system with 20 telephones. The customization for all sets except sets
10 and 15 is the same. The customization for set 10 is different from the customization
for set 15.
PROCEDURE: Customize a set other than 10 or 15. Copy that customization to all sets.
Customize set 10. Customize set 15.
EXAMPLE: You have a system with 24 telephones. The sets are in three groups – Group 61,
Group 62, and Group 63. (See page 22 or page 3 for group assignments.) For customization
of the telephones in Group 61, only telephones 14 and 15 are identical. The customization
for all telephones in Group 62 matches the settings for telephone set 12 in Group 61. The
customization for all telephones in Group 63 matches the settings for telephones 14 and 15
in Group 61.
PROCEDURE: Customize set 12. Copy customization of set 12 to Group 62 using the COPY
TO GROUP feature. Customize set 13. Customize set 14. Copy the customization of set 14
to set 15 using the COPY TO TELEPHONE feature. Copy the customization of set 14 to
Group 63 using the COPY TO GROUP feature. Customize the rest of the telephones in
Group 61 (Telephones 10, 11, 13, 16, 17).
EXAMPLE: You have a system with 24 telephones. The customization for all the sets is the
same except for AUTOMATIC LINE SELECTION.
EXAMPLE: Customize set 10. Copy the customization to all sets in the system using the
COPY TO ALL feature. Customize AUTOMATIC LINE SELECTION for each set.
You can see that use of the COPY TO (COPY TO TELEPHONE, COPY TO GROUP,
and COPY TO ALL) feature may save you from having to customize every telephone
individually.
■ To customize a telephone (STATION),
Press STATION and dial the intercom extension number of the telephone to be customized.
If the telephone is being used, you will hear a busy signal and you must wait until the
telephone is not busy before you can customize it. You can press STATION and dial another
intercom extension to customize another telephone, or you may choose to leave telephone
customization.
Administration Manual
19
Telephone Customization
■ LINE BUTTON ASSIGNMENTS
Press FEATURE. Dial 1.
The line indicator lights will show which lines have or have not been assigned to buttons on
that telephone. (Line assignments are labeled on the system administration overlay and shown
in the table on page 15.) To remove a line from a button, press the line button and dial 1.
To assign a line to a button, press the line button and dial 2. You may change multiple lines
by pressing more than one line button before dialing 1 or 2. If you enter a digit without
first pressing a line button you will hear the error tone.
Lines are assigned to buttons in ascending order from left to right, bottom to top. For example,
if lines 1, 4, 5, 8, 10, and 12 are assigned to a telephone, the bottom row of buttons on that
set will be assigned lines 1, 4, and 5. The second row of buttons will be assigned lines 8, 10, and
12, in that order, left to right.
REMEMBER, the more lines you assign to buttons, the fewer SpeedCall and Intercom Extension
buttons the telephone can have.
The installed setting is for the first 12 lines to appear on buttons. If you have fewer than 12 lines,
it is important to “remove” the “lines” you don’t have. To determine the number of lines to
remove, subtract the number of lines you have from 12. If more than 6 lines are assigned to
an intercom extension number, only the first 6 lines will appear on buttons if a 6-button set is
installed at that position.
As the administrator of the system, you assign what lines will appear on a telephone. The
system automatically assigns the line to a button. It is important that each button that serves
as a line button is labeled AT EACH TELEPHONE and that the label includes BOTH the
number of the line for the system (01 through 24) and the incoming line telephone number.
DIAL
1
2
INDICATOR LIGHT
OFF
ON
SETTING
Remove Line (Line Not Assigned to a Button)
Assign Line (Line Assigned to a Button)
■ LINE USE PERMISSION
Press FEATURE. Dial 2.
Each line indicator light will show the telephone's current permission for that line. (Line
assignments are labeled on the system administration overlay and shown in the table on page 15.)
To change the option for individual line(s) on that telephone, press the line button(s) and
dial a valid digit from the table below. You may press more than one line button to make the
change on more than one line. If you enter a digit without first pressing a line button you will
hear the error tone.
DIAL
1
2
3
20
Administration Manual
INDICATOR LIGHT
OFF
ON
Even Flash
SETTING
No Permission
Full Permission (installed)
Answer Only
Telephone Customization
■ AUTOMATIC LINE SELECTION
Press FEATURE. Dial 3.
Each line indicator light will show the current status for that line. (Line assignments are
labeled on the system administration overlay and shown in the table on page 15.) To change the
option for individual line(s) on that telephone, press the line button(s) and dial a valid digit
from the table below. You may press more than one line button to make the change on more than
one line. If you enter a digit without first pressing a line button you will hear the error tone.
DIAL
1
2
INDICATOR LIGHT
OFF
ON
SETTING
Not Eligible
Eligible (installed)
Lines customized without Full Permission from the telephone being customized will show as
Not Eligible for AUTOMATIC LINE SELECTION. Selecting such a line will be ignored.
Lines that are not assigned to buttons are never eligible for AUTOMATIC LINE SELECTION,
even if they are customized as such.
■ LINE RINGING OPTIONS
Press FEATURE. Dial 4.
Each line indicator light will show the current ringing option for that line. (Line assignments
are labeled on the system administration overlay and shown in the table on page 15.) To change
the option for individual line(s) on that telephone, press the line button(s) and dial a digit
from the table below. You may press more than one line button to make the change on more than
one line. If you enter a digit without first pressing a line button you will hear the error tone.
DIAL
1
2
3
4
INDICATOR LIGHT
OFF
ON
Even Flash
“Wink” (Short ON, Long OFF)
SETTING
No Ring
Normal Ring (installed)
Abbreviated Ring
Delayed Ring
Lines that have been customized as No Permission will show No Ring. Selecting such lines
will be ignored.
■ NIGHT RINGING
Press FEATURE. Dial 5.
The indicator light for line 1 will show the current NIGHT RINGING option for this telephone.
To change the option, dial one of the digits from the following table:
DIAL
1
INDICATOR LIGHT
OFF
2
ON
SETTING
Normal Ring (Disregards customized LINE RINGING
OPTIONS when Night Service is on.)
Customized Ring (installed) (The telephone will ring
according to customized LINE RINGING OPTIONS
whether Night Service is on or off.)
Administration Manual 21
Telephone Customization
■ OUTSIDE SERVICE
Press FEATURE. Dial 6
The indicator light for line 1 will show the current overall OUTSIDE SERVICE for the telephone.
To change the overall OUTSIDE SERVICE, dial one of the digits from the following table.
DIAL
1
2
3
INDICATOR LIGHT
OFF
ON
Even Flash
SETTING
Outward Restricted
Unrestricted (installed)
Toll Restricted
■ COPY TO
You can use the three COPY TO features to save time if the customization of two or more
telephones is similar or identical. The telephone(s) being copied to must not be busy. If you hear
a busy tone, cancel the copy request by pressing the COPY TO button again.
Copy To Telephone
To copy the choices for the telephone being customized to another telephone, press COPY TO.
The COPY TO indicator light will go on, and all the line indicator lights will go off. While the
COPY TO indicator light is on, dial the intercom extension number of the telephone to
which you want to copy. The telephone being copied to must not be busy. All of the telephone
customization settings for the set being customized will be copied to the specified telephone
set and you will hear a confirmation tone. The COPY TO light indicator will go off. To do
another copy, repeat the process.
To cancel a copy, press the COPY TO button again without dialing the intercom extension number.
Copy To Group
The groups within your SPIRIT Communications System are numbered from 61 to 66.
INTERCOM EXTENSION NUMBER
10-17
18-25
26-33
34-41
42-49
50-57
GROUP NUMBER
61
62
63
64
65
66
You can copy the customization for the telephone being customized to all the telephones in a
group by pressing the COPY TO button and then dialing the two-digit group number (61-66).
All telephones in the group (except set 10) must be idle.
Copy To All
To copy the set-up for the telephone being customized, to all other telephones in the system,
press COPY TO, then press ✱ . All the telephones in the system (except set 10) must be idle.
The Copy To All procedure may require up to five seconds to complete. You will hear a
confirmation tone when Copy To All is completed.
22
Administration Manual
System SpeedCall - 3
The SpeedCall feature is an important time saver for users. There are two kinds of SpeedCall
numbers: Personal and System. Personal SpeedCall numbers are entered by the users of the
sets. Each user may store 12 Personal SpeedCall numbers. System SpeedCall numbers are stored
in the system memory and are for the use of everyone in the system. The system can store
70 System SpeedCall numbers; of these 70, 50 are unrestricted and 20 are restricted (see below).
SpeedCall numbers are dialed by using a two-digit code.
Restricted and Unrestricted SpeedCall Numbers
Unrestricted SpeedCall numbers (including toll numbers) may be called by using a two-digit
code from any telephone in the system that has full permission to an outside line, including
telephones restricted from making outside calls or toll calls. For this reason, emergency numbers
such as FIRE, POLICE, and AMBULANCE, should be entered as unrestricted numbers.
Unrestricted numbers are stored with codes 30-79. The OUTSIDE SERVICE restrictions you
may have assigned to each telephone apply to numbers stored with codes 80-99, which are
restricted SpeedCall numbers. The number 911 can be dialed from any telephone that has at
least one line with full line use permission, and need not be entered as a SpeedCall number.
In summary,
Unrestricted SpeedCall numbers:
● may
be called from any telephone regardless of OUTSIDE SERVICE customization.
Restricted SpeedCall numbers:
● may
be called from telephones with Unrestricted OUTSIDE SERVICE.
● may
be called from telephones with Toll Restricted OUTSIDE SERVICE, if the numbers are local.
● may
not be called from telephones with Outward Restricted OUTSIDE SERVICE.
SpeedCall Directory
Be sure you keep an accurate directory of the numbers you have stored in the System
SpeedCall memory. Since numbers may be erased and added often, it’s a good idea to make
several spare, blank copies of the sample directory. Photocopy the System SpeedCall Directory
on page 35.
Administration Manual
23
Storing System SpeedCall Numbers
If you dialed 3 in STEP 5 on page 13, you began customization of the System SpeedCall
memory.
A. DIAL THE TELEPHONE NUMBER
Dial the number to be entered in the System SpeedCall directory. A total of 16 digits, including
pauses and one flash, may be stored as one number.
NOTE: Press the HOLD/PAUSE button to enter a 1½ second pause in the number (i.e., to wait for
a dial tone or access tone). If your system is part of a PBX/Centrex system you may store the outside
access code as part of the number. If the line is customized as a PBX/Centrex line and the access
code is entered in system customization, the system will automatically insert a pause after the
code when you use your SpeedCall numbers.
If you make a mistake entering the number, begin again by pressing ENTER ADMIN and
dialing 3.
B. PRESS MEMORY
C. ENTER TWO-DIGIT CODE
Enter the two-digit code you want to assign to the number you have stored. Remember, codes
30 through 79 are for unrestricted numbers that can be dialed by anyone in your system,
regardless of OUTSIDE SERVICE restrictions that may be customized on a telephone. Codes 80
through 99 are restricted according to the OUTSIDE SERVICE you customize for each telephone
(see OUTSIDE SERVICE, page 7).
If you use a code that is already in use for another number, the new number will be stored
over the old number and the old number will be lost. If you enter an invalid code (a code
other than 30-99) you will hear the error tone (see page 12 for instructions on how to
recognize the error tone). This means you will have to start over again at A, entering the
telephone number. When you have successfully stored a number in the System SpeedCall
memory you will hear a confirmation tone (three short beeps).
When you hear the confirmation tone you may continue to store numbers in the System
SpeedCall memory by going back to A and entering a new number. If you want to continue with
another kind of customization, press ENTER ADMIN. If you are finished storing numbers
and want to exit customization, hang up the receiver (or press SPEAKER if you were using the
speakerphone).
Erasing a Number from the System SpeedCall Memory
You may enter a new number over an old number instead of erasing the old number. If you
want to erase a number, follow the storing procedure described above, except do not enter a
new number. After you press the MEMORY button, enter the code of the number you want
to erase. A confirmation tone indicates your success. You may continue erasing, or you may
enter a new number by going back to A. If you want to continue with another kind of
customization, press ENTER ADMIN. If you want to exit the procedure, hang up the receiver
(or press SPEAKER if you were using the speakerphone).
24
Administration Manual
SMDR Call Report - 4
The Call Report feature provides the information needed to track telephone usage. Using the
output, you can observe line and telephone usage that will help your company make the best
use of the system. Do you need more or fewer incoming lines? Should the telephones in a
particular area be customized as Toll Restricted? These and other questions may be answered
after viewing an accurate history of the incoming and outgoing calls on your system.
No action is necessary to "start" or "stop" the Call Report feature. If a printer, personal computer
with appropriate software, or specialized hardware is installed with your system and is plugged
into the "SMDR" jack on the controller, information will be sent to it as calls are completed.
As long as the device is on, a Call Report (see page 28) will be printed.
Call Reports may contain confidential information and should be kept private.
Account Codes
Some companies find it useful to assign account codes to telephone calls. For instance, an
attorney’s office may want to be able to bill the time spent on a call to a specific client.
Account codes for Call Report purposes may be up to 16 digits long. The user must program
a multi-purpose button as an "account code" entry button (see User Manual). If the user presses
the programmed button, enters the account code, and then presses the programmed button
again, the account code will be included as part of the Call Record.
Customizing SMDR Call Report
You must enter the day of the week and the time of day when the optional equipment is
installed and after long periods without power so that the information on the report is accurate.
The reported call duration means the length of call you want to be reported—the system will
not report calls that are ended before the customized time. INCOMING calls will be reported
unless you customize the incoming Call Report feature described on the next page.
Call Report features are customized by entering a digit. If the digit you enter is valid, you will
hear a confirmation tone. If the digit you enter is not valid you will hear the error tone and the
system will remain ready to customize that feature until a valid digit is entered or you exit
the feature.
To customize the Call Report feature in your system, follow the first four customization steps
on page 13. At STEP 5, dial 4.
Administration Manual
25
SMDR Call Report
■ DAY OF WEEK
Press FEATURE. Dial 1.
Line indicator lights will be OFF. Enter a digit from 1-7 (1 is Sunday, 2 is Monday, etc.).
You will hear a confirmation tone if you enter a valid digit and an error tone if the digit you
entered is not valid. The information will be used as part of the call record. If the day of the
week is not entered, ? will appear on the call record.
A System Reset (see page 14) will not affect the day of week setting.
■ TIME OF DAY
Press FEATURE. Dial 2.
Line indicator lights will be OFF. Enter a four-digit time in 24-hour format (for example, if the
time is 2:15 in the afternoon, enter 1415). Valid times are 0000 to 2359. You will hear a
confirmation tone if you enter a valid time and an error tone if you enter an invalid time.
The time is set at 9999 when shipped from the factory and will not change until a time is
entered. If you reset the system (see page 14), the TIME OF DAY setting will not be affected.
■ REPORTED CALL DURATION
Press FEATURE. Dial 3.
Line indicator lights will be OFF. Enter a digit from 1 to 9 to indicate the minimum length of
call to be reported. If a 1 is entered, the system will report any call longer than 10 seconds.
If a 2 is entered, the system will wait for 20 seconds before reporting the call, and so on.
Maximum entry is 9, for ninety seconds. You will hear a confirmation tone after entering a valid
digit, and an error tone after an invalid entry. Installed setting is 30 seconds.
■ INCOMING CALL REPORT
Press FEATURE. Dial 4.
Line 1 indicator light shows the current setting for incoming call reporting on a system-wide
basis. Outgoing calls are always reported. Enter a 1 to prevent incoming calls from being
reported. Enter a 2 to report incoming calls.
DIAL
1
2
INDICATOR LIGHT
OFF
ON
SETTING
Incoming Calls Not Reported Disabled
Incoming Calls Reported Enabled (installed)
After customizing a feature, you may do any of the following:
26
● press
the FEATURE button to customize another feature
● press
the ENTER ADMIN button to go back to STEP 5 on page 13
● hang
up the receiver or press SPEAKER to exit customization
Administration Manual
Printing Customization Information - 5
If your system has optional equipment for Call Report information, you can print the results of
your system and telephone customization, your System SpeedCall directory, and the call
reporting customization information.
NOTE: You can also send this same information about your system to a personal computer.
To begin, follow steps 1-4 on page 13. At STEP 5, dial 5.
■ PRINT SYSTEM CUSTOMIZATION
Press FEATURE. Dial 1.
The printer will print the customization information for system features.
■ PRINT TELEPHONE CUSTOMIZATION
Press FEATURE. Dial 2.
The printer will print the telephone customization information. The print-out will show
information for a system capacity of 48 telephones, whether you have that many in your system
or not.
■ PRINT SYSTEM SpeedCall DIRECTORY
Press FEATURE. Dial 3.
The printer will print a System SpeedCall directory.
■ PRINT CALL REPORT INFORMATION
Press FEATURE. Dial 4.
The printer will print the Call Report customization information.
■ CANCEL PRINTER
Press FEATURE. Dial #.
Use this procedure to cancel the current activity and resume sending call records.
After you request a printing activity, you may exit customization and the printing will
continue. You should not, however, continue with other customization procedures while
customization information is still being printed.
NOTE: During the printing of customization information, the printing of call records by the Call
Report feature is interrupted. The system will store the information for 24 calls, but information
on more calls than that will be lost. Since the printing of the telephone customization information
can take as long as five minutes, you may want to schedule printing activities during times
when your system is not very busy.
Some sample print-outs of Call Records and customization information are shown on the
next pages.
After completing a printing operation, you may do any of the following:
● press
the FEATURE button to go to another print feature
● press
the ENTER ADMIN button to go back to STEP 5 on page 13
● hang
up the receiver or press SPEAKER to exit customization
Administration Manual 27
Sample SMDR Call Report
C
C
C
C
†C
C
C
C
C
DAY
APPROX.
TIME
FRI
FRI
FRI
FRI
FRI
FRI
FRI
FRI
FRI
11:03
11:02
11:04
11:04
11:30
11:33
11:31
11:34
11:31
CALLED
NUMBER
6847
5559876
9P5557654
IN*
5551234
IN
IN
5559876#12378945?
DURATION
LINE
STN.
00:00:37
00:02:28
00:26:01
00:26:03
00:01:13
00:00:57
00:03:26
00:00:43
00:02:55
08
04
24
08
05
24
08
20
12
21
10
40
13
22
23
40
† This is an example of a record of a call placed with a device plugged into an LA jack.
No called number is available for this type of call.
KEY:
C-Call Record
IN-Incoming Call
✱ - Digits dialed on an incoming call
? - more than 16 digits entered
P-Pause
28
Administration Manual
ACCOUNT
CODE
#32165*753#
Sample Customization Reports
SYSTEM CUSTOMIZATION
SETTING
FEATURE
A
A
A
A
A
A
A
AUTOMATIC PRIVACY
TOLL CALL CHECK
HELD CALL REMINDER
LINE TYPE
PBX ACCESS CODES
EXTERNAL ALERT
DIAL TYPE
2
1
1
3 3 3
75
3 3 3
1 1 1
3 3
70
1 1
1 1
3 3 3 3 3 3 3 3 3 3 3 3 2 2 2 1 1 1 1
9
3 3 1 3 3 1 4 2 1 1 1 1 1 4 4 2 2 2 2
1 1 1 1 1 1 1 1 1 1 1 1 2 2 1 1 1 1 1
TELEPHONE CUSTOMIZATION
STN.
FEATURE
SETTING
A
A
A
A
A
A
10
10
10
10
10
10
LINE BUTTON ASSMT
LINE PERMISSION
AUTO LINE SELECT
LINE RINGING
NIGHT RINGING
OUTSIDE SERVICE
1
2
2
2
1
2
1
2
2
2
1
2
2
2
1
2
2
2
1
2
2
2
1
2
2
2
2
2
1
1
2
2
2
2
1
1
2
2
1
1
2
2
1
1
2
2
2
3
2
4
2
3
2
4
1
1
2
2
1
1
2
2
1
1
2
2
2
2
2
3
1
1
1
2
1
1
1
2
2
2
1
1
1
1
2
2
1
1
2
2
1
1
2
2
1
1
2
2
A
A
A
A
A
A
11
11
11
11
11
11
LINE BUTTON ASSMT
LINE PERMISSION
AUTO LINE SELECT
LINE RINGING
NIGHT RINGING
OUTSIDE SERVICE
1
2
2
1
2
3
1
2
2
1
1
2
2
1
1
2
2
1
1
2
2
1
1
2
2
1
1
1
2
2
1
1
2
2
2
2
2
2
1
1
2
2
1
1
2
2
1
1
2
2
1
1
2
2
2
2
2
3
2
3
2
4
1
1
2
2
1
1
2
2
2
2
1
1
2
2
1
1
2
2
1
1
1
2
2
2
1
2
2
2
1
2
2
2
1
2
2
2
Settings are reported for each line in ascending order.
SYSTEM SPEED CALLING NUMBERS
RESTRICTED
UNRESTRICTED
A
A
A
A
A
A
A
A
A
CODE
PHONE NUMBER
CODE
PHONE NUMBER
30
31
32
33
34
35
36
37
38
5559876
#2143658709#
6847
15552345
7513175552345
*9P5557654
R6510
95556789
80
81
82
83
84
85
86
87
88
7015551357
95553579
5558642
7513175558765
*5551928
03175552534
CALL REPORT CUSTOMIZATION
FEATURE
A DAY OF WEEK
A TIME OF DAY
A CALL DURATION
A INCOMING CALL RPT
SETTING
3
11:38
30
1
KEY:
A-Administration
Administration Manual
29
SECTION 2 Additional Information
Ringing Options
If an attendant answers most of the calls that come into the office, you may want to
customize the lines on other telephones to No Ring or Delayed Ring.
Some businesses have one attendant and no backup, leaving no one to answer calls if the
attendant is absent. If this is your situation, you may want to set the lines on all the phones
in the office to Delayed Ring so that when the attendant is not available calls will ring
automatically at the other phones after twelve seconds. You could also set NIGHT RINGING
to Normal Ring for telephones that you want to ring when the attendant is not able to answer
the telephone. The attendant must then turn on Night Service when that situation occurs.
If there is someone to cover for the attendant, you may choose to customize the lines on the
backup person’s phone to Delayed Ring and all other phones for No Ring.
The customizing procedure is so simple you can change call coverage and ringing patterns on an
as-needed basis. Think of your customizing as flexible and easily changed.
System Changes
From time to time you will want to make changes, either in the system or on individual lines or
sets. To make changes simply follow the instructions for customizing features.
When you customize a telephone from telephone set 10 you are not actually customizing the
telephone, but the location where the telephone line is plugged in at the controller. Therefore,
if you want a telephone to retain previous customization, be sure the cord or wiring run for
that telephone is plugged into the controller in the same jack as before. For example, if Linda,
whose intercom extension number is 14, and Bob, whose intercom extension number is 15, exchange
offices, you may switch the telephones to the new locations and plug station cord 14 into
controller jack 15 and station cord 15 into controller jack 14. Relabel the cords to identify
the new positions. Linda is still intercom extension number 14 and Bob is still intercom extension
number 15, and they retain their individual customization and personal SpeedCall memories.
You may need to change a person’s group assignment. Since group assignments are determined
by SPIRIT intercom extension number assignments, the person will need a new intercom
extension number. Be sure the cord or wiring run for that set is plugged into the controller at
the new station jack. If the telephone customization for that person will remain about the
same, use Copy To to copy the customization from the old station number to the new one. The
person will have to redo programming of SpeedCall numbers and multi-purpose buttons at the
new extension number.
If a permanent change is made in the assignment of a SPIRIT extension number that is already
being used, the programming that was done at that extension will need to be erased. To do this
from the individual telephone, erase all the two-digit SpeedCall codes, 10-21, using the method in
the SpeedCall section of the User Manual, and then erase all the buttons following the procedure
in the Programming Multi-Purpose Buttons section of the User Manual. A faster way of getting
rid of individual programming is to enter telephone customization from set 10, and first assign
all 24 possible lines (even if you do not have 24 lines at your business) to line buttons on the set
(Line Button Assignment) and then remove the ones that are not wanted. All programming
that the person did at the set will be erased but all programming you did, as the administrator,
will be retained.
Using with a PBX/Centrex System
Throughout the Administration Manual and the User Manual you are directed to dial an
"intercom extension" number. This number is the two-digit SPIRIT telephone number, not a
PBX/Centrex extension number. The intercom extension number refers to the controller jack
into which the telephone line cord or wiring run is plugged. That information should be part of
the system directory that was completed during installation of the system.
30 Administration Manual
If your system requires a PBX/Centrex line access code, you should customize that code through
the system customization process (see page 17). If the line access code is customized, the
system will automatically enter a pause to wait for a dial tone after the code is dialed as part of
a SpeedCall number. If the code is not customized, the system may consider the code part of
the telephone number and not be able to check the digits for toll call restrictions.
A SPIRIT system behind a PBX or Centrex may not act as expected in some cases. For
example, If you were previously using such a system, you could distinguish between "inside"
and "outside" calls by the ringing pattern. Now if you are using a SPIRIT system behind
PBX/Centrex, "inside" calls include only SPIRIT Intercom calls, and all other calls will ring as
"outside" calls.
If you are using both SPIRIT and PBX/Centrex features, be sure you remember to access
each feature as required. To access SPIRIT features, you must be using INTERCOM; to access
PBX/Centrex features you must be using a PBX/Centrex line. You may have some unexpected
and confusing results if you attempt to access a PBX feature on INTERCOM, or a SPIRIT
feature on a PBX/Centrex line.
If there are some PBX/Centrex features that you use often, you can program them as personal
SpeedCall numbers for easy access. First, make sure you have the code for the PBX/Centrex
feature you wish to access. Then, following the procedure outlined in the User Manual, program
the following as a SpeedCall number: RECALL, PAUSE, Feature Code. You can then use SpeedCall
to access the PBX/Centrex feature.
LA Jacks (Dedicated Lines and Power Failures)
Dedicated Lines
One jack for each four line jacks is labeled LA on the controller. LA means Line Auxiliary.
These jacks provide standard telephone service unaffected by system features and are useful as
dedicated lines for computer modems, answer/record machines, and in power failure situations.
The controller and expansion unit have a "line card" for every four incoming lines in the
system. There is one LA jack for every line card installed in your controller or expansion unit.
Each LA jack uses the same incoming line as the lowest numbered line on the card. When
the LA jack on a line card is being used (that is, the device plugged into that jack is "offhook" and
is actually being used), the lowest numbered line on that line card will be unavailable for use
by the system. Devices may be left plugged in the LA jacks, and as long as they are not in
use they will not interfere with the lines.
Power Failures
The LA jacks may be used with a standard telephone during a power failure when the rest of
the system cannot be used. Simply plug one end of a telephone line cord into one of the
LA jacks and the other end into a standard telephone.
During power failures less than 2½ days, the customization memory will be maintained;
however, the system clock will not continue to run during the power outage. If you are using
Call Reporting you should reset the time and possibly the day depending upon the length of
the power failure. During power failures of more than 2½ days, the memory will be lost and all
customized features will reset to the installed setting. Be sure to keep a record of current
customization.
Optional Equipment
The controller has jacks for a music on hold source, and an external alerter. A volume control
for the music on hold is located next to the music on hold jack on the controller. The controller
also has an SMDR (Station Message Detail Recording) jack for a serial printer or personal
computer. Several models of serial printers and personal computers are available for use with
the system, but a 355A or 355AF RS232 adapter MUST be used with ANY of this equipment.
There are also loudspeaker paging systems available for use with the SPIRIT system. See your
AT&T representative for more information.
NOTE: Users of equipment that rebroadcasts copyrighted music or other material may be
required to obtain a license from a third party such as ASCAP or BMI.
Administration Manual 31
Additional Feature Information
Outside Calls on INTERCOM Buttons
Features and operations that would normally require a line button can use the INTERCOM
button instead. The INTERCOM button can act as a line button for a call if no button exists
for that line on that telephone. This means not only that you may use the INTERCOM button
to access a line for which you have no button, BUT ALSO that incoming calls will ring in on
the INTERCOM button and may be answered in the normal way. The indicator light for
the INTERCOM button will act like the line button indicator light, except during held calls
(see Indicator Light Patterns in the User Manual).
Following are a few differences which may occur when you are using an INTERCOM button in
place of a line button:
● If you hang up on such a call, the INTERCOM light will go out even if another person is still
on the call.
● If you place the call on hold, the indicator light will show the I HOLD pattern unless the line
is still in use by another person. If the line is still in use after you place it on hold, the
indicator light will show the THEY USE pattern; for example, a line might still be in use if
someone else had bridged onto the call.
● If you place the call on hold and the call is taken off hold at another telephone or another
SPIRIT set was already on the call, you may not be able to rejoin the call if Privacy is on. If
this occurs, that INTERCOM button and indicator light will be unavailable to you until the
call is hung up.
An outside call on an INTERCOM button leaves only one button left for intercom calls or
other features accessed by pressing INTERCOM, an important consideration if you are
planning a conference with more than one intercom extension.
You may program into a SpeedCall location the code sequence (8 plus the line number desired)
for dialing an outside number on a line not assigned to a line button. You may, if you want,
include the telephone number if you want to use this feature for a specific outgoing call only.
INTERCOM Indicator Lights
The indicator lights next to the INTERCOM buttons show what is happening on intercom calls
or outside calls on the INTERCOM button at that telephone:
● I USE flashes a long ON and short OFF.
● I HOLD flashes a short ON and long OFF.
● Incoming alert flashes an even ON and OFF.
● If the light is OFF, that INTERCOM button is idle
A graphic description of light patterns is shown in the User Manual.
Intercom Extension Indicator Lights
Intercom Extension buttons, whether on the station adjunct or programmed for that use on a
telephone, have indicator lights that show what is happening on that telephone.
● If the light is OFF the telephone is idle.
● If the light in ON, the telephone is busy.
● If the light is FLASHING rapidly, the telephone is the source of an incoming intercom call
or group page to your telephone, returning a transferred call to your telephone, or manually
signaling your telephone,
● If the light is FLASHING slowly, that telephone is receiving an intercom call that you may
answer by using the call pickup procedure described in the User Manual.
Intercom extension indicator lights do not flash for transferred calls.
Conference
A maximum of four telephones may be conferenced; only three of these may be SPIRIT
telephones. The total of four must include any telephones bridged onto the conference.
The originator of a conference call is the person who makes the initial conference. If the
originator hangs up, the call is disconnected. Only the originator can add or drop other people.
If one of the other telephones in a conference call is an intercom extension, the originator can
leave the conference call without disconnecting the other people by placing it on hold. The
32
Administration Manual
originator can then hang up and the other people can continue the call. If none of the telephones
except the originator's is an intercom extension, the outside callers are on hold, and will not
hear each other. In either case, the originator is still considered one of the four participants
on the call, so if someone other than a conference participant sets up the conference, a total
of three people can be conferenced. The call will disconnect when all the other parties hang
up. If your system has a system attendant who will be responsible for originating the conference
calls, be sure this procedure is explained carefully.
A conference call on hold is actually without an originator, so if someone picks up a line
when a conference call is on hold, that person becomes temporary custodian of the call and will
disconnect the conference call by hanging up. When retrieving a held call, it is important that
the line or INTERCOM button that is pressed is flashing an I HOLD pattern; pressing a button
with a THEY HOLD pattern can result in hanging up on all of the other parties.
Placing and retrieving conference calls on hold can require special treatment, particularly if
outside calls appearing on an INTERCOM button are involved. You may want to form a few
practice conferences involving combinations of lines and stations so that you can set up written
guidelines for conferencing.
Depending on your situation (geographic location, number of conferees, distance between
conferees, etc.), voice quality on conference calls may be affected (distant parties may have
difficulty hearing each other).
Call Forwarding
Intercom calls may be forwarded to or from any telephone that is plugged into the controller
at the time of the forwarding. An intercept tone (continuous error tone) will result if the user
attempts to forward calls to an intercom extension that is not plugged in.
Calls may not be forwarded to an attendant adjunct. An intercept tone will result if such an
attempt is made.
Calls may be forwarded to telephones from which calls are already forwarded, but the calls will
not be forwarded again. For example, if intercom extension 12 is forwarded to 20 and
intercom extension 15 forwards calls to 12, the calls for intercom extension 15 will ring at extension
12, not extension 20.
Call forwarding allows users to switch locations temporarily without losing calls. For example,
calls to intercom extension 12 may be forwarded to 15 and calls to 15 may be forwarded to
12. Anyone dialing extension 15 would then have the call forwarded to extension 12 and the
reverse would be true for extension 12.
If a user forwards calls from one extension to the same extension number, call forwarding for
that extension is canceled.
If Auto Callback is placed to an intercom extension which has calls forwarded, the call back
signal from the extension with calls forwarded will not occur until call forward is canceled.
Turing on the message light for telephones is not forwarded, even if the intercom call was
forwarded.
Transferred calls will not be forwarded; only intercom calls can be forwarded not outside calls.
When a call comes into a telephone from which calls have been forwarded, that telephone will
ring with one very short ring. This serves as a reminder to the user that the calls have been
forwarded. It is NOT possible to answer the call at that phone.
Group Paging
When a telephone is involved in a group page, the user will not hear a ring if a call comes in.
If the user has HFAI on, it may be difficult to distinguish a group page from an HFAI intercom
call. Announcements should be phrased in such a way as to make it clear that a page is occurring.
Administration Manual
33
Helpful Hints
As you probably already know, when people have troubles with their sets, they will come and
discuss them with you. Here are some of the problems you may hear, and suggestions for
handling them.
set will not ring when it should and the MUTE light is blinking. Do Not Disturb may have
accidentally been turned on. Have the person press INTERCOM, SPEAKER, #, 2. The light
will go out and the set should be able to ring again.
●A
● When
people think they are on outside calls, sometimes their voices can be heard over the
loudspeakers. Make sure that the “line” associated with the line jack into which the loudspeaker
paging system is plugged is not eligible for Automatic Line Selection.
ring briefly and when answered, no one is there. Either someone else answered
the call or the user inadvertently used Line Reserve, that is, pushed an in-use line button.
When the line was free, the user was signaled.
● Telephones
typed or written labels on the sets are hard to read. Be sure that they are typed at the
very top of the label.
● The
● People
ignore their message lights. Tell the people who send the messages about Auto Callback.
are inadvertently taking other people’s calls off Hold. Encourage the use of Exclusive
Hold. Not only will no one but the person who has put a call on Hold be able to retrieve it, but
the number of blinking line indicator lights will be reduced.
● People
are too many blinking lights on the telephones. Encourage the use of Exclusive Hold.
Not only will no one but the person who has put a call on Hold be able to retrieve it, but
the number of blinking line indicator lights will be reduced.
● There
that have been placed on Hold cannot be retrieved elsewhere. Make sure that people
are not accidentally using Exclusive Hold by pressing the Hold button twice. Sometimes a
finger bounces a little without the person’s realizing it.
● Calls
● People
complain that there are buttons on their sets that are not line buttons that they cannot
program. Make sure that line Button Assignments are customized correctly. Since the default
setting is 12 line buttons on 24-button sets, even if your telephone service provides less than
12 lines, there will be 12 line buttons on sets unless some of the line buttons have been “removed”
during Telephone Customization.
complain that they cannot program Intercom Extension Buttons. Make sure that they
are not trying to program an intercom extension number that is already on another button.
● People
complain that they cannot program SpeedCall Buttons. Make sure that the two-digit
SpeedCall code is not already being used with another SpeedCall button.
● People
telephone will not "hang up." Make sure that the receiver has not been switched to a nonSPIRIT one.
●A
SPIRIT user sounds fuzzy or faint. Make sure that the receiver has not been switched to
a non- SPIRIT one.
● The
● There
● Calls
is no dial tone. Make sure that the receiver has not been switched to a non- SPIRIT one.
cannot be placed. Make sure that the receiver has not been switched to a non- SPIRIT
one.
ignore the system attendant’s calls when they are on other calls. Encourage the use of
Manual Signaling, in conjunction with turning on Message Lights.
● People
24-Button Attendant Adjunct (optional) does not work. Make sure that it is plugged into
the station jack that is numbered one higher than the station set with which it is paired.
● The
telephone starts making calls when no one has touched it. Make sure that a 24-Button
Attendant Adjunct (an optional piece of equipment that which may be located elsewhere) is
not plugged into the controller’s next highest station jack.
●A
34
Administration Manual
System SpeedCall Directory
Name/Number
Unrestricted:
Code
30
31
32
33
34
35
36
37
38
39
40
41
42
43
44
45
46
47
48
49
50
51
52
53
54
55
56
57
58
59
60
61
62
63
64
Name/Number
Code
65
66
67
68
69
70
71
72
73
74
75
76
77
78
79
Restricted:
80
81
82
83
84
85
86
87
88
89
90
91
92
93
94
95
96
97
98
99
Administration Manual 35
Intercom Extension and Group Directory
Number
10
11
12
13
14
15
16
17
18
19
20
21
22
23
24
25
26
27
28
29
30
31
32
33
34
35
36
37
38
39
40
41
42
43
44
45
46
47
48
49
50
51
52
53
54
55
56
57
36 Administration Manual
Name or Location
Group
61
61
61
61
61
61
61
61
62
62
62
62
62
62
62
62
63
63
63
63
63
63
63
63
64
64
64
64
64
64
64
64
65
65
65
65
65
65
65
65
66
66
66
66
66
66
66
66
2448 Administration Manual Index:
A
Abbreviated ring, 6, 9, 10, 21
Account codes, 25
Add function, 3
Administration overlay, 3, 10, 13
Answer only, permission, 6, 9, 10, 18, 20
Assign line, 20
Automatic line selection, 6, 9-10, 12, 19, 20, 21
Automatic privacy, 5, 8, 10, 16
C
Call forwarding, 33
Centrex line access codes, 5, 8, 10, 17
Conference, 32-33
Controller, 2
Confirmation tones, 12
Copy to function, 3, 10, 11, 22
D
Dedicated lines, 31
Delayed ring, 6, 9, 10, 21
Dial, 3; type, 5, 8, 10; pulse, 5
Drop function, 3
E
Enter admin. function, 3, 10, 11, 13-15
Erase all codes, 17; PBX/Centrex dial code, 17
Error tones, 12
External alert, 2, 5, 8, 10, 17
Extensions group, 3; intercom, 3
Exit telephone customization, 13
F
Features system, 5; telephone, 6-7
P
Paging, 33; group, 33
Parts of the system, 2
PBX line access codes, 5, 8, 10, 17
Permission answer only, 6; full, 6; no, 6
Power failures, 31
Privacy, 5, 8, 10, 16
Programmed ring, 6, 9, 10, 21
H
Hands-free answer indicator,
HFAI button and indicator light.
Held call reminder, 5
Helpful hints, 34
How to use this manual, 4
I
Intercom, 2, 3, 10, 12, 32
Incoming call report, 7, 8, 11
Indicator lights, 3
J
Jacks, LA, 31; network interface, 2; SMDR, 2
L
LA jacks, 31
Line access codes, 5, 8, 10; assignments, 6, 10;
ringing options, 6, 9, 10; types, 5, 8, 10;
use permission, 6, 9, 10
Loudspeaker paging, 2, 31
M
Memory button, 3
Music on hold, 2, 31; volume control, 2, 31
N
Network interface jacks, 2
Night ringing, 6, 9, 10, 21
Normal ring, 6, 9, 10, 21
O
Optional equipment, 31
Outside service, 7, 10; restricted, 9;
Unrestricted, 10; toll restricted, 10
G
Group extensions, 3
Group paging, 33
R
Recall button,
Remove line, 10, 20
Reported call duration, 7, 8, 11, 26
Reset system, 4, 14
Restricted SpeedCall numbers, 23
Ring, abbreviated, 6, 9-10, 21;
customized, 6, 9-10, 21;
delayed, 6, 9-10, 21; normal, 6, 9-10, 21;
programmed, 6, 9-10, 21;
night, 6, 9-10, 21; no, 6, 9-10, 21
S
SMDR call report, 4, 7, 13, 25-26;
customizing, 25; sample, 28
SpeedCall, 4, 7, 11, 23;
directories, 23; erasing, 24; numbers, 7;
print, 27; restricted, 23; storing, 24;
unrestricted, 23;
System changes, 30
T
Toll call check, 5, 8, 10, 16
Toll restriction, 7, 9, 10, 18, 22, 23, 25,
18, 22-23, 25
Touch Tone, 5, 8, 10, 17
V
Volume control button, 2
A copy of the Administration Overlay is located on page 10.
To order additional copies of SPIRIT® Communications System, Model 2448 documents,
write:
Customer Information Center
P.O. Box 19901
Indianapolis, IN 46219
or call: 1-800-432-6600
Select Code
950-232
Document Number
999-500-232
Installation Instructions,
2448 Expansion Unit
950-233
999-500-233
Installation Instructions,
Line and Station Cards
950-234
999-500-234
Administration Manual
950-235
999-500-235
48-Button Attendant Adjunct,
Instruction Card
950-236
999-500-236
User Manual
950-237
999-500-237
Reference Card (set of 10)
950-238
999-500-238
Set (1 each of the above)
950-000
Document Title
Customer Installation
Instructions, 1224 Controller
999-500-242
Administration Overlay
Customer Convenience Kit
(blank and printed telephone
set labels, plastic strips,
Administration Overlay)
999-240
999-500-240