1
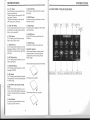
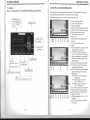
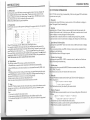
BLUETOOTH8- ENABLED IN-DASH MOTORIZED DOUBLE-DIN DVD/MP3/CD AM/FM RECEIVER WITH DETACHABLE 7" WIDESCREEN TOUCHSCREEN DIGITALTFT MONITOR WITH USB AND SO MEMORY CARD PORTS AND AUX INPUT ii\)~S BV9562B CONTENTS Bluetooth-Enabled In-Dash Motorized Double-DIN DVDIMP31CD AMIFM Receiver With 7" Widescreen Touch Screen TFT Monitor And Front Panel AIV AUX Input INSTRUCTIONS Welcome Thank you for enjoying our dj.gita1 car A/V product. To properly use this produc( please go through this instruction manual for installation and operation, put it in a safe place for fuhue use! CATALOG Warmly Suggestion- - - - - - - - - - - - - - - - - - - - - - - - - - - - - - - - - - - - - - - - - - - - - - -03 WARNING Notice Item- _________ - - - - - - - - - - - - - - - - - - - - - -- - - - - - - - - - - - - - - - - - - - - - - 04 1. Please keep the disc slot clean, wipe it off when there is some dirty on it, please wipe off the dirty on disk before slot it into the unit. If dirty on disk go into the slot with disc, that will lead unit to slow slot or cannot read disc. In fact ,that is not quality problem. Please ask professional to clean the laser. That will bring you some inconvenience . Features------- -- --- ------ -------------- --- -- -------- ------------ - ~5 l.Front Panel Function Instruction- - - - - - - - - - - - - - - - - - - - - - - - - - - - - - - -06 2.Basic Function- - - - - - - - - - - - - - - - - - - - - - - - - - - - - - - - - - - - - - - - - - - - -- - - - - 07 3.Remote Con trol Function- - - - - - - - - - - - - - - - - - - - - - - - - - - - - - - - - - - - - - - -09 4.Main menu touch operation- -- -- - - - --- - - - ---- - - - - - --- - - - - - -- - - - -11 5.RDS User Operation - - - - - - - - - - - - - - - - - - - - - - - - - - - - - - - - - - - - - - - - - - - - 15 6.Radio Operation- -- - - - - - - -- - - - - - -- - - - - - - -- - - - - - -- - - - - - - -- - -- - - --16 2. Playing disc for long time or high volume level will influence the lift of unit. To protect this unit, please work with radio, middle level volume level during long time use. 3. This unit is set up by precision parts. Please do not open the unit or adjust any parts inside unit by yourself. 4. Please do not touch LCD display by hard object to protect in from scratch. 7. A u di 0- ___ - - - - - - - - - - - - - - - - - - - - - - - - - - - - - - - - - - - - - - - - - - - - - - - - - - - - - - - 17 8.Disc Play Touch Operation- - - - - - - - - - - - - - - - - - - - - - - - - - - - - - - - - - - - - -19 5. TO avoid accident caused by scatterbrain, driver should not operate this unit or watch its screen. If needed, please park the car in a safe place before operation. 9. DVD Basic Opera tion- - - - - - - - - - - - - - - - - - - - - - - - - - - - - - - - - - - - - - - - - - -24 10.V CD Basic Op era tion- - - - - - - - - - - - - - - - - - - - - - - - - - - - - - - - - - - - - - - - - -27 6. This unit is for 12V and negative ground system car, please do not connect it directly in 24V truck or bus. 1l.CD Basic Operation- -- -- - --- - --- - ---- - - ---- - - - - - - --- - - - --- -- - ~ -30 12.MP3/USB/SD Operation--- - - - - - -- - - - - - -- - - -- - - -- --- - - --- - - - - - - ·32 Note: We keep improving this product, if there is any change, forgive us do not announce. 13.Bluetooth Function Instruction - - - - - - - - - - - - - - - - - - - - - - - - - - - - - - - -33 14.0th e r P I a y Mod e - - - - - - - - - - - - - - - - - - - - - - - -- - - - - - - - - - - - - - - - - - - - - - -3 5 15.Troub Ie Shooting - - - - - - - - - - - - - - - - - - - - - - - - - - - - - - - - - - - - - - - - - - - - - -36 16. Wiring Diagram- - - - - - - - - - - - - - - - - - - - - - - - - - - - - - - - - - - - - - - - - - - - - - - -37 17. S P e ci fi ca ti ons_ - - - - - - - - - - - - - - - - - - - - - - - - - - - - - - - - - - - - - - - - - - - - - - - - -38 18.Accessory__________________________________________ ------------ 39 19.5etup NeedPassword - - -- - - - - - --- - - - - - -- - - - - - -- - - - - - - --- - - - - --39 02 03 INSTRUCTIONS INSTRUCTIONS NOTE • FEATURES This unit can play the following disc: DVDPLAYER MODE CONTENT DISK SIZE DVD Sound, image 12CM VCD Sound,image 12CM 1.MPEG-4 Decoder Teclmology 2.CompatiblewithMP4(AVI/S.X),DVD(DVD-R/DVD-RW),VCD,SVCD,CD-RW, WMA,MP3,JPEG 3.Supporting Multiles Subti tIes, Angles, Languages 4.Child lock function S.4-Channel Audio Output 6.Pause, play, UP/Down, Stop, Zoom, PBCFunction RADIO MP3 Sound only 12CM CD Sound only 12CM Note: 1. This unit is compatible with MP4/DVD/VCD1.0/2.0/3.0 version, DVD, CD-R, CD-RW, MP3, WMA, JPEG. 2. When play DVD, VCD, MP3, CD disc, display will auto identify the disk and show corresponding word. When appear on display, that means no that function, please choose other function. Detailed operation please refer to other related instructions . 1.AM/FM Radio Tuner 2.30 Radio Preset Stations (18FM, 12AM) BULETOOTHFUNCTION 1.Bluetooth wireless transfers 2.Displaying bluetooth paring and connection status, call status, and caller's ill 3.Fastperformance, fast connection, accurate and sensible search of devices in range 4.supportA2Dp, AVRCp, HSIHF for handing calls and playing music lliJ • It may lead to accident if you are going to change unit. .Playing disk during car run on bumpy road will damage laser. Playing substandard disk or damage disk will damage laser . • The environment of inside car is not good, too much dirty, please clean the laser by laser cleanser timely. .00 not work under terribly hot or cold environment, please ensure the temperature in car is in -20 'C ~ 60 'C . • During operation, if lliJ appear on LCD, that means unit do not support that function, operation is invalid . • When unit is showing some abnormal, please refer to TROUBLE SHOOTING in this instruction manual, If you cannot find any solution, please press RESET to resume to initial status. 04 05 INSTRUCTIONS INSTRUCTIONS 2.BASIC FUNCTION 1. Front Panel Function Instruction I~ f===d ~ 1. SRC Button Press this button shortly to power on, press this button lon ger to power off. In normal situation, press SOURCE button can return to the m ain menu . @: 2. DBAS Button Pre ss thi s button to base on /o ff. ®--©----p.' @_ ;:[I CD L ~; I i-i "~ I l=re~=+~illL~ o 5 6 CD 1. SRC Button 2. DBAS Button 3. VOL- Button 4. VOL+Button 5. MUTE Button 6. Disc eject button 7. UP Button 8. DNButton 9. Remote Control Receiver 10. RESET Button 11. MIC Input 3. VOL- Button Press this button sh ortly d ecrease vo lume level one step by one step . Press this button lon ger d ecrease vol ume level continuou sly. 4.VOL+ Button Press this button sh ortly in creas a volume level one s tep by one step. Press this button lon ger increase volume level continuou sly. 5. MUTEiTFT on/off Button Press this button to shut off sound output, repress th is b utton to resume sound o utput; Press this button longer to turn on/offTFT LCD d isplay. 6.Disc eject button Firstly press REL button on the panel, then press this button to eject the disc. 7. DNButton Short press this bu tton to m ake the m onitor glide d own steply; Long p ress thi s button to m ake th e mon itor glide d own to the lowest position . S.UP Button Short press this bu tton to m ake the monitor glid e up steply; Lon g press this button to make the m on itor glide u p to the top position. 9.Remote Control receiver It is able of receiving infrared signals launched by the remote control m atching the unit. 06 07 INSTRUCTIONS INSTRUCTIONS 3. REMOTE CONTROL FUNCTION 10.RESET Button Press this button and this unit will be restored to the initial state. fJ 3. SOURCE Button Press this button to choose audio sources. EJ l1.MIC Input Bluetooth MIC input. 4. EQ Button ---Press this button to choose POP, ROCK, CLASS, EQ off. 5. SEEK + ( -.) I SEEK - (-- ) Button Press this button to manual turning, speed or quick back, previous song and next song. BASE @ @ @ 6. VOL + ( - ) I VOL - ( - ) Press this button to increase or decrease volume level. 7. SEL Button Press this button to choose sound feature. ~ II fJ EJ II D III 12. Disc slot 13. Slot indicator light 14. SD Slot POWER ON / OFF Em 8. LOUD Button Press this button to startup LOUD function. AMS/ RPT VOL+ / VOL m TITLE m AUDIO m SET PLAYING TIME mI SUBTITLE m PBC / MENU ED UP/ DOWN / L/ R ENTER III D ml LOUD m SLOW BAND/ PIN fE ANGLE IE IE! PLAY / PAUSE 1m 0-10+ MUTE SOURCE EQ SEEK+ / SEEK o SEL LOC / RDM m STOP ST / PROG m SETUP m OSD m ZOOM m MENU 1. POWER Press once to switch on, press again to switch off. 2. MUTE Button Press once to turn off audio output, press again to resume volume leveL 08 9. BAND - PIN Button In radio mode, press this button to choose band. In VCD, DVD mode, press this button to choose AUTO, PAL or NTSC system. 10. LOCIRDM Button In radio mode, press this button to switch between local and direction. In VCD, CD mode, press tlUs key to randomly play. 11. STOP Button Press this button to stop playing. 12. PLAYIPAUSE Button Press this button to switch between play and pause. In stop mode, press this button to play. 13. STI PROG Button In radio mode, press this button to choose stereo or mono station. In audio mode, it can help STOP button to programmed play. 09 INSTRUCTIONS INSTRUCTIONS 14.0 - 10 + Button Press this button to choose desired song, section, preset stations. * Decimal numbers, for example the 19th song, press 1,9 button; * Centesimal numbers, for example, the 120th song, press 1,2,0 button. 23. ANGLE Button In DVD mode, press this button to change play angle. 15. AMS / RPT Button In radio mode, press this button to browse stored stations. In audio mode, press this button to play repeatedly. 25. OSD Display Press this button to display the title chapter and the left time. 4. MAIN MENU TO~H OPERATION 24. SETUP Button In audio mode, press this button to choose different set items. 26. ZOOM Button In DVD/VCD mode, press this button to ZOOM in. 16. TITLE Button In DVD mode, press this button to play back to the top menu of disc. 17. AUDIO Button In DVD mode, press this button to switch language of dialogue. In VCD mode, press this button to choose left track, right track, and stereo. 18. SET Playing Time In DVD mode, press this button, you can define playing time. 27. MENU Button Press button to back to the mil-in menu . BATTERY CHANGE When control distance of remote control becomes shorter or no function, please change battery. Please confirm polarity before change. One hand press stopper, then pull out battery. 19. SUBTITLE Button In DVD mode, press this button to switch language of subtitle. 20. PBC Button In VCD mode, press this button to display all song menus, work with number button to choose songs. 21. UP, DOWN, LEFT, RIGHT, ENTER Button In DVD mode, press this button to move cursor up, down, left, right to choose item in menu. Press the enter button to confirm choice. I BLUETOOJHl I TV(Optional) II AUX INPUT IICD OOptional)IIIPOD (Optional)1 . Put battery mto controller. Insert battery holder into controller. 22. SLOW Button In audio mode, press this button to slow backward and slow forward. 10 11 ---- INSTRUCTIONS INSTRUCTIONS Learn steering wheel control operation as follows OSDSETUP In the main interface, touch _ Into following interface. Isteering wheel setup I ~~xit t. :-ii ~ [TOuch calibration setup I (IQj} =-" I '~'-- ~/ RADII') I GENERAL SETUP 1 '~ e) ,...---~:\ ~' Olur.rOOTH ~::;:~~~ Isystem setup IJ I~ i' ~ .--I ~ Iradio frequ ency setup I [ TV setup I.-t.= ',--_J . , -, ~'-"\ I\-...._=-~) (~. <~:.) -~;/ DvD . ,\ 0:-\) (I,~~) [fune!§Pl (;;P'~1 IV 8 1 ', . : 0» ) ( - \ \.--~/ CDC ) -~/' l.pls connect the positive pole/negative pole from origin steering wheel control wire rightly to our unit,power on that unit to that menu as above picture showing,click the setup button. Exit Touchcalibration: --.J mI m \ ;E;---- I !.,NtiI.· ~ '1IiII ':.1" It¥.I' [. "3 Touch the center of"+" to calibrate when the position misgrated. System Setup:click this button,then input password"888888".Click"OK"into systemsetup, press relevant button to choose on/off.Press "OK" button to confirm. 2.after enter into the setup,click "steering wheel" button like as picture show. Radio frequency setting According to differ ent area to choose frequency , pIs as blew pic: Emopc -:::l~~ ::t USAl JAPAN &l11:.i USA2 RUSSIA 3.enter into steering whe~l control setup manu. -:'1 'i..-' TIME DISPLAY AND ADJUST Time display: Touch main menu into adjust mode, and press time setup button, then the corresponding function will be display in yellow words. (1)Press "+" on hour setup to add hour, press "-" to reduce hour; (2)Press "+" on minute setup to add minute, press "-" to reduce minute. NOTE: Touch the correspondence function, it will be showed in green background. The unit include two times system: Europe time (24 hour setup), America time (12 hour setup), It indicate morning time while show the AM wark, and it indicates afternoon time while show the PM mark. 12 4.make a note for origin car steering wheel control function. INSTRUCTIONS INSTRUCTIONS ~ KII(92 ~ 20235'1 3 1.5saV 2 0 oo<)v 3 S.RDS USER OPERATION 4 J, S68V K2 1 I) OOIW Short press on this button to increase radio frequency; longer press on this button to seek radio channels frequency increased direction. J. S68V 4 J 490'1 1 01 C" • sec ENTER RESET ALLOCATE 5.(1)press the button step by step on car steering wheel control and write it down,then click "allocate" button on our unit like as picture show (2) click number"1" to choose that function according to car origin steering wheel control function Short press on this button to decrease radio frequency; longer press on this button to seek radio channels frequency decreased direction. 6.(1)as pircture indicated,click "voice" in the screen(position 1), then choose the same word in the choose screen. (2) click the" confirm" button in the screen, then finish the setup. (3) like picture show, click" confirm" button in order to keep save, click "3" to return 2PWR 4 MODE !) CH+ SEEK. 2 VOl.. S MODE ~ 'IOl" CH + ~.t:EK- Press this button to adjust angles of the monitor . . ---~ ~ 6 ~ 3 CH I~ this button to resume sound. SEEK~ Press this button each time, it will automatically execute the following operation in an order of FMI ~ FM2 ~ FM3 ~ SRC In the radio state, press "APS" button, it will automatically seek radio 7.like picture shows, click position 1 to choose what function button you revise , click position 2 to make revise to them. channels in the whole band and preset the strongest radio channels. AMI Press TA, When TA is on, it means the urn t is automatically track RDS radio channels 8.click area 1 to delete all steering wheel control, and reset all steering control function under re-do the above mentioned 14 15 ~ AM2 INSTRUCTIONS INSTRUCTIONS RDS 6. RADIO OPERATION 1. Band selection In radio mode, press BAND button, BAND/P/N button on remote control, or touch position of switch bank position every time to choose band, the sequence is as follows: FMl L ---+ FM2 ---+ AM2 + - AM1 FM3 ..J 2. Adjust frequency Manually adjust frequency: Press SEEK + button on remote control, or ~ touch button on display shortly every time, frequency will increase one step by one step till you get desired frequency. Press SEEK button on remote control, or ~ touch button on display shortly every time, frequency will decrease on step by step till you get desired frequency. Search station: Press SEEK + / SEEK - button on remote control, or ~ / ~ touch button on display Longer every time to search station in up/down direction. When get one station, it will auto stop searching. 3. Browse / Auto search and store station I)In radio mode, press AMS/RPT button on remote control, or APS button on display shortly to browse preset station on 1-6; 2)In radio mode, press AMS/RPT button on remote control, or APS button on display longer to auto search in whole band from present frequency and store 6 most strong frequency on 1-6; 3)This unit has FMl, FM2, FM3, AMI, AM2 band, Each band can preset 6 stations, total 30preset stations. Note: After preset station, unit will cancel the former preset stations. 4. Mono/Stereo Selection In radio mode, press ST/ PROG button on remote control or ST touch position on display to choose mono/stereo program. Note: In radio mode, start up the stereo function automatic, touch the ST button again on the display, the TFT display will show the ST OFF & MONO mark, that is to tum off the stereo. When the right under foot appear the MONO mark, it show the MONO on. 5. Manual preset and store station In radio mode, press 1-6 button on remote control, or 1-6 position on display longer to store preset frequency into preset channel. For example, the present frequency is 89.8MHz, press 2 button longer, then 89.8MHz frequency is stored in 2 channel. 16 1. EON (RDS Mark) Indicate main unit is on auto tracking RDS mode. 2. AF (RDS Auto Tracking Mark) Indicate radio is auto tracking RDS channel. 3. TA (RDS Signal Increasing Output) Indicate RDS channel have signal increasing output. 4. TP (RDS Channel Stereo Mark) Indicate RDS channel is on stereo playing mode. 5. POP.M (RDS Channel Mark) Indicate RDS channel name. I. RDS Tracking System Press AF button in FM mode, and then press ~ / ~ last 2 seco nds, RDS will auto search channel up and down, it will stop searching when RDS channel be founded, but "AF" will keep remaining on the screen and waits for the next traffic emergency report. II. RDS Tracking on Playing Mode In playing mode, "AF" tracking system keeps on opening and waits for traffic emergency report. l)PTY: RDS button, press once will show music mode POp, press 1-6 function memory button, every group have 2 channel. POPM ROCKM EASYM LIGHT M CLASSICS MOTHER M JAZZ COUNTRY NATION 2)Press PTY button twice and then press 1-6 function memory button, every button have 3 channel. NEWS AFFAIRS INFORMATION SPORT EDUCATION DRAMA CULTURE SCIENCE CHILDREN SOCIETT TELIGION PHONING TRAVEL Note: RDS channel in broken line is available. AF : RDS auto search button, in radio mode also can press this button shortly auto tracking RDS channel, press this button shortly can cancel RDS function. TA: In RDS mode, press this button can output TA signal, and check RDS channel is exist or not, if no RDS signal TFT will show "NO. TA. TP" . 17 INSTRUCTIONS INSTRUCTIONS 8.DISC PLAY TOUCH OPERATION 7. AUDIO Press "version set up" to entry the interfaces as below: When playing disc, touch any position of the screen, it will display the function menu; touch the menu and the operation of relative function will display. Note: When loading a disc, touch screen function can not be used. Bass choosing: when touched the button will be yellow, touch this button to exi t, touch it again to resume. 1. Click to choose play/pause 2. Click to reduce the volume 3. Click to stop playing 4. Click to choose the speed of quick back 5. Click to choose the speed speeding play 6. Click to leap backwards to play 7. Click to leap upwards to play 8. Click to exit 9. Click to enter the next page to setup the menu 10. Click to increase the volume 11. Audio 12. Click to display title, chapter, the time already played, the time left 13. At MP3 mode, press this button so . you can move the cursor to left/right / up/down and select the songs which in the system menu. then press " OK" button to enter. 14. Click to enter next page set up menu 15. In DVD mode, touch this button to return the directory menu. 16. Click this button to switch to different angles of playing picture in the disc. 17. Repeat play [ Back main menu [ \' ,.1 Adjust front and rear speaker Adjust left and ri ght speaker EQmode From POP - ROCk ] L Off - Change the listening position Classic [ Video:Standard DVD: Title Repeat - Chapter Repeat Repeat playoff VCD: Single song repeat - Full disc repeat - Repeat playoff MP3: Single song repeat - Directory repeat - Repeat playoff Loud : Press once loud on, press aga in to turn off . @ 18. Click on this button to enter title menu 19. Click this button to choose language, 20. click this button and the screen will display 0-10 button. 21. Click this button to ZOOM in/ ZOOM out the picture. 22. Click to enter the menu of operation for touching. 18 19 INSTRUCTIONS INSTRUCTIONS DVDMODE + In DVD interface, touch setup"-""button into the audio/video setup interface as following. AUDIO SETTING ON TOUCH SCREEN 'f 23. Click this to choose mode as below: VOL-BASS-TRE-BAL-FAD, after your desired mode is selected, touch VOL+jVOL- to adjust the volume. 24. Press this button to adjust angles of the monitor ~ I 25. Back main menu. 26.Color adjustment 27.Click to select your desired song or chapter 28. Return to the menu one level Note: 1. When playing VCD, if PBC FUNCITION is on, repeat play is not available. 2. PBe is only suitable for VCD. 3. For VCD disc with play memory, you can use the PBC function; 4. Press PBC in the remote control, Play/Off PBC, press one time to play from the first song; 5. When PBC is on, you can choose speed forward or backward, leap forward or backward, but repeat play is not available. 6. When PBC is on, choose casual play, scan play or search play, PBC function will close automatically. EQ mode: Touch the button to change settings: pop - ROCK- CLASSIC OFF Audio selection: VOL - BAS - TRE - BAL - FAD t I t Vihen using this function, the position bar will be highlighted. Change the listening position "1, Loud choosing: this function is defined :\1 open, when it is touched at the first time, Bass choosing: when touched the button will be yellow, touch this button to exit, touch it again to resume. the loud function will be closed, at the same time, yellow light disappear. 20 21 I INSTRUCTIONS INSTRUCTIONS VIDEO SETTING ON TOUCH SCREEN Calibration to re-gain touch + Please follow the below instructions to calibrate when there is no touch or touch is not accura teo You can choose: Brightness, Contrast, Color, Hue, adjust the image effect according to your sight. The blue bar will show your level. Step 1 :Press the mode button in the unit to switch to DVD mode. Step 2: Insert a DVD disc, after DVD is loaded, press the stop button " ~ " ( as show in picture 1.) in the remote short, the uni t will display as show in picture 2. Picture (1 ) Picture (2) 8" Step 3: Press" in the remote as show in picture (3), the unit will display as show in picture (4) Picture (3 ) Picture (4) Step 4 :Press" ... "button in the remote and then quickly press " T "button and you will enter the touch calibration interface. Video mode: When using this function, the position will be darker on the screen. Image mode: You can choose the area in the broken line on the panel, standard, defined, soft, according wha t you need to choose, the blue back light will disappear. Picture ( 5 ) Picture (6) Step 5: User the touch pen to touch the center of the cross cursor, the cross cursor will move from the center to top left comer, top right comer, right down, left down, when the cross cursor stop at each comer, touch the center of the cursor. Then the panel will display OK and leave the calibration interface and the unit regained touch. Picture ( 7 ) III 22 23 INSTRUCTIONS INSTRUCTIONS 9.DVD BASIC OPERATION Slot in DVD disc, unit will play it automatically. If disc is in slot, press DVD touch button on main menu can to play. 8.0SD In playing mode, short press OSD on remote control to show all information of present disc. 1. Pause play In playing mode, press ~I button on remote control, or ~I touchbutton on display to pause. Press again to back to normal play. 9. Repeatedly play In play mode, press AMS/RPT button on remote control to start up follow repeat function. Repeat (chapter) ~ Repeat (section) ~ Repeat (off) 2. Stop play In playing mode, 1) Press -/ ) button on remote control to enter the pause mode, the position will be stored in unit. At that time, press ~I button on remote control or touch button on display to resume playing at the stored pOSition. 2) Press _/) button on remote control twice to enter into stop mode, here, press ~I button on remote control or touch button on display, unit will play from the first song. 10. Angle switch If the DVD disc is recorded with multi-angles, you can press the ANGLE button to switch the angle during playing. The sequence is as follow: ANGLE 1 - ANGLE 2 - ANGLE 3 Note: 1. It just can be worked by the remote control. 2. It is only for the DVD disc which has multi-angle. . 3. If there is a ~ sign on the cover of the DVD disc. The number in the sign means how many angles the disc has . 4. You can not switch the angle when slow playing. 3. Speed forward / backward play In playing mode, press SEEK + button on remote control, or ~ touch button on display to speed play. When you need quick back, press SEEK - button on remote control, or ... touch button on display to quick back play. Note: Hold above button a bit longer to operate. t I 6. Slow play 1l.Multi-audio There are different languages of dialogue and audio systems in DVD disc. If the DVD disc is recorded w ith multi-audio, you can switch the language of dialogue and the audio systems when playing. . Press the AUDIO button repeatedly to change the language of dialogue. Note 1. It just can be worked by the remote control. 2. It is only for the DVD disc which has multi-language. 3. If there is a 0»)) sign on the cover of the DVD disc, 0»)) means that it was recorded by multi-language/audio system. 4. In VCD mode, press the AUDIO button to select the L/R or STEREO track. Press SLOW button on remote control to slow play. The level of slow playing is as follows. Sequence is : SLOW 1/2 ~ SLOW 1 /3~SLOW I/~SLOW 1/5 If the DVD disc is recorded with multi-subtitle, you can switch the languages of subtitle. 4. Previous / next song play In playing mode, press SEEK + / SEEK - on remote control, or »I / i+I touch button on display to choose next/previous song. 5. Switch system In playing mode, short press the BAND/PIN button on remote control, to select PAL, AUTO, NTSC TV system. Note: This function can only be worked by the remote control. L PLAY ..- SLOW Ifl ..- SLOW 1/6 ..J Note: This function can only be worked by the remote control. 7. Zoom in / Zoom out Press ZOOM button on remote control to zoom in / zoom out the picture. The levels are as follows: ZOOM IN 2 ~ ZOOM IN 3 ~ ZOOM IN 4 ~ ZOOM IN 1/2 L Note: ZOOM IN OFF ..-ZOOM IN 1/4..-Z00M IN 1/3..J 1. This function can only be worked by the remote control. 2. Image which is zoomed in can be moved by up/down/ left/right cursor to move. 3. Image which is zoomed out cannot be moved. 24 12.Multi-subtitle Press the sub-t button repeatedly to change the language. Note: l. It jusfcan be worked by the remote control. 2. It only for the DVD disc which is recorded with multi-Subtitle 3. If there is a W sign on the cover of the DVD disc Wmeans that it has several subtitle. 13. Title select In DVD mode, press TITLE button to back to the title menu. Display shows all the titles of the disc. You can select the chapter you want by the cursor, press play button to play the chapter. Note: It just can be worked by the remote control. 25 INSTRUCTIONS INSTRUCTIONS 14. MENU select In playing mode, press PBC button on remote control to back to the menu, display will show chapter and section in disc. Work with A. / 'f button on remote control or touch button on display to choose your desired song. Press ~I button / ENTER button to play. Note: This function can only be worked by the remote control. OPEN: Press OPEN button on panel to eject disc. 15. Program play In OVO mode, you can set the sequence of playing by the program function, the operation is as follow: PROG TC TC TC TC 1 [[1]:[[]] 5 9 13 2[[1]:1tiJ 6 7 8 10 14 11 12 15 PLAY DELETE 3 4 16 When OVO is playing, press ST / PROG button, then display shows: For example, program the first song, input 01, press" button move the cursor to the second lattice, input desired song, for example, the third song. Program the second song, press 'f button, move the cursor to 2 Id--. input 01, press .. button move the cursor to the second lattice, input desired song, for example, the 6"' song (press 6). Press ~I button to program play. Back to the normal mode, press the ST/pROG button, then press ~I button. Note: This function can only be worked by the remote control. 16. Digital album Play the disc contains JPEG pictures, read the picture menu first. 1. Press ~I button on remote control, the pictures will be browsed automatically. 2. Press ENTER button on the remote control, it can be manual browsed by SEEK + and SEEK -. 3. ZOOM in picture function: During auto browsing, press pause button stop the screen, press ZOOM button to zoom in or zoom out the picture. During manual browsing, you can press ZOOM button to zoom in or zoom out pictureAdirectly. 4.Under zoom in picture, you can move the picture by ... ,~ . Note : You can not move picture in normal mode and zoom out mode. 10. VCD BASIC OPERATION Slot in VCO disc, unit will play it automatically. If disc is in slot, press OVO touch button on main menu can to play. 1. Pause play In playing mode, press ~I button on remote control, or pause. Press again to back to normal play. 26 touchbutton on display to 2. Stop play In playing mode, 1) Press -/) button on remote control to enter the pause mode, the position will be stored in unit. At that time, press ~I button on remote control or touch button on display to resume playing at the stored position. 2) Press _/) button on remote control twice to enter into stop mode, here, press ~I button on remote control or touch button'on display, unit will play from the first song. 3. Speed forward I backward play In playing mode, press SEEK + button on remote control, or ~ touch button on display to speed play. When you need quick back, press SEEK - button on remote control, or ... touch button on display to quick back play. Note: Hold above button a bit longer to operate. 4. Previous I next song play In playing mode, press SEEK + / SEEK - on remote control, or display to choose previous/next song. ~ /~ touch button on 5. Switch system In playing mode, short press the BANO/P/N button on remote control, to select PAL, AUTO, NTSC TV system. Note: This function can only be worked by the remote control. 6. Slow play Press SLOW button on remote control to slow play. The level of slow playing is as follows. Sequence is : SLOW 1/2 - 17. Setup Press SET UP button, display will show the system set up menu and the submenu, select the item you want by ... A~ ,after selecting the proper item, press A. /'f /"'4/" to press ENTER to confirm. ' Note: 1. It just can be worked by the remote control. 2. Some function setting maybe different because of the different model or disc. 3. If the selected language is not recorded in the disc, then unit will show the appointed language. ~I L PLAY SLOW 1/3-SLOW 1/4---+ SLOW 1/5 ~ SLOW 1/7 - SLOW 1/6 . J Note: This function can only be worked by the remote control. 7. Zoom in I Zoom out Press ZOOM button on remote control to zoom in / zoom out the picture. The levels are as follows: ZOOM IN 2 - ZOOM IN 3 - ZOOM IN 4 - L ZOOM IN 1/ 2 Note: ZOOM IN OFF _ ZOOM IN 1/ 4 ZOOM IN 1/3 . J 1. This function can only be worked by the remote control. 2. Image which is zoomed in can be moved by up/down/left/right cursor to move. 3. Image which is zoomed out cannot be moved. 27 INSTRUCTIONS INSTRUCTIONS 8.0S0 In playing mode, short press OSO on remote control to show all information of present disc. 9.Number button In VCO mode, press 0-9 number button to input song. For example, you want to choose 13" song, press 10+ button, and then press 3 button once to play 13" song. Note: This function can only be worked by the remote control. 15. VCO program play.ing In VCO mode, you can set playing sequence of songs by program play function. The program playing operation steps are as follows: In VCO mode, press ST/PROG button, display will show; PROG TC 2 3 10. Repeatedly play In playing mode, press AMS/RPT button on remote control, to startup following, repeat function. Single song repeat- Repeat playoff. Note: 1) When playing VCO disc, if PBC is on, no repeat function. 2) After unit is power off or mode is switched to other playing mode except VCO mode, if you switch back to VCO mode, repeat playing will be cancelled. 11. Randomly play In VCO mode, press LOC/ROM button on remote control, to .instantly play each song. 4 - - :- - TC TC TC 5 9 6 7 8 PLAY 10 - - : - 11 12 DELETE 12.Switch Track In VCO mode, press AUDIO button on remote control to switch track as following Left t --+ Right --+ 13 - - : - 14 15 16 Input the songs which you want to programmed by the number buttons on remote control. For example: Program the first song, input your desires song, for example, the fourth song, and press number button 4 on the remote control. Program the second song, press ... button move the cursor to 2 bd-- . Input your desired song, for example, the eighth song, press number button 8 on the remote control. Press ~I button to program play. Back to the normal mode, press the ST/pROG button, then press ~I button. Note: Thls function can only be worked by the remote control. Press again to back to the normal play. Note: When playing VCD disk, if PEC is on, RDM will not wo rk. sequence: - Stereo I 13. OPEN Press OPEN button on panel to eject disc. 14. PBC (MENU) play In VCO mode, press thls button then play the PBC and display will show whole menu in disk, work with number button to choose song. When you are playing either song of the PBC, and you want to stop to select another song, press the button to turn off. Note: 1) This function can be wo rked by the remote control 2) PBC is suitable for the SVCO and VCO 2.0 disc. 3) In PBC mode, you can not press number button only to choose song. 29 INSTRUCTIONS INSTRUCTIONS 10. CD program play 11. CD BASIC OPERATION Slot in CD disc unit will play it automatically. If disc is in slot, press DVD touch button on main menu can to play. In CD mode, you can set the sequence of playing by the program function, the operation is as follow: When CD is playing, press ST/PROG button, then the display shows: 1. Repeatedly play In CD mode, press AMS/RPT button on remote control, to startup following, repeat CD disc: Single song repeat--- Repeat playoff. fRUG 2 2. Speed forward / backward play Press SEEK + / SEEK - button on remote control, or ~ / +4 touch button on display to 3 4 speed forward or backward playing. Note: Hold above button a bit longer to operate. 3. Previous / next song play In playing mode, press SEEK + / SEEK - on remote control, or ~ / ~ touch button on display to choose previous/next song. 4. Pause play In playing mode, press ~I button on remote control, or ~I touchbutton on display to pause. Press again to back to normal play. TC TC 5 TC TC 9 13 6 10 14 7 8 11 12 PLAY DELETE - - : - - - - : - - In playing mode, 1) Press _/) button on remote control to enter the pause mode, the position will be stored in unit. At that time, press ~ I button on remote control or touch button on display to resume playing at the stored position. 2) Press _/ ) button on remote control twice to enter into stop mode, here, press ~I button on remote control or touch button on display, unit will play from the first song. 6.0SD In playing mode, short press OSD on remote control to show all information of present disk. 7. Randomly play In CD mode, press LOC/RDM button on remote control, to instantly play each song. Press again to back to the normal play. 8. EQ mode 1) This function can only be worked by remote control. 2) When playing CD, press the /I EQ /I button on the remote control, you can choose the sound mode. 9. OPEN Press OPEN button on panel to eject disc. 30 - : : - - -- Input the NO. of the song you want to program by the remote control, program the fi rst song, input your desired song, for example, the sixth song, and press number button 6 on the remote control. Program the second song, press T button move the cursor to 2 [_ J. Input your desired song, for example, the ninth song, press number button 9 on the remote control. Press ~I button to program play. Back to the normal mode, press the ST/PROG button , then press ~I button, Note: This function can only be worked by the remote control. 5. Stop play J 15 16 - 31 INSTRUCTIONS INSTRUCTIONS 13. BLUETOOTH FUNCTION INSTRUCTION 12. MP3/USB/SD OPERATION 1.Enter/exit Touch -- - II on main menu interface to enter Bluetooth interface; 1 5 2 6 9 -. * CHANGE 1. Insert SO card or USB, MP3 disc; click the name of the song directly to select the song you want to broadcast. If there are pictures or video document in the disc or SO card, you can select the relative icon to broadcast. 2. Playback MP4 files,the touch screen~ into the MP4 format,you can click directly Or through remote control and touch button to choose the direction you need MP4 repertoire. 3. This interface of OVD touch function will display if you click on KEY (Please refer to the instruction of OVD touch function) NOTE :By a remote control 0 / '\ stop button to return to the playback screen. 1. Pause play In playing mode, press ~I button on remote control, or ~I touch button on display to pause. Press again to back to normal play. 2. Previous / next song play In playing mode, press SEEK + / SEEK - on remote control, or ~ / ~ touch button on display to choose next/previous song. 3 7 4 8 a # ~ + PAIR VOlA\' IHand-free keYI NOTE F EXIT g-upkey! Press IC'Iwill exit Bluetooth interface and return main menu interface. 2.Matchlconnection If you want to use Bluetooth function, you must establish a cOlU1ection first. Matching unit with Bluetooth cell phone .. [operation way] Set your cell phone to Bluetooth mode, and use cell phone to search equipment. After Bluetooth equipment of this unit has been search by cell phone, cell phone will Ask you for Bluetooth matching password .. touch matching setup button on unit and input Bluetooth Password (OOOO) on cell phone and confirm it. Cell phone will note to whether authorize Connection with this equipment. Please select "yes" . cell phone will auto establish connection with Bluetooth of the equipment within 20seconds. Under any mode(radio, DVD etc. if there is an incoming call to your cell phone, the unit will switch from current statue to Bluetooth. It will automatically restore current mode after hang-up. Note: ifBluetooth equipment matching with this unit correctly, it will display "LINK OK" otherwise it display "NO LINK". 3.Dial 3. Speed forward / backward play Press SEEK + / SEEK - button on remote control, or ~ / ~ touch button on display to speed forward or backward playing. 4. Repeatedly play In CD mode, press AMS/RPT button on remote control, to startup following, repeat Mp3 disc: Single song repeat~ Oirectoryrepeat ~ Repeat playoff. 32 You can use cell phone or touch digital key on display to input telephone number. If input wrong, you can press to delete. After enter telephone number, press ~ to dial.. Touch_ to hang-up. During call period, press "CHANGE" will let phone sound switch between speaker of unit and speaker of Phone. -==- INSTRUCTIONS INSTRUCTIONS 14.0THER PLAY MODE 4.Incoming display If there is incoming, under any mode, system will automatically switch to Bluetooth hand-free function interface. And it have incoming sound and incoming display note you to answer telephone. 5.Answer phone When there is an incoming call, Touch ~ to connect and touch to refuse to connect. AUX IN OPERATION 1) Press "Source" buttonon remote control or touch "AUX" on the touch screen, switch to AUXmode. 2) Make video input plug connect to AUX video input outlet, audio input connect to AUX audio input outlet. 3)This unit only supply Ipcs video input & 1 pair audio input. 6.Calllogs - Under Bluetooth mode, press call logs button will enter call logs interface, as following: iii:' 13. DIALED CALL RECEIVED CALL IJ? CHANGE ~ MISSED CALL PAIR VOIAL N01E EXIT (1 )Press [dialed calls) function posi tion, you will search telephone number which you have dialed. (2)Press [received calls) function position, you will search telephone number which you have answered (3)Press [missed calls) function position, you will search telephone number which you have missed. 34 CCD (Car backsight function) 1) If there is a car back camera on your car, please connect car back control line "BACK" to your car camera control terminal, and connect video input line to the video output terminal of your car camera. 2) When car is back, the unit will auto switch to CCD mode, and there is a " [IT] " appeared on the screen. 3) You can set CCD image according to your car's own position in general setting mode. INSTRUCTIONS INSTRUCTIONS 16.WIRING DIAGRAM lS.TROUBLE SHOOTING This player is equipped with ISO standard cormector, please follow below instruction: PROBLEM Can not power on SOLUTION CAUSE Check whether power fuse melt or not Change fuse same as the old one Some factor cause MPU wrong operation Press RESET button on the panel by pen point, then, power on • Red - ACC ON (+12V) • Grey/Grey black - Right front speaker (+/-) • Yellow -]2 V Constant • White/White black - Left front speaker (+-) • Black - Ground wire • PurplelPurple black - Right rear speaker (+/-) • Bl'ue - Power Antenna / Remote Amp Turn On • Green/Green black - Left rear speaker (+/-) • Orange - Back-Up Camera Trigger (+) After ignition Wrong connection between switch off, setting ignition line ACC and power information all lose line anode pole BAIT Reconnect line Remote control no function No enough power supply from battery Change battery of remote control Poor performance of radio station Improper set of length of antenna, poor connection of antenna grounding Check whether antenna is connected or not, or poor connection Can not load disc Can not play disc There is a disk inside NOTE:8e sure the unIllS coMccted 10 a 12Volts Bal1ery with Negatlva Gro""d.l\'lre marked SPEAKERI-jmusl be conn,aed wtthl-jSPEAKER, or else,the product may be damaged. .. ~ =-~= Eject disk ,then, slot in new disk. Disc is scratched Change new disc Put wrong side of disc into unit Slot in the disk with sign side up [D)CfF en- .. cu,........fWlldI B, 1--------- Darl:gray wUbred-whll. up: lronIRCAoulpUl(redrlghl .....h.Uelell) Grey wllh red-while lip: tllr RCA OUlplIl(ri'd rlg bl while leh) 81~ck wuh tad-whit. tip: AUX ud lo In pullred tl9ht W hU81~(11 Brawa with bNl WDl ip s llhwoo[e r all tPllt(apllonall '~ ~ • No image Lens has dirty Clean lens by lens clean disc There is only one language/ subtitle in disc Video line between unit and TV is not properly connected If disk is not with multi-language/subtitle, it cannot switch language/subtitle Reconnect lines """ "'" ,"""" "" ""' :~ GRIDI IBI..I.C!i FURI'U": illUDI Lt!I/nI" RIJhI ,... 6I\£T '~_' ~""I~ PWU: - Can not switch language/subtitle • Pink - Parking Brake (_) ~. : ~' C, Black with yellow tip; ultrnl l vld.OIDpUI GI"1!Y with yello w Up/ dark gny wllh yal1Dw IIp"2 cha one! Video oulpul Brawn wl1h yellow np : CCD vld lo Inpul Black wuh bl.cJ: lip: USB wlr. (DptlDnaIJ 0, AadloanlaDas Brown wl1b rl!llow lip "bltkstghl'ltdeDlnPlll(oPUonall SW[ wit. : bled.- --s lur lng whllel ground will! brown-Itnrtngwhul Wb!1~ - sleering whnl Note: The "PARKING BRAKE" wire must be connected to the parking brake system of your car. When the parking brake is engages, the LCD will be allowed to view your video. If not, the screen will produce an image saying, "PARKING BRAKE"_ This is a safety feature d~signed for the driver not to watch a video while driving_ The video output on this unit will not be affected by this_ 36 37 INSTRUCTIONS INSTRUCTIONS IS.ACCESSORY I7.SPECIFICATIONS Power supply - - - - - - - - - - - - - - - - - - - - - - - - - - - - - - -.- - - - - - - - - - - - - - - - - - DC 12V Accessory Power range - - - - - - - - - - - - - - - - - - - - - - - - - - - - - - - - - - - - - - - - - - - - -I0.8-16.0V DC Quantity Max operate current - - - - - - - - - - - - - - - - - - - - - - - - - - - - - - - - - - - - - - - - - - - - - - -lOA Ground system- - - - - - - - - - - - - - - - - - - - - - - - - - - - - - - - - - - - - - - - Negative ground Amp Rating - - - - - - - - - - - - - - - - - - - - - - - - - - - - - - - - - - - - - - - - 85 WattsX4 Channels FM tuner European frequency range- - - - - - - - - - - - - - - - - - - - - - - - - - - - - - - - - - 87.5-108MHz USA frequency range- - - - - - - - - - - - - - - - - - - - - - - - - - - - - - - - - - - - - 87.5-107.9MHz Signal/Noise ratio - - - - - - - - - - - - - - - - - - - - - - - - - - - - - - - - - - - - - - - - - - - - - - - -55dB User Manual 1PC Wire 1PC USB Cable 1PC Remote Controller 1PC Warranty card 2PCS Stereo separation - - - - - - - - - - - - - - - - - - - - - - - - - - - - - - - - - - - - - - - - - - - - - - - - . 30dB Search station volt - - - - - - - - - - - - - - - - - - - - - - - - - - - - - - - - - - - - - - - - - - 20-30dBuv Distortion rate- - - - - - - - - - - - - - - - - - - - - - - - - - - - - - - - - - - - - - - - - - - - - - - - - - - 1.5% AM tuner European frequency range- - - - - - - - - - - - - - - - - - - - - - - - - - - - - - - - - - - -522-1620kHz USA frequency range- - - - - - - - - - - - - - - - - - - - - - - - - - - - - - - - - - - - - - - - 530-1710kHz Limit noise sensitivity_ - - - - - - - - - - - - - - - - - - - - - - - - - - - - - - - - - - - - - - - - - - - - 32dB DVDPLAYER Signal/Noise ratio - - - - - - - - - - - - - - - - - - - - - - - - - - - - - - - - - - - - - - - - - - - - - - - - 70dB Frequency response - - - - - - - - - - - - - - - - - - - - - - - - - - - - - - - - - - - - - - - - 20Hz-20KHz 38 I9.SETUP NEED PASSWORD Setup need password * During actual operation, when you enter TV setup, * system setup, radio area and touch calibration, you need to enter the password "888888". DVD Parental control function: The default set for DVD is #8 adult, which means all grades of DVD can be read without entering password.To change the default grade, you need to follow the below procedure: Press SETUP button on the remote, display will show the system set up menu and the submenu,select password and enter 0000, you will be able to choose the DVD grade as def~ult. 39 I I