1
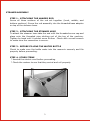
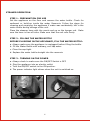
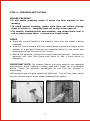
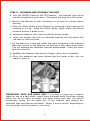
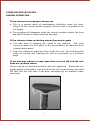
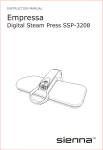
INSTRUCTION MANUAL
Garment Steamer
SureCare SGS-0308
CONTENTS
Features......................Introduction
Safety Reminders.........................1
Parts Identification.......................2
Steamer Assembly........................3
Steamer Operation....................4-5
Cleaning the Steamer....................6
Other Important Notes..................7
Troubleshooting...........................8
Warranty................................9-10
Features of the Steamer
Your Steamer provides clean,
professional results every time
Ø Water container holds 2.6 litres, enough for hours of continuous use
Ø No need to empty water from steamer after each use
Ø Eliminates ironing by removing wrinkles on the hanger
Ø Automatic shut-off safety feature
Ø Power indicator light
Ø Easy-Roll casters makes unit portable
Ø Stores upright in a small space
Ø Hose hangs on its own hook
Introduction
IMPORTANT SAFETY INSTRUCTIONS
When use your appliance, basic precautions should always be followed, including:
Ø To reduce the risk of contact with hot water emitting from
steam vents, check
appliances before each use by holding it away from body and operating steam button.
Ø Before plugging in your steamer, be sure the electrical information on the label at the
bottom of the base agrees with your power supply. This is a high wattage appliance. To
avoid a circuit overload, do not operate an-other high wattage appliance on the same
circuit at the same time.
Ø Read all Instructions before using your steamer.
Ø Use the steamer only for its intended use.
Ø To protect against the risk of electric shock, Do not immerse the appliance in water.
Ø Always turn the switch to the OFF position before plugging in or unplugging the unit.
Ø Never yank the cord from the outlet, Always grasp the plug and pull it out to disconnect.
Ø Do not allow the cord to touch hot surfaces.
Ø Do not leave the steamer unattended while it is operational.
Ø Always allow the appliance to cool completely for at least thirty minutes Before storing.
Ø Do not operate the steamer without properly filling the reservoir.
Ø Always check the water level upon initial operation.
Ø Only hang the steamer hose end on the supplied hanger rod.
Ø Do not T lay the hose on the ground or wind it unnecessarily.
Ø Move the appliance by grasping the hose and the hose hanging rod. Do not force the
casters. If they stick for some reason, turn the appliance OFF, then empty the reservoir and
inspect the casters.
Ø The appliance has very hot surfaces-Do not allow unsupervised children to use the
appliance.
Ø Always disconnect the appliance from the outlet before filling with or Removing water. Be
careful to avoid spilling excess water into the reservoir when removing or placing the
reservoir bottle into the reservoir.
Ø Different water sources contain different levels of mineral content. If the steamer beings
to cut on and off during normal use, the thermostat is indicating that the unit may have
sediment inside which needs to be cleaned out.
Ø Always allow the unit to cool completely before inspecting or cleaning the interior.
ALWAYS disconnect the appliance when not in use.
Ø Do not use the appliance if it has been dropped or damaged.
Ø Do not disassemble the appliance. Incorrect reassembly can cause a risk of electric
shock. Send it to an authorized service centre for repair.
Ø Do not operate another high wattage appliance on the same circuit.
Ø This appliance Must be grounded. Do not alter the plug or attempt to defeat this feature.
Ø Be careful. Burns can occur from touching Hot metal parts, Hot water or Steam.
THIS UNIT IS FOR HOUSEHOLD USE ONLY
SAVE THESE INSTRUCTIONS
1
IDENTIFYING THE PARTS OF THE STEAMER
2
1) The Control Handle at the end of the
steamer hose sits just before the
nozzle. By grasping the control handle
you can aim the
direction of
the
steam released from the nozzle.
1
2) The Nozzle with its small hole openings
is at the end of the steamer hose.
Always sit the nozzle end of the hose
on the hanger rod for the hose when
not in use. Keep the nozzle pointed
upward and steam will rise from the
openings. Try not to point the nozzle
downwards so water does not condense
and drip from the nozzle.
3) The Hanger Rod has a convenient hook
shaped end for resting the nozzle end
of the steamer
hose.
It can be
extended and retracted by telescoping
the rod from its sleeve.
3
4
7
NOTE ON INSTRUCTIONS
The pole is adjustable by taking the pole
out and moving the split ring located on
the bottom rod section. (see page 3 for
further details on moving the split ring).
8
5
6
9
4) The Steamer Hose protrudes from the base of the appliance and holds
the control handle and nozzle on its end. Avoid yanking on the hose
unnecessarily.
5) The On/Off Switch can be pushed to turn the power on and off.
6) The Ready Light comes on when the appliance is power on .
7) The Water Bottle is filled with tape water and repositioned upside
down in the water reservoir of the base. Avoid spilling excess water
into the reservoir when filling as this could cause the steamer to
expel water from the nozzle. Do not substitute another water bottle
for the one that came with your unit.
8) The Steamer Base houses the reservoir, water bottle, and attaches
the hose and hanger rod.
9) The Casters are on the bottom of the unit for wheeling the appliance
around.
2
STEAMER ASSEMBLY
STEP 1 - ATTACHING THE HANGER ROD
Screw all three sections of the rod set together (hook, middle, and
bottom sections). Screw the rod assembly into the threaded base adapter
on top of the steamer base.
STEP 2 - ATTACHING THE STEAMER HOSE
To attach the steamer hose take the end with the threaded screw cap and
place onto the threaded pipe sticking out of the top of the machine.
Tighten by hand until it cannot move further. Check with a small wrench
to make sure the connection is secure.
STEP 3 - BEFORE FILLING THE WATER BOTTLE
Check to make sure the bottle seats into the reservoir securely and fits
properly before proceeding.
STEP 4- OTHER ITEMS
* Unwind the electric cord before proceeding.
* Check the casters to see that they swivel and roll properly.
3
STEAMER OPERATION
STEP 1 - PREPARATION FOR USE
Set the appliance on the floor and remove the water bottle. Check for
sediment or build-up inside the water Reservoir. Follow the steps for
cleaning and emptying the appliance if water was accidentally left in the
water bottle during storage of the unit.
Place the steamer hose with the nozzle end up on the hanger rod. Make
sure the hose is free of kinks. Make sure that the unit rolls freely.
STEP 2 - FILLING THE WATER BOTTLE
BEFORE PLUGGING IN THE APPLIANCE, FILL THE WATER BOTTLE:
a. Always make sure the appliance is unplugged before filling the bottle.
b. Fill the Water Bottle with ordinary, cool tap water.
c. Close the cap tight.
d. Replace the water bottle straight into the reservoir.
STEP 3 - TURNING ON THE POWER
a. Always check to make sure the ON/OFF Switch is OFF.
b. Plug the appliance into an electric outlet.
c. Turn the ON/OFF switch to the ON position.
d. The power indicator light shines when the unit is switched on.
4
STEP 4 - PRESSING WITH STEAM
BEFORE PRESSING
*It will make pressing easier if there are few creases in the
laundry.
*To avoid excess creasing, shake each item out before placing
them in a drier or *hanging them out to dry in the open air.
*For towels, handkerchiefs and napkins, peg drape them over a
rod or steam press them *in place over towel racks.
PRESS
a. Grasp the control handle of the steamer hose once the steam is being
released.
b. Hold the control handle with the nozzle facing upward and begin at the
bottom of a garment allowing the escaping steam to rise inside and
outside removing the wrinkles as it rises.
c. After a few seconds, remove the nozzle from the garment. Smooth the
garment with your free hand and check to see if more steam is
necessary.
IMPORTANT NOTE: For heavier fabrics you may need to use repeated
applications. Avoid heating a single area with steam for a prolonged
period. Check the garment periodically to see that the process is
succeeding.
With practice you will gain speed and efficiency. You will also learn which
of your clothes require more steam pressing than others.
5
STEP 5 - CLEANING AND STORING THE UNIT
a. Turn the ON/OFF switch to the OFF position. The indicator light will go
out as the appliance cools down. Disconnect the plug from the outlet.
b. Wait for the Steamer to cool completely, for at least 30 minutes before
draining.
c. Drain the Water Bottle of the Steamer by removing it and emptying its
contents in a sink. Rinse the Water Bottle lightly, shake out excess
moisture and set it aside to dry.
d. Unplug the steamer hose from its position and set aside.
e. Lower the hanger rod from its extended position and disconnect the
rod entirely from the base.
f. Lift the base over a sink and empty the water remaining in the reservoir.
Wash the interior of the reservoir by flushing it with some fresh water.
This will dislodge any sediment that has accumulated. Drain this water
from the reservoir.
g. Reattach the steamer hose and the hanger rod or store separately.
h. Once the appliance has been drained and set aside to dry, you are
ready to store it.
IMPORTANT NOTE FOR DAILY USE: If you wish to leave your steamer
ready for use on a daily basis, simply leave the water bottle filled and in place.
While you do not have to empty the water bottle each day, you should
periodically empty the old water out of the steamer and remove any
sediment that may have accumulated. Empty it once a month, depending on
use and water mineral content in your area.
6
OTHER IMPORTANT NOTES DURING OPERATION If the steamer hose gurgles during use
a. This is a normal result of condensation collecting inside the hose.
Simply lift the control handle upward until the hose is extended to its
full height.
b. The gurgling will disappear when the excess moisture inside the hose
has had a chance to drain back into the base.
If the steamer stops producing steam then starts again
a. You may wish to examine the inside of the reservoir. The most
common reason for this effect is the accumulation of sediment from
mineral laden water.
b. Clean the offending sediment from inside the unit, first following the
steps for cooling and cleaning the unit as presented on a previous
page.
If the steamer indicator ready light does not turn ON and the unit
does not produce steam
There may be an electrical problem with the appliance. Disconnect the
power supply immediately, cool and drain the unit as previously described.
DO NOT use the unit until it has been examined by an qualified repair
technician.
7
TROUBLE SHOOTING
Below is a chart detailing the most common problems, their causes and
solutions. Before shipping any appliance to a service center please check to
make sure that the solution is not listed here:
CAUSE
SOLUTION
Steamer DOES NOT
get hot
Steamer is not plugged
into an outlet.
Automatic Shut-Off has
engaged.
The Water Bottle is empty
and the reservoir has
drained.
Plug the appliance in. Push
the ON/OFF switch to the
OFF position. Fill the Water
Bottle and replace inside
the Reservoir. Once the
appliance is refilled, turn
the power ON.
No Steam
Water level is too low.
Push the ON/OFF switch to
the OFF position. Refill the
Water Bottle and replace
the reservoir. Once the
appliance is refilled, turn
the power ON.
Water drips from the
Nozzle
Condensation has formed
inside the steamer hose.
Hold the hose upright
and allow excess
moisture to drain back
into the base of the unit.
PROBLEM
8
ONE YEAR LIMITED WARRANTY
Warranty: This product warranty extends only to the original consumer
purchaser of the product. This product is warranted by the manufacturer
to be free from all defects in materials or workmanship for a period of
one year from the date of original purchase. This warranty is subject to
the following conditions, exclusions and exceptions.
Warranty Exclusions: This warranty does not cover normal wear and
tear of parts and does not apply to any product that has been tampered
with or used for commercial purposes. This warranty does not cover
damage caused by misuse, abuse, negligent handling or damage due to
mishandling in transit or shipping. This warranty does not cover damage
or defects caused by or resulting from repairs, service or alterations to
the product or any of its parts, which have been performed by a repair
person not authorized by the manufacturer. This warranty is effective
only if the product is purchased and operated in the USA or Canada, and
does not extend to any units which have been used in violation of written
instructions furnished by the manufacturer, or to units which have had
the serial number removed, altered, defaced or rendered illegible.
Warranty Performance: During the limited warranty period, the
manufacturer will, at its option, repair or replace free of charge a
defective product or part that is covered by this warranty. As a matter of
warranty policy, the manufacturer will not refund the purchase price. A
repaired or replacement product will be covered by this warranty for the
balance of the initial one year warranty period and an additional one
month period. To contact Consumer Service write to:
Anvid Products, Inc.
Attn: Consumer Service
1401-1499 Greenville Road,
Livermore, CA 94550
Or call :1-888-5SIENNA (1-888-574-3662).
Please refer to your product name and model number when contacting
Consumer Service.
9
Consumer Service will give you further instructions for returning a defective
product for repair or replacement. When returning a defective product,
carefully pack the item to avoid damage in shipping. the manufacturer cannot
assume responsibility for loss or damage during incoming shipment. We
recommend that you insure the package, as damage in shipping including the
shipping cost is not covered by this warranty. Be sure to include the following
items with your product: any accessories related to the problem; your name,
complete address and phone number; a note describing the problem you
experienced; and a copy of your sales slip or other proof of purchase to
determine warranty status. C.O.D. shipments cannot be accepted.
Out-of-Warranty Service: A flat rate charge by model is made for Out-ofWarranty service. Please contact our Customer Service for a flat rate. In
addition, please include a check of $20.00 made payable to
Anvid
Products, Inc.
for return shipping and handling. The check will need to be
cleared by the Bank to enable us to return the product.
Limitation of Remedies: No representative or person is authorized to assume
for the manufacturer any other liability in connection with the sale of our
products. This limited warranty is not transferable and any sale, transfer or
other disposition of the product voids this limited warranty. There shall be no
claims for defects or failure of performance or product failure under any
theory of tort, contract or commercial law including, but not limited to,
negligence, gross negligence, strict liability, breach of warranty and breach of
contract.
ANY IMPLIED WARRANTIES, OBLIGATIONS, OR LIABILITIES,
INCLUDING, BUT NOT LIMITED TO, THE IMPLIED WARRANTY OF
MERCHANTABILITY AND FITNESS FOR A PARTICULAR PURPOSE,
SHALL BE LIMITED IN DURATION TO THE DURATION OF THIS
WARRANTY. Some states do not allow limitations on how long an implied
warranty lasts, so the above limitations may not apply to you.
REPAIR OR REPLACEMENT SHALL BE THE SOLE REMEDY OF THE
PURCHASER UNDER THIS LIMITED WARRANTY, AND IN NO EVENT
SHALL THE MANUFACTURER BE LIABLE FOR ANY SPECIAL,
INCIDENTAL, OR CONSEQUENTIAL DAMAGES, LOSSES OR EXPENSES
YOU MAY INCUR IN CONNECTION WITH YOUR PURCHASE OR USE OF
THE PRODUCT OR FOR ANY BREACH OF THIS OR ANY OTHER
WARRANTY, EXPRESS OR IMPLIED, WHATSOEVER. Some states do not
allow the exclusion or limitation of special, incidental, or consequential
damages, so the above limitation may not apply to you. This limited warranty
gives you specific legal rights, and you may also have other rights which vary
from state to state.
Copyright
2010 Anvid Products, Inc.
Made in China
10
Printed in China