1
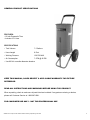
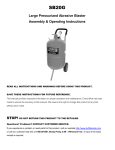
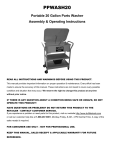
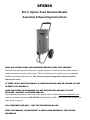
SFSB90
90 Lb. Siphon Feed Abrasive Blaster
Assembly & Operating Instructions
READ ALL INSTRUCTIONS AND WARNINGS BEFORE USING THIS PRODUCT.
This manual provides important information on proper operation & maintenance. Every effort has been
made to ensure the accuracy of this manual. These instructions are not meant to cover every possible
condition and situation that may occur. We reserve the right to change this product at any time
without prior notice.
IF THERE IS ANY QUESTION ABOUT A CONDITION BEING SAFE OR UNSAFE, DO NOT
OPERATE THIS PRODUCT!
HAVE QUESTIONS OR PROBLEMS? DO NOT RETURN THIS PRODUCT TO THE
RETAILER - CONTACT CUSTOMER SERVICE.
If you experience a problem or need parts for this product, visit our website http://www.buffalotools.com
or call our customer help line at 1-888-287-6981, Monday-Friday, 8 AM - 4 PM Central Time. A copy of the
sales receipt is required.
FOR CONSUMER USE ONLY – NOT FOR PROFESSIONAL USE.
KEEP THIS MANUAL, SALES RECEIPT & APPLICABLE WARRANTY FOR FUTURE
REFERENCE.
TABLE OF CONTENTS
RECOGNIZE SAFETY SYMBOLS, WORDS AND LABELS ................................................................ 2
SERVICE .............................................................................................................................................. 6
SPECIFIC SAFETY RULES AND/OR SYMBOLS ................................................................................ 7
PACKAGE CONTENTS........................................................................................................................ 8
COMPONENTS .................................................................................................................................... 8
ASSEMBLY .......................................................................................................................................... 8
OPERATION......................................................................................................................................... 9
MAINTENANCE.................................................................................................................................. 10
PARTS DIAGRAM .............................................................................................................................. 11
PARTS LIST ....................................................................................................................................... 11
TROUBLESHOOTING........................................................................................................................ 12
RECOGNIZE SAFETY SYMBOLS, WORDS AND LABELS
What You Need to Know About Safety Instructions
Warning and Important Safety Instructions appearing in this manual are not meant to cover all possible
conditions and situations that may occur. Common sense, caution and care must be exercised when
assembling or using this product.
Always contact your dealer, distributor, service agent or manufacturer about problems or conditions you
do not understand.
This is a safety alert symbol. It is used to alert you to potential personal injury hazards.
Obey all safety messages that follow this symbol to avoid possible injury or death.
This is a safety alert symbol. It is used to alert you to potential personal injury hazards.
Obey all safety messages that follow this symbol to avoid possible injury or death.
SFSB90 90 Lb. Siphon Feed Abrasive Blaster Assembly & Operating Instructions
2
GENERAL PRODUCT SPECIFICATIONS
FEATURES:
• 10 Inch Pneumatic Tires
• Includes 8 Ft. Hose
SPECIFICATIONS
• Tank Volume
7.5 Gallons
• Hose Length
8 Feet
• Working Pressure
120 PSI MAX
• Air Consumption
7 CFM @ 80 PSI
• Use 80 Grit or smaller diameter abrasive
KEEP THIS MANUAL, SALES RECEIPT & APPLICABLE WARRANTY FOR FUTURE
REFERENCE.
READ ALL INSTRUCTIONS AND WARNINGS BEFORE USING THIS PRODUCT.
When unpacking, check to make sure all parts listed are included. If any parts are missing or broken,
please call Customer Service at 1-888-287-6981.
FOR CONSUMER USE ONLY – NOT FOR PROFESSIONAL USE
SFSB90 90 Lb. Siphon Feed Abrasive Blaster Assembly & Operating Instructions
3
IMPORTANT SAFETY RULES
COMMON SENSE AND CAUTION ARE FACTORS WHICH CANNOT BE BUILT INTO ANY PRODUCT.
THESE FACTORS MUST BE SUPPLIED BY THE OPERATOR.
Keep your work area clean and well lit. Cluttered work benches and dark work areas may cause
accidents or injury.
Do not operate the abrasive blaster in explosive areas, such as in the presence of flammable
liquids, gases or dust. Tools create sparks which may ignite the dust or fumes.
Keep bystanders, children and visitors away while operating the abrasive blaster. Distractions can
cause you to lose control.
Do not force tool. Use the correct tool for your application. The correct tool will do the job better and
safer at the rate for which it is designed.
Store idle tools out of reach of children and other untrained persons. Tools are dangerous in the
hands of untrained users.
Always check to make sure that the trigger is not on before connecting blaster to air supply. Tool
may cause damage to property or person if plugged in while on.
Wash hands after handling the air hose. Touching the air hose could expose you to lead, which is
known in the State of California to cause cancer, birth defects and other reproductive harm.
All work areas should be clean and well lit. Accidents are more likely to occur in poorly lit and cluttered
areas.
Keep children, and other distractions at a distance while operating the Abrasive Blaster.
Keep the air hose in good condition, and replace damaged air hose immediately. Keep the air hose
away from materials and surfaces that could damage air hose.
Use common sense while operating this abrasive blaster.
Do not use this tool if you are:
• Feeling tired or are under the influence of alcohol or drugs.
• Wearing loose clothing or jewelry. Keep long hair pulled back and away from moving parts.
• Overreaching or have improper footing. Handling the tool in this way could cause serious injury.
• When using this Abrasive Blaster, always:
• Wear the proper safety equipment, such as safety goggles, dust masks, non-skid shoes, etc.
• Check to be sure all adjusting keys or wrenches have been removed before starting the power tool.
• Check that the power switch is in the “OFF” position before plugging the unit into an electrical outlet.
SFSB90 90 Lb. Siphon Feed Abrasive Blaster Assembly & Operating Instructions
4
Always release any built-up air even after disconnecting hose. Disconnect the Pressure Blasting
System when not in use.
Follow these steps to maintain safe working conditions and good working condition of air
blaster. Improper care can result in electric shock or serious injury.
Secure and support the work piece using clamps. Do not use your hands to hold the piece in place.
Use the correct tool for the job. Using the correct tool is safer and faster.
Keep out of reach of children, or any untrained person. Store tools in a safe and dry place.
Keep tools clean. Maintaining tools with proper care will increase the life of the power tool, and reduce
the risk of injury.
Check to be sure all moving parts are free from binding and are properly aligned.
Use only accessories that are recommended by the manufacturer for your tool model.
Safety glasses and ear protection must be worn during operation.
Stay within air pressure capacity. Never operate the Pressure Blasting System above 120 PSI.
Compressed air only. Use clean, dry, regulated, compressed air at 60 to 120 PSI. Never use oxygen,
carbon dioxide, combustible gases, or any other bottled gas as a power source for this product.
Transport the Pressure Blasting System safely. Always disconnect air supply when moving the tool.
Pull the tool by the handle to avoid tipping.
Avoid working alone. If an accident happens, an assistant can bring help.
Maintain a firm grip on the Gun when in use. Never point the Gun toward yourself, other people, or
animals. Keep all people and animals safely away from the work area.
Industrial applications must follow OSHA requirements.
Maintain a safe distance away from the object being sandblasted. Whenever possible, sandblast the
object at a 45 degree angle to minimize the possibility of grit, dirt, and debris ricocheting directly backward
toward your face and body.
Whenever possible, perform a sandblasting test on a small area of the object to be sandblasted. If
necessary, adjust the distance to the object and/or change the Nozzle of the Gun for more effective
results.
SFSB90 90 Lb. Siphon Feed Abrasive Blaster Assembly & Operating Instructions
5
Abrasive blasting with media containing crystalline silica can cause serious or fatal respiratory
disease. Exposure to crystalline silica may cause silicosis (a serious lung disease), cancer, and death.
Exposure to aluminum oxide (a dust generated from material removing processes) can result in eye, skin,
and breathing irritation. Always use a NIOSH-approved respirator, safety impact eye glasses, and a full
face shield. Avoid skin exposure. Proper ventilation in the work area is required. Read and understand the
recommended measures below to reduce crystalline silica exposure in the workplace and prevent
silicosisand silicosis related injuries and deaths.
The brass components of this product contain lead, a chemical known to the State of California to cause
birth defects (or other reproductive harm). (California Health & Safety code § 25249.5, et seq.)
1. Prohibit silica sand (or other substances containing more than 1% crystalline silica) as an abrasive blasting material
and substitute less hazardous materials.
2. Conduct air monitoring to measure worker exposures.
3. Use containment methods such as blast-cleaning machines and cabinets to control the hazard and protect adjacent
workers from exposure.
4. Practice good personal hygiene to avoid unnecessary exposure to silica dust.
5. Wear washable or disposable protective clothes at the worksite. Shower, and change into clean clothes before leaving
the worksite to prevent contamination of cars, homes, and other work areas.
Avoid unintentional starting. Make sure the Control Lever on the Gun is in its “OFF” or “CLOSED” position when the
tool is not being used.
SERVICE
Tool service must be performed only by qualified repair personnel. Service or maintenance by unqualified
personnel could result in a risk of injury.
When servicing a tool, use only identical replacement parts and follow instructions in the manual. Use
of unauthorized parts or failure to follow Maintenance Instructions may create a risk of shock or injury.
SAVE THESE INSTRUCTIONS FOR FUTURE REFERENCE.
This manual contains important information regarding safety, operation, maintenance and storage of this product.
Before use, read carefully and understand all warnings, cautions, instructions and labels. Failure to do so could result
in serious personal injury, property damage or even death.
SFSB90 90 Lb. Siphon Feed Abrasive Blaster Assembly & Operating Instructions
6
IMPORTANT SAFETY INSTRUCTIONS
Before using this tool, you need to become familiar with its operation. If you are unsure about the
operation of the tool, or have any questions about its proper use, call the Customer Service Department
at 1-888-287-6981. Follow these instructions for safe handling of the tool:
• Always secure and support the work piece using clamps. Do not use your hands to hold the
piece in place.
• Be sure your work area is clean and secure. Be sure the area is free from all foreign material,
nails, staples, or any other material.
• Always use the appropriate safety gear when operating this abrasive blaster. Including but not
limited, to goggles, dust mask or respirator. Always work in a well-ventilated area to reduce your
exposure to harmful chemicals and dust particles.
• Keep hands away from the cutting area.
• Do not reach under the work piece.
Some dust created by power sanding, sawing, grinding, rilling, and other construction activities contain
chemicals known (to the State of California) to cause cancer, birth defects, or other reproductive harm.
Some examples of these chemicals are:
* Lead from lead-based paints,
* Crystalline silica from bricks, cement, and other masonry products,
* Arsenic and chromium from chemically treated lumber.
SPECIFIC SAFETY RULES AND/OR SYMBOLS
SYMBOLS
The following symbols may be used on your tool. Be familiar with and learn the symbols to operate the tool safely.
Symbol
V
A
Hz
W
Kg
min
s
…/min
1,2,3…
Name
Volts
Amperes
Hertz
Watt
Kilograms
Alternating Current
Direct Current
Alternating or Direct Current
Earthing Terminal
Description
Voltage (Potential)
Current
Frequency (Cycles per Second)
Power
Weight
Type of Current
Type of Current
Type of Current
Grounding Terminal
Class II Construction
Minutes
Seconds
Diameter
No Load Speed
Denotes Double Insulation
Time
Time
Size of Drill Bits, Grinding Wheels, etc.
No-load Rotational Speed
Revolutions per Minute
Ring Selector Settings
Revolutions, Surface Speed, Strokes, etc. per Minute
Speed, Torque or Position Settings
SFSB90 90 Lb. Siphon Feed Abrasive Blaster Assembly & Operating Instructions
7
3
PACKAGE CONTENTS
• 8 Ft Hose
• Tank
• Hood
• Funnel
2
1
COMPONENTS
1. Hose Hook
2. Tank
3. Handle
4. Hose Clamp
5. Tire
6. Tank Stand
5
4
ASSEMBLY
6
1. Align the holes in the upper portion of the Handle with the holes in the Abrasive Tank.
2. Place Flat Washer on a Long Screw and insert Screw through Handle and Abrasive
Tank.
3. Place a Flat Washer and Lock Nut onto screw end and hand tighten.
4. Repeat steps 2-3 for remaining hole in Handle.
5. Using a Phillips head screwdriver and a wrench, fully tighten screws.
FOOT AND WHEELS
1. Align the holes in the rear of the Foot with the holes in the lower portion of the Handle.
2. Slide the Wheel Axle through the holes in the Handle and Foot until the Wheel Axle sticks
out approximately 3.5" inches on both sides of the Handle.
3. Place a Wheel Washer onto both ends of the Wheel Axle and slide a Wheel onto both ends of the Wheel Axle.
4. Place a Wheel Washer onto both ends of the Wheel Axle - make certain that the air valve in
the wheel is facing out.
5. Insert Cotter Pin through each of the holes in the Wheel Axle and bend them so the Wheels cannot slide off the Wheel Axle.
SUPPORT POST
1. Align the hole in the end of the Support Post with the hole in the front of the Foot.
2. Place a Flat Washer on a Long Screw and insert Screw through the Foot and Support Post.
3. Place Flat Washer and Lock Nut onto end of Screw and hand tighten.
4. Align the two holes in the upper portion of the Support Post with the holes in the Abrasive Tank.
5. Place a Flat Washer on a Short Screw and insert Screw through Support Post and Abrasive
Tank.
6. Place a Flat Washer and Lock Nut on Screw and secure in place with a phillips head screwdriver and a wrench.
7. Repeat steps 5-6 for remaining hole in Support Post.
8. Using a Phillips head screwdriver and a wrench, fully tighten the Screw installed in step 2.
Abrasive Gun and Hose
1. Place a Hose Clamp onto each end of the Abrasive Hose. Firmly push the end of the Abrasive Hose onto
the abrasive inlet on the Abrasive Gun.
2. Position one of the Hose Clamps so that it is overlapping both the Abrasive Hose AND the
abrasive inlet of the Abrasive Gun.
3. Tighten Hose Clamp in place with a screwdriver and firmly push the opposite end of the Abrasive Hose onto the abrasive
outlet, located at the base of the Abrasive Tank. Note: There is an air hole in the abrasive outlet - DO NOT cover this air
hole with Abrasive Hose.
4. Position the remaining Hose Clamp so that it is overlapping both the Abrasive Hose AND the
abrasive outlet of the Abrasive Tank. Tighten Hose Clamp in place with a screwdriver.
SFSB90 90 Lb. Siphon Feed Abrasive Blaster Assembly & Operating Instructions
8
LOAD MEDIA INTO TANK
Make sure the media used is dry to avoid clogging the Media Metering Valve, Media Manifold, or Material Hose.
WARNING! Always wear ANSI-approved safety impact eye glasses under a full face shield, a respirator, and heavy duty
work gloves when operating the Pressure Blasting System. Also, wear heavy duty work boots, long trousers, and
long sleeve shirt.
Turn the Air Input Valve (14) to the “OFF” (horizontal) position.
Check the Pressure Gauge (5) to make sure it reads “0” pressure.
Pour the media into the Tank (3), making sure to pour enough into the Tank to do the job at hand. NOTE: If this is a large
job, fill the Tank only 3/4 full and reload as needed to finish the job.
IMPORTANT TIP: If the humidity is 90 to 100%, the Water Trap (12) will not be able to trap all of the moisture in a 3/4 full
Tank It is recommended to reduce the amount of media, load more frequently, and empty the Water Trap more often. This
will reduce the possibility of clogging the bottom of the Tank or the line.
Depending on the size (diameter) of the media, install the proper size Nozzle onto the Sandblasting Gun. To do so,
unscrew and remove the Nozzle Cover. Position the Nozzle Gasket against the Pipe Adapter. Position the proper Nozzle
against the Nozzle Gasket. Then screw the Nozzle Cover back onto the Pipe Adapter to secure the Nozzle Gasket and
Nozzle in place.
OPERATION
Always wear your hood, dust mask and heavy duty canvas gloves when operating the
abrasive blaster.
Before operating your abrasive blaster, inspect each connection, double checking to make
sure that all are tight and properly sealed.
The kind of abrasive you choose will greatly influence the amount of time needed to clean a given surface
area. Abrasive materials include garnet, glass beads and others. For best results, use 80 grit abrasive or
finer. Do not exceed 80 grit media size.
Your Abrasive Blaster is designed to operate between 60 and 120 psi. We recommend setting
the air pressure on your air compressor to 80 psi.
1. After connecting your air hose (sold separately) to your air compressor, connect air hose to the
hose fitting on the Abrasive Gun.
2. Make sure air hole located on the base of the Abrasive Tank is open. Keep it open at all times.
3. Start compressor.
4. Check for leaks at the Abrasive Gun hose fitting and along all hoses and fittings. If leaks are observed, turn off air
compressor, disconnect hose and repair immediately.
5. Point Abrasive Gun in a safe direction away from people, pets or anything around you that may be
damaged by direct or indirect abrasive spray.
6. Press and hold Abrasive Gun Trigger until abrasive media is flowing through the Nozzle.
7. Grip the Sandblasting Gun firmly with both hands.
8. Point the Sandblasting Gun at the workpiece so that the media will strike the surface of the workpiece at about a
45 degree angle.
SFSB90 90 Lb. Siphon Feed Abrasive Blaster Assembly & Operating Instructions
9
9. Squeeze the Control Lever of the Sandblasting Gun to release the media. NOTE: The flow rate of the media may be
irregular when the Sandblasting Gun is first started. Provided the media is dry, the flow rate will become normal in
approximately one minute.
10. When the sandblasting job is completed, release pressure on the Control Lever of the Sandblasting Gun. Turn off
the air compressor.
MAINTENANCE
Keep your abrasive blaster clean, and protect it from damage.
To clean the exterior of the Pressure Blasting System, wipe with a clean, damp cloth using a mild detergent or mild
solvent. Do not immerse the tool in liquids.
After 10-12 hours of blasting time the nozzle should be checked for wear. The nozzle will wear out over
time and should be replaced when the hole is no longer round or the abrasive media does not flow
smoothly through it.
SFSB90 90 Lb. Siphon Feed Abrasive Blaster Assembly & Operating Instructions
10
PARTS DIAGRAM
PARTS LIST
Part #
Description
QTY
0001
0002
0003
0004
0005
0006
0007
0008
0009
0010
0011
0012
0013
0014
0015
0016
0024
0025
0029
0030
Abrasive Tank
Support Post
Handle
Short Screw
Flat Washer
Nut
Long Screw
Foot
Wheel Axle
Wheel Washer
Wheel
Cotter Pin
Abrasive Gun
Hose Clamp
Abrasive Hose
Hood
Nozzle adapter nut
Nozzle
Gun
Air Hose Fitting
1
1
1
2
10
5
3
1
1
4
2
2
1
2
1
1
1
1
1
1
SFSB90 90 Lb. Siphon Feed Abrasive Blaster Assembly & Operating Instructions
11
TROUBLESHOOTING
Problem
Possible Solution
Blast flow surges.
1. Air pressure too low. Increase air pressure.
2. Too much media. Adjust media valve.
Excessive media consumption.
1. Media valve open to far. Close slightly.
2. Air pressure too low. Increase air pressure.
Clogging and plugging of blast flow.
1. Excessive debris in media. Purge and filter.
2. Media size too large. Use smaller grit size.
3. Nozzle plugging. Use larger nozzle.
4. Nozzle plugging. Adjust media valve.
5. Wet media. Dry media. Drain water from water trap.
Moisture in abrasive media.
1. Wet media. Change or use dry media.
2. Water in air. Drain water from water trap.
3. Water in tank. Empty tank, and refill.
Humid weather.
1. Moderate humidity: Keep media as dry as possible.
2. Moderate humidity: Use dryer or moisture separator.
3. High humidity: Avoid that period of use if possible.
Overtaxed compressor.
1. Compressor too small. Use larger compressor or restrict
time used.
2. Nozzle size too large. Use smaller nozzle.
3. Too many leaks in air compressor system. Seal and
tightening all leaks.
4. Holes in media hose. Replace hose.
5. Air filter on compressor plugged. Clean filter.
6. T-Handle Seal worn or dirty. Replace or clean Seal.
Lack of abrasive flow.
1. Tank empty. Fill tank.
2. Moisture in media. Dry media.
3. Not enough air pressure. Increase air pressure.
4. Media Hose kinked. Straighten hose.
5. Excessive debris in media. Clean or filter media.
6. Metering Valve (18) open too much, or too little.
(SFSB90201001)
COS14 14 Inch Cut Off Saw Assembly & Operating Instructions
12