1
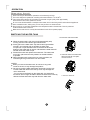
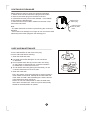
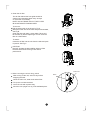
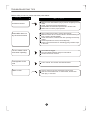
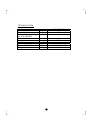
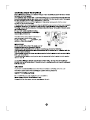
10 L Dehumidifier
Instruction Manual
1
2
CONTROL PANEL
3
2
ON/OFF Switch
1
1.ON/OFF Switch & Power On indicator light
Press the ON/OFF button once to start the operation of the unit. The power on indicator
light [3] will be illuminated. Press the button again to switch the unit off.
2. Water tank full indicator light
When the water tank is full, the unit will switch itself off and this water tank full indicator
light will be illuminated.
NOTE :
When the frost builds up on the evaporator coils, the automatic defrost function will
be started. The compressor will be turned itself off and the fan will continue to run until
the frost is removed.
- The unit will continue to operate until the water tank is full or you switch it off.
- Ensure to switch it off when not in use.
3
PARTS
Front
Rear
Control panel
Air intake
grille
Handle
Air Outlet grille
Continuous drainage port
Water tank
Water level
window
Power cord hook
(Used only when storing
the unit.)
Air filter
(behind the air intake
grille)
Power Plug
Power Cord
Placement
A dehumidifier operating in a basement will have little or
no effect in drying an adjacent enclosed storage area,
such as a closet, unless there is adequate circulation
of air in and out of the area.
40cm or
more
Do not use outdoors.
This dehumidifer is intended of indoor residential
applications only. This dehumidifier should not be
used for commercial or industrial applications.
Place the dehumidifier on a smooth, level floor strong
enough to support the unit with a full bucket of water.
Allow at least 20cm of air space on all sides of the unit
for good air circulation.
Place the unit in an area where the temperature will not
falll delow 5OC(41OF). The coils can become covered with
frost at temperatures below 5OC(41OF), which may reduce
performance.
Place the unit away from the clothes dryer, heater or radiator.
Use the unit to prevent moisture damage anywhere books
or valuables are stored.
Use the dehumidifier in a basement to help prevent
moisture damage.
The dehumidifier must be operated in an enclosed
area to be most effective.
Close all doors, windows and other outside openings
to the room.
4
Air outlet grille
Air inlet
grille
20cm or more
20cm or more
20cm or more
20cm or more
OPERATION
When using the unit
When first using the dehumidifier, operate the unit continuously 24 hours.
This unit is designed to operate with a working environment between 5OC and 35OC.
If the unit has been switched off and needs to be switched on again quickly, allow approximately
three minutes for the correct operation to resume.
Do not connect the dehumidifier to a multiple socket outlet, which is also being used for other electrical appliances.
Select a suitable location, making sure you have easy access to an electrical outlet.
Plug the unit into a 220~240V 50Hz(Refer to the nameplate located on the side/rear of the unit ) electrical
socket-outlet with earth connection.
Make sure the water tank is correctly fitted otherwise the unit will not operate properly.
EMPTYING THE WATER TANK
1. Pull out the water tank a little.
When the water tank is full, the unit will automatically stop
running, and the Full indicator light will illuminate.
Slowly pull out the water tank. Grip the left and right handles
securely, and carefully pull out straight so water does
not spill. Do not put the water tank on the floor because the
bottom of the water tank is uneven. Otherwise the water tank will
fall and cause the water to spill.
Discard the water and replace the water tank. The water tank
must be in place and securely seated for the dehumidifier
to operate.
When the water tank is put back in its correct position, the
indicator light will go off and the unit will re-start.
NOTES:
When you remove the water tank, do not touch any parts
inside of the unit. It may damage the product.
Be sure to push the water tank gently all the way into the unit.
Put the water tank back to the unit by force may damage the
unit or water tank.
- Do not remove the float from the water tank, the water tank
full sensor will no longer be able to detect the water level correctly
without the float and water may leak from the water tank.
5
2. Hold both sides of the water tank
with even strength, and pull it
out from the unit.
3. Pour the water out.
CONTINUOUS DRAINAGE
Please follow the steps to setup the continuous drainage.
1. Switch off the unit and remove the plug from the mains.
2. Remove the rubber plug from the back of the unit.
3. Insert the drain tube (12mm outer diameter - not included)
to the continuous drainage port.
4. Place the other end in a drain. Make sure the tube is free
from twists and bends.
Remove the
rubber plug
Insert the hose
from the drain
outlet
Note:
- The water tanke has to remain in place during the continuous
drainage.
- If the continuous drainage is no longer to use, remove the drain
tube and put the rubber plug back the drainage port.
CARE AND MAINTENANCE
Turn the dehumidifier off and r emove the plug
from the wall outlet before cleaning.
Household
Drain
Cleaner
1. Clean the Grille and Case
Use water and a mild detergent. Do not use bleach
or abrasives.
Do not splash water directly onto the main unit. Doing
so may cause an electrical shock, cause the insulation
to deteriorate, or cause the unit to rust.
The air intake and outlet grilles get soiled easily, so use
a vacuum attachment or brush to clean.
2. Clean the water tank
Every few weeks, clean the water tank to prevent growth of
mold, mildew and bacteria. Partially fill the water tank with
clean water and add a little mild detergent. Swish it around
in the water tank, empty and rinse.
NOTE: Do not use a dishwasher to clean the water tank.
After clean, the water tank must be in place and securely
seated for the dehumidifier to operate.
6
Thinner
No
3. Clean the air filter
The air filter behind the front grille should be
checked and cleaned at least every 30 days
or more often if necessary.
NOTE: DO NOT RINSE OR PUT THE FILTER
IN AN AUTOMATIC DISHWASHER.
To remove:
Pull the water tank out as shown in Fig.A.
Grasp the lower side of the filter and pull it downward,
see Fig.B.
Clean the filter with warm, soapy water. Rinse and
let the filter dry before replacing it. Do not clean the
filter in a dishwasher.
Fig. A
To attach:
Insert the air filter into the unit from the side and push
it upward. See Fig.C
CAUTION:
DO NOT operate the dehumidifier without a filter
because dirt and lint will clog it and reduce
performance.
Fig. B
Fig. C
Power cord
4. When not using the unit for long period
Band
After turning off the unit, wait one day before
emptying the tank.
Clean the main unit, water tank and air filter.
Tie up the cord with the band.
Cover the unit with a plastic bag.
Store the unit upright in a dry, well-ventilated place.
7
TROUBLESHOOTING TIPS
Before calling for service, please check the points below :
Problem
Unit does not start
What to check
,
Make sure the dehumidifier s plug is pushed completely into the
outlet.
Check the house fuse/circuit breaker box.
Dehumidifier has reached its preset level or bucket is full.
Water tank is not in the proper position.
Dehumidifier does not
dry the air as it should
Did not allow enough time to remove the moisture.
Make sure there are no curtains, blinds or furniture blocking the
front or back of the dehumidifier.
Check that all doors, windows and other openings are securely
closed.
Room temperature is too low, below 5 C(41 F).
There is a kerosene heater or something giving off water vapor
in the room.
The unit makes a loud
noise when operating
The air filter is clogged.
The unit is tilted instead of upright as it should be.
The floor surface is not level.
Frost appears on the
coils
This is normal. The unit has Auto defrost feature.
Water on floor
Hose to connector or hose connection may be loose.
Intend to use the water tank to collect water, but the back
drain plug is removed.
8
TECHNICAL DATA
Model
Power Supply
Power consumption
Dehumidifying capacity
(at 30oC, 80%RH)
Water Tank
Refrigerant
Recommend room size
Working temperature
Dimension W X D X H
Weight
MDT-10DMN3
220-240VAC 50Hz
250
10
W
L/24h
L
1.5
R134A
Up to 18
5 to 35
330 X 260 X 420
13
m2
o
C
Mm
Kg
9
10
PRODUCT GUARANTEE
This product is guaranteed against manufacturing defects for a period of
Year
This product is guaranteed for twelve months from the date of original purchase. Any
defect that arises due to faulty materials or workmanship will either be replaced,
refunded or repaired free of charge where possible during this period by the dealer
from whom you purchased the unit.
The guarantee is subject to the following provisions:
- The guarantee does not cover accidental damage, misuse, cabinet parts, knobs
or consumable items.
- The product must be correctly installed and operated in accordance with the
instructions contained in this manual.
-
It must be used solely for domestic purpose.
-
The guarantee will be rendered invalided if the product is re-sold or has been
damaged by inexpert repair.
Specifications are subject to change without notice.
-
The manufacturer disclaims any liability for the incidental or consequential damages.
-
The guarantee is in addition to, and does not diminish your statutory or legal rights.
Guarantor: Argos Ltd
489 - 499 Avebury Boulevard
Central Milton Keynes
MK9 2NW