1
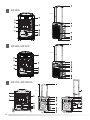
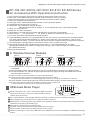
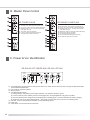
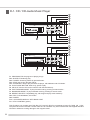
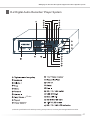
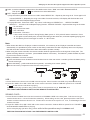
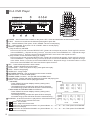
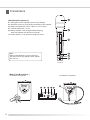
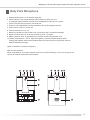
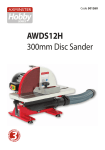
EP-700 / EP-2001G
EP-800 / EP-810 / EP-900 Series
Owner's Manual
Multipurpose Wireless Microphone
Digital Class-D PA Speaker System
M
P
3
R
E
P
E
A
T
1
A
L
L
F
O
L
D
E
R
S
H
U
F
F
L
E
P
R
O
G
R
A
M
R
E
P
E
A
T
1
A
L
L
A
B
C
D
FOLDER
A
B
POWER
STOP / EJ
REP / SHU
disc
OFF/ON
AC 100-240V
Multipurpose Wireless Microphone Digital Class-D PA Speaker System
Table Of Contents
Contents
p1
All accessories with operational instruction
p2
A / Wireless Receiver Module / USB-Audio Music Player
p3
B / Master Panel Control
p4
C / Power & Vol. Identification
p4
T / Tape Recorder With Auto Reverse
p5
D-1 CD / CD Audio Music Player
p6
D-2 Digital Audio Music Recorder & Player
p7
D-3 CD / USB / SD Audio Music Player
p8
D-4 DVD Player
p10
Transmitters
p12
Handheld Microphones
p12
Body Pack Microphone
p13
Specifications
p14
Note on Unit Installation
p16
Instruction For Changing Battery
p19
Introduction
Thank you for choosing Multipurpose Wireless Portable PA Amplifier System In order to perform at its
best, before operating the unit, please read this manual thoroughly, and retain it for future reference.
Please save this manual. The unit has an elegant design, with a rugged and durable case, reliable
performance, water resistance with fiber material, unusual PCB device, clear and powerful sound. It
is simple to operate. The unit is suitable for both indoor and outdoor use with duration of 6-8 hours,
depending on the volume size.
1.Charging time for the unit varies between 6-8 hours.
2.Wheels can fitted for effortless moving around.
01
EP-900
55cm(H)
13
D
M
P
3
R
E
P
E
A
T
1
A
L
L
F
O
L
D
E
R
S
H
U
F
F
L
E
P
R
O
G
R
A
M
R
E
P
E
A
T
1
A
L
L
A
B
C
D
A
B
3
14
10
6
11
12
EP-800 / EP-810
55cm(H)
13
D
M
P
3
R
E
P
E
A
T
1
A
L
L
F
O
L
D
E
R
S
H
U
F
F
L
E
P
R
O
G
R
A
M
R
E
P
E
A
T
1
A
L
L
A
B
C
D
A
B
3
6C
14
6B
10
6
11
12
EP-700 / EP-2001G
55cm(H)
FOLDER
D
POWER
STOP / EJ
REP / SHU
disc
3
6A
OFF/ON
AC 100-240V
10
11
12
EP-700
02
EP-2001G
Multipurpose Wireless Microphone Digital Class-D PA Speaker System
EP-700 / EP-2001G / EP-800 / EP-810 / EP-900 Series
All Accessories With Operational lnstruction
1. Carry Handle: To stretch or retract the carry handle by press up the button one touch.
2. Rear Cover: Fixed related operational units with audio accessories, such as CD player,
digital recording system, auto cassette player, wireless microphone modules, battery.
3. Front Cover: Speaker with fixed grill net.
4. Front Upper Cover: Optional high pitched speaker or close up without speaker.
5. Heat Sink Board: Heat sink use or close up.
6. Loudspeaker: (6A) Optional full range 8" speaker.
(6B) Optional full range 8" speaker, or 10" low pitched and (6C)1" high pitched speaker.
7. Trolley: For moving this unit
8. Grilled Net: To protect the speaker
9. Tripod Socket: For tripod stand and rotation 360 degree to enhance the acoustic fidelity.
10. Power On/Off: 「-」On, power start; 「0」Off, power off, please turn off electricity when no use.
11. AC Power Input: Meet with international voltage 90v-264v.
12. Lead Acid Battery:Instruction For changing Battery:To take out 2 pieces of screws and remove batteries plates
from main panel board and take batteries out. Please note to follow the correct operation in order to avoid
causing damage of battery. ( Positive-red line with red line terminal; negative-black line with black line terminal.)
13. The Storage Box: A storage space for microphone, remote control, and AC power cord.
14. Microphone Recharging Box: Simultaneously charge 4pcs of 1.2V/1300mA!2500mA for the spare
rechargeable batteries of microphone, red light as in charging, green continuous light as full load charged.
(EP-700/EP-2001G NO)
15.Carry handle with wheels
A. Wireless Receiver Modules
UDR-7F
USR-6F
4
5
6
7
USR-6FD
4
6
7
6
4
7
A1. RF Signal Indicator: The yellow LED RF lights up that when wireless audio signal are being received and
transmitted.
A2. The LED display: When select channels on (A4), the turned channel is showed on the display as well.
A3. AF Signal Indicator: The red LED AF lights up that microphone signal are being transmitted and received
when microphone turned on.
A4. Channel selector a. Revolving spindle of 16 users selectable channel.
A5. RA/RB: Diversity A/B indicator; the LED lights glow when the receiver detects
RF signals from the transmitter. If it is only one light glows means only one signal received from one antenna.
A6. Power ON/OFF /Volume Knob: Adjust by turning clockwise when power is on while volume up microphone.
A7. Volume control: Rotate volume knob clockwise to increase volume to desire level
or counterclockwise to decrease volume until the power switch off.
1
USB-Audio Music Player
2
3
Error
4
5
6
7
Repeat
1 Power ON/ OFF/ VOL: Turn it clockwise to high volume up
ON
8
which is turning it on or turn it to anticlockwise to reduce
OFF
volume until off position.
2 Error LED indicator: The red light indicator will flash on while it is error reading or playing.
3 Stop: Stop playing songs while it is on playing mode or stop all.
4 EQ/ Repeat: To choosing jazz/ pop/ classic/ rock equalizer mode or 3 seconds to the single repeat and
repeat all music songs by pressing up.
5 Play/ Pause: Start to play or pause to play.
6 Forward mode: Press button to forward search music songs.
7 Rewind mode: Press button to rewind search music songs.
8 USB connection port: Insert any USB device; the USB device must be compatible to USB mass storage
device.
DIGITAL AUDIO PLAYER
03
B. Master Panel Control
B1
B1
B2
B3
LINE IN
B4
B2
EP-700/EP-2001G
EP-800/EP-810/EP-900
B1. The CD VOL: Volume control with on/off.
B3
B2: The TAPE VOL.: Tape volume control with on/off.
B3. Line in VOL: Volume control for external audio input.
B4. 6.3Φ/RCA Audio Line in: To amplify external audio
inputs likes CD, DVD.
B4
B5. The volume control for wired MIC..
B6. 6. 3O and XLR2 wire Microphone input jack.
B7. The balanced input XLR Jack for MIC.
LINE IN
B5
B5
B6
B6
B7
B8
B7
B9
B1. The CD VOL: Volume control with on/off.
B2: The TAPE VOL.: Tape volume control with on/off.
B3. Line in VOL: Volume control for external audio input.
B4. 6.3Φ/RCA Audio Line in: To amplify external audio
inputs likes CD, DVD.
B5. Digital Echo volume control. (EP-700/EP-2001G NO)
B6. The volume control for wired MIC.
B7. The Wireless Microphone Priority.
B8. 6. 3O and XLR2 wire Microphone input jack.
B9. The balanced input XLR Jack for MIC.
ON
WIRELESS MIC.
PRIORITY
OFF
C. Power & Vol. Identification
EP-2001G / EP-700/EP-800 / EP-810 / EP-900
CHARGE
L.A.B ATT
ON
OFF
C1
C2
C3
C4
C5
C6
C7
C8
C1. Lead Acid battery charge indicator: Press power switch to on while connect with AC power to charge the lead acid battery.
(for EP-800/EP-810/EP-900)
C2. The socket of extension speaker.
C3. DC IN 24V/3A
C4. The Wireless MIC priority
(1). All signal light-- Fully battery power Signal reduced—The decrease in battery power
(2). Connect with AC power without press the recharging button, all signal lightened: Fully power condition..
(3).Connect with AC power and press the recharging button, Flashing green: shows the Situation for battery charging
(4). Solid Red- turn on the power.Red signal off -- The power has been shut down or device in low battery power.
C5.: Mix Out.: Connect with wireless transmitter or PA broadcasting system.
C6.: Main VOL.
C7.: Bass: Bass of control microphone and music.
04
Multipurpose Wireless Microphone Digital Class-D PA Speaker System
T-1 . Tape Recorder With Auto Reverse
T1. EJECT MODE: To slot TAPE or draw it out.
T2. DIGITAL COUNTER: LCD counter with back light.
T3. RESET MODE: Reset digit counter.
T4. SPEED ADJUSTMENT: Fast to play mode.
T5. PLAY MODE SELECTOR:
T6. STOP MODE: Removing cassette to press stop while it is playing.
T7. FAST FORWARD PLAY MODE: Fast to play when pressing
this mode.
T8. FORWARD PLAY MODE: To play forward mode by pressing.
T9. REVERSE SIDE MODE: To play reverse mode by pressing.
T10. REWIND MODE: Rewind tape play mode.
T11. RECORD MODE
Note On Unit Operation :
Make sure the recorder is turned off by pressing the stop mode before turning off the main
power switch control. The cassette operating switch is the second switch located on the right hand
side, turn anti-clockwise to reduce volume and switch off.
※For:EP-700 / 800 / 810 / 900
T-2 . Tape Location of Controls
T1. EJECT MODE: To slot TAPE or draw it out.
T2. DIGITAL COUNTER: 4digit LCD counter with back light.
T3. RESET MODE: Reset the 4 digit counter.
T4. SPEED ADJUSTMENT: Fast to play mode.
T5. PLAY MODE SELECTOR:
T6. FAST FORWARD PLAY MODE: F.WD: Fast forward in a cycle
T7. FORWARD PLAY MODE: To play forward mode by pressing.
T8. STOP MODE: Removing disc before press stop while it is playing.
T9. REVERSE SIDE MODE: To play reverse side mode by pressed stop mode.
T10. REWIND MODE: Fast reverse in a cycle
T11. RECORD MODE
NOTE ON UNIT OPERATION:
Make sure the recorder is turned off by pressing the stop mode before turning off the main
power switch control. The cassette operating switch is the second switch located on the right hand
side, turn anti-clockwise to reduce volume and switch off.
※For:EP-2001G
05
D-1. CD / CD-Audio Music Player
D1
D2a
D3a
D4
D5
D6
D7
D10
D8
D9a
D1
D2b
D3b
D4
D5
PITCH
LO
HI
D6
D10
D11
D7
D8
D9b
D1. PROGRAM: Edit the program of playing songs.
D2a. SHUFFLE: Randomly play.
D2b. FOLDER: Searching folders by pressed button.
D3a. STOP: stop to play the laser player.
D3b. STOP/EJECT: Stop to play the laser CD player, CD withdraws and CD inhales.
D4. PLAY/ PAUSE BUTTON: Start to lay, pause to play.
D5. CD SLOT: Slot the CD into the machine with the label side up.
D6. FAST FORWARD MODE: To play forward mode by pressing to search tracks. .
D7. BACKWARD MODE: To play backward mode by pressing to search tracks.
D8. REPEAT/ SHUFFLE: Repeatedly play, edit songs and play tracks randomly.
D9a. EJECT: CD Withdraws, CD inhales.
D9b. POWER
D10. LCD SCREEN DISPLAY WITH BACK LIGHT
D11. PITCH CONTROL (option)
This CD player only accepts 12cm Disk like CD_R and CD_RW. Do not attempt to insert CD_ROM, CD_I, CDV,
Computer CD and 8cm CD Disk. Please make sure do not attach any other material than the supplied standard
CD Disk or otherwise causing damage to the magnetic head.
06
Multipurpose Wireless Microphone Digital Class-D PA Speaker System
D-2.Digital Audio Recorder/ Player System
n
12
Enter
※Above specifications fit with upcoming new products, and may be changed without notice.
07
D-3. CD / USB / SD Audio Music Player
13 15 14
1 2 3 4 5
6 7 8 9
16
9a
17
18
19
M
P
3
R
E
P
E
A
T
1
A
L
L
F
O
L
D
E
R
S
H
U
F
F
L
E
P
R
O
G
R
A
M
C
D
A
B
5
3
4
2
24
13 10 14
11
12
15
8
9b
20
21
22
23
1 POWER :ON / Press Power to switch on the power. OFF / Press and hold Power to switch off the power.
2 SD / USB / CD:Press this key will changed to USB, SD or CD mode.
3 FB:Select backward. Then press “ PLAY / PAUSE “ back to normal playing.
4 F.F:Select forward. Then press “ PLAY / PAUSE “ back to normal playing.
5 FOLDER :Select files. Available for playing DM3 format. Press each FOLDER key a time,
it will change to next catalogue.
6 REV:Press to desired previous track number.
7 F.WD:Press to desired next track number.
8 PLAY/PAUSE:Press once stat to play, press again pause to stop.
9 STOP/EJECT:Press to stop playing and press to disk ejected gradually.
9a EJECT:press to disk ejected gradually.
9b STOP:to stop playing.
10 INFRARED WINDOW:Pick up signal from the remote controller.
11 USB Connector.
12 SD/MMC CARD Connector:Accepts SD Card and MMC Card.
13 LO ( PITCH ):To adjust slow-speed play. Press once, the screen will indicate PITCH: -1,
press one time, it will be -1. It has 10 steps of speed variation. (option)
14 HI ( PITCH ):To adjust high speed play. Press once, the screen will indicate PITCH: 1, press one time,
it will be +1. It has 10 steps of speed variation. (option)
15 NOR/PITCH :To adjust the speed to zero. Press NOR/PITCH key, the speed will be zero to back to normal play.(option)
16 LCD DISPLAY:Display CD status including track number and playing time.
17 PROG:Can memorize the self-set playing procedure.
1) Play the ordinary CD ROM, press " PROG” key a time, and then select the number 0~9 from the
combination key, for example: press 2 and 3, then LCD will display "23", then press
Confirm key to
complete memory setup; LCD will display "23:01". If press "5" again, and press
key, LCD will
display "05:02", and so it has set "23" and "05" as memorized songs. And press
play key, it will play all
of the memorized songs. Meanwhile, LCD indicator will display "MEMORY" and the playing song numbers.
If want to cancel all of the memorized songs, press " PROG” key for 2 times repeatedly.
2)To play MP3 form, press "PROG” key once, and select the song numbers 0~9 from the catalogue of combination
key, for example: press 2 and then press
Confirm key, and then press 3, and then press
key, then LCD
will display 02 03:01", so it has set up 02 as memorized in the catalogue, 03 is the song in the catalogue and 01 is
the first memorized song. Repeat this way to operate and memorized more songs. After confirmation the
memorized playing songs, then press
play key to play all the memorized songs. Meanwhile, LCD
indicator will display "MEMORY" and the playing song number. If want to cancel all of the memorized songs,
press "PROG” key for 2 times repeatedly
08
Multipurpose Wireless Microphone Digital Class-D PA Speaker System
18 RAN:A random selection is played from alive labile tracks. Press "RAN” and LCD it
Then press
or
shows SHUFFLE.
can selection from alive labile tracks.
19 REP:Repeat mode.
1) Play the ordinary CD ROM. Press once LCD it shows REPEAT ALL : Repeat by the songs in all. Press again LCD
it shows REPEAT 1 : Repeat by the song in the folder. Press the 3rd time, LCD display will eliminate the word
REPEAT, and cancel Repeat Playing function.
20
21
22
23
2) To play MP3 form. Press each “REP” key a time; it will change to “REPEAT ALL", “REPEAT FOLDER”,
“REPEAT 1", the last to cancel Repeat Playing function. “REPEAT FOLDER”: Repeat all the songs in the folder.
:To next track.
:Skip to the former track.
:ON / OFF Mute.
confirmation:Execution.
24 “A→B”:It is the zone memory function. During Playing State, press “A→B” A point will start to memorize. Press
“A→B” again to memorize B point, and stop memorizing at the same time, and start repeating playing point
“A→B” Memory Zone. Press again to cancel “A→B” Function.
Note:
1.When inserts the disk into CD player or takes out the disk, it is necessary to let CD player insert disk and return
automatically. It is prohibited to push or take out the disk by hand before the disk completely return from CD player,
thus will cause the machine to be broken down and unable to operate normally.
2.When using the remote controller, the remote controller shall be appointed to the receiving hole of face plate. The
optimal receiving distance is 3 meters. (the available distance is 5 meters.) The batteries ( model CR2025 3V) shall
be put into the remote controller.
3.Battery installation of remove controller.
1 Press and hold the tenon located on lower left-hand corner of the rear remote controller, pull out the battery set by
the slot at the right.
2 Place the battery〈positive electrode faces upwards〉according to its correct polarity.
3 Push the battery compartment back to the fixed position.
USB:
1. Insert USB into the insert hole of USB in the face plate. If don't need to use USB, may take it off directly.
2. Press SD / USB / CD or SD / USB / CD on the remote controller. Selects USB then press PLAY / PAUSE
or
on the remote controller to playing.
As for other playing operation way, please refer to the operation way in PLAYING and
THE FUNCTIONS RESPECTIVELY ON THE REMOTE CONTROLLER.
SD/MMC CARD:
1. Insert SD Card or MMC Card into the insert hole of SD/MMC CARD in the face plate. Pull the card to get
stuck with the tenon. It then finished the assembly. When taking out the card, please push the card to the
bottom and then release to shout it out. Please don't use the force to pull it out. If so, it will damage the card
and the machine.
2. Press SD / USB / CD or SD / USB / CD on the remote controller. Selects SD then press PLAY / PAUSE or
on the remote controller to playing.
As for other playing operation way, please refer to the operation way in PLAYING
and
THE FUNCTIONS RESPECTIVELY ON THE REMOTE CONTROLLER.
09
D-4. DVD Player
35
14
1 2 3 4 5
6 7 8 9
36
37
2
15
16
27
M
P
3
R
E
P
E
A
T
1
A
L
L
F
O
L
D
E
R
S
H
U
F
F
L
E
P
R
O
G
R
A
M
R
E
P
E
A
T
1
A
L
L
A
B
C
D
10
1
2
3
4
5
6
7
8
9
10
11
12
13
14
15
16
17
18
19
20
10
11
12
A
B
13
19
20
28
29
30
31
32
33
34
5
8
9
17
18
21
22
23
24
25
26
POWER :ON / Press Power to switch on the power. OFF / Press and hold Power to switch off the power.
EJECT :Press once to take out the disk and press again to eject disk.
FB :Select backward. Then press “ PLAY / PAUSE “ back to normal playing.
F.F :Select forward. Then press “ PLAY / PAUSE “ back to normal playing.
REPEAT:Repeat mode.
1) Play the ordinary CD ROM.
Press once the screen it shows REPEAT OFF : Means do not repeat at present. Press again the screen
it shows REPEAT 1 : Repeat the song. Press 3 rd time the screen shows REPEAT ALL : Repeat all songs.
Press the button 4 th times the screen shows REPEAT OFF and cancels the repeat function.
2)Play the MP3 format and disk building-in catalog.
Press once the screen it shows REPEAT OFF : Means do not repeat at present. Press again the screen
it shows REPEAT 1 : Repeat the song. Press 3 times the screen shows REPEAT DIR : Repeat all songs
in the folder. Press 4 th time the screen shows REPEAT ALL : Repeat all songs. Press the button 5 th times
the screen shows REPEAT OFF and cancels the repeat function.
REV :Press to desired previous track number.
F.WD :Press to desired next track number.
PLAY/PAUSE :Press once pause to stop, press again stat to play.
STOP:Press to stop playing.
VIDEO OUT:Image output.
INFRARED WINDOW:Pick up signal from the remote controller.
USB Connector:Insert the USB system.
SD/MMC CARD Connector:Accepts SD Card and MMC Card.
LCD DISPLAY:Display CD status including track number and playing time.
PROG:can memorize the self-set playing procedure.
1)CD MODE:
PROG
‧Press "PROG” the screen displays memory setting menu,
1.[09]
5.[--]
9.[--]
13.[--]
as above illustraction.
2.[09]
6.[--]
10.[--]
14.[--]
‧Set catalog and song number then press PLAY to start play
3.[09]
7.[--]
11.[--]
15.[--]
memoried songs, press CLEAN to cancel the memoried song.
4.[09]
8.[--]
12.[--]
16.[--]
2)MP3 MODE OR DISK BUILDING-IN CATALOG.:
PLAY
CLEAR
‧Press "PROG” the screen displays memory setting menu,
as above illustraction.
‧Set catalog and song number then press PLAY to start play
1. [01:09] 5. [--:--]
9. [--:--] 13. [--:--]
memoried songs, press CLEAN to cancel the memoried song.。
2. [02:04] 6.[--:--] 10.[--:--] 14.[--:--]
RANDOM:A random selection is played from alive labile tracks. 3 [02:01] 7.[--:--] 11.[--:--] 15.[--:--]
4.[--:--]
8.[--:--] 12.[--:--] 16.[--:--]
Press once to start this function.
NEXT : To next track.
PLAY
CLEAR
PREV. : Skip to the former track.
:Press once to activate fast reverse in a cycle as fellows : 2× → 4× → 8× → 20×. Then press “PLAY/PAUSE”
back to normal play.
:Press once to activate fast forward in a cycle as fellows : 2× → 4× → 8× → 20×. Then press “PLAY/PAUSE”
back to normal play.
Multipurpose Wireless Microphone Digital Class-D PA Speaker System
21
22
23
24
25
26
27
28
29
30
31
32
33
34
35
36
37
PBC:To choose whether to play optional catalog of VCD.
Direction Functions : Moving upwards / downward / right / left for setting up. Using on screen to operate it.
“ENTER” Confirmation : Input execution.
SETUP:Press “SETUP” the screen will display the setup menu.
RETURN:Press the button once to back to the program menu and keep present setup ( support DVD and VCD disk ).
ZOOM:When playing DVD or VCD, press this key to enlarge a picture in a cycle as fellows :
2× → 3× → 4× → 1/2× → 1/3× → 1/4× → zoom off.
DIS:To indicate the play function. Using on screen to operate it.
Press 1 time: display "play time".
Press 2 times: display "play time" and " total remained play time in CD "
Press 3 times: display "play time" and "remained time for the playing songs"
Press 4 times: cancel DIS function.
CD/USB/SD:Selection DISC, USB UMS DISC, or SD CARD. Press once "CD/USB/SD” The screen will show READ
CD, READ USB and READ CARD, and then use
to select and press ENTER to confirm.
“A→B”:It is the zone memory function. During Playing State, press “A→B” A point will start to memorize.
Press “A→B” again to memorize B point, and stop memorizing at the same time, and start repeating
playing point “A→B” Memory Zone. Press again to cancel “A→B” Function.
GOTO:Press once the screen above shows the presently playing time, song section, and so on, using the
to set up the playing time and sections then press ENTER confirm.
TITLE:Must use in DVD disk. Press this button some DVD dusk can display DVD title content or play from the first title.
MENU:Press the button will turn to main menu list ( support DVD and VCD disk )
ANGLE:Use in some special DVD disk. Press the key views scenes from different camera angles.
SLOW:Press this key to slow down the motion playback at variable speeds as fellows :
1/7 → 1/6 → 1/5 → 1/4 → 1/3 → 1/2 and then cancel the function.
:ON / OFF Mute. Press once to mute and press again to cancel mute function.
SUBTITLE:Press this button to select subtitle in DVD or VCD disk.
AUDIO:Swap Channels : Left / Right Channel and Mono selection.
Note:
1.When inserts the disk into CD player or takes out the disk, it is necessary to let CD player insert disk and return
automatically. It is prohibited to push or take out the disk by hand before the disk completely return from CD player,
thus will cause the machine to be broken down and unable to operate normally.
2.When using the remote controller, the remote controller shall be appointed to the receiving hole of face plate. The
optimal receiving distance is 3 meters. (the available distance is 5 meters.) The batteries ( model CR2025 3V) shall
be put into the remote controller.
3.Battery installation of remove controller.
1 Press and hold the tenon located on lower left-hand corner of the rear remote controller, pull out the battery set by
the slot at the right.
2 Place the battery〈positive electrode faces upwards〉according to its correct polarity.
3 Push the battery compartment back to the fixed position.
USB:
1. Insert USB into the insert hole of USB in the face plate. If don't need to use USB, may take it off directly.
2. Press SD / USB / CD or SD / USB / CD on the remote controller. Selects USB then press PLAY / PAUSE
or
on the remote controller to playing.
As for other playing operation way, please refer to the operation way in PLAYING and
THE FUNCTIONS RESPECTIVELY ON THE REMOTE CONTROLLER.
SD/MMC CARD:
1. Insert SD Card or MMC Card into the insert hole of SD/MMC CARD in the face plate. Pull the card to get
stuck with the tenon. It then finished the assembly. When taking out the card, please push the card to the
bottom and then release to shout it out. Please don't use the force to pull it out. If so, it will damage the card
and the machine.
2. Press SD / USB / CD or SD / USB / CD on the remote controller. Selects SD then press PLAY / PAUSE or
on the remote controller to playing.
As for other playing operation way, please refer to the operation way in PLAYING and
THE FUNCTIONS RESPECTIVELY ON THE REMOTE CONTROLLER.
11
Transmitters
H1
[ Handheld microphones ]
H1. Steel grille: Protect capsule to prevent any damage.
H2. Aluminium neck ring: logo printing and fixed top and capsule.
H3. Battery Compartment: 1.5V x 2 piece or 1.2 x 2 piece..
H4. Channel switch from 1 to 16.
H5.Battery indicator: This red light indicator flashing
when the batteries are almost out of power.
H6. Power switch on / off: Control microphone power.
H2
H3
H4
Note:
Remove the batteries if you do not plan to
use the unit for a long period of time. Please
turn it to off.
H5
H6
UH-816
[ Body Pack Microphone ]
A. Lavaliere microphone
12
B. Headset microphone
Multipurpose Wireless Microphone Digital Class-D PA Speaker System
Body Pack Microphone
1. External antenna jack: 1/4 for antenna input jack.
2. Power indicator: The red light indicator will be flash once when turn it on.
The red light indicator will be solid red when the batteries are almost out of power.
3. 3.5mmφmicrophone input jack or mini XLR jack.
4. Volume Control: Adjusted by turning clockwise to the volume adjustment knob.
5. Power switch: Power on / Power off.
6. Channel selector from 1 to 16.
7. Buckle is fixed with a screw so that is can conveniently clip on the belt comfortably.
8. Buckle is fixed on the unit. It can set revolved up to 90°by fingers.
9. Battery chamber cover: To put batteries in and take out from this chamber cover.
10. Battery compartment: 1.5V x 2. Align the negative or positive polarities properly when
inserting the batteries. Remove the batteries when not been used for a long period of time to
keep the batteries life longer.
Options: Headset or Lavaliere microphone.
Note On Unit Operation:
When using lavaliere, try to place capsule close to the mouth while doing, so do not turn high up the
volume as it cannot achieve the best reception.
10
9
13
EP-900 Specifications
EP-810 Series
EP900A
EP-900D
EP-900/TD
EP-900/DRA
EP-900/DVD
(High Efficiency)
EP-900/DMUS
UHF 600-960MHz(UHF863-865MHz)
RMS 150W(Class-D Digital Amplifer Syster)
/
2
12V/5Ah(2pcs)(for microphone as 1.2V/1.3Ah)x4pcs
EP-810 Specifications
EP-810 Series
EP-810A
EP-810D
EP-810/TD
EP-810/DRA
UHF 600-960MHz(UHF863-865MHz)
RMS 120W(Class-D Digital Amplifer Syster)
/
2
14
EP-810/DVD
EP-810/DMUS
Multipurpose Wireless Microphone Digital Class-D PA Speaker System
EP-800 Specifications
EP-800DVD
UHF 600-960MHz(UHF863-865MHz)
RMS 100W(Class-D Digital Amplifer Syster)
2
EP-700 / EP-2001G Specifications
EP-700/EP-2001G Series
EP-700A
EP-2001GA
EP-700D
EP-2001GD
EP-700TDM
EP-2001GTDM
EP-700DAR
EP-2001GDAR
EP-700DVD
EP-2001GDV
EP-700DMUS
EP-2001GDMUS
UHF 600-960MHz(UHF863-865MHz)
RMS 100W(Class-D Digital Amplifer Syster)
2
15
Chanel Specifications
Frequency range
UHF PLL
Carrier Frequency Range
UHF 600-960MHz
Stability
6
0.005%,provide redeem temperate
Deviation
6
40KHz, with level Limiting circuit controlled
Dynamic range
>110dB
S/N Ratio
>105dB
<0.5%
T.H.D.
Squelch Circuit
Pilotone squelch / PLL Synthesized Receiver /
Non-Diversity
Frequency Response
50Hz~18KHz6
3dB
Receiver Mode
Quartz and Tone Squelch True Diversity/
Single Receiver/Non-Diversity or PLL System
Wireless Microphone Capsule Type
Dynamic Capsule or Condenser Capsule
Wireless Transmitter Ratio
Approx 10mW
Transmitter Battery
AA No 3 Batteries (2 pcs) / 9V Battery (1pc)
Micphone Specifications
MODEL
Carrier frequency range
Pre-programmed Frequency
Frequency stability
Frequency response
UPL-83
600-960MHz
Preset 16 Channels
<0.005%
50Hz-18KHz( ± 3dB)
Antenna
External antenna
Battery
1.5v x 2 or
1.2V x 2(AA UM-3)
Weight
100g
Transmitter Model
UH-816
Outlood design
Microphone capsule
Carrier Frequency range
Handheld
Dynamic(EP-900 device ECM)
600-960MHz
Frequency Stability
Frequency Response
±0.005%
50Hz-18KHz(±3dB)
Antenna
Built in
S/N Ratio
80dB overall
RF Output Power
10mW MAX.
Currency Consumption
100mA ±10mA
Battery
1.5V x 2 Pecs
Weight
230g
Note On Unit Installation
1. To assembly this unit should be away from ground (1 meter ~ 1.5 meter) to get best position.
Option with tripod stand (ST-3B)
2. Adjust the volume to the minimum position (Main volume control/CD or TAPE volume) by any volume control.
3. When charging the batteries, the(Ⅱ) green light indicator is blinking. And when the rechargeable batteries are fully
charge, the green light indicator will be solid green.
4. The receiver of this unit can be changed frequencies which is high quality product with easy operation.
5. The Extension speaker system must be to 4Ω/80W handling and power impedance to be connected and insert into
6.3mm external jack.
Troubleshooting And Maintenance Guide
1. Make sure positive and negative when changing the rechargeable batteries.
2. To keep batteries service longer, switched off while not using this unit.
3. No need to connect with power cord , the duration of operation with speaking mode could be 3-10 hours
(It depends on volume)When the green signal remain last , it shows low battery status, please recharge the battery right
away and switch the power as off, Flashing green–Indictor Recharging the battery.Solid green signal–Fully battery power.
4. Remove the batteries if you do not plan to use the unit for a long period of time. To keep full batteries, please
charging once between 2-3 month without fixed schedule.
Note on Unit:
1. No altering or remodeling, this can cause malfunctioning.
2. No dropping or strong impacts, this may damage the unit.
3. Do not leave the unit exposed to direct sunlight for long periods of time.
4. Do not use trolley on the ragged ground and avoid any damage. Technical service: www.ecen.com.tw
16
Multipurpose Wireless Microphone Digital Class-D PA Speaker System
Instruction For Changing Battery
1. Please switch power off before start to changing batteries.
2.Take out
4 pieces of screws and remove batteries plates from main panel board and take batteries out.
Install batteries 12V/4.5A into battery compartment.
3.Make sure the battery pack is properly inserted then closed the cover by tight up the screws.
To connected red line into positive R1 red line terminal, black line into
negative B2 black line terminal, to gathered negative B1 and positive R2 to connect each and inserted.
4.Note: Make sure the pole with color. Refer to Instruction for Changing Battery Diagram 1. Do not make error
attached or otherwise causing damage or power is not working in perfect condition. To keep full batteries,
if you do not plan to use the unit for a long period of time.
Note: Diagram 1.
Red
Black
Warning
Federal Communication Commission Interference Statement
This equipment has been tested and found to comply with the limits for a Class B digital device, pursuant to Part 15 of the
FCC Rules. These limits are designed to provide reasonable protection against harmful interference in a residential installation.
This equipment generates, uses and can radiate radio frequency energy and, if not installed and used in accordance with
the instructions, may cause harmful interference to radio communications. However, there is no guarantee that interference
will not occur in a particular installation. If this equipment does cause harmful interference to radio or television reception,
which can be determined by turning the equipment off and on, the user is encouraged to try to correct the interference by one
of the following measures:
●Reorient or relocate the receiving antenna.
●Increase the separation between the equipment and receiver.
●Connect the equipment into an outlet on a circuit different from that to which the receiver is connected.
●Consult the dealer or an experienced radio/TV technician for help.
FCC Caution: To assure continued compliance, any changes or modifications not expressly approved by the party responsible
for compliance could void the user's authority to operate this equipment. (Example use only shielded interface cables when
connecting to computer or peripheral devices).
CAUTION
RISK OF ELECTRIC SHOCK
DO NOT OPEN
CAUTION :To reduce the risk of electric shock, do not remove the cover, No user serviceable
parts inside. Refer servicing to qualified personnel.
WARNING:To prevent fire or electric shock, do not expose this equipment to rain or moisture.
Explanation Of Graphical Symbols
The lightning flash with arrowhead symbol, within an equilateral triangle, is
intended to alert the user to the presence of uninsulated dangerous voltage
within the products enclosure that may be of sufficient magnitude to
constitute a risk of electric shock to humans.
The exclamation point, within an equilateral triangle, is intended to alert the
user to the presence of important operating and maintenance(servicing)
instructions in the literature accompanying the appliance.
17
ECEN ELECTRONICS CO., LTD.
SENRUN ELECTOINICS CO., LTD.
No.26-13-1 Fongle Road, Beitun District.
Taichung City, 40673, TAIWAN.
TEL:+886-4-2422-3369
FAX:+886-4-2422-4360
e-mail:[email protected]
http://www.ecen.com.tw
Distributor