1
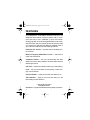
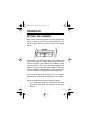
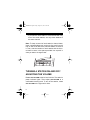
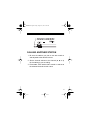
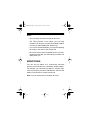
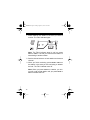
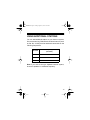
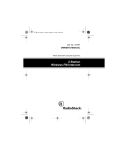
43-490.fm Page 1 Friday, August 13, 1999 9:52 AM
Cat. No. 43-490
OWNER’S MANUAL
Please read before using this equipment.
Three-Station Wireless Intercom
43-490.fm Page 2 Friday, August 13, 1999 9:52 AM
FEATURES
Your RadioShack Three-Station Wireless Intercom is an
advanced three-channel intercom system that is convenient and easy to use. Installation is quick and simple.
Simply plug each of the three supplied stations into a standard AC outlet, and you’re ready to send and receive calls
or to monitor an area where a station is installed. Each of
your intercom’s stations has the following features:
Precision PLL Circuit — provides clear and stable communications.
Built-in Frequency Modulation Circuit — reduces line
noise and interference.
3-Channel Control — lets you communicate with both
stations at once or talk privately to another station without
disturbing the third.
Call Tone — alerts other stations before you start talking.
Lock — lets you set a station for monitoring or other oneway communication.
Power Indicator — lights to show that the station is on.
Talk Indicator — lights to let you know when you are
transmitting to other stations.
© 1997 Tandy Corporation.
All Rights Reserved.
RadioShack is a registered trademark used by Tandy Corporation.
2
43-490.fm Page 3 Friday, August 13, 1999 9:52 AM
WARNING: To reduce the risk of
fire or shock hazard, do not expose this product to rain or moisture.
CAUTION
RISK OF ELECTRIC SHOCK.
DO NOT OPEN.
!
CAUTION: TO REDUCE THE RISK OF
ELECTRIC SHOCK, DO NOT REMOVE
COVER OR BACK. NO USER-SERVICEABLE PARTS INSIDE. REFER SERVICING TO QUALIFIED PERSONNEL.
This symbol is intended to alert you to the presence of uninsulated dangerous voltage within the product’s enclosure
that might be of sufficient magnitude to constitute a risk of
electric shock. Do not open the product’s case.
!
This symbol is intended to inform you that important operating and maintenance instructions are included in the literature accompanying this product.
The graphical symbols with supplemental markings are on
the bottom of the unit.
3
43-490.fm Page 4 Friday, August 13, 1999 9:52 AM
CONTENTS
Installation ................................................................... 5
Mounting the Stations ............................................. 6
Operation ...................................................................... 7
Setting the Channel ................................................ 7
Turning a Station On and Off/
Adjusting the Volume .............................................. 8
Calling Another Station ........................................... 9
Monitoring ............................................................. 10
Using Additional Stations ...................................... 12
Care and Maintenance .............................................. 13
The FCC Wants You to Know ............................... 14
4
43-490.fm Page 5 Friday, August 13, 1999 9:52 AM
INSTALLATION
You can install the stations almost anywhere there is a
standard AC outlet. Simply plug each station into an AC
outlet, then place it directly on a desk, shelf, or table, or
mount it on a wall.
Important: You must connect all of the stations to AC
outlets connected to the same power line transformer. All
AC outlets in most residential and many commercial
properties are connected to the same power line transformer. Stations can transmit up to 300 feet and between
buildings as long as they are connected to the same power line transformer.
Caution: To prevent electric shock, one blade on the
power cord’s plug is wider than the other and the plug fits
only one way. If you cannot easily insert the plug, turn it
over and try again. Do not force it.
Note: Make sure you install the stations at least 10 feet
away from each other. Placing the stations too close together produces feedback and creates a squealing
sound.
5
43-490.fm Page 6 Friday, August 13, 1999 9:52 AM
MOUNTING THE STATIONS
To mount a station on the wall, you need two screws (not
supplied). The screws must have heads that fit into the
keyhole slots on the bottom of the stations.
Follow these steps to mount a station on the wall.
1. Select a location for the station. Then mark the
mounting screw locations on the wall 2 9/16 inches
(65.80 mm) apart, one above the other.
2. Drill two holes at the marked locations.
3. Thread a screw into each hole until the screw’s head
extends about 1/8 inch from the wall.
4. Align the keyhole slots on the bottom of the station
with the screw heads in the wall, then slide the station down onto the screws to secure it.
6
43-490.fm Page 7 Friday, August 13, 1999 9:52 AM
OPERATION
SETTING THE CHANNEL
Each station has three channels so you can select which
station or stations you want to communicate with. You
can also use a station to monitor sounds near another
station.
For example, you could set the station you installed in the
kitchen to Channel A, a station you installed in the family
room to Channel B, and a station you installed in a bedroom to Channel C. Then, using the station installed in the
kitchen, you can communicate with the station in the family
room by setting the channel selector to B, or with the station in the bedroom by setting the channel selector to C.
Or, if you set all stations to Channel A, you can communicate with both of the other two stations from any station.
Set the channel selector on each station as follows:
• If you want all the stations to communicate with each
other at the same time, set all stations to the same
channel.
7
43-490.fm Page 8 Friday, August 13, 1999 9:52 AM
• If you want to use a station to communicate with only
one of the other stations, set only those stations to
the same channel.
Note: To keep a record of each station’s channel letter,
insert a pointed object such as the tip of a pencil into the
hole on the cover above the channel selector to remove
it. Then, write the location of each station and the channel each is set to in the space provided. Use a pencil in
case you want to change it later.
TURNING A STATION ON AND OFF/
ADJUSTING THE VOLUME
Rotate OFF-VOLUME to the left until it clicks. The station’s
power indicator lights. Then adjust OFF-VOLUME to a
comfortable listening level. To turn off the station, rotate
OFF-VOLUME to the right until it clicks.
8
43-490.fm Page 9 Friday, August 13, 1999 9:52 AM
CALLING ANOTHER STATION
1. Be sure the stations you plan to use are turned on
and adjusted to the desired volume.
2. Set the channel selector to the channel (A, B, or C)
for the station(s) you are calling.
3. Press CALL. Each station that is turned on and set to
the selected channel sounds a tone.
9
43-490.fm Page 10 Friday, August 13, 1999 9:52 AM
4. Hold down TALK and speak in a normal voice. When
you finish speaking, release TALK and listen for the
response.
10
43-490.fm Page 11 Friday, August 13, 1999 9:52 AM
Notes:
• Only one party can talk on a channel at a time.
• The TALK indicator on the station you are using
remains lit as long as you hold down TALK or CALL,
or when you press LOCK (see “Monitoring”).
• If your voice sounds distorted, you might be speaking
too loudly or too close to the microphone.
• Be sure to set the channel selector back to your designated channel after you finish talking, so others can
easily reach you.
MONITORING
You can set any station so it continuously transmits
sounds in the area where it is located to another station.
For example, you could set the station in a baby’s bedroom to pick up any sounds in that bedroom, then use the
station in the kitchen to monitor the sounds.
Note: You can monitor only one station at a time.
11
43-490.fm Page 12 Friday, August 13, 1999 9:52 AM
1. Press LOCK on the station in the area you want to
monitor. The TALK indicator lights.
Note: The TALK indicator stays lit until you press
CALL or TALK. This lets you know that the station is
transmitting to another station.
2. Set the channel selector on both stations to the same
channel.
3. When you finish monitoring, press TALK or CALL on
the station in the area you are monitoring to release
the lock. The TALK indicator turns off.
Note: When you press LOCK on a station, you cannot call or talk to that station until you press TALK or
CALL to release the lock.
12
43-490.fm Page 13 Friday, August 13, 1999 9:52 AM
USING ADDITIONAL STATIONS
You can add additional stations to your intercom system.
We recommend any RadioShack wireless intercom (such
as Cat. No. 43-225) that has stations that transmit on the
following frequencies:
Frequency
(±2.5 kHz)
Channel
A
200 kHz
B
270 kHz
C
230 kHz
Note: If you want to set up a separate intercom system,
be sure it operates on a different frequency.
13
43-490.fm Page 14 Friday, August 13, 1999 9:52 AM
CARE AND MAINTENANCE
Your RadioShack Three-Station Wireless Intercom is an
example of superior design and craftsmanship. The following suggestions will help you care for your intercom
stations so you can enjoy them for years.
Keep the intercom stations dry. If they get
wet, wipe them dry immediately. Liquids
might contain minerals that can corrode the
electronic circuits.
Use and store the intercom stations only in
normal temperature environments. Temperature extremes can shorten the life of
electronic devices and distort or melt plastic parts.
Keep the intercom stations away from dust
and dirt, which can cause premature wear
of parts.
Handle the intercom stations gently and
carefully. Dropping them can damage circuit boards and cases and can cause the
intercom stations to work improperly.
14
43-490.fm Page 15 Friday, August 13, 1999 9:52 AM
Wipe the intercom stations with a damp
cloth occasionally to keep them looking
new. Do not use harsh chemicals, cleaning
solvents, or strong detergents to clean the
intercom stations.
Modifying or tampering with the intercom’s internal components can cause a malfunction and might invalidate
your intercom’s warranty and void your FCC authorization
to operate them. If your intercom stations are not performing as they should, take them to your local RadioShack
store for assistance.
THE FCC WANTS YOU TO KNOW
Your intercoms might cause TV or radio interference
even when they are operating properly. To determine
whether your intercoms are causing the interference, turn
them off. If the interference goes away, your intercoms
are causing it. Try to eliminate the interference by:
• Moving your intercoms away from the receiver
• Connecting your intercoms to outlets that are on a
different electrical circuit from the receiver
15
43-490.fm Page 16 Friday, August 13, 1999 9:52 AM
Limited Ninety-Day Warranty
This product is warranted by RadioShack against manufacturing defects in material and workmanship under normal use for ninety (90) days from the date of purchase from RadioShack company-owned stores and authorized RadioShack
franchisees and dealers. EXCEPT AS PROVIDED HEREIN, RadioShack MAKES
NO EXPRESS WARRANTIES AND ANY IMPLIED WARRANTIES, INCLUDING
THOSE OF MERCHANTABILITY AND FITNESS FOR A PARTICULAR PURPOSE, ARE LIMITED IN DURATION TO THE DURATION OF THE WRITTEN
LIMITED WARRANTIES CONTAINED HEREIN. EXCEPT AS PROVIDED
HEREIN, RadioShack SHALL HAVE NO LIABILITY OR RESPONSIBILITY TO
CUSTOMER OR ANY OTHER PERSON OR ENTITY WITH RESPECT TO ANY
LIABILITY, LOSS OR DAMAGE CAUSED DIRECTLY OR INDIRECTLY BY USE
OR PERFORMANCE OF THE PRODUCT OR ARISING OUT OF ANY BREACH
OF THIS WARRANTY, INCLUDING, BUT NOT LIMITED TO, ANY DAMAGES
RESULTING FROM INCONVENIENCE, LOSS OF TIME, DATA, PROPERTY,
REVENUE, OR PROFIT OR ANY INDIRECT, SPECIAL, INCIDENTAL, OR CONSEQUENTIAL DAMAGES, EVEN IF RadioShack HAS BEEN ADVISED OF THE
POSSIBILITY OF SUCH DAMAGES.
Some states do not allow the limitations on how long an implied warranty lasts or
the exclusion of incidental or consequential damages, so the above limitations or
exclusions may not apply to you.
In the event of a product defect during the warranty period, take the product and
the RadioShack sales receipt as proof of purchase date to any RadioShack store.
RadioShack will, at its option, unless otherwise provided by law: (a) correct the
defect by product repair without charge for parts and labor; (b) replace the product
with one of the same or similar design; or (c) refund the purchase price. All replaced parts and products, and products on which a refund is made, become the
property of RadioShack. New or reconditioned parts and products may be used in
the performance of warranty service. Repaired or replaced parts and products are
warranted for the remainder of the original warranty period. You will be charged for
repair or replacement of the product made after the expiration of the warranty period.
This warranty does not cover: (a) damage or failure caused by or attributable to
acts of God, abuse, accident, misuse, improper or abnormal usage, failure to follow instructions, improper installation or maintenance, alteration, lightning or other
incidence of excess voltage or current; (b) any repairs other than those provided
by a RadioShack Authorized Service Facility; (c) consumables such as fuses or
batteries; (d) cosmetic damage; (e) transportation, shipping or insurance costs; or
(f) costs of product removal, installation, set-up service adjustment or reinstallation. This warranty gives you specific legal rights, and you may also have other
rights which vary from state to state.
RadioShack Customer Relations, Dept. W, 100 Throckmorton St., Suite 600,
Fort Worth, TX 76102
We Service What We Sell
RadioShack
A Division of Tandy Corporation
Fort Worth, Texas 76102
6A7
3/97
811080730A
Printed in China