1
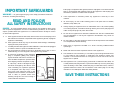
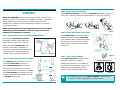
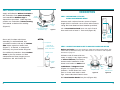
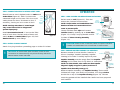
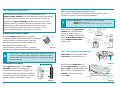
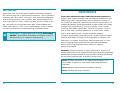
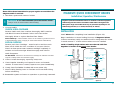
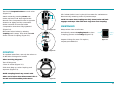
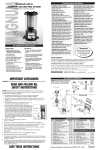
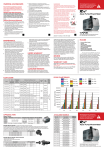
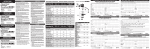
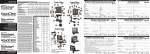
LIMITED WARRANTY
Within 2 years from the date of original purchase, Marineland Aquarium Products
will repair or replace, at its option, any MAGNUM 220/350 Canister Filter which
is deemed defective in workmanship or materials.
Please return the unit, together with proof of date of purchase, to your local dealer
or send unit, (postage paid) to:
MAGNUM
®
220/350
Self-Star ting
Conver tible Canister Filter s
MARINELAND AQUARIUM PRODUCTS
6100 Condor Drive
Moorpark, CA 93021
Damage or injuries resulting from negligence or misuse are not covered by
this warranty. Incidental or consequential damages are specifically excluded.*
This warranty gives you specific legal rights. You may also have other rights
which vary from state to state.
*Because some states do not allow the exclusion of incidental or consequential damages, this exclusion may
not apply to you.
C
U® L
LISTED
US
The Magnum 220/350 are listed by
Underwriters Laboratories to ensure
that they meet stringent U.S. and
Canadian safety requirements.
Marineland, BIO-Wheel, Magnum, Rite-Size,
and Black Diamond are trademarks of AQUARIA, Inc
AQUARIUM PRODUCTS
© 2001 Marineland
Printed in the U.S.A.
11/01 P/N 8706
OWNER’S MANUAL
IMPORTANT SAFEGUARDS
WARNING – To guard against injury, basic safety precautions should be
observed, including the following.
READ AND FOLLOW
ALL SAFETY INSTRUCTIONS
DANGER – To avoid possible electric shock, special care should be taken in the
use of aquarium equipment. For each of the following situations, do not attempt
repairs yourself. Return the appliance to an authorized service facility for service
or discard the appliance.
1. A. If the appliance falls into the water, DON’T reach for it! First unplug it and
then retrieve it. If electrical components of the appliance get wet, unplug the
appliance immediately.
B. If the appliance shows any sign of abnormal water leakage, immediately
unplug from the power source.
C. Carefully examine the appliance after installation. It should not be plugged
in if there is water on parts not intended to be wet.
D. Do not operate any appliance if it has a damaged cord or plug, or if it is
malfunctioning or if it is dropped or damaged in any manner.
E. To avoid the possibility of the appliance
plug or receptacle getting wet, position AQUARIUM
TANK
aquarium stand and tank to one side of a
wall mounted receptacle to prevent water
from dripping onto the receptacle or plug.
A “drip loop”, shown in the figure at right,
should be arranged by the user for each
APPLIANCE
cord connecting an aquarium appliance
to a receptacle. The “drip loop”, is that
part of the cord below the level of the POWER
SUPPLY
receptacle or the connector, if an extension CORD
cord is used, to prevent water from WITH
DRIP
traveling along the cord and coming in LOOP
contact with the receptacle.
If the plug or receptacle does get wet, DON‘T unplug the cord. Disconnect the
fuse or circuit breaker that supplies power to the appliance. Then unplug and
examine for presence of water in the receptacle.
2. Close supervision is necessary when any appliance is used by or near
children.
3. To avoid injury, do not contact moving parts or hot parts such as heaters,
reflectors, lamp bulbs, etc.
4. Always unplug an appliance from an outlet when not in use, before putting
on or taking off parts, and before cleaning. Never yank cord to pull plug from
outlet. Grasp the plug and pull to disconnect.
5. Do not use an appliance for other than intended use. The use of attachments
not recommended or sold by the appliance manufacturer may cause an
unsafe condition.
6. Do not install or store the appliance where it will be exposed to the weather
or to temperatures below freezing.
7. Make sure an appliance mounted on a tank is securely installed before
operating it.
8. Read and observe all the important notices on the appliance.
9. If an extension cord is necessary, a cord with a proper rating should be used.
A cord rated for less amperes or watts than the appliance rating may
overheat. Care should be taken to arrange the cord so that it will not be
tripped over or pulled.
10. This appliance has a polarized plug (one blade is wider than the other). As
a safety feature, this plug will fit in a polarized outlet only one way. If the plug
does not fit fully in the outlet, reverse the plug. If it still does not fit, contact a
qualified electrician. Never use an extension cord unless plug can be fully
inserted. Do not attempt to defeat this safety feature.
SAVE THESE INSTRUCTIONS
MAGNUM 220/350
SILENT POWER, MATCHLESS PERFORMANCE
The Magnum 350 Deluxe includes both the continuous duty Carbon/
Media Container and quick clean Micron Cartridge as standard
equipment...plus an Intake Extension Tube for deeper aquariums, a
Flexi-Brush Cleaning Tool, and two Magnum Quick Disconnect Double
Valves for easy setup and operation.
UNPARALLELED VERSATILITY
The only canister filters with a patented self-priming, bottom mounted
motor, the Magnum 220 & 350 provide the ultimate in power,
performance, easy setup and restart capability. Water enters the
canister, surrounds the media and flows through rather than around it.
No bypass...just total media contact and100% total filtration.
With the Magnum 220, mechanical and chemical filtration are provided
by the replaceable Rite-Size Bonded Filter Sleeve - a dense, high porosity
prefilter to trap dirt and debris - and a Carbon/Media Container filled
with 16 ounces of BLACK DIAMOND™ Premium Activated Carbon to
remove dissolved organic impurities. The Magnum 220 easily converts
from everyday 2-stage filtration to quick-clean micron water polishing
using the Magnum Micron Cartridge (sold separately).
The water polishing Micron Cartridge is standard equipment for the
Magnum 350. Ideal for quick-clean duty, the reusable pleated Micron
Cartridge has 320 square inches of surface area. It efficiently removes
microscopic particles, eliminating the need for diatomite powder...and
the more it filters, the more efficient it becomes! And the Magnum 350
is readily convertible from water polishing to everyday 2-stage filtration
via the Magnum Carbon/Media Container (sold separately).
2
ADVANCED MAGNUM SYSTEM DESIGN ALSO ALLOWS YOU
TO CONNECT THE OUTPUT TO A BIO-WHEEL PRO FOR
SUPERIOR WET/DRY BIOLOGICAL FILTRATION.
The rotating BIO-Wheel ® is an incredible
innovation in aquarium biological filtration.
Spray Bar driven, it is the ideal culture site
for beneficial, oxygen-loving bacteria...and
it eliminates the need for a far less effective
undergravel filter. The beneficial bacteria eliminate toxic
ammonia and nitrite on contact for a cleaner, healthier aquarium.
MAGNUM
CONVERTIBLE CANISTER FILTRATION FOR
A SPARKLING, HEALTHY AQUARIUM
Perfect for Freshwater or Marine
3
MAGNUM PARTS IDENTIFICATION
AND REPLACEMENT PARTS LISTS
4
Item No.
Key
220
350
350D
If parts are unavailable from store where filter was purchased, call our Customer
Service Department at (800) 322-1266, Monday - Friday from 8AM - 5PM
(Pacific Time). Please have your model number, part number and MasterCard or
VISA ready when ordering.
Note: All items bearing a “PA” designation are considered accessories rather than
replacement parts. They may be purchased at your local Marineland outlet.
PR 1401
PR 1402
PR 1404
PR 1410
PR 1411
PR 1412
PR 1413
PR 1414
PR 1416
PR 1420
PR 1421
PR 1422
PR 1430
PR 1437
1
2
3
4
5
5
6
7
8
9
10
11
12
13
•
•
•
•
•
•
•
•
•
•
•
•
•
PR 1450
PA 1462
PR 1469
PR 1470
PR 1472
PR 1474
PR 1475
PR 1476
PR 1477
PR 1478
PR 1479
PR 1480
PR 0010
PR 1517
PA 1341
PA 0140
PA 0145
PA 0114
PR 1590
n/s
14
15
16a
16b
17
18
19
20
20
21
22
n/s
23
24
25
26
27
•
•
•
•
•
•
•
•
•
•
•
•
•
•
•
•
•
•
•
•
•
•
•
•
•
•
•
•
•
•
•
•
•
• •
• •
•
• •
•
•
•
•
•
•
•
•
•
•
•
•
•
•
•
•
•
•
•
•
•
• •
•
•
• •
Description
Outlet Tube with Split Flow Diffuser
Intake Tube with Strainer
Tube Retainer Bracket with Bow
Hose Retainer Bands Pkg-4
Canister Cover w/Intake Diffuser
Canister Cover w/Intake Diffuser
O-Ring Cover Seal
Rubber Gasket Set
Carrying Handle
Core for Micron Cartridge
Core Set for Carbon Container
Carbon Container Screen
Impeller Exhaust Tube
Clip and Pin Set Pkg-4
O-RINGS - MAGNUM Quick Disconnect Valve Pkg-4
Inlet Strainer
Magnetic Impeller Assembly for 220
Magnet only, for 350
Impeller and Shaft Assy. w/o Magnet
Impeller Housing
Adhesive Foot Pads Pkg-14
Canister w/Clips
Sealed Motor & Switch Assembly
Sealed Motor & Switch Assembly
Stabilizer Leg
Sump Cap
UGF Adapter
Split Flow Diffuser
3/4” Ext. Tube w/Coupling
Micron Cartridge
Carbon/Media Container
Bonded Filter Sleeve
Silicone Lubricant
PARTS DIAGRAM AND IDENTIFICATION
NOTE: Some parts and their assembly differ for Model 220, 350
or 350D. Always follow instructions specifically for your Model
where indicated.
Prior to assembly, remove parts bag and filter from display
box. Inspect each part carefully and note that all parts are
included according to the diagram. If all is in order,
fill out the Warranty and Owner Information Card and
4
return it to Marineland. If any part is damaged or
missing, call Marineland Customer Service
at (800) 322-1266.
5
10
6
3
2
1
23
24
14
25
11
9
7
26
12
27
17
15
8
13
16a
16b
19
MAGNUM 350
Impeller Parts
Assembly
22
20
18
21
See Key for Parts I.D.
5
ASSEMBLY
PRIOR TO ASSEMBLY...remove parts bag and filter. Identify and
inspect all parts. If any parts are damaged or missing, return the
unit to dealer where purchased for replacement. Read all
instructions completely before attempting to install and operate
your Magnum filter.
NOTE: Most Magnum parts are preassembled and do not require
disassembly prior to installation. These few steps are the final
assembly and installation procedure.
STEP 1: INSTALL INTAKE AND OUTLET TUBE RETAINER BRACKET
Tube
The two-part Tube Retainer Bracket
Retainer
Assembly secures Outlet Tube and
Bracket
Intake Tube to aquarium frame. To
install, first slide Flexible Bow onto
bracket. Then attach assembly to
aquarium in desired location. Bow fits
inside aquarium, under frame, and
locks bracket in position (Figure 1).
Flexible Bow
STEP 2: INSTALL INTAKE TUBE AND STRAINER
Slide Strainer over long end of black
U-shaped Intake Tube (Figure 2a).
Attach Intake Extension if necessary.
If using Magnum to power an undergravel filter, Strainer will not be needed.
Slide UGF Adapter (provided) over end
of Intake Tube and rest Adapter on top
of Lift Tube (Figure 2b).
Outlet
Tube
STEP 4: INSTALL INTAKE AND OUTLET TUBES
Snap Intake Tube into desired side of
Stabilizer Bracket. Snap Outlet Tube
into available side of Retainer Bracket.
For optimum flow efficiency, position
Elbow below water level at all times
(Figure 4).
Figure 3
Intake
Tube
Outlet
Tube
Elbow
Diffuser
Figure 1
STEP 5: ADJUST FLOW DIVERTERS
Adjust Flow Diverters (located inside
Split Flow Diffuser) to desired
directional preference. In addition to
providing hi-lo circulation (Figure 5a),
diffuser may be rotated for wider
surface area coverage (Figure 5b).
UGF Adapter
Intake Extension
Figure 4
Flow Diverter Adjustment
Flow Diverters
Figure 5a
Lift
Tube
Strainer
6
Split Flow
Diffuser
NOTE: Water
level should be
above Elbow.
Intake
Tube
Figure 2a
STEP 3: INSTALL SPLIT FLOW DIFFUSER
Install Split Flow Diffuser carefully on Outlet Tube as shown (Figure 3).
Tube “lip” must be positioned inside Diffuser or seal will not form.
Figure 2b
*
Flow Diverters
Figure 5b
IMPORTANT: Never remove Split Flow Diffuser. Surface agitation
is critical to maintain oxygen levels in aquarium water.
7
STEP 6: POSITION MOTOR AND CANISTER
Apply self-adhesive Rubber Foot Pads to
the underside of the Motor Assembly
and extendible Stabilizer Legs in
depressions provided. Slide legs into
position on underside of Motor Housing
and extend as desired for stability
(Figure 6).
CONNECTION
Motor
Assembly
Stabilizer
Legs
Foot Pads (underside
of Stabilizer Leg)
Place unit (Canister with Motor
Assembly) in well-ventilated, but
accessible location with top of Canister
Filter below aquarium water level
(Figure 7). If desired, a waterproof
sheet may be placed under Magnum
for additional protection. Keep Canister
Cover in place to ensure accurate
measurement of hose length prior to
installation. DO NOT PLUG IN.
Figure 6
2”
Hose
Retainer
Band
Note:Top of
Canister must be
below water level.
Canister Cover
Figure 7
Roll hose
retainer
bands 2”
from end
Figure 8
Aquarium
Canister
Filter
8
STEP 1: MEASURE AND CUT HOSES,
INSTALL HOSE RETAINER BANDS
Measure and cut hose into two pieces of equal
length (fold in half and cut at crease with scissors).
Using the Hose Retainer Band Installer provided,
roll a Hose Retainer Band over one end of each
hose and back at least 2” from end (Figure 8).
STEP 2: CONNECT MAGNUM HOSES TO MAGNUM COVER AND SECURE
Before you begin: If you are choosing to install Quick Disconnect Valves, first
install hoses (as directed below), then install Valves in accordance with separate
directions on page 17.
Moisten ends of hoses with hot
water or apply a very light coating
of Silicon Lubricant (included) to
ensure easier installation. Push
hoses over barbs on Intake and Outlet
Port
Outlet Ports of Magnum Cover
(Figure 9a). Apply firm, even
Magnum Cover
pressure...undue stress can crack
port on Cover and result in leakFigure 9a
age. Hose ends should touch cover.
Roll Hose Retainer Bands into place (Figure 9b).
Intake
Port
Hose
Retainer Band
Figure 9b
9
STEP 3: CONNECT MAGNUM TO INTAKE/OUTLET TUBES
Extend hoses to reach highest barbs on Intake and
Outlet Tubes (Figure 9). Add 6 inches to this
Outlet
measured length and cut hose. This is to avoid Tube
cutting hoses too short. Trim hoses to size, if
Hose
Retainer
necessary, leaving an inch or two of slack.
Bands
NOTE: Leaving more than 6” extra length
may cause hose to kink or Magnum to
operate improperly.
Install Hose Retainer Bands 2” back at the Tube
ends of each hose. Moisten ends of hoses and
attach Outlet and Intake Tubes (Figure 10). Roll
Retainer Bands up onto fittings.
OPERATION
STEP 1: OPEN CANISTER AND REMOVE FROM MOTOR BASE
Intake
Tube
Figure 10
STEP 4: INSTALL CARRYING HANDLE
Attach Carrying Handle to protruding pegs on sides of Canister.
!
10
CAUTION: To avoid water spills and leaks, check all hose
connections to ensure that they are placed securely with Hose
Retainer Bands where indicated.
Switch motor to OFF (Figure 11). This also
Motor
unlocks the Canister from the motor.
Housing
NOTE: Unclip Intake and Outlet Tubes from Assembly
Retainer Bracket and remove them from
water to prevent spills.
Canister
Unsnap stainless steel Clips and remove
Cover
Canister Cover by pushing up on Cover Tabs Cover
(Figure 12). Grasp Carrying Handle and lift Tab
Canister off Motor Housing Assembly
(Figure 11).
!
Figure 11
Clips
Figure 12
CAUTION: When Cover is removed, water can siphon onto floor
if Intake and Outlet Tubes are not removed or valves closed.
STEP 2: PREPARE CANISTER ASSEMBLY FOR OPERATION
Remove contents (Carbon/Media Container or
Gasket
Impeller
Housing
Micron Cartridge; Impeller Assembly; Impeller
Housing) of Canister. Carefully inspect all parts.
Impeller Assembly must be snugly fitted into Impeller
Housing and Canister free of any debris or obstruction.
Impeller
NOTE: On 350 Models, also make sure that Impeller
Assembly
Magnet is tightly snapped in place (as shown in
Figure 13
Impeller Parts Assembly Inset pg. 5).
Replace Impeller Assembly and Impeller Housing. Three rubber
Gaskets (two large, one small) are provided. One large Gasket
should rest on top of the Impeller Housing (Figure 13). The two
remaining gaskets will be installed after media has been prepared
and installed.
11
STEP 3: PREPARE AND INSTALL MEDIA
The Magnum 220 and 350 are convertible filters. The
Carbon/Media Container and blue Rite-Size Bonded Filter Sleeve
(standard with the Magnum 220) are necessary for everyday
filtration. The Micron Cartridge (standard with Magnum 350)
polishes water by removing microscopic particles, and is used
periodically to make aquarium water crystal clear. Both
Carbon/Media Container and Micron Cartridge can be
purchased separately for use on the 220 or 350.
To install Carbon/Media Container:
Remove Container Cover and fill container
completely with Black Diamond Premium Activated
Carbon. Replace Container Cover and rinse
thoroughly until water runs clear (Figure 14).
Slide Rite-Size Filter Sleeve over
Carbon/Media Container. Install in Canister
over top of Impeller Housing and Rubber Gasket.
*
Container
Cover
Install remaining Large Rubber
Gasket atop Carbon/Media
Container (Figure 16a) or
Micron Cartridge (Figure 16b).
Install Small Rubber Gasket over
top of Impeller Exhaust Tube
(Figure 16c).
Top of
Carbon/
Media
Container
Rubber
Gasket
Figure 16a
Rubber
Gasket
Top of
Micron
Cartridge
Carbon is graded for uniform particle size. Grading prevents
smaller media particles from escaping and seriously damaging
Impeller Assembly.
Micron
Cartridge
Rigid
Core
Small
Rubber
Gasket
Impeller
Exhaust
Tube
Figure 16b
Figure 14
Figure 16c
STEP 5: CLOSE AND SEAL CANISTER COVER
Wet O-Ring. Place it around inside
Cover Skirt as shown (Figure 17).
O-Ring
Make sure that Outlet Port and
Impeller Exhaust Tube are aligned Tab to Notch - as shown (Figure 18).
Press Canister Cover down into
Canister until it seats snugly.
Close Clips.
Clips
Figure 15
12
!
CAUTION: DO NOT force Canister onto Motor Assembly!
DO NOT start Motor yet!
NEVER run Motor when Canister is empty or out of place.
Carbon/Media
Container
IMPORTANT: Unlike other carbon, Black Diamond Activated
To install Micron Cartridge:
Place Rigid Core inside a clean Micron
Cartridge to keep the cartridge from
collapsing during operation (Figure 15).
Place Rite-Size Filter Sleeve over cartridge,
if desired. Then place cartridge over top of
Impeller Housing and Rubber Gasket.
STEP 4: FILL CANISTER, REPLACE AND SEAL COVER
Fill Canister with water to level slightly above water line. Slide
Canister into place on Motor Housing Assembly.
Cover Skirt
Figure 17
Outlet Port
Tab
Notch
Impeller
Exhaust
Tube
Figure 18
13
STEP 6: START FILTER
Plug power cord into a standard household polarized receptacle.
Do not force plug into a non-polarized receptacle - use an adapter if
necessary. Be sure to use a “drip loop” (see “Important Safeguards”
section). Slide switch to “ON” position; wait approximately10 seconds, then switch to “OFF.” Aquarium water will fill Canister to the
top, evacuating air through the Intake Tube. When bubbles stop,
return switch back to “ON”. If air pocket remains, “burp” Canister
according to directions in Troubleshooting Guidelines section.
*
IMPORTANT: A slight rattling noise is normal ONLY DURING
STARTUP. If noise persists, shut off filter and recheck for dirt or
debris that may be in Canister or Canister Sump.
MAINTENANCE
Proper filter maintenance begins with frequent visual inspections to
ensure normal system operation and non-stressful conditions for fish.
Additionally, every aquarist should plan to devote an average of
15 minutes per week to the performance of basic maintenance and
needed adjustments. These requirements include monthly 25% water
changes and gravel cleaning, as well as regular (once a month,
minimum) filter media replacement. Unusual occurrences - such as
lack of water flow, excessive mechanical or water noise, cloudy
and/or bad smelling water - require immediate attention.
To ensure optimum filter performance and maintain full flow, regular
cleaning and media changes are recommended as necessary (at
least every 2- 4 weeks). Significantly reduced water flow is a sure
sign of clogging media and should be dealt with immediately.
Always rinse or replace Filter Sleeve when it is clogged...
replace if damaged.
Remember...Magnum requires no motor maintenance. There are no
moving motor parts and no user-serviceable parts inside the permanently
sealed motor housing. Attempts to open the motor housing will damage
the unit and expose the user to electrical shock hazard.
Never use soap, abrasives or any other cleaning agents on or
around filter or aquarium. Clean with water unless otherwise
instructed.
Never attempt to open the Motor Assembly Housing.
Never submerge the Motor Assembly.
14
15
Please follow these instructions for proper regular care each time the
Magnum media is serviced:
1. Shut down system and remove Canister.
!
CAUTION: IF YOU HAVE INSTALLED QUICK DISCONNECT VALVES…
always close all valves before disconnecting.
2. Change media:
CARBON/MEDIA CONTAINER
Remove media and rinse container thoroughly. Refill container
with Black Diamond Activated Carbon and rinse carbon
thoroughly. Rinse or replace Rite-Size Filter Sleeve.
Environmental Tip...Used activated carbon can be added to garden soil to aid
in plant fertilization (does not apply to media used with fish medications).
MICRON CARTRIDGE
Remove and clean Cartridge – never brush or machine wash.
Rinse off all visible dirt. Mix a solution of one part chlorine
bleach to three parts water. Immerse cartridge completely in
solution and soak overnight. Rinse thoroughly until chlorine
smell disappears.
For Best Results...Purchase a second Micron Cartridge for alternate use while
original Cartridge soaks and dries thoroughly.
3. Clean Canister thoroughly, especially sump area.
4. Clean Impeller Assembly and inspect for wear and smooth
rotation. If excess wear is noted, replace worn parts immediately.
6. Gently clean flat Rubber Gaskets with warm water only.
7. Wash O-Ring Seating Area on Canister and Cover.Wet O-Ring
before reinstalling.
8. Reassemble system and return to operation as previously instructed.
MAGNUM QUICK DISCONNECT VALVES
Installation/Operation/Maintenance
Magnum Quick Disconnect Double Valves are featured as standard equipment
with the Magnum 350 Deluxe Convertible Canister Filter and Magnum 350
PRO System. Single and Double Valves may be purchased separately for use
with the Magnum 220 (1/2” Valves) and 350 (5/8” Valves).
INSTALLATION
Install Valves after completing hose installation (Figure 19).
Begin installation on hoses leading from top of Magnum Canister.
Choose convenient, easily accessible location along tubes for valves.
Cut and remove 5” of hose where valves are to be installed.
NOTE: If installing Single Valves make sure the ON/OFF Flow
Regulator is located on the Upper Hose Section.
Upper
Hose to
Aquarium
On
Position
Compression
Nut
ON/OFF or FLOW
REGULATOR
Lock
Coupling
Barrel
Off
Position
ON/OFF or
FLOW REGULATOR
Lower
Hose to
Magnum
Double Valves Shown
16
Off
Position
Compression
Nut
Figure 19
17
Turn back Compression Nut on each valve
(Figure 20).
Attach valves by pressing Hoses over
barbs until each end stops against the
threads. Turn Compression Nut in opposite
direction to tightly seal the connection.
Make sure end of Hose fits inside
Compression Nut when fully tightened
(Figure 20).
Reconnect valve halves by twisting
Coupling until it stops. Then slide the Lock
down over the Coupling (Figure 21).
Compression
Nut
Lift Canister (with Cover in place) from motor for maintenance.
Reconnect by reversing order of previous steps.
NOTE: To ensure that Couplings are fully closed, twist until Lock
engages and stops. Then slide Lock ring down over Coupling.
Hose
MAINTENANCE
Figure 20
Lock
Keep valves clean at all times.
Periodically remove Coupling Barrel to clean
Coupling grooves and O-Rings (Figure 23).
Inspect O-Rings for wear. To replace,
request part #PR1450.
O-Rings
Coupling
Barrel
Figure 23
Coupling
OPERATION
Figure 21
To regulate water flow, use only the valve on
Outlet side of Magnum Canister.
When servicing Magnum...
Turn off Magnum.
Close all valves (Figure 22).
Slide Lock Ring up, twist Coupling and
separate (Figure 19).
NOTE: Coupling barrel may remain with
either end of valve when disconnected. This is
normal and will not affect performance.
18
Figure 22
19
TROUBLESHOOTING GUIDELINES
SYMPTOM
COMMENTS/SOLUTION
If Flexible Hosing kinks
or collapses…
Reposition filter to avoid loops and deep curves in hose.
Adjust hose length.
If Intake Tube is too long…
Cut to desired length and reinstall.
If Intake Tube is too short…
Purchase 3/4” diameter extension from aquarium dealer
(PA1341).
If unit will not pump and/or
air won’t evacuate from
Canister…
Be sure Impeller Assembly and Housing are properly installed.
Check Rite-Size Filter Sleeve, Carbon/Media Container or
Micron Cartridge for clogging - clean or replace.
“Burp” Canister. If air remains trapped in Canister after
Start/Stopping procedure, lift Canister off motor (do not
disconnect Canister Cover), hold lower than aquarium, and tilt
Canister until air has evacuated. Restart.
Make certain that “OUT” port inside Canister Cover is fitted
over Impeller Exhaust Tube inside Canister.
Make certain that “OUT” port on top of Canister Cover is
connected to Outlet Hose and Tube.
Check to see that end of Outlet Tube and Diffuser are
under water.
Correct any loops, kinks or deep curves in hose.
If Filter makes excessive
noise or stops abruptly…
If pumping slows or
stops gradually…
Rinse Canister, Impeller Assembly and Impeller Sump to ensure
that no gravel or carbon obstructs natural flow.
COMMENTS/SOLUTION
If air accumulates in
Canister during operation…
Move Intake away from airstone bubbles or other air source.
If leakage occurs at
hose connections…
Position hose and/or Hose Retainer Bands properly. Reinstall
with light coating of silicon lubricant (included).
If leakage occurs along
rim of Canister Cover…
Check to see that O-Ring is positioned properly. If O-Ring is
damaged, replace immediately (PR1413).
Check position of hoses and retainer bands to ensure that air is
not being sucked in through hose connections.
Wash O-Ring seal area thoroughly.
If leak persists, try lubricating O-Ring lightly with silicon lubricant
(included) (PR1590).
BLACK DIAMOND™ Premium Activated Carbon…
ONLY FROM MARINELAND!
Previously sold under the Magnum name, Black Diamond eliminates foul
odors, unsightly discoloration and harmful organic substances to keep
aquarium water healthy and sparking long after other carbons quit. Its
heat-activated bituminous coal-based granules are larger (so they won’t
damage filter impellers), stronger and far more efficient than inferior
coconut, wood or peat-based carbons.
And with Black Diamond, you get more. Because while as
much as 60% of other “prewashed” carbon weight is
water, Black Diamond contains less than 2% moisture.
More carbon, better value.
Rinse Carbon Media Container thoroughly.
• Ideal for all filtration needs
Use only Black Diamond Activated Carbon.
• Up to 3 times more effective than other carbons
Inspect hoses for dirt blocking flow.
Clear with Flexi Brush accessory (PA0554).
Clean or replace Rite-Size Flter Sleeve, Carbon/Media
Container or Micron Cartridge.
20
SYMPTOM
• Phosphate free
NOW AVAILABLE IN NEW RESEALABLE
8 oz., 16 oz., 36 oz., and 68 oz. CONTAINERS.
21