1
Printer Guide
Please read this guide before operating this product.
After you finish reading this guide, store it in a safe place for future reference.
ENG
imageRUNNER
1750i/1740i/1730i
Printer Guide
Manuals for the Machine
The manuals for this machine are organized as shown below. Please refer to them for detailed
information. Some manuals may not be needed for certain system configurations and products
purchased.
Guides with this symbol are printed manuals.
• Installation of the Machine
• Legal Notices
• Setup Instructions
• Quick Reference for Basic Operations
• Basic Operations
• Troubleshooting
• Copying Instructions
• Sending and Fax Instructions
• Remote User Interface Instructions
• Network Connectivity
• Security Management
• Color Network ScanGear Instructions
• USB Memory Media Printing Instructions
• PS/PCL/UFRII LT Printer Instructions
• Windows Printer Driver Instructions
• Windows Fax Driver Instructions
CD-ROM
Guides with this symbol are PDF manuals included on the
accompanying CD-ROM.
Starter Guide
User’s Guide
Easy Operation Guide
CD-ROM
Reference Guide
CD-ROM
Copying Guide
CD-ROM
Sending and Facsimile Guide
CD-ROM
Remote UI Guide
CD-ROM
System Settings Guide
CD-ROM
Network ScanGear Guide
CD-ROM
Printer Guide
(This Document)
CD-ROM
Windows Printer Driver Guide
CD-ROM
Windows Fax Driver Guide
CD-ROM
To view the manual in PDF format, Adobe Reader/Adobe Acrobat Reader is required. If Adobe Reader/Adobe Acrobat Reader is not installed on your
system, please download it from the Adobe Systems Incorporated website.
How This Manual Is Organized
Chapter 1
Introduction to Print Function
Chapter 2
Printing from USB Memory Media (Media Print)
Chapter 3
Managing Print Jobs
Chapter 4
Customizing Settings
Chapter 5
Troubleshooting
Chapter 6
Appendix
Includes the Symbol Sets Supported, Specifications, and Index.
Considerable effort has been made to ensure that this manual is free of inaccuracies and omissions. However, as we are constantly improving our
products, if you need an exact specification, please contact Canon.
Contents
Preface . . . . . . . . . . . . . . . . . . . . . . . . . . . . . . . . . . . . . . . . . . . . . . . . . . . . . . . . viii
How to Use This Manual . . . . . . . . . . . . . . . . . . . . . . . . . . . . . . . . . . . . . . . . . . viii
Symbols Used in This Manual . . . . . . . . . . . . . . . . . . . . . . . . . . . . . . . . . . . . . viii
Keys Used in This Manual . . . . . . . . . . . . . . . . . . . . . . . . . . . . . . . . . . . . . . . . viii
Illustrations Used in This Manual . . . . . . . . . . . . . . . . . . . . . . . . . . . . . . . . . . . . ix
Displays Used in This Manual . . . . . . . . . . . . . . . . . . . . . . . . . . . . . . . . . . . . . . ix
Abbreviations Used in This Manual . . . . . . . . . . . . . . . . . . . . . . . . . . . . . . . . . . x
Trademarks . . . . . . . . . . . . . . . . . . . . . . . . . . . . . . . . . . . . . . . . . . . . . . . . . . . . x
Legal Notices . . . . . . . . . . . . . . . . . . . . . . . . . . . . . . . . . . . . . . . . . . . . . . . . . . . . .xi
License Notice . . . . . . . . . . . . . . . . . . . . . . . . . . . . . . . . . . . . . . . . . . . . . . . . . . xi
Copyright . . . . . . . . . . . . . . . . . . . . . . . . . . . . . . . . . . . . . . . . . . . . . . . . . . . . . . xi
Disclaimers. . . . . . . . . . . . . . . . . . . . . . . . . . . . . . . . . . . . . . . . . . . . . . . . . . . . . xi
Chapter 1
Introduction to Print Function
Overview of the Printer Function . . . . . . . . . . . . . . . . . . . . . . . . . . . . . . . . . . . .1-2
Chapter 2
Printing from USB Memory Media (Media Print)
Printing from USB Memory Media . . . . . . . . . . . . . . . . . . . . . . . . . . . . . . . . . . .2-2
Index Printing . . . . . . . . . . . . . . . . . . . . . . . . . . . . . . . . . . . . . . . . . . . . . . . . . .2-8
Selecting All Files in Folder . . . . . . . . . . . . . . . . . . . . . . . . . . . . . . . . . . . . . . .2-9
Selecting Files by Date . . . . . . . . . . . . . . . . . . . . . . . . . . . . . . . . . . . . . . . . .2-10
Selecting Files by Extension . . . . . . . . . . . . . . . . . . . . . . . . . . . . . . . . . . . . .2-12
Chapter 3
Managing Print Jobs
Managing Print Jobs . . . . . . . . . . . . . . . . . . . . . . . . . . . . . . . . . . . . . . . . . . . . . .3-2
Canceling a Print Job Using the Stop Key . . . . . . . . . . . . . . . . . . . . . . . . . . . .3-2
Checking and Canceling Print Jobs Using the System Monitor . . . . . . . . . . . .3-3
Checking the Print Log. . . . . . . . . . . . . . . . . . . . . . . . . . . . . . . . . . . . . . . . . . .3-6
Chapter 4
Customizing Settings
Printer Settings . . . . . . . . . . . . . . . . . . . . . . . . . . . . . . . . . . . . . . . . . . . . . . . . . .4-3
Setting Priorities . . . . . . . . . . . . . . . . . . . . . . . . . . . . . . . . . . . . . . . . . . . . . . . .4-4
Using the Printer Settings Menu . . . . . . . . . . . . . . . . . . . . . . . . . . . . . . . . . . . .4-5
iv
Settings Menu . . . . . . . . . . . . . . . . . . . . . . . . . . . . . . . . . . . . . . . . . . . . . . . . . . . 4-7
Default PaperSize . . . . . . . . . . . . . . . . . . . . . . . . . . . . . . . . . . . . . . . . . . . . . . 4-7
Default PaperType . . . . . . . . . . . . . . . . . . . . . . . . . . . . . . . . . . . . . . . . . . . . . . 4-8
Copies . . . . . . . . . . . . . . . . . . . . . . . . . . . . . . . . . . . . . . . . . . . . . . . . . . . . . . . 4-8
2-Sided Printing . . . . . . . . . . . . . . . . . . . . . . . . . . . . . . . . . . . . . . . . . . . . . . . . 4-8
Print Quality . . . . . . . . . . . . . . . . . . . . . . . . . . . . . . . . . . . . . . . . . . . . . . . . . . . 4-9
Layout . . . . . . . . . . . . . . . . . . . . . . . . . . . . . . . . . . . . . . . . . . . . . . . . . . . . . . 4-11
Combining the Binding and Margin Settings. . . . . . . . . . . . . . . . . . . . . . 4-13
Auto Continue . . . . . . . . . . . . . . . . . . . . . . . . . . . . . . . . . . . . . . . . . . . . . . . . 4-13
Timeout . . . . . . . . . . . . . . . . . . . . . . . . . . . . . . . . . . . . . . . . . . . . . . . . . . . . . 4-14
Finishing . . . . . . . . . . . . . . . . . . . . . . . . . . . . . . . . . . . . . . . . . . . . . . . . . . . . 4-15
Personality . . . . . . . . . . . . . . . . . . . . . . . . . . . . . . . . . . . . . . . . . . . . . . . . . . . 4-17
Mode Priority . . . . . . . . . . . . . . . . . . . . . . . . . . . . . . . . . . . . . . . . . . . . . . . . . 4-17
Auto Select . . . . . . . . . . . . . . . . . . . . . . . . . . . . . . . . . . . . . . . . . . . . . . . . . . 4-17
Initialize . . . . . . . . . . . . . . . . . . . . . . . . . . . . . . . . . . . . . . . . . . . . . . . . . . . . . 4-18
PCL Settings . . . . . . . . . . . . . . . . . . . . . . . . . . . . . . . . . . . . . . . . . . . . . . . . . . . 4-19
Paper Save . . . . . . . . . . . . . . . . . . . . . . . . . . . . . . . . . . . . . . . . . . . . . . . . . . 4-19
Orientation . . . . . . . . . . . . . . . . . . . . . . . . . . . . . . . . . . . . . . . . . . . . . . . . . . . 4-19
Font Number . . . . . . . . . . . . . . . . . . . . . . . . . . . . . . . . . . . . . . . . . . . . . . . . . 4-20
Point Size. . . . . . . . . . . . . . . . . . . . . . . . . . . . . . . . . . . . . . . . . . . . . . . . . . . . 4-20
Pitch . . . . . . . . . . . . . . . . . . . . . . . . . . . . . . . . . . . . . . . . . . . . . . . . . . . . . . . . 4-20
Form Lines . . . . . . . . . . . . . . . . . . . . . . . . . . . . . . . . . . . . . . . . . . . . . . . . . . . 4-21
Symbol Set . . . . . . . . . . . . . . . . . . . . . . . . . . . . . . . . . . . . . . . . . . . . . . . . . . 4-21
Custom Paper . . . . . . . . . . . . . . . . . . . . . . . . . . . . . . . . . . . . . . . . . . . . . . . . 4-21
Unit of Measure . . . . . . . . . . . . . . . . . . . . . . . . . . . . . . . . . . . . . . . . . . . . . . . 4-22
X dimension . . . . . . . . . . . . . . . . . . . . . . . . . . . . . . . . . . . . . . . . . . . . . . . . . . 4-22
Y dimension . . . . . . . . . . . . . . . . . . . . . . . . . . . . . . . . . . . . . . . . . . . . . . . . . . 4-22
Append CR to LF . . . . . . . . . . . . . . . . . . . . . . . . . . . . . . . . . . . . . . . . . . . . . . 4-23
Widen A4 Print . . . . . . . . . . . . . . . . . . . . . . . . . . . . . . . . . . . . . . . . . . . . . . . . 4-24
Halftones . . . . . . . . . . . . . . . . . . . . . . . . . . . . . . . . . . . . . . . . . . . . . . . . . . . . 4-25
BarDIMM . . . . . . . . . . . . . . . . . . . . . . . . . . . . . . . . . . . . . . . . . . . . . . . . . . . . 4-25
FreeScape . . . . . . . . . . . . . . . . . . . . . . . . . . . . . . . . . . . . . . . . . . . . . . . . . . . 4-25
PS Settings. . . . . . . . . . . . . . . . . . . . . . . . . . . . . . . . . . . . . . . . . . . . . . . . . . . . . 4-26
Job Timeout . . . . . . . . . . . . . . . . . . . . . . . . . . . . . . . . . . . . . . . . . . . . . . . . . . 4-26
Wait Timeout . . . . . . . . . . . . . . . . . . . . . . . . . . . . . . . . . . . . . . . . . . . . . . . . . 4-26
Print PS Errors . . . . . . . . . . . . . . . . . . . . . . . . . . . . . . . . . . . . . . . . . . . . . . . . 4-26
Halftones . . . . . . . . . . . . . . . . . . . . . . . . . . . . . . . . . . . . . . . . . . . . . . . . . . . . 4-27
Ppr Size Override. . . . . . . . . . . . . . . . . . . . . . . . . . . . . . . . . . . . . . . . . . . . . . . . 4-28
Chapter 5
Troubleshooting
Identifying and Isolating Problems . . . . . . . . . . . . . . . . . . . . . . . . . . . . . . . . . . 5-2
Printer Problems . . . . . . . . . . . . . . . . . . . . . . . . . . . . . . . . . . . . . . . . . . . . . . . 5-2
Printing Problems . . . . . . . . . . . . . . . . . . . . . . . . . . . . . . . . . . . . . . . . . . . . . . 5-4
Print Quality Problems . . . . . . . . . . . . . . . . . . . . . . . . . . . . . . . . . . . . . . . . . . . 5-5
v
Chapter 6
Appendix
Printer Settings Menu . . . . . . . . . . . . . . . . . . . . . . . . . . . . . . . . . . . . . . . . . . . . .6-2
Some Basic Facts about Fonts. . . . . . . . . . . . . . . . . . . . . . . . . . . . . . . . . . . . . .6-5
What Is a Font? . . . . . . . . . . . . . . . . . . . . . . . . . . . . . . . . . . . . . . . . . . . . . . . .6-5
Attributes of Fonts . . . . . . . . . . . . . . . . . . . . . . . . . . . . . . . . . . . . . . . . . . . . . .6-5
Typeface . . . . . . . . . . . . . . . . . . . . . . . . . . . . . . . . . . . . . . . . . . . . . . . . . . .6-6
Stroke Weight . . . . . . . . . . . . . . . . . . . . . . . . . . . . . . . . . . . . . . . . . . . . . . .6-6
Style . . . . . . . . . . . . . . . . . . . . . . . . . . . . . . . . . . . . . . . . . . . . . . . . . . . . . .6-6
Point Size . . . . . . . . . . . . . . . . . . . . . . . . . . . . . . . . . . . . . . . . . . . . . . . . . .6-7
Pitch (cpi) . . . . . . . . . . . . . . . . . . . . . . . . . . . . . . . . . . . . . . . . . . . . . . . . . .6-7
Character Width (Fixed and PS). . . . . . . . . . . . . . . . . . . . . . . . . . . . . . . . .6-8
Orientation . . . . . . . . . . . . . . . . . . . . . . . . . . . . . . . . . . . . . . . . . . . . . . . . .6-8
Symbol Set . . . . . . . . . . . . . . . . . . . . . . . . . . . . . . . . . . . . . . . . . . . . . . . . .6-9
Fonts and Scalable Fonts . . . . . . . . . . . . . . . . . . . . . . . . . . . . . . . . . . . . . . .6-10
Bitmapped Fonts . . . . . . . . . . . . . . . . . . . . . . . . . . . . . . . . . . . . . . . . . . .6-10
Scalable Fonts . . . . . . . . . . . . . . . . . . . . . . . . . . . . . . . . . . . . . . . . . . . . .6-11
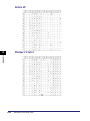
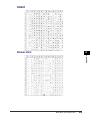
Standard Scalable and OCR Sets Fonts (PCL) . . . . . . . . . . . . . . . . . . . .6-12
Symbol Sets (For Scalable Typefaces Only) . . . . . . . . . . . . . . . . . . . . . .6-16
PS Fonts . . . . . . . . . . . . . . . . . . . . . . . . . . . . . . . . . . . . . . . . . . . . . . . . . .6-17
Typeface Samples . . . . . . . . . . . . . . . . . . . . . . . . . . . . . . . . . . . . . . . . . . . . .6-20
For PCL. . . . . . . . . . . . . . . . . . . . . . . . . . . . . . . . . . . . . . . . . . . . . . . . . . .6-20
For PS . . . . . . . . . . . . . . . . . . . . . . . . . . . . . . . . . . . . . . . . . . . . . . . . . . . .6-24
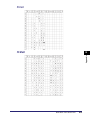
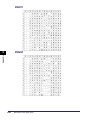
Symbol Sets . . . . . . . . . . . . . . . . . . . . . . . . . . . . . . . . . . . . . . . . . . . . . . . . . .6-33
ARABIC8 . . . . . . . . . . . . . . . . . . . . . . . . . . . . . . . . . . . . . . . . . . . . . . . . .6-33
DeskTop . . . . . . . . . . . . . . . . . . . . . . . . . . . . . . . . . . . . . . . . . . . . . . . . . .6-33
GREEK8 . . . . . . . . . . . . . . . . . . . . . . . . . . . . . . . . . . . . . . . . . . . . . . . . . .6-34
HEBREW7. . . . . . . . . . . . . . . . . . . . . . . . . . . . . . . . . . . . . . . . . . . . . . . . .6-34
HEBREW8. . . . . . . . . . . . . . . . . . . . . . . . . . . . . . . . . . . . . . . . . . . . . . . . .6-35
ISO United Kingdom . . . . . . . . . . . . . . . . . . . . . . . . . . . . . . . . . . . . . . . .6-35
ASCII . . . . . . . . . . . . . . . . . . . . . . . . . . . . . . . . . . . . . . . . . . . . . . . . . . . .6-36
ISO Swedish . . . . . . . . . . . . . . . . . . . . . . . . . . . . . . . . . . . . . . . . . . . . . . .6-36
ISO Italian . . . . . . . . . . . . . . . . . . . . . . . . . . . . . . . . . . . . . . . . . . . . . . . . .6-37
ISO Spanish . . . . . . . . . . . . . . . . . . . . . . . . . . . . . . . . . . . . . . . . . . . . . . .6-37
ISO German . . . . . . . . . . . . . . . . . . . . . . . . . . . . . . . . . . . . . . . . . . . . . . .6-38
ISO Norwegian . . . . . . . . . . . . . . . . . . . . . . . . . . . . . . . . . . . . . . . . . . . . .6-38
ISO French . . . . . . . . . . . . . . . . . . . . . . . . . . . . . . . . . . . . . . . . . . . . . . . .6-39
ISOCYR . . . . . . . . . . . . . . . . . . . . . . . . . . . . . . . . . . . . . . . . . . . . . . . . . .6-39
ISOGRK . . . . . . . . . . . . . . . . . . . . . . . . . . . . . . . . . . . . . . . . . . . . . . . . . .6-40
ISOHEB . . . . . . . . . . . . . . . . . . . . . . . . . . . . . . . . . . . . . . . . . . . . . . . . . .6-40
ISO 8859-1 Latin 1 . . . . . . . . . . . . . . . . . . . . . . . . . . . . . . . . . . . . . . . . . .6-41
ISO 8859-2 Latin 2 . . . . . . . . . . . . . . . . . . . . . . . . . . . . . . . . . . . . . . . . . .6-41
ISO 8859-9 Latin 5 . . . . . . . . . . . . . . . . . . . . . . . . . . . . . . . . . . . . . . . . . .6-42
ISO 8859-10 Latin 6 . . . . . . . . . . . . . . . . . . . . . . . . . . . . . . . . . . . . . . . . .6-42
Legal. . . . . . . . . . . . . . . . . . . . . . . . . . . . . . . . . . . . . . . . . . . . . . . . . . . . .6-43
Math-8 . . . . . . . . . . . . . . . . . . . . . . . . . . . . . . . . . . . . . . . . . . . . . . . . . . .6-43
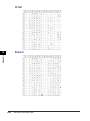
vi
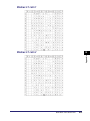
MC Text . . . . . . . . . . . . . . . . . . . . . . . . . . . . . . . . . . . . . . . . . . . . . . . . . . 6-44
Microsoft Publishing. . . . . . . . . . . . . . . . . . . . . . . . . . . . . . . . . . . . . . . . . 6-44
PC-775 . . . . . . . . . . . . . . . . . . . . . . . . . . . . . . . . . . . . . . . . . . . . . . . . . . . 6-45
PC-8 . . . . . . . . . . . . . . . . . . . . . . . . . . . . . . . . . . . . . . . . . . . . . . . . . . . . . 6-45
PC-850 . . . . . . . . . . . . . . . . . . . . . . . . . . . . . . . . . . . . . . . . . . . . . . . . . . . 6-46
PC-851 . . . . . . . . . . . . . . . . . . . . . . . . . . . . . . . . . . . . . . . . . . . . . . . . . . . 6-46
PC-852 . . . . . . . . . . . . . . . . . . . . . . . . . . . . . . . . . . . . . . . . . . . . . . . . . . . 6-47
PC-862 . . . . . . . . . . . . . . . . . . . . . . . . . . . . . . . . . . . . . . . . . . . . . . . . . . . 6-47
PC-864 . . . . . . . . . . . . . . . . . . . . . . . . . . . . . . . . . . . . . . . . . . . . . . . . . . . 6-48
PC-866 . . . . . . . . . . . . . . . . . . . . . . . . . . . . . . . . . . . . . . . . . . . . . . . . . . . 6-48
PC-8 D/N . . . . . . . . . . . . . . . . . . . . . . . . . . . . . . . . . . . . . . . . . . . . . . . . . 6-49
PC-Turkish . . . . . . . . . . . . . . . . . . . . . . . . . . . . . . . . . . . . . . . . . . . . . . . . 6-49
PC8GRK. . . . . . . . . . . . . . . . . . . . . . . . . . . . . . . . . . . . . . . . . . . . . . . . . . 6-50
PC-1004 . . . . . . . . . . . . . . . . . . . . . . . . . . . . . . . . . . . . . . . . . . . . . . . . . . 6-50
Pi Font . . . . . . . . . . . . . . . . . . . . . . . . . . . . . . . . . . . . . . . . . . . . . . . . . . . 6-51
PS Math . . . . . . . . . . . . . . . . . . . . . . . . . . . . . . . . . . . . . . . . . . . . . . . . . . 6-51
PS Text . . . . . . . . . . . . . . . . . . . . . . . . . . . . . . . . . . . . . . . . . . . . . . . . . . . 6-52
Roman-8. . . . . . . . . . . . . . . . . . . . . . . . . . . . . . . . . . . . . . . . . . . . . . . . . . 6-52
Ventura International . . . . . . . . . . . . . . . . . . . . . . . . . . . . . . . . . . . . . . . . 6-53
Ventura Math . . . . . . . . . . . . . . . . . . . . . . . . . . . . . . . . . . . . . . . . . . . . . . 6-53
Ventura US . . . . . . . . . . . . . . . . . . . . . . . . . . . . . . . . . . . . . . . . . . . . . . . . 6-54
Windows 3.0 Latin 1. . . . . . . . . . . . . . . . . . . . . . . . . . . . . . . . . . . . . . . . . 6-54
WINARB . . . . . . . . . . . . . . . . . . . . . . . . . . . . . . . . . . . . . . . . . . . . . . . . . . 6-55
Windows Baltic. . . . . . . . . . . . . . . . . . . . . . . . . . . . . . . . . . . . . . . . . . . . . 6-55
WINCYR . . . . . . . . . . . . . . . . . . . . . . . . . . . . . . . . . . . . . . . . . . . . . . . . . . 6-56
WINGRK. . . . . . . . . . . . . . . . . . . . . . . . . . . . . . . . . . . . . . . . . . . . . . . . . . 6-56
Windows 3.1 Latin 1. . . . . . . . . . . . . . . . . . . . . . . . . . . . . . . . . . . . . . . . . 6-57
Windows 3.1 Latin 2. . . . . . . . . . . . . . . . . . . . . . . . . . . . . . . . . . . . . . . . . 6-57
Windows 3.1 Latin 5. . . . . . . . . . . . . . . . . . . . . . . . . . . . . . . . . . . . . . . . . 6-58
ISO Latin 9 . . . . . . . . . . . . . . . . . . . . . . . . . . . . . . . . . . . . . . . . . . . . . . . . 6-58
PC-858 . . . . . . . . . . . . . . . . . . . . . . . . . . . . . . . . . . . . . . . . . . . . . . . . . . . 6-59
Roman 9. . . . . . . . . . . . . . . . . . . . . . . . . . . . . . . . . . . . . . . . . . . . . . . . . . 6-59
OCR-A . . . . . . . . . . . . . . . . . . . . . . . . . . . . . . . . . . . . . . . . . . . . . . . . . . . 6-60
OCR-B . . . . . . . . . . . . . . . . . . . . . . . . . . . . . . . . . . . . . . . . . . . . . . . . . . . 6-60
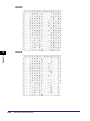
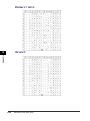
Symbol Sets Supported . . . . . . . . . . . . . . . . . . . . . . . . . . . . . . . . . . . . . . . . . . 6-61
ISO Substitution Table . . . . . . . . . . . . . . . . . . . . . . . . . . . . . . . . . . . . . . . . . . 6-61
Specifications . . . . . . . . . . . . . . . . . . . . . . . . . . . . . . . . . . . . . . . . . . . . . . . . . . 6-63
Software Specifications . . . . . . . . . . . . . . . . . . . . . . . . . . . . . . . . . . . . . . . . . 6-63
Index . . . . . . . . . . . . . . . . . . . . . . . . . . . . . . . . . . . . . . . . . . . . . . . . . . . . . . . . . . 6-64
vii
Preface
Thank you for purchasing the Canon imageRUNNER 1750i/1740i/1730i. Please read this
manual thoroughly before operating the machine to familiarize yourself with its capabilities,
and to make the most of its many functions. After reading this manual, store it in a safe place
for future reference.
How to Use This Manual
Symbols Used in This Manual
The following symbols are used in this manual to explain procedures, restrictions,
handling precautions, and instructions that should be observed for safety.
IMPORTANT Indicates operational requirements and restrictions. Be sure to read
these items carefully to operate the machine correctly, and avoid
damage to the machine or property.
NOTE
Indicates a clarification of an operation, or contains additional
explanations for a procedure. Reading these notes is highly
recommended.
Keys Used in This Manual
The following table provides a few examples of how keys to be pressed are
expressed in this manual:
Control Panel
Touch Panel Display
viii
Keys
Example
Key icon + (Key Name)
(Additional Functions)
[Key Name]
[OK], [Cancel], etc.
[Key Icon]
[
], [
], etc.
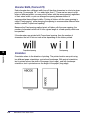
Illustrations Used in This Manual
The machine illustrations used in this manual are those of the imageRUNNER
1750i with the following optional equipment attached: Staple Finisher-H1 and
Cassette Module-Y1 (triple-tiered).
Displays Used in This Manual
Screen shots used in this manual may differ from actual displays depending on the
machine configuration.
The keys to be pressed are marked with a
, as shown below.
When multiple keys can be pressed, all of them will be marked. Select the keys best
suited to your needs.
ix
Abbreviations Used in This Manual
In this manual, the product name “Microsoft Windows operating system” is
abbreviated as “Windows.”
Trademarks
Adobe and Adobe Acrobat are trademarks of Adobe Systems Incorporated.
PCL, PCL5, and PCL6 are trademarks of Hewlett-Packard Company.
Windows logo and Windows are trademarks or registered trademarks of Microsoft
Corporation in the U.S. and/or other countries.
Concerning typeface credit, the actual names on a FONT LIST for this machine
may differ from those listed below.
CG and UFST are trademarks of Monotype Imaging, Inc. or its affiliated companies
and may be registered in some jurisdictions.
Marigold is a trademark of AlphaOmega Typography, Inc.
ITC Avant Garde Gothic, ITC Bookman, ITC Zapf Chancery, and ITC Zapf Dingbats
are registered trademarks of International Typeface Corporation.
Clarendon, Helvetica, New Century Schoolbook, Palatino, and Times are
trademarks of Linotype-Hell AG and its subsidiaries. Univers is a trademark of
Linotype-Hell AG and its subsidiaries and may be registered in some jurisdictions.
Coronet is a registered trademark of Ludlow Type Foundry.
Wingdings is a trademark of Microsoft Corporation.
Albertus, Arial, and Times New Roman are trademarks of the Monotype
Corporation plc., and may be registered in some jurisdictions.
CG Omega is a product of Agfa Corporation and CG Times, based on Times New
Roman under license from the Monotype Corporation plc, is a product of Agfa
Corporation.
BarDIMM is a registered trademark of Jetmobile SAS.
Other product and company names herein may be the trademarks of their
respective owners.
x
Legal Notices
License Notice
This product contains the Universal Font Scaling Technology or UFST ® under
license from Monotype Imaging, Inc. UFST ® is a trademark of Monotype Imaging,
Inc. registered in the United States Patent and Trademark Office and may be
registered in certain jurisdictions.
UFST: Copyright © 1989 - 1996, 1997, 2003, 2004, 2008, all rights reserved, by
Monotype Imaging Inc.
Copyright
Copyright 2011 by Canon Inc. All rights reserved.
No part of this publication may be reproduced or transmitted in any form or by any
means, electronic or mechanical, including photocopying and recording, or by any
information storage or retrieval system without the prior written permission of
Canon Inc.
Disclaimers
The information in this document is subject to change without notice.
CANON INC. MAKES NO WARRANTY OF ANY KIND WITH REGARD TO THIS
MATERIAL, EITHER EXPRESS OR IMPLIED, EXCEPT AS PROVIDED HEREIN,
INCLUDING WITHOUT LIMITATION, THEREOF, WARRANTIES AS TO
MARKETABILITY, MERCHANTABILITY, FITNESS FOR A PARTICULAR
PURPOSE OR USE OR NON-INFRINGEMENT. CANON INC. SHALL NOT BE
LIABLE FOR ANY DIRECT, INCIDENTAL, OR CONSEQUENTIAL DAMAGES OF
ANY NATURE, OR LOSSES OR EXPENSES RESULTING FROM THE USE OF
THIS MATERIAL.
xi
xii
Introduction to Print Function
1
CHAPTER
This chapter provides an overview of the Printer function.
Overview of the Printer Function . . . . . . . . . . . . . . . . . . . . . . . . . . . . . . . . . . . . . . . . . . . 1-2
1-1
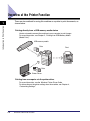
Overview of the Printer Function
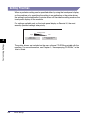
There are two methods for using this machine as a printer to print documents, as
shown below.
Introduction to Print Function
1
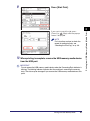
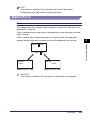
Printing directly from a USB memory media device
You do not need to connect the machine to your computer to print images.
For more information, see Chapter 2, “Printing from USB Memory Media
(Media Print).”
USB memory media
Data
Print
Data
Printer Driver
Printing from a computer via the printer driver
For more information, see the Windows Printer Driver Guide.
For information on the printer settings from the machine, see Chapter 4,
“Customizing Settings.”
1-2
Overview of the Printer Function
Printing from USB Memory
Media (Media Print)
2
CHAPTER
This chapter describes how to print from USB memory media.
Printing from USB Memory Media . . . . . . . . . . . . . . . . . . . . . . . . . . . . . . . . . . . . . . . . . . 2-2
Index Printing . . . . . . . . . . . . . . . . . . . . . . . . . . . . . . . . . . . . . . . . . . . . . . . . . . . . . . . . . . . . . . . .2-8
Selecting All Files in Folder . . . . . . . . . . . . . . . . . . . . . . . . . . . . . . . . . . . . . . . . . . . . . . . . . . . . .2-9
Selecting Files by Date. . . . . . . . . . . . . . . . . . . . . . . . . . . . . . . . . . . . . . . . . . . . . . . . . . . . . . . .2-10
Selecting Files by Extension. . . . . . . . . . . . . . . . . . . . . . . . . . . . . . . . . . . . . . . . . . . . . . . . . . . .2-12
2-1
Printing from USB Memory Media
You can print data directly from a USB memory media device by inserting it into the
machine and selecting the desired images on the touch panel display. You do not
need to connect the machine to your computer to print images.
2
Printing from USB Memory Media (Media Print)
This function is available only when the Use Media Print setting in the Memory
Media Settings is set to ‘On’. For more information, see Chapter 7, “Other System
Settings,” in the System Settings Guide.
IMPORTANT
• The supported file systems of a USB memory media device are FAT16 and FAT32.
• The supported maximum sizes of a USB memory media device are as follows:
- FAT32: 8GB
- FAT16: 2GB
• USB memory media devices with security function or card readers are not supported.
• USB memory media devices used with an extension cable are not supported.
• Use of USB memory media devices through a USB hub (except for the optional USB
Application 3-Port Interface Kit-B1) is not supported.
• USB memory media devices that do not comply with USB specifications are not
supported.
NOTE
• You can only print data from one folder at a time.
• You cannot select data in a lower level folder.
• The following file formats are supported:
- JPEG
- TIFF
• JPEG files that conform to the following are supported:
- DCF/Exif2.21 or earlier/JFIF
- Number of pixels: 160 × 120 to 7,040 × 10,200 pixels (approximately equivalent to
A3 or 11" × 17" size in 600 dpi)*
* For example, you can print A3 size image on A4 paper. (A3 and 11" × 17" paper are not available.)
- Number of components: 3
- Sampling ratios: 4:1:1 (16 × 16), 4:1:1 (32 × 8), 4:2:2 (16 × 8), or 4:4:4 (8 × 8)
• Progressive JPEG files are not supported.
• Supported TIFF file format is TIFF Profile F, which is a black and white TIFF file format
used for I-faxes.
• The images to be printed are automatically rotated to fit on the selected paper size
when necessary. However, the TIFF image with the length of 8,192 pixels or more
cannot be rotated.
2-2
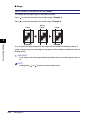
Printing from USB Memory Media
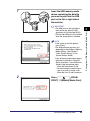
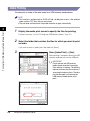
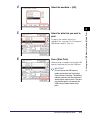
Insert the USB memory media
device containing the data file
you want to print into the USB
port on the left or right side of
the machine.
IMPORTANT
• The USB ports on the right side of
the machine are optional (USB
Application 3-Port Interface Kit-B1).
• The left side USB port is not available
when the above option is attached.
NOTE
• If the screen on the left appears,
press [Done].
• The displayed message may vary
depending on the settings in Memory
Media Settings. (See Chapter 7,
“Other System Settings,” in the
System Settings Guide.)
• If any of the messages below appear,
follow the instructions in Chapter 2,
“Basic Operations,” in the Reference
Guide to take the required steps:
- <Enter the Department ID and
Password using the numeric keys.>
- <You must insert a control card.>
- <Enter the User ID and Password.>
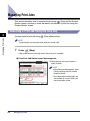
2
Press
(SCAN/
PRINT) ➞ [Memory Media Print].
Printing from USB Memory Media
2-3
2
Printing from USB Memory Media (Media Print)
1
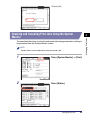
3
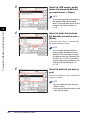
Select the USB memory media
device that stores the data that
you want to print ➞ [Down].
NOTE
You can print an index of all the files in
the selected USB memory media
device. For instructions on how to print
an index, see “Index Printing,” on
p. 2-8.
2
Printing from USB Memory Media (Media Print)
4
Select the folder that contains
the data that you want to print ➞
[Down].
If you select data which is saved outside
the folder, proceed to step 5.
NOTE
You can select the desired data by
sorting all data according to date or
extension. For instructions on how to
sort data by date, see “Selecting Files
by Date,” on p. 2-10. For instructions
on how to sort data by extension, see
“Selecting Files by Extension,” on
p. 2-12.
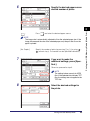
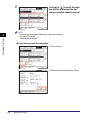
5
Select the data that you want to
print.
You can simultaneously select multiple files
in the same folder.
NOTE
• You can select data from only one
folder at a time.
• If you want to check the details of the
data, press [Details].
2-4
Printing from USB Memory Media
6
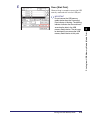
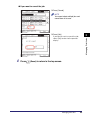
Specify the desired paper source
and the number of prints.
:
Press
and select the desired paper source.
NOTE
The image size is automatically adjusted to fit on the selected paper size. If the
image size exceeds the size of the selected paper, only the part that fits on the
paper is printed.
[No. Copies]:
7
Specify the number of prints by pressing [-] or [+] or using
(numeric keys). The number can be specified individually.
If you want to make the
additional settings, press [Spec.
Feat.].
Otherwise, proceed to step 9.
NOTE
The settings below are only for JPEG
files. If the selected data includes TIFF
files, the settings are not applied to the
TIFF files.
8
Select the desired settings for
the prints.
Printing from USB Memory Media
2-5
Printing from USB Memory Media (Media Print)
2
[N on 1]:
Select [2 On 1] or [4 On 1] to reduce two or four images onto one
sheet.
NOTE
• The number of prints is limited to one.
• Only JPEG data can be printed. If the selected files include TIFF files, only the
JPEG files are printed.
• The print size is adjusted automatically to fit on one sheet of paper.
• The layout order cannot be specified.
• A blank space for printing the date and file name is left below the printed image
even if [Print Date] or [Print File Name] is set to [Off].
Printing from USB Memory Media (Media Print)
2
[Print Date]:
Select whether or not to print the creation date on the printed image.
[Print File Name]: Select whether or not to print the file name on the printed image.
NOTE
• Only the dates and file names for JPEG files can be printed.
• The printable file name can consist of up to 20 characters.
• When you print an index, the date and file names are printed automatically. For
instructions on how to print an index, see “Index Printing,” on p. 2-8.
[Brightness]:
Adjust brightness to suit your needs.
[Halftones]:
Select [Error Diffusion] or [Gradation] to optimize the image for
printing.
NOTE
• The [Brightness] and [Halftones] settings are applied only to the JPEG files.
• The default setting for the [Halftones] setting is [Error Diffusion].
2-6
Printing from USB Memory Media
9
Press [Start Print].
NOTE
For instructions on how to check the
record of media print jobs, see
“Checking the Print Log,” on p. 3-6.
10
When printing is complete, remove the USB memory media device
from the USB port.
IMPORTANT
Do not remove the USB memory media device when the Processing/Data indicator is
blinking. The blinking indicator indicates that the machine is accessing the memory
data. The data may be damaged if you remove the USB memory media device at this
point.
Printing from USB Memory Media
2-7
Printing from USB Memory Media (Media Print)
2
If you want to cancel the job, press
[Cancel] or
(Stop) while the pop up
screen is displayed.
Index Printing
You can print an index of the data saved on a USB memory media device.
NOTE
• This function is available only for JPEG of 5,100 × 8,400 pixels or less. If the selected
folder contains TIFF files, they are not printed.
• The print date and file names are printed under the images automatically.
2
Printing from USB Memory Media (Media Print)
1
Display the media print screen to specify the files for printing.
For help, see steps 1 to 3 of “Printing from USB Memory Media,” on p. 2-2.
2
Select the folder that contains the files for which you want to print
an index.
If you want to select a folder, press the folder ➞ [Down].
3
Press [Index Print] ➞ [Yes].
When printing is complete, remove the USB
memory media device from the USB port.
IMPORTANT
Do not remove the USB memory
media device when the Processing/
Data indicator is blinking. The blinking
indicator indicates that the machine is
accessing the memory data. The data
may be damaged if you remove the
USB memory media device at this
point.
2-8
Printing from USB Memory Media
Selecting All Files in Folder
You can print all files saved on the selected folder at a single time. The number of
prints can be specified for each individual file.
Display the media print screen to specify the files for printing.
For help, see steps 1 to 3 of “Printing from USB Memory Media,” on p. 2-2.
2
2
Select the folder that contains the files that you want to print.
If you want to select a folder, press the folder ➞ [Down].
3
Press [Select All].
To specify the number of prints for
individual files, see step 6 in “Printing from
USB Memory Media,” on p. 2-2.
4
Press [Start Print].
When printing is complete, remove the USB
memory media device from the USB port.
IMPORTANT
Do not remove the USB memory
media device when the Processing/
Data indicator is blinking. The blinking
indicator indicates that the machine is
accessing the memory data. The data
may be damaged if you remove the
USB memory media device at this
point.
Printing from USB Memory Media
2-9
Printing from USB Memory Media (Media Print)
1
Selecting Files by Date
You can search files by date to select and print only the desired files. This function
is useful especially when there are a number of files in the folder or when the file
names make it difficult to identify the desired file(s).
1
2
Display the media print screen to specify the files for printing.
Printing from USB Memory Media (Media Print)
For help, see steps 1 to 3 of “Printing from USB Memory Media,” on p. 2-2.
2-10
2
Press
3
Select the start date ➞ [Next].
Printing from USB Memory Media
➞ [Specified Date].
4
Select the end date ➞ [OK].
5
Select the data that you want to
print.
To specify the number of prints for
individual files, see step 6 in “Printing from
USB Memory Media,” on p. 2-2.
6
Press [Start Print].
When printing is complete, remove the USB
memory media device from the USB port.
IMPORTANT
Do not remove the USB memory
media device when the Processing/
Data indicator is blinking. The blinking
indicator indicates that the machine is
accessing the memory data. The data
may be damaged if you remove the
USB memory media device at this
point.
Printing from USB Memory Media
2-11
Printing from USB Memory Media (Media Print)
2
Selecting Files by Extension
You can search files by format to select and print only the desired files.
1
Display the media print screen to specify the files for printing.
For help, see step 1 to 3 of “Printing from USB Memory Media,” on p. 2-2.
2
Printing from USB Memory Media (Media Print)
2
Select a folder that contains the files that you want to print.
If you want to select a folder, press the folder ➞ [Down].
3
4
Press
➞ [JPEG] or [TIFF].
Select the data that you want to
print.
To specify the number of prints for
individual files, see step 6 in “Printing from
USB Memory Media,” on p. 2-2.
2-12
Printing from USB Memory Media
Press [Start Print].
When printing is complete, remove the USB
memory media device from the USB port.
IMPORTANT
Do not remove the USB memory
media device when the Processing/
Data indicator is blinking. The blinking
indicator indicates that the machine is
accessing the data in the USB
memory media device. The data may
be damaged if you remove the USB
memory media device at this point.
Printing from USB Memory Media
2-13
2
Printing from USB Memory Media (Media Print)
5
Printing from USB Memory Media (Media Print)
2
2-14
Printing from USB Memory Media
Managing Print Jobs
3
CHAPTER
This chapter describes how to cancel print jobs using
(Stop) and the System Monitor
screen, and how to check the details and records of print jobs using the System Monitor
screen.
Managing Print Jobs . . . . . . . . . . . . . . . . . . . . . . . . . . . . . . . . . . . . . . . . . . . . . . . . . . . . . 3-2
Canceling a Print Job Using the Stop Key . . . . . . . . . . . . . . . . . . . . . . . . . . . . . . . . . . . . . . . . . .3-2
Checking and Canceling Print Jobs Using the System Monitor . . . . . . . . . . . . . . . . . . . . . . . . .3-3
Checking the Print Log. . . . . . . . . . . . . . . . . . . . . . . . . . . . . . . . . . . . . . . . . . . . . . . . . . . . . . . . .3-6
3-1
Managing Print Jobs
This section describes how to cancel print jobs using
(Stop) and the System
Monitor screen, and how to check the details and records of print jobs using the
System Monitor screen.
Canceling a Print Job Using the Stop Key
3
Managing Print Jobs
You can cancel a print job using
(Stop) while printing.
NOTE
Several prints may be output even after you cancel a job.
1
Press
(Stop).
If the screen returns to the top screen, the print job is canceled.
● If the Print Job Status screen below appears:
❑ Select the job you want to cancel ➞
press [Cancel].
NOTE
• If the Device screen appears, press
[Print] to display the Print screen
shown in the left.
• You cannot select multiple jobs and
cancel them all at once. Select and
cancel one job at a time.
3-2
Managing Print Jobs
❑ Press [Yes].
Checking and Canceling Print Jobs Using the System
Monitor
You can check the status of print jobs and cancel jobs being processed or waiting to
be processed from the System Monitor screen.
NOTE
Several prints may be output even after you cancel a job.
1
Press [System Monitor] ➞ [Print].
2
Press [Status].
Managing Print Jobs
3-3
Managing Print Jobs
3
3
Use [ ] or [ ] to scroll through
the job list, and select the job
that you want to check or cancel.
NOTE
The messages displayed on the Status screen are as follows:
- [Printing]: Current job
- [Waiting]: Reserved jobs
Managing Print Jobs
3
● If you want to check the job details:
❑ Press [Details].
❑ Check the job details and press [Done].
3-4
Managing Print Jobs
● If you want to cancel the job:
❑ Press [Cancel].
NOTE
You cannot select multiple jobs and
cancel them all at once.
❑ Press [Yes].
3
4
Press
Managing Print Jobs
If you do not want to cancel the job,
select [No] to return to the previous
display.
(Reset) to return to the top screen.
Managing Print Jobs
3-5
Checking the Print Log
You can check all of the completed print jobs using the System Monitor screen.
NOTE
If Job Log Display in System Settings is set to ‘Off’, the print log screen is not
displayed on the System Monitor screen. For instructions on how to set Job Log
Display, see Chapter 6, “Protecting the Machine from Unauthorized Access,” in the
System Settings Guide.
1
Press [System Monitor] ➞ [Print].
2
Press [Log].
Managing Print Jobs
3
3
Press [Job Type] ➞ [Printer] or
[Memory Print].
[Printer]:
Press to check the print jobs from the
printer driver.
[Memory Print]:
Press to check the print jobs from the USB
memory media device.
3-6
Managing Print Jobs
4
Use [ ] or [ ] to scroll through
the job list, and select the job
that you want to check ➞ press
[Details].
5
Check the details of job log ➞
[Done].
Managing Print Jobs
3
6
Press
(Reset) to return to the top screen.
Managing Print Jobs
3-7
Managing Print Jobs
3
3-8
Managing Print Jobs
Customizing Settings
4
CHAPTER
This chapter describes how to use the Printer Settings menu and its submenus from the
Additional Functions.
Printer Settings . . . . . . . . . . . . . . . . . . . . . . . . . . . . . . . . . . . . . . . . . . . . . . . . . . . . . . . . . 4-3
Setting Priorities . . . . . . . . . . . . . . . . . . . . . . . . . . . . . . . . . . . . . . . . . . . . . . . . . . . . . . . . . . . . . .4-4
Using the Printer Settings Menu . . . . . . . . . . . . . . . . . . . . . . . . . . . . . . . . . . . . . . . . . . . . 4-5
Settings Menu. . . . . . . . . . . . . . . . . . . . . . . . . . . . . . . . . . . . . . . . . . . . . . . . . . . . . . . . . . 4-7
Default PaperSize. . . . . . . . . . . . . . . . . . . . . . . . . . . . . . . . . . . . . . . . . . . . . . . . . . . . . . . . . . . . .4-7
Default PaperType . . . . . . . . . . . . . . . . . . . . . . . . . . . . . . . . . . . . . . . . . . . . . . . . . . . . . . . . . . . .4-8
Copies . . . . . . . . . . . . . . . . . . . . . . . . . . . . . . . . . . . . . . . . . . . . . . . . . . . . . . . . . . . . . . . . . . . . .4-8
2-Sided Printing . . . . . . . . . . . . . . . . . . . . . . . . . . . . . . . . . . . . . . . . . . . . . . . . . . . . . . . . . . . . . .4-8
Print Quality . . . . . . . . . . . . . . . . . . . . . . . . . . . . . . . . . . . . . . . . . . . . . . . . . . . . . . . . . . . . . . . . .4-9
Layout. . . . . . . . . . . . . . . . . . . . . . . . . . . . . . . . . . . . . . . . . . . . . . . . . . . . . . . . . . . . . . . . . . . . .4-11
Auto Continue. . . . . . . . . . . . . . . . . . . . . . . . . . . . . . . . . . . . . . . . . . . . . . . . . . . . . . . . . . . . . . .4-13
Timeout. . . . . . . . . . . . . . . . . . . . . . . . . . . . . . . . . . . . . . . . . . . . . . . . . . . . . . . . . . . . . . . . . . . .4-14
Finishing . . . . . . . . . . . . . . . . . . . . . . . . . . . . . . . . . . . . . . . . . . . . . . . . . . . . . . . . . . . . . . . . . . .4-15
Personality . . . . . . . . . . . . . . . . . . . . . . . . . . . . . . . . . . . . . . . . . . . . . . . . . . . . . . . . . . . . . . . . .4-17
Mode Priority . . . . . . . . . . . . . . . . . . . . . . . . . . . . . . . . . . . . . . . . . . . . . . . . . . . . . . . . . . . . . . .4-17
Auto Select . . . . . . . . . . . . . . . . . . . . . . . . . . . . . . . . . . . . . . . . . . . . . . . . . . . . . . . . . . . . . . . . .4-17
Initialize. . . . . . . . . . . . . . . . . . . . . . . . . . . . . . . . . . . . . . . . . . . . . . . . . . . . . . . . . . . . . . . . . . . .4-18
PCL Settings. . . . . . . . . . . . . . . . . . . . . . . . . . . . . . . . . . . . . . . . . . . . . . . . . . . . . . . . . . 4-19
Paper Save . . . . . . . . . . . . . . . . . . . . . . . . . . . . . . . . . . . . . . . . . . . . . . . . . . . . . . . . . . . . . . . . .4-19
Orientation . . . . . . . . . . . . . . . . . . . . . . . . . . . . . . . . . . . . . . . . . . . . . . . . . . . . . . . . . . . . . . . . .4-19
Font Number. . . . . . . . . . . . . . . . . . . . . . . . . . . . . . . . . . . . . . . . . . . . . . . . . . . . . . . . . . . . . . . .4-20
Point Size . . . . . . . . . . . . . . . . . . . . . . . . . . . . . . . . . . . . . . . . . . . . . . . . . . . . . . . . . . . . . . . . . .4-20
Pitch . . . . . . . . . . . . . . . . . . . . . . . . . . . . . . . . . . . . . . . . . . . . . . . . . . . . . . . . . . . . . . . . . . . . . .4-20
Form Lines . . . . . . . . . . . . . . . . . . . . . . . . . . . . . . . . . . . . . . . . . . . . . . . . . . . . . . . . . . . . . . . . .4-21
Symbol Set . . . . . . . . . . . . . . . . . . . . . . . . . . . . . . . . . . . . . . . . . . . . . . . . . . . . . . . . . . . . . . . . .4-21
Custom Paper. . . . . . . . . . . . . . . . . . . . . . . . . . . . . . . . . . . . . . . . . . . . . . . . . . . . . . . . . . . . . . .4-21
Unit of Measure . . . . . . . . . . . . . . . . . . . . . . . . . . . . . . . . . . . . . . . . . . . . . . . . . . . . . . . . . . . . .4-22
X dimension . . . . . . . . . . . . . . . . . . . . . . . . . . . . . . . . . . . . . . . . . . . . . . . . . . . . . . . . . . . . . . . .4-22
Y dimension . . . . . . . . . . . . . . . . . . . . . . . . . . . . . . . . . . . . . . . . . . . . . . . . . . . . . . . . . . . . . . . .4-22
Append CR to LF . . . . . . . . . . . . . . . . . . . . . . . . . . . . . . . . . . . . . . . . . . . . . . . . . . . . . . . . . . . .4-23
Widen A4 Print . . . . . . . . . . . . . . . . . . . . . . . . . . . . . . . . . . . . . . . . . . . . . . . . . . . . . . . . . . . . . .4-24
Halftones . . . . . . . . . . . . . . . . . . . . . . . . . . . . . . . . . . . . . . . . . . . . . . . . . . . . . . . . . . . . . . . . . .4-25
4-1
4. Customizing Settings
BarDIMM . . . . . . . . . . . . . . . . . . . . . . . . . . . . . . . . . . . . . . . . . . . . . . . . . . . . . . . . . . . . . . . . . . 4-25
FreeScape. . . . . . . . . . . . . . . . . . . . . . . . . . . . . . . . . . . . . . . . . . . . . . . . . . . . . . . . . . . . . . . . . 4-25
PS Settings . . . . . . . . . . . . . . . . . . . . . . . . . . . . . . . . . . . . . . . . . . . . . . . . . . . . . . . . . . . 4-26
Job Timeout . . . . . . . . . . . . . . . . . . . . . . . . . . . . . . . . . . . . . . . . . . . . . . . . . . . . . . . . . . . . . . . 4-26
Wait Timeout . . . . . . . . . . . . . . . . . . . . . . . . . . . . . . . . . . . . . . . . . . . . . . . . . . . . . . . . . . . . . . . 4-26
Print PS Errors . . . . . . . . . . . . . . . . . . . . . . . . . . . . . . . . . . . . . . . . . . . . . . . . . . . . . . . . . . . . . . 4-26
Halftones . . . . . . . . . . . . . . . . . . . . . . . . . . . . . . . . . . . . . . . . . . . . . . . . . . . . . . . . . . . . . . . . . . 4-27
Ppr Size Override . . . . . . . . . . . . . . . . . . . . . . . . . . . . . . . . . . . . . . . . . . . . . . . . . . . . . . 4-28
Customizing Settings
4
4-2
Printer Settings
This section describes the printer settings and how to access them using the touch
panel display.
The basic settings, such as the number of copies and the paper size, can be
specified by the application sending the print job or by the printer driver. The
machine, however, has more printer settings including those that cannot be
specified remotely from an application or from the printer driver.
There are two ways to specify the printer settings, as follows.
• Specifying the settings on the Remote UI:
You can specify some settings from your computer using your web browser.
NOTE
• This guide only explains how to specify the printer settings on the touch panel display.
For instructions on how to specify the printer settings on the Remote UI, see the
Remote UI Guide.
• The Printer Settings are stored in the machine’s nonvolatile memory. Therefore, the
settings are stored even if the power to the machine is switched OFF, and they will still
be available when the power is switched ON again.
Printer Settings
4-3
Customizing Settings
4
• Specifying the settings on the touch panel display:
Display the Printer Settings screen on the touch panel display and specify the
settings by pressing the appropriate keys on the screen.
Setting Priorities
When a particular setting can be specified either by using the touch panel display
on the machine or by specifying the setting in an application or the printer driver,
the setting from the application or printer driver will override the setting made on the
touch panel display on the machine.
For settings available only on the touch panel display or Remote UI, the most
recently specified settings take priority.
Setting priority
High
Application
Printer driver
Low
Touch panel display
Remote UI
Customizing Settings
4
The printer drivers are included on the user software CD-ROMs provided with the
machine. For more information, see Chapter 3, “Accompanying CD-ROMs,” in the
User’s Guide.
4-4
Printer Settings
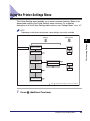
Using the Printer Settings Menu
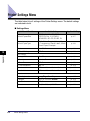
The Printer Settings menu enables you to access common features. Below is an
abbreviated outline of the Printer Settings menu structure. For a detailed
description of all the Printer Settings menu options, see “Settings Menu,” on p. 4-7.
NOTE
Depending on the printer environment, some settings may not be available.
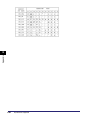
Settings
Setting Value
Printer Settings
Default PaperSize
A4
Default PaperType
DL
Customizing Settings
4
Paper Save
PCL Settings
Font Number
0
104
PS Settings
Ppr Size Override
“
1
Press
” and “
” indicate that settings or levels are omitted.
(Additional Functions).
Using the Printer Settings Menu
4-5
2
Press [Printer Settings].
3
Press [ ] or [ ] to select the
setting that you want to change
➞ press [OK].
Customizing Settings
4
Referring to the descriptions of the following settings, select the option best suited to
your preferences:
- Default PaperSize (See p. 4-7)
- Default PaperType (See p. 4-8)
- Copies (See p. 4-8)
- 2-Sided Printing (See p. 4-8)
- Print Quality (See p. 4-9)
- Layout (See p. 4-11)
- Auto Continue (See p. 4-13)
- Timeout (See p. 4-14)
- Finishing (See p. 4-15)
- Personality (See p. 4-17)
- Mode Priority (See p. 4-17)
- Auto Select (See p. 4-17)
- Initialize (See p. 4-18)
- PCL Settings (See p. 4-19)
- PS Settings (See p. 4-26)
- Ppr Size Override (See p. 4-28)
4
4-6
Press
(Reset) to return to the top screen.
Using the Printer Settings Menu
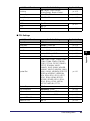
Settings Menu
This section provides detailed information on the Printer Settings.
NOTE
The default settings are indicated in bold.
Default PaperSize
This setting defines the default paper size used when the paper size cannot be set from the
printer driver in the computer, or when no paper source is specified.
IMPORTANT
If you are printing from a computer that does not have the appropriate printer driver for
the machine, make sure that the paper loaded in the paper drawer matches the paper
size selected for this setting. If paper of the selected size is missing in any of the paper
sources, the machine displays an error message on the touch panel display and
suspends further printing. If no paper source has been selected through the
application, the machine automatically selects the default printer setting for the paper
size. (See Chapter 3, “Configuring the Machine’s Basic Settings,” in the Reference
Guide.)
Settings Menu
4-7
4
Customizing Settings
A4, B5, A5, LGL, LTR, STMT, EXECUTIV, No. 10 (COM10), MONARCH, ISO-C5, ISO-B5,
DL
Default PaperType
Plain, Color, Recycled, Heavy Paper 1, Transparency, Bond, Labels, 3Hole Punch Paper,
Envelope
This setting sets the default paper type to be used for print jobs. This machine has internally
defined optimal print modes for each specified paper type. For more information on the paper
types, see Chapter 7, “Appendix,” in the Reference Guide.
IMPORTANT
If you are printing from a computer that does not have the appropriate printer driver for
the machine, make sure that the paper loaded in the paper drawer matches the paper
type selected for this setting. If paper of the selected type is missing in any of the
paper sources, the machine displays an error message on the touch panel display and
suspends further printing. If no paper source has been selected through the
application, the machine automatically selects the default printer setting for the paper
type. (See Chapter 3, “Configuring the Machine’s Basic Settings,” in the Reference
Guide.)
Customizing Settings
4
Copies
1 to 999; 1
This setting enables you to specify the number of copies printed. The default setting is ‘1’, but
you can specify up to 999 copies.
2-Sided Printing
Off, On
This setting selects one- or two-sided printing. In the 2-Sided Printing mode, the document is
printed on both sides of the paper.
NOTE
• In the 2-Sided Printing mode, you can use A4, A5, B5, LTR, LGL, STMT, or EXEC
paper.
• The paper types and weight available for two-sided printing are as follows:
- Paper type: Plain, Recycled, Color, 3Hole Punch Paper (only A4 or LTR size is
available), Heavy Paper 1
- Paper weight: 64 to 105 g/m2
4-8
Settings Menu
Print Quality
■ Image Refinement
On, Off
This setting smoothes the jagged outlines of characters and graphics.
If [On] is selected, smoothing is performed before printing.
If [Off] is selected, jobs are printed without being smoothed.
NOTE
The effects of image refinement may vary depending on the types of characters and
graphics on the printed document.
9 levels; 5
This setting adjusts the print density.
Pressing [ ] or [ ] makes the print image lighter or darker, respectively. You can select from
nine levels, with level ‘5’ (middle) being the default setting.
IMPORTANT
This setting applies only to print jobs sent from a computer via the printer driver. To
adjust the density when printing from USB memory media, use the Printer Density
setting in Common Settings. (See Chapter 3, "Configuring the Machine's Basic
Settings," in the Reference Guide.)
■ Toner Save
Off, On
This setting enables or disables the toner saving feature. When this feature is enabled, less
toner is used to print documents, resulting in a longer toner life.
IMPORTANT
This setting applies only to print jobs sent from a computer via the printer driver. To
save toner when printing from USB memory media, enable the Toner Save Mode in
Common Settings. (See Chapter 3, "Configuring the Machine's Basic Settings," in the
Reference Guide.)
NOTE
If [On] is selected for Toner Save, very light or finely detailed images may not be
printed clearly.
Settings Menu
4-9
Customizing Settings
4
■ Density
■ Line Refinement
On, Off
This setting enables you to make clearer prints of documents containing fine lines and small
characters.
■ Horizontal Line
Off, Level 1, Level 2, Level 3, Level 4
This setting adjusts the thickness of horizontal lines to produce fine lines and small
characters more clearly. The higher the level number, the thicker the horizontal lines printed.
NOTE
• This setting is also available when the Line Refinement is set to [On] in the printer
driver.
• With this setting, horizontal lines are based on the direction in which the paper is fed.
• Selecting [Level 2] or higher for this setting may result in abrupt changes in gradation
with halftone images.
Customizing Settings
4
■ Vertical Line
Off, Level 1, Level 2, Level 3, Level 4
This setting adjusts the thickness of vertical lines to produce fine lines and small characters
more clearly. The higher the level number, the thicker the vertical lines printed.
NOTE
• This setting is also available when the Line Refinement is set to [On] in the printer
driver.
• With this setting, vertical lines are based on the direction in which the paper is fed.
• Selecting [Level 2] or higher for this setting may result in abrupt changes in gradation
with halftone images.
4-10
Settings Menu
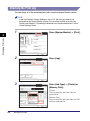
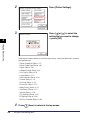
Layout
■ Binding Location
Long Edge, Short Edge
This setting determines whether the binding position is along the long edge or the short edge
of the paper. When binding for two-sided printing, the image orientation is automatically
adjusted to produce the correct layout.
When the binding position is on the long edge of the paper:
Two-sided printing
in portrait orientation
Front
Back
Two-sided printing
in landscape orientation
Front
Back
Customizing Settings
4
When the binding position is on the short edge of the paper:
Two-sided printing
in portrait orientation
Front
Back
Two-sided printing
in landscape orientation
Front
Back
NOTE
• You cannot create a binding margin with this setting alone. Use this setting in
combination with the Margin setting (described below) to create a binding margin.
• For two-sided printing, the orientation of the image on the back side of the page may
be changed using this setting.
Settings Menu
4-11
■ Margin
-50.0 to +50.0mm (in increments of 0.5 mm); 0.0mm
This setting sets the page margin in millimeters or inches.
Press [ ] to increase the width of the outside margin. (Example 1)
Press [ ] to increase the width of the inside margin. (Example 2)
0.0mm
Center
Center
Center
4
Customizing Settings
Example 1
Example 2
You can specify the edge along which the margin will be created in the Binding setting. To
create a margin along one of the edges of the paper, use this setting in combination with the
Binding setting.
IMPORTANT
If this setting moves the image outside the printable area, part of the image may be cut
off.
NOTE
Holding down [
4-12
Settings Menu
] or [
] makes the values change faster.
Combining the Binding and Margin Settings
The figures below illustrate how the Binding and Margin settings are combined. You
can set the paper orientation using the printer driver. (See Chapter 1, “Printing
Functions,” in the Windows Printer Driver Guide.)
Binding and Margin Settings
Portrait printing
Front
Back
Landscape printing
Front
(Two-sided printing)
Back
(Two-sided printing)
Margin
[+]
Long
Edge
4
Customizing Settings
Margin
[–]
Binding
Location
Margin
[+]
Short
Edge
Margin
[–]
The shaded parts (
) indicate the binding margin.
Auto Continue
Off, On
This setting enables you to automatically clear an error and continue printing when an error
occurs (Error skip).
If [Off] is selected, you must perform error skips from the touch panel display.
If [On] is selected, error skips are performed automatically.
NOTE
• Error skip only temporarily clears an error, so the data may not print correctly.
• This setting is valid even if multiple errors have occurred.
Settings Menu
4-13
Timeout
On (5 to 300sec), Off; 15sec
The Timeout setting enables the machine to discard a print job that remains in the machine’s
memory after a specified period of time.
This setting is useful when the data for the current job has some error and prevents the
machine from performing further printing. In this case, the machine will not receive other print
commands because it performs printing in chronological order (jobs are printed in the order
they are received).
If the Timeout setting is enabled, the current job is discarded automatically after the specified
period of time. For example, if the Timeout is enabled at ‘20 sec’, the data for the current job
will be erased from the machine’s memory 20 seconds after the machine starts processing
the data.
4
Customizing Settings
If [Off] is selected, the machine will not discard jobs automatically.
IMPORTANT
• This setting applies only for PCL and PS data.
• If a job that consists of a large amount of data is sent from a computer, the function
may cause the machine to end the print job before all of the data is received. In this
case, set a longer timeout period (in seconds).
• If [Off] is selected, you will not be able to make copies until print jobs that use the
Staple mode are complete.
NOTE
When a job is being processed, the Processing/Data indicator blinks on the control
panel.
4-14
Settings Menu
Finishing
Off, Collate, Offset+Collate, Offset+Group, Staple+Collate
This setting enables you to make printouts in sets arranged in page order, or in groups of
each page as required. You can also staple printouts.
NOTE
The Offset and Staple modes are available only when the optional Staple Finisher-H1
is attached to the machine.
Off
This setting prints all copies of the same page before printing the next page.
Collate
Offset+Collate
This setting prints all pages of each copy (collating), and offsets every other complete copy
to indicate where each copy starts.
Offset+Group
This setting prints all copies of the same page before printing the next page. It offsets every
other complete set of pages to indicate where each new set starts.
Staple+Collate
This setting prints all pages of each copy (collating), and staples them together before
printing the next copy.
Settings Menu
4-15
Customizing Settings
4
This setting prints all pages of each copy before printing the next copy.
Examples of each Finishing option when printing three copies of a three page document are
provided below.
[Off]
[Offset+Collate]
[Collate]
[Offset+Group]
Customizing Settings
4
[Staple+Collate]
NOTE
• Offset+Collate and Offset+Group are available for the following paper sizes:
A4, B5, LTR, LGL, or EXEC.
• The Staple+Collate mode is available for selection if the paper size is A4, B5, LTR,
LGL, or EXEC.
• You can use the 64 to 128 g/m2 paper for stapling. The maximum number of sheets
that can be stapled when you are using the 80 g/m2 paper is 50 for A4, B5, LTR, LGL,
and EXEC.
Staple position
4-16
Settings Menu
Personality
Auto, PCL, PS
This setting enables the machine to process data received from the host computer in the
specified data format. Setting the ‘Personality’ to [Auto] makes the machine determine the
type of data received from the host on a job-by-job basis. If you are printing from applications
on a computer, we recommend that you use the [Auto] setting.
NOTE
If the machine does not correctly switch to the appropriate personality when
‘Personality’ is set to [Auto], change the setting manually to match the data you are
sending from the host computer.
Mode Priority
Off, PCL, PS
This setting determines which personality should be used if a job is received without a
specified command language. ‘Mode Priority’ is available only when ‘Personality’ is set to
[Auto].
[Off]:
Applies the current Personality setting if the machine cannot detect a
command language.
[PCL]:
Assigns priority to the PCL personality.
[PS]:
Assigns priority to the PS personality.
Auto Select
PCL: On, Off
PS: On, Off
This setting determines which personality should be used when [Auto] is selected in the
Personality setting.
If [On] is selected in each mode, the mode is available for the Personality setting.
If [Off] is selected in each mode, the mode is not available for the Personality setting.
Settings Menu
4-17
Customizing Settings
4
Initialize
Off, On
The printer settings can be returned to the factory defaults by initializing the printer settings.
If [On] is selected, the settings are initialized. If [Off] is selected, the settings are not
initialized.
IMPORTANT
Do not turn OFF the machine while the settings are being initialized, as this may
damage the machine’s memory.
Customizing Settings
4
4-18
Settings Menu
PCL Settings
The PCL settings available with the machine are described below.
Paper Save
OFF, ON
This setting specifies whether to output a blank page when software does not send print data
between End Page codes.
4
Customizing Settings
If [OFF] is selected, a blank page is output.
If [ON] is selected, a blank page is not output, thus saving paper.
Orientation
Portrait, Landscape
This setting enables you to set the paper orientation.
If [Portrait] is selected, the print image is printed in portrait orientation regardless of the
orientation of the paper in the paper drawers.
ABCDE
Portrait
If [Landscape] is selected, the print image is printed in landscape orientation.
ABCDE
Landscape
PCL Settings
4-19
Font Number
0 to 104; 0
You can set the default font typeface for this printer function using the corresponding font
numbers.
For typeface samples for each font number, see “Typeface Samples,” on p. 6-20.
IMPORTANT
This setting is available for PCL5 printing only. PCL6 printing is not supported.
Point Size
4
Customizing Settings
4.00 to 999.75 point (in increments of 0.25 point); 12.00
This setting enables you to specify the point size for the default font.
IMPORTANT
This setting is available for PCL5 printing only. PCL6 printing is not supported.
NOTE
• This setting is available if a value from ‘1’ to ‘78’ is specified for the ‘Font Number’
option.
• Holding down [ ] or [ ] makes the values change faster.
Pitch
0.44 to 99.99 cpi (in increments of 0.01 cpi); 10.00
This setting enables you to specify the pitch for the default font.
IMPORTANT
This setting is available for PCL5 printing only. PCL6 printing is not supported.
NOTE
• This setting is available if a value of ‘0’ or from ‘79’ to ‘104’ is specified for the ‘Font
Number’ option.
• Holding down [ ] or [ ] makes the values change faster.
4-20
PCL Settings
Form Lines
5 to 128 lines; 64
This setting enables you to specify the number of lines to be printed on a page.
IMPORTANT
This setting is available for PCL5 printing only. PCL6 printing is not supported.
Symbol Set
This setting enables you to select the symbol set most suited to the needs of the host
computer.
IMPORTANT
This setting is available for PCL5 printing only. PCL6 printing is not supported.
Custom Paper
Off, On
This setting enables you to specify a custom paper size. If [On] is selected, you can enter a
custom size.
IMPORTANT
This setting is available for PCL5 printing only. PCL6 printing is not supported.
NOTE
You can only select the custom paper size entered with settings from the printer driver.
PCL Settings
4-21
4
Customizing Settings
PC8, PC850, PC851, PC852, PC862, PC864, PC866, PC8DN, PC8GRK, PC8TK, PC1004,
PIFONT, PSMATH, PSTEXT, ROMAN8, VNINTL, VNMATH, VNUS, WIN30, WINARB,
WINBALT, WINCYR, WINGRK, WINL1, WINL2, WINL5, ARABIC8, DESKTOP, GREEK8,
HEBREW7, HEBREW8, ISO4, ISO6, ISO11, ISO15, ISO17, ISO21, ISO60, ISO69,
ISOCYR, ISOGRK, ISOHEB, ISOL1, ISOL2, ISOL5, ISOL6, LEGAL, MATH8, MCTEXT,
MSPUBL, PC775
Unit of Measure
Millimeters, Inches
This setting enables you to specify the unit of measurement to use to specify the custom
paper size.
IMPORTANT
This setting is available for PCL5 printing only. PCL6 printing is not supported.
NOTE
This function is available if [On] is selected in the Custom Paper setting.
X dimension
Customizing Settings
4
140.0 to 630.0 mm; 356.0
This setting enables you to specify the horizontal size of the custom paper.
This function is useful when part of the printed image is cut off. Increasing this value may
allow some of the missing text to be correctly printed. Make sure not to increase the value
beyond the actual size of the paper you are using for printing.
IMPORTANT
This setting is available for PCL5 printing only. PCL6 printing is not supported.
NOTE
• This function is available if [On] is selected in the Custom Paper setting.
• Holding down [ ] or [ ] makes the values change faster.
Y dimension
99.0 to 216.0 mm; 216.0
This setting enables you to specify the vertical size of the custom paper.
This function is useful when part of the printed image is cut off, increasing this value may
allow some of the missing text to be correctly printed. Make sure you do not increase the
value beyond the actual size of the paper you are using for printing.
IMPORTANT
This setting is available for PCL5 printing only. PCL6 printing is not supported.
4-22
PCL Settings
NOTE
• This function is available if [On] is selected in the ‘Custom Paper’ setting.
• Holding down [ ] or [ ] makes the values change faster.
Append CR to LF
No, Yes
This setting enables you to specify whether to append a carriage return (CR) when a line
feed code (LF) is received.
If [Yes] is selected, the print head moves to the beginning of the next line when a line feed
code is received.
If [No] is selected, the print head moves down to the next line when a line feed code is
received, and the margin does not change (such as to the beginning of the next line).
4
Customizing Settings
ABCDE ↓ FGHIJ
LF code ( ↓ ) only
ABCDE
FGHIJ
Append CR to LF: [Yes]
ABCDE
FGHIJ
Append CR to LF: [No]
IMPORTANT
This setting is available for PCL5 printing only. PCL6 printing is not supported.
PCL Settings
4-23
Widen A4 Print
Off, On
This setting determines whether to expand the printable area of A4 size paper to that of
Letter size in width.
If [On] is selected, the entire area on a page 4.23 mm from the top and bottom edges and
1.28 mm from the left and right edges is available for printing on A4 paper. Only the width
increases.
If [Off] is selected, the entire area on a page 4.23 mm from the top, bottom, left, and right
edges is available for printing on A4 paper.
C
C
D
Customizing Settings
4
D
A
A
B
B
D
D
'ON'
C
'OFF'
C
Printable area
Settings
‘ON’
A: Length
B: Width
C: Left and right edges
D: Top and bottom edges
‘OFF’
288.54 mm
207.44 mm
201.54 mm
1.28 mm
4.23 mm
4.23 mm
IMPORTANT
This setting is available for PCL5 printing only. PCL6 printing is not supported.
NOTE
• This setting is available for A4 paper only.
• This setting is available for portrait orientation only.
4-24
PCL Settings
Halftones
Text: Resolution, High Resolution, Tone, Gradation
Graphics: Tone, Gradation, Resolution, High Resolution
Image: Tone, Gradation, Resolution, High Resolution
This setting specifies how to express halftones in black and white data.
Print data is expressed in dots. Fine gradations, edges, and shades are expressed by using
dither patterns, which are groups of dots. This is called halftone processing.
For example, using a pattern that sharpens character and line edges, or a pattern that
smoothens image and graph gradation, enables you to obtain the most suitable texture.
Select to print with sharp gradation and well-balanced texture,
contrasting light and shade. Best for printing images.
[Gradation]:
Select to print with both smooth gradation and outlines. Best for
printing graphs and graphics that use gradation.
[Resolution]:
Select to print text with distinct outlines. Best for printing text and thin
lines.
[High
Resolution]:
Select to print finer than with [Resolution], although toner stability is
somewhat weaker. Best for printing small characters, fine lines, and
outlines (such as from CAD data) sharply.
4
Customizing Settings
[Tone]:
BarDIMM
Enable, Disable
This setting is available only when the BarDIMM function is activated.
IMPORTANT
This setting is available for PCL5 printing only. PCL6 printing is not supported.
FreeScape
~, ", #, $, /, \, ?, {, }, |, OFF
This setting is available only when the BarDIMM function is activated.
IMPORTANT
This setting is available for PCL5 printing only. PCL6 printing is not supported.
PCL Settings
4-25
PS Settings
The PS settings available with the machine are described below.
Job Timeout
0 to 3600 seconds (in increments of 1); 0s
This setting enables you to specify the amount of time before a job times out. If a job has not
finished within the set time limit, the job automatically cancels.
Customizing Settings
4
Wait Timeout
0 to 3600 seconds (in increments of 1); 300s
This setting enables you to specify the amount of time the machine will wait for data sent
from the host computer before it times out. If data is not received within the set time limit, the
job automatically cancels.
Print PS Errors
Off, On
This setting determines whether an error page is printed when an error occurs.
4-26
PS Settings
Halftones
Text: High Resolution, Gradation, Resolution
Graphics: Gradation, Resolution, High Resolution
Image: Gradation, Resolution, High Resolution
This setting specifies how to express halftones in black and white data.
Print data is expressed in dots. Fine gradations, edges, and shades are expressed by using
dither patterns, which are groups of dots. This is called halftone processing.
For example, using a pattern that sharpens character and line edges, or a pattern that
smoothens image and graph gradation, enables you to obtain the most suitable texture.
Select to print with both smooth gradation and outlines. Best for
printing graphs and graphics that use gradation.
[Resolution]:
Select to print text with distinct outlines. Best for printing text and thin
lines.
[High
Resolution]:
Select to print finer than with [Resolution], although toner stability is
somewhat weaker. Best for printing small characters, fine lines, and
outlines (such as from CAD data) sharply.
PS Settings
4
Customizing Settings
[Gradation]:
4-27
Ppr Size Override
Off, On
Paper of the size selected in the printer driver might not be loaded in any of the machine’s
paper drawers. If the Ppr Size Override setting is enabled, the machine will automatically
substitute paper of an available size for the missing paper, as shown in the table below.
Customizing Settings
4
Printer Driver Setting
Substitute Paper
Letter
A4
A4
Letter
NOTE
The machine does not use substitute paper if the above substitute paper is not loaded
in the machine’s paper drawers.
4-28
Ppr Size Override
Troubleshooting
5
CHAPTER
This chapter describes how to identify and solve problems you may face when operating the
machine.
Identifying and Isolating Problems . . . . . . . . . . . . . . . . . . . . . . . . . . . . . . . . . . . . . . . . . . 5-2
Printer Problems . . . . . . . . . . . . . . . . . . . . . . . . . . . . . . . . . . . . . . . . . . . . . . . . . . . . . . . . . . . . . .5-2
Printing Problems . . . . . . . . . . . . . . . . . . . . . . . . . . . . . . . . . . . . . . . . . . . . . . . . . . . . . . . . . . . . .5-4
Print Quality Problems . . . . . . . . . . . . . . . . . . . . . . . . . . . . . . . . . . . . . . . . . . . . . . . . . . . . . . . . .5-5
5-1
Identifying and Isolating Problems
You may experience problems while operating the machine. Take a minute to see if
there is a simple solution to your problem before contacting your local authorized
Canon dealer.
Printer Problems
Indicators are off and the display is blank.
Troubleshooting
5
Cause 1
Power switch is not turned ON.
Remedy
Check the power switch to ensure that the machine is turned ON.
Cause 2
Power cord is not connected.
Remedy
Check the power cord and make sure it is connected at both ends.
Cause 3
No power at the AC outlet.
Remedy
Check the AC outlet. Consult an electrician or the local power company. If you
are using a power strip, ensure that the power lead is connected at the source
and turned ON.
Printing does not start.
5-2
Cause 1
The output tray is full of paper during the print job. (When the optional Staple
Finisher-H1 is set up, the tray is full of paper.)
Remedy
Remove the paper in the tray.
Cause 2
The machine and host computer are not properly connected.
Remedy
Check the cable connection between the host computer and the machine. (See
Chapter 2, “Before You Start Using the Machine,” in the User’s Guide.)
Cause 3
A failure occurred in the machine or an optional device.
Remedy
Follow the instructions in the message on the touch panel display.
Identifying and Isolating Problems
Cause 4
The paper size loaded in the drawer is different from the paper size you have set
up in the application software, or the appropriate paper size you have set for
enlarging or reducing the copy is not loaded.
Remedy 1 Change the paper in the selected drawer to the paper size you have set in the
application software (or to the size you have set for enlarging/reducing copy),
and then print again.
Remedy 2 Select the drawer with the appropriate paper size you have set up in the
application software (or to the size you have set for enlarging/reducing copy),
and then print again.
Cause 5
The paper in the drawer or the stack bypass has run out.
Remedy
Load more paper.
The machine does not work.
There is a problem with the machine or software.
Remedy
Follow the instructions in the message on the touch panel display.
5
Troubleshooting
Cause
You cannot print a job or store a job.
Cause
The total number of pages in all jobs has exceeded the limit which can be
processed.
Remedy 1 Cancel other jobs, or wait until those jobs are finished, and then print again.
Remedy 2 Divide the job, and then print again.
Paper is excessively curled after coming out of the machine.
Cause
You may be using paper that curls too easily.
Remedy 1 Remove the paper stack, turn it over, reload it in the drawer and try again.
Remedy 2 Make sure that the paper meets the paper requirements. (See Chapter 7,
“Appendix,” in the Reference Guide.)
High jam rates, incorrect feeding, or multiple sheet feed errors.
Cause
You may be using unsuitable paper.
Remedy
Always use paper that is suitable for the machine. (See Chapter 7, “Appendix,”
in the Reference Guide.)
Identifying and Isolating Problems
5-3
The service call (E730) appears when using the PS functions.
Cause
A malfunction occurred when using the PS driver.
Remedy
Restart the machine—turn OFF the machine, wait at least 10 seconds, and then
turn it ON. (See Chapter 6, “Troubleshooting,” in the Reference Guide.)
Printing Problems
Printer is not using the font you want.
Cause
You have specified a font that is not available.
Remedy
Check whether the font you specified is available with the machine. (See
“Typeface Samples,” on p. 6-20 and “Symbol Sets,” on p. 6-33.)
One edge of the document is cut off.
Troubleshooting
5
Cause
You are trying to print something outside the printable area of the page.
Remedy
Use your software application to adjust the margins of the page. Make sure that
your software application is not trying to print graphics or text outside the
printable area. (See the application software manual.)
Printer is printing garbled text.
5-4
Cause 1
The printer selection you made when you set up or installed your software was
incorrect.
Remedy
Make sure that the correct printer is selected.
Cause 2
If different portions of the text are garbled every time you print, the USB cable
may be too long, causing noise to corrupt the data.
Remedy
A USB cable of 3 meters or shorter is recommended. If your USB cable is
longer than this, replace it with a shorter one.
Cause 3
The machine is plugged into an outlet shared with another electrical device
capable of generating noise, such as a photocopier, shredder or air conditioner.
Remedy
Plug the machine into a different outlet or consult a qualified technician to install
a noise filter.
Identifying and Isolating Problems
Print Quality Problems
Printed text is faded or streaked with white.
Cause
The level of toner remaining in the toner cartridge may be low, or the toner may
not be evenly distributed inside the cartridge.
Remedy
Replace the toner cartridge. (See Chapter 5, “Routine Maintenance,” in the
Reference Guide.)
Printed pages are dirty or have white specks.
Cause
The fixing roller inside the fixing unit has become dirty with toner dust.
Remedy
Clean the fixing unit inside the machine. (See Chapter 5, “Routine
Maintenance,” in the Reference Guide.)
The printout is too light or too dark.
The toner density settings are not correct.
Remedy
Adjust the toner density and print the data again. (See “Print Quality,” on p. 4-9.)
Cause 2
[Toner Save] is set to ‘On’.
Remedy
Set [Toner Save] to ‘Off’ and print the data again. (See “Toner Save,” on p. 4-9.)
Black spots appear on the front and back of the printed pages
Cause
The fixing roller inside the fixing unit may be dirty.
Remedy
Clean the fixing roller. (See Chapter 5, “Routine Maintenance,” in the Reference
Guide.)
Black stripes appear on multiple sheets in sequence.
Cause
The toner cartridge is old or damaged.
Remedy
Contact your local authorized Canon dealer.
Identifying and Isolating Problems
5-5
Troubleshooting
5
Cause 1
Troubleshooting
5
5-6
Identifying and Isolating Problems
Appendix
6
CHAPTER
This chapter summarizes the machine’s specifications and includes the index.
Printer Settings Menu . . . . . . . . . . . . . . . . . . . . . . . . . . . . . . . . . . . . . . . . . . . . . . . . . . . . 6-2
Some Basic Facts about Fonts . . . . . . . . . . . . . . . . . . . . . . . . . . . . . . . . . . . . . . . . . . . . . 6-5
What Is a Font?. . . . . . . . . . . . . . . . . . . . . . . . . . . . . . . . . . . . . . . . . . . . . . . . . . . . . . . . . . . . . . .6-5
Attributes of Fonts . . . . . . . . . . . . . . . . . . . . . . . . . . . . . . . . . . . . . . . . . . . . . . . . . . . . . . . . . . . .6-5
Fonts and Scalable Fonts. . . . . . . . . . . . . . . . . . . . . . . . . . . . . . . . . . . . . . . . . . . . . . . . . . . . . .6-10
Typeface Samples . . . . . . . . . . . . . . . . . . . . . . . . . . . . . . . . . . . . . . . . . . . . . . . . . . . . . . . . . . .6-20
Symbol Sets . . . . . . . . . . . . . . . . . . . . . . . . . . . . . . . . . . . . . . . . . . . . . . . . . . . . . . . . . . . . . . . .6-33
Symbol Sets Supported . . . . . . . . . . . . . . . . . . . . . . . . . . . . . . . . . . . . . . . . . . . . . . . . . 6-61
ISO Substitution Table . . . . . . . . . . . . . . . . . . . . . . . . . . . . . . . . . . . . . . . . . . . . . . . . . . . . . . . .6-61
Specifications . . . . . . . . . . . . . . . . . . . . . . . . . . . . . . . . . . . . . . . . . . . . . . . . . . . . . . . . . 6-63
Software Specifications . . . . . . . . . . . . . . . . . . . . . . . . . . . . . . . . . . . . . . . . . . . . . . . . . . . . . . .6-63
Index . . . . . . . . . . . . . . . . . . . . . . . . . . . . . . . . . . . . . . . . . . . . . . . . . . . . . . . . . . . . . . . . 6-64
6-1
Printer Settings Menu
The table below lists all settings of the Printer Settings menu. The default settings
are indicated in bold.
■ Settings Menu
Additional Functions
6
Available Settings
Applicable Page
Default PapaerSize
A4, B5, A5, LGL, LTR, STMT,
EXECUTIV, No. 10 (COM10),
MONARCH, ISO-C5, ISO-B5, DL
p. 4-7
Default PaperType
Plain, Color, Recycled, Heavy Paper
1, Transparency, Bond, Labels, 3Hole
Punch Paper, Envelope
p. 4-8
Copies
1 to 999; 1
p. 4-8
2-Sided Printing
Off, On
p. 4-8
Appendix
Print Quality
Image Refinement
On, Off
p. 4-9
Density
9 levels; 5
p. 4-9
Toner Save
Off, On
p. 4-9
Line Refinement
On, Off
p. 4-10
Horizontal Line
Off, Level 1, Level 2, Level 3, Level 4
p. 4-10
Vertical Line
Off, Level 1, Level 2, Level 3, Level 4
p. 4-10
Binding Location
Long Edge, Short Edge
p. 4-11
Margin
Layout
6-2
-50.0 to +50.0mm; 0.0mm
p. 4-12
Auto Continue
Off, On
p. 4-13
Timeout
On (5 to 300sec), Off; 15sec
p. 4-14
Printer Settings Menu
Additional Functions
Available Settings
Applicable Page
Finishing
Off, Collate, Offset+Collate*,
Offset+Group*, Staple+Collate*
p. 4-15
Personality
Auto, PCL, PS
p. 4-17
Mode Priority
Off, PCL, PS
p. 4-17
Auto Select
PCL
On, Off
PS
On, Off
Initialize
Off, On
p. 4-17
p. 4-18
* The Offset and Staple modes are available only when the optional Staple Finisher-H1 is attached to the machine.
■ PCL Settings
Available Settings
Applicable Page
Paper Save
OFF, ON
p. 4-19
Orientation
Portrait, Landscape
p. 4-19
Font Number
0 to 104; 0
p. 4-20
Point Size
4.00 to 999.75 point; 12.00
p. 4-20
Pitch
0.44 to 99.99 cpi; 10.00
p. 4-20
Form Lines
5 to 128 lines; 64
p. 4-21
Symbol Set
PC8, PC850, PC851, PC852, PC862,
PC864, PC866, PC8DN, PC8GRK,
PC8TK, PC1004, PIFONT, PSMATH,
PSTEXT, ROMAN8, VNINTL,
VNMATH, VNUS, WIN30, WINARB,
WINBALT, WINCYR, WINGRK, WINL1,
WINL2, WINL5, ARABIC8, DESKTOP,
GREEK8, HEBREW7, HEBREW8,
ISO4, ISO6, ISO11, ISO15, ISO17,
ISO21, ISO60, ISO69, ISOCYR,
ISOGRK, ISOHEB, ISOL1, ISOL2,
ISOL5, ISOL6, LEGAL, MATH8,
MCTEXT, MSPUBL, PC775
p. 4-21
Custom Paper
Off, On
p. 4-21
Unit of Measure
Millimeters, Inches
p. 4-22
X dimension
140.0 to 630.0 mm; 356.0
p. 4-22
Y dimension
99.0 to 216.0 mm; 216.0
p. 4-22
Append CR to LF
No, Yes
p. 4-23
Widen A4 Print
Off, On
p. 4-24
Printer Settings Menu
6
Appendix
Additional Functions
6-3
Additional Functions
Available Settings
Applicable Page
Halftones
Text
Resolution, High Resolution, Tone,
Gradation
Graphics
Tone, Gradation, Resolution, High
Resolution
Image
Tone, Gradation, Resolution, High
Resolution
BarDIMM*
FreeScape
Enable, Disable
~, ", #, $, /, \, ?, {, }, |, OFF
p. 4-25
Bar Code
Printing Guide
* The BarDIMM function is available only when it is activated.
■ PS Settings
Additional Functions
Available Settings
Applicable Page
Job Timeout
0 to 3600 seconds; 0s
p. 4-26
Wait Timeout
0 to 3600 seconds; 300s
p. 4-26
Print PS Errors
Off, On
p. 4-26
Halftones
Appendix
6
Text
High Resolution, Gradation,
Resolution
Graphics
Gradation, Resolution, High
Resolution
Image
Gradation, Resolution, High
Resolution
p. 4-27
■ Other Settings
Additional Functions
Ppr Size Override
6-4
Printer Settings Menu
Available Settings
Off, On
Applicable Page
p. 4-28
Some Basic Facts about Fonts
This section summarizes some of the basic facts you should know about fonts.
What Is a Font?
A font is a collection of letters and symbols used when printing a document. In
general, a group of letters and symbols sharing a common design is referred to as a
font. A font consists of the letters A to Z in both upper and lowercase, as well as
numerals and symbols.
The design that distinguishes one font from another is referred to as a “typeface.”
Each font has a typeface name, such as Courier, CG Times, Letter Gothic, etc.
Attributes of Fonts
Typeface
The design of the letters (e.g. Courier, CG Times, Helvetica, or
Gothic).
Stroke Weight
The thickness of the lines with which the letters are drawn (e.g.
bold, medium, or light).
Style
Whether the letters are drawn straight or at an angle (e.g.
upright or italic).
Point Size
Height of the letters (e.g. 10 point or 5 point).
Pitch (cpi)
Number of characters that are printed in one inch (e.g. 10 cpi,
12 cpi, or Scale).
Character Width (Fixed/ Indicates whether the character width is set to “Fixed” or
PS)
“Proportional.”
Orientation
Orientation of the characters on a page (“Portrait” or
“Landscape”).
Symbol Set
The rule that defines the correspondence between the character
codes coming from the host computer, and the letter forms that
appear on the page (e.g. Roman-8).
Some Basic Facts about Fonts
6-5
6
Appendix
All fonts share some common characteristics, called “attributes.” The typeface is
one such attribute. The letters and symbols that are actually printed are determined
by these attributes.
Typeface
Typeface refers to the design of the characters and symbols. The following figure
shows an example of some typefaces.
Stroke Weight
Stroke weight refers to the thickness of the print. There are light, medium, and bold
stroke weights. The printer function has medium and bold fonts available. The
figure below shows an example of medium and bold printing.
Style
6
Appendix
Style refers to the shape of the characters. The printer function can print in two
styles: upright and italic.
With some fonts, like CourierPS and Letter Gothic, the terms “Oblique” and
“Slanted” are used in the same manner as italics.
6-6
Some Basic Facts about Fonts
Point Size
Point size refers to the height of the character. Character size is measured in points.
One inch is divided into 72 points and 1 point is 1/72 of an inch (about 0.35 mm).
The printer function has bitmapped fonts and scalable fonts available. The
bitmapped fonts are fixed in size, but the scalable fonts are not fixed in size.
Scalable fonts are freely scalable to any size you wish in 0.1 point increments. The
following figure shows an example of various point sizes.
Pitch (cpi)
Pitch refers to the number of characters that are printed in one inch. The unit is cpi
(characters per inch). As the number of characters per inch increases, the space
between characters decreases; as the cpi decreases, the space between
characters increases.
Some Basic Facts about Fonts
6-7
6
Appendix
NOTE
See “Fonts and Scalable Fonts,” on p. 6-10, for more information on bitmapped fonts
and scalable fonts.
Character Width (Fixed and PS)
Each character has a different width from all the other characters in a font at a given
point size. For example, “W” is a wider letter than “I.” There are two ways to print
letters of different widths: you can print all letters with the same spacing, regardless
of their actual width; or you can change the spacing between letters to
accommodate these different widths. Printing all letters with the same spacing is
called “Fixed spacing,” while changing the spacing to accommodate different letter
widths is called “Proportional spacing.”
Because the Fixed spacing method prints all letters with the same spacing, the
number of characters which will fit into a given length is a fixed quantity which can
be specified.
If the characters are printed with Proportional spacing, then the number of
characters that will fit into an inch varies depending on the letters printed.
6
Appendix
Orientation
Orientation refers to the direction of printing. The printer function can print using
two different paper orientations: portrait and landscape. With portrait orientation,
text is printed across the width of the paper (short edge), and with landscape
orientation, text is printed across the length of the paper (long edge).
6-8
Some Basic Facts about Fonts
Symbol Set
When you print the letter “A,” the host computer sends a code corresponding to “A”
(hexadecimal 41 is an example of this) to the machine. This code is referred to as
the character code. The machine stores an internal representation of each
character, and selects from among these character patterns the pattern
corresponding to the received code. In this case, the machine searches for the
pattern for “A,” and prints it.
■ The process by which letters are printed
Computer
Machine
Character
Patterns
The machine uses a fixed rule to decide which letter or symbol corresponds to
the character code sent from the host computer. For example, the letter “A” is
printed for the hexadecimal code “41.” The rule which determines the
correspondence between character codes and printed letters is called the
“symbol set.”
Some Basic Facts about Fonts
6-9
Appendix
6
Fonts and Scalable Fonts
There are two types of fonts available, and these fonts are distinguished by the type
of data from which they are formed.
• Bitmapped fonts
• Scalable fonts
Bitmapped Fonts
Each character of bitmapped fonts are composed of a grid of small dots and stored
in the machine’s memory in dot matrix format.
Bitmapped fonts are fixed in size and specified by characteristics called “attributes,”
such as typeface, stroke weight, style and so on. Various types of bitmapped fonts
are produced by the combination of these attributes.
Appendix
6
6-10
Some Basic Facts about Fonts
Scalable Fonts
With scalable fonts, characters are freely enlarged or compressed from the one
point to any size you wish in 0.1 point increments.
Appendix
6
Some Basic Facts about Fonts
6-11
Standard Scalable and OCR Sets Fonts (PCL)
With scalable fonts, characters are freely enlarged or compressed from one point to
any size you wish in 0.1 point increments. (The maximum range of scaling depends
on the size of the memory installed in the machine and the size of the paper used.)
The following scalable typefaces are included with the machine.
Font Number
Appendix
6
6-12
Font Name
0
Courier
1
CG Times
2
CG Times Bold
3
CG Times Italic
4
CG Times Bold Italic
5
CG Omega
6
CG Omega Bold
7
CG Omega Italic
8
CG Omega Bold Italic
9
Coronet
10
Clarendon Condensed Bold
11
Univers Medium
12
Univers Bold
13
Univers Medium Italic
14
Univers Bold Italic
15
Univers Medium Condensed
16
Univers Bold Condensed
17
Univers Medium Condensed Italic
18
Univers Bold Condensed Italic
19
Antique Olive
20
Antique Olive Bold
21
Antique Olive Italic
22
Garamond Antiqua
23
Garamond Halbfett
24
Garamond Kursiv
25
Garamond Kursiv Halbfett
26
Marigold
27
Albertus Medium
28
Albertus Extra Bold
29
Ryadh
Some Basic Facts about Fonts
Font Number
Font Name
30
Ryadh Bold
31
Malka
32
Malka Bold
33
Malka Italic
Dorit
35
Dorit Bold
36
Naamit
37
Naamit Bold
38
Arial
39
Arial Bold
40
Arial Italic
41
Arial Bold Italic
42
Times New Roman
43
Times New Roman Bold
44
Times New Roman Italic
45
Times New Roman Bold Italic
46
Helvetica
47
Helvetica Bold
48
Helvetica Oblique
49
Helvetica Bold Oblique
50
Helvetica Narrow
51
Helvetica Narrow Bold
52
Helvetica Narrow Oblique
53
Helvetica Narrow Bold Oblique
54
Palatino Roman
55
Palatino Bold
56
Palatino Italic
57
Palatino Bold Italic
58
ITC Avant Garde Gothic Book
59
ITC Avant Garde Gothic Demi
60
ITC Avant Garde Gothic Book Oblique
61
ITC Avant Garde Gothic Demi Oblique
62
ITC Bookman Light
63
ITC Bookman Demi
64
ITC Bookman Light Italic
6
Appendix
34
Some Basic Facts about Fonts
6-13
Font Number
Appendix
6
6-14
Font Name
65
ITC Bookman Demi Italic
66
New century Schoolbook Roman
67
New century Schoolbook Bold
68
New century Schoolbook Italic
69
New century Schoolbook Bold Italic
70
Times Roman
71
Times Bold
72
Times Italic
73
Times Bold Italic
74
ITC Zapf Chancery Medium Italic
75
Symbol
76
SymbolPS
77
Wingdings
78
ITC Zapf Dingbats
79
Courier Bold
80
Courier Italic
81
Courier Bold Italic
82
Letter Gothic
83
Letter Gothic Bold
84
Letter Gothic Italic
85
Naskh
86
Naskh Bold
87
Koufi
88
Koufi Bold
89
CourierPS
90
CourierPS Bold
91
CourierPS Oblique
92
CourierPS Bold Oblique
93
OCR-A
94
OCR-B
95
Line Printer
96
Line Printer
97
Line Printer
98
Line Printer
99
Line Printer
Some Basic Facts about Fonts
Font Name
100
Line Printer
101
Line Printer
102
Line Printer
103
Line Printer
104
Line Printer
6
Appendix
Font Number
Some Basic Facts about Fonts
6-15
Symbol Sets (For Scalable Typefaces Only)
The following symbol sets are included with the machine.
ASCII (ISO6)
Arabic-8(ARABIC8)
DeskTop
Dingbats (14L)
Greek-8(GREEK8)
Hebrew-7(HEBREW7)
Hebrew-8(HEBREW8)
ISO 8859-1 Latin1
ISO 8859-10 Latin 6
ISO 8859-2 Latin 2
ISO 8859-9 Latin 5
ISO 8859-5 Latin/Cyrillic(ISOCYR)
ISO 8859-7 Latin/Greek (ISOGRK)
ISO 8859-8 Latin/Hebrew(ISOHEB)
ISO French (ISO69)
ISO German (ISO21)
ISO Italian (ISO15)
ISO Latin 9 *
ISO Norwegian (ISO60)
ISO Spanish (ISO17)
ISO Swedish:names (ISO11)
ISO United Kingdom (ISO4)
Legal
Math-8
MC Text *
Microsoft Publishing
OCR-A
OCR-B
PC-1004 (OS/2)
PC-775
PC-8
PC-8 D/N
Appendix
6
6-16
Some Basic Facts about Fonts
PC-8 Greek CP437
PC-8 Greek(PC8GRK)
PC-850
PC-851
PC-852
PC-858 *
PC-860 Portugal
PC-862
PC-864
PC-865 Norway
PC-866
PC-Turkish
Pi Font
PS Math *
PS Text
Roman-8
Roman 9 *
Symbol
Ventura International
Ventura Math
Ventura US
Windows 3.0 Latin 1 *
Windows Baltic *
Windows 3.1 Latin 1 *
Windows 3.1 Latin 2 *
Windows 3.1 Latin 5 *
Windows Arabic (WINARB)
Windows Latin/Cyrillic (WINCYR)
Windows Latin/Greek (WINGRK)
Wingdings
* Supports the euro symbol.
PS Fonts
BodoniCE-Italic
BodoniCE-Poster
BodoniCE-PosterCompressed
Bookman-Demi
Bookman-DemiItalic
Bookman-Light
Bookman-LightItalic
BookmanCE-Demi
BookmanCE-DemiItalic
BookmanCE-Light
BookmanCE-LightItalic
Candid
Chicago
ChicagoCE
Clarendon
Clarendon-Bold
Clarendon-Light
ClarendonCE
ClarendonCE-Bold
ClarendonCE-Light
CooperBlack
CooperBlack-Italic
Copperplate-ThirtyThreeBC
Copperplate-ThirtyTwoBC
Coronet-Regular
CoronetCE-Regular
Courier
Courier-Bold
Courier-Oblique
CourierCE
CourierCE-Bold
CourierCE-BoldOblique
CourierCE-Oblique
Courier-BoldOblique
Eurostile
Eurostile-Bold
Eurostile-BoldExtendedTwo
Eurostile-ExtendedTwo
Some Basic Facts about Fonts
6
Appendix
AlbertusMT
AlbertusMT-Italic
AlbertusMT-Light
AntiqueOlive-Bold
AntiqueOlive-Compact
AntiqueOlive-Italic
AntiqueOlive-Roman
AntiqueOliveCE-Bold
AntiqueOliveCE-Compact
AntiqueOliveCE-Italic
AntiqueOliveCE-Roman
Apple-Chancery
Apple-ChanceryCE
Arial-BoldItalicMT
Arial-BoldMT
Arial-ItalicMT
ArialCE
ArialCE-Bold
ArialCE-BoldItalic
ArialCE-Italic
ArialMT
AvantGarde-Book
AvantGarde-BookOblique
AvantGarde-Demi
AvantGarde-DemiOblique
AvantGardeCE-Book
AvantGardeCE-BookOblique
AvantGardeCE-Demi
AvantGardeCE-DemiOblique
Bodoni
Bodoni-Bold
Bodoni-BoldItalic
Bodoni-Italic
Bodoni-Poster
Bodoni-PosterCompressed
BodoniCE
BodoniCE-Bold
BodoniCE-BoldItalic
6-17
EurostileCE
EurostileCE-Bold
EurostileCE-BoldExtendedTwo
EurostileCE-ExtendedTwo
Geneva
GenevaCE
GillSans
GillSans-Bold
GillSans-BoldCondensed
GillSans-BoldItalic
GillSans-Condensed
GillSans-ExtraBold
GillSans-Italic
GillSans-Light
GillSans-LightItalic
GillSansCE-Bold
GillSansCE-BoldCondensed
GillSansCE-BoldItalic
GillSansCE-Condensed
GillSansCE-ExtraBold
GillSansCE-Italic
GillSansCE-Light
GillSansCE-LightItalic
GillSansCE-Roman
Goudy
Goudy-Bold
Goudy-BoldItalic
Goudy-ExtraBold
Goudy-Italic
Helvetica
Helvetica-Bold
Helvetica-BoldOblique
Helvetica-Condensed
Helvetica-Oblique
Helvetica-Condensed-Bold
Helvetica-Condensed-BoldObl
Helvetica-Condensed-Oblique
Helvetica-Narrow
Helvetica-Narrow-Bold
Helvetica-Narrow-BoldOblique
Helvetica-Narrow-Oblique
HelveticaCE
HelveticaCE-Bold
HelveticaCE-BoldOblique
HelveticaCE-Cond
HelveticaCE-CondBold
HelveticaCE-CondBoldObl
HelveticaCE-CondObl
Appendix
6
6-18
Some Basic Facts about Fonts
HelveticaCE-Narrow
HelveticaCE-NarrowBold
HelveticaCE-NarrowBoldOblique
HelveticaCE-NarrowOblique
HelveticaCE-Oblique
HoeflerText-Black
HoeflerText-BlackItalic
HoeflerText-Italic
HoeflerText-Ornaments
HoeflerText-Regular
HoeflerTextCE-Black
HoeflerTextCE-BlackItalic
HoeflerTextCE-Italic
HoeflerTextCE-Regular
JoannaMT
JoannaMT-Bold
JoannaMT-BoldItalic
JoannaMT-Italic
JoannaMTCE
JoannaMTCE-Bold
JoannaMTCE-BoldItalic
JoannaMTCE-Italic
LetterGothic
LetterGothic-Bold
LetterGothic-BoldSlanted
LetterGothic-Slanted
LetterGothicCE
LetterGothicCE-Bold
LetterGothicCE-BoldSlanted
LetterGothicCE-Slanted
LubalinGraph-Book
LubalinGraph-BookOblique
LubalinGraph-Demi
LubalinGraph-DemiOblique
LubalinGraphCE-Book
LubalinGraphCE-BookOblique
LubalinGraphCE-Demi
LubalinGraphCE-DemiOblique
Marigold
Monaco
MonacoCE
MonaLisa-Recut
NewCenturySchlbk-Bold
NewCenturySchlbk-BoldItalic
NewCenturySchlbk-Italic
NewCenturySchlbk-Roman
NewCenturySchlbkCE-Bold
NewCenturySchlbkCE-BoldItalic
TimesNewRomanCE-Bold
TimesNewRomanCE-BoldItalic
TimesNewRomanCE-Italic
TimesNewRomanPS-BoldItalicMT
TimesNewRomanPS-BoldMT
TimesNewRomanPS-ItalicMT
TimesNewRomanPSMT
Univers-Bold
Univers
Univers-BoldExt
Univers-BoldExtObl
Univers-BoldOblique
Univers-Oblique
Univers-Condensed
Univers-CondensedBold
Univers-CondensedBoldOblique
Univers-CondensedOblique
Univers-Extended
Univers-ExtendedObl
Univers-Light
Univers-LightOblique
UniversCE-Bold
UniversCE-BoldExt
UniversCE-BoldExtObl
UniversCE-BoldOblique
UniversCE-Condensed
UniversCE-CondensedBold
UniversCE-CondensedBoldOblique
UniversCE-CondensedOblique
UniversCE-Extended
UniversCE-ExtendedObl
UniversCE-Light
UniversCE-LightOblique
UniversCE-Medium
UniversCE-Oblique
Windings-Regular
ZapfChanceryCE-MediumItali
ZapfChancery-MediumItalic
ZapfDingbats
Some Basic Facts about Fonts
6
Appendix
NewCenturySchlbkCE-Italic
NewCenturySchlbkCE-Roman
NewYork
NewYorkCE
Optima
Optima-Bold
Optima-BoldItalic
Optima-Italic
OptimaCE-Bold
OptimaCE-BoldItalic
OptimaCE-Italic
OptimaCE-Roman
Oxford
Palatino-Bold
Palatino-BoldItalic
Palatino-Italic
Palatino-Roman
PalatinoCE-Bold
PalatinoCE-BoldItalic
PalatinoCE-Italic
PalatinoCE-Roman
StempelGaramond-Bold
StempelGaramond-BoldItalic
StempelGaramond-Italic
StempelGaramond-Roman
StempelGaramondCE-Bold
StempelGaramondCE-BoldItalic
StempelGaramondCE-Italic
StempelGaramondCE-Roman
Symbol
Taffy
Times-Bold
Times-BoldItalic
Times-Italic
Times-Roman
TimesCE-Bold
TimesCE-BoldItalic
TimesCE-Italic
TimesCE-Roman
TimesNewRomanCE
6-19
Typeface Samples
For PCL
Appendix
6
6-20
Some Basic Facts about Fonts
Appendix
6
Some Basic Facts about Fonts
6-21
Appendix
6
6-22
Some Basic Facts about Fonts
Appendix
6
Some Basic Facts about Fonts
6-23
For PS
Appendix
6
6-24
Some Basic Facts about Fonts
Appendix
6
Some Basic Facts about Fonts
6-25
Appendix
6
6-26
Some Basic Facts about Fonts
Appendix
6
Some Basic Facts about Fonts
6-27
Appendix
6
6-28
Some Basic Facts about Fonts
Appendix
6
Some Basic Facts about Fonts
6-29
Appendix
6
6-30
Some Basic Facts about Fonts
Appendix
6
Some Basic Facts about Fonts
6-31
Appendix
6
6-32
Some Basic Facts about Fonts
Symbol Sets
ARABIC8
Appendix
6
DeskTop
Some Basic Facts about Fonts
6-33
GREEK8
6
Appendix
HEBREW7
6-34
Some Basic Facts about Fonts
HEBREW8
6
Appendix
ISO United Kingdom
Some Basic Facts about Fonts
6-35
ASCII
6
Appendix
ISO Swedish
6-36
Some Basic Facts about Fonts
ISO Italian
ISO Spanish
Appendix
6
Some Basic Facts about Fonts
6-37
ISO German
6
Appendix
ISO Norwegian
6-38
Some Basic Facts about Fonts
ISO French
ISOCYR
Appendix
6
Some Basic Facts about Fonts
6-39
ISOGRK
6
Appendix
ISOHEB
6-40
Some Basic Facts about Fonts
ISO 8859-1 Latin 1
6
Appendix
ISO 8859-2 Latin 2
Some Basic Facts about Fonts
6-41
ISO 8859-9 Latin 5
6
Appendix
ISO 8859-10 Latin 6
6-42
Some Basic Facts about Fonts
Legal
6
Appendix
Math-8
Some Basic Facts about Fonts
6-43
MC Text
6
Appendix
Microsoft Publishing
6-44
Some Basic Facts about Fonts
PC-775
6
Appendix
PC-8
Some Basic Facts about Fonts
6-45
PC-850
6
Appendix
PC-851
6-46
Some Basic Facts about Fonts
PC-852
6
Appendix
PC-862
Some Basic Facts about Fonts
6-47
PC-864
6
Appendix
PC-866
6-48
Some Basic Facts about Fonts
PC-8 D/N
6
Appendix
PC-Turkish
Some Basic Facts about Fonts
6-49
PC8GRK
6
Appendix
PC-1004
6-50
Some Basic Facts about Fonts
Pi Font
6
Appendix
PS Math
Some Basic Facts about Fonts
6-51
PS Text
Roman-8
Appendix
6
6-52
Some Basic Facts about Fonts
Ventura International
Ventura Math
Appendix
6
Some Basic Facts about Fonts
6-53
Ventura US
6
Appendix
Windows 3.0 Latin 1
6-54
Some Basic Facts about Fonts
WINARB
6
Appendix
Windows Baltic
Some Basic Facts about Fonts
6-55
WINCYR
6
Appendix
WINGRK
6-56
Some Basic Facts about Fonts
Windows 3.1 Latin 1
6
Appendix
Windows 3.1 Latin 2
Some Basic Facts about Fonts
6-57
Windows 3.1 Latin 5
6
Appendix
ISO Latin 9
6-58
Some Basic Facts about Fonts
PC-858
6
Appendix
Roman 9
Some Basic Facts about Fonts
6-59
OCR-A
6
Appendix
OCR-B
6-60
Some Basic Facts about Fonts
Symbol Sets Supported
This section provides a list of the character code tables for the characters in each
symbol set.
ISO Substitution Table
Appendix
6
The shaded characters in the table are replaced with the corresponding ones in the
following table according to the graphic set used.
Symbol Sets Supported
6-61
Appendix
6
6-62
Symbol Sets Supported
Specifications
This section lists the specifications of the machine.
Software Specifications
Command Language PCL5e, PCL6, PostScript 3 emulation (PS3)*1, and UFRII LT
PCL:
93 Scalable fonts, 2 OCR fonts, and 10 Bitmap
fonts
PS3*1:
251 Scalable fonts
Resident Fonts
PCL5e, PCL6: Reduced to 4.23 mm from the top, bottom, left, and
right edges of the paper.
PS3*1:
Reduced to 4 mm from the top, bottom, left, and
right edges of the paper.
UFR II LT:
Reduced to 5 mm*2 from the top, bottom, left, and
right edges of the paper.
6
Appendix
Printable Area
*1 Only available for the PS3 Printer.
*2 For envelopes:10 mm
Specifications
6-63
Index
Numerics
E
2-Sided Printing, 4-8, 6-2
3Hole Punch Paper, 4-8
Envelope, 4-8
Executive, 4-7
A
F
Abbreviations Used in This Manual, x
Append CR to LF, 4-23, 6-3
Attributes of Fonts, 6-5
Auto Continue, 4-13
Auto Select, 4-17
Finishing, 4-15
Fixed and PS, 6-5
Fixed Spacing, 6-8
Font Number, 4-20
Fonts
Attributes, 6-5
Bitmapped, 6-10
Definition, 6-5
Scalable, 6-11
Standard Scalable, 6-12
Form Lines, 4-21
FreeScape, 4-25, 6-4
Appendix
6
B
BarDIMM, 4-25
Binding, 4-11
Bitmapped Fonts, 6-10
Bond Paper, 4-8
H
C
Carriage Return, 4-23
Character Width, 6-5, 6-8
Color Paper, 4-8
Copies, 4-8
Cpi, 4-20
Custom Paper, 4-21
D
Default PaperSize, 4-7
Default PaperType, 4-8
Density, 4-9
6-64
Index
Halftones (PCL Settings), 4-25
Halftones (PS Settings), 4-27
Heavy Paper, 4-8
I
Image Refinement, 4-9
Index Printing, 2-8
Initialize, 4-18
ISO Substitution Table, 6-61
Italics, 6-6
J
Job Timeout, 4-26
L
Labels, 4-8
Landscape, 4-19
Layout, 4-11
Line Feed, 4-23
Print Quality, 4-9
Print Quality Problems, 5-5
Printer Problems, 5-2
Printer Settings Menu
Functions List, 6-2
Using, 4-5
Printing Problems, 5-4
Proportional Spacing, 6-8
PS Fonts, 6-17
PS Settings, 4-26
R
Margin, 4-12
Media Print, 2-1, 2-2
Index Printing, 2-8
Selecting All Files in Folder, 2-9
Selecting Files by Date, 2-10
Selecting Files by Extension, 2-12
Mode Priority, 4-17
O
Oblique, 6-6
OCR Sets, 6-12
Offset + Collate, 4-15
Offset + Group, 4-15
Orientation, 4-19, 6-5, 6-8
P
Paper Save, 4-19
PCL font lists, 6-12, 6-20
PCL Settings, 4-19
Personality, 4-17
Pitch, 4-20, 6-5, 6-7
Plain Paper, 4-8
Point Size, 4-20, 6-5, 6-7
Portrait, 4-19
Ppr Size Override, 4-28
Print PS Errors, 4-26
Recycled Paper, 4-8
S
Scalable Fonts, 6-10, 6-11
Software Specifications, 6-63
Specifications, 6-63
Staple, 4-15
Staple Position, 4-15
Stroke Weight, 6-5, 6-6
Style, 6-5, 6-6
Symbol Set, 4-21, 6-5, 6-9, 6-16, 6-33
6
Appendix
M
T
Timeout, 4-14
Toner Save, 4-9
Transparency, 4-8
Typeface, 6-5, 6-6
Typeface Samples, 6-20
U
Unit of Measure, 4-22
Upright, 6-6
Using the Printer Settings Menu, 4-5
Index
6-65
W
Wait Timeout, 4-26
Widen A4 Print, 4-24
X
X dimension, 4-22
Y
Y dimension, 4-22
Appendix
6
6-66
Index
CANON INC.
30-2, Shimomaruko 3-chome, Ohta-ku, Tokyo 146-8501, Japan
CANON U.S.A., INC.
One Canon Plaza, Lake Success, NY 11042, U.S.A.
CANON CANADA INC.
6390 Dixie Road Mississauga, Ontario L5T 1P7, Canada
CANON EUROPA N.V.
Bovenkerkerweg 59-61 1185 XB Amstelveen, The Netherlands
(See http://www.canon-europe.com/ for details on your regional dealer)
CANON LATIN AMERICA, INC.
703 Waterford Way Suite 400 Miami, Florida 33126 U.S.A.
CANON AUSTRALIA PTY. LTD
1 Thomas Holt Drive, North Ryde, Sydney, N.S.W. 2113, Australia
CANON CHINA CO., LTD
15F Jinbao Building No.89 Jinbao Street, Dongcheng District, Beijing 100005, China
CANON SINGAPORE PTE. LTD.
1 HarbourFront Avenue #04-01 Keppel Bay Tower, Singapore 098632
CANON HONGKONG CO., LTD
19/F., The Metropolis Tower, 10 Metropolis Drive, Hunghom, Kowloon, Hong Kong
USRM1-8066-00
© CANON INC. 2011