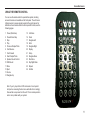
1
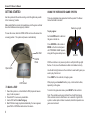
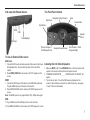
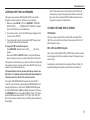
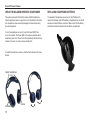
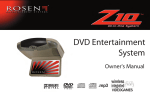
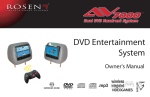
NEW Z10 LOGO
DVD Entertainment
System
Owner's Manual
R
wireless
.mp3 integrated
VIDEOGAMES
NOTICES
NOTICE OF INTENDED USE
Rosen Electronics are designed to enable viewing of video
ONLY for rear-seat occupants, and are not intended for
viewing by the driver when the vehicle is in motion. Such
use might distract the driver or interfere with the driver’s
safe operation of the vehicle, and thus result in serious
injury or death. Such use might also violate state or local
laws.
Rosen Electronics disclaims any liability for any bodily
injury or property damage that might result from any improper or unintended use.
About the Registered Marks
This item incorporates copy protection technology that is protected by U.S. patents
and other intellectual property rights of Rovi Corporation. Reverse engineering and
disassembly are prohibited.
NOTE: Features and specifications listed in this manual are subject to change
without notice
Manufactured under license from Dolby Laboratories.“Dolby” and the double-D
symbol are trademarks of Dolby Laboratories.
Table of Contents
Getting Started…………………………………………………………………………………………………………………………………............…………………...6
Introduction ……………………..........……………………………………………………………………………………………………………………………………..8
Discs Compatibility………………………………………………………………………………………………………...........………………………………………….9
Changing and Adjusting Display Settngs…………………………………………………………………………………………………………..........……….……..10
Using the Remote Control…………………………………………………………………………………………………………………………..........……….………11
Basic Remote Control Buttons……………………………………………………………………………………………………………………..........……….………12
Using Menu and Navigation Buttons, Using Audio Buttons……………………………………………………………………………………..........………………13
Using DVD Disc Features…………………………………………………………………………………………………………………………….........…….……….14
Replacing the Remote Battery……………………………………………………………………………………………………………………….........…….……….14
Listening Over the Car Speakers………………………………………………………………………………………….………………………………...........……..15
CD Audio,MP3 And JPEG Playback.........………………………………………………………………………………………………………….............……..……15
Using the Included Wireless Headphones………………………………………………………………………………………………...........…………..................16
Replacing the Headphone Batteries ………………………………………………………………………………………………....................................………….16
DVD Setup and Configuration.……………………………………………………………………………………………………………………………..........…..…..17
Frequently Asked Questions……………………………………………………………………………………………..…………………………..........……………..18
Warranty Terms......................................................................................................................................................................................................................20
Rosen X10 Owner’s Manual
GETTING STARTED
USING THE INTEGRATED GAME SYSTEM
Use the system with the vehicle running or with the ignition key switch
in the “accessory” position.
There are integrated video games built into the system. The Rosen
Game Controller is included.
Make certain that the remote, the headphones, and the game controller
have fresh batteries and are properly installed.
To lower the screen, slide the OPEN LATCH and move the screen into
a viewing position. The system will power on automatically.
Disc Slot
Control
Panel
Open Latch
Flashing Logo Light
To play a game:
Set the A/Off/B switch to A to turn
the game controller on.
Press SOURCE on the remote or
MODE on the front control panel
until “INTERNAL GAME” appears,
along with the game startup menu.
A/OFF/B
With the controller on A, press any button to verify the LED logo light
flashes. If not, insure the batteries are fresh and installed correctly.
Use the left and right arrows on the controller to select which game you
want to play from the list.
Press START on the controller, to begin a game.
LCD Screen
To Watch a DVD:
1 Power the system on, unit will default to DVD player and resume
play, if a disc is present.
2 Press EJECT to remove any loaded disc.
3 Insert a DVD with the label facing up.
4 Most DVD discs begin playback automatically. If a menu appears,
press PLAY or ENTER as instructed on the screen.
6
While playing, use A and/or B as fire, jump, or other action buttons,
depending on the game.
To return to the game main menu, press RESET on the controller.
Note: The controller works using infrared “line-of-sight” technology.
If the controller is held so that there is not a clear line of sight to the
system or under rapid controller movement, intermittent operation or a
game reset will result.
Rosen Electronics
The Front Panel Controls
Side view with External Source
Play/Pause
Enter
Navigation Up/Fast Forward
Source Button
Eject Button
HDMI
USB
Speaker
Sound
Dome/Maplight
AUX Input
Previous Chapter or
Track/Navigation Left
Navigation Down/Forward
Next Chapter or Track/
Navigation Right
To Use An External Video Source
AUX Input
1 Connect the RCA audio and video outputs of the device to the Rosen
RCA adapter cable. Plug into AUX input port on the side of the
monitor.
2Press MODE (SOURCE on the remote) until “AUX” appears on the
screen.
HDMI
1 Connect the HDMI output of the device to an HDMI cable (optional).
Plug into HDMI input port on the side of the monitor.
2 Press MODE (SOURCE on the remote) until “HDMI” appears on the
screen.
Note: The HDMI input can only support 480p, 720p, 1080p video signal.
Listening Over the Vehicle Speakers
1 Make sure MUTE is off. Press SPEAKER button on the front panel of the
system or the remote control each time the system is used.
2“SPEAKER SOUND ON FM _ _ _ . _ PRESS R/L KEY TO ADJUST” will
appear.
3 Turn on the car radio. Tune to the FM frequency displayed on the
screen. If radio interference is heard, try another frequency. (see pages
13 and 15 for more information)
USB
1 Plug a USB device to the USB input port on side of monitor.
2 Press MODE (SOURCE on the remote) until “DVD” appears on screen.
7
Rosen X10 Owner’s Manual
INTRODUCTION
•
Congratulations on owning a Rosen Electronics System! Here’s a list of
some things you can do with your system:
•
· Play DVD movies, music CDs, or discs with MP3 audio files.
· Play onboard video games.
· Play audio through the vehicle speakers or the wireless headphones
· Use external audio/video inputs from video game consoles,
camcorders, or optional units like a TV tuner or a DVD changer.
· View JPG photo files or playback compatible MPG videos.
Precautions
In order to operate the system, the
vehicle ignition key switch must be
in the ACC or engine ON position.
•
•
•
•
8
ACC or engine
ON position
Use this system only if properly installed by a qualified installer.
If the unit shows any sign of malfunction, turn it off and consult your
dealer immediately. Do not open the unit - there are no serviceable
parts inside.
Do not press directly on the display surface - you may damage
it.
Clean the display surface with a slightly damp, soft cloth using
household glass cleaner. Do not use solvents such as benzene,
thinner, or commercial cleaners.
•
When using portable radios and telephones near the system, picture or sound interference may occur.
If your car was parked in a very cold or very hot place, you may see
a blank screen, distorted picture or the unit may not be able to load
a disc. The system will return to normal after the unit temperature
returns to a normal operating range. This may take more than an
hour depending on the temperature and/or require resetting the
unit.
If your car battery charge is low or the vehicle battery is old, you
may see a blank screen, distorted picture or the unit may not be
able to load a disc. The system will return to normal after the unit
voltage returns to a normal operating range and/or require resetting
the unit.
Note: The system’s operating voltage range is
11-16VDC operating voltage. The system operating temperature is 32o to 140o F ( 0o to 60o C).
Use of the system beyond the safe operating
ranges listed, can cause temporary or permanent damage to the unit, and such damage
may not be covered by the manufacturer’s
warranty.
Rosen Electronics
DISC COMPATIBILITY
Incompatible Discs
Compatible Discs
The following disc types are known to be incompatible with the system:
Note: Not all discs are supported by this system. You may find
a disc that will not play on this system, but works fine on other
players. Various manufacturers of discs change technology from
time to time which may create compatibility issues. This is not a
problem with the unit and is not covered by warranty.
· All DVD-ROM/DVD-RAM/DVD+RAM discs.
Most DVD and CD-Audio discs are compatible with the X1020 system.
The unit can also play most CD-Recordable discs containing CD-Audio, MP3 files, and JPEG images - but not all such discs. Since these
discs are usually made on home computers, there is no certification process ensuring that all such discs play on all players.
DVD Regions
When a DVD disc is created, it is encoded with a “Region number.”
The disc will only play on DVD players with the same Region number.
For instance, a Region 3 disc won’t play on a Region 1 player.
Region 1: U.S. and U.S. Territories, Canada
Region 2: Japan, Western Europe, Middle East, South Africa
Region 3: South Korea, Hong Kong, Taiwan, Southeast and East Asia
Region 4: New Zealand, Australia, Pacific Islands, Mexico, Central/
South America
Region 5: Russia and the former Soviet Union, Africa, Indian
subcontinent, North Korea
Region 6: China
· Some DVD-R/DVD-RW/DVD+R/DVD+RW discs.
· Some Photo CDs.
· All CD-ROM data discs.
· CD-Audio discs made with certain copy protection methods.
· Any DVD with a different Region number than the unit.
· Any disc that does not meet DVD Forum standards.
Why the system doesn’t respond the same way to all discs
When a DVD disc is created, the creator has to define how the disc
will operate when loaded into a DVD player. For instance, some discs
begin playing immediately, while other discs only display a menu and
require a menu selection to be made before playback will start.
The DVD standard also allows the maker of a DVD disc to disable
functions at certain times, such as Fast-Forward and Stop (which is
why you can’t skip past the copyright warning screen). If some DVD
feature temporarily isn’t working for you, usually the disc is preventing
the player from performing that function.
Discs that don’t properly load and play
Some CD and DVD discs, especially homemade discs which do not
have all the data needed to properly initialize all DVD players, may not
load and play properly. They may even create a state where the DVD
player will not eject the disc at all. In these cases, use a paper clip to
press the Reset button (this button’s location is shown on page 6), followed by rapidly pressing eject on the unit.
9
Rosen X10 Owner’s Manual
CHANGING AND ADJUSTING THE DISPLAY
Selecting a display mode: The system’s “widescreen” display has
a 16:9 aspect ratio - wider than a standard television. While many
DVDs provide widescreen video images that fit the screen, standard
broadcast TV and many video games do not.
• To view a widescreen DVD, press the DISPLAY button on the
remote until “WIDE” is displayed on the screen.
•
To watch a fullscreen DVD, the internal game system, or broadcast television, select “STANDARD.”
Change the Display Adjustments Remote Control Only: The
display has adjustable video settings. To change these settings, press
and hold the DISPLAY button on the remote control to bring up the
following menu:
BRIGHTNESS32
CONTRAST
32
COLOR32
TINT32
To select a setting to be changed: Press the DOWN arrow button to
move the cursor down the menu list. Once you have selected the item
to change, use the LEFT and RIGHT arrows on the remote or the
front panel to adjust the settings. After you have finished making your
desired changes, press the DISPLAY button on the remote to exit and
save the changes you have made.
To change the value of a setting: Use the LEFT and RIGHT arrow buttons. The range is from 0 to 63.
10
To exit the menu: Press the DISPLAY button to save settings and exit.
Set the brightness level in daytime conditions with plenty of ambient
light. You can use the Day/Night mode button to switch between Day
and Night modes.
Note: The internal DVD player can be configured for either a
16:9 “Wide” image output or a 4:3 “Standard” image output.
Since the unit has a wide screen display, the DVD player should
be configured for “Wide.” For more information, see page 19.
Note: The internal DVD player also has a set of video adjustments, which are separate from the main adjustments.
Rosen Electronics
USING THE REMOTE CONTROL
You can use the remote control to operate the system, including
access to features not available on the front panel. The unit has an
infrared sensor to receive signals located in the control panel. For
definitions of each remote control button’s specific function, see the
following pages.
1 Power (Not Active)
15 Info Menu
2 Pause/Frame Step
16 Zoom
3 Stop
17 Navigate Left
4Play
18Enter
5 Previous Chapter/Track
19 Navigate Right
6 Fast Reverse 20 Display
7 Fast Forward
21 Setup
8 Next Chapter/Track
22 Navigate Down
9 Speaker Sound Control
23 Disc Menu
10 RES Sound
24 Day/Night Mode
11 Mute
25 Repeat
12 Eject 26 Subtitle
13Source
14 Navigate Up
1
2
3
4
5
6
7
8
9
10
11
12
13
14
15
16
17
18
19
20
23
24
21
22
25
26
Note: If you try to perform a DVD action when it is not permitted (such as accessing the disc menu while the disc is loading),
there will be no response from the unit. This is normal operation
and is not a problem with your system.
11
Rosen X10 Owner’s Manual
BASIC REMOTE CONTROL BUTTONS
1Power
This button powers on the optional external source unit. (The system
powers on automatically with the screen position)
4Play
Press to begin or resume playback of a DVD.
Note: When the disc is first inserted, you may have to press
PLAY or ENTER to begin playback.
3Stop
Press once to temporarily stop playback of a DVD. To resume normal
playback from the same point, press PLAY.
To play the disc from the beginning, press STOP twice, then PLAY.
Note: Once STOP is pressed twice, the player can only begin
playing from the beginning of the disc.
2
Pause/Frame Step
Press once to pause playback. Press repeatedly to advance video
frame by frame. To resume normal playback, press PLAY.
12
5
Previous Chapter/Track
Press to jump to the previous title or chapter if available on a DVD, or
to the previous track on an audio CD. Not supported with some VCDs.
8
Next Chapter/Track
Press to jump to the next title or chapter if available on a DVD, or to the
next track on an audio CD. Not supported with some VCDs.
6
Fast Reverse
Press to search in reverse. To resume normal playback, press PLAY.
Press the REVERSE button multiple times to adjust search direction
and speed. Choose from 2, 4, 8, and 16x. Press PLAY to resume
regular play.
7
Fast Forward
Press during playback to fast forward. Press the FAST FORWARD button multiple times to adjust search direction and speed. Choose from
2, 4, 8, and 16x. Press PLAY to resume regular play.
24 Day/Night Mode
This button decreases display brightness for optimum viewing in low
light conditions. For more information, see page 10.
Rosen Electronics
USING MENU AND NAVIGATION BUTTONS
13Source
SOURCE
This button allows you select the Internal DVD/CD player, the Internal
Game or the Auxiliary Input. You can also select the optional TV Tuner,
DVD changer, or other optional auxiliary sources, if installed.
Note: The Mode button on the control panel performs the same
function.
14, 22
Up/Down Navigation Arrows
Press to move up or down in a menu or to change channels when
watching TV.
17, 19
Left/Right Navigation Arrows
Press to move left or right in a menu. Also used to change frequencies
on the FMT, after the Speaker Sound button is pressed.
9
Speaker Sound Control
When this button is pressed, “Speaker Sound On” appears on the
screen, along with the FM frequency to which you should tune your
radio, such as “FM 88.1.” To change the frequency, press the LEFT or
RIGHT arrow buttons on the remote control and wait two seconds for
the station to set. Headphone audio is not affected by this button.
FM frequencies available: Find a frequency in your geographic location
that has no static transmission and set it.
Note: If the frequency does not appear on screen when this
button is pressed, an external FM Modulator is probably being
used. See page 15 for more information.
10RES
The Rosen Electronics Sound RES button cycles through various
sound enhancements.
11Mute
18Enter
Press to make a menu selection.
21Setup
USING AUDIO BUTTONS
Press once to mute all system audio. As long as the Mute function is
active, “Mute” will appear on the screen. Press again to turn Mute off.
SETUP
Pressing this button brings up the DVD player setup screen.
15 Info Menu
Pressing this button brings you into the DVD player menu.
13
Rosen X10 Owner’s Manual
USING DVD DISC FEATURES
23 Disc Menu
DISC
MENU
Press to see the main menu for the DVD being played. To resume
normal playback, press PLAY.
CHANGING THE SHAPE AND SIZE OF THE IMAGE
16Zoom
+
+
View the same scene on a DVD at different magnifications.
1 Press the ZOOM button during playback to select among the following options: Zoom 1, Zoom 2, Zoom 3, and Off.
2 To resume normal playback, press ZOOM until “Zoom off” is displayed.
20 Display
DISPLAY
•
To adjust the display settings (color, contrast, etc.), press and hold
the DISPLAY button for two seconds.
For more information about image shapes, see “Managing Black Bars,”
on page 18.
25 Repeat
This button enables chapter and title repeat.
26 Subtitle
This button enables the DVD’s Subtitle menu.
REPLACING THE REMOTE BATTERY
Press tab here
and pull battery tray out
This button allows you select from the various screen display modes.
•
To view a widescreen DVD, press this button until “WIDE” is displayed on the screen. This uses the full width of the screen.
•
To watch a fullscreen DVD or broadcast television, press until “STANDARD” is displayed. This mode uses most of the screen, but black bars will be visible on the sides, like this:
Battery
Use a single 3V battery, type CR2025. Insert as shown. Observe the
correct orientation of the battery as marked on the battery tray.
Battery life is approximately six months, depending on how often the
remote is used.
14
Rosen Electronics
LISTENING OVER THE CAR SPEAKERS
The system uses a wireless FM Transmitter (FMT) to send audio
through the vehicle’s speakers. To listen over your speakers:
1 Make sure system MUTE is off. Press SPEAKER. “SPEAKER
SOUND ON FM_ _ _ . _ PRESS R/L KEY TO ADJUST” appears.
Select a FM frequency as described below.
2 Turn on the car radio. Tune to the FM frequency displayed on the
screen, such as “FM 88.7”.
3 If no system audio is heard, try changing the FMT frequency and
re-tuning the radio to the new frequency.
To change the FM Transmitter frequency:
Press SPEAKER. “Speaker Sound on FM_ _ _ . _” will be displayed.
Now use the LEFT and RIGHT buttons to change the frequency.
Select a frequency, re-tune your radio and check for clear sound.
The system saves the frequency you select, and returns to it each time
the system is turned on. You may want to store the FMT frequency as
a preset of your radio for ease of use.
Note: If there seems to be a strong station on the FM Transmitter frequency, and you are hearing a radio station mixed in with
the system audio, change the FM Transmitter frequency. Avoid
frequencies used by local radio stations.
CD AUDIO, MP3 AND JPEG PLAYBACK
CD Playback
When you insert an audio CD, the standard CD commands (PLAY,
NEXT, etc.) will control the unit. Some CDs recorded in CD-R or CDRW mode may not play.
MP3, JPEG and MPEG Playback
When a disc containing MP3, JPEG or MPEG files is inserted, a menu
screen appears. Use the arrow buttons to select a file type and press
enter to play it.
Loading time is directly related to the number of files on the disc. To
speed the loading time, keep the number of files to less than 25.
The Speaker Button must be pressed each time you want to use
this feature. The internal radio transmitter will automatically turn
off when you turn the vehicle off or close the monitor.
If the words “HEADPHONES ONLY” appear, the internal FMT is
turned off. It can be turned on by pressing the SPEAKER button and
selecting a FM frequency. If the words “SPEAKER SOUND” appear,
an external FM Modulator (FMM) is probably being used. In this case,
the SPEAKER button turns the external FMM on and off. The Rosen
external FMM frequencies are FM 87.7, 87.9, 88.1, 88.3, 88.5, 88.7,
88.9. If you have any questions about your FMM, please contact your
Rosen dealer.
15
Rosen X10 Owner’s Manual
USING THE INCLUDED WIRELESS HEADPHONES
REPLACING HEADPHONE BATTERIES
The system comes with infrared (IR) wireless fold-flat headphones.
These headphones receive a signal from an IR transmitter built into the
unit. Headphones allow rear-seat passengers to listen without using
the vehicle speakers.
The wireless IR headphones require two (2) “AAA” batteries. To
replace the batteries, slide off the battery compartment door on the left
earpiece and insert batteries, as shown. Make certain that the battery
orientation matches the marks inside the battery compartment.
To turn the headphones on and off, push the Power ON/OFF button on the earpiece. The Power LED on the earpiece indicates when
headphone power is on. Power turns off automatically after about three
minutes of no audio, in order to preserve battery life.
To adjust the headphone volume, rotate the thumb wheel on the headphones.
Adjust headphones
here
On/Off
Batteries
16
Volume
Rosen Electronics
DVD TYPICAL SETUP AND CONFIGURATION
Speaker Setup
The following section explains how to customize various features of the
Internal DVD Player, including languages, display, and parental control
features.
This allows you to customize the speaker setting.
Note: Some DVD menu settings do not apply to this system, since it
is specifically engineered for automotive use. Changing the state of
some settings can cause apparent system failure. Do not change any
settings other than those decribed in this section.
Default Settings:
→Downmix = Stereo
To change the settings for the internal DVD player:
1Press SETUP on the remote.
2 Use the UP and DOWN navigation buttons to highlight a selection.
3 Press the ENTER button to confirm your selection.
General Setup
Several settings can be customized on the DVD Player.
Preference Setup
This allows you to customize the video output, subtitle, language and
parental settings.
Note: The disc must be in stop mode or removed to access this menu.
Default Settings:
→TV Type= NTSC
→Audio = English
Default Settings:
→Angle Mark = Off
→OSD = English
→Subtitle = Off
→Disc Menu = English
→Parental pass = 3308
→Captions = Off
→Screen Saver = Off
Note:Not all language settings are supported by all discs.
17
Rosen X10 Owner’s Manual
FREQUENTLY ASKED QUESTIONS
HOW DO I RESET MY SYSTEM?
Periodically the system may need to be reset.
Solution: To RESET the system, turn the vehicle off or press and hold the RESET button for 3 or more seconds. The RESET button is located in the display pocket.
MY SYSTEM RESETS WHEN I START MY VEHICLE
Voltage levels while starting the vehicle can fall below the minimum
operating levels for the system.
Solution: Ensure your battery is fully charged and in good condition.
Solution: Avoid operating your system without the engine running for periods longer than 10 minutes.
MY SYSTEM IS NOT RESPONDING TO COMMANDS
Periodically, the DVD system may receive conflicting commands from
a DVD or remote control. When this happens, the system may not respond properly to the remote control, control buttons, or may be locked
up and not respond at all.
Solution: The system needs to be RESET as described above.
Solution: Replace the battery in the remote control.
I CAN NOT GET AUDIO ON THE RADIO
To receive audio over the radio, the system must have SPEAKERS
ENABLE selected, and the radio must be tuned to the proper station.
Solution: Press the SPEAKER button on the remote control to en able the radio transmission.
Solution: Tune the radio to the proper FM station as directed in the “Listening Over the Car Speakers” section of this manual.(see page 15)
Solution: Reset the system
MY AUDIO HAS STATIC ON THE RADIO
To receive audio over the radio, the radio must be tuned to a broadcast
station which is not in use by a local radio station.
Solution: Set the FM Transmitter to an alternate radio station. Then tune the radio to the newly selected station. (see pages 7,15)
MY DVD WILL NOT PLAY
Some DVDs will not play properly due to compatibility, dirt, rough
edges, damage to the disc or the system may be beyond its operating
temperature.
Solution: Confirm the DVD is a compatible format. (see page 9)
Solution: Check and clean the DVD as needed.
Solution: Use a pencil or soft wood to smooth the edge of the disk.
Solution: Replace the DVD if scratched, cracked or warped.
Solution: Allow the system temperature to return to normal operating temperatures. This may take up to an hour after the air temperature in the vehicle is at a comfortable level.
18
MY DVD WILL NOT EJECT
Damaged DVDs, incompatible DVDs or improper system installation
will prevent the DVD from ejecting and may lock up the system.
Solution: Reset the system then quickly press EJECT while the disc is spinning.
Solution: Check the DVD for damage, replace the DVD if scratched, cracked or warped.
Solution: Confirm the DVD is a compatible format. (see page 9)
I DO NOT HAVE HEADPHONE AUDIO
The headphone audio should be present at all times, unless MUTE is
on, or a DVD setting has been changed in the DVD Settings Menu.
Solution: Press the MUTE button to enable the audio and turn the MUTE OFF.
Solution: Confirm that the headphones are turned on, and the ON LED indicator is illuminated. Change batteries if needed.
Solution: Check the DVD settings and restore them to FACTORY SETTINGS if needed.
Rosen Electronics
MY PICTURE FREEZES
Damaged or incompatible DVDs will cause the system to freeze and
lock up the system.
Solution: Check and clean the DVD as needed.
Solution: Replace the DVD if scratched, cracked or warped.
Solution: Confirm the DVD is a compatible format. (see page 9)
Solution: Allow system to return to normal operating temperature.
Solution: Reset the system.
MY RADIO LOSES ITS NORMAL STATIONS
With an external FM Modulator and while the system is set to broadcast over the radio with SPEAKERS ENABLED, the vehicle’s antenna
is temporarily disabled.
Solution: Press the SPEAKER button on the remote to restore the vehicle antenna, “Headphones Only” will appear on the screen.
SERVICE PARTS
Part Number
AP1043
AP1007
AC3614
AP1023
AP1011
Description
IR Remote Control
IR Game Controller
Fold Flat Single Channel IR Headphones
Owner’s Manual
AUX Input Cable
MY PICTURE IS DISTORTED
Excessive cold or hot temperatures will cause the picture on the display to become distorted or lose color or contrast.
Solution: Allow the system temperature to return to normal operating temperatures. This may take up to an hour after the air temperature in the vehicle is at a comfortable level.
MY PICTURE IS BLACK
The screen will appear black or dark blue if there is no video signal.
This may happen if the DVD fails to initialize properly or if a source is
selected which is not connected.
Solution: Eject the DVD and inspect it for damage, scratches or cracks. Clean the DVD and re-insert the disc.
Solution: Reset the system.
For other questions and capabilities please contact your authorized
Rosen dealer. To locate a Rosen Electronics authorized dealer, please
visit www.rosenelectronics.com.
19
LIMITED PRODUCT WARRANTY
NONTRANSFERABLE
Terms of the Limited Warranty:
Rosen Electronics, L.P., a California Limited Partnership, (ROSEN) warrants to the original retail purchaser, that the product(s) when installed by a ROSEN Authorized Dealer,
in the original vehicle, are free from defects in materials or workmanship under normal use and conditions as follows;
• For product(s) installed within the first Thirty (30) days after the new vehicle delivery, product(s) shall be warranted for a period of THREE (3) YEARS or 36,000 MILES from
date of retail purchase, whichever comes first. Where the original OEM vehicle manufacturer’s standard audio equipment warranty is greater than Three Years, the term will
be extended to match the OEM audio equipment warrant at time of installation, not to exceed Five (5) Years or 50,000 Miles.
• For product(s) installed more than Thirty (30 ) days after the new vehicle delivery, product(s) shall be warranted for a period of ONE (1) YEAR or 12,000 MILES from date
of retail purchase, whichever comes first.
• Remote controls, headphones and game controllers are warranted for a period of NINETY (90) DAYS from date of retail purchase.
A sales receipt and/or vehicle purchase contract, showing the installation date and ROSEN product details are required as proof of retail purchase. Should the product(s) be
determined defective during the applicable warranty period, the defective product(s) will be repaired or replaced with a reconditioned product at ROSEN’s sole discretion. To
obtain warranty service, the product(s) must be returned to a ROSEN authorized dealer with proof of retail purchase and warranty coverage.
Exclusions:
• Costs incurred for trouble-shooting, installation, removal, reinstallation of the product(s) or service calls and/or transportation of the vehicle.
• Elimination of externally generated or induced static, noise or engine whine, or the correction of antenna problems or weak television reception.
• Product(s) which have been opened, modified or tampered with, for any reason or which have been service by anyone other than ROSEN.
• Cosmetic wear and tear or damage due to negligence, misuse, abuse, failure to follow operating instructions, accidental spills or customer applied cleaners.
• Damage due to improper installation or connection to the vehicle or other equipment, use of a faulty cleaning disc, or improper cleaning materials.
• Damage to video games, video game consoles, memory devices, software, camcorders, discs, speakers, accessories or vehicle electrical systems.
• Damage or loss due to environmental causes such as floods, airborne fallout, chemicals, salt, hail, windstorms, lightning or extreme temperatures.
• Damage or loss due to accidents, road hazards, fire, theft or vandalism.
EXCEPT AS EXPRESSLY SET FORTH IN THIS LIMITED WARRANTY, ROSEN MAKES NO OTHER WARRANTIES, EXPRESSED OR IMPLIED,
INCLUDING ANY IMPLIED WARRANTIES OF MERCHANTABILITY AND FITNESS FOR A PARTICULAR PURPOSE. ROSEN EXPRESSLY
DISCLAIMS ALL WARRANTIES NOT STATED IN THIS LIMITED WARRANTY.
ANY IMPLIED WARRANTIES THAT MAY BE IMPOSED BY LAW ARE LIMITED TO THE TERMS OF THIS EXPRESSED LIMITED WARRANTY.
Some states do not allow limitation on how long an implied warranty lasts. In such states, the limitations or exclusions of this Limited Warranty may not apply. Some states
do not allow the exclusion or limitation of incidental or consequential damages. In such states, the exclusion or limitation of this Limited Warranty may not apply to you. This
Limited Warranty gives you specific legal rights and you may have other rights, which vary from state to state.
Rosen Electronics, LP 1120 California Avenue, Corona, California 92881 www.rosenelectronics.com
ROSEN Copyright 2013 Rev A
20
RES PN AP3007 Rev A
© 2013 Rosen Electronics
www.rosenelectronics.com
All rights reserved.
No part of this publication may be reproduced, stored in a retrieval system or transmitted in any form, electronic, mechanical, recording or other means without prior written permission from Rosen.