1
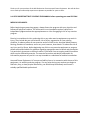
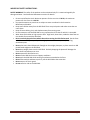
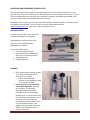
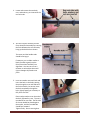
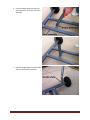
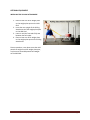
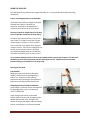
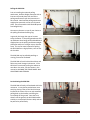
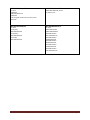
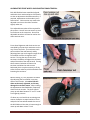
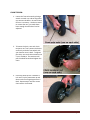
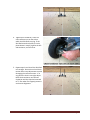
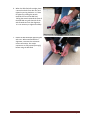
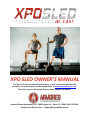
XPO SLED OWNER’S MANUAL The latest, full-color version of this document, as well as instructional videos for assembly, use and workouts, can be viewed online at www.ArmoredFitness.com. The online version will contain the very latest updates and photos. Armored Fitness Equipment, LLC | 6300 Douglas St. | Plano, TX 75093 |469-547-SLED www.armoredfitness.com | [email protected] Thank you for your purchase of the XPO Sled trainer from Armored Fitness Equipment. We will do all we can to make your ownership experience as pleasant as possible for years to come. It is VERY IMPORTANT THAT YOU READ THIS MANUAL before operating your new XPO Sled. MEDICAL DISCLAIMER: Before beginning any exercise program, always discuss the program with your physician and follow your physician’s advice. This information is not intended to replace a physician’s independent judgment about the appropriateness or risks of engaging in this or any exercise program. Exercise is not without its risks, and using this or any other exercise equipment may result in injury. They include but are not limited to: risk of injury, aggravation of a pre-existing condition, or adverse effect of over-exertion such as muscle strain, abnormal blood pressure, fainting, disorders of heartbeat, and in very rare instances, heart attack. To reduce the risk of any injury and /or illness, before beginning use of this or any exercise equipment or program, please seek medical advice for guidance regarding appropriate exercise levels and precautions. It is particularly important to seek such advice if you suffer from an ongoing medical condition which may be affected by exercise. The exercise instruction and advice presented is for information purposes only and is in no way intended as a substitute for medical consultation. Armored Fitness Equipment, LLC accepts no liability from or in connection with the use of this equipment. As with any exercise program, if at any point during your workout you begin to feel faint, dizzy, or have physical discomfort, you should stop immediately and consult a suitably qualified health professional. © 2013 Armored Fitness Equipment, LLC Page 2 IMPORTANT SAFETY INSTRUCTIONS: SAFETY WARNING: The safety of the product can be maintained only if it is examined regularly for damage and wear. See Preventive Maintenance section for details. • • • • • • • • • • • • • • • Do not overinflate the tires! Maximum pressure for the rear tires is 20 PSI; the maximum pressure for the front tire is 40 PSI. Pay special attention to parts that are subject to wear as outlined in the Preventive Maintenance Schedule. Keep small children away from the XPO Sled. There are pinch points and other areas that can cause harm. Keep all loose clothing, hair, and shoelaces away from moving parts. Do not attempt to use the XPO Sled for any purpose other than that for which it is intended. Wear shoes with rubber or high-traction soles. High heels, dress shoes, sandals or bare feet are not suitable for use with the XPO Sled. Never carelessly drop the front wheel down when turning the XPO Sled around. Set the front wheel down carefully -- especially with weight plates on the center post and/or pulling attachment post. Never place more than 100 pounds of weight on the weight plate post; or place more than 180 pounds total weight on the XPO Sled Never drop weight plates onto the XPO Sled. Violently dropping the plates will damage the front wheel components over time. Never expose the XPO Sled to rain. Never use the XPO Sled in wet or slippery conditions. Never push the XPO Sled while wearing a tow harness attached to the front. Never allow multiple athletes to push or pull the XPO Sled at the same time. Never step on the chain guard. Do not stand or ride on the XPO Sled. © 2013 Armored Fitness Equipment, LLC Page 3 UNPACKING AND ASSEMBLING YOUR XPO SLED: You may notice some small scratches at the attachment points on the powder coating finish of your new XPO Sled. This is not an indication your XPO Sled has been used or refurbished in any way. As part of our thorough quality control process, every XPO Sled is inspected, assembled, and adjusted at the factory to insure proper fit and alignment of the front wheel. We highly recommend that you watch the XPO Sled Assembly Demo video posted on our website, prior to assembling your XPO Sled. You can find this and more video demonstrations at www.ArmoredFitness.com. Once there, click on the Support menu. UNPACKING PARTS: Carefully remove all parts from carton and inspect for damaged or missing parts. If damaged parts are found or parts are missing, contact Armored Fitness Equipment immediately. Your carton should contain: Front wheel/fork assembly Rear axle assembly, including two bolts, two nuts, and four washers Weight plate post Long handles (two) ASSEMBLY: 1. After unpacking and checking all parts, you’ll need the following tools for assembly (not included): Two crescent/adjustable wrenches or the appropriate sized non-adjustable wrenches 2. Important note if you purchased or own multiple XPO Sleds: Each XPO Sled is unique. The Rear axle assembly and Front wheel/fork assembly are not interchangeable between units. If you have more than one unit, ensure that the parts are not mixed up. Your serial number is located underneath the motor on the Front wheel/fork assembly. We suggest writing the serial number on the Rear axle assembly as well. A Sharpee works well. © 2013 Armored Fitness Equipment, LLC Page 4 3. Locate and remove the two bolts, nuts, and washers, pre-inserted in the rear axle tabs. 4. Join the rear axle assembly and the front wheel/fork assembly by inserting the forks between the rear axle tabs, lining up the bolt holes as shown. The motor and the handle stubs should be facing up. If necessary, use a rubber mallet or block of wood to gently tap the forks/front wheel assembly into alignment. Use care not to use a hammer or other object that could chip or damage the powder coat finish. 5. Insert one washer over each bolt and insert the bolts in the holes, putting them through the rear axle tabs and the fork assembly. Be sure to insert the bolts completely through the holes, lightly tapping as necessary to fully insert the bolt. Place another washer over the end of the bolt, followed by a nut. The nut is rounded off on one side. The flat side of the nut should be placed against the washer, and the rounded side should face outward. Tighten firmly. Do not over-tighten. © 2013 Armored Fitness Equipment, LLC Page 5 6. Place the weight plate post over the stub located on the center of the fork assembly. 7. Place the long handles over the handle stubs on the rear axle assembly. © 2013 Armored Fitness Equipment, LLC Page 6 8. When assembly is completed, the following test and adjustment needs to be performed before regular use. Before completing this test, we highly recommend that you view the General Use videos posted at www.ArmoredFitness.com. Once there, click on the Support menu. Locate an area where you can push the XPO Sled straight for at least 10 yards. Load the weight plate post with at least one 45# weight plate. Aggressively push the XPO Sled to the end of your 10 yard (or more) area, put your foot on the kick tape, turn the sled around, and push it back. Repeat this aggressive relay push 10 times. Re-tighten the rear axle tab bolts. Congratulations! Your XPO Sled is now ready for use. If you notice that your XPO Sled does not roll straight, please see the section later in this manual on ALIGNING THE FRONT WHEEL AND ADJUSTING CHAIN TENSION. It is a good idea to read this section now to understand how to perform maintenance that may be required on your XPO Sled in the future. © 2013 Armored Fitness Equipment, LLC Page 7 OPTIONAL EQUIPMENT: INSTALLING THE PULLING ATTACHMENT: 1. Place at least one 45 lb. weight plate on the weight plate post on the XPO Sled. 2. Insert the rear upright of the Pulling Attachment into the weight plate post on the XPO Sled. 3. Lower it until the front tabs fully seat between the fork tubes. 4. Place at least one 45 lb. weight plate on the weight plate post on the Pulling Attachment. Please remember, never place more than 100 pounds of weight on either weight plate post; or place more than 180 pounds total weight on the XPO Sled. © 2013 Armored Fitness Equipment, LLC Page 8 USING THE XPO SLED: Your XPO Sled can be pushed at this stage of assembly, or it can be pulled with the optional Pulling Attachment. Proper use of weight plates on the XPO Sled: Unlike older style sleds, the weight on the XPO Sled does not create or influence the resistance. Resistance is provided by the resistance motor driven by the front wheel. The only purpose for weight plates on the XPO Sled is to provide traction for the front wheel. On indoor high traction surfaces, such as stall mats, there is no need for more than a single 45 pound plate. Outdoor or slicker surfaces, such as concrete, may require more weight to maintain traction. If the front tire begins to slip (usually can be heard) or leaves a skid mark, you should add weight plates to the XPO Sled to prevent unnecessary wear on the front tire. It is a common mistake to push or lift up on the handles while trying to push forward. This will cause the back tires to lift off the ground as the XPO Sled begins to move. Apply force directly forward instead of lifting up to keep all tires on the ground. Pushing the XPO Sled: Long Handles: Begin pushing the XPO Sled by holding the handles, leaning forward, and beginning to walk or run. In general, slower walking movements will involve higher hand positions. Experiment to find what works best for you. Changing Direction/Turning the XPO Sled: Small changes in direction can be accomplished by applying greater force to one handle to “steer” the XPO Sled. Larger changes in direction can be made quickly while still under load, by squeezing the handles toward each other, lifting the rear wheels off the ground slightly, while continuing to push, and steering in the direction needed. © 2013 Armored Fitness Equipment, LLC Page 9 Pulling the XPO Sled: Prior to installing the optional pulling attachment, load the weight plate post with at least one 45 pound plate, then install the pulling attachment as per the instructions in this manual. Now load the pulling attachment weight plate post with at least one 45 pound plate. (Do not exceed the XPO Sled 180 pound total weight limit) Connect any harness or rope of your choice to the pulling attachment loading ring. In general, the longer the rope or harness strap, the better. If the pulling attachment lifts up and down when being pulled, add additional weight plates to the pulling attachment weight plate post and/or use a longer rope or harness strap. This is even more important if pulling the XPO Sled from a high position, such as over the shoulder. The XPO Sled may be pulled by walking or running, forward or backward. The XPO Sled will track behind the athlete and follow very small changes in direction. If the XPO Sled is consistently pulling the athlete to one side or the other, see the section in this manual on ALIGNING THE FRONT WHEEL AND ADJUSTING CHAIN TENSION. Re-Positioning the XPO Sled: The XPO Sled will easily roll backward with little resistance. It may also be pushed even more easily by placing a foot on the black kick tape located at the center of the rear axle assembly, pulling back on the handles, and lifting the front wheel off the ground. Once the front wheel is off the ground, the XPO Sled handles similarly to a two-wheel furniture dolly and can be pushed or pulled freely. © 2013 Armored Fitness Equipment, LLC Page 10 Warm Ups: The XPO Sled is an excellent full-body warm up when pushed at lower levels of intensity. A 200-400 meter push at a brisk walking pace, using multiple hand positions, will thoroughly warm up most major joints and muscle groups. Workouts: An XPO Sled push or pull is an excellent substitution for the running or rowing portion of workouts that you may already be familiar with. As a general guideline, try substituting half the distance of the run or row with an XPO Sled push or pull. Combine it with a barbell, a kettlebell, or a medicine ball and the options are endless. Don’t let the weather stop you, the XPO Sled can be used indoors or outdoors. Some of our favorite workout combinations are listed below, and videos can be found on our website at www.ArmoredFitness.com. XPO Sled Benchmark 1: XPO Sled Benchmark 2: Set up two barbells 50 meters apart. Load one for deadlift and one for front squat. Recommended weights are 275# or 315# for deadlift and 155# or 185# for front squat for men. Scale and select your weights as appropriate. Begin with the XPO Sled beside your front squat barbell. For Time: 400m XPO Sled Push Front tire must remain on the ground at all times. For Time: 50m XPO Sled Push 5 Deadlift 50m XPO Sled Push 5 Front Squat 50m XPO Sled Push 4 Deadlift 50m XPO Sled Push 4 Front Squat 50m XPO Sled Push 3 Deadlift 50m XPO Sled Push 3 Front Squat 50m XPO Sled Push 2 Deadlift 50m XPO Sled Push 2 Front Squat 50m XPO Sled Push 1 Deadlift 50m XPO Sled Push 1 Front Squat © 2013 Armored Fitness Equipment, LLC XPO Sled Benchmark 3: For Time: 100m XPO Sled Push or Pull 500m row Page 11 XPO Sled Benchmark 4: XPO Sled Benchmark 5: For Time: 15 Burpees 150m XPO Sled Push 15 Burpees *This is a great workout to turn into a team relay race. 5x50m XPO Sled Push or Pull 1:1 work to rest XPO Sled Benchmark 6: XPO Sled Benchmark 7: For Time: 21 Thrusters 30m XPO Sled Push 15 Thrusters 30m XPO Sled Push 9 Thrusters 30m XPO Sled Push For Time: 100 Double Unders 100m XPO Sled Push 80 Double Unders 80m XPO Sled Push 60 Double Unders 60 XPO Sled Push 40 Double Unders 40 XPO Sled Push 20 Double Unders 20 XPO Sled Push 10 Double Unders 10m XPO Sled Push © 2013 Armored Fitness Equipment, LLC Page 12 ALIGNING THE FRONT WHEEL AND ADJUSTING CHAIN TENSION: Each XPO Sled has been assembled, aligned, and had its chain tensioned prior to shipment so that no adjustment should be necessary. If required, adjustments can be made in just a few minutes. Chain tension may need to be adjusted over time as the chain stretches slightly under use. Two adjustable wrenches will be required for this process. You will use one wrench on each front axle nut at the same time. One of the adjustable wrenches will later be used on the chain tensioner nuts. Front wheel alignment and chain tension are controlled by the two chain tensioners on the very front of the forks. The tensioners each pull one side of the axle forward, and by adjusting them you can change the angle of the front wheel as well as change the chain tension. Turning the nuts on the chain tensioners clockwise will tighten the tensioner and pull that side of the axle forward. Turning them counter clockwise will loosen the tensioner and allow the axle to move backwards, but it may be necessary to firmly strike the front wheel to pull the axle back after loosening the tensioner. Before starting, it is very important to realize that adjusting the front wheel in any way affects chain tension. It is critical that the chain not be overly tightened, as this may damage the resistance motor. When making the adjustments described below, frequently check the chain tension. The chain should move up and down between ⅛” and ¼” under firm fingertip pressure. If it does not, turn both chain tensioning nuts counter clockwise an equal number of turns and push the front wheel towards the rear of the XPO Sled until the chain is loose enough to move up and down at least ¼ inch. © 2013 Armored Fitness Equipment, LLC Page 13 CHAIN TENSION: 1. Loosen the front axle nuts by placing a wrench on each nut, and turning either one counter-clockwise. No more than a full turn is necessary. You do not need to remove the nuts, just make them loose enough that the wheel can be adjusted. 2. To loosen the chain, turn each chain tensioner nut ½ turn counter clockwise and firmly strike the front wheel with your hand to move it back. To tighten the chain, turn each chain tensioner nut ½ turn clockwise. The tensioner will pull the wheel forward and tighten the chain. 3. Check the chain tension. Between ⅛ inch and ¼ inch of movement up and down under firm fingertip pressure is ideal. Repeat step 2 until the correct chain tension is achieved. © 2013 Armored Fitness Equipment, LLC Page 14 4. Place a wrench on both front axle nuts, and tighten by turning clockwise. It is best to tighten by pushing the wrench towards the rear of the XPO Sled. Pulling the wrench towards the front of the XPO Sled may pull that side of the axle forwards and ruin the alignment. It is not necessary to tighten forcefully. 5. By moving both chain tensioners equally, the alignment of the front wheel should be preserved. Check alignment and if the XPO Sled does not roll straight, follow the steps for alignment. ALIGNMENT: We highly recommend that you watch the XPO Sled Front Wheel Alignment Demo video posted on our website, prior to following these steps. You can find this and more video demonstrations at www.ArmoredFitness.com. Once there, click on the Support menu. 1. Loosen the front axle nuts by placing a wrench on each nut, and turning either one counter-clockwise. No more than a full turn is necessary. You do not need to remove the nuts, just make them loose enough that the wheel can be adjusted. © 2013 Armored Fitness Equipment, LLC Page 15 2. Disconnect the resistance motor connections so the XPO Sled will roll freely. Pull on the connectors themselves; do not pull on the wire, as this may cause the wire and the connector to separate. 3. Firmly push the XPO Sled on a level surface. Let go, and note the direction in which the XPO Sled is turning. This is easiest to do if there is a straight line for reference, such as an expansion joint or parking lot painted lines. © 2013 Armored Fitness Equipment, LLC Page 16 4. Tighten (turn clockwise) ½ turn the chain tensioner nut on the side to which the XPO Sled is turning. If the XPO Sled turned to the left (as in the photo above in step 3), tighten the left side tensioner, and vice versa. 5. Repeat steps 3 and 4 until the XPO Sled rolls straight. Be certain to check chain tension after every adjustment to avoid damaging the resistance motor. If at any point the chain is too tight, adjust BOTH chain tensioner nuts counter clockwise until the chain has loosened to ⅛” flex under firm fingertip pressure and resume alignment. © 2013 Armored Fitness Equipment, LLC Page 17 6. When the XPO Sled rolls straight, place a wrench on both front axle nuts, and tighten by turning clockwise. It is best to tighten by pushing the wrench towards the rear of the XPO Sled. Pulling the wrench towards the front of the XPO Sled may pull that side of the axle forwards and ruin the alignment. It is not necessary to tighten forcefully. 7. Retest the XPO Sled after tightening the axle nuts. When satisfied with the alignment, reconnect the resistance motor connections. Be certain connectors are fully seated (fit snugly) before using the XPO Sled. © 2013 Armored Fitness Equipment, LLC Page 18 XPO SLED DUTY CYCLE: The XPO Sled has a 50% duty cycle when performing at high loads in repetitive or team/relay exercises. In our experience, a single individual is not capable of overloading the capacity of the XPO Sled. However, continuous use by a team of athletes may overload the ability of the motor to dissipate excess heat. To avoid this, do not operate the XPO Sled continuously for more than 5 minutes in a team setting. Allow cooling time equal to the time in use before repeating. If at any point, the resistance motor begins to smoke or emit a burning smell, discontinue use and allow the XPO Sled to cool. Armored Fitness Equipment, LLC is not responsible for replacing motors that have been damaged by repeated overheating from this type of misuse. TIPS TO EXTEND THE LIFE OF YOUR XPO SLED: • • • • • • Although the XPO Sled is ruggedly built, use caution NOT to drop the front wheel down when turning around. Set the front wheel down carefully -- especially with weight plates on the center post and/or pulling attachment post. Do not drop weight plates onto the XPO Sled. Violently dropping the plates can damage the front wheel components over time. Never place more than 100 pounds of weight on the weight plate post; or place more than 180 pounds total weight on the XPO Sled (using the optional pulling attachment). A good general rule is: Do not use more weight than is required to keep the front tire from skidding on the particular surface you are pushing on. Do not step on the chain guard. Pay special attention to parts that are subject to wear as outlined in the Preventive Maintenance section. It is imperative that you adhere to the duty cycle as specified in this manual. PREVENTIVE MAINTENANCE BEFORE DAILY USE: • • • • Inspect the tires for proper inflation. Maximum pressure for the rear tires is 20 PSI; the maximum pressure for the front tire is 40 PSI. Inspect all weld points for cracks. Inspect all assembly bolts to ensure they are tight. Inspect the chain for alignment and proper tension. (Please see the ALIGNMENT and CHAIN TENSION sections above) Lubricate the chain using any quality spray lubricant. HOW TO GET PARTS & SERVICE: All returns must be pre-authorized by Armored Fitness Equipment. Armored Fitness Equipment’s obligation under the warranty is limited to replacing or repairing the product at our option. Parts reconditioned to As New Condition may sometimes be supplied as warranty replacement parts and constitute fulfillment of warranty terms. Please retain your proof of purchase, such as your bill of sale or receipt. Simply call Customer Service at (+1) 469-547-SLED (469-547-7533), Monday through Friday from 9:00 a.m. to 5:00 p.m. Central Time, and have your name, address, phone and product serial number ready. We will assist in getting your XPO Sled back in service. The serial number is located under the motor mount plate. © 2013 Armored Fitness Equipment, LLC Page 19 MANUFACTURER’S LIMITED WARRANTY This Armored Fitness Equipment product ("Product") is warranted to be free of all defects in material and workmanship. All components and labor are covered, after the date of purchase, for the period of one year. The frame weld points are covered for a period of 3 years. Tires and tubes are consumable items and are not covered by warranty. This warranty applies to the original purchaser or any person receiving a newly purchased Product as a gift from the original purchaser. If the Product or any warranted part must be returned to a service facility for repairs, Armored Fitness Equipment will pay all shipping and insurance charges during the warranty period (within the United States only). The purchaser is responsible for shipping and insurance charges after the warranty has expired. To correct covered defects, we will ship to you any new or rebuilt replacement part or component, or, at our option, replace the Product. Such replacement parts are warranted for the remaining portion of the original warranty period. Exclusions -- Any failures or damage caused by unauthorized service, misuse, accident, negligence, improper assembly or installation, debris resulting from any construction activities in the Product's environment, rust or corrosion as a result of the Product's location, alterations or modifications without our written authorization or by failure on your part to use, operate and maintain the Product as set out in your Owner’s Manual ("Manual"). All terms of this warranty are void if this Product is moved beyond the continental borders of the United States of America (excluding Alaska, Hawaii and Canada) and are then subject to the terms provided by that country's local authorized Armored Fitness Equipment Representative. To obtain warranty service, retain proof of purchase (our receipt of the attached registration card assures registration of purchase information but is not required); use, operate and maintain the Product as specified in the Manual; notify Customer Service of any defect within 10 days after discovery of the defect; if instructed, return any defective part for replacement or, if necessary, the entire Product for repair. Armored Fitness Equipment reserves the right to decide whether or not a product is to be returned for repair. THIS LIMITED WARRANTY IS IN LIEU OF ALL OTHER WARRANTIES OF ANY KIND EITHER EXPRESSED OR IMPLIED, INCLUDING BUT NOT LIMITED TO THE IMPLIED WARRANTIES OF MERCHANTABILITY AND FITNESS FOR A PARTICULAR PURPOSE, AND ALL OTHER OBLIGATIONS OR LIABILITIES ON OUR PART. We neither assume nor authorize any person to assure for us any other obligation or liability concerning the sale of this Product. Under no circumstances shall we be liable under this warranty, or otherwise, of any damage to any person or property, including any lost profits or lost savings, for any special, indirect, secondary, incidental or consequential damages of any nature arising out of the use of or inability to use this Product. Some states do not allow the exclusion or limitation of implied warranties or of liability for incidental or consequential damages, so the above limitations or exclusions may not apply to you. Warranties may vary outside the U.S. Contact Armored Fitness Equipment for details. This warranty gives you specific legal rights and you may have other rights which vary from state to state. CAUTION: Any changes or modifications to this equipment could void the product warranty. © 2013 Armored Fitness Equipment, LLC Page 20