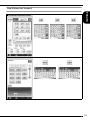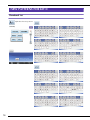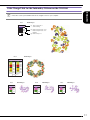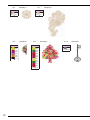
1
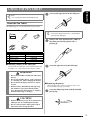
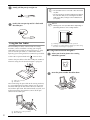
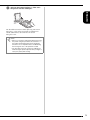
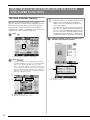
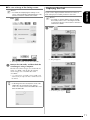
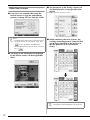
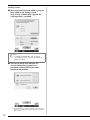
CONTENTS
ENGLISH
BEFORE YOU START................................................................................................................. 2
NEW FEATURES ........................................................................................................................ 2
USING THE PEN TABLET .......................................................................................................... 3
About the Pen Tablet............................................................................................................. 3
Using the Pen Tablet ............................................................................................................. 4
FIND NEW COLOR SCHEMES WITH THE COLOR VISUALIZER FUNCTION........................... 6
The Color Visualizer Function ............................................................................................... 6
Saving and Recalling the Custom Thread Table using USB media ......................................... 8
NEW FEATURES OF VERSION 2 ............................................................................................... 9
Displaying Patterns in The Embroidery Edit Screen Magnified By 200% ................................ 9
Specifying The Size of Pattern Thumbnails ............................................................................ 9
Saving a Camera Image or Settings Screen Image to USB Media.......................................... 10
Displaying The Grid ............................................................................................................ 11
Other New Features ............................................................................................................ 12
New Patterns for Version 2.................................................................................................. 15
NEW PATTERNS FOR KIT II .................................................................................................... 16
Thumbnail List .................................................................................................................... 16
Color Change Table for the Embroidery Patterns on the CD-ROM....................................... 17
Before using this upgrade kit, be sure to read this Instruction and Reference Guide for information for
proper use.
1
BEFORE YOU START
It is important to perform the upgrade according to the procedure outlined in the Installation Guide. The machine
can then be used as outlined in this upgrade Instruction and Reference Guide.
NEW FEATURES
The following features will be activated with the upgrade for Kit II.
• The On Screen Designer™ software is added to create your own original embroidery pattern on the screen of
the sewing machine. Refer to the Instruction and Reference Guide on the CD-ROM for use. (page 4)
• The pen tablet is included, allowing you to expand your operation of sewing machine. The pen tablet was
designed for use with the On Screen Designer™ software. (page 4)
• The Color Visualizer function is added to find new color schemes suggested by your sewing machine. Select
the desired effect from one of the four available color schemes, then the sample for the selected effect is
displayed. (page 6)
• The custom thread table setting can be saved as a data file to USB media, and then recalled again.
• 10 new embroidery patterns are included on the CD-ROM. (page 17)
• 2 new handwriting fonts are added to the embroidery alphabet characters category pattern selection screen.
(page 16)
2
USING THE PEN TABLET
Unscrew the upper barrel of the tablet pen.
• Use only the pen tablet included with this Kit.
ENGLISH
a
Note
About the Pen Tablet
The following parts are included with the pen tablet.
1
2
3
Note
• Unscrew the upper barrel slowly, so that the tablet
pen will not be damaged.
4
5
No.
1
2
3
4
5
Part Name
Pen tablet
Tablet pen
Tablet pen holder
Extra pen tips (4)
Pen tip clip
b
Install a new AAA alkaline battery (LR03) in
the tablet pen with the positive end (+)
pointing up.
c
Screw the upper barrel to the tablet pen.
Part Code
XF0248-001
XF0182-001
XF0185-001
XF0183-001
XF0184-001
■ Installing a battery in the tablet pen
A battery for the tablet pen is not included with your
machine. Use a new AAA alkaline battery (LR03).
WARNING
• Do not disassemble or modify the tablet pen/
battery.
• Do not use metallic objects, such as tweezers
or a metallic pen, when changing the battery.
• Do not throw the battery into fire or expose
to heat.
• Remove battery immediately and stop using
the machine if you notice abnormal odor,
heat, discoloration, deformation or anything
unusual while using or storing it.
■ Replacing the pen tip
When the pen tip is worn out, replace with a new
one included with your pen tablet.
a
Grasp the old pen tip firmly with the included
pen tip clip.
CAUTION
• Remove the battery if you do not intend to use
tablet pen for an extended period of time.
• Do not set the positive and negative ends of
the battery in the wrong direction.
3
b
Gently pull the pen tip straight out.
Note
• The pen tablet can be connected or disconnected at
any time.
• Do not perform any operations with the pen tablet at
the same time that you are touching the machine's
LCD screen with your finger or the included touch
pen (stylus).
c
Memo
Push in the new pen tip until it is flush with
the tablet pen.
• Working area of the pen tablet differs depending on
performing functions of the sewing machine.
Using the Pen Tablet
a Working area for normal machine operation
b Working area when drawing with the pen tablet using
The included pen tablet, connected to the sewing
machine, can be used when creating your original
embroidery pattern with On Screen Designer™. Also,
you can use the pen tablet as a USB mouse when
operating your sewing machine. Connect the pen tablet
to the USB 1.1 port marked with
the On Screen Designer™ program
■ Using with On Screen Designer™
a
Select your favorite picture for creating
embroidery pattern.
b
Insert the picture under the tablet sheet.
. You can also
connect the pen tablet to the other USB port (USB 2.0)
when not using the On Screen Designer™ program.
a USB port for mouse
b Pen tablet
After connecting the pen tablet to the sewing machine,
it is activated when the pointer appears on the screen.
The blue LED light on the tablet is the main indicator
for hardware operation. The LED normally stays off, and
will turn on when you touch the surface of the pen
tablet with the tablet pen.
a
a Working area of the pen tablet
b Blue LED light
4
c
Activate On Screen Designer™, then trace
the picture with the tablet pen.
ENGLISH
For detailed instructions about operating On Screen
Designer™, refer to the Instruction and Reference
Guide (PDF format) stored on the On Screen
Designer™ CD.
Note
• When you create the embroidery pattern by tracing
the picture using the pen tablet, the actual size of
the pattern will be bigger than the tracing picture.
Check the size of the pattern before embroidering,
then change the size of the pattern if needed.
• The pen tablet cannot be used as the USB mouse
while tracing the picture. Operate with your finger or
touch pen (stylus) while tracing.
5
FIND NEW COLOR SCHEMES WITH THE COLOR
VISUALIZER FUNCTION
The Color Visualizer Function
Note
• This function may not be available depending on the
pattern you select (ex. a bordered embroidery
pattern). If the color visualizer key is grayed out,
select another pattern.
• If you have not set any color in the custom thread
table, the color visualizer key will be grayed out. In
that case, use the thread table (64 colors) instead or
set some colors in the custom thread table. Refer to
“Creating a Custom Tread Table” on the Instruction
and Reference Guide of the machine for the detail.
With the color visualizer function, the machine
suggests new color schemes for the embroidery pattern
that you have selected. After you select the desired
effect from one of the four available color schemes
(“RANDOM”, “VIVID”, “GRADIENT” and “SOFT”) the
sample for the selected effect is displayed.
a
Press
.
c
Select the number of colors you want to use
and then select the desired effect.
→ The thread color palette screen appears.
b
Press
.
→ You can select the color visualizer function either
from thread table (64 colors) or custom thread table
(300 colors). The thread table (64 colors) is the
preset color table, and the custom thread table (300
colors) is the color table that you can set as you like.
By setting the embroidery thread colors of the brand
you have, you can create your embroidery pattern
with your own thread colors.
a
b
a
b
a Thread table (64 colors)
b Custom thread table (300 colors)
6
a Number of colors to be used in the pattern
b Effects for schemes
Note
d
Press the desired color scheme from samples.
* Press
to display the new schemes.
ENGLISH
• If the following message appears, there are not
enough colors in the custom thread table, to display
the color scheme you have selected to display. In
this case, set more colors in the custom thread
table, or select less colors in the Color Visualizer
function.
• If the following message appears, there are not
enough colors in the thread table, to display the
color scheme effect you have selected. In this case,
either select another effect or the custom thread
table (300 color palette) or less colors in the Color
Visualizer function. If there are not enough number
of colors set in the custom thread table, set more
colors in the table. Refer to “Creating a Custom
Thread Table” in the Instruction and Reference
Guide for the machine, about setting the colors in
the custom thread table.
a
a Press to review the previous schemes.
Note
• Maximum 10 pages of schemes can be reviewed.
After 10 pages of schemes, the oldest page is
deleted every time you press
e
Press
scheme.
.
to select the displayed color
* Press
to return to the previous screen.
* You can continue selecting color schemes from the
selected page prior to pressing
Memo
* Press
or
.
to display the other color schemes.
• Selection for the desired number of colors must stay
within the range for the number of thread changes
for the pattern you selected.
→ The embroidery edit screen will appear.
7
Saving and Recalling the Custom
Thread Table using USB media
c
Press
.
You can save a custom thread table data file to USB
media, and then you can recall the saved data from
USB media again. Refer to “Creating a Custom Thread
Table” in the Instruction and Reference Guide of the
machine, for detailed instructions about a custom
thread table.
Note
• Custom thread table data can only be saved to USB
media. You cannot save the data in the machine’s
memory or in the computer.
• Custom thread table data is saved as “.pcp” data
file.
■ Saving the custom thread table in USB media
a
Insert the USB media into the primary (top)
USB port on the right side of the machine.
→ The “Saving” screen is displayed. When the data is
saved, the display returns to the original screen
automatically.
Note
• Do not insert or remove USB media while “Saving”
screen is displayed. You will lose some or all of the
data you are saving.
a Primary (top) USB port for media
b USB media
■ Recalling the custom thread table in USB
media
Note
• Two USB media cannot be used with this machine
at the same time. If two USB media are inserted,
only the USB media inserted first is detected.
b
Press
and then press
a
Insert the USB media containing the custom
thread table data into the primary (top) USB
port.
.
Note
• You can only recall one custom thread table data at
a time. Do not store two or more “.pcp” data file in
USB media.
b
Press
c
Press
and then press
.
.
→ The “Saving” screen is displayed. When the data is
loaded to the machine, the display returns to the
original screen automatically.
Note
• Do not insert or remove USB media while “Saving”
screen is displayed. You will lose some or all of the
data you are saving.
• To delete all the specified colors from the custom
thread palette, press
8
.
NEW FEATURES OF VERSION 2
Displaying Patterns in The Embroidery
Edit Screen Magnified By 200%
In the Embroidery Edit screen, the pattern can be
magnified by 200% within the embroidery display area.
a
Press
→
b
.
changes to
magnified by 200%.
ENGLISH
If your machine is installed with software version 1, the following features are added after the software is upgraded.
• Previews of embroidery patterns can be magnified by 200%.
• Thumbnails of embroidery patterns can be displayed at a larger size.
• An image of the needle position being displayed by the built-in camera or an image of the Settings screen can
be saved in the BMP format on USB media.
• A grid can be displayed to check the needle position in the LCD. This enables easy alignment of the needle
position.
• Various improvements in operation and screen displays have been incorporated, making the machine easier
to use.
For details, refer to the following descriptions.
Specifying The Size of Pattern
Thumbnails
The thumbnails for selecting an embroidery pattern can
be set to be displayed at the normal size or a larger size.
The larger size is 1.5 times the normal size. The
thumbnail size setting can be selected from page 8/8 of
the Settings screen.
, and the pattern is
Check the displayed pattern.
Use
to scroll through the display
in any direction.
c
To display the pattern back to the normal size
(100%), press
.
9
a
Press
or
to select the desired
thumbnail size.
Note
• If two USB medias are inserted simultaneously, the
files will be saved only on the USB media inserted
first.
b
Display the screen to be saved, and then save
the displayed image.
Note
• An image can be captured only of screens
containing the indicated key
/
.
■ To save an image of the needle position
displayed by the built-in camera
Memo
• For details about using the built-in camera to display
the needle position, refer to “Checking the Needle
Location in the Screen” in the machine’s Instruction
and Reference Guide.
Press
.
Note
• When thumbnail size setting has been changed the
pattern selection screen will not immediately reflect
the chosen size. To view the patterns with the new
thumbnail size, return to the category selection
screen, and then select the pattern category again.
Saving a Camera Image or Settings
Screen Image to USB Media
An image of the needle position being displayed by the
built-in camera or an image of the Settings screen can
be saved as a BMP file.
A maximum of 100 images can be saved on a single
USB media at one time.
a
Insert the USB media into the primary (top)
USB port on the right side of the machine.
a Primary (top) USB port
b USB media
10
→ The image file will be saved to the USB media.
■ To save an image of the Settings screen
Displaying The Grid
Memo
A grid can be displayed when the built-in camera is
used to display the needle position in the LCD.
Memo
Press
.
• For details on using the built-in camera to display
the needle position, refer to “Checking the Needle
Location in the Screen” in the machine’s Instruction
and Reference Guide.
a
Press
ENGLISH
• For details about displaying the Settings screen,
refer to “Using the Machine Setting Mode Key” in the
machine’s Instruction and Reference Guide.
.
→ The grid appears.
→ The image file will be saved to the USB media.
c
Remove the USB media, and then check the
saved image(s) using a computer.
The files for camera images are saved with the
name “C**.BMP”, and the files for Settings
screen images are saved with the name
“S**.BMP”.
• “**” in the names “C**.BMP” and “S**.BMP” will
automatically be replaced with a number between
00 and 99.
Note
• If 100 image files have already been saved on the
USB media, the following message appears.
In this case, delete a file from the USB media or use
different USB media.
• To turn the grid off, press
.
11
Other New Features
■ If an area is not selected while using the
built-in camera to align the embroidering
position, scanning will start from the center.
Note
• Scanning cannot start from the center after an area
has been selected. To scan from the center, press
to close the window, then display the
window again but do not select an area to scan, then
press
■ The parameters in the Settings screens can
also be displayed in a language other than
English.
Example: Deutsch (German) screen
■ When combining character patterns, the
stitching connecting patterns (jump stitches)
are no longer displayed in the preview so
that the patterns can be viewed more
clearly.
.
■ The image of the needle position displayed
by the built-in camera can be magnified by
200%.
Note
• Jump stitches may be displayed on the character.
12
■ If twin needle sewing has been selected, the
stitching is displayed in the preview as two
rows of stitching.
ENGLISH
■ When pressing the keys for advancing/
returning to a page, for example, in the
pattern selection screen, the pages are
scrolled through continuously (from the last
page directly to the first page or from the
first page directly to the last page).
Memo
• Two rows of stitching are displayed even if
was pressed.
Note
• The pages displayed after
is pressed
cannot be scrolled through continuously.
13
Settings screen
■ Since functions have been added, a page has
been added to the Settings screen.
New settings available with Upgrade Kit
(sold separately) are added.
Note
• For details on Upgrade Kits, visit our website
“www.babylock.com” or contact your authorized
Baby Lock retailer.
■ The keys for these new functions are
activated when the Upgrade Kit I is
purchased and Certification has been
completed on machine.
→ Background Image Display and the Fabric Thickness
Sensor are activated after Upgrade Kit I is installed
and certified.
14
New Patterns for Version 2
ENGLISH
■ Character Decorative Stitch
■ Embroidery/Embroidery Edit
15
NEW PATTERNS FOR KIT II
Thumbnail List
Alphabet character patterns
16
Color Change Table for the Embroidery Patterns on the CD-ROM
ENGLISH
Memo
• These files can be opened with Palette Ver.8 or higher version on your computer.
No.1
XKIT2T01.pes
a Time required for
105 min
embroidering
1
(614)
2
(209)
b Embroidery thread color/
(027)
Embroidery thread color
number
c Embroidery size
3
29.6 cm
No.2
18.7 cm
XKIT2T02.pes
80 min
1
(515) 10
(515)
2
(027) 11
(027)
3
(209) 12
(209)
4
(800) 13
(800)
5
(515) 14
(515)
6
(206) 15
(206)
7
(208) 16
(208)
8
(027) 17
(027)
9
(001) 18
(001)
19.6 cm
No.3
19.1 cm
XKIT2T03.pes
No.4
XKIT2T04.pes
No.5
7 min
7 min
7 min
1
(612)
1
(612)
1
(612)
2
(085)
2
(085)
2
(085)
3
(513)
3
(513)
3
7.5 cm
9.6 cm
8.1 cm
9.6 cm
XKIT2T05.pes
(513)
8.1 cm
9.6 cm
17
No.6
XKIT2T06.pes
No.7
87 min
20 min
1
1
(307)
9.6 cm
9.6 cm
No.8
XKIT2T08.pes
No.9
17.7 cm
XKIT2T09.pes
No.10
66 min
11 min
(206)
1
(812)
2
(027)
2
(027)
3
(107)
3
(515)
4
(620)
4
(086)
5
(810)
5
(800)
6
(209)
6
(107)
7
(900)
7
(086)
4.7 cm
8
(812)
9
(027)
10
(515)
11
(107)
12
19.6 cm
18
(307)
29.6 cm
1
9.6 cm
XKIT2T07.pes
(800)
17.5 cm
14 min
1
(817)
17.6 cm
6.5 cm
XKIT2T10.pes
English
111-001